


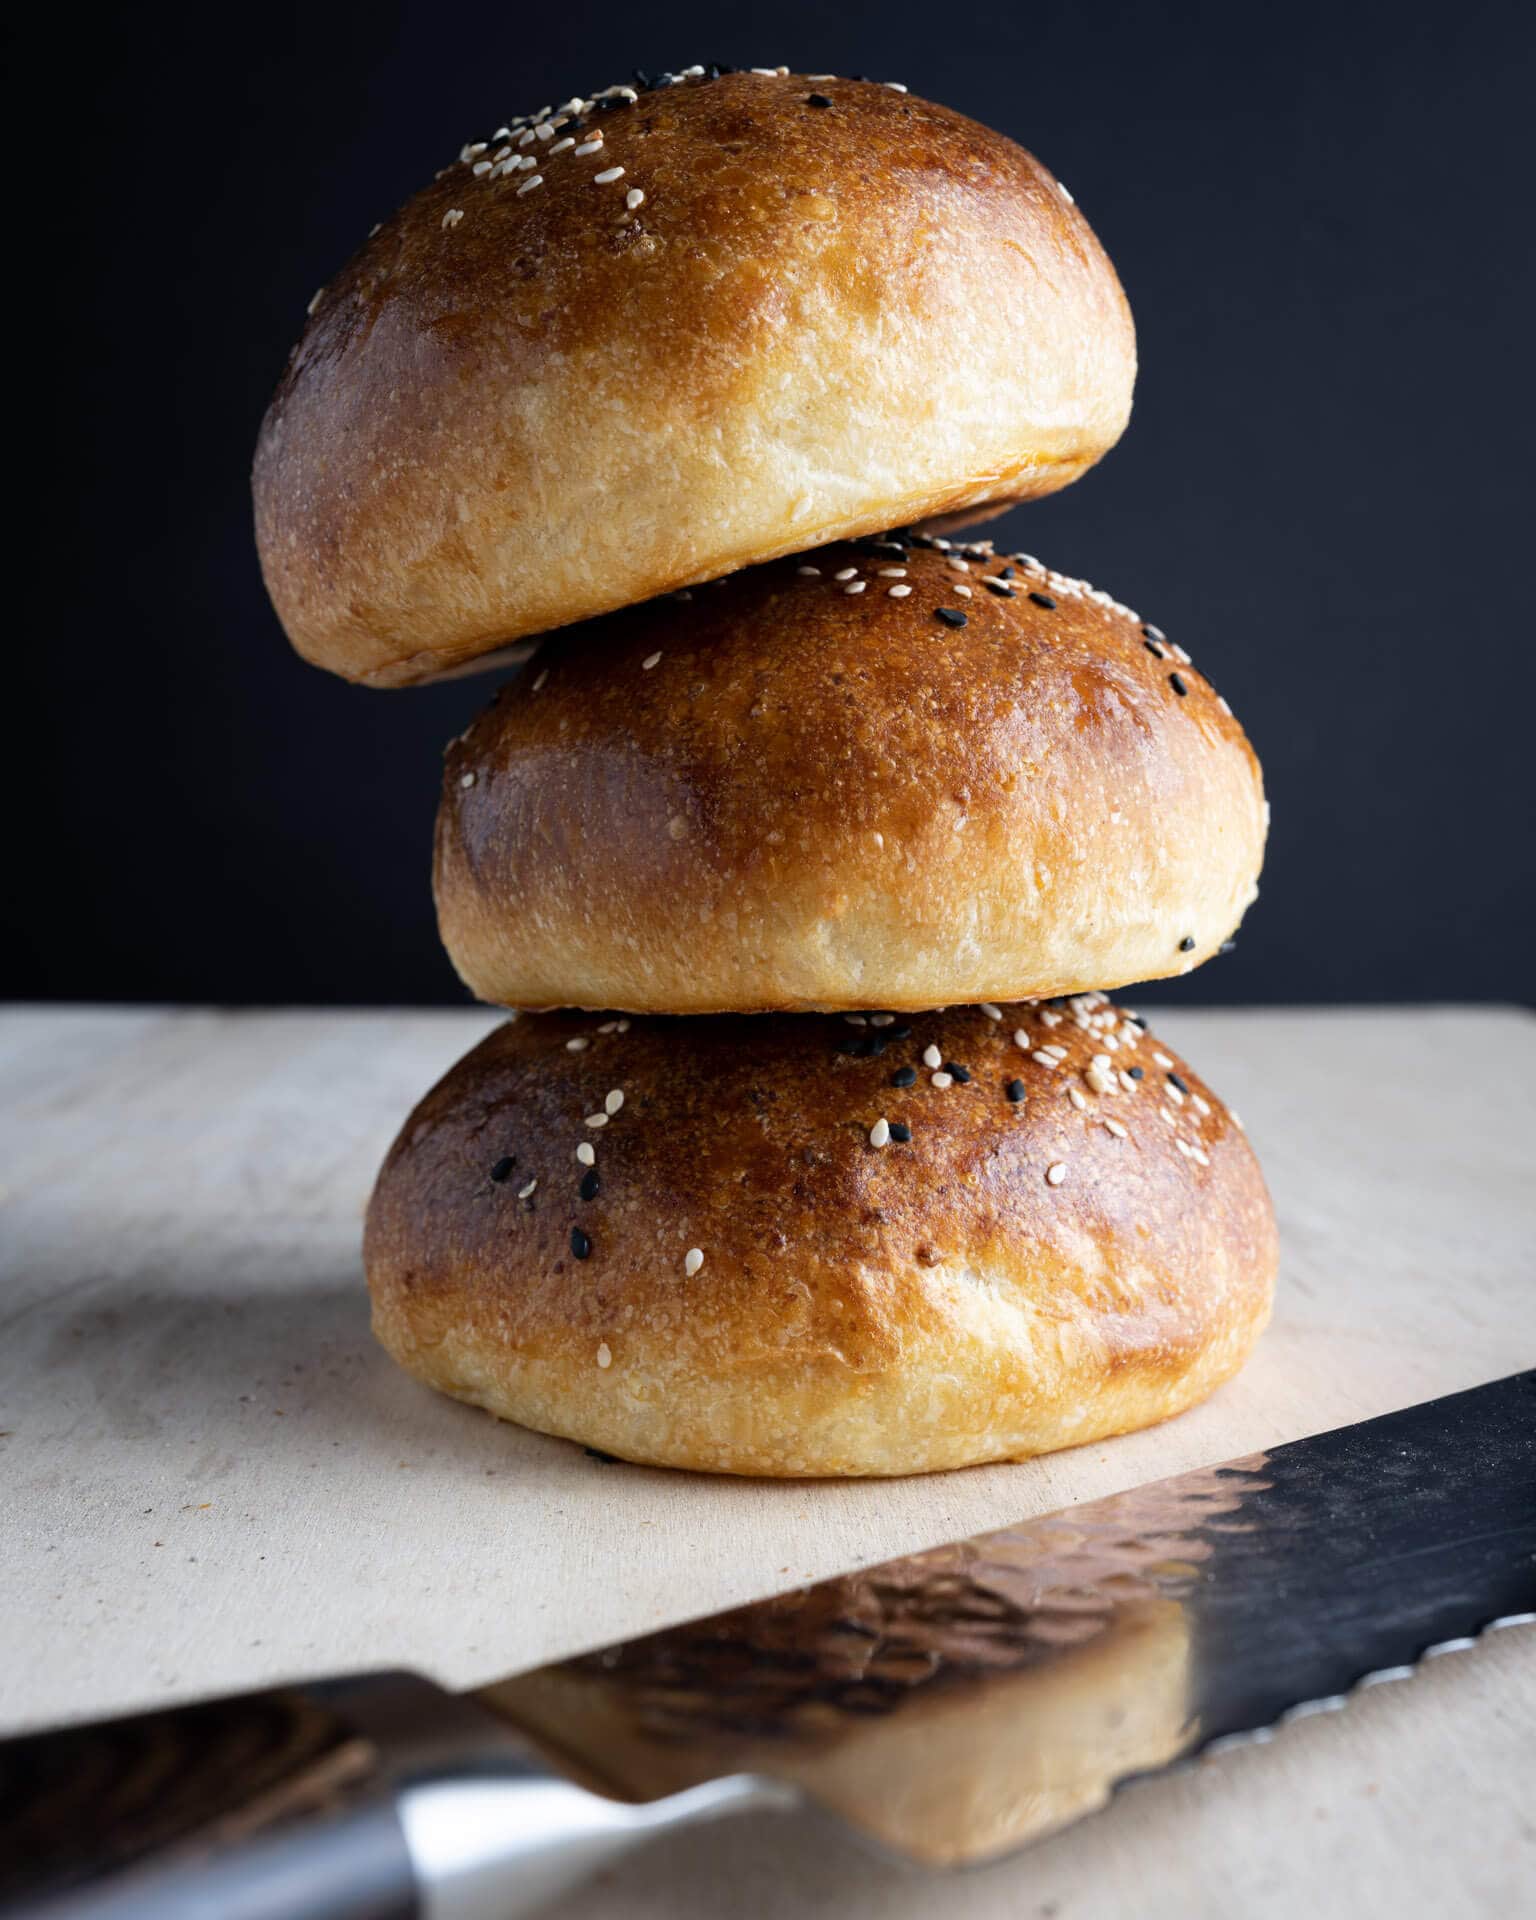
These soft sourdough potato buns call for the addition of an unapologetically high amount of baked and then riced potato. This fluffy potato mess brings all the gelatinized starches of the baked potato straight into the dough mix (similar to adding scalded flour, or tangzhong), imparting the best kind of softness to the baked buns. When you bake a dough with an excess of starches, you transform the result into something delicate and light beyond what you might expect. Right out of the oven, I feared one might disappear into my mouth. And while that may or may not have happened in my last test bake, I’m sure you’ll love this recipe.
In eating these, you’ll find the potato flavor isn’t all that apparent. But our friend, the tuber, has a more critical role: improving the texture. This amplified texture plays so well with the running flavor undercurrent we expect from natural fermentation: subtle complexity, a touch of sourness, heightened “wheaty” flavors, and, thanks to the tiny bit of sugar, the slightest suggestion of sweetness.
These buns are fantastic sliced in half and grilled right on the hot grate; the exterior rapidly becomes crispy, whereas the interior retains most of its initial softness. And the juxtaposition of the two makes for perhaps the best hamburger bun I’ve ever eaten. “Ahh, the platitudes!” you cry—no, these are really good.
When compared to the buns you might find in bags at the market—which always, ALWAYS, disappoint with their marshmallow (in a bad way) texture and flavorless composition—these are in another class altogether. And while they’re a little extra work preparing the potato, it’s justified.
The small margin of extra work isn’t much, but I’ve found a few tools that help make these even more manageable—and all the tools will be helpful in your other baking endeavors.
Video: Soft Sourdough Potato Buns From Start to Finish
Watch me make these potato buns from start to finish in my YouTube video below!
Tools
First, a few of the tools and ingredients I use to bring these buns together:
- potato ricer—for preparing the potato to add into the dough (and making gnocchi!)
- pre-cut, half sheet parchment paper (I also use these in my combo cooker when baking—no sticking)
- KitchenAid stand mixer—the best for mixing enriched doughs
- black and white sesame seeds—my go-to topping these days
- Pastry brush—for spreading on the egg wash
Flour Selection
The goal for these buns was softness, softness, and more softness. But for flavor, I wanted them minimally sour. Building a fast, high-inoculation (inoculation refers to the amount of ripe starter added to the levain build—the levain is inoculated with your starter to seed fermentation) levain with 100% white all-purpose flour will help in this pursuit, and after testing with combinations of whole wheat—and even whole spelt—I dropped back to using all white flour. Whole grains are wonderful in a hamburger bun, but there’s absolute joy in a supremely soft bun with a delicate flavor.
Baking Schedule

This recipe is a direct process recipe, meaning it’s started and baked the same day with no overnight, cold-proof (retard). You can begin the dough first thing in the morning when your sourdough starter is ready and finished before dinner.
Alternatively, if you want to split this over two days — which might introduce a touch more sourness, I would place the dough after 2 hours into bulk fermentation in the fridge, covered. The next day, take the dough out, divide and shape, and proof until ready (this might be 2-4 hours at room temperature).
Soft Sourdough Potato Buns Formula
For tips on how to calculate baker’s percentages or how to modify this formula, see my post on baker’s percentages (baker’s math).
| Total Dough Weight | 1,250 grams |
| Pre-fermented Flour | 12.00% |
| Yield | 10 x 120g buns or rolls |
Total Formula
My final dough temperature for this dough was 78°F (25°C). See my post on the importance of dough temperature for more information.
Note that this is the Total Formula which lets you know all the ingredients you need for this recipe. Scroll down to the Method section for what you need in each step.
| Weight | Ingredient | Baker’s Percentage |
|---|---|---|
| 508g | All-purpose white flour, ~11-12% protein (Central Milling Artisan Baker’s Craft, Malted Flour) | 100.00% |
| 203g | Potato, russet (about 3 medium; baked, riced, and cooled) (I’d imagine just about any potato would work very well here, even sweet potato.) | 40.00% |
| 112g | Butter, unsalted (pliable, room temperature) | 22.00% |
| 91g | Eggs (cold from the fridge) | 18.00% |
| 25g | Sugar, caster (Caster sugar is superfine white sugar. If you don’t have caster sugar, pulse granulated white sugar in a food processor for 30 seconds or use the finest white sugar you have.) | 5.00% |
| 178g | Milk, whole (cold from the fridge) | 35.00% |
| 61g | Water | 12.00% |
| 11g | Salt (sea salt) | 2.10% |
| 61g | Sourdough starter (100% hydration) | 12.00% |
In addition to the above ingredients, you’ll need one more egg and a tablespoon of whole milk or heavy cream for the egg wash.
Soft Sourdough Potato Buns Method
1. Prepare Levain and Potatoes – 8:00 a.m.
Prepare levain
Mix the following ingredients together in a container and leave covered to ripen for 3 hours. Be sure to keep it warm—and warm the mixing water if necessary—around 78°F (26°C).
| Weight | Ingredient | Baker’s Percentage |
|---|---|---|
| 61g | Ripe sourdough starter (100% hydration) | 100% |
| 61g | All-purpose white flour, ~11-12% protein (Central Milling Artisan Baker’s Craft, Malted Flour) | 100% |
| 61g | Water | 100% |
40.91% levain in final dough mix.
Prepare potatoes
Note: Baking vs. boiling potatoes: I prefer to bake the potatoes instead of boiling them to prevent the absorption of extra water, which might add hydration to the dough. Additionally, baking ensures maximal potato starch gelatinization, which results in a light and fluffy texture.
Preheat the oven to 350°F (178°C) with a rack in the middle. Grab three or four potatoes that together weigh at least 300g or so—you will need a little extra to avoid coming in short (I baked 3 and had a little leftover) and scrub the skin clean under running water. The recipe calls for 203g of potato flesh so make sure the potatoes you’re baking are a little over this to cover any lost potato in processing — go for 300g to play it safe.
Place the whole potatoes into a small roasting pan or dish and, with a fork, prick the skin around the potatoes several times to allow them to breathe during baking. Bake the potatoes for about 1 hour, flipping them halfway through. Remove them from the oven when a knife can easily slide into the center of the potato (internal temp of 208-211°F / 98-99°C).
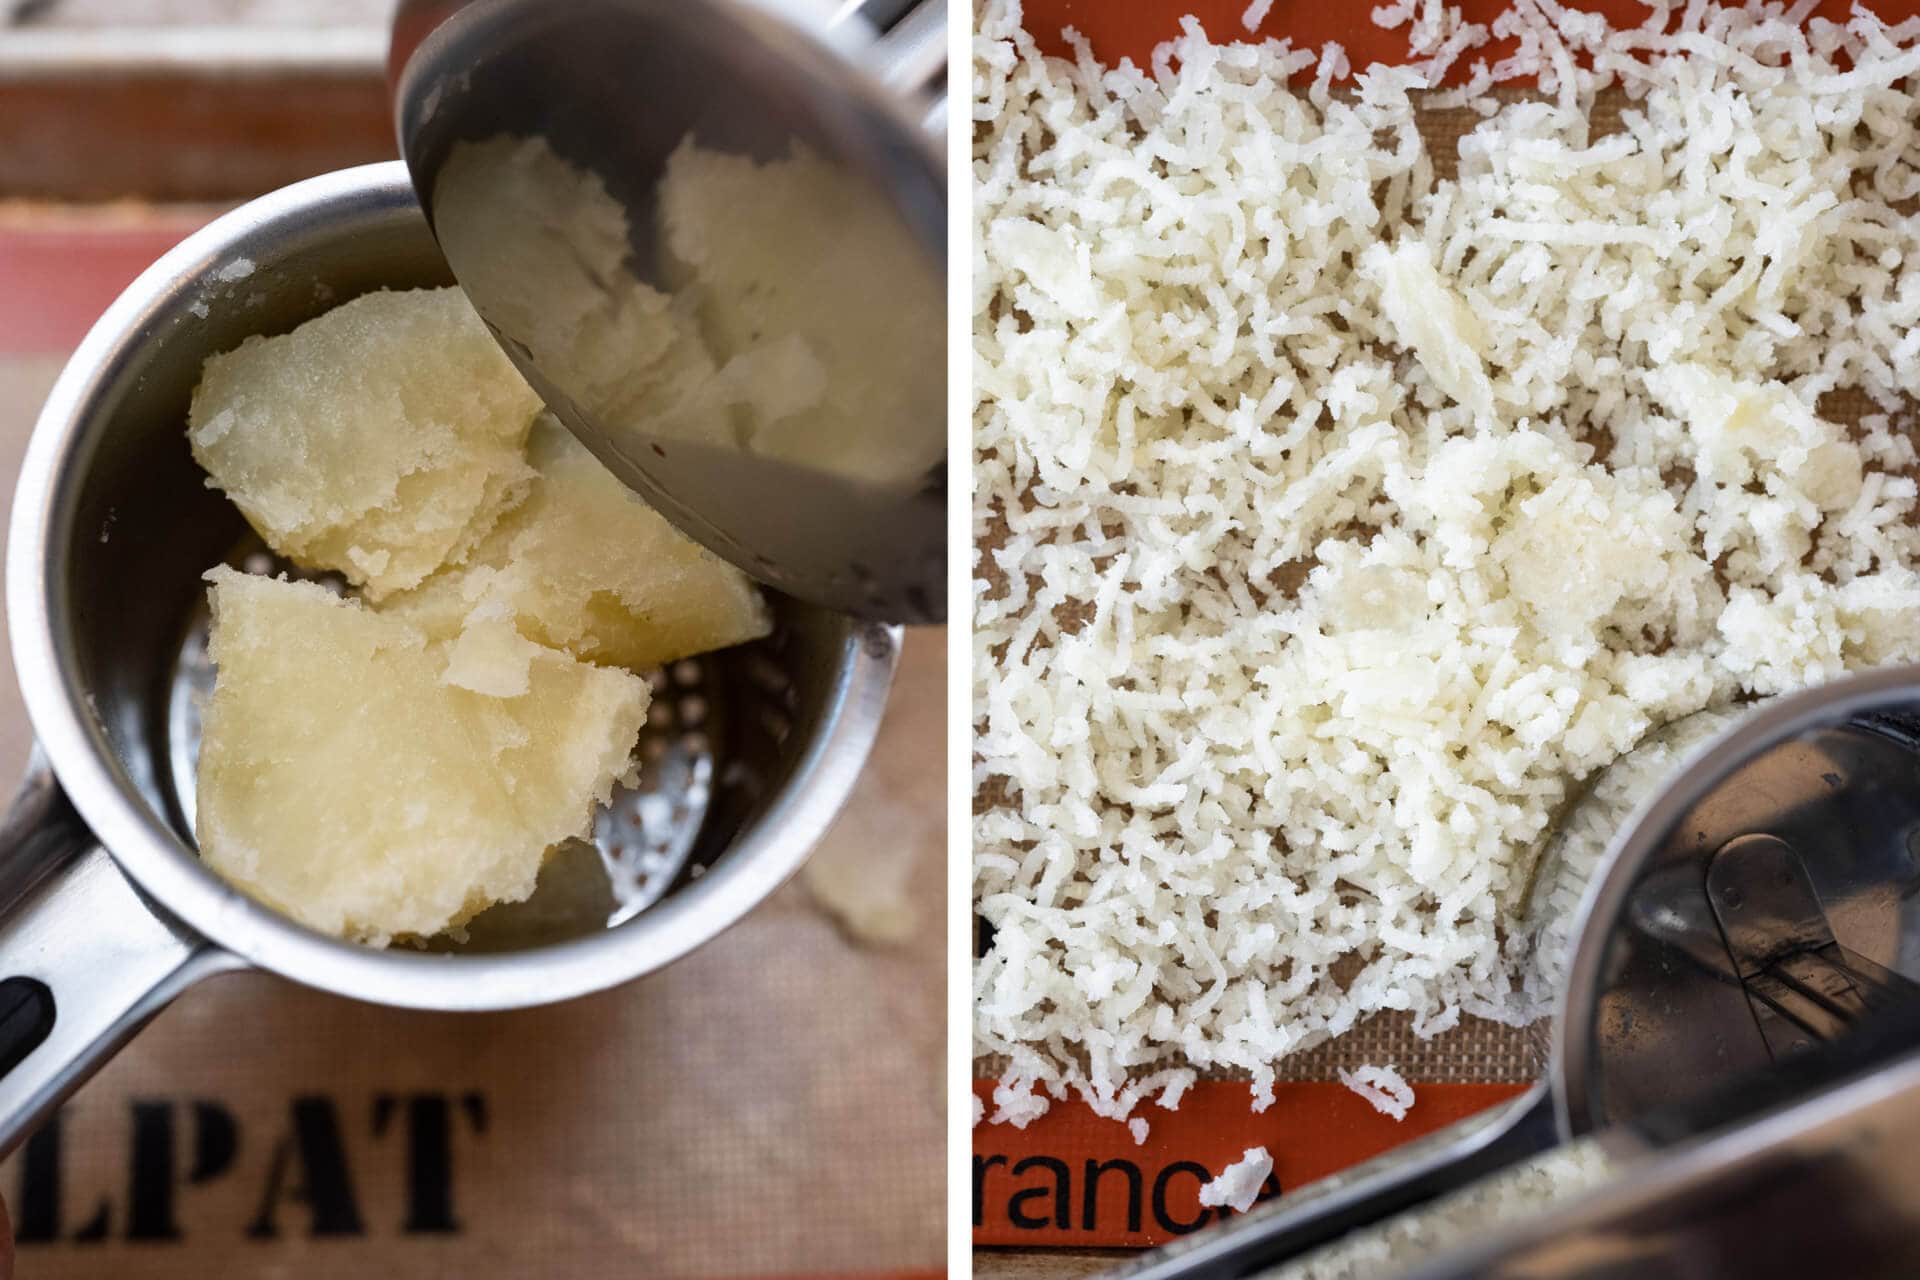
When finished baking, remove the potatoes from the oven. Using oven-safe gloves and tongs, remove the skin from the potatoes while they’re still warm. Then, roughly chop the potato flesh into large chunks. Using a potato ricer, rice the warm potato out onto a baking sheet to cool. If you don’t have a potato ricer, mash the potatoes very well or chop finely and spread on the sheet to cool.
2. Mix – 11:00 a.m.
Soften butter: Take out the called for 112g butter and cut it into 1/2″ pieces. Let the butter sit out on the counter until called for later in mixing.
I used my KitchenAid stand mixer to mix this dough. It’s possible to mix this all by hand, but it will be challenging with the added butter (the potato shouldn’t be a problem at the end). If you choose to do it by hand, you could knead the dough in a bowl with a wet hand or slap/fold on the counter.

Mix and strengthen the dough: To the bowl of a stand mixer, and when your sourdough starter is ripe (see the image, above), add the ingredients below.
Note: the butter and potato will be added later in mixing once the dough has sufficient strength from mixing.
| Weight | Ingredient |
|---|---|
| 447g | All-purpose white flour |
| 91g | Eggs |
| 25g | Sugar, caster |
| 178g | Milk, whole |
| 11g | Salt (sea salt) |
| 183g | Ripe levain (everything in the Levain Build section) |
Turn the mixer to the lowest speed and mix until everything is incorporated. Scrape the sides of the bowl and dough hook and increase to speed 2, mix for 3-5 minutes until the dough begins to cling to the dough hook and remove from the sides of the bowl. Then, scrape the hook clean, cover the mixing bowl, and let rest for 10 minutes.
After the rest, mix on speed 2 for another 2-3 minutes until the dough again begins to cling to the hook and look smoother. If you did a windowpane test at this point it would not pass, but it would start to show a thin membrane forming.
Add the butter: The butter should be at room temperature at this point: a finger press should easily press into the butter with little resistance. With the mixer set to low speed, add the butter, one pat at a time. Continue mixing on low until all the butter is added and the dough again becomes one cohesive mass.
Add the riced potato: Once all the butter is added to the dough, add in half of the riced potato and mix on low until incorporated (this should not take long). Then, add the remainder of the riced potato and finish mixing until the potato is mostly incorporated into the dough, again, this should not take long.
Transfer your dough to a bulk fermentation container and cover.
2. Bulk Fermentation – 11:15 a.m. to 2:30 p.m. (about 3.5 hours)
At 72-75°F (22-24°C), bulk fermentation should take 3.5-4 hours. During this time, we will strengthen the dough through a series of stretch and folds directly in the bowl.
For each set wet your hands, grab one side and stretch it up and over the dough to the other side. Rotate the bowl 180° and perform another stretch and fold (this forms a long rectangle in the bowl). Then, rotate the bowl 90° and do another stretch and fold. Finally, rotate the bowl 180° and do one last stretch and fold.
Give the dough 3 sets of stretch and folds starting after the first 30 minutes of bulk fermentation, and two more times spaced by 30 minutes. After the last set of stretch and folds, let the dough rest, covered, until the next step.
3. Divide and Shape – 2:30 p.m.
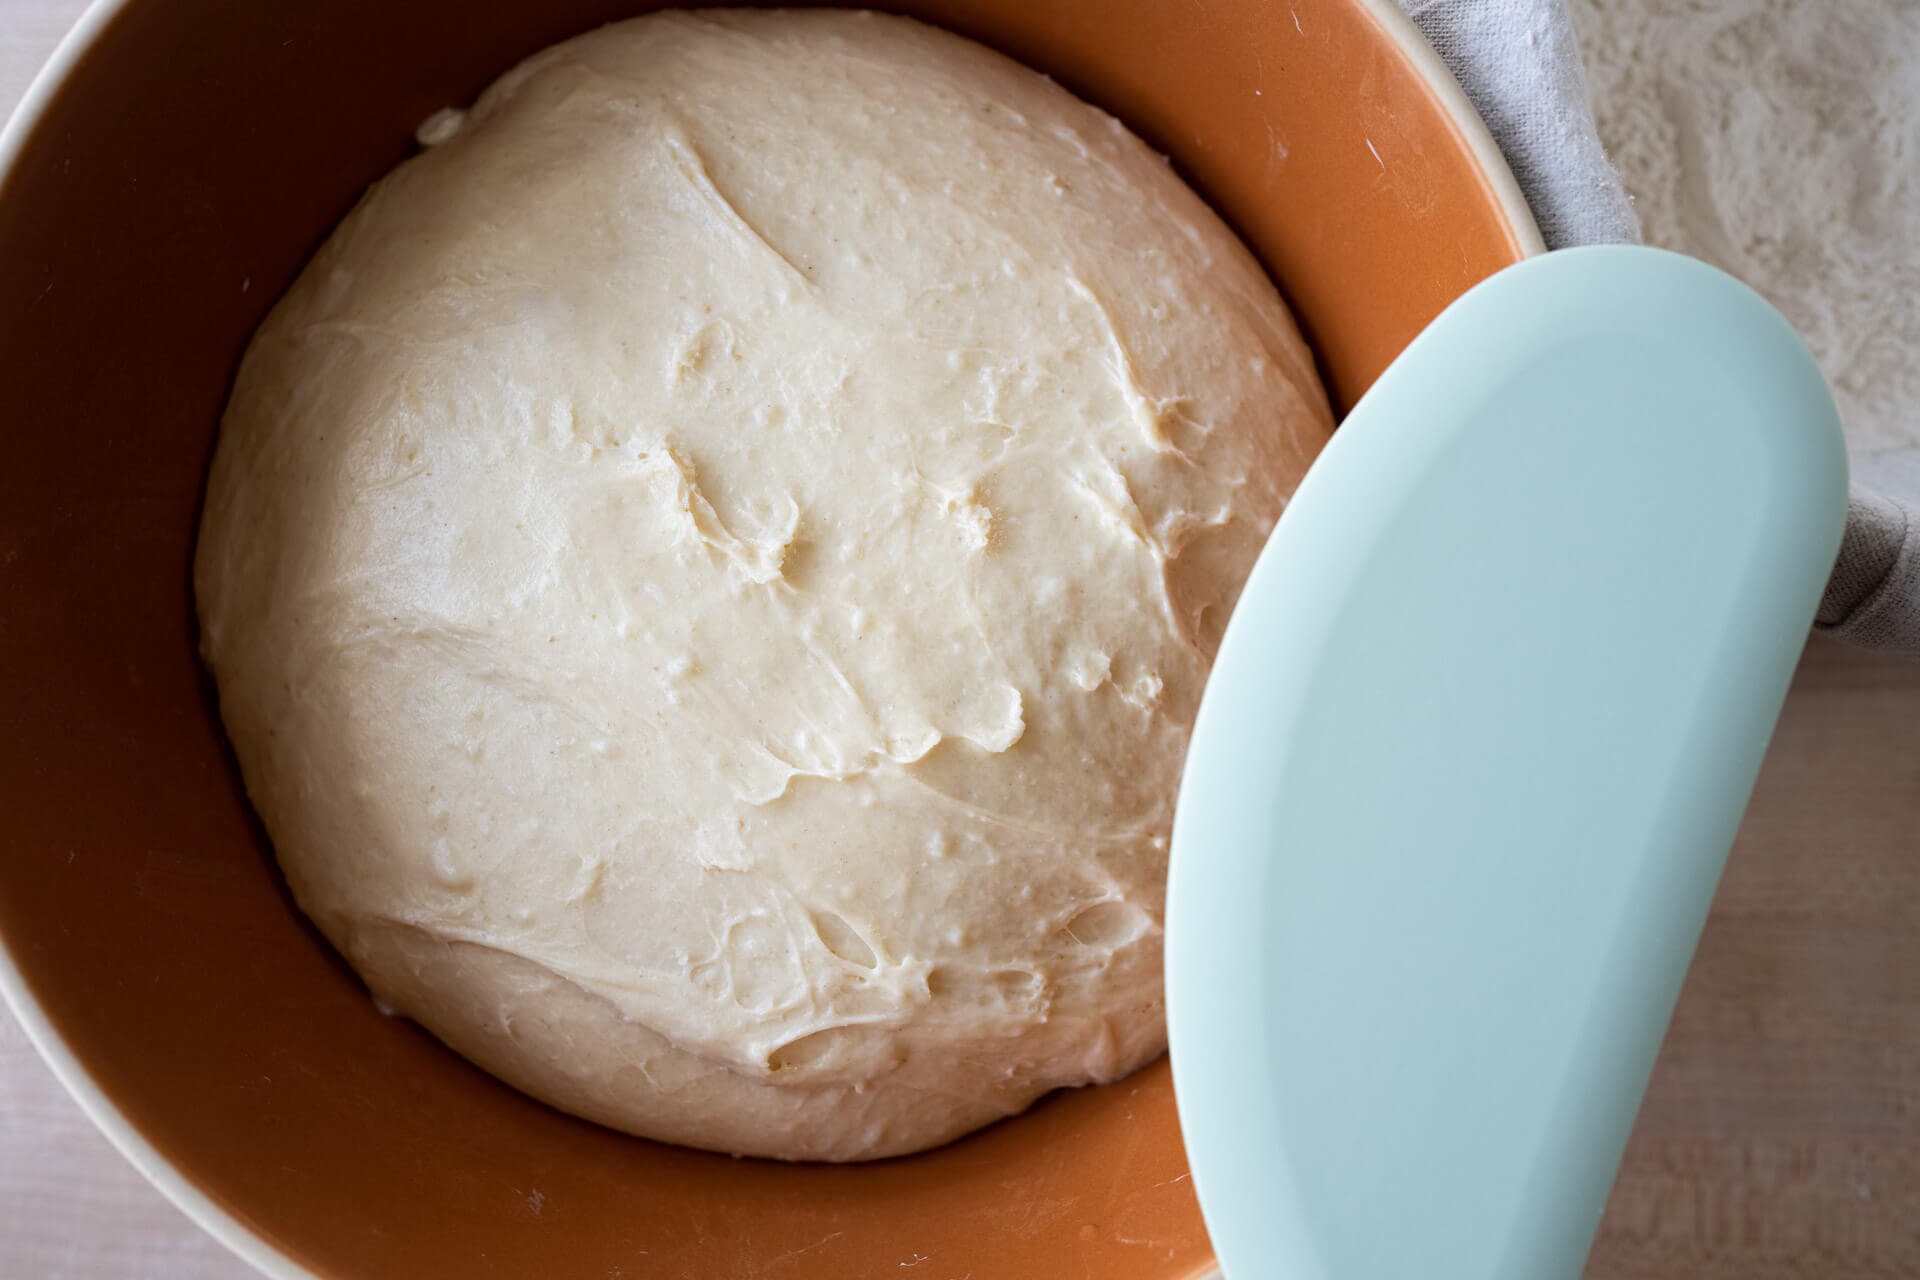
Chilled dough option: This dough is very, very soft. I shaped the dough right at room temperature, but if you want to make shaping a little easier, place the bulk container in the refrigerator for 20-30 minutes until the dough cools and slightly firms to the touch.
This dough is very, very soft. Chill the dough in the refrigerator if you worry shaping might be difficult.
Line two baking sheets with parchment paper. Liberally flour your work surface and, using a bowl scraper, gently scoop the dough out to the floured area. Lightly flour the top of the dough and divide it into ten 120g portions.
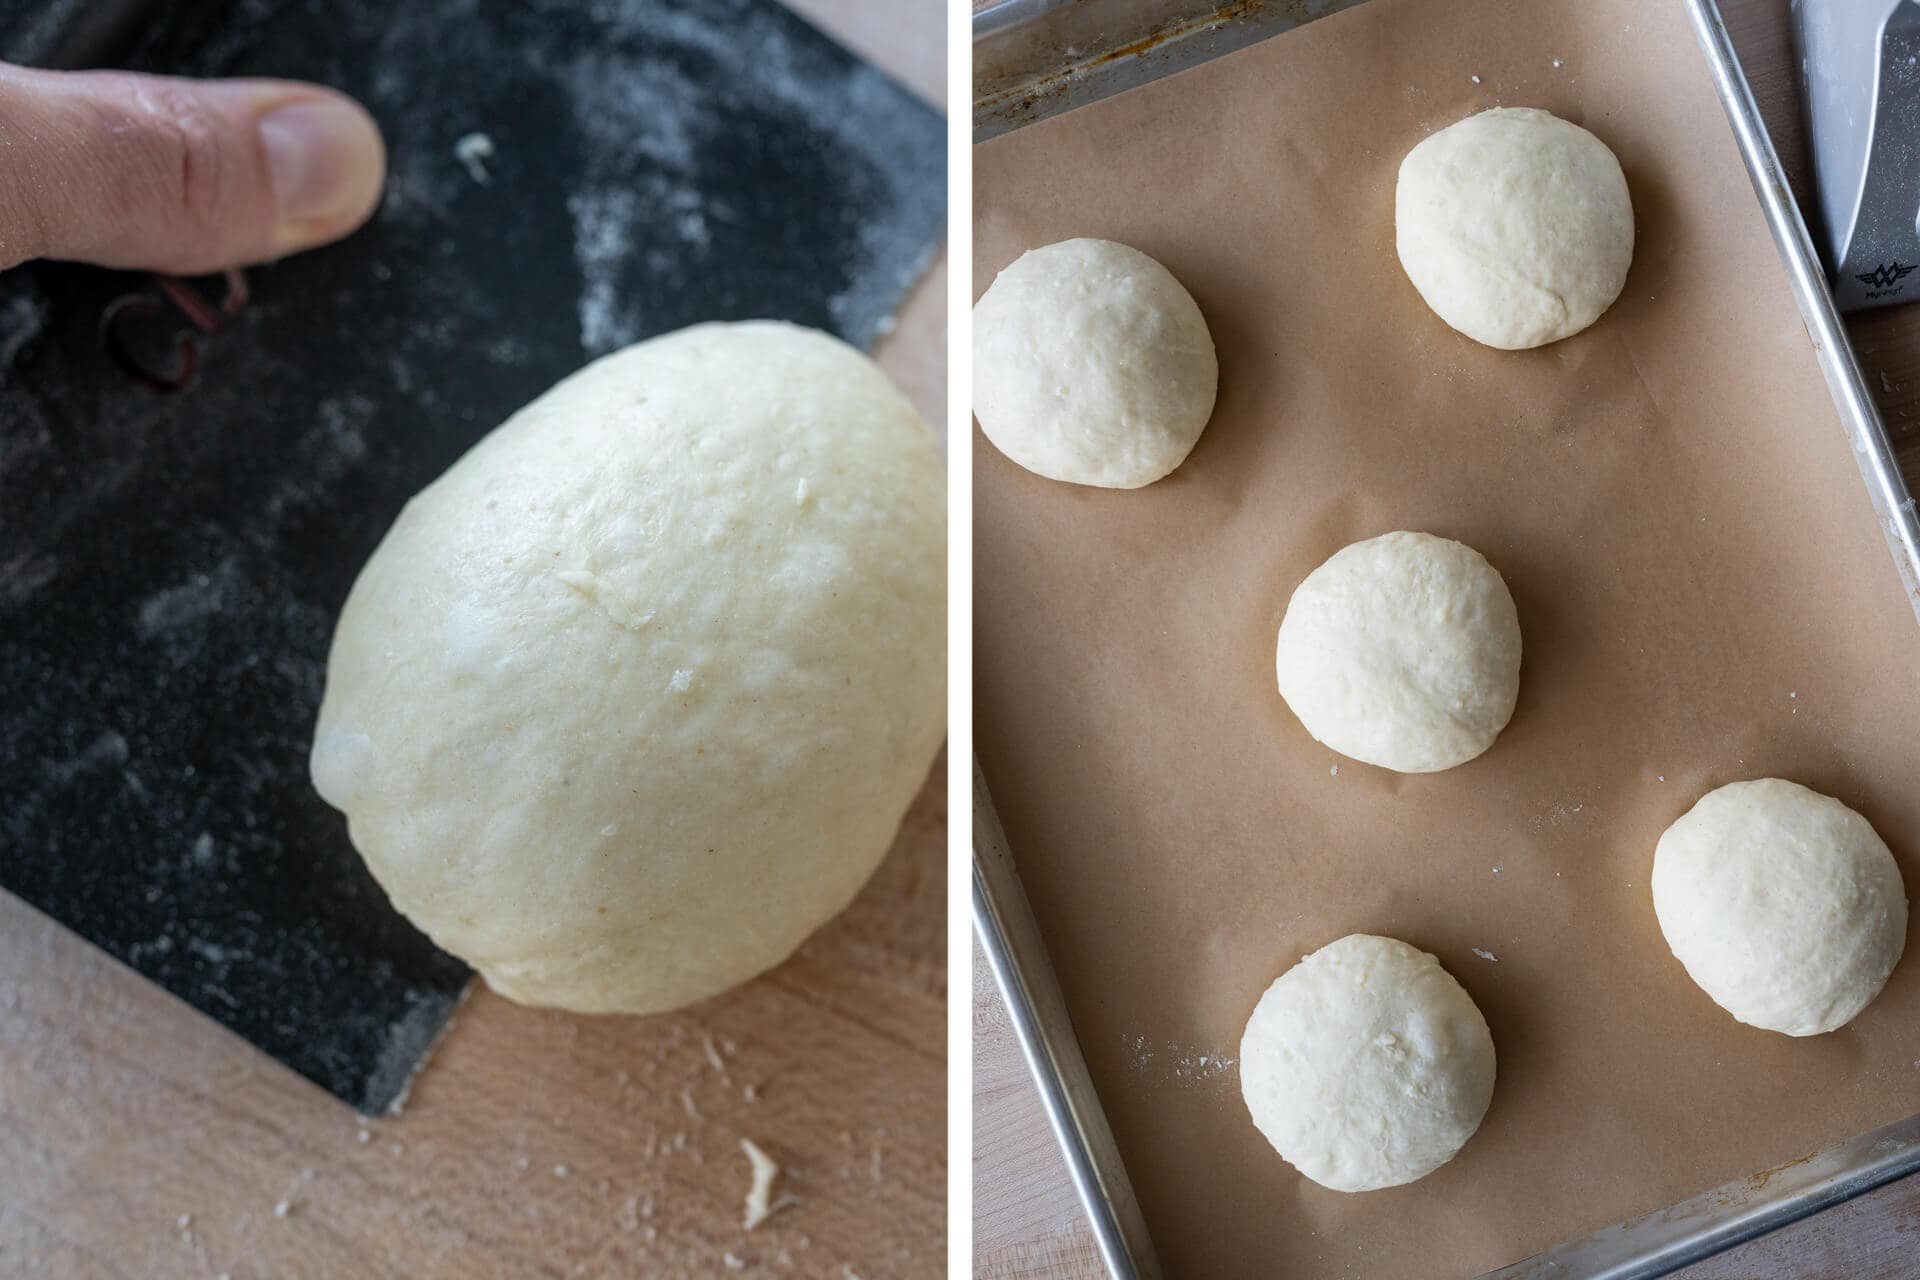
Lightly flour the top of the resting dough pieces. Using floured hands and a bench scraper, shape the portions into tight balls. As seen above, after I shaped the dough into a ball, I used the bench scraper to push the dough against the work surface to impart a tight skin on the outside.
For more shaping instruction, see my guide page to shaping buns and rolls.
4. Proof – 2:45 p.m. 5:15 p.m. (or when the dough is ready)
After all the pieces are shaped, cover each baking sheet with a large, reusable plastic bag and seal shut. To keep the bags up off the dough, place something tall, like a small cup, in the bags before closing.
Or even better, use these snap-on reusable baking sheet covers.
Proof for 2.5 hours or longer until the dough has puffed up considerably. When gently poked, they should feel extremely soft and yield immediately to almost no pressure. If you notice the skin on the dough starts to tear during the end of the proof, bake them immediately.
5. Bake – 5:15 p.m. (pre-heat oven at 4:45 p.m.)
Preheat your oven to 450°F (232°C) with one rack at the bottom third and another at the top third.
Make the egg wash: in a medium bowl whisk together one whole egg and 1 tablespoon of whole milk. Whisk until no lumps remain and the mixture is frothy.
Uncover your baking sheets and, using a pastry brush, paint on an even layer of the egg wash (avoid drenching the dough, the wash will just pool at the base and crack in the oven). Liberally sprinkle on black and white sesame seeds.
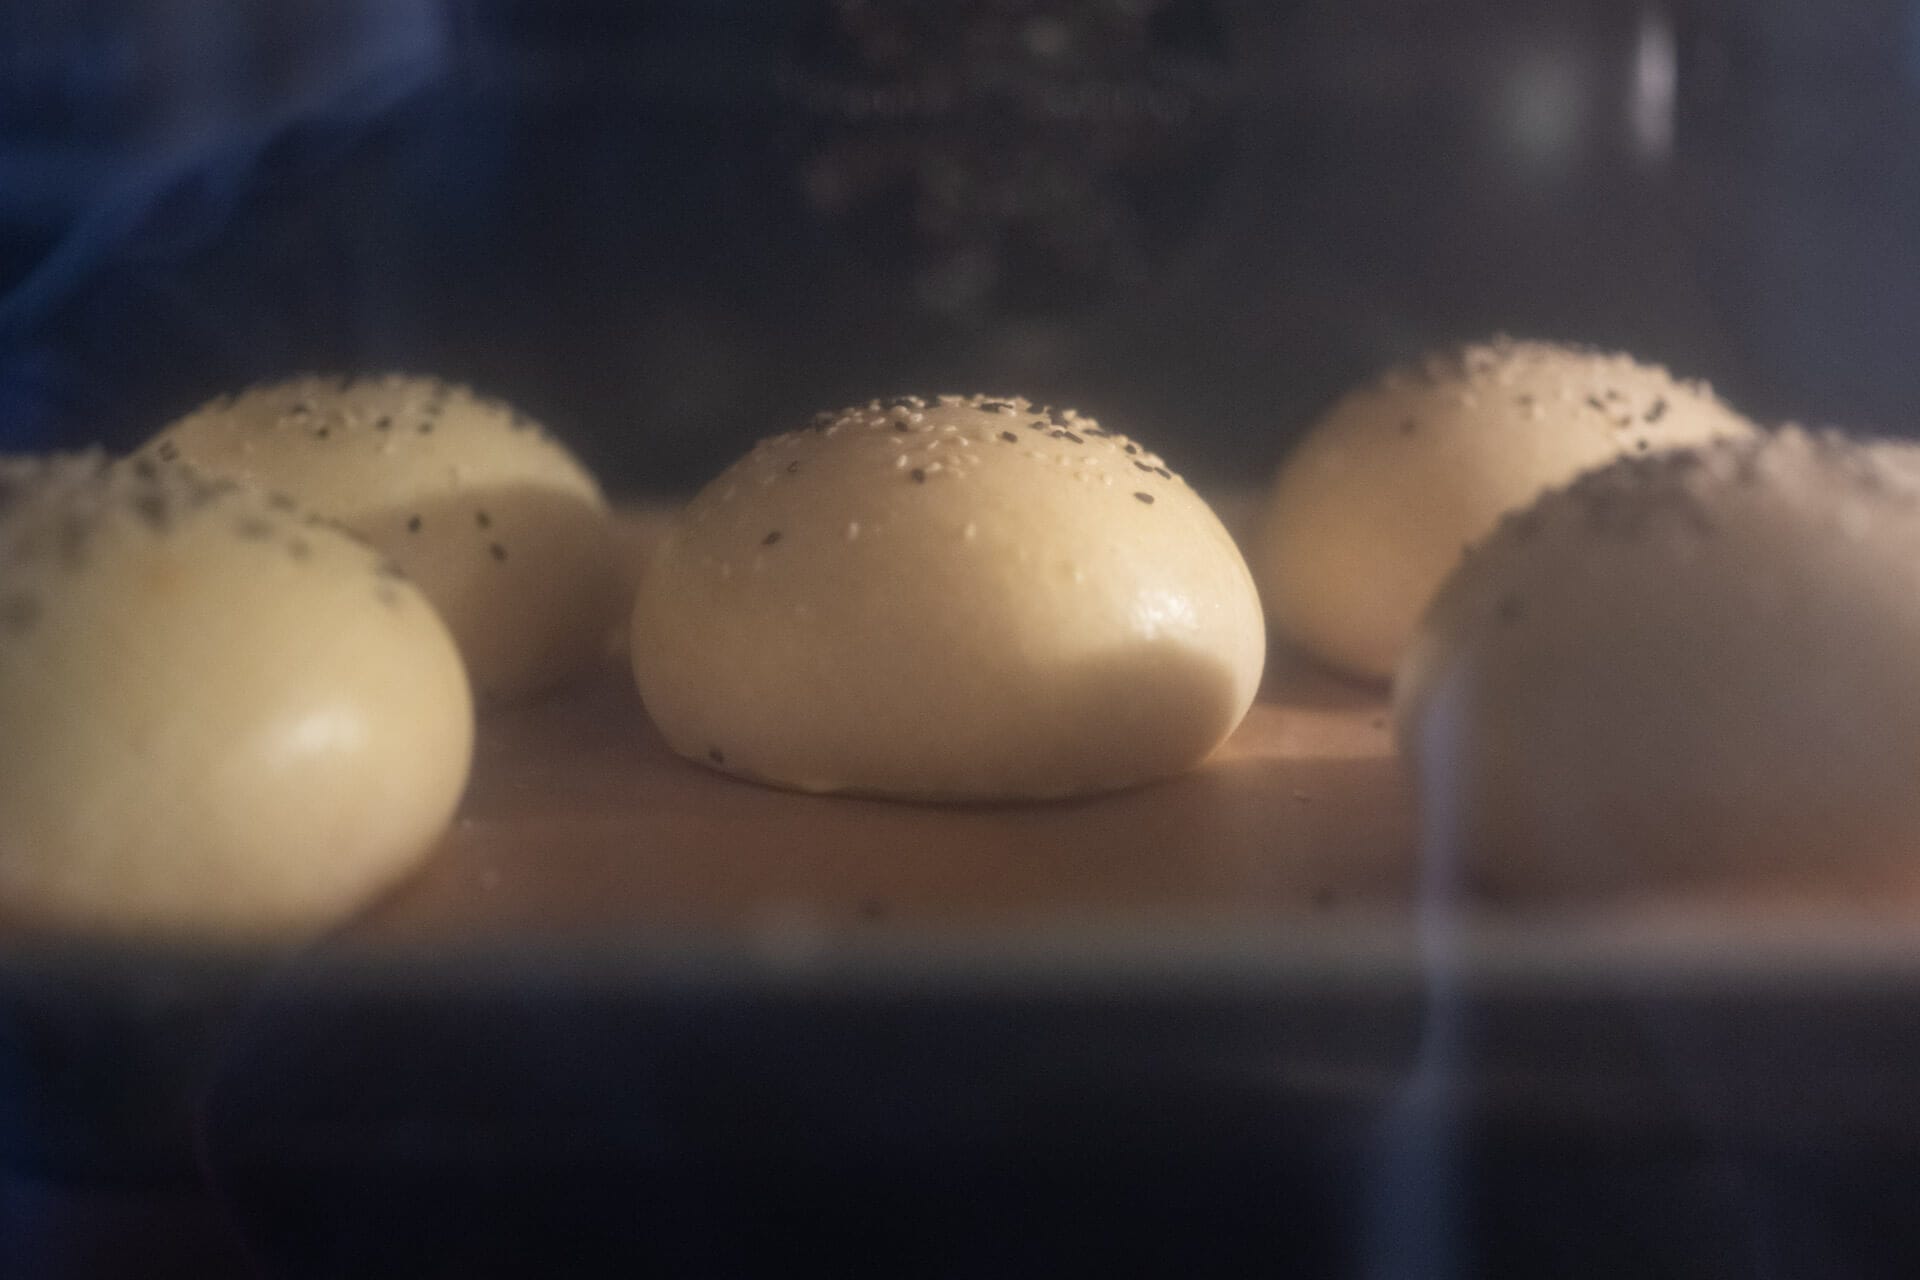
Place the baking sheets into the oven and bake for 25-30 minutes until well colored. Rotate the pans halfway through baking. Because of the egg wash, there is no need to steam the oven.
Remove the buns to cool for 5 minutes on the baking sheets, then transfer to a cooling rack until cool to the touch. If you cut the buns too early (or eat one straight off the baking sheet), they may be excessively soft—better to wait.
Conclusion
The surprising thing about these soft sourdough potato buns is that they successfully thread the needle between delicacy and rigidity. I’ve run them through their paces as hamburger buns, dinner rolls (torn apart and dipped in all manner of sauces), and playing the structural (but so much more!) component of a classic egg-avo-tomato-arugula-chile sandwich. How’d they fare? They avoided crumbling and completely dodged the dreaded soggy bun syndrome, even with extra doses of that sweet, sweet Tapatío. Success ✅
Crust

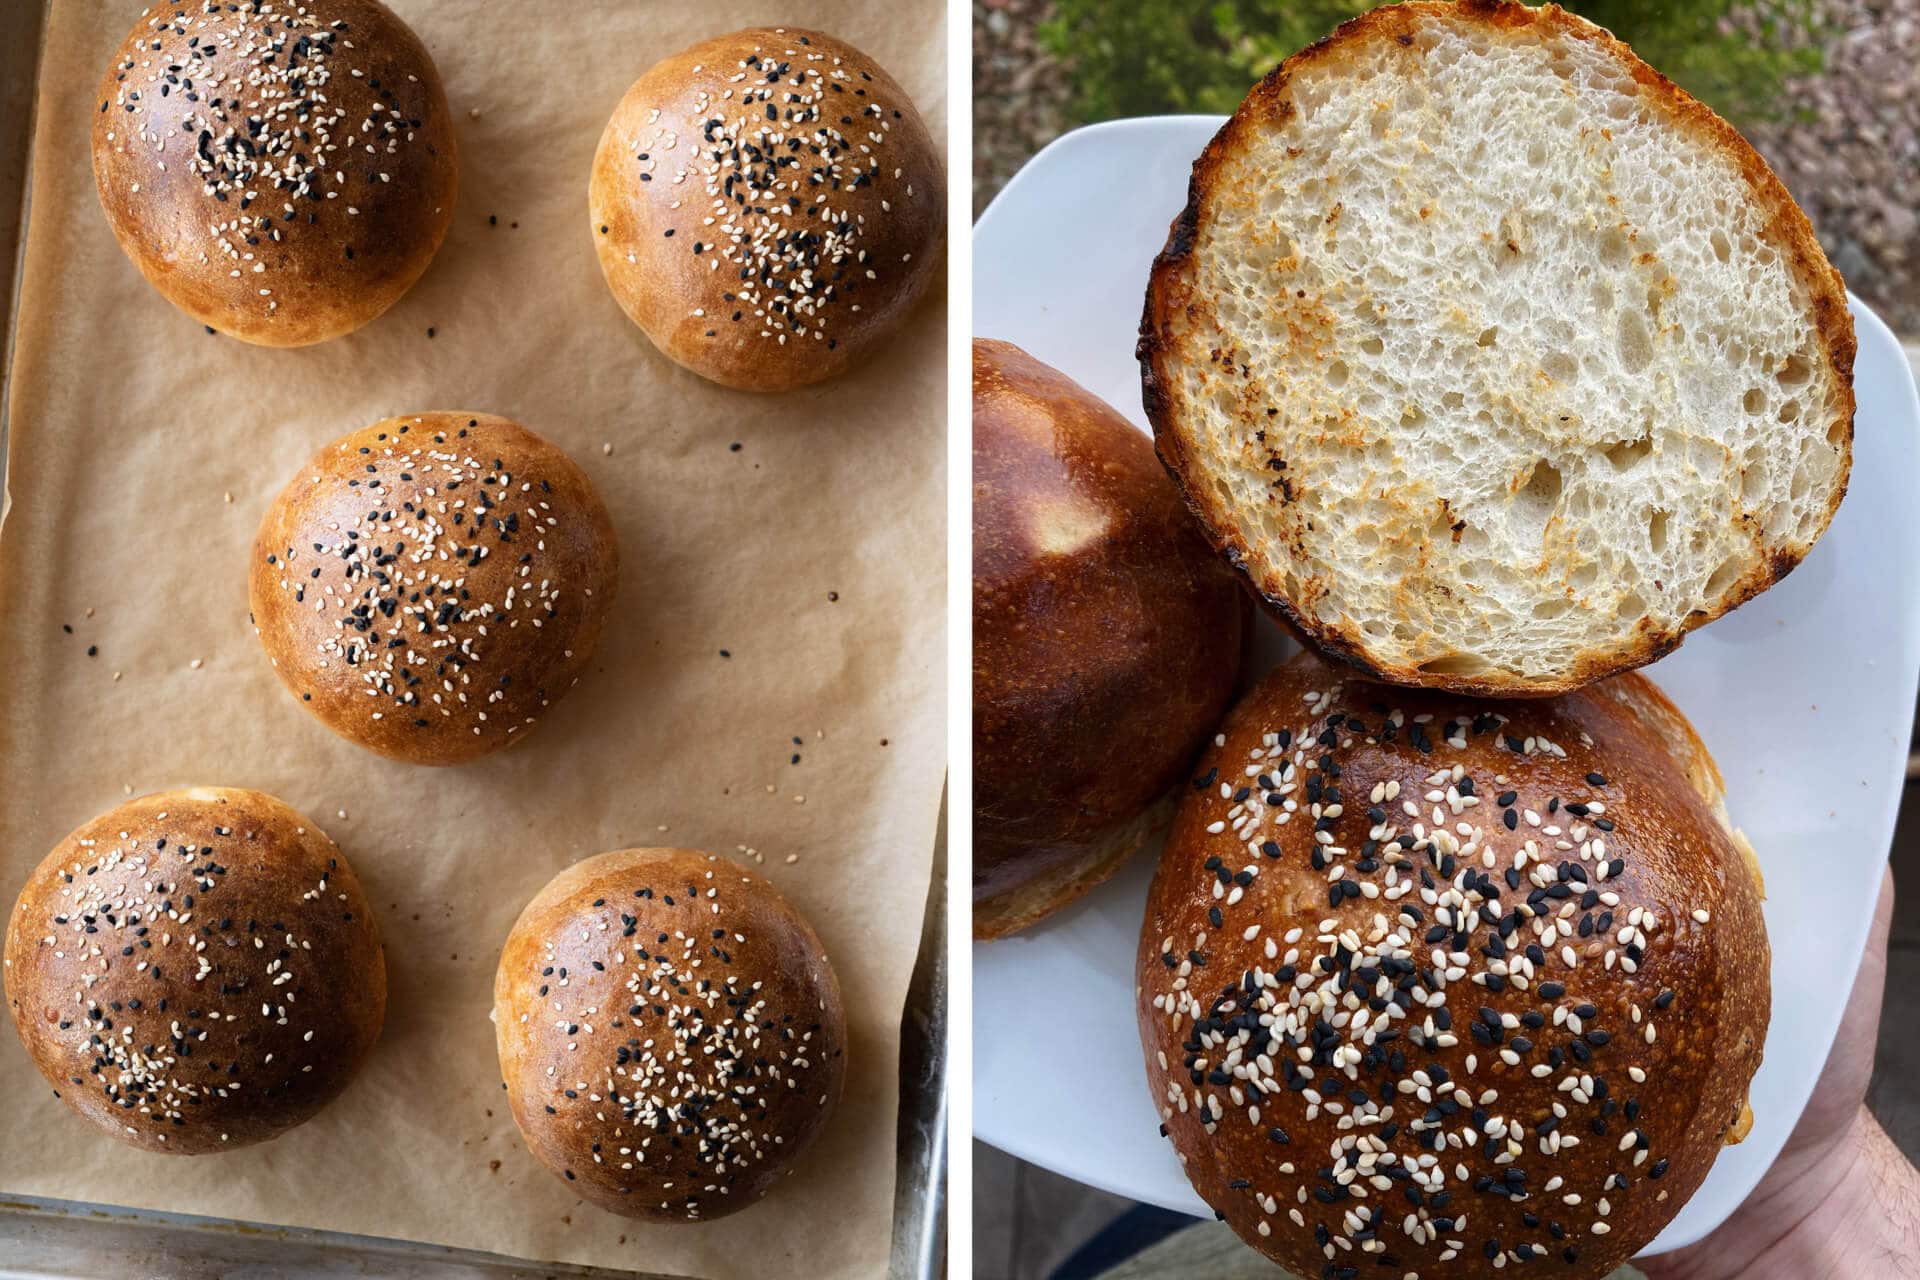
Utterly soft and thin—that is, until they’re grilled or toasted. If you want to keep the buns soft-as-can-be, then eat them as is, but I prefer toasting them directly on the grill grate — the exterior firms ever so slightly with perceptible chew at each bite.
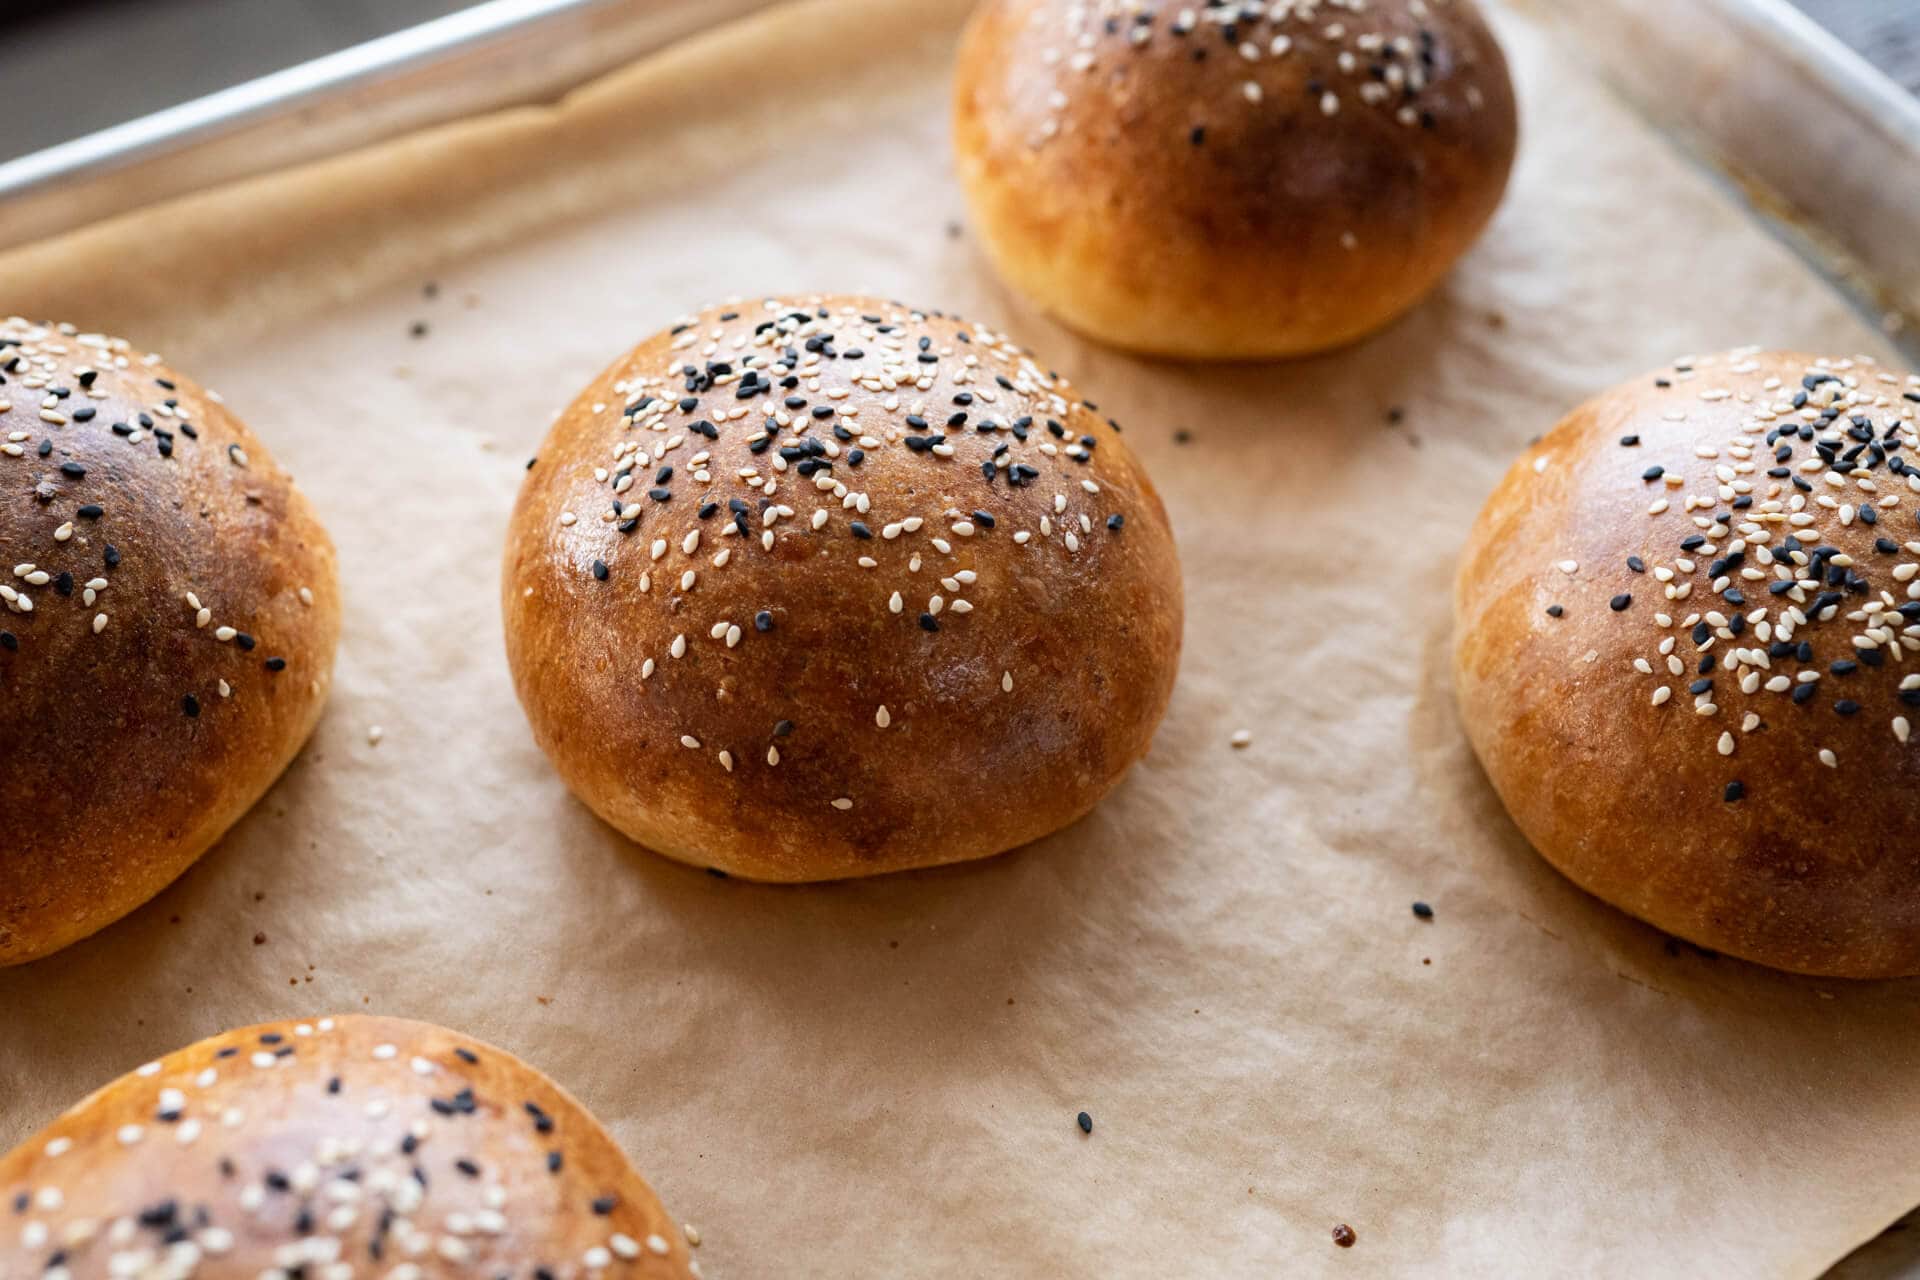
The egg wash turns the crust into a mahogany marvel, but also surprisingly shiny when the light catches them just right. And the two pieces really entice, making it hard not to grab just one more bun…
Crumb & Taste
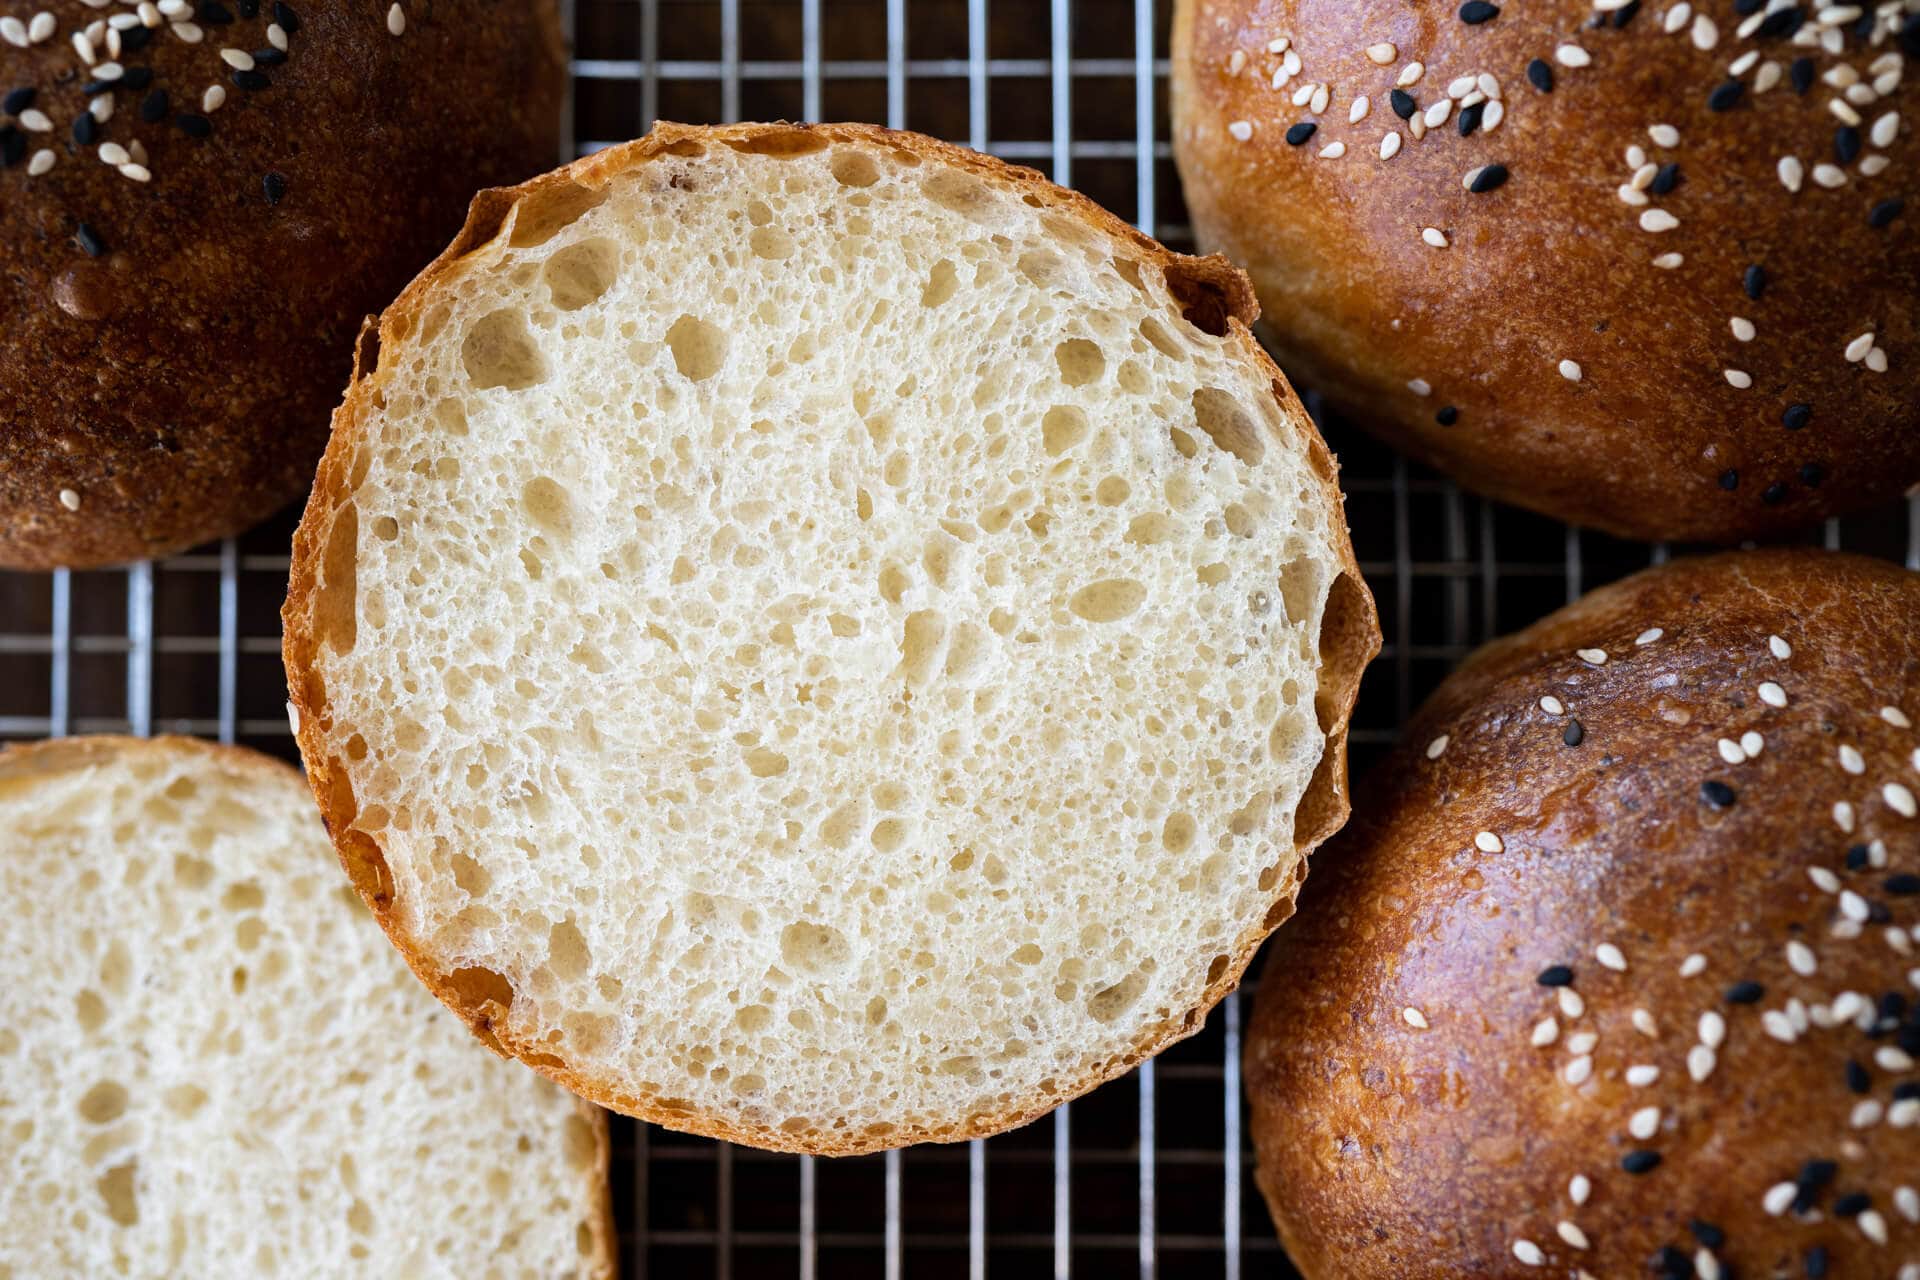
Soft like a cloud—how else better to describe the tenderness imparted by the added potato? The interior is light and airy without being overly open, which would spell disaster for a bun or roll. Even though the potato was riced, in the end, you’d be hard-pressed to find a single potato bit left in its original form (unlike my hearth-style sourdough with roasted potato recipe).
As I mentioned earlier, these are certainly my favorite hamburger buns I’ve yet to create. They have a depth of flavor and subtle sweetness that’s really hard to ignore, even when the buns are stacked with ingredients. If you’re going the hot dog route, check out my homemade hot dog buns for an equally delicious grilling experience.
Buon appetito!
Print
Soft Sourdough Potato Buns
- Prep Time: 9 hours
- Cook Time: 30 minutes
- Total Time: 9 hours 30 minutes
- Yield: 10 buns
- Category: American
Description
These sourdough buns with added potato are the perfect hamburger bun. Extremely soft with enough strength and structure to support anything you might be grilling.
Ingredients
Levain
- 61g all-purpose white flour
- 61g water
- 61g ripe sourdough starter
Main Dough
- 447g all-purpose white flour
- 203g potato, russet (about 3 medium; baked, riced, and cooled)
- 112g butter, unsalted
- 91g eggs
- 25g caster sugar
- 178g whole milk
- 11g sea salt
- 183g ripe levain
Egg Wash
- 1 egg
- 1 tablespoon whole milk
Topper
A mix of white and black sesame seeds, if desired.
Instructions
- Prepare levain and potatoes – 8:00 a.m.
In a small bowl, mix and knead the Levain ingredients. Transfer to a small container, cover, and keep it at a warm temperature for 3 hours. Preheat the oven to 350°F (178°C) with a rack in the middle. Grab three or four potatoes that together weigh at least 300g or so — you will need a little extra to avoid coming in short (I baked 3 and had a little leftover) and scrub the skin clean under running water. Place the whole potatoes into a small roasting pan or dish and, with a fork, prick the skin around the potatoes several times to allow them to breathe during baking. Bake the potatoes for about 1 hour, flipping them halfway through. Remove them from the oven when a knife can easily slide into the center of the potato (internal temp of 208-211°F / 98-99°C). When baked, remove from the oven, skin them and rice them onto a baking sheet to cool. - Mix – 11:00 a.m.
To the bowl of a stand mixer fitted with the dough hook attachment, add all of the Main dough ingredients except the potato and butter (leave the butter at room temp to soften at this time). Turn the mixer to the lowest speed and mix until everything is incorporated. Scrape the sides of the bowl and dough hook and increase to speed 2, mix for 3-5 minutes until the dough begins to cling to the dough hook, and remove from the sides of the bowl. Then, scrape the hook clean, cover the mixing bowl, and let rest for 10 minutes. After the rest, mix on speed 2 for another 2-3 minutes until the dough again begins to cling to the hook. Next, add the room temperature butter, one pat at a time, while the mixer is set to low speed. Once all the butter is added, add half the riced potato and mix on low until incorporated. Then, add the remainder of the potato. Transfer the dough to a container for bulk fermentation. - Bulk fermentation – 11:15 a.m. to 2:30 p.m. (about 3.5 hours)
This dough will need 3 sets of stretches and folds during bulk fermentation where the first set starts after 30 minutes into bulk fermentation and the subsequent sets are at 30-minute intervals. After the third set of stretches and folds, let the dough rest, covered, for the remainder of bulk fermentation. - Divide and shape – 2:30 p.m.
To make shaping easier, place your bulk fermentation container into the fridge for 30 minutes. Line two baking sheets with parchment paper. After the dough is chilled, scrape the dough out to a floured work surface and divide into 120g potions. Using floured hands, flour the top of the dough pieces and shape them into tight balls. Place 5 on each baking sheet. - Proof – 2:45 p.m. to 5:15 p.m. (2.5 hours)
Cover the baking sheets with large reusable plastic and seal shut and proof for about 2 1/2 hours until the dough has puffed up considerably and is very soft to the touch. - Bake – 5:15 p.m., pre-heat oven at 4:45 p.m.
Preheat your oven to 450°F (232°C) with one rack at the bottom third and another at the top third. Make the egg wash: in a medium bowl whisk together one whole egg and 1 tablespoon of whole milk. Whisk until no lumps remain, and the mixture is frothy. Uncover your baking sheets and, using a pastry brush, paint on an even layer of the egg wash. Liberally sprinkle on black and white sesame seeds, if desired. Bake the dough for 25-30 minutes until well colored. When baked, remove and let cool for 5 minutes on the sheets, then transfer to wire cooling racks.
Notes
If you don’t have a potato ricer, mash the potatoes while still warm with a potato masher or fork.
Soft Sourdough Potato Buns Frequently Asked Questions
What can I do if I don’t have a potato ricer?
Instead, mash the warm potatoes into a smooth puree or grate the potatoes on a box grater.
What can I use instead of eggs?
Use a vegan flax egg substitute instead of the eggs in this recipe.
What’s Next?
Are you looking for a lighter—but no less delicious—bun? My fluffy milk bread hamburger buns have you covered.
Or, perhaps, something other than burgers this holiday? Sourdough starter discard tortillas might just be what you’re looking for!


262 Comments
Hi Maurizio,
I mistakenly assumed this would need an overnight retard so I baked the potatoes and made the levain the day before. What timeline would you recommend me to retard the bulk at? Bulk at 25c for 2 hours and then retard?
Yes, that sounds about right. I usually like 2 hours at warm temp until I see some activity, then into the fridge. The next day it should look puffed up and ready to divide. Hope that helps, Andrew!
Hi Maurizio. Alberto from north-east of italy!
Tried today your potato buns.
Two things to ask.
First: you mentioned water in the ingriedents but you avoid when to use it (with all the ingredients in the first mixing?)
Second: should i turned down a bit the temperature to around 200°C after a preheated of 230°C? Becouse the buns burns on top quickly with that to high temperature…
Do you speak italian?
Ciao, Alberto! There’s no water in that first part of the mix, only milk! All of the water is used in the levain.
Yes, if they color too fast in your oven, turn the temp down to what works for your oven and location. It always takes a little adjustment!
I’m not fluent in Italian, sorry! I can understand quite a bit when out there traveling, but not fluent 🙂 Happy baking!
Hi Maurizio, first of all: your blog has been an amazing source of information for me in the last couple of years. So, thank you!
I tried this recipe twice, and unfortunately both doughs did not have any sign of active fermentation! Even when I prolonged the bulk fermentation by a couple of hours. I bake sourdough for a couple of years now and also have some experience with enriched doughs. From my results baking regular sourdough loafs, I can tell that my starter is perfectly healthy. I am very methodical in baking. I check all the temperatures and perecentages accurately. The only difference to your recipe was, that I used a leaven that I made the night before so probalby about 12 hours old. But it was at peak activity. I noticed that my starter had a little longer to get to peak activity because I used white flour (type 450) for the leaven. Normally my starter ist fed with type 550 flour (Switzerland) which has more mineral content than white flour. Could that be the issue? I will try this recipe again with a leaven made from my regular feeding flour. Mabey I should also increase the percentage of leaven to have more activity?
You’ve very welcome, Fabiano! That’s very strange. As long as you used your starter at the right time you should have plenty of activity in the dough. Yes, you could try increasing the percentage of your preferment in the dough to see if that helps! Please report back, I’m curious.
Hi Maurizio, I’ve made these once and they were GREAT. Just wondering if you have ever tried making these with potato flour? I have a bag and would like to use it up 😉
Awesome! No, I haven’t used potato flour but it is something I’ve wanted to experiment with! Extra starch is always a good thing IMO 🙂
I’ve made these twice. The first time they rose after shaping, but were quite dense after baking. I think I may have been impatient. The second time I extended the final rise, placed them in a 9×13 for pull apart buns, and baked covered for the first 10 minutes. I baked for a total of 25 minutes and they turned out perfect. Thanks for all of the great recipes on here.
Awesome to hear that, Jesse! Yes, you nailed it, that first batch was likely under proofed. With this dough it’s definitely important to push that fermentation time!
Hello! I just made the buns, it’s a great recipe and the buns tasted good. But the color of the buns are uneven, I tried using different temperature to bake them. Could it be the problem of the egg wash ? I made other burger buns before but I didn’t have such problem.
You definitely want to have the egg wash applied evenly or they won’t color uniformly. But it might also be the way they’re spaced on the sheet pan and in the oven. If you’re baking them on two sheet pans, bake one pan at a time with plenty of space between the buns (keep the rest in the fridge).
Awesome, Mike! Glad to hear you like them. I’ve not tried to freeze these but others said they froze well. Unfortunately, I don’t have a vac seal system or I’d definitely give that a try. I feel like I’d freeze them all together or separate them and then freeze (if you want to take one out at a time). I’d wrap the rolls very well with plastic wrap, then into a freezer bag (ziplock freezer). Vac seal would probably work even better with a light removal of air. Those are my guesses!
This is obviously an amazing perfect recipe. I did also do a veganised version with 100ml of olive oil instead of butter, replaced the milk with the same amount of freshly made oat milk, and replaced the egg with 2 tbsp ground flax seed mixed with 6 tbsp of water. Then for egg wash I used more of the oat milk. It worked great! Not quite as soft perfect, but honestly really delicious!
Right on, Joshua! Love those modifications. I’ve been getting asked quite a bit lately for vegan alternatives to my enriched recipes—these all sound great! Thanks for reporting back and happy baking 🙂
So glad to hear that! I think that would work really well. I haven’t tested it with some varieties of sweet potatoes, you might want to do a test run before the big day, just to be sure you have a firm grip on the dough hydration and consistency of the dough using sweet potatoes.
How did it turn out Zehorit?
Definitely give these ones a bit more time, the added sugar slows bulk and proof down just a bit. They should be very puffy, light, and soft before baking! Happy holiday 🙂
Fantastic, glad to hear they turned out so well, Zehorit! Enjoy and Happy Thanksgiving!
Do you think this recipe could be veganized with olive oil, or coconut oil instead of butter and aquafaba instead of eggs?
Yes, I think the oils will work. I’ve not tried aquafaba, but might be worth a shot. I’m skeptical, though, it’s hard to substitute butter properly (although some have reported success with vegan butters).
What about just replacing the milk with a nut milk?
I’m so in love with this burger buns 🤩 they are just everything you have sayed. They are perfect soft and light like a cloud.
Thank you, thank you!!!
Best regards,
Isabella
So happy to hear that, Isabella! Enjoy 🙂
My all purpose flour is not enriched. How much malt powder would you add?
It’s ok if it isn’t, the flour might be just fine as-is. If you find you’re not getting satisfactory fermentation activity and/or not enough color on the buns, perhaps add diastatic malt at .25-.5% to total flour.
Hi, may I check what’s the difference with using a higher protein bread flour about 12.5% instead of all purpose flour?
Many differences! Most notably with regard to this recipe, you’ll find bread flour will provide more strength to this dough and might require an increase in hydration. I find high protein flour, in high percentage, can also lead to a tougher mouthfeel in the end product as well.
These look great, but just wondering if its possible to replace the milk with water? Or would you recommend a non-milk alternative at the same percentage?
You could certainly do that for a lighter bun (less fat). You could also use oat milk or another dairy alternative milk.
Thank you!
Hi Maurizio, I can’t wait to try this recipe. May I ask why the eggs need to be cold?
Hey, Shoba! They don’t have to be, but mine typically are. It does help bring the final dough temperature dough after mixing, but as long as the other ingredients are in line with that temperature, any single ingredient can be any temperature.
Hi Maurizio,
as non-US folks can’t get their hands on the exact ingredient you have used, it would be great to add information about the expected state at the end of each stage instead of just timelines. E.g. how much should the levain have risen after 3 hours? I assume it’s ok to move on once it has doubled (which my levain has after 3h despite using a rye starter because that’s what I have at this point). How can I tell the dough is ready for shaping? I assumed it should have noticeably increased in volume.
The idea to use a plastic bag is great! Will try it out.
I don’t typically like to judge readiness by height change, that’s why I typically don’t list that (unless I find it’s true for all cases). Because ingredients aren’t the same worldwide, this is precisely why I don’t say markers like “double in volume!” For instance, if you’re using a very soft wheat it might not rise to the same height as my flour here. I do try to give other sensory clues, though, like how elastic the dough is, the aroma, some measure of rise, etc. Hope that helps!
Could you substitute summer squash or zucchini for the potatoes?
Hmm, that might be possible. I’d be worried using those in high quantity in the dough, though. I’d probably start with a lower percentage and work up.
Hi Maurizio, I am a regular reader of your blog and have tried a few recipes with great results. Thank you for sharing your knowledge with us.
My question is why do you add 40% mature starter in your Brioche Hamburger Buns recipe, but just 12% in this recipe, despite the yield for both recipes being the same? Is it because the quantities of the enrichments like eggs, sugar and butter in the Brioche Hamburger Buns are higher than this recipe?
Various reasons! Quantities of enrichments, timeline, temperatures, and levain build characteristics — all of these go into it and play a part!
I think it’s because 40% mature starter in the Brioche Hamburger Buns recipe is the total amount of levain added whereas 12% mature starter in this recipe is the amount of starter used to build the levain.
Would these freeze okay so I could dip them in lye and turn them into pretzel buns?
I’d probably use my pretzel dough and shape it into a bun instead!
Maurizio,
Your soft sourdough potato buns (double recipe) have just come out of the ovens (along with a Tartine basic country loaf). This is the second time I’ve played around with your recipe and it is a winner. A very tricky, soft dough (did the refrigerator tip prior to shaping), but a rewarding challenge. Thank you!
[Based on your recommendation for pairing, I have this recipe to recommend: https://www.californiaavocado.com/recipes/recipe-container/bacon-arugula-california-avocado-tomato-sandwich}
Best regards,
Thomas
Really glad to hear this, Thomas! And that avo sandwich looks ideal for these!
I just made these on the 4th of July, I always feel like maybe I’m screwing them up but then they turn out amazing! I think this last time was maybe the best, The only thing I did differently was throw the levian in the oven under proof (I think it keeps it about 95 degrees, I measured once) because I felt like my starter needed a bit more help (it floated but usually it floats more enthusiastically) but really it may be that I finally am getting decent about shaping. I also had different potatoes (yellow) and maybe I just liked the flavor they added a bit better. I don’t know, these are always awesome. Wednesday we had sandwiches on the last of them and they were still incredible! I pretty much always end these posts by saying Thank You, but really, THANK YOU!!
So excellent to hear that, Lauren! And good move adjusting as necessary for your kitchen and your environment — each is different. Happy baking!
I am confused about rip starter vs. levain – can I just use the total amount of my 100% hydration starter if I have enough and skip the levain step?
You could but will likely end up with a different tasting bun in the end — but it might be just fine if you want to go that route!
Maurizio, thank you for this great recipe. Awesome! I will definitely bake it again, but this time, I will bake back-to-back, to preserve the heat of the oven focused on one baking sheet only. All the best!
You’re very welcome, Umut! Yes, having one sheet in the oven does help them color evenly and bake a little better, I run into the same issue here.
My best and most satisfying enriched sourdough so far. Epic result all around and the perfect vehicle for a 4th of July burger feast.
Final dough temp (78F) and ambients were relatively high. Used overnight refrigeration following ~ 3 hr bulk fermentation @78F. Shaped cold and let proof another 3 hrs until the dough puffed nicely and felt ready to bake. I doubled the batch and had somewhat different oven spring and baking time on the trays despite rotating (up > down / front > back) at 10 mins. Will probably bake back-to-back if doubling again.
Thanks for the inspiration!
Right on! Happy they worked out for you and those are good modifications. I have had issues with even baking on two trays as well. I chalk it up to my oven, it just can’t radiate heat evenly and this is one reason I always try to cram everything on one sheet if possible (I do this with my sourdough bagels). Agreed, back to back is the way to go.
Thanks for the feedback and happy baking!
That was THE best hamburger bun I have ever eaten! Hands down.
Thanks for that feedback and glad you liked them! I have to agree with ya 🙂
We made these yesterday, and they were excellent. It only took 15 minutes for them to cool on the rack sufficiently to cut. We used Yukon gold potatoes. Since we don’t have a ricer and they were too hot to grate (which is what I do for gnocchi), we pureed them in a food processor until they were a gluey paste. It blended well with the dough; the buns rose just like the pictures. I had some trouble forming them, even with 20 minutes in the fridge. They continuously stuck to my hands and bench knife, but they honestly turned out okay despite the large amounts of flour I had to cover them with to finish shaping. I’m able to get the top taut, but the bottom is always quite wrinkly. It doesn’t show in the final product, though. Timing quoted in the recipe was spot on for a 74 degree kitchen from start to finish.
A tip for those who have difficulty covering the formed bun dough in the final stage: we brush plastic wrap with oil and don’t worry if it touches the buns. If you pull it off slowly, it won’t tear the top. We did still prop it with a cup to minimize contact. Note that the oil will often pool, so I use egg white for shine and rely on the residual oil to add color. Do wipe up any pooled oil from the SHEET before baking.
Glad to hear that, Natalie! Great adjustments as well. When shaping these you can use your bench knife instead of your hands to help create tension on the touch by holding it at an angle to the dough and pushing or dragging it. This will pinch the dough as you move the knife and release cleanly. I shaped this dough without the cold chill, and while the dough was certainly soft and sticky, the bench knife and a little dusting flour worked if I got “stuck” 🙂 Enjoy!
Made these buns yesterday for Father’s Day. Hands down the best burger buns I’ve ever made or eaten. Thank you for a wonderful recipe.
I had read some other comments and baked more potato than I needed. Glad I did or I would have ended up with too little. Baked 2 potatoes which weighed in over 200 grams each and only had a tiny more riced potato than I needed.
Super glad to hear that, Katia! I have to agree, definitely a winner here. I’m updating the post now to add in another potato 🙂
Any idea how these would turn out with sweet potatoes? Thinking about leaving out the sugar to account for the added sweetness.
Quite well!
Hi Maurizio, thank you for this recipe. I am planning to do it this weekend, however 10 buns are a bit too many for my family of 2, can i cut the recipe in half?
My bad. I just read one of your guides and got the answer to my question. Thanks 🙂
Glad to hear that. I was going to point you to my post on baker’s percentages if you hadn’t found it — have fun!
I don’t have a mixer, but slap and fold works great. I may have overbaked a tiny bit, but these rolls are perfect.
Awesome Anne! Thanks for reporting back and enjoy 🙂
Can you give me an approximation of how many eggs amount to 91 grams? Also, are they weighed with or without shells?
thank you
A medium egg weighs around 50g without shell (always weigh without shell) — so about two medium eggs.
35% of sourdough starter? isn´t that too much? i thought the limit was 20%
There’s no limit 🙂 I’ve seen, and made, bread with 1% starter all the way up to 50% (and more) — it all depends on the formula and your end goal.
I just devoured a green chile cheeseburger on one these fabulous buns. They did indeed come out with a shiny mohogany finish and were strong enough to hold up to the last bite of my substantial and messy burger, yet with a light enough texture to elicit several “mmmmmms” from both myself and my husband. As other bakers have said, I was a little short on potato after baking what I thought would be an adequate amount, but I just microwaved (don’t tell anyone) another potato to get to the right amount. I baked my buns 25 minutes and they were perfectly done. I see others here say theirs were done in less time but I wonder if altitude is a factor. Having lived at sea level, at 7,400 feet, 3200 feet and now a mile high in Albuquerque, I find altitude affects a lot of things. I’m so glad I love these buns because I bought a potato ricer just for this recipe, even though several of my culinary enthusiast friends have been telling me for years that I need to get one.
Excellent, Sharon! Glad to hear that. Yes, I need to add a little note about the potato — will do this soon. Alt definitely impacts baking! I usually like to give other cues for what to look for when baking (including internal temperatures where appropriate) and it sounds like you adjusted as necessary. A potato ricer is such a handy tool in the kitchen. Next up for you: gnocchi 🙂 Happy baking and thanks for the feedback!
Hey Maurizio!
I just put my dough away for the bulk fermentation, and I wanted to send you a note – in hindsight, I should’ve weighed my riced potato immediately after mashing to make sure that it was sufficient, however, I did not. I read your instructions thoroughly and noted that you said to allow for some extra weight to be lost during processing, but in my mind that just meant stuck to the container. I totally didn’t think about water weight lost during baking, and since I waited until the add-in step to actually measure it, I’m going in about 63g potato short. It might be helpful to future bakers to add a note to your recipe with how much your pre-bake total potato is, because I read “grab two potatoes that weigh about 210g…” as grab potatoes to total 210g, not two potatoes that are each 210g.
I’m saying the same thing over and over, but basically, my potato weighed 235g going into the oven, and 140g once baked and peeled, so there’s much more water in there than people might think.
Thanks for the recipe! I’m still excited to see how it goes.
I almost did the same thing! I think I had 2 potatoes around 400g, thinking that would be more than enough. It turned out to be just enough, but I was literally scraping the ricer and the peeled skins to eke out every gram I could get. Also, I didn’t want mine to get too dark, so I baked them at 400 for 25 minutes. They are perfect!
Glad they came out great! I’ll be updating the post to maybe say three potatoes instead of two — a lot is lost in processing! Enjoy 🙂
Excellent point here, Chrissy. I’ll update the post to make this all more clear — and you’re absolutely right, they lose a lot of weight by the time they actually get to the mixing part! In the end, I think your buns will still turn out perfectly delicious, even with the bit of potato reduction. Enjoy and thanks again.
Thank you for the great recipe! I have made it a few times. The best hamburger buns ever! So soft but strong enough to hold everything together. I also need to cut down the baking time like other reviewer. I baked it no more than 20 minutes.
That’s great to hear, Margaret! Each oven and each environment is different, nice work on adjusting the bake time. I might add a note about this. Thanks for the feedback and enjoy!