

This slap and fold technique is my go-to kneading technique for wet dough. It takes a little practice to get the hang of it, and it gets messy, but it’s so effective at quickly strengthening a dough that I almost always use this approach when mixing by hand.
I find this method most effective with a wetter dough, which for me, is typically anywhere above 78% hydration. This hydration number is subjective, so you’ll have to experiment to see when this technique is most useful. If the dough is overly stiff or too dry, it’s hard to stretch it sufficiently at each turn. In this case, I knead the dough in the bowl with a series of folds right in the bowl to bring it together after initial incorporation.
A tip to keep your hands and counter clean: wet your hands often with water, pausing periodically through the kneading process. Keeping them mostly nonstick will help avoid excessive dough tearing. Additionally, use a plastic scraper to occasionally stop and scrape the counter clean, reincorporating any stuck bits back into the mass (you can see me do this in the video below).
What is The Slap and Fold Kneading Technique?
The slap and fold kneading technique, also called French fold, is a method for strengthening bread dough (and, more specifically, the gluten in bread dough) during the mixing phase before the start of bulk fermentation.
When Should I Slap and Fold?
First, I don’t usually slap and fold until after the autolyse step, if there is one. When mixing, I typically like to break it up into stages where I hold back salt and some mixing water until later in the mixing process.
I find adding salt too early makes mixing more difficult, as it has a tightening effect on the dough. While adding salt early can help prevent some oxidization of the dough during mixing, I find with hand mixing—and its gentle nature—this isn’t a cause for concern.
You can slap and fold for a few minutes after incorporating just the flour, water, and sourdough, then add the salt and withheld water and do another slap and fold until strengthened to the desired amount. Or, you can slap and fold only once before the salt or after everything is incorporated. This is up to you and your preference.
How Dough Hydration Affects Slap and Fold Kneading
Excessive dough hydration can make the slap and fold process a little messier and sometimes even very difficult. If your dough is highly hydrated, it can help to split mixing up into stages or even do a bassinage type mix, slowly adding water through the mix to avoid a very sloppy dough in the beginning.
For instance, hold back some of the mixing water and begin slap and fold without the reserved water. Once the dough builds some strength, add a little more to the dough in the mixing bowl and continue strengthening in a second slap and fold session on the counter.
Recommended reading: My ultimate guide to mixing (and kneading) bread dough.
The Slap and Fold Technique: Step by Step
- Dump the incorporated dough onto a clean work surface
- Using wet hands, grab one side of the dough to your left or right with both hands in a pincher-type formation
- Pick up the dough (it’ll hang long in front of you) and slap the long-hanging dough down onto the counter
- While still holding the dough, stretch it towards your body (the dough slapped to the counter should stick and anchor so the whole mass elongates)
- Quickly fold the dough nearest your body in the air over the anchored section on the counter (it will fold up into a tight package)
- Repeat (note that the dough rotates 90° each time you perform these actions to ensure the entire mass is strengthened eventually)
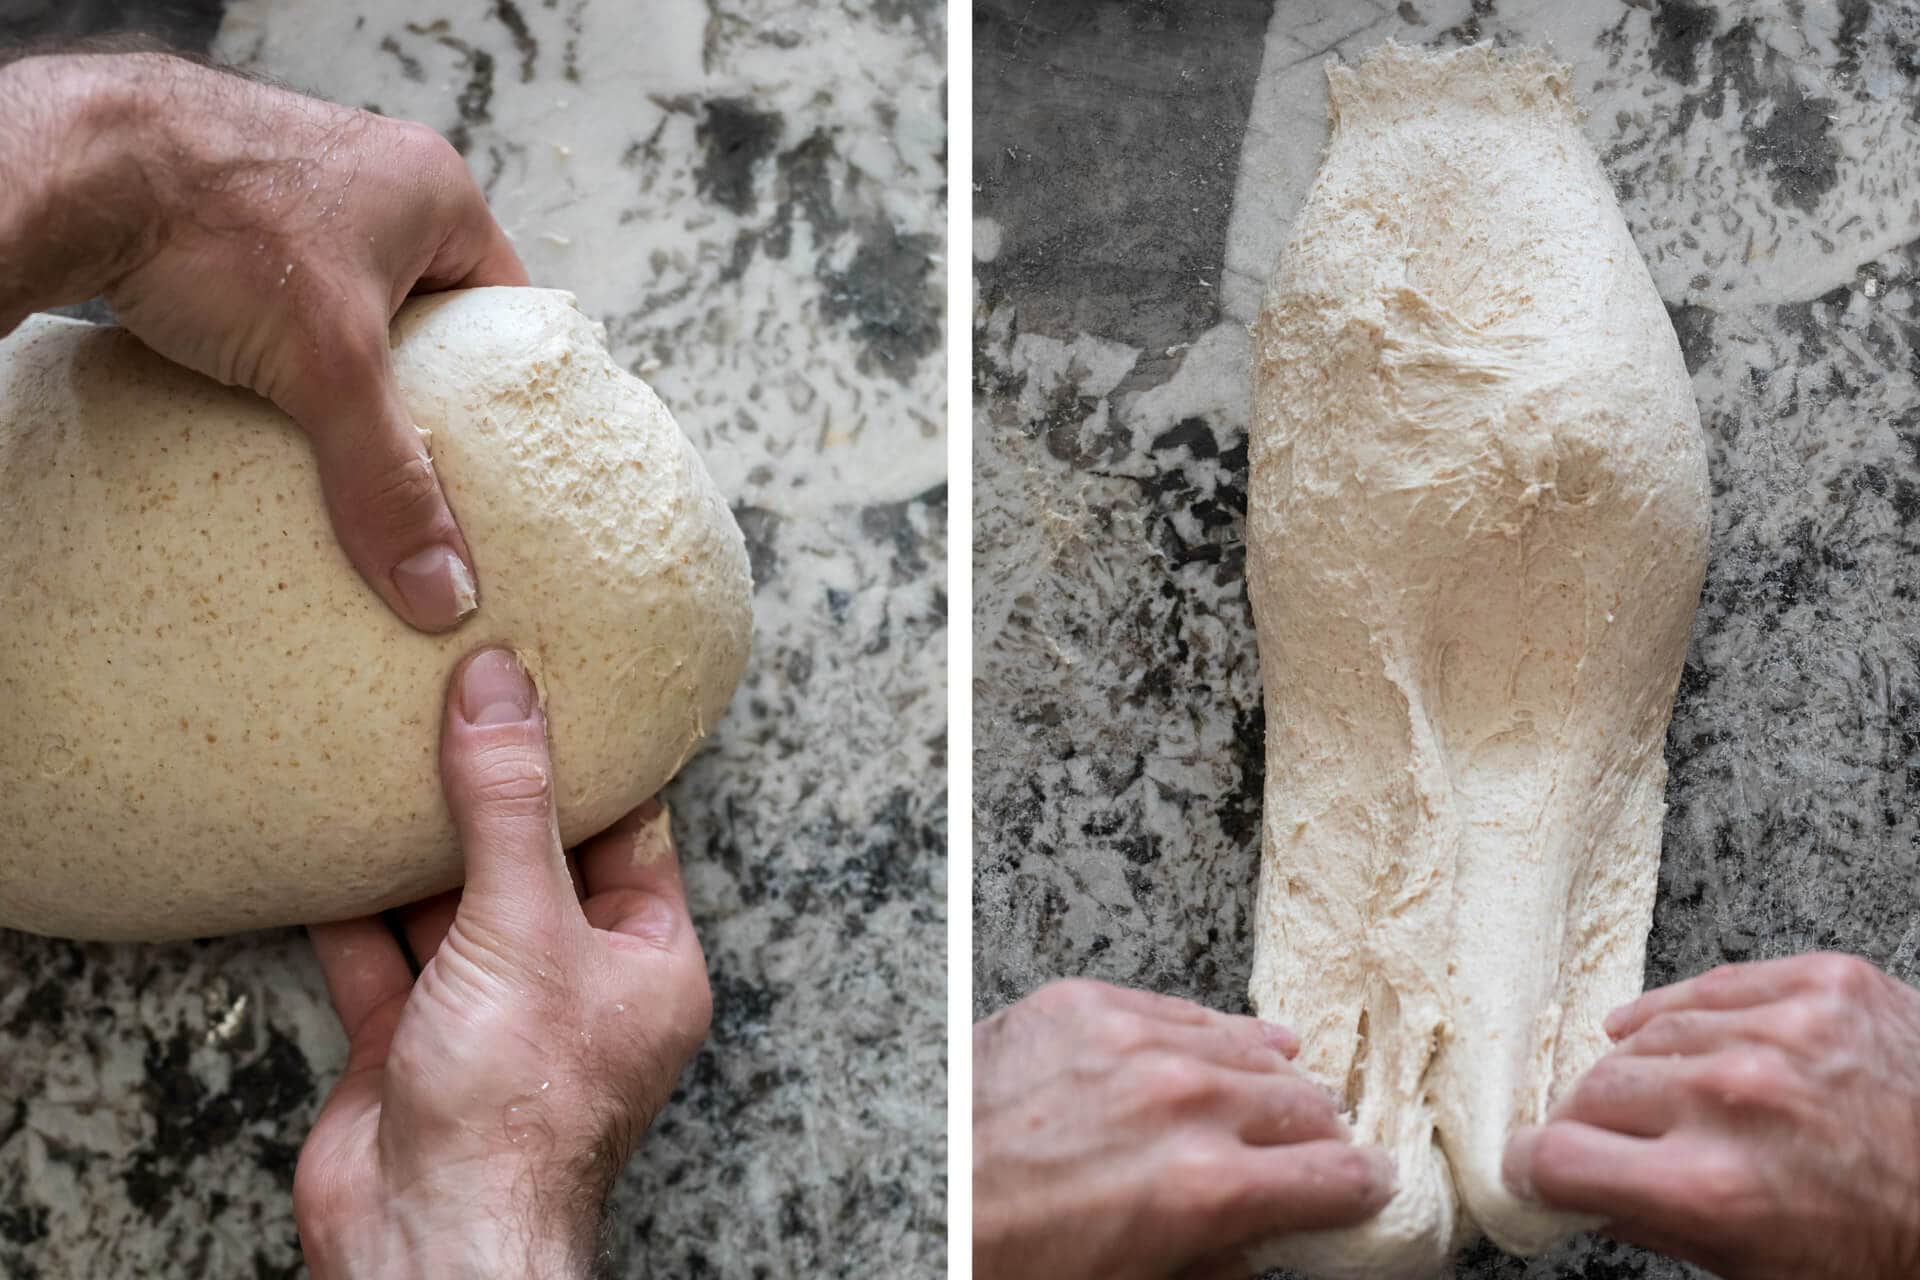
In the image above, you can see the pincher-type hand grip and the slap and stretch mentioned in steps 2, 3, and 4 above.
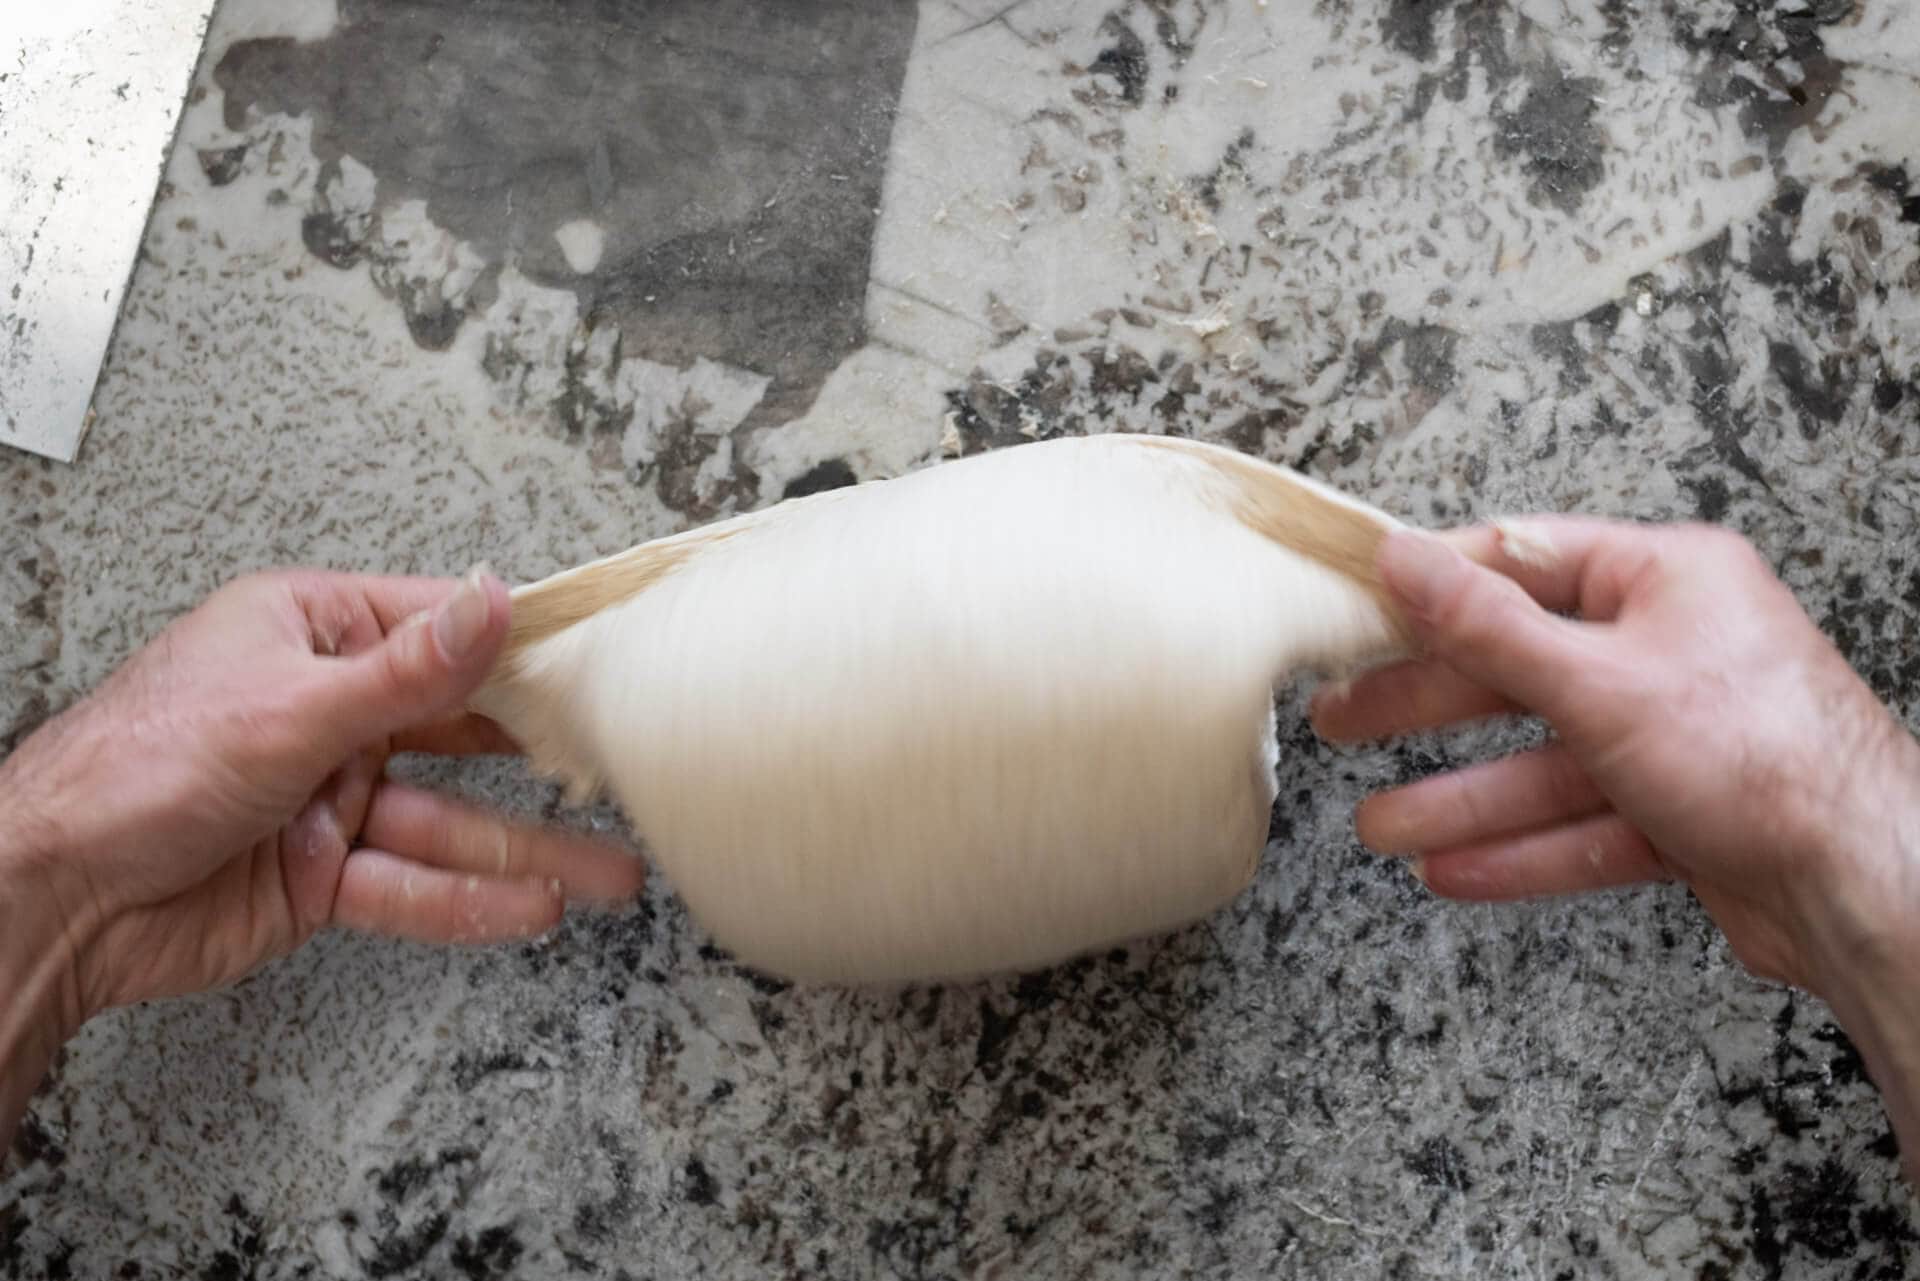
In the image above, you can see the quick fold over after the slap and stretch. This motion folds the dough into a tight little package, picked up again at the right side with the pincher grip, repeating the process.
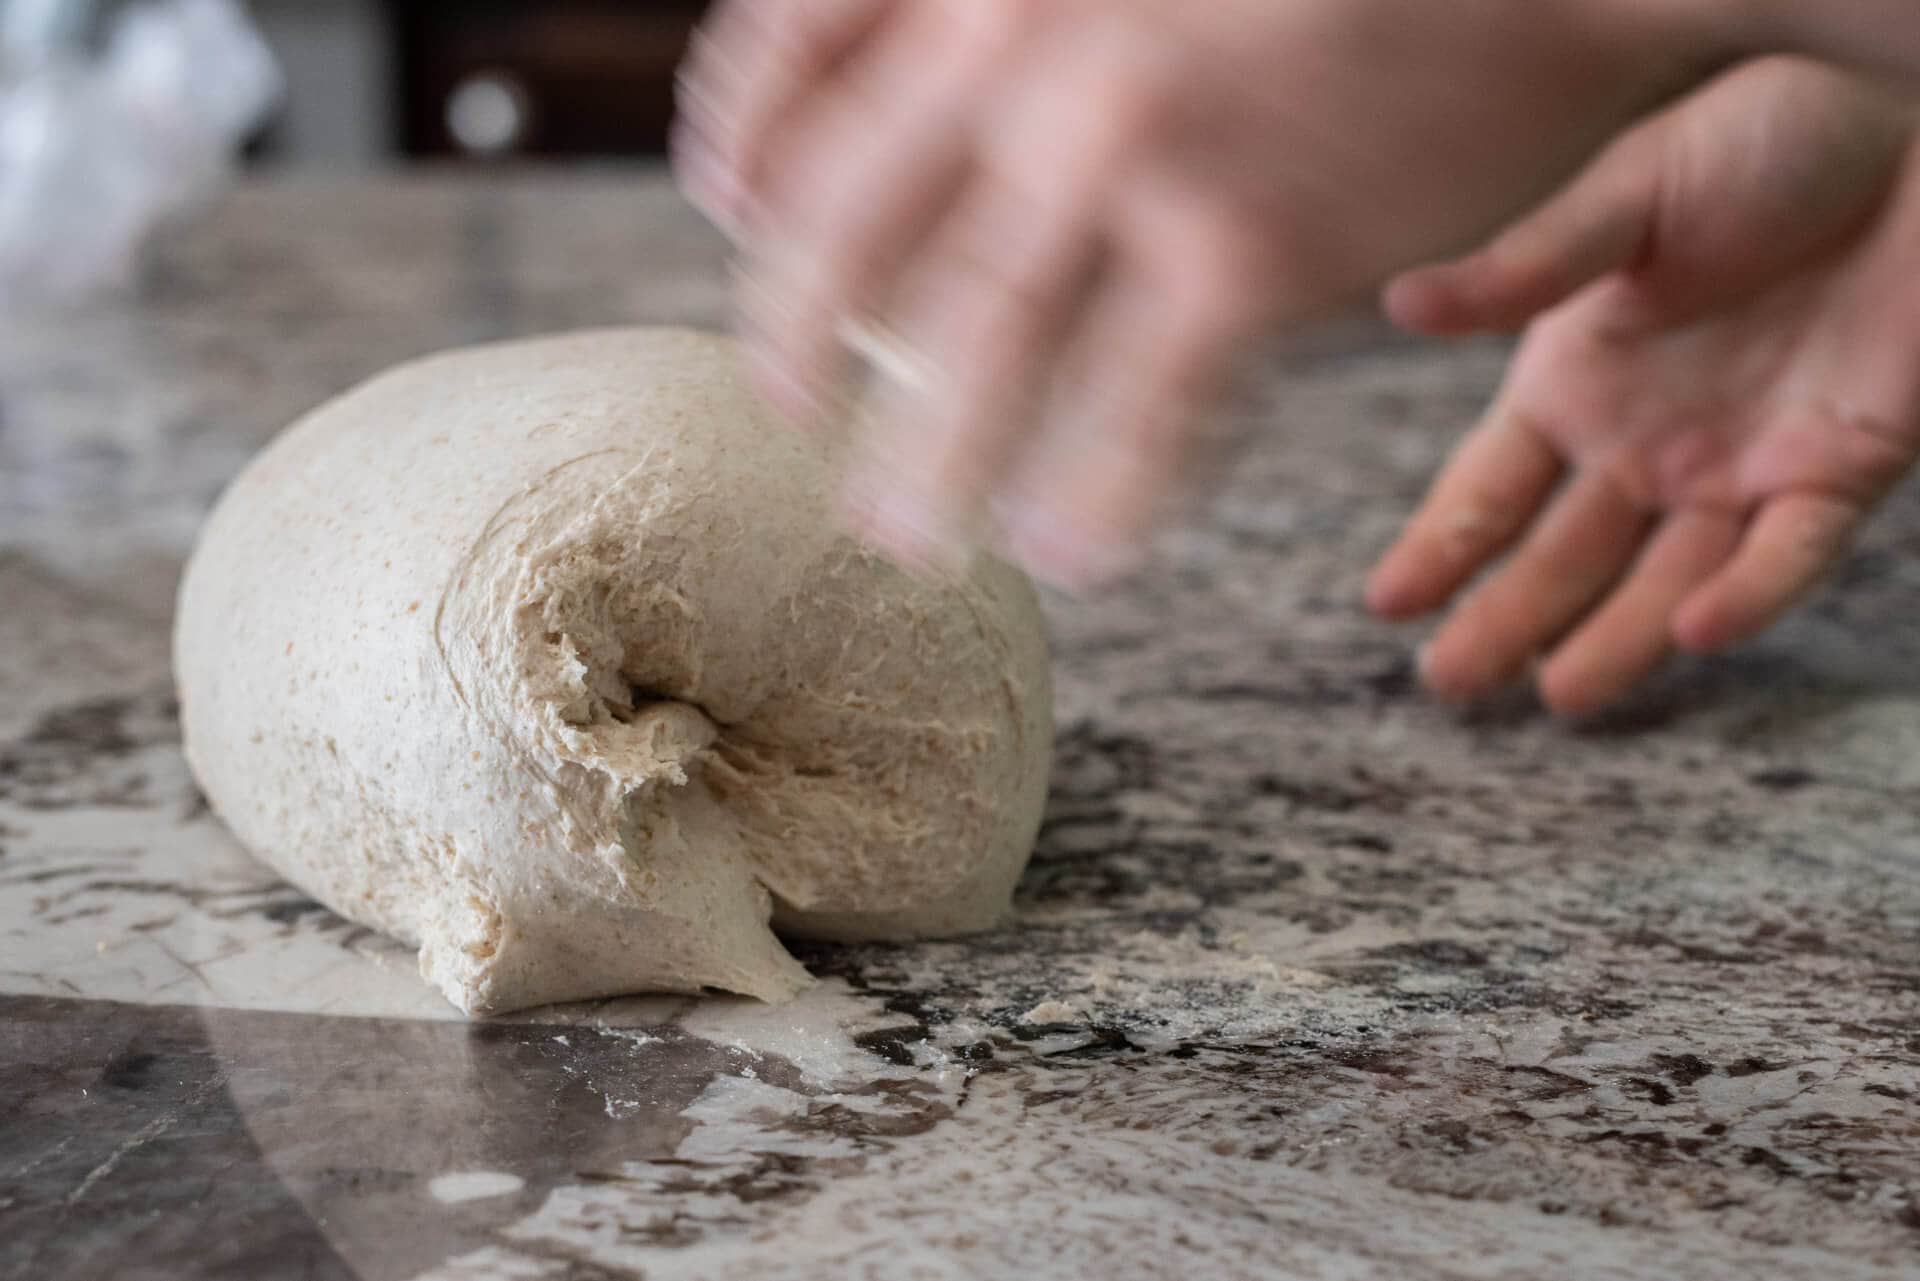
Continue each step in this process, over and over, until the dough is sufficiently strengthened for the target number of stretch and folds you intend to do during bulk fermentation. For example, I typically slap and fold until the dough smooths out, stops sticking to the counter as much as the beginning of the process, and generally starts to hold its shape on the counter without any excessively shaggy sections. This would mean I’d still need 1-3 sets of stretch and folds during bulk to finish strengthening the dough for my typical doughs.
The amount of kneading you perform on a bread dough is very related to the strengthening required during bulk fermentation. In other words, the more kneading you do, the less you’ll have to stretch and fold the dough during bulk fermentation.
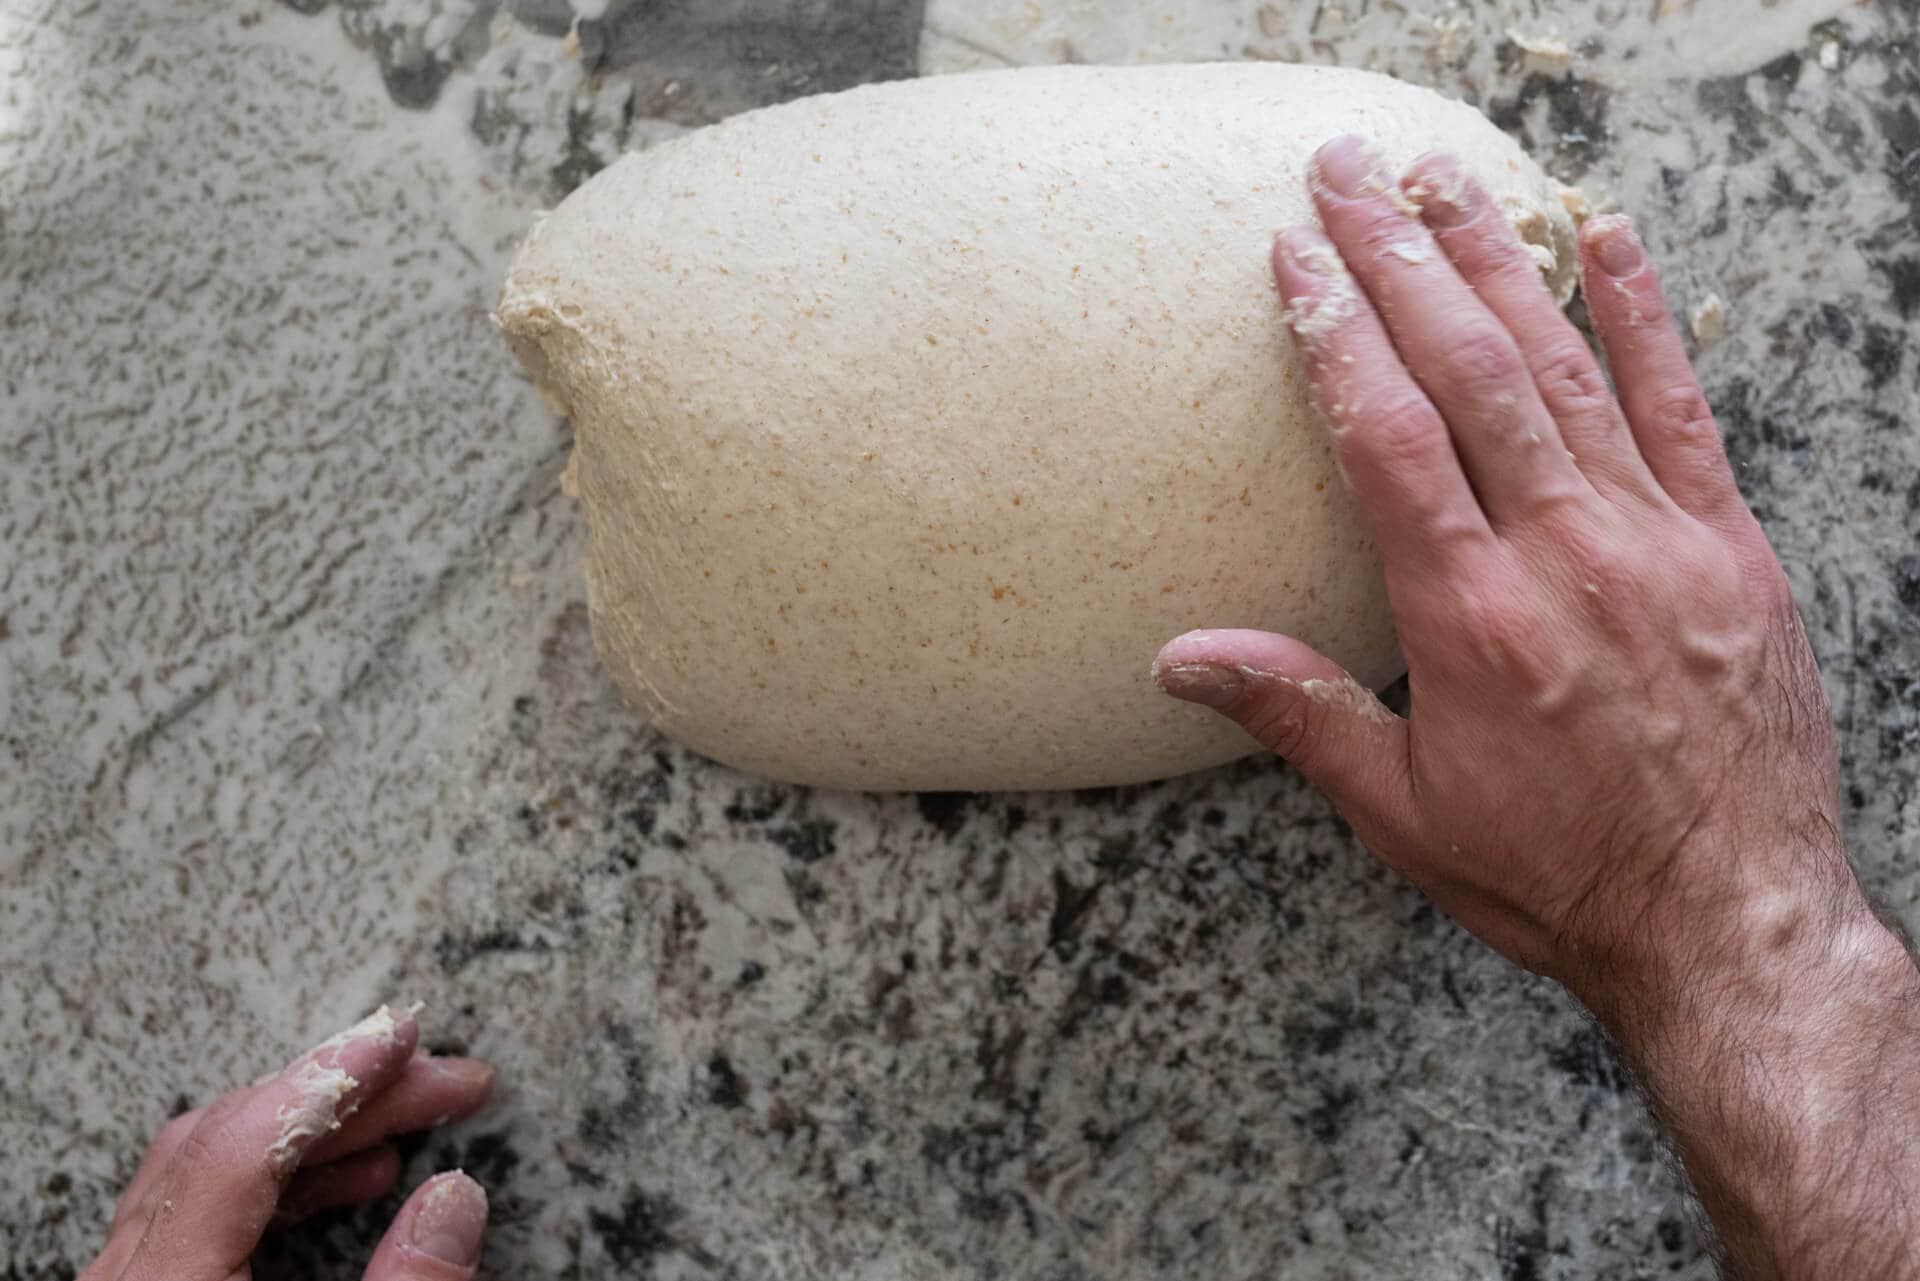
You can see the dough is smooth in the image above, not nearly as shaggy as the images above, and holds itself well on the counter. At this point, I’ll proceed with bulk fermentation.
How long should I slap and fold (knead) bread dough?
This is highly dependent on the dough (the flour itself and the hydration) you’re working with, and your effectiveness in the technique, but a good rule for me is somewhere around 3-6 minutes to yield a dough that usually requires 1-3 sets of stretch and folds during bulk to finish strengthening. Note that I’m quite vigorous during this process and give the dough a strong stretch at each step; if you’re more gentle, you might require a longer total kneading time.
Watch Me Slap and Fold Bread Dough
This video illustrates how a wet dough can go from super shaggy and loose to nicely strengthened by the end. It’s worth a minute to scroll back and forth through the video to see how this transformation takes place in just a few minutes of kneading.
To see more of my technique videos, head over to my YouTube channel.
What’s Next?
This kneading technique can be used with almost any of the bread recipes here at my site. Specifically, I like to use it with higher hydration doughs like My Best Sourdough Recipe.
Or, take a look at each step of the sourdough bread-making process to learn more.
Happy baking!

42 Comments
Would you consider doing a cooking school in Albuquerque?
Would you consider doing some hands on cooking school in Albuquerque?
Would you ever use this slap/fold method AFTER bulk fermentation, before shaping/banneton?
No, this is strictly for kneading at the beginning parts of the process.
Would you ever replace the stretch and fold with slap and fold after mixing and at the beginning of bulk fermentation or just for mixing? Thanks for all your help!
I sometimes do this if the dough is super slack and wet and really needs a boost. I only do it at the beginning stages of bulk, though. Great Q, Paul!
I was on the fence about adding the 2nd water to my Rustico dough. The dough seemed perfect after the first 10 minute rest, but I thought perhaps it should have a bit more hydration. The dough was the perfect temp, 78 degrees. I added half of Water 2 and all seemed ok as I started my slap and folds. Then everything got gooey. Perhaps my wooden work surface would not allow the dough to release for the slap and fold as well as the dough becoming too hydrated? I worked it as best as I could, way longer than 3-5 minutes. It’s in a proofing box now and has had one stretch and fold. The dough seemed to have stiffened up from the gooey mess I had on the wooden work surface. I did more than one set of Stretch & Fold than the recipe called for. Fingers crossed all goes well. Perhaps I will do a coil fold as well. I was so pleased I had Type 85 flour on hand. I really want this loaf to be great.
It's okay for the dough to break apart a bit, just keep mixing until it comes back together, then do the slap and fold!
Hi
this is the recipe and issue in having with my slap and folds. It kind of felt strengthened midway through then I kept going, won't
wetting my hands as I went but it then just kind of seems to fall apart. Can you be too aggressive with it and break the gluten.
I had recently made this recipe and only put in half the water this time so I was hoping to see it gain the resistance. I gave it an extra 3-4 minutes if kneading to see if it would come back but it seemed to stay broken and a blob. It feels like it has some structure with the stretch and folds stage but I don't think I ever got to the window pane stage and kept deteriorating instead of building in the kneading. So I stopped and kept going to the next stage.
I've had really good success with a seeded sourdough that is usually my go to but have not had great luck with working with wet dough and feeling like it's got strength as well as getting much oven spring
You cant overmix by hand, so I would not worry about that. It sounds like you need to reduce the water in the recipe you're working with to better suit your flour!
When I slap and fold a high hydration dough, it is so sticky that I have to constantly wet my hands, which inevitably over hydrates it. This is especially true if I’m using freshly milled flour. Sometimes it will start coming together after about 3-4 minutes, but 2 minutes later it will be a slack mess, almost unrecoverable and doesn’t hold shape at all. It’s extremely frustrating.
Do you have any suggestions? Do I need to add flour back if this happens?
What I would do is hold back more of the water at the beginning, it’s easier to slap/fold a dough that’s a bit drier. This way, you can also adjust the hydration after you’ve strengthened the dough some (which is what I do often here, it’s labeled as Water 2). Give that a try!
Thank you. I’m starting with holding back 5-10% of water. Not to mention I live in the tropics. Do you find that freshly milled flour can be almost unbearably sticky?
At least one French expert advises against using fresh flour, preferring flour that has "stabilized," or rested for at least 3 weeks.
This may be causing some of your problems. Good luck!
What about those of us older folks with a Kitchen-aid mixer? Is there a way to strengthen dough using the dough hook without slap and fold?
Yes, just use your mixer instead! Mix to the same level as described in any recipe. Both are equally effective.
Thanks for your advice, it already helped me twice. Do you have any advice about how to find the right moment to stop kneading ? I have the feeling that my recipes involving sourdough, are either too dry, or have been strengthened to much ?
Once the dough starts to become more cohesive and holding itself on the counter, I stop kneading. If it was a little under-strengthened at that point, it’s okay, just add in more sets of stretches and folds in bulk to compensate.
I am using a simple artisan bread recipe that does not require a starter. It turns out great with the rustic look of baked bread at the end of the process. However, I am starting to tinker with scoring techniques and am wondering if the slap and fold would be beneficial with releasing more gas so I don’t have unwanted cracks/breaks in my bread. Do I put dough in oven after the process of slap and fold or let it proof more? Does the slap and fold process repeat? Please advise and thank you for your help!
This technique won’t really affect scoring in this way!
Hi Maurizio,
Hope you’re well! I’m looking forward to trying this with our porridge sourdough at work tomorrow! Just wondering – the dough is very high hydration (not sure of the % but the porridge makes it very slack) – would a combination of slap/fold & stretch/fold be beneficial when working with a very wet dough?
Thanks!
Yes, a combination would be the way to go.
When doing the slap/fold, hold back some of the water so you don’t have a very, very wet dough right from the start. This way, you can develop the gluten in the dough when it’s lower hydration, which will be more effective. Then, add in the water in stages (I usually do two rounds) where the second stage will be a little easier because the gluten is a bit developed already.
Hi! This is the second time I am making your Pizza al taglio recipe and, since my hand mixer is not working, I have been using the slap and fold technique to knead the dough. My dough, both times, was a lot stickier than what you have shown in the video and therefore, much harder to handle. Should I hold back some of the water you have mentioned in your recipe? I must mention that I live in India and it is very humid and warm here.
Yes, you can certainly do that to make the dough more manageable!
Hi Maurizio,
It’s unclear to me when you decide to use slap and fold upfront or just do stretch and folds throughout bulk. Could you shed more light on this?
Additionally, I’ve been doing slap and folds with 100% whole wheat dough. I noticed that where I grab the dough it tears, not fully but the surface looks damaged. Could this be because of the bran in the whole grain?
Thanks so much.
It really depends on the dough recipe. If I want to add in more strength (maybe the dough is highly hydrated or I want to do less stretch and fold during bulk) I’ll use slap/fold. The more you strengthen the dough upfront, the less you’ll have to do during bulk fermentation.
That’s typical for 100% ww dough. Slap and fold is great for a short period with ww doughs, but it will tear after a while. Nothing to worry about!
What if it tears with normal white flour? Not enough extensibility?
G’day Maurizio, can this slap and stretch be done for maybe 5 minutes, after the bread machine has completed its dough mixing cycle?. Worth a try I think, what do you reckon. thanks so much, Don.
I’m not too familiar with bread machines, but I would say sure, why not!
Hello Maurizio,
I’m making the Spelt, Rye & Whole wheat recipe right now and used the slap and fold technique (recipe suggests about 8 mins). At first very soggy, almost couldn’t pick up the dough. Then improved quite quickly and started to round up more and more. However, at some point the dough started to become more slack again and was increasingly difficult to hold shape. Decided to stop (after about 5-6 mins) and start bulk fermentation.
My dough is about 24 degrees C and 81% hydrated (compared to 84% in recipe) and I only wetted my hands to handle the dough.
What went wrong? Did the tiny bit of water make it to hydrated? Is there such a thing as slap & folding too long?
Thanks for the help!
Hey, Maurits. It’s very hard, if not impossible, to over work the dough by hand. I too sometimes see these cycles of strength and then slack, and then eventually it’ll strengthen again. It’s possible you over hydrated (it’s always a possibility), but I’d say add in another set or two of stretch and folds during bulk fermentation if it looks like the dough is still slack after the last set. I have a feeling it’ll strengthen up just fine by the end of bulk fermentation!
Ok good, thanks. My previous doughs actually never had great surface tension before the overnight proofing (didn’t use slap and folds though) but still had awesome results after baking.
My understanding is that this is very normal as the salt starts acting on the dough. Basically, keep going until it starts pulling itself back together, or just do more stretch and folds during bulk fermentation.
Ciao Maurizio,
thanks for the great resource! I have a question: is it normal the dough (specifically the outher skin) tears during the slap & fold? Especially with “stiffer” (72%) doughs, if I S&F after the autolyse, the dough appears to come together super quick, but after 1 minute or 2 the skin breaks. I usually just keep going until I have another skin, but I’m afraid I’m damaging it. Any ideas?
Fabio—yes, that’s pretty normal. It’s ok if this happens, there’s no worry about over working the dough. If it’s tearing excessively, you could try to flip the dough over and start slap and fold on the other side (which will work another area of the dough).
Thanks, that’s good to know!
Hi Maurizio,
I want to use this technique for your newest Super Soft sourdough rolls…would I do this instead of the stretch and folds or during the butter incorporation? I saw that you linked this from one of the comments left on that recipe. I don’t have a stand mixer so I’ll be doing all the mixing by hand! Thanks for any help!
I would still do both. I’d do a session of stretch and folds upfront (before adding butter) to strengthen the dough. Then add the butter and finish mixing in the bowl. Finish strengthening the dough off during bulk fermentation by doing stretch and folds in the bowl, it’ll likely still need more mixing!
Thanks so much! I’m in the process now, and coming up on the end of the bulk fermentation, and I’m not seeing much rise. I’m gonna do another series of stretch and folds, but should I also do a round of Slap and folds?
Is it cooler in your kitchen? If your dough is on the cool side it might need more time in bulk! I don’t usually do slap and folds that late in the process, but yes, another set of stretch and folds can help. You can also preshape and shape a little tighter to help give strength.
I actually decided to warm up my oven and use that as my proofing box and it really helped! Rolls came out delicious and light! I used your round pan suggestion, but they were a little darker on the bottom than I would have liked…should I drop the temp say to 400 or maybe only bake for 30 min instead of 40?
Yes, I’d try dropping the temperature!