


I’ve been thinking about this recipe for some time, and I’ve been tinkering with it for just about as long. I wanted to create a whole wheat sourdough bread that wasn’t all the way 100% whole grain, but still enough to bring out that assertive wheat flavor, gentle yet complex sourness, and also one that packs a nutritious punch. I wanted it to be light in hand, soft of texture, and be the right starting place for those who might not have had much experience with bread boasting a majority of whole grains.
This recipe is a beginner’s sourdough recipe but with more whole grains than not. A fifty-fifty whole wheat sourdough bread to get you and your family on the whole-grain train without them missing the characteristics of white flour. Typically, bread with a significant amount of white flour is lighter, more open, and loftier.
As you might know, I always like to experiment. To tinker. To change. Even when things are already working well I seem to dig in and just have to adjust. My previous work with whole wheat almost always utilized a stiff levain (around 65% hydration) but here I opted for 100% hydration liquid levain. I made this change mostly to see if the result would be all that different, but also because I wanted to add flexibility to this bread—knowing that I, or you out there, could make it with a stiff or liquid levain just the same. I find there are advantages and disadvantages to both but when it comes down to it as long as you adjust the total water in your recipe you’ll get a great result no matter which type of starter you maintain or levain you use.
Instead of a long levain build period, this formula calls for a shorter time from levain mix to using it in the dough. This is a handy thing to be comfortable with, it means you can get a strong, reliable levain ready to go in a shorter time period (about 3-4 hours instead of 6-7). Nothing groundbreaking here, but I like to highlight it upfront as something to add to your baking toolbox. The ability to adjust your levain to suit your schedule is handy and it means baking can revolve around our busy schedules and hectic weekends.
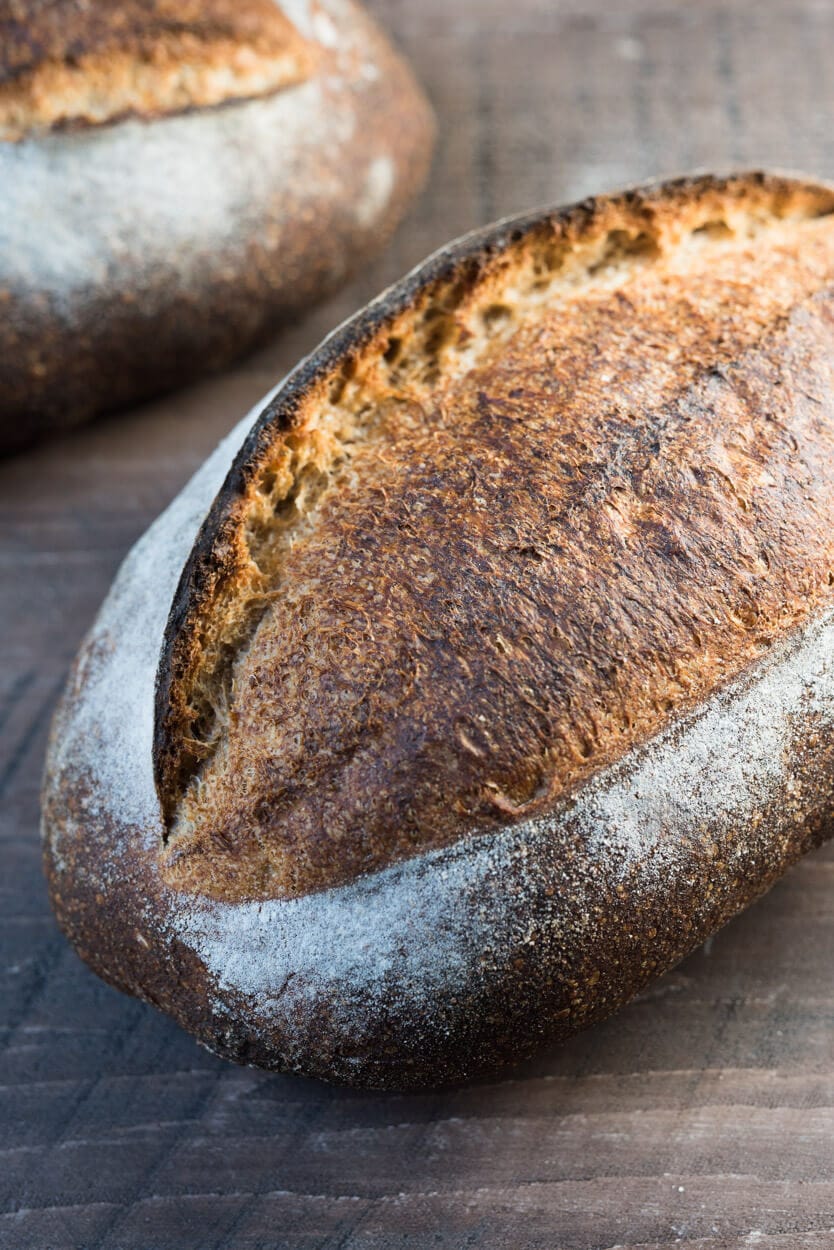
And finally, I played with baking this bread at a much higher temperature for a shorter period overall—I baked these fast and hot (and you can see that in the image above, a little more color all around and especially on top). Instead of baking on thick baking stones, I opted for a Baking Steel as my “deck,” which gets incredibly hot. More on this later, and before we delve into these things any further, let’s talk about flour.
Flour Selection
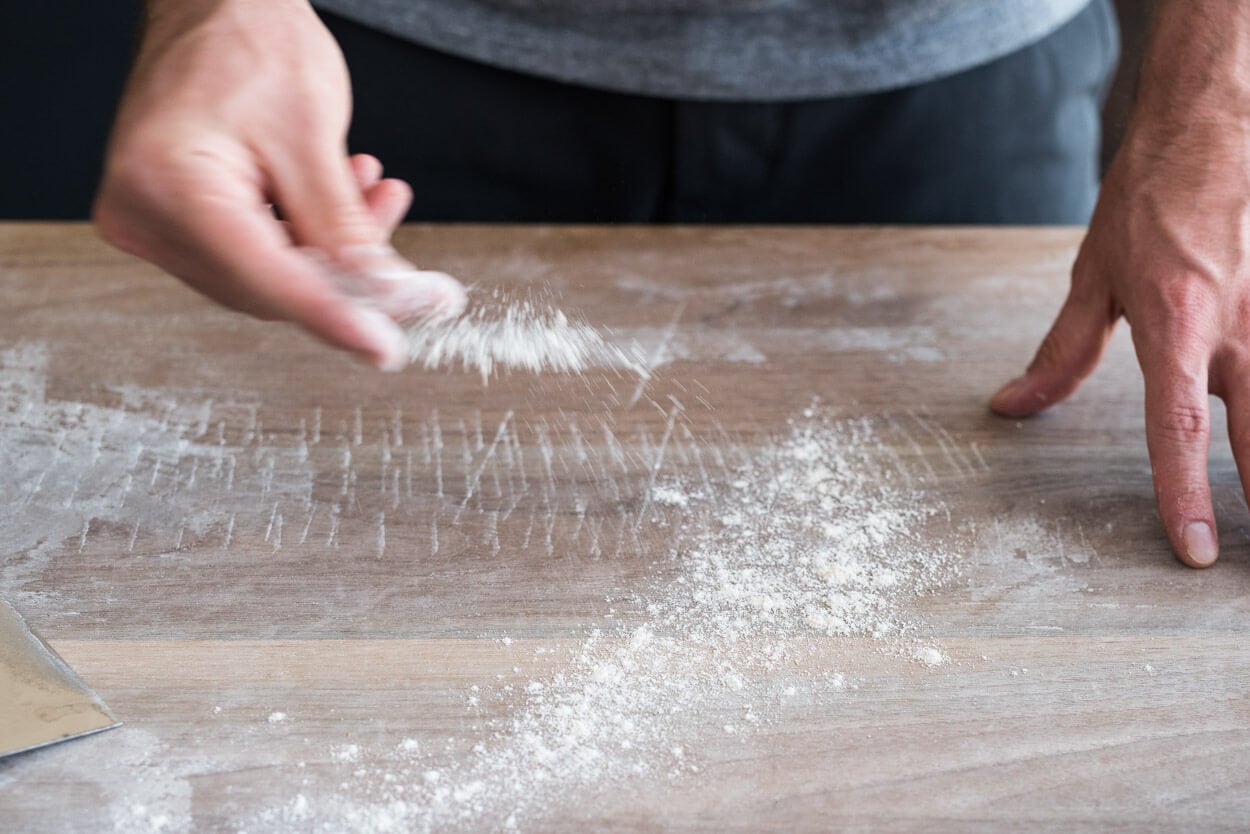
My whole wheat selection here is pretty straightforward, just a good quality stoneground whole wheat (and it’s actually the whole wheat flour I use most often here in my kitchen). In experimenting between stoneground and roller milled whole wheat flour I’ve found the flavor of stoneground whole wheat to be more assertive, deep and much tastier overall. Due to the method of milling, stoneground whole wheat preserves more of the bran and germ and these particles are clearly evident when passing the raw flour through your fingers. If you don’t have stoneground whole wheat a roller milled whole wheat (this is typically what you’ll find at the market) will work just as well, perhaps with a slightly different flavor profile and less assertive whole wheat taste overall.
Generally, I prefer the texture of lower protein white flour like Giusto’s or Central Milling Artisan Baker’s Craft (both which are around 11-12% protein). To me, these generally have less of a gummy texture and perform very well for extended fermentation times. If you don’t have access to this flour any “all-purpose” flour would work well here, including King Arthur all-purpose.
Fifty-Fifty Whole Wheat Sourdough Bread Formula
Vitals
| Total Dough Weight | 1,800 grams |
| Pre-fermented Flour | 5.00% |
| Hydration | 82.00% |
| Yield | 2 x 900g loaves |
Total Formula
Target final dough temperature (FDT) is 78°F (26°C).
This recipe is highly hydrated because there’s a high percentage of whole grains, which require more water in the mix (the bran and germ present in the flour can take on quite a bit more). If this is your first time trying this loaf, reserve 100g of the mixing water and only add it in if the dough feels like it can handle the addition.
| Weight | Ingredient | Baker’s Percentage |
|---|---|---|
| 476g | Whole wheat flour (Giusto’s whole wheat) | 50.00% |
| 238g | Medium-protein bread flour or All-purpose flour (~11% protein, Giusto’s Artisan Bread Flour) | 25.00% |
| 238g | High protein flour (~12% protein, King Arthur Bread Flour) | 25.00% |
| 781g | Water | 82.00% |
| 18g | Salt | 1.90% |
| 48g | Sourdough starter (100% hydration) | 5.00% |
Method
1. Levain – 12:30 p.m.
| Weight | Ingredient | Baker’s Percentage |
|---|---|---|
| 48g | Ripe starter | 100% |
| 24g | Giusto’s Stoneground Whole Wheat | 50% |
| 24g | Giusto’s Artisan Bread Flour | 50% |
| 48g | Water | 100% |
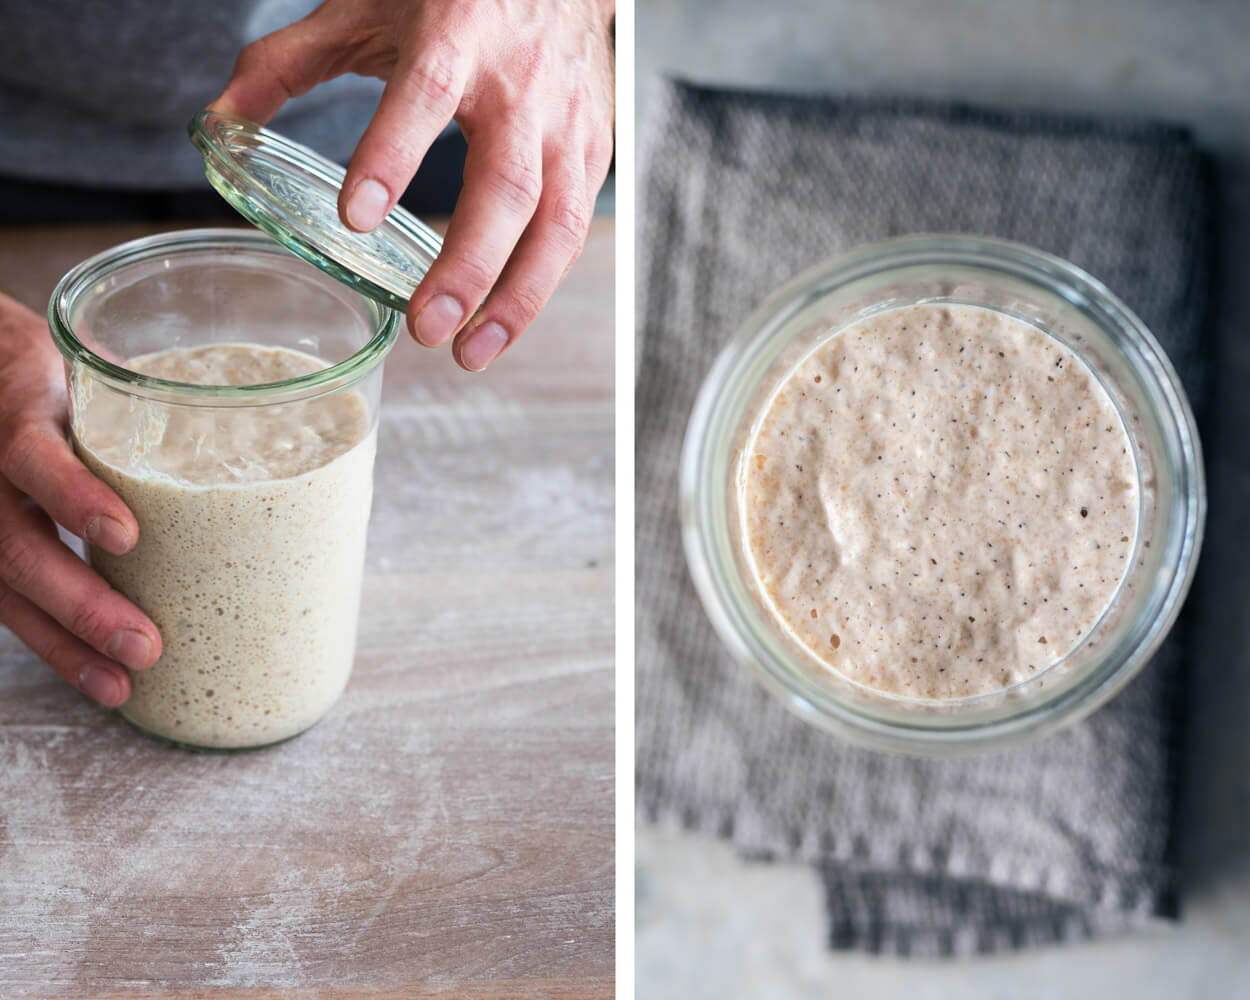
As mentioned earlier, I worked with a shorter levain build for this bread. To adjust for the reduced build time, we’ll increase our inoculation of ripe starter and the water temperature. This gets the whole process moving faster, and by the time you’re ready to use this levain, you’ll notice some significant activity. See my post on the importance of dough temperature for more information.
Build the liquid levain (everything listed in the Levain Build section above) in the morning or afternoon and store somewhere around 78°F (26°C) ambient for 3 hours.
2. Autolyse – 1:30 p.m.
Usually, with high percentages of whole wheat and/or bread flour, I lengthen the autolyse time, sometimes up to 5-6 hours. The two-hour autolyse in this recipe, while not as long as 5-6 hours, helps the high percentage of whole grains fully hydrate and starts the gluten development process without mixing. This will help reduce the total mix time required later in the process.
See my guide to the autolyse technique for more information on its benefits and why I used this technique in this recipe.
| Weight | Ingredient |
|---|---|
| 453g | Whole wheat flour |
| 214g | Medium-protein bread flour or all-purpose flour |
| 238g | High protein flour (“bread” flour) |
| 634g | Water (100g was held back until Mix) |
Mix the above ingredients in a bowl until all dry bits are hydrated. Cover the bowl and store somewhere warm for 2 hours.
3. Mix – 3:30 p.m.
| Weight | Ingredient |
|---|---|
| 143g | Ripe levain |
| 18g | Salt |
| 100g | Water (reserved from Autolyse step) |
Add the called for ripe levain to your autolysed dough and using about half of the reserved 100g of water mix thoroughly with your hands. You want the levain to be pretty well mixed through the dough and the added water absorbed.
Let’s mix/knead. I chose to do slap and fold for about 4 minutes, just until the dough started to show signs of a smooth surface and it was catching some air. If you aren’t comfortable with slap/fold method or don’t like it, you can do stretch and folds in the bowl until your dough tightens up and becomes slightly hard to stretch out and fold over. Medium development.
When finished mixing spread the salt on top of the dough and the remaining water to help dissolve. Pinch through the dough thoroughly and fold the dough over itself to help incorporate and absorb the remaining water. When finished transfer the dough to a tub or thick-walled bowl for our first rise, or bulk fermentation.
4. Bulk Fermentation – 3:40 p.m. to 7:10 p.m.
At 78-80°F (25-26°C) ambient temperature, bulk fermentation should go for about 3 hours and 30 minutes. Give the dough 5 sets of stretch and folds during this time, spaced out by 30 minutes. Keep an eye on the dough as it approaches the three-hour mark. It will rise a bit and be quite active! See my sequence of images below to get a feel for how the dough should look and feel during the 3.5-hour rise.
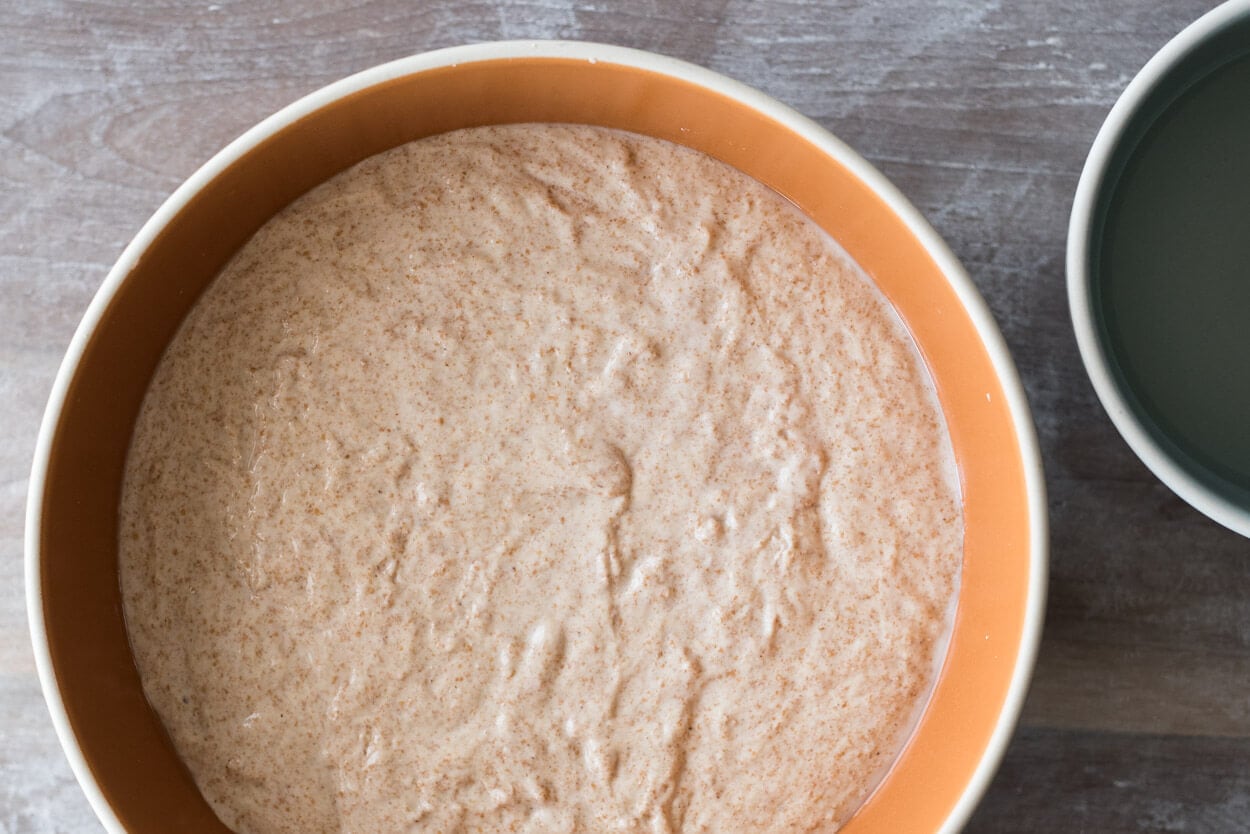
Above is a picture of my dough after mixing and right at the beginning of bulk. You can see how shaggy the dough is, how wet and lifeless—it’s just sitting there in a single flat layer. There’s no rounding between the edges of the dough and the bowl, no bubbles anywhere, and if you jiggled the bowl you wouldn’t see much movement.
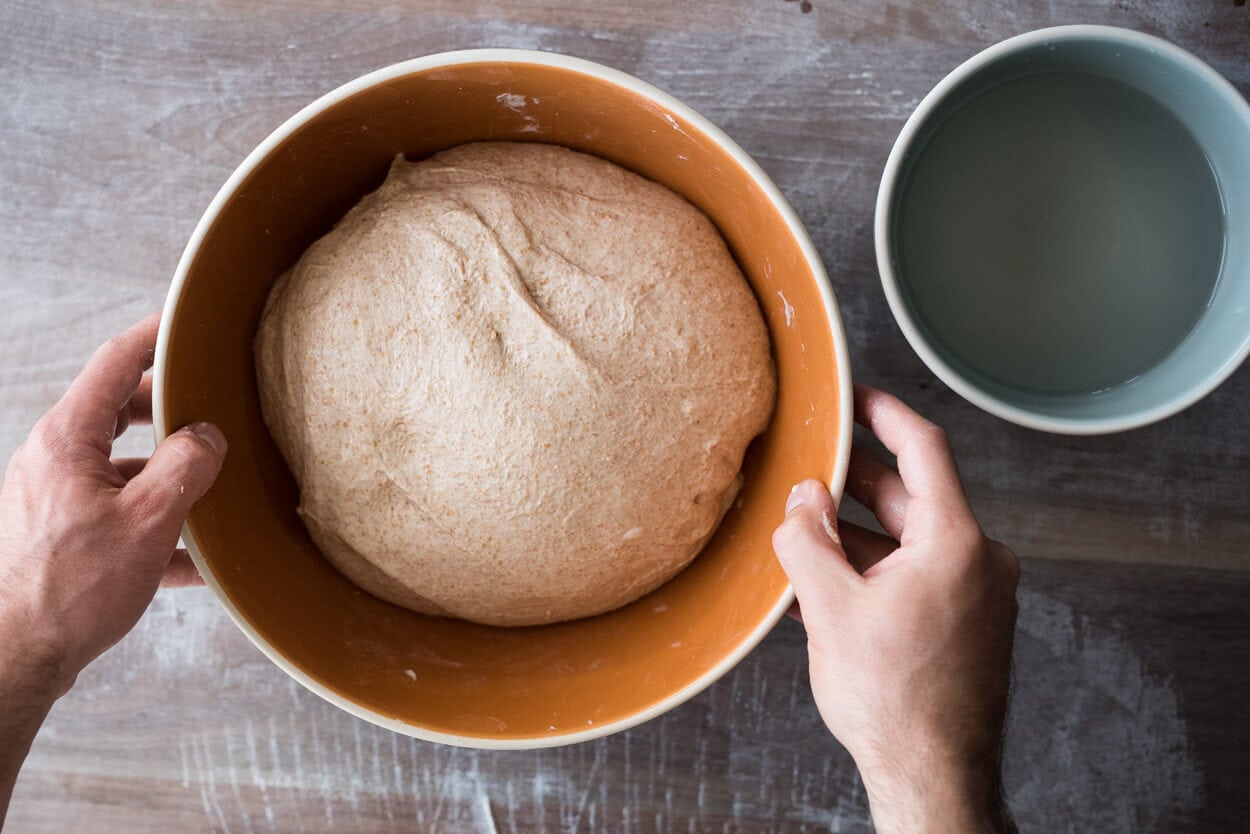
Above is my dough after the fifth, and last, set of stretch and folds. Look how strong the dough has become compared to the picture above. It’s holding its shape in the bowl extremely well—this is a sign for me that the dough is now strong enough and no further strengthening is needed. I will now let the dough rest, relax and rise the remainder of the time specified for bulk fermentation.
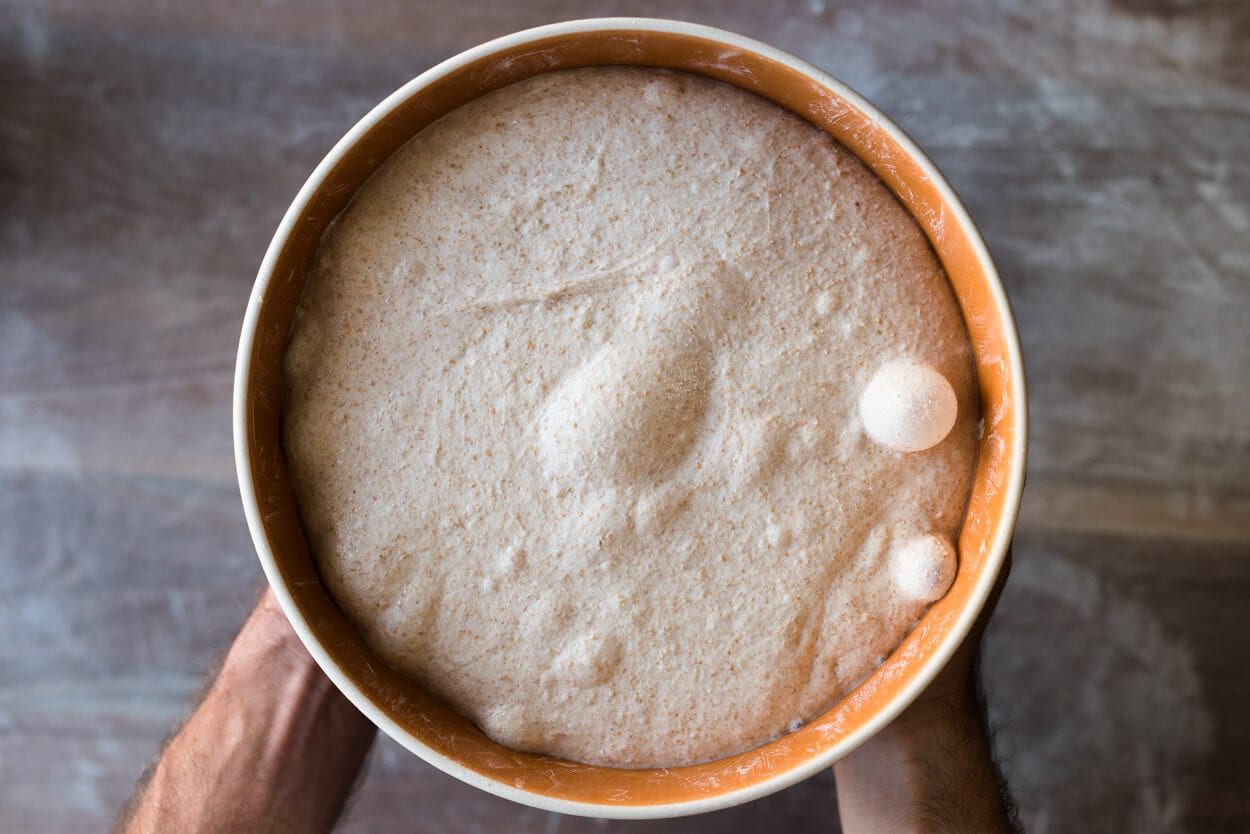
I called bulk fermentation quits when I saw the dough reach the point seen in the picture above. You can see it’s risen significantly, there are plenty of bubbles on top and just below the surface, and most importantly, the edge where the dough meets the bowl is domed & convex.
If I were to wet my hand and tug on the dough a little I’d feel much more resistance and elasticity—the ability of an object or material to resume its normal shape after being stretched or compressed. It’s gained strength and can hold its shape much more than at the beginning of bulk. These are all good signs your dough is strong enough and ready to be divided.
5. Divide & Pre-shape – 7:10 p.m.
Gently dump out the dough from your bulk container onto an un-floured work surface. Divide in half and pre-shape the dough into two round boules. Let the rounds rest 20 minutes uncovered.
6. Shape – 7:30 p.m.
Prepare two baskets that will hold your dough during its long cold proof overnight. If you decide to shape the dough as two boules (rounds), find two round kitchen bowls, and if you decide to shape it as a batard (ovals), use two bread baskets. Line the baskets with cotton or canvas liners if you have them, clean kitchen towels if not, and dust them lightly with white rice flour to prevent the dough from sticking during the proof.
Moderately flour the top of the dough and flour the work surface. Flip one resting round over, so the floured side is down on the work surface. Fold the dough’s top up and over to the middle and repeat for the bottom (you’ll now have a long slender rectangle in front of you). Pickup the rectangle and rotate it 90º, so it’s now lengthwise facing you. Grab the dough at the very top and fold over a little way, press to seal with the dough’s central mass. Now grab this rolled over the top and gently continue to roll it down towards the bottom, tucking in the dough as you go (imagine rolling down a beach towel). At the end of this, you’ll have a tube that has essentially been rolled downward. Once shaped, transfer each to their floured shaping basket with the seam side facing up.
For an in-depth guide to shaping like this, see my batard shaping guide.
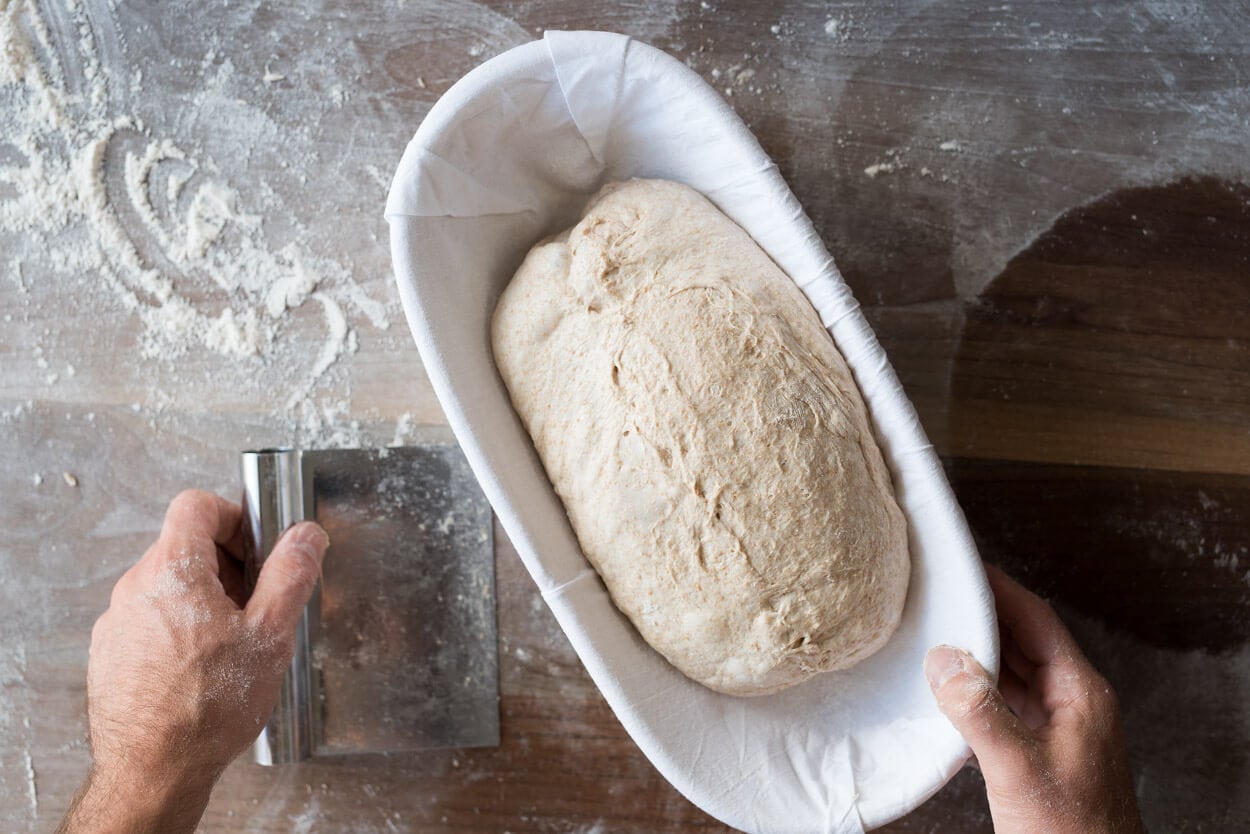
Repeat with the other round.
7. Rest & Proof – 7:35 p.m.
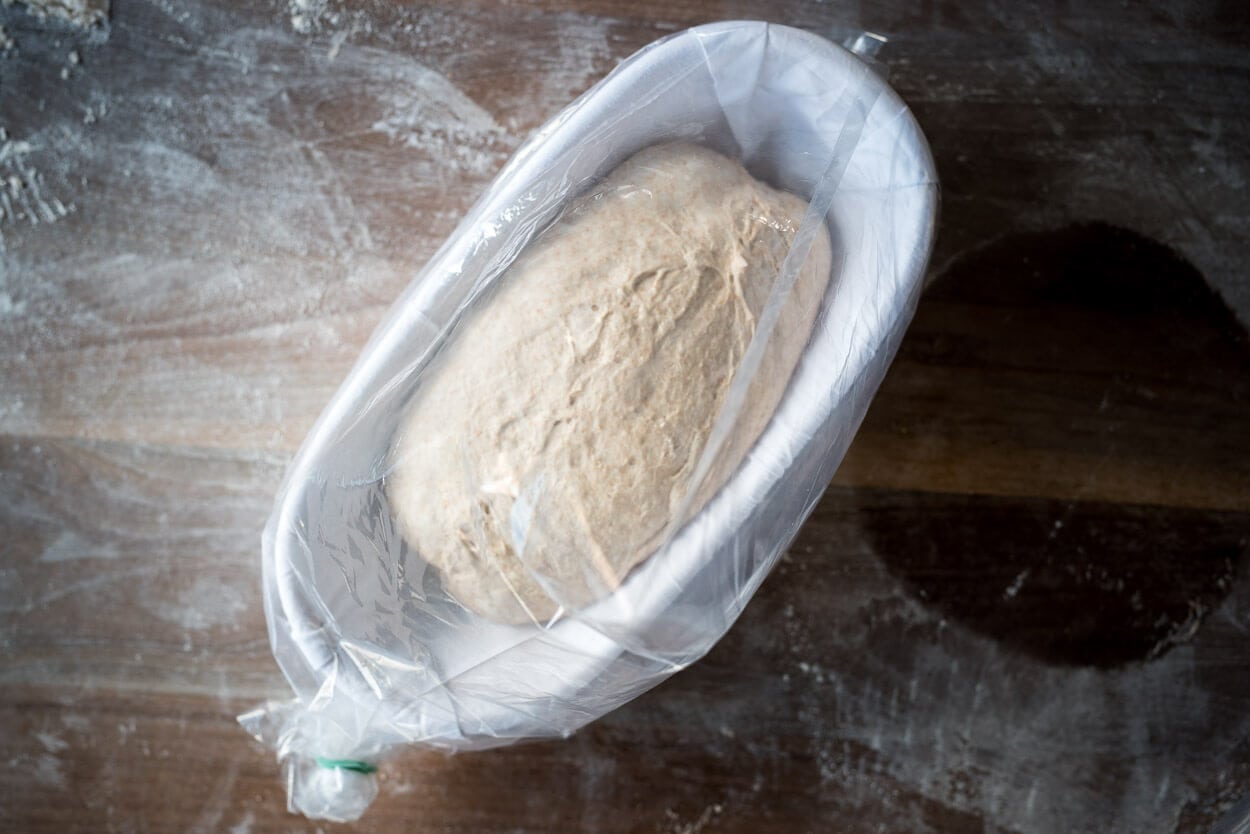
Cover your baskets with plastic and then place them in the refrigerator to proof at 39°F (4°C).
8. Bake – Next Morning: Preheat oven at 8:30 a.m., Bake at 9:00 a.m.
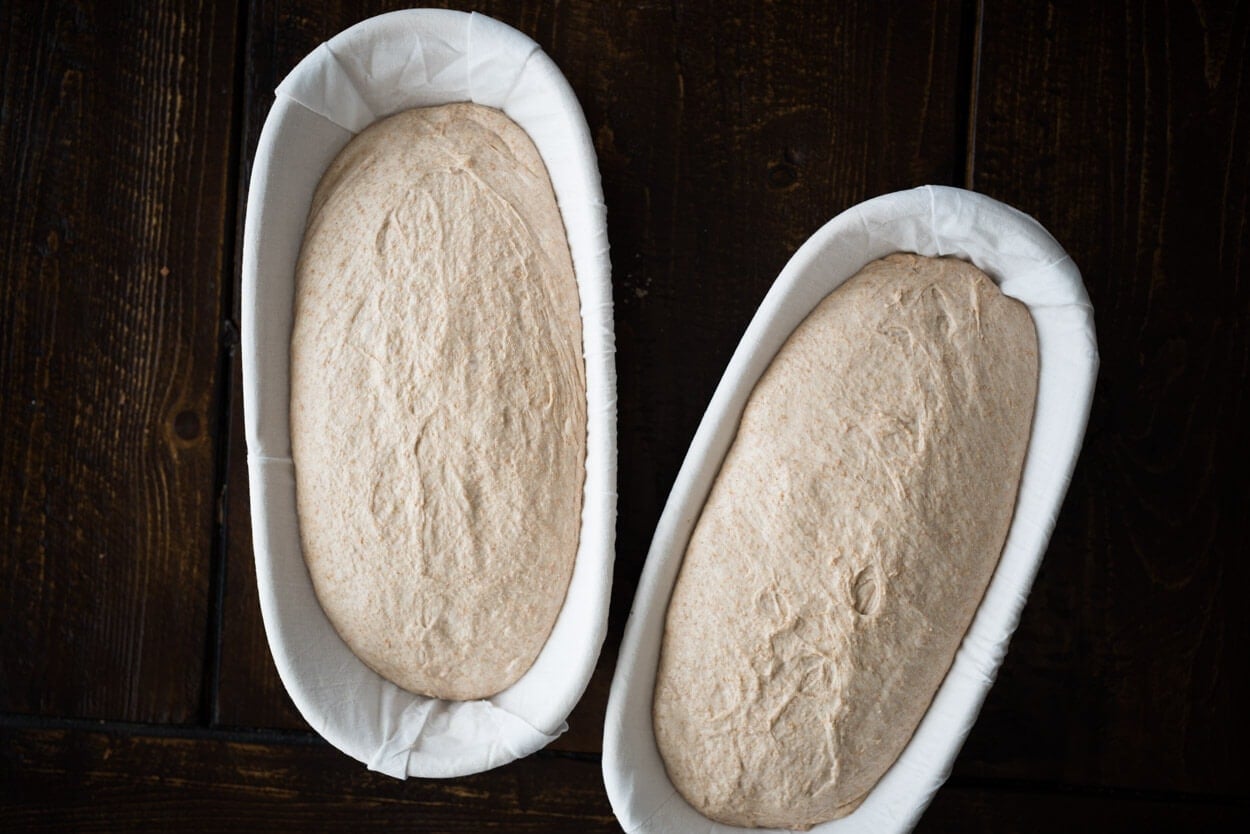
Place your Baking Steel in your oven and preheat for one hour at 450°F (230°C). Once preheated, take out both of the baskets from the fridge and remove the plastic wrap.
You’ll notice my dough has risen somewhat but not a significant amount. Instead, the dough has relaxed to fill my proofing baskets and is perhaps a little puffier (the loaf on the right was a slightly higher final dough weight and will result in a larger loaf).
Cut a piece of parchment paper to fit over the top, place it over the basket, and then place a pizza peel or small cutting board over the top. Quickly invert each basket onto the parchment and peel/board. Using a sharp razor blade fastened to a stick, scissors, or a very sharp knife, carefully score the top of each loaf at a shallow angle to the dough, just deep enough to cut below the top skin created at shape time. I like to score whole wheat loaves with my bread lame at a very shallow angle; this helps the loaf attain maximal rise when in the oven. If you score at a straight 90° angle with the dough, then as the dough rises, it sort of splits open instead of peeling back.
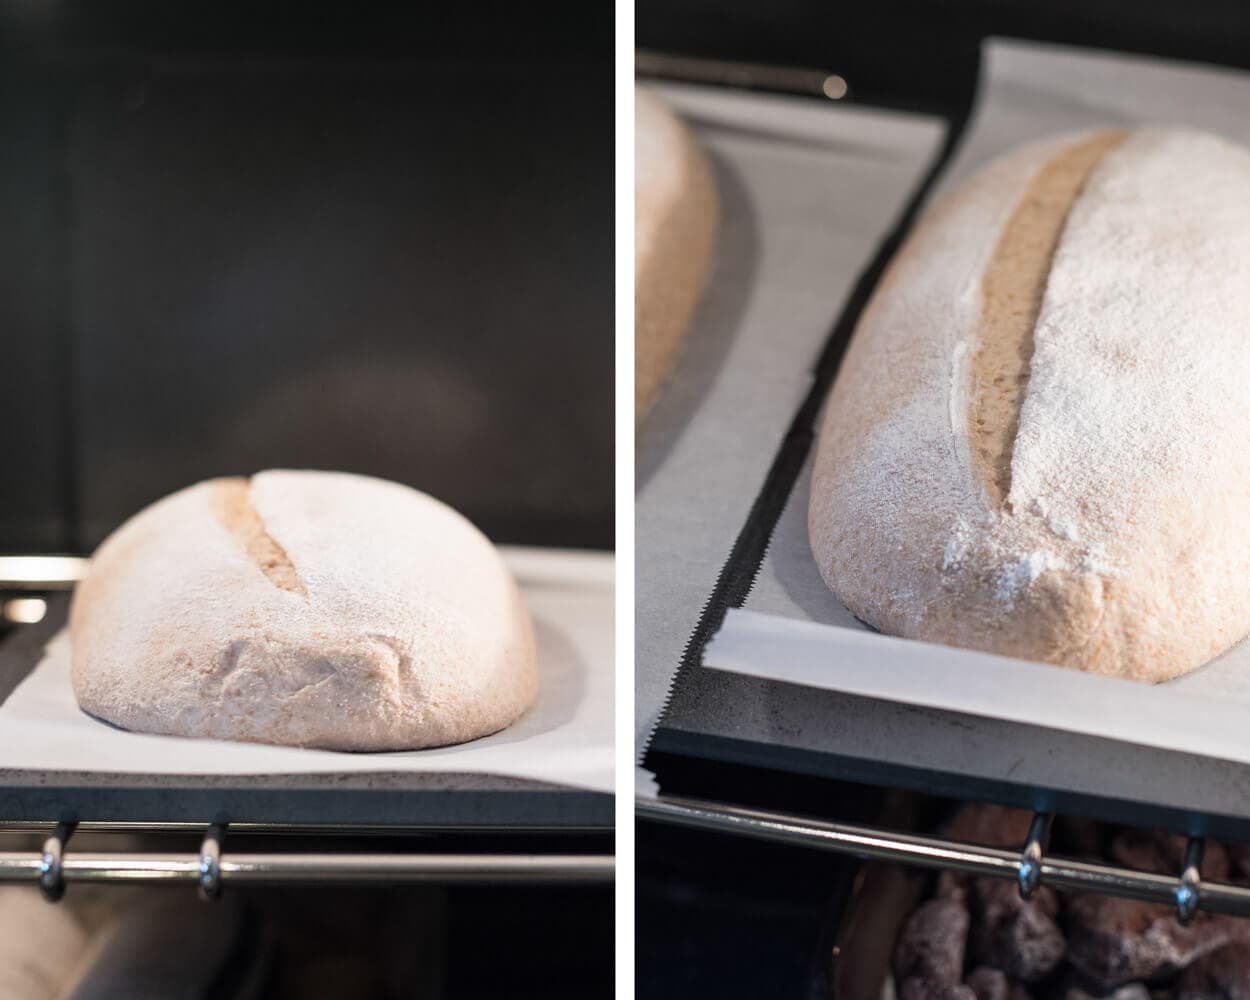
I steamed my oven in my usual way, described here in my post how to steam your home oven for baking. I baked these loaves hot and fast. The goal was to bake the exterior to a nice dark color, and also bake the interior, but take the loaves out before they completely dried out inside. I like my loaves with whole wheat to be much more tender and moist, and I found this baking schedule achieves that.
Bake for 20 minutes, then remove the steaming pans from inside the oven. Then, bake for an additional 30 minutes until the internal temperature registers around 206-210°F (96-98°C). Keep an eye on these from the middle of the bake all the way to the end as the prolonged high temperature can quickly scorch the outside of the loaves.
Note: these times and temperatures work well when baking here at a high altitude (about 5280 ft. above sea level) and in my environment. The first time you try this recipe, keep a close watch over the dough in the oven to adjust as necessary.
For an alternative to baking on a hot surface, check out the Challenger Bread Pan, which is a large cast-iron pan able to bake these batards with no problem.
Remove from the oven and cool on a wire rack for at least 2 hours. Be sure to store the bread properly to keep it fresh for a week or longer.
Conclusion
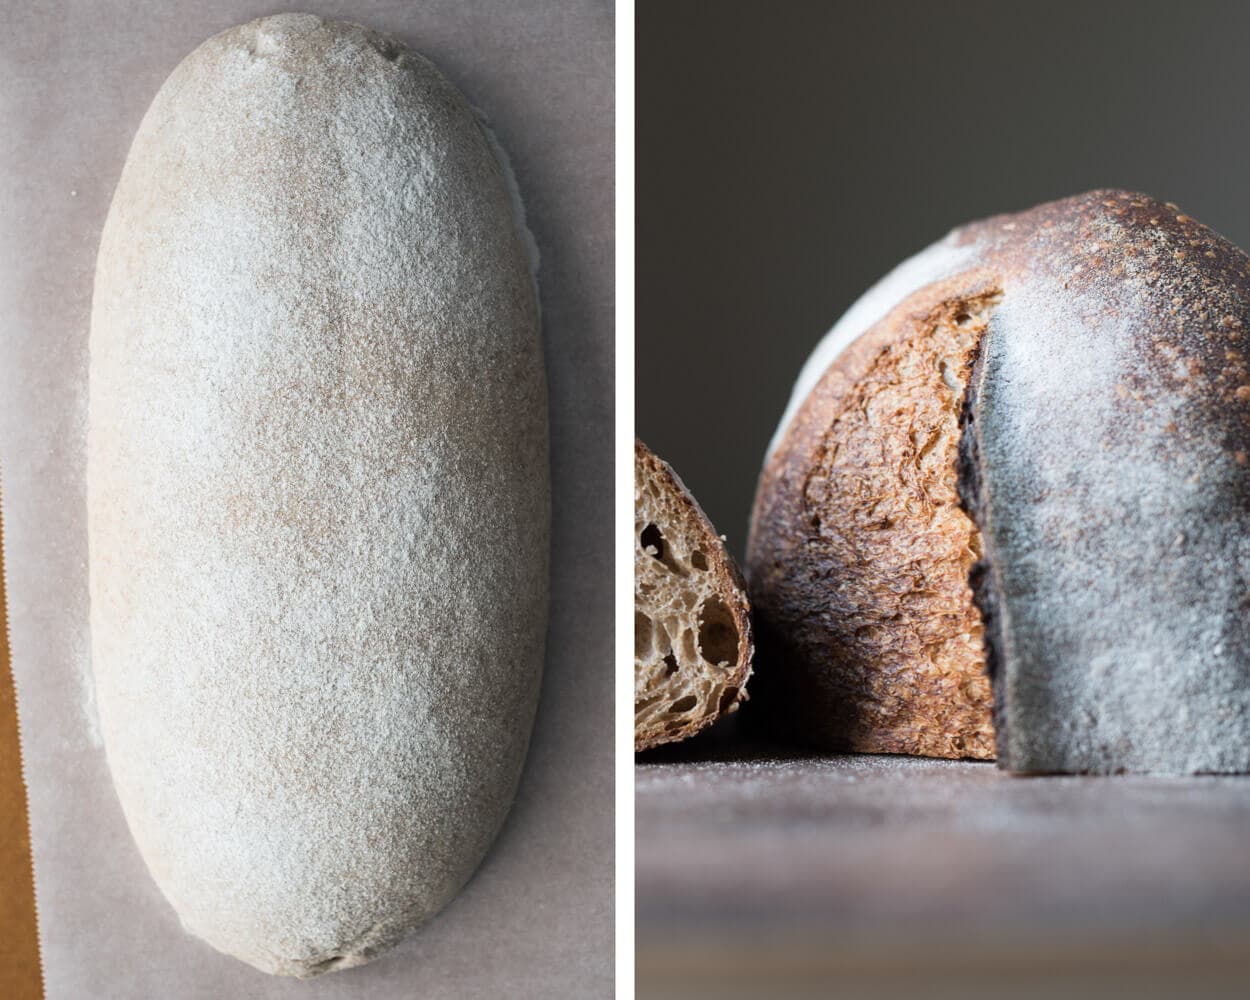
With this much whole wheat, it’s always a challenge to get a tall and airy loaf, but the addition of the bread flour, high hydration, and relatively tight shaping have helped achieve that. Along with the nice rise, the soft and tender interior and dark, crunchy crust play off each other to create a balanced bread that is flavorful and light in hand.
One modification I’d love to try is to use white wheat instead of red wheat for the 50% whole wheat portion. White wheat is one of my favorites to use, mainly because of its mild, laid-back flavor, but also I conveniently have a new 25-pound bag of raw white wheat berries sitting in my pantry ready to go (and nowadays it’s almost always used in my weekly sourdough sandwich bread). This change might reduce this bread’s overall assertiveness, but it would be exciting to see the flavor profile difference.
Crust
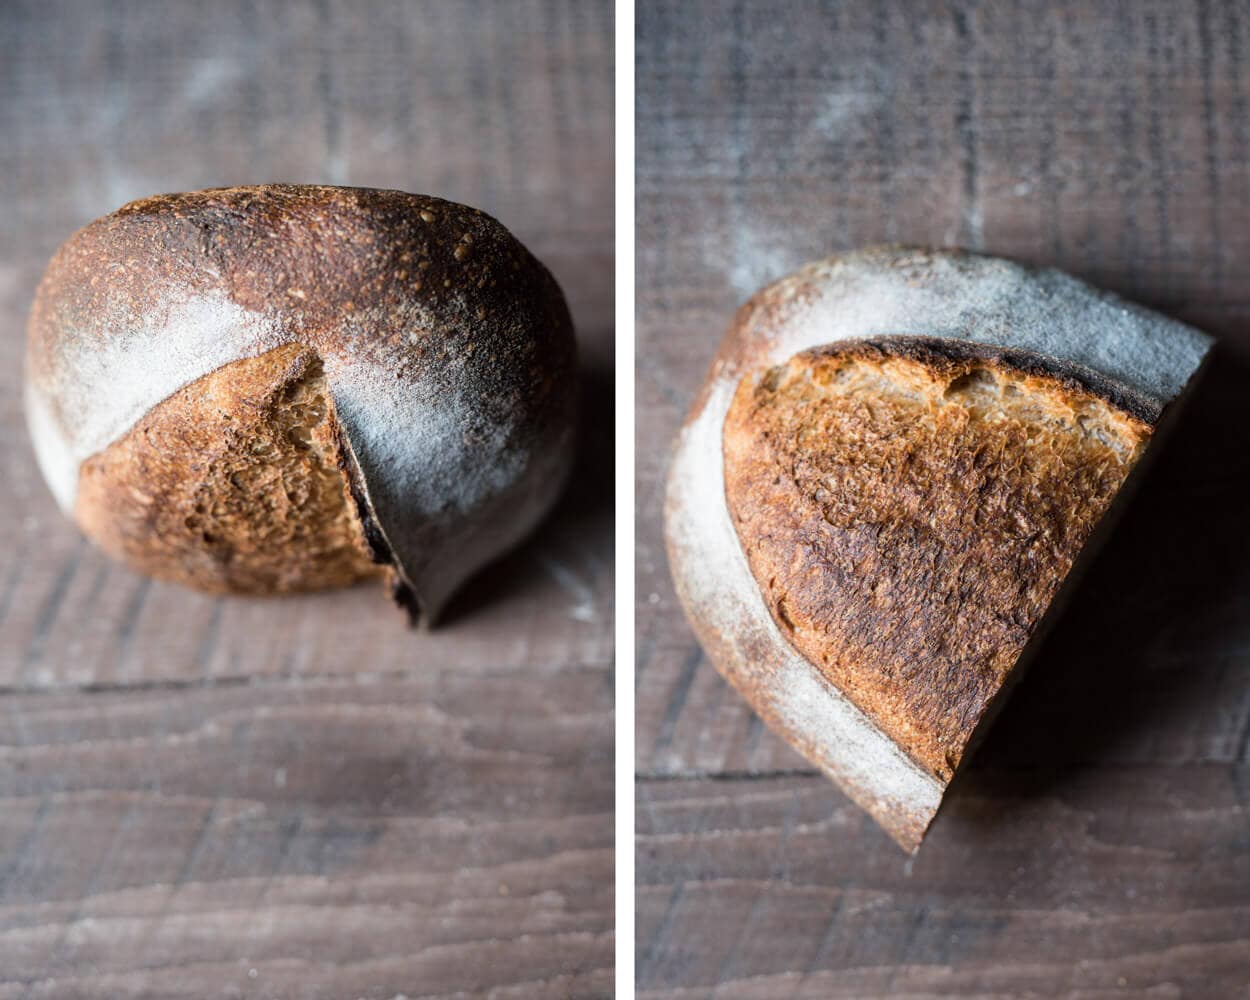
I love this dark crust, and because of the hot bake, the interior did not dry out in the slightest. Sometimes it can be hard to achieve this, but a minor tweak to the baking schedule really did the trick. I plan to try this in the future with my other recipes. The crust results speak for themselves!
I almost always prefer the batard shape over a boule, mainly because of how the bread slices up (not too wide and a little taller), and this bread is no exception. I enjoy how the crust peels back as the bread opens in the oven. It contributes to that tall loaf with a really pleasing aesthetic.
Crumb
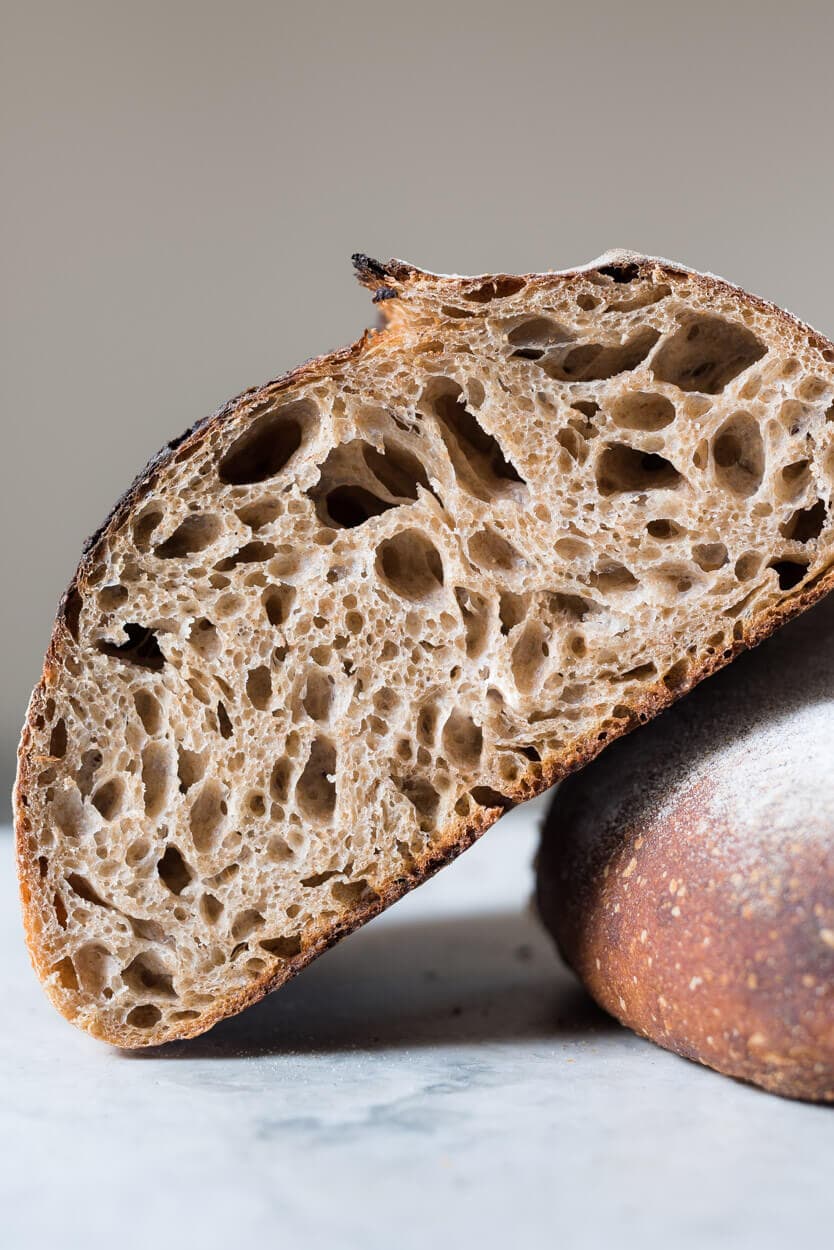
For 50% whole wheat, I couldn’t be happier with the crumb. As you know, the higher you go in whole grains, usually, the denser your bread will be, but I think the relatively high hydration and a mix of flours have helped achieve a really light loaf that has uniform openness throughout.
Taste
This bread has an assertive wheat flavor but not so much that it’s overpowering; it really showcases the stoneground wheat and doesn’t let it play the second role here. There’s a tad more sourness peeking through, but it’s actually a very complimentary flavor to the wheat, adding a touch more complexity and depth. I’m not big on overly sour bread, and for me, this was just right.
If you’d like more sourness, try to proof a bit longer or add even more whole grains, and if you’d like less, do the opposite. Just be wary of the timetable I’ve laid out here when modifying the whole grain percentage. As you know, more whole grains means increased fermentation activity.
I like the idea that this recipe is a starting point for those who might not have a lot of experience working with whole grains (or even if you do!). With this gateway bread, you can adjust the whole wheat percentage up or down to suit you and your family’s tastes. It’s a good jumping-off point with a majority of whole grains and a base formula for our endless tweaking and testing in search of that perfect loaf.
Buon appetito!
Print
Fifty-Fifty Whole Wheat Sourdough Bread
- Prep Time: 24 hours
- Total Time: 24 hours
- Yield: Two 900g loaves
Description
A delicious loaf of sourdough bread with 50% whole grains. This bread is airy, light in hand, and it has a deep, complex flavor profile from the assertive wheat and fermentation flavor.
Ingredients
Levain
- 24g medium protein bread flour (or all-purpose flour)
- 24g whole wheat flour
- 48g water
- 48g ripe sourdough starter
Autolyse
- 453g whole wheat flour
- 214g medium-protein flour (or all-purpose flour)
- 238g high-protein bread flour
- 634g water
Main Dough
- 18g salt
- 143g ripe levain
- 100g water
Instructions
- Levain (12:30 p.m.)
In a small container, mix the Levain ingredients and keep it at a warm temperature for 3 hours. - Autolyse (1:30 p.m)
In a medium mixing bowl, add the autolyse ingredients and mix until no dry bits remain. Cover the bowl and let rest for 2 hours. - Mix (3:30 p.m.)
To the mixing bowl holding your dough, add the levain and a splash of water. Mix thoroughly and strengthen the dough for about 4-5 minutes. Add the salt, another splash of water, and mix until incorporated. Strengthen the dough further if necessary until it’s elastic and smooth. Transfer the dough to a bulk fermentation container and cover. - Bulk Fermentation (3:40 p.m. to 7:10 p.m.)
This dough will need 5 sets of stretch and folds during bulk fermentation, at 30-minute intervals. After the last set, let the dough rest for the remaining time in bulk fermentation. - Divide and Preshape (7:10 p.m.)
Lightly flour your work surface and scrape out your dough. Using your bench knife, divide the dough in half. Lightly shape each half into a round shape. Let the dough rest for 20 minutes, uncovered. - Shape (7:30 p.m.)
Shape each piece of dough into a round (boule) or oval (batard) and place the dough in proofing baskets. - Proof (7:35 p.m. to 9:00 a.m. the next day)
Cover proofing baskets with reusable plastic and seal shut. Then, place both baskets into the refrigerator and proof overnight. - Bake (The next day, bake at 9:00 a.m.)
Preheat your oven with a baking surface or combo cooker/Dutch oven inside to 450°F (230°C).When the oven is preheated, remove your dough from the fridge, score it, and transfer it to the preheated baking surface or combo cooker. Bake for 20 minutes with steam. After this time, vent the steam in the oven or remove the lid (you can keep it in the oven or remove it) and continue to bake for 30 minutes longer. When done, the internal temperature should be around 206°F (96°C).
Let the loaves cool for 2 hours on a wire rack before slicing.
If you use this recipe, tag @maurizio on Instagram so I can take a look!


646 Comments
Hi, I tried this recipe and didn’t manage to get any oven spring. I’m not sure where my main issues lie. I used 50% all purpose flour instead of bread flour, because that’s all I could find, but my 50% whole wheat flour (King Arthur) had a high 14% protein content, so I figured that would help. To compensate, I lowered the hydration from 84% to 80%. I also only managed to fit in 3 coil folds before the bulk fermentation was done, so I might not have gotten enough gluten development. When shaping the batards, they didn’t really hold their shape well, and even after a 16 hour cold proof, they could barely hold their shape. I’m worried I might have degassed them somewhat during shaping because they kept sticking to my hands, but the bigger issue is the lack of strength.
Maybe lowering the hydration to 70 or 75% could make this easier to manage?
Sorry to hear that, Ian. Yes, I’d drop the hydration a bit more and see if you can give it a bit more strengthening upfront after mixing everything together. You can do folds in the bowl, slap and fold, or do a more vigorous stretch and fold for that first set in bulk fermentation.
Hi -I love this recipe. I baked it last weekend and it turned out amazing! As it’s getting hotter, I was wondering if you have a recipe that requires an evening bake? Or if there’s part of this recipe I can adjust to a summer schedule. Thank you!
You could do this as a same-day bake: instead of proofing it in the fridge, proof it on the counter for 1-2 hours until ready to go into the oven. You could also shift the entire schedule so the loaf goes into the fridge for the proof later, and then the next day, let it stay in the fridge until the evening to bake — that should work well!
Was looking through the comments for this, thanks Maurizio! I usually feed my starter before bed so it’s ready early in the morning, so mixing the levain at 12:30 is too late for me! Same day bake for this is perfect.
Hi! I’m very new to sourdough bread or baking in general and absolutely love your recipes. I’ve baked 4 batches (2 loaves each) in 8 days 😀 Just a quick question though, I’ve baked this on Tuesday and I swear the recipe was a little different, mainly it called for diastatic malt powder, and I’m preparing to make this now and the recipe changed?! Am I losing my mind or did you update the recipe?
I thought I was losing my mind too! So happy you said something…I wrote the recipe down last week and it definitely had diastatic malt in it.
Glad to know that I’m not completely crazy lol. I went everywhere to find diastatic malt, eventually found it at a Korean grocery store, so I really want to use it!
I also thought I was losing it when I didn’t see the diastatic malt there! Very confusing that it was changed without commentary…I ended up using the notes above from Natalie but my levain was with the new measurements- hopefully it’ll still work!!
See my reply on why I removed it, above, Sophie! Sorry about the confusion.
Thanks so much for your reply Maurizio! Did the levain instructions change as well? I notice Natalie’s post has different amounts of flour than the new recipe. If so- why did that change too? I used the new levain instructions but Natalie’s post with old flour amounts and I’m a bit concerned it won’t work.
Yes, because I removed the malt the entire formula changed in response. So sorry about this! Just be sure to use the levain when ripe and it should work out just fine, though. Next time I’d switch over to the formula as listed here in this post.
I thought I was going mad!. I have my note book with the original
recipe so nver really check the www now for ingredients so when I
checked the process noticed the ingredients were different..But it was
too late by then and I used my notebook reference which I can see now is
the “old version”. So where is your reply Maurizio explaining why you
removed it please ?
Yeah, it was 10g I beleive added for the autolyse. I’m interested to know why he changed it.
I followed this recipe and they came out beautifully but I’d like to know if he posted the old version somewhere or anyone has the measurements.
In my notes for the previous 50/50 recipe I have:
For Levain:
40g Starter
40.3g Giusto’s Stoneground Whole Wheat
40.3g Giusto’s Artisan Bread Flour
80.6g H20
For Dough:
466g Giusto’s Stoneground Whole Wheat
244g Central Milling High Mountain Bread Flour
222g Giusto’s Artisan Bread Flour
805g H20 (this is for 86% hydration, recipe stated this was very wet and to experiment with 78%-80% hydration, 730g-750g if you were not comfortable with high hydration)
10g Diastatic Malt
21g sea salt
132g Levain
Hope this help!
Thanks for posting that, Natalie!
See my reply above, Karl!
Sorry about that, Andrea! Yes, I removed the diastatic malt after baking this loaf so many times for so long — it’s really not needed given the high percentage of whole grains. Sorry about the confusion, I should have added a note in the post!
No worries! I just thought I was losing my mind and somehow copied down the wrong recipe 😂 thank you!
Hi there! Question. When you say in the dough formula, that the formula is the final dough and does not take into account the levain.
That is very confusing. Do we subtract the Respective flower and water weight of our levain from the final dough formula, or do we make the final dough formula and then add the levain to it?
Sorry for the confusion, I’ve been meaning to come back and update that to be more consistent with my latest recipes. Just mix everything in the recipe listed as-is, no deductions or subtractions are necessary.
Thank you! I’ve made this loaf several times and love the flavor. I have a hard time getting a good spring though.
I retard during the final rise for about 24 hours. I’ve had horribly under-proofed cavernous loafs, and good but fairly flying saucer shaped loafs.
I’ll give it a few more attempts and play with the bulk fermentation time and final rise time. I added <1% malt to help the structure.
Sounds like perhaps the dough was under hydrated! This dough has quite a high hydration, it shouldn’t have dry lumps at all 🙂
Made half recipe just to test. My starter wasn’t ready in time so I did the autolyse overnight. Did not do the shape step in the fridge just let it rest for 30 mins. All came out fine. The dough was not sticky as long as I used wet fingers , which is how I used up the reserved water. Also when incorporating the salt I just put it in my finger water rather than sprinkle. Hope this helps someone to combat sticky dough. Longer and cold autolyse I believe is required.
Dissolving the salt in a bit of the mixing water will definitely help it incorporate more easily!
I missed pre-shaping the dough is that ok?
Totally fine, just be sure to shape a little tighter and/or take extra steps shaping if necessary.
Why does this always turn out as a sticky sloppy mess at stage 5? Even with 50g less water!
Sounds like over hydration, as you guessed. Try dropping the water even more, perhaps 150g, and see if that helps. It’s all very dependent on the flour you’re using 🙂
Hi! I’ve baked this loaf a couple of times in the past – it’s always great! The one thing that I can’t seem to get right though is my dough consistency, post autolyse. I often find that even after the addition of levain, water, salt, the dough is already pretty stiff. I feel like it ought to be more slack than it is, especially at such an early stage. I often have to pull my do apart for each turn. I don’t think I’m overdoing the slap and fold, but full disclosure, I’ve been using AP flour instead of bread flour. What do you think?
That’s interesting. If it’s overly stiff usually increasing the hydration will help and decreasing the amount of strengthening done as well. I’d say try increasing the hydration slowly, perhaps just 25g the first time, and see how that goes!
Hi: I’m confused about the levain amount. The levain build adds up to 150g, but the dough formula lists 132g “Mature, liquid levain”. Should it be 150g or is there a reason for its being less? Thank you!
There’s a little extra levain built into this recipe, use only 132g called for in the mix!
Would love to see a video of your mix for this recipe. I have tried it several times and reduced the hydration to 78 percent but even then it is a very sloppy mess when adding the extra water with leavin and then again with Salt. I end up doing more slap and folds after the salt and water addition. Should it be that soggy then? Will adding the extra slap and folds after the salt mix in mess with the process? Thank you! Loving this blog!
I was wondering the same! I found myself making 50/50 white/wheat after flour shortage due to Covid. Bread flour was short in supply. My usual SD recipe was not as good as usual so I went to find a more wheat suitable recipe and found this. The autolyse and high hydration produced a much better loaf than my usual. However, like other folks, I have a hard time when I get to the water/salt addition, and I feel like I’m doing something wrong with the soggy mess. I’ve made this recipe a few times, and I usually just keep slap and fold until it comes together. But the instructions say to slap and fold for 4 minutes. Which I do to incorporate levain, but after adding water and salt, I go way past 4 minutes and wonder if perhaps I overwork the dough. Just now, I did the stretch and fold in the bowl method, and after adding salt and water in last step, definitely left it a little soggy. I trust that the following 5 stretch and folds will help it come together. I’ll let y’all know tomorrow morning if it’s better than last time. I’m also using my Alaska gold rush starter this time which is just a bit more active (it’s a beast) than my homemade which is about 5 years old, but not quite as bubbly, and earthy smelling, as my Alaska.
This is definitely a wet dough, and it might be even more so with your flour (it’s very dry here and I typically add a bit more water to my mixes). You can certainly add in more sets of slap and fold as necessary to strengthen the dough, but I’d say drop down to 75% hydration and see if that helps first! It’s definitely ok to do a second round of slap and fold after adding the salt. The dough will break apart a bit, but it will eventually come back together and accept more strengthening.
Alternatively, you could omit that second set of s/f and add in more sets of stretch and folds during bulk to finish strengthening.
Thanks so much Maurizio for the amazing and detailed recipes. I was a bit confused about—if I am making this recipe for 50/50 whole wheat but using a dutch oven instead of a baking steel—whether I should follow the baking temperatures and times in the dutch oven baking guide (475–>450?) or the temps and times in this recipe (500–>450). But, I experimented and did both, starting with the 500–>450. It was delicious but a bit dark on both top and bottom, so on the second loaf in the dutch oven I went with 475–>450. Oddly it didn’t seem to make any difference. Both were very dark and took the same amount of time to cook.
I used 50% stoneground whole wheat and 50% AP flour. No bread flour. My mixture definitely seemed too moist at the slap-and-fold stage so I added some more flour. Next time after reading a lot of comments I see that I should probably have withheld some water when going with AP flour instead of bread flour.
Not sure what happened but ended up with a sloppy wet mess for step 7. Couldn’t get a neat boule for the proofing basket at all. That’s after the 5 stretch and folds and 5.5 hours of bulk fermenting. Any thoughts?
I’m also new to bread making but I did read (and have noticed in my own baking) that too long a bulk can over ferment the dough and it basically turns to shapeless glue. My somewhat-amateur advice would be to keep on eye on the dough rather than the clock to make sure you’re not over-fermenting.
Hi Maurizio! I’ve been reading your columns for several months and have been a sourdough baker for about 20 years. My standard process has been Peter Reinhardt’s San Francisco sourdough, with a barn starter and intermediate firm starter; overall a three day process. Final loaves beautiful but relatively fine crumbed.
Lately I decided to try your technique and recipes, and have shared my starter with my adult son, who is now “hooked”.
I am loving the process and the results!
The stretch and fold process works well for my son, who doesn’t possess a $700 mixer like my Kitchen Assistent. And I told him he’d burn up his KitchenAid if he tried to knead sourdough bread in it.
Anyway, I just made your 50/50 whole wheat, using KA organic bread flour and Stone Buhr whole wheat. The results are outstanding.
Open, moist interior, mild sourdough flavor but the nutty “sweetness” of the whole grain.
I’m converted to this type of baking!
I’m trying to add a photo, maybe a second email following.
Thank you!
Judy Force, Grass Valley CA
Hello Maurizio! Thank you so much for all your information and videos! I’ve been making sourdough bread since two weeks and been learning a lot. But I have the problem that my dough is always kind of watery and it is really hard to pre-shape and shape. And once I cook it it rises but it doesn’t have the huge holes of sourdough bread. thank you again and greetings from Chile!
First off, thank you so much for such a detailed website. I’ve learned so much from both your detailed writing, the photos, and your videos. I have a question about a pattern I keep noticing. After my bulk fermentation time, I notice that three out of four “sides” of the circle look strengthened, according to your criteria – have domed sides, have bubbles. But there is always a “side” that still appears flat and kinda watery. And when I go to preshape, one side of the top still appears craggy and very sticky (the others form a nice taut surface with very little stickiness). This makes my shaping a mess. Do you know why this is happening? I think I do equal stretch and folds on each side. I’ve made 5 loaves so far (3 Beginner sourdough, 2 Fifty Fifty Whole Wheat) and have consistently noticed this pattern, no matter I do.
Hi! As a new sourdough baker I am loving your site and the scientific approach, so thank you!
I am wondering why the amount of mature levain used in the final dough recipe is smaller than what is produced in the levain build – is it just to have easy to work with numbers in the levain build or is there a particular reason to make more than actually used in the final recipe? Thanks!
Hi all, I am a relatively new baker and have made this 3 times and each loaf had really large tunnels / flying crust. This has never happened before with anything else I’ve baked. I am following the recipe as above and 3rd attempt tried an extra hour bulk ferment and a shorter proof overnight of 8h vs 12h the other times. The result was exactly the same. I’m struggling to know what the cause may be as online info points to many causes, any advice would be very gratefully received. Thanks in advance
I just tried this recipe. I am new to baking sourdough and it was definitely a struggle to figure out how to handle and shape the wet dough. My main question though is about the cook time – mine were scorched by the time I was 8 minutes into the 10 minute stretch without steam – I took an internal temperature of 210 F and decided to take them out. Besides being scorched on the outside they are delicious and moist inside, and don’t seem underdone at all. But how could one possibly keep the loaves in there for 20 minutes longer without burning them to a crisp? Did my oven get too hot? I thought I followed the directions exactly. Any ideas why this happened?
Hi Katy, I’m at sea level in a high humidity environment and find I need to reduce all of Maurizio’s baking temperatures by 15 to 25 deg F depending on humidity. After some trial and error, I’ve found that I need to I preheat to 480 F and reduce down to 430 F for this recipe with a similar steaming method adapted for my “lovely” electric oven where I can’t fit anything underneath the baking deck. Also, I find that these loaves read 211
F to 212 F on my Thermapen when they are done, while still being quite moist and juicy in the interior. I believe Maurizio is at ~5K ft elevation so that’s a significant reduction in the boiling point of water, ~202 F instead of 212F, and generally much lower humidity levels. This recipe is a household favorite, and otherwise seems indestructible no matter how much I think I mess things up otherwise.
I just saw your reply here! Thanks so much, that explains it!
Appreciate that comment, Colin! Spot on.
Issue: I don’t have diastatic malt
Can I use honey, bread or whole wheat flour as substitute for the malt – do you just add 10g of the substitute or not add any extra flour?
I made this recipe without the malt or any substitute and it still worked out great
Omit the malt, will be just fine. In fact, I’ve updated the recipe to do without it!
I’ve tried this one 4-5 times now to figure out what I am doing wrong. For years I was doing variations on the Tartine method and baking same day but I wanted to figure out overnight proofing and higher hydration. I also have a lot of whole wheat to use up and not a ton of bread flour since it is hard to find at the moment. Despite finding the higher hydration just as easy to shape I cannot get it to hold its shape and spring at all like the 90% bread flour recipe for country loaf. I followed the recipe exactly besides baking in a dutch oven (combo cooker). I tried doing a lamination stretch as my last stretch and fold and a few other tricks but still it spreads out and refuses to cook into a nice boule. Today I had a bit more luck by letting it proof a bit on the counter before refrigerating but I’m still trying to get that nice spring and crumb like the pictures here. Using 50% local whole wheat and 50% K.A. bread flour. I love the taste of a 50/50 loaf with overnight fermentation but I want a less dense crumb.
I am having the exact same issue. Not getting much, if any rise during bulk fermentation, though it seems strong in stretch and fold. Let it bulk ferment a little longer yesterday which seemed to help a bit but it still spread a bit during pre shape and I could tell lost tension overnight when I went to score it 🤷🏻♀️
I am having the same issue! Ended up with 2 flatter loaves with a dense
crumb (still super tasty!) but not near what the pictures look like. I
have a very strong starter, but I also didn’t end up with enough levain
(5 ish g short) for this recipe so that could have contributed to the
issue. Will try next time to lower hydration, add a few more stretch and
folds, maybe bulk ferment a little longer. Not sure! Either way it
tastes good 🙂
So I had the same problem, but I don’t have the problem when making the beginner sourdough. As best I can tell my leaven is not active enough. Mine certainly didn’t look like the pics in the recipe. The weather was cool yesterday so maybe that was it, plus the dough during bulk fermentation wasn’t as lively – almost no bubbles. my 50/50 WW is not even 2 inches where by sourdough is usually twice that.
Glad to know I’m not the only one. I even took my starter out of the fridge for a week and gave it daily feedings (doubling each time in 4-5 hours) before I baked the last time and still had the issue. Maybe our whole wheat is too course. I have tried sifting some of the bran out but it didn’t make a difference.
I’ll try again in a few days paying closer attention to temperatures.
So 3rd times the charm. Finally got a bread that looks like the standard white loaf in terms of crumb and rise. I extended the bulk fermentation for 2 hours and added 3 more folds. I also put the dough in the oven for the last 2 hours to maintain temp. Last modification was to cut 50 grams of water from the mixing step. I could tell when scoring that it was going to work. I think Maurizo’s at higher elevation and a less humid environment, compared to San Francisco.
Hey Maurizio,
Have you ever used coarse whole wheat flour in your baking? It is all I have on hand, and I tried this recipe with it but my dough lacked oven spring, which has never been an issue when I bake 90% white country loaves. Admittedly, the dough felt rather slack when I shaped it, despite a lengthy slap and fold following the autolyse and good activity during bulk fermentation.
Any suggestions?
Best,
Noah
Hi Maurizio, thanks for all your advices, I have a doubt, If I have malt extract, Can I use it? In which proportion? I have to reduce the amount of water?. Thanks in advance
Hey Maurizio, I keep coming back to a 50/50 mix of fresh milled whole grain after trying this recipe. Of course I am a fiddler so I usually add 5% rye also. My best adjustment however has been in process. When I mix the levain, I also autolyse the fresh whole grain flour at 100% hydration in my mixer, then when ready to mix I add in the bread flour and the rest of the water, wait 30 minutes then add in the levain. With the extended autolyse, 85% hydration is the ticket. The dough is incredibly silky. The crumb is magnificent for a 50% whole grain loaf. https://photos.app.goo.gl/SSjeBcUWcCTdUMFe8 . Thanks for all your inspirations!
Very nice photo! I am going to try this method. Thanks for sharing.
Nice improvement! – using a mixer keeps my counter and hands cleaner. Is their some kind of unwritten rule against using a mixer for sourdough? 😉 The longer autolyse with the whole grain flour seems to improve the dough and final loaf beyond what was already excellent!
I think there is a romantic notion of all by hand. My decision making on using a mixer is about how much it helps compared to the extra work of cleaning the mixer. If I am working with an enriched dough or doing a sandwich loaf I typically use a mixer to get a very silky dough, hoping that leads to a crumb more suited to a sandwich loaf. In this case it was hard to mix in the added bread flour and water by hand but the mixer makes it easy.
Getting there! https://drive.google.com/file/d/1G4IrBtH4GKOO7lCxBCB9gaFSd7li-f7V/view?usp=sharing A few edits: 400 g flour (150 local WW red hard winter; 150 bread (King Arthur Lancelot), 100 King Arthur a/p; 300 g h2o (75%), 10 g salt, 80 g starter (20%)
Hi Maurizio – thanks so much for your fabulous webpage! I am brand new to sourdough – I got my first starter from a neighbor 3 weeks ago, made your beginner’s sourdough recipe 2 weeks ago, and this 50-50 recipe last weekend. They all turned out beautifully! For the 50-50 recipe, I didn’t have these exact flours so I used 50% King Arthur Sir Galahad Artisan bread flour and 50% Trader Joe’s white whole wheat flour. Based on others’ comments, I reduced the hydration to 78% and it worked really well (I am basically at sea-level). Your videos for slap-and-fold and shaping were super helpful. Thanks for getting me started on this exciting journey!
So with the Covid19 outbreak flour has been pretty hard to come by. I was able to find one bag of whole wheat and one of organic all purpose (both bobs) Do you think a decent loaf could be made with all purpose and wheat flours? thanks for your time and I wish you health and awesomeness during this wild time.
Same issue for me!! I can’t find bread flour anywhere….but I do have organic white all purpose and whole wheat. Wondering if I can try my first loaf without it!!!
Absolutely! Check out my homepage for some new recipes with just all-purpose — if you haven’t already 🙂
Do you think it would be possible to bake this loaf night-of? Instead of refrigerating for a long rise overnight, letting it rise for a couple hours outside of the fridge after bulk before baking? Thank you!
Yes, absolutely. Just let it proof on the counter until ready to bake, perhaps 2-4 hours depending on temperature.
Hi Maurizio,
My dough doesnt rise as much after the 3.5 hr bulk ferment. Do you suggest i should continue the bulk fermentation for longer? If yes, then how long can i go for?
I had the same problem with my first two batches. For the 3rd version I kept bulk fermentation going for 2 more hours, including 3 more folds. That did the trick. I also let keep the dough in the oven for the last 2 hours.
Thanks as always for sharing all your knowledge and the results of (I’m sure) many past bakes that have culminated in this post! I made this recipe today and ran into the classic high-hydration shaping problem that I’ve run into before (although, don’t think I’ve done a bake with this amount of hydration): The dough sticks like glue to my wooden work surface and seems to resist strengthening. Shaping it over and over strengthens it somewhat, but I can’t seem to get the boules as tight and strong as I have in other bakes (realize there’s also other variables at work, like quality and quantity of stretch and folds, pre-shaping, etc.).
Reading through the comments, I can see I’m not alone! One thing I can certainly try is reducing the water, as I’m in London which is only 11 m above sea level (I can see you’re quite high above sea level). Given your altitude and the hydration levels you work with, do you ever see dough that’s sticky when it comes time to shape? I’ve seen in your “Shaping a Boule” video that your dough doesn’t seem sticky—do you see that behavior with the level of hydration in this recipe?
How would you advise to work with dough that’s this sticky? My technique when I encounter doughs like this is to use a large bench/putty scraper as shown in this video by the San Francisco Baking Institute (this is what I used for this recipe). They seem to deal with high hydration dough regularly and it seems like it’s made that way on purpose. Thanks!
I’m so sad to report this didn’t work well for me. It was clear after 20 min of ‘slap and fold’ that it was just not going to firm up like yours. Perhaps it is my older flour and slight mish mash of wheat flours and no digastic malt? Just too much water? I didn’t put in the last 100g because the dough was a sloppy mess. It is proofing now and did rise a bit, but I’m sure it won’t be ready to cut and shape before I need to go to bed. I will put in the fridge and try to cut and shape in the morning and give it another rest. I’m so determined to get sourdough to succeed, but I’m on about my 8th recipe now with tasty results but a denser dough without good rise. I’m going to try your other Simple Sourdough recipe tomorrow. The primary problem is the lack of flour. I primarily have whole wheat, no bread flour and am running low on All purpose so anxious to have a good recipe that uses a mix. Thanks for the posts and video! After 20 min of practice I got pretty good at the slap – it sounded just like yours.
Sorry to hear that, Teresa! Keep with this, I’m confident you’ll get it. Please give that Simple Sourdough a shot and see how that goes, I’m sure you’ll have some great results.
However, with this recipe I’d say yes, please reduce hydration next time. Perhaps hold back 200g from my recipe and see how that feels next time you mix it up. Slap/fold can be a challenge if there’s too much water and it sounds like your flour was pushed beyond its limit.
Keep with it! Give that Simple Sourdough a try, let me know how it goes. Have fun and happy baking!
I was having similar problems. I live at sea level so I’ve been cutting the water a bit – 50 grams in this recipe. Also, I let bulk fermentation go on for an extra 2 hours until I got the dough to rise. This was my 3rd attempt.
Hi Maurizio – me again, hope you have some advice. I was so excited about this recipe, the picture of the crumb is just beautiful. Unfortunately it came out of oven with very little rise and was extremely gummy, I mean stick to the knife and your fingers gummy :(. Here are some details, I followed your formula exactly. Used KAF bread flour and Bob’s Stoneground Whole Wheat. My startrer is very active, as well as the levain. It was very slack when I went to divide and shape.
First question – was this underproofed? The stretch and folds, 5, all felt good; however, it never really doubled, though it had bubbles like you described, but no rounded edges. Retarded in refrigerator for 12 hours in baskets. Baked at exact temps given in cast iron dutch oven for times. Internal temp of 210.
Second question – could the added 10g of diastatic malt cause this since I see KAF bread flour contained malt barley flour? I’m at 2,500 elevation and oven temp was spot on. Flavor was great, but the gummy thing is so disheartening. Should I just got back on water?
Any other advice, I hate to give up, but am bummed. Any and all comments greatly appreciated.
Steve, hey again! Hmm, it sounds like under proofed dough to me, but I might also guess a little too high of a hydration. I’d say give the dough more time in bulk fermentation until you do see some good rise there, 30-40% or so perhaps.
Yes, I would omit the malt next go. It can definitely give the bread a gummy interior.
So in the end, a combination of these things and I think you’ll be spot on next time!
Hi Maurizio, I followed this recipe closely except I started early and so it ended up in the fridge for nearly 14 hours. While the dough didn’t hold its shape that well, it still had a pretty open crumb and a nice crispy crust. I wonder also if I need to reduce the water as some commenters suggest since your recipes are for ABQ altitudes. Handling and folding the dough felt much like rolling around a water balloon. Also please have some Western hash browns at Frontier for me next time you’re there. I miss green chile anything so much!
Hey there! Yes, it sounds like you probably should reduce the hydration as well, but I’m glad it still baked up pretty well! With reduced water my feeling is your bread will bake up taller and stronger. Ahh good old Frontier, I’ll definitely do that! Thanks and happy baking 🙂
Hello Maurizio!
I hope you and your family are well. Being locked at home has inspired me to get back to sourdough! I’m ready to bake some bread, but the only problem is that every store is completely out of flour. I managed to snag 2 bags of all purpose flour and some whole wheat, but I’m used to baking with bread flour. Can I substitute all purpose for the specialty flours you call for here? Or, do you have any other recipes if yours that you would recommend for all purpose flour?
Thank you!!!
Sarah
Hey, Sarah! Likewise, I hope all is well. Yes, you can use all-purpose flour with no problem in this recipe. You might want to hold back a little more of the mixing water and only add it in if the dough feels like it can handle it — you can always add more water, you can’t take it out 🙂
All of the recipes here that call for “medium protein bread flour” can be substituted out for all-purpose.
Happy baking!
A lovely recipe, thank you so much! I and my wife are very happy right now. I used brown rice flour for the final rest and proof as I did not manage to find white rice flour in Oxford (UK). It is the first time my bread did not stick to the banneton! Very satisfying. I forgot to score the bread before the bake, so there are still some improvements to be made next time.
Once again, thank you for this recipe and all the others — I have been using your blog from the beginning of my sourdough journey a year ago. I love your approach and attention to detail. I find myself coming back here when I have doubts about any part of the baking process.
All the best for the quarantine times. I hope you manage to carry on with bringing us all that baking joy! Please take care of yourself.
Glad to hear all of this! Sounds like the bake when very well — no worries about white vs. brown rice flour, you could also just use plain white flour.
You’re very welcome and thank you so much for the kind words, I really appreciate it. Wishing you good health and happy baking!