


I’ve been thinking about this recipe for some time, and I’ve been tinkering with it for just about as long. I wanted to create a whole wheat sourdough bread that wasn’t all the way 100% whole grain, but still enough to bring out that assertive wheat flavor, gentle yet complex sourness, and also one that packs a nutritious punch. I wanted it to be light in hand, soft of texture, and be the right starting place for those who might not have had much experience with bread boasting a majority of whole grains.
This recipe is a beginner’s sourdough recipe but with more whole grains than not. A fifty-fifty whole wheat sourdough bread to get you and your family on the whole-grain train without them missing the characteristics of white flour. Typically, bread with a significant amount of white flour is lighter, more open, and loftier.
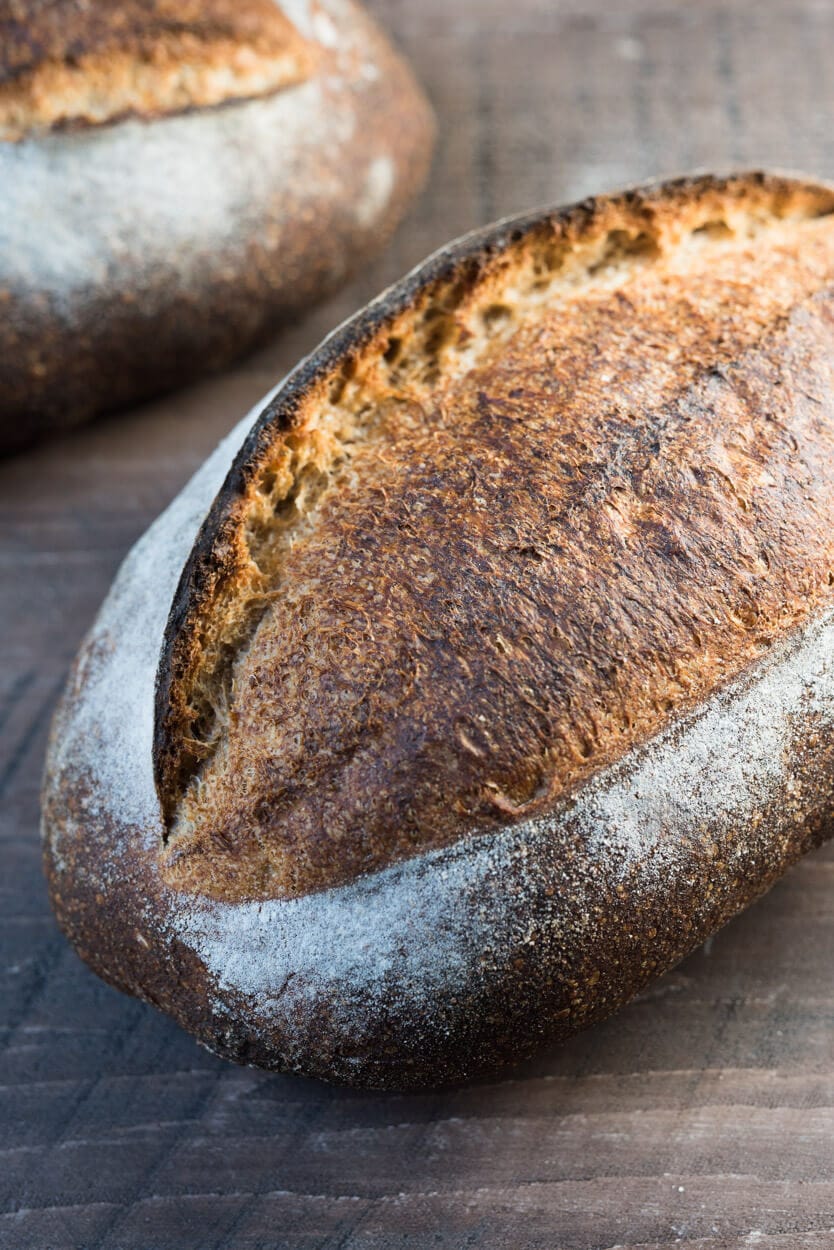
As you might know, I always like to experiment. To tinker. To change. Even when things are already working well I seem to dig in and just have to adjust. My previous work with whole wheat almost always utilized a stiff levain (around 65% hydration) but here I opted for 100% hydration liquid levain. I made this change mostly to see if the result would be all that different, but also because I wanted to add flexibility to this bread—knowing that I, or you out there, could make it with a stiff or liquid levain just the same. I find there are advantages and disadvantages to both but when it comes down to it as long as you adjust the total water in your recipe you’ll get a great result no matter which type of starter you maintain or levain you use.
Instead of a long levain build period, this formula calls for a shorter time from levain mix to using it in the dough. This is a handy thing to be comfortable with, it means you can get a strong, reliable levain ready to go in a shorter time period (about 3-4 hours instead of 6-7). Nothing groundbreaking here, but I like to highlight it upfront as something to add to your baking toolbox. The ability to adjust your levain to suit your schedule is handy and it means baking can revolve around our busy schedules and hectic weekends.
And finally, I played with baking this bread at a much higher temperature for a shorter period overall—I baked these fast and hot (and you can see that in the image above, a little more color all around and especially on top). Instead of baking on thick baking stones, I opted for a Baking Steel as my “deck,” which gets incredibly hot. More on this later, and before we delve into these things any further, let’s talk about flour.
Flour Selection
My whole wheat selection here is pretty straightforward, just a good quality stoneground whole wheat (and it’s actually the whole wheat flour I use most often here in my kitchen). In experimenting between stoneground and roller milled whole wheat flour I’ve found the flavor of stoneground whole wheat to be more assertive, deep and much tastier overall. Due to the method of milling, stoneground whole wheat preserves more of the bran and germ and these particles are clearly evident when passing the raw flour through your fingers. If you don’t have stoneground whole wheat a roller milled whole wheat (this is typically what you’ll find at the market) will work just as well, perhaps with a slightly different flavor profile and less assertive whole wheat taste overall.
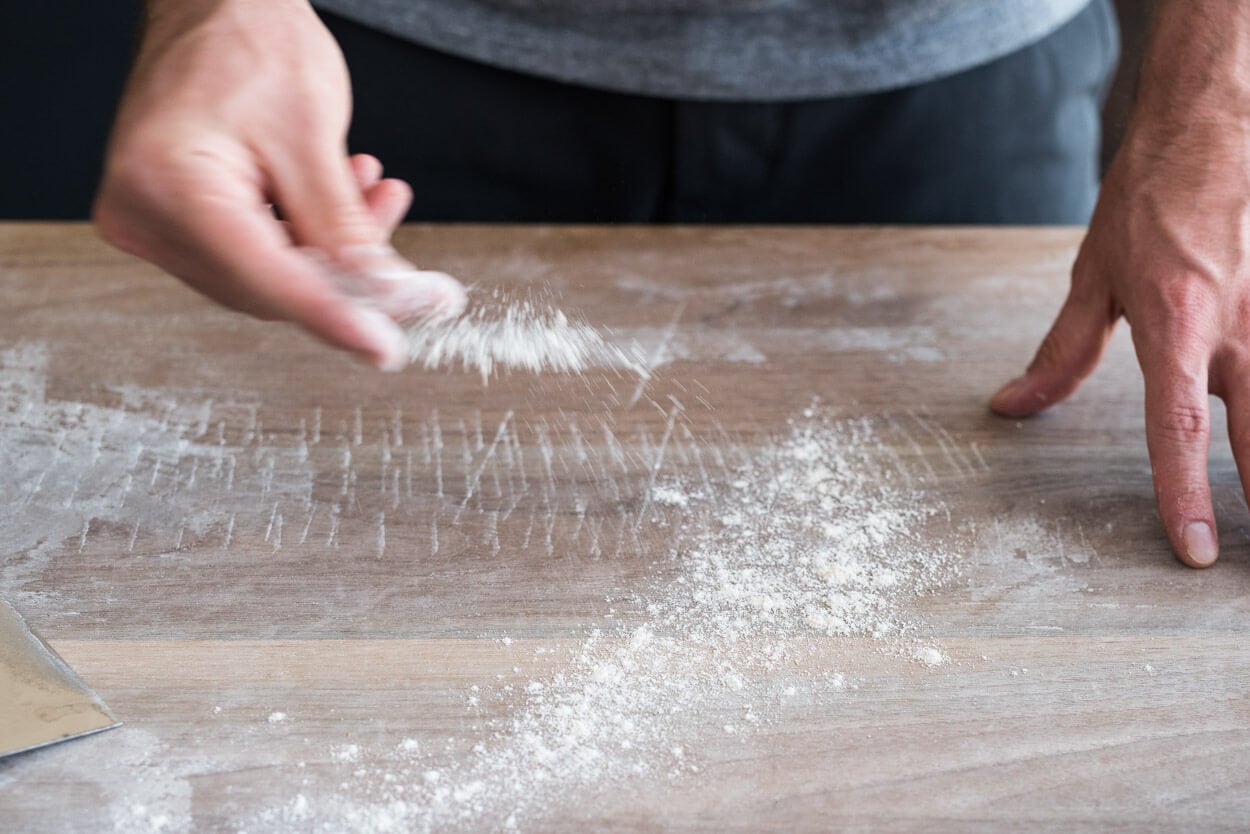
Generally, I prefer the texture of lower protein white flour like Giusto’s or Central Milling Artisan Baker’s Craft (both which are around 11-12% protein). To me, these generally have less of a gummy texture and perform very well for extended fermentation times. If you don’t have access to this flour any “all-purpose” flour would work well here, including King Arthur all-purpose.
Fifty-Fifty Whole Wheat Sourdough Bread Formula
Vitals
| Total Dough Weight | 1,800 grams |
| Pre-fermented Flour | 5.00% |
| Hydration | 82.00% |
| Yield | 2 x 900g loaves |
Total Formula
Target final dough temperature (FDT) is 78°F (26°C).
This recipe is highly hydrated because there’s a high percentage of whole grains, which require more water in the mix (the bran and germ present in the flour can take on quite a bit more). If this is your first time trying this loaf, reserve 100g of the mixing water and only add it in if the dough feels like it can handle the addition.
| Weight | Ingredient | Baker’s Percentage |
|---|---|---|
| 476g | Whole wheat flour (Giusto’s whole wheat) | 50.00% |
| 238g | Medium-protein bread flour or All-purpose flour (~11% protein, Giusto’s Artisan Bread Flour) | 25.00% |
| 238g | High protein flour (~12% protein, King Arthur Bread Flour) | 25.00% |
| 781g | Water | 82.00% |
| 18g | Salt | 1.90% |
| 48g | Sourdough starter (100% hydration) | 5.00% |
Method
1. Levain – 12:30 p.m.
| Weight | Ingredient | Baker’s Percentage |
|---|---|---|
| 48g | Ripe starter | 100% |
| 24g | Giusto’s Stoneground Whole Wheat | 50% |
| 24g | Giusto’s Artisan Bread Flour | 50% |
| 48g | Water | 100% |
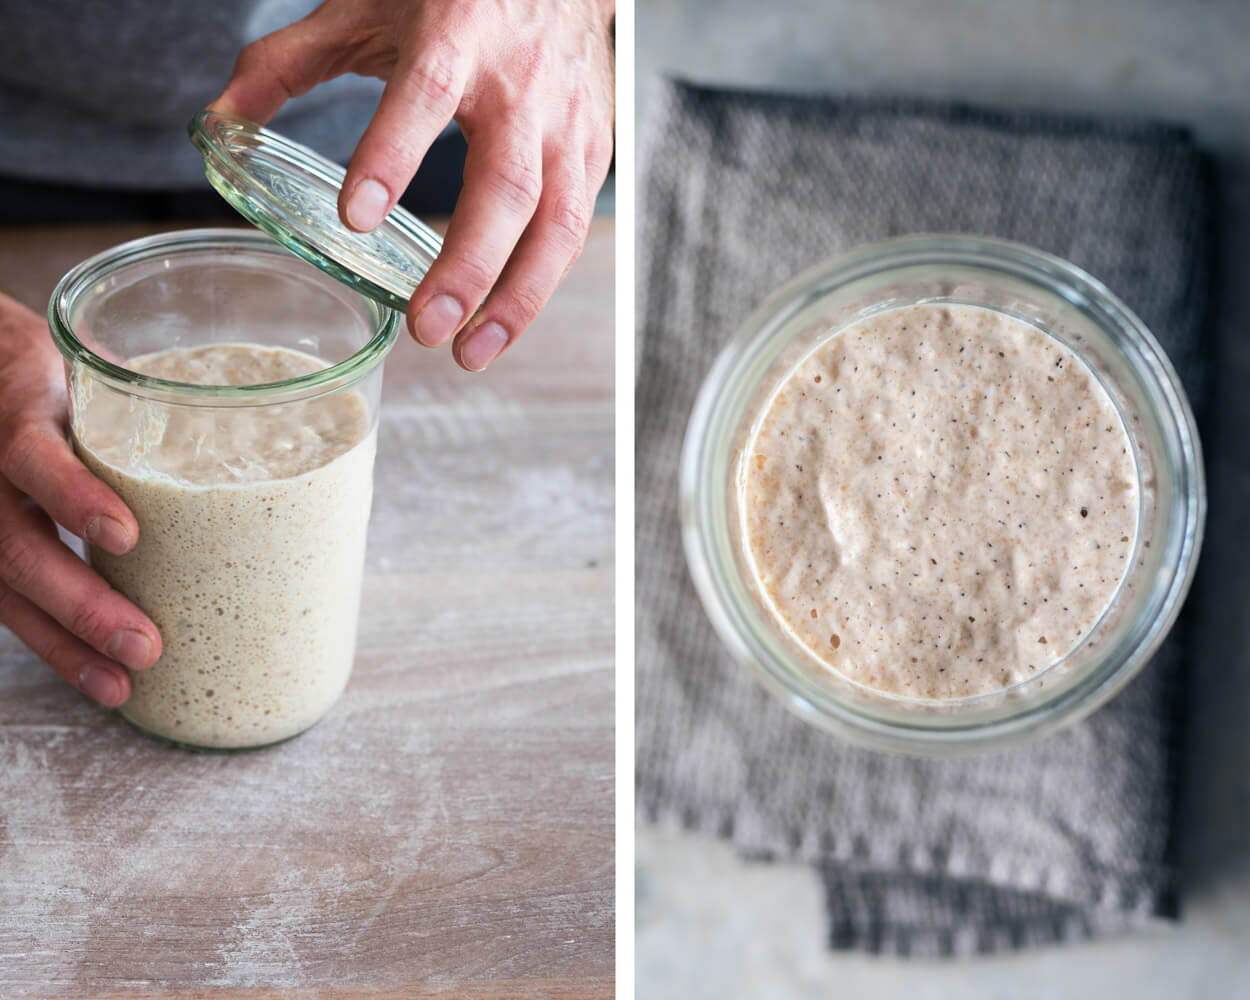
As mentioned earlier, I worked with a shorter levain build for this bread. To adjust for the reduced build time, we’ll increase our inoculation of ripe starter and the water temperature. This gets the whole process moving faster, and by the time you’re ready to use this levain, you’ll notice some significant activity. See my post on the importance of dough temperature for more information.
Build the liquid levain (everything listed in the Levain Build section above) in the morning or afternoon and store somewhere around 78°F (26°C) ambient for 3 hours.
2. Autolyse – 1:30 p.m.
Usually, with high percentages of whole wheat and/or bread flour, I lengthen the autolyse time, sometimes up to 5-6 hours. The two-hour autolyse in this recipe, while not as long as 5-6 hours, helps the high percentage of whole grains fully hydrate and starts the gluten development process without mixing. This will help reduce the total mix time required later in the process.
See my guide to the autolyse technique for more information on its benefits and why I used this technique in this recipe.
| Weight | Ingredient |
|---|---|
| 453g | Whole wheat flour |
| 214g | Medium-protein bread flour or all-purpose flour |
| 238g | High protein flour (“bread” flour) |
| 634g | Water (100g was held back until Mix) |
Mix the above ingredients in a bowl until all dry bits are hydrated. Cover the bowl and store somewhere warm for 2 hours.
3. Mix – 3:30 p.m.
| Weight | Ingredient |
|---|---|
| 143g | Ripe levain |
| 18g | Salt |
| 100g | Water (reserved from Autolyse step) |
Add the called for ripe levain to your autolysed dough and using about half of the reserved 100g of water mix thoroughly with your hands. You want the levain to be pretty well mixed through the dough and the added water absorbed.
Let’s mix/knead. I chose to do slap and fold for about 4 minutes, just until the dough started to show signs of a smooth surface and it was catching some air. If you aren’t comfortable with slap/fold method or don’t like it, you can do stretch and folds in the bowl until your dough tightens up and becomes slightly hard to stretch out and fold over. Medium development.
When finished mixing spread the salt on top of the dough and the remaining water to help dissolve. Pinch through the dough thoroughly and fold the dough over itself to help incorporate and absorb the remaining water. When finished transfer the dough to a tub or thick-walled bowl for our first rise, or bulk fermentation.
4. Bulk Fermentation – 3:40 p.m. to 7:10 p.m.
At 78-80°F (25-26°C) ambient temperature, bulk fermentation should go for about 3 hours and 30 minutes. Give the dough 5 sets of stretch and folds during this time, spaced out by 30 minutes. Keep an eye on the dough as it approaches the three-hour mark. It will rise a bit and be quite active! See my sequence of images below to get a feel for how the dough should look and feel during the 3.5-hour rise.
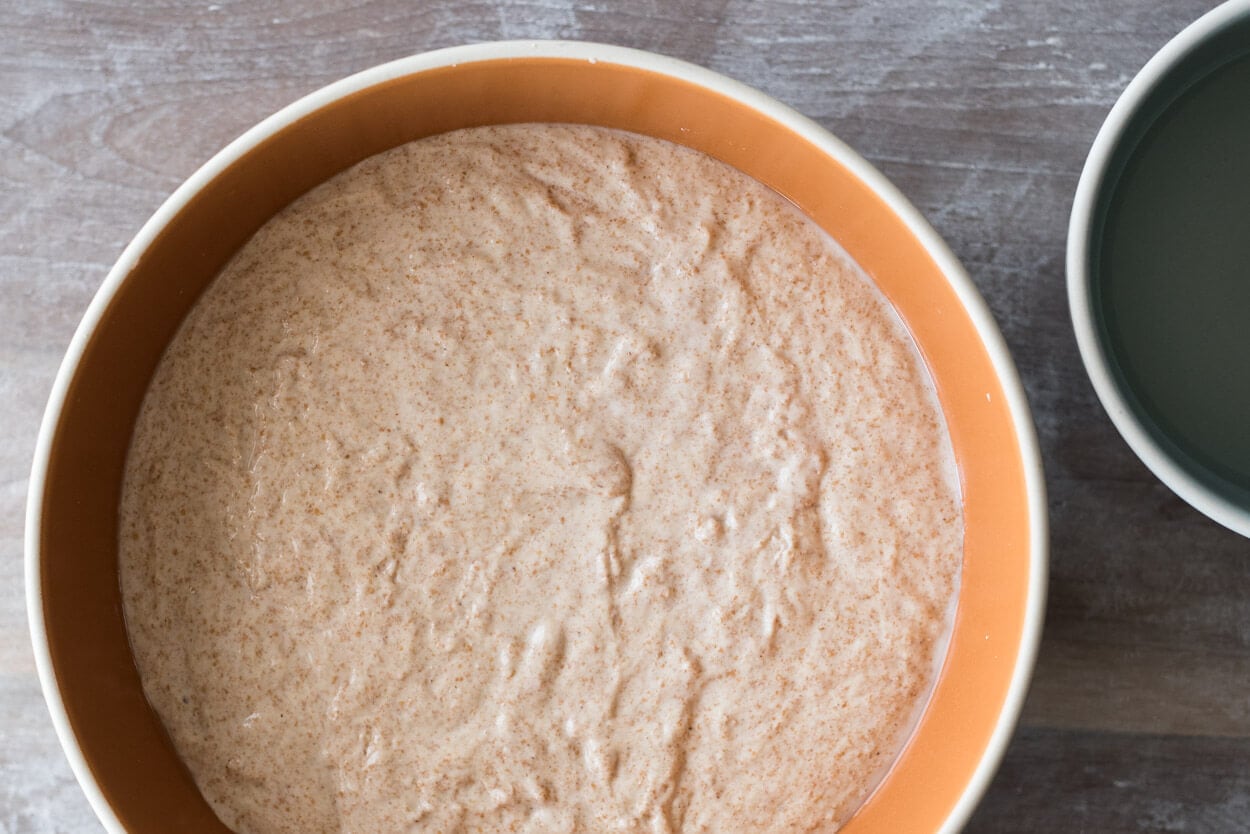
Above is a picture of my dough after mixing and right at the beginning of bulk. You can see how shaggy the dough is, how wet and lifeless—it’s just sitting there in a single flat layer. There’s no rounding between the edges of the dough and the bowl, no bubbles anywhere, and if you jiggled the bowl you wouldn’t see much movement.
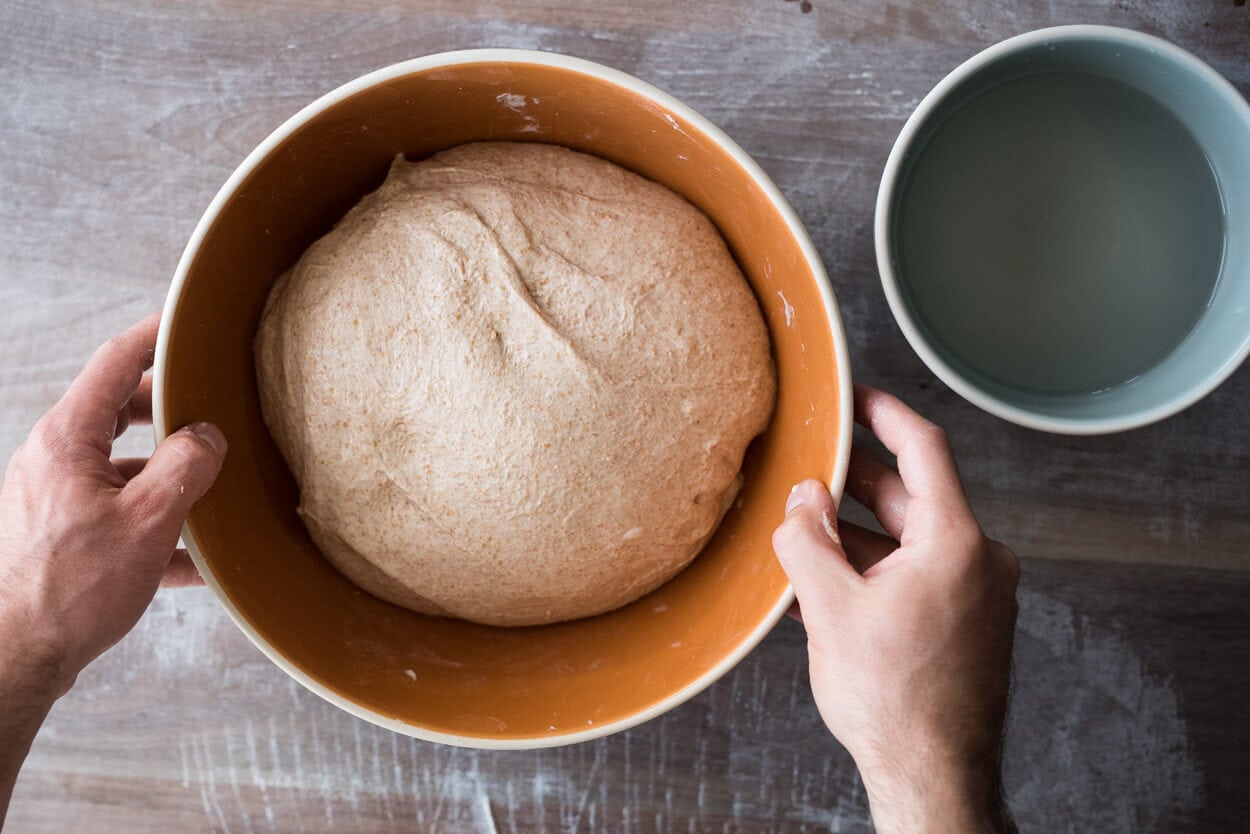
Above is my dough after the fifth, and last, set of stretch and folds. Look how strong the dough has become compared to the picture above. It’s holding its shape in the bowl extremely well—this is a sign for me that the dough is now strong enough and no further strengthening is needed. I will now let the dough rest, relax and rise the remainder of the time specified for bulk fermentation.
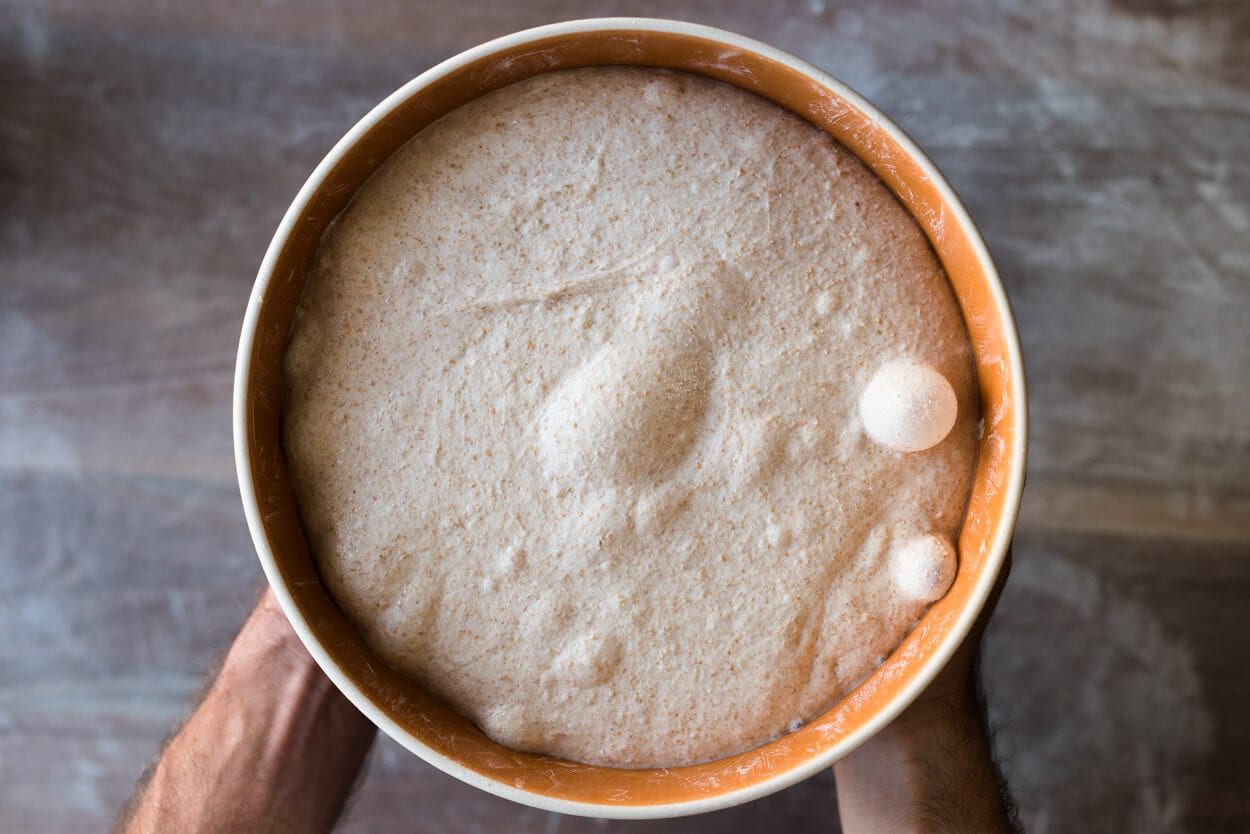
I called bulk fermentation quits when I saw the dough reach the point seen in the picture above. You can see it’s risen significantly, there are plenty of bubbles on top and just below the surface, and most importantly, the edge where the dough meets the bowl is domed & convex.
If I were to wet my hand and tug on the dough a little I’d feel much more resistance and elasticity—the ability of an object or material to resume its normal shape after being stretched or compressed. It’s gained strength and can hold its shape much more than at the beginning of bulk. These are all good signs your dough is strong enough and ready to be divided.
5. Divide & Pre-shape – 7:10 p.m.
Gently dump out the dough from your bulk container onto an un-floured work surface. Divide in half and pre-shape the dough into two round boules. Let the rounds rest 20 minutes uncovered.
6. Shape – 7:30 p.m.
Prepare two baskets that will hold your dough during its long cold proof overnight. If you decide to shape the dough as two boules (rounds), find two round kitchen bowls, and if you decide to shape it as a batard (ovals), use two bread baskets. Line the baskets with cotton or canvas liners if you have them, clean kitchen towels if not, and dust them lightly with white rice flour to prevent the dough from sticking during the proof.
Moderately flour the top of the dough and flour the work surface. Flip one resting round over, so the floured side is down on the work surface. Fold the dough’s top up and over to the middle and repeat for the bottom (you’ll now have a long slender rectangle in front of you). Pickup the rectangle and rotate it 90º, so it’s now lengthwise facing you. Grab the dough at the very top and fold over a little way, press to seal with the dough’s central mass. Now grab this rolled over the top and gently continue to roll it down towards the bottom, tucking in the dough as you go (imagine rolling down a beach towel). At the end of this, you’ll have a tube that has essentially been rolled downward. Once shaped, transfer each to their floured shaping basket with the seam side facing up.
For an in-depth guide to shaping like this, see my batard shaping guide.
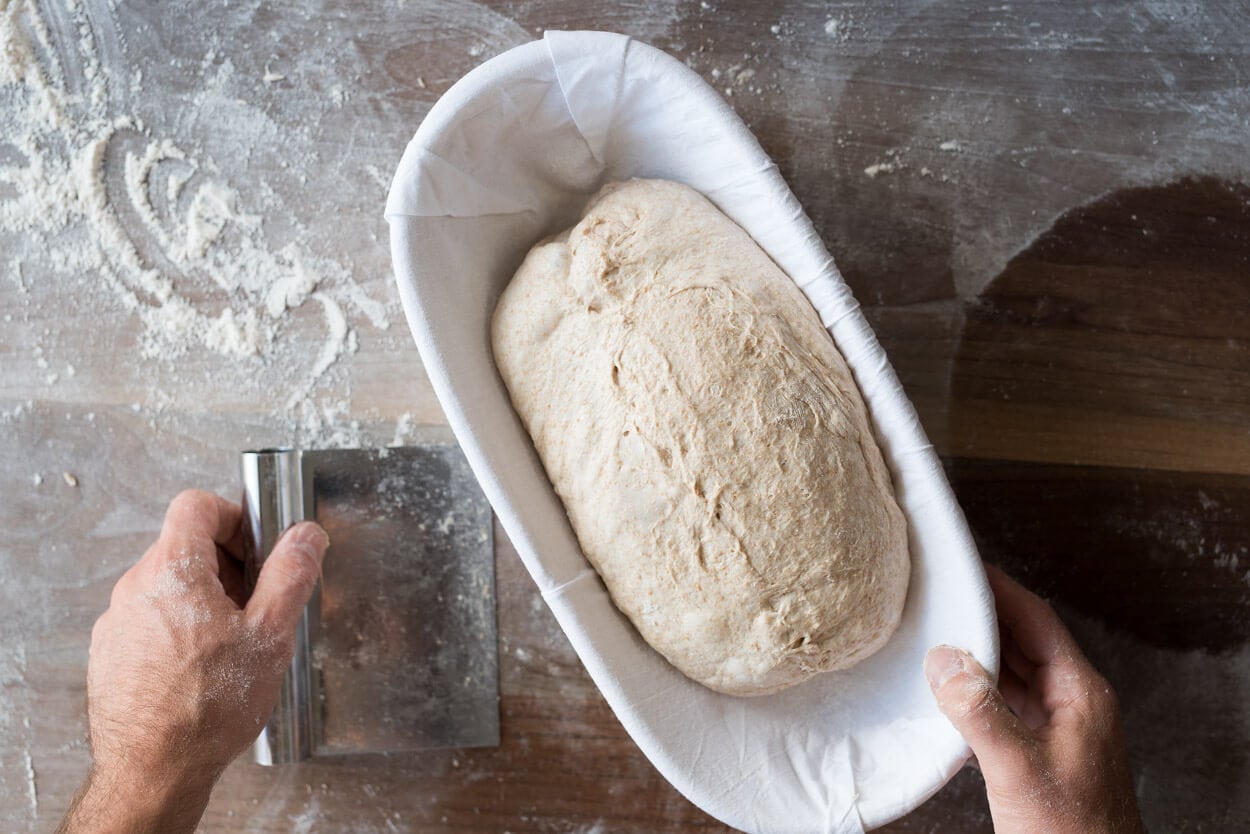
Repeat with the other round.
7. Rest & Proof – 7:35 p.m.
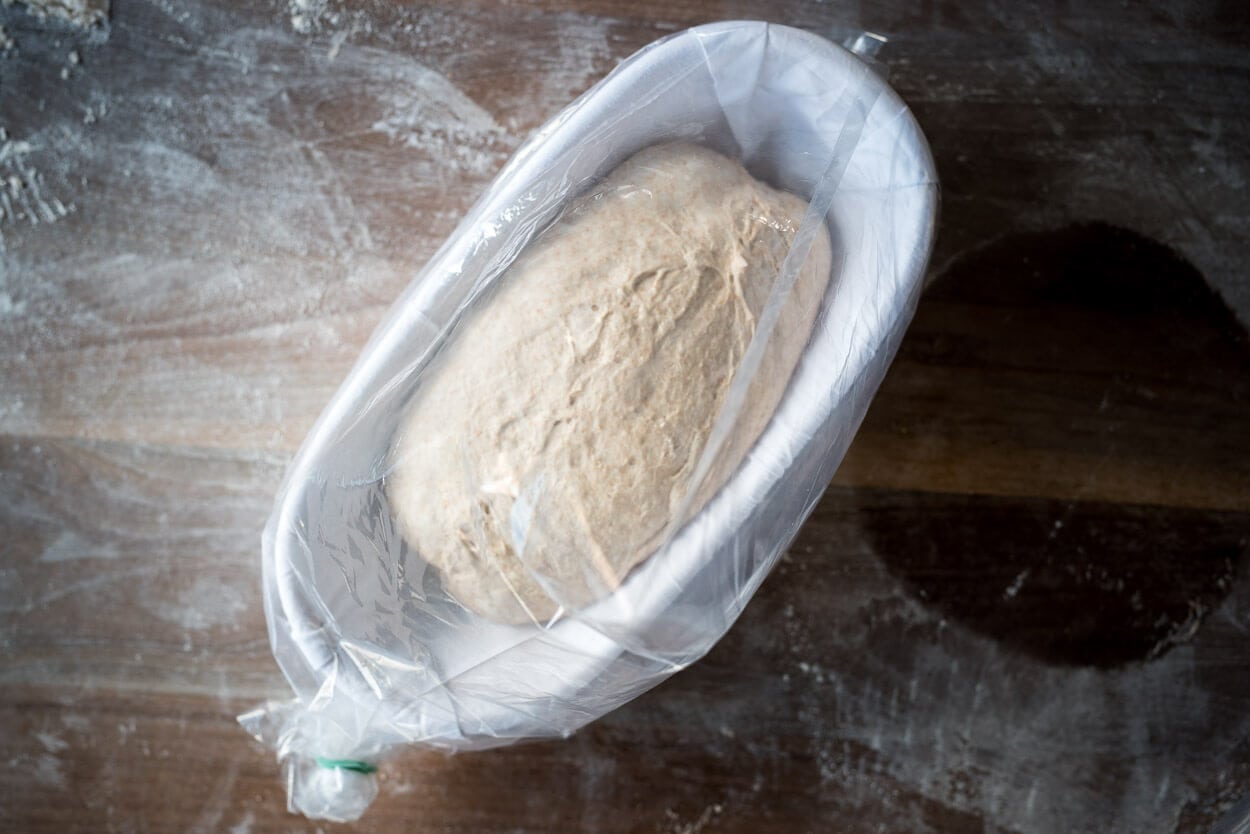
Cover your baskets with plastic and then place them in the refrigerator to proof at 39°F (4°C).
8. Bake – Next Morning: Preheat oven at 8:30 a.m., Bake at 9:00 a.m.
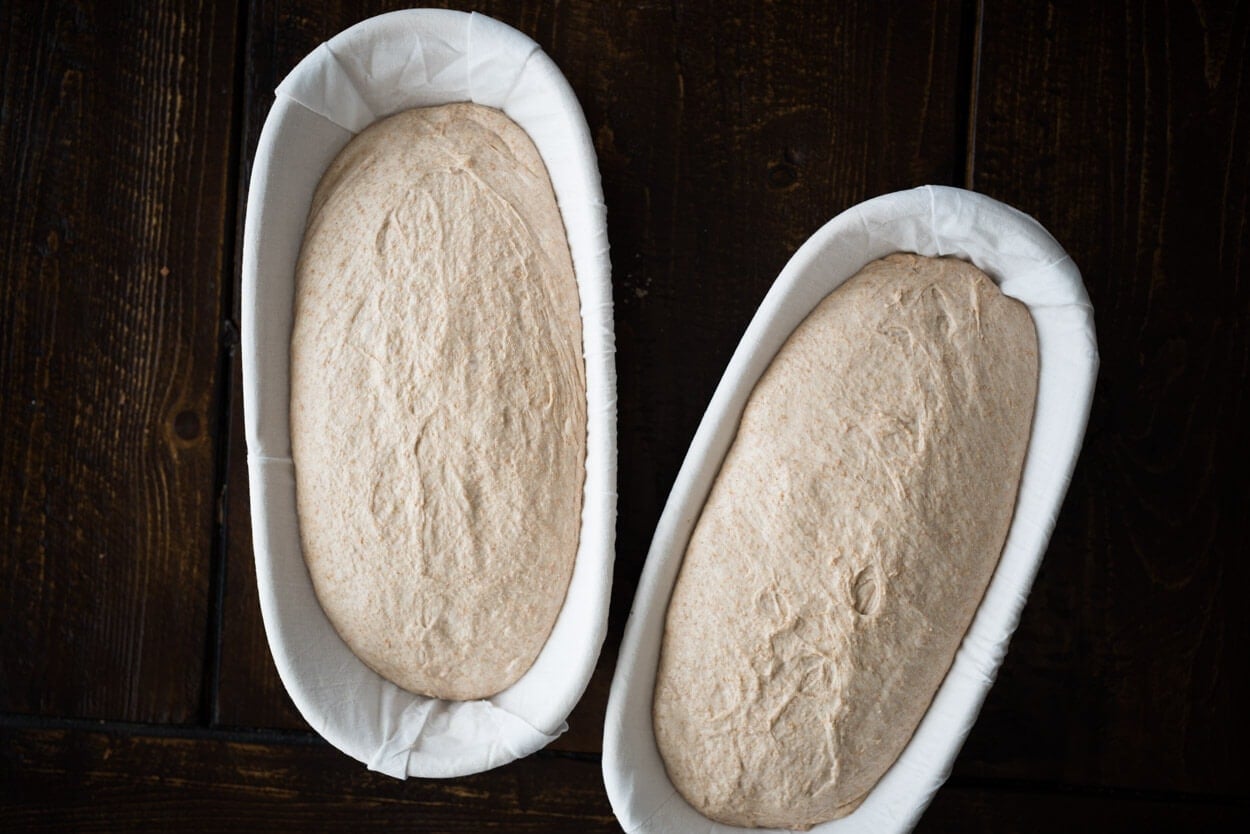
Place your Baking Steel in your oven and preheat for one hour at 450°F (230°C). Once preheated, take out both of the baskets from the fridge and remove the plastic wrap.
You’ll notice my dough has risen somewhat but not a significant amount. Instead, the dough has relaxed to fill my proofing baskets and is perhaps a little puffier (the loaf on the right was a slightly higher final dough weight and will result in a larger loaf).
Cut a piece of parchment paper to fit over the top, place it over the basket, and then place a pizza peel or small cutting board over the top. Quickly invert each basket onto the parchment and peel/board. Using a sharp razor blade fastened to a stick, scissors, or a very sharp knife, carefully score the top of each loaf at a shallow angle to the dough, just deep enough to cut below the top skin created at shape time. I like to score whole wheat loaves with my bread lame at a very shallow angle; this helps the loaf attain maximal rise when in the oven. If you score at a straight 90° angle with the dough, then as the dough rises, it sort of splits open instead of peeling back.
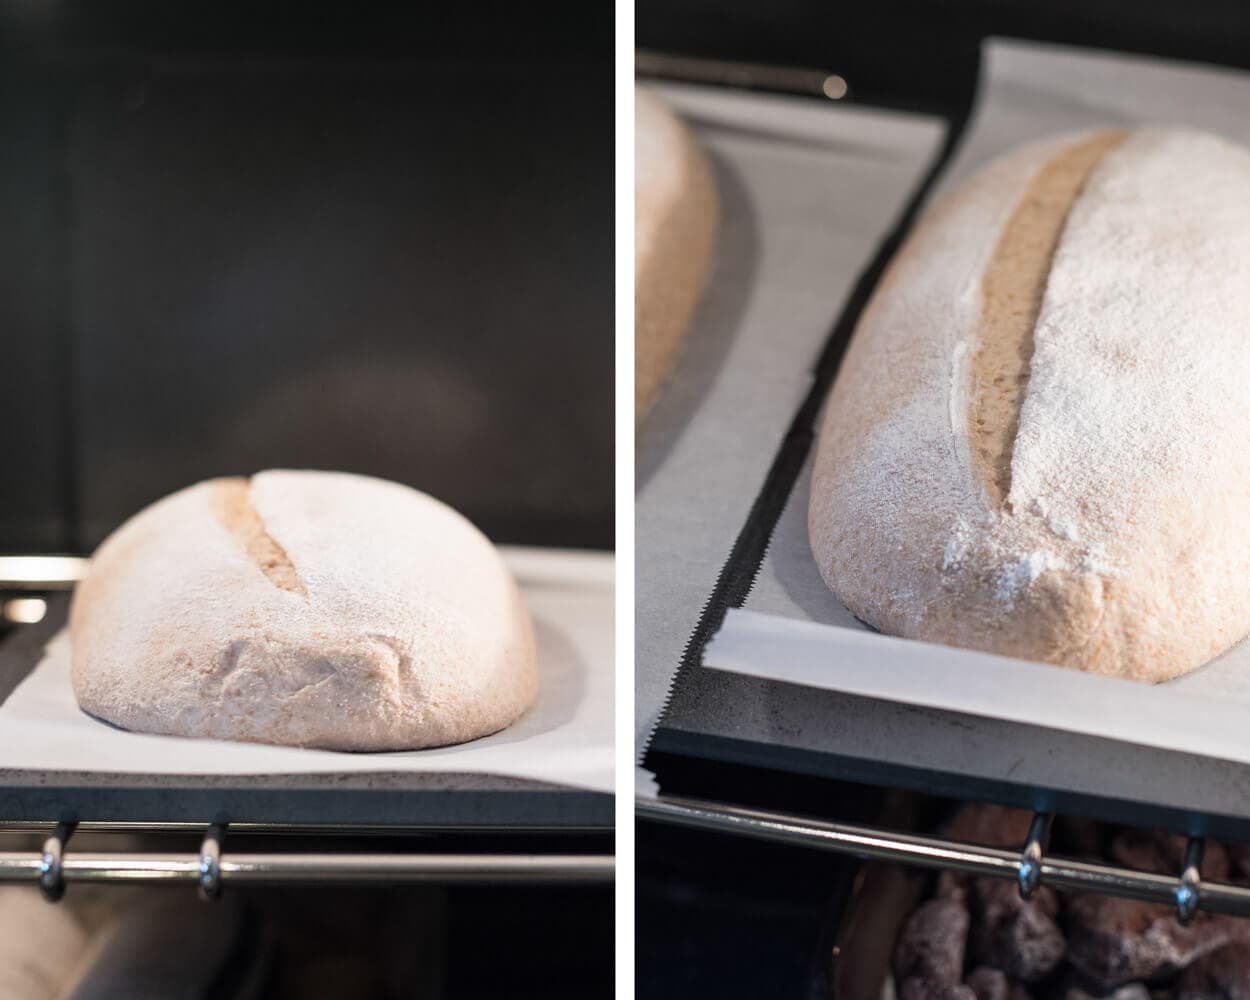
I steamed my oven in my usual way, described here in my post how to steam your home oven for baking. I baked these loaves hot and fast. The goal was to bake the exterior to a nice dark color, and also bake the interior, but take the loaves out before they completely dried out inside. I like my loaves with whole wheat to be much more tender and moist, and I found this baking schedule achieves that.
Bake for 20 minutes, then remove the steaming pans from inside the oven. Then, bake for an additional 30 minutes until the internal temperature registers around 206-210°F (96-98°C). Keep an eye on these from the middle of the bake all the way to the end as the prolonged high temperature can quickly scorch the outside of the loaves.
Note: these times and temperatures work well when baking here at a high altitude (about 5280 ft. above sea level) and in my environment. The first time you try this recipe, keep a close watch over the dough in the oven to adjust as necessary.
For an alternative to baking on a hot surface, check out the Challenger Bread Pan, which is a large cast-iron pan able to bake these batards with no problem.
Remove from the oven and cool on a wire rack for at least 2 hours. Be sure to store the bread properly to keep it fresh for a week or longer.
Conclusion
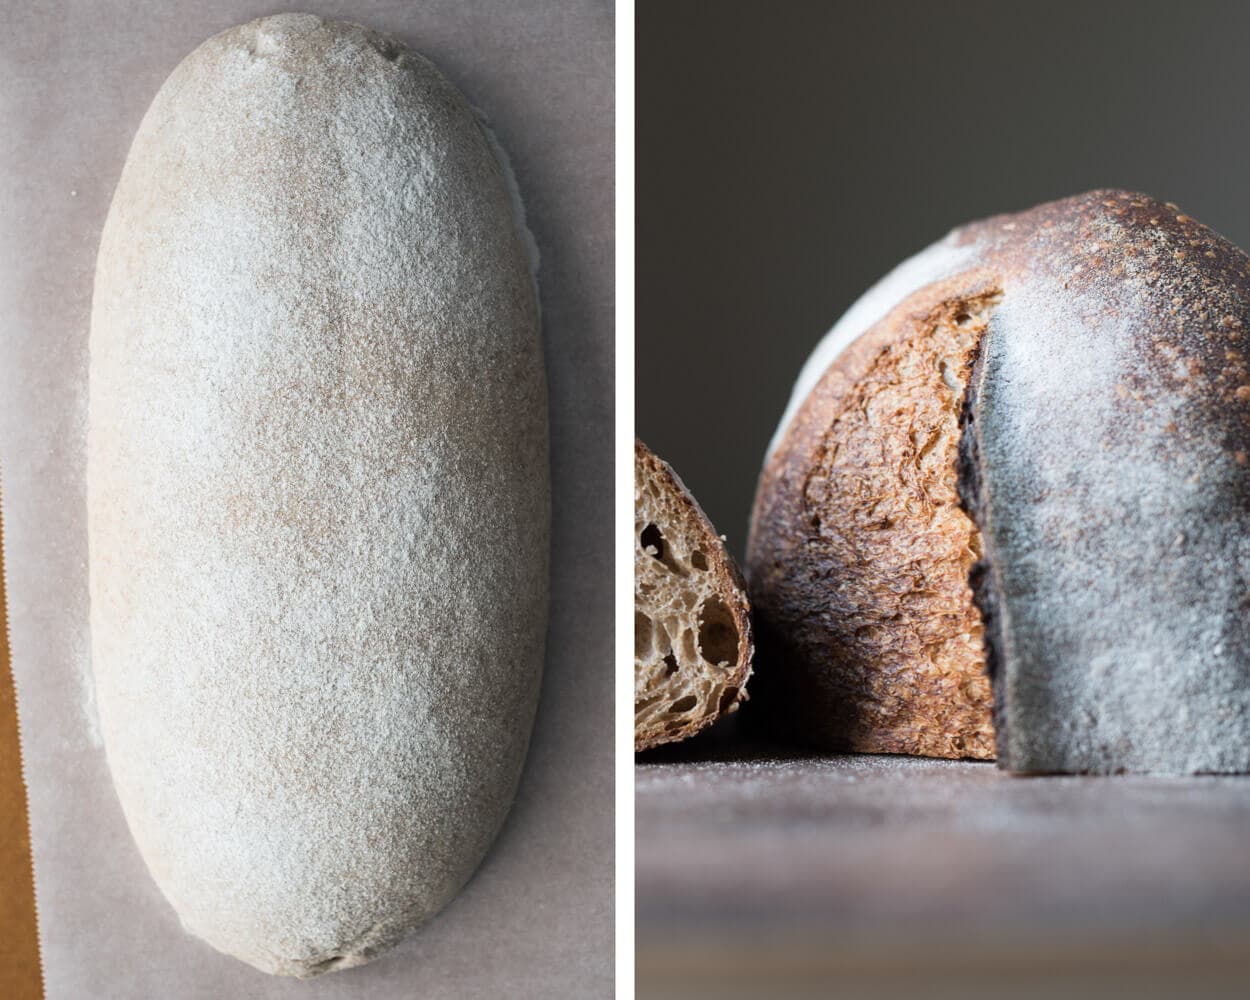
With this much whole wheat, it’s always a challenge to get a tall and airy loaf, but the addition of the bread flour, high hydration, and relatively tight shaping have helped achieve that. Along with the nice rise, the soft and tender interior and dark, crunchy crust play off each other to create a balanced bread that is flavorful and light in hand.
One modification I’d love to try is to use white wheat instead of red wheat for the 50% whole wheat portion. White wheat is one of my favorites to use, mainly because of its mild, laid-back flavor, but also I conveniently have a new 25-pound bag of raw white wheat berries sitting in my pantry ready to go (and nowadays it’s almost always used in my weekly sourdough sandwich bread). This change might reduce this bread’s overall assertiveness, but it would be exciting to see the flavor profile difference.
Crust
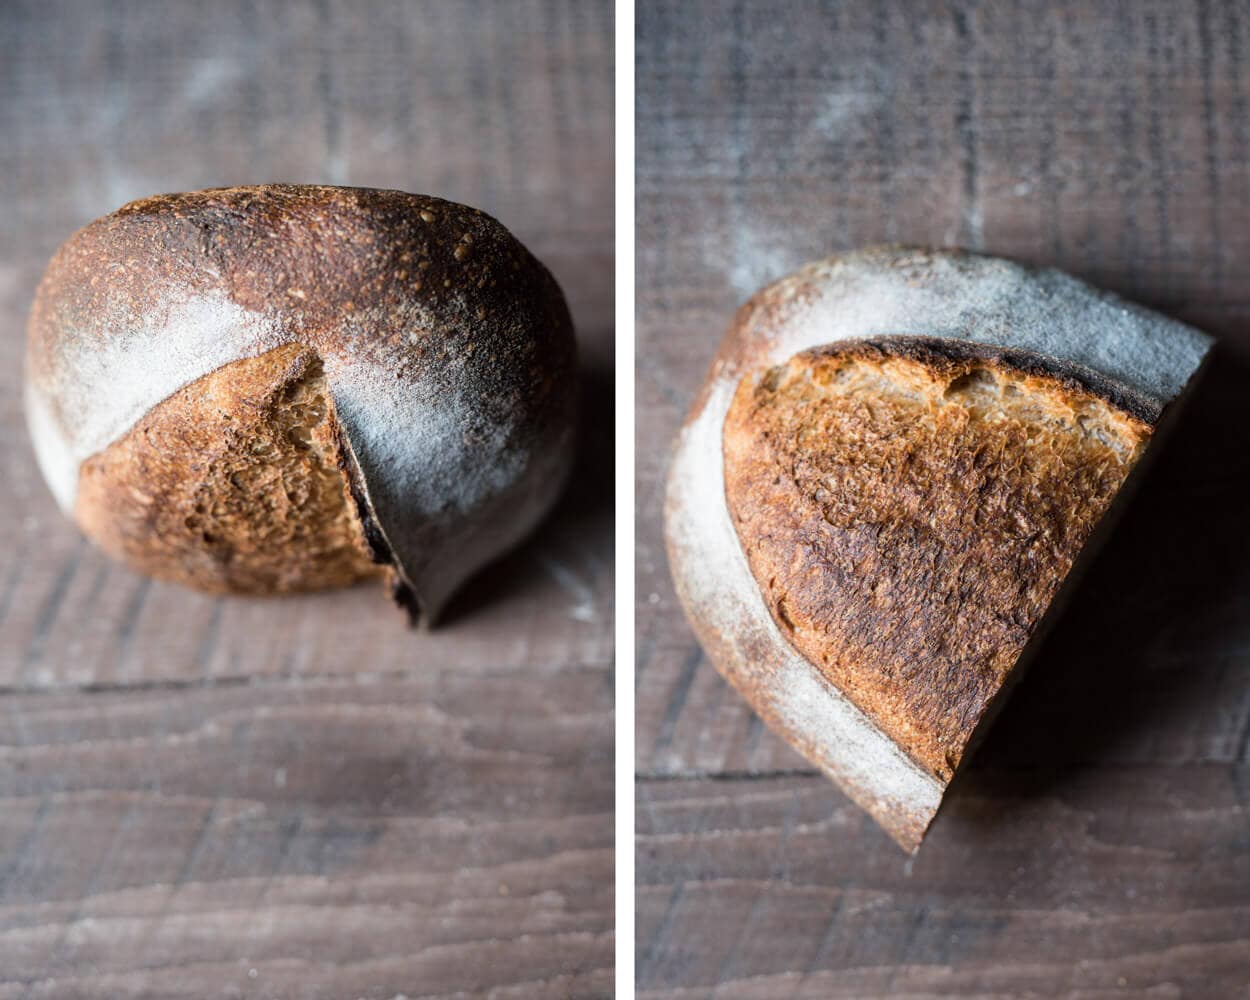
I love this dark crust, and because of the hot bake, the interior did not dry out in the slightest. Sometimes it can be hard to achieve this, but a minor tweak to the baking schedule really did the trick. I plan to try this in the future with my other recipes. The crust results speak for themselves!
I almost always prefer the batard shape over a boule, mainly because of how the bread slices up (not too wide and a little taller), and this bread is no exception. I enjoy how the crust peels back as the bread opens in the oven. It contributes to that tall loaf with a really pleasing aesthetic.
Crumb
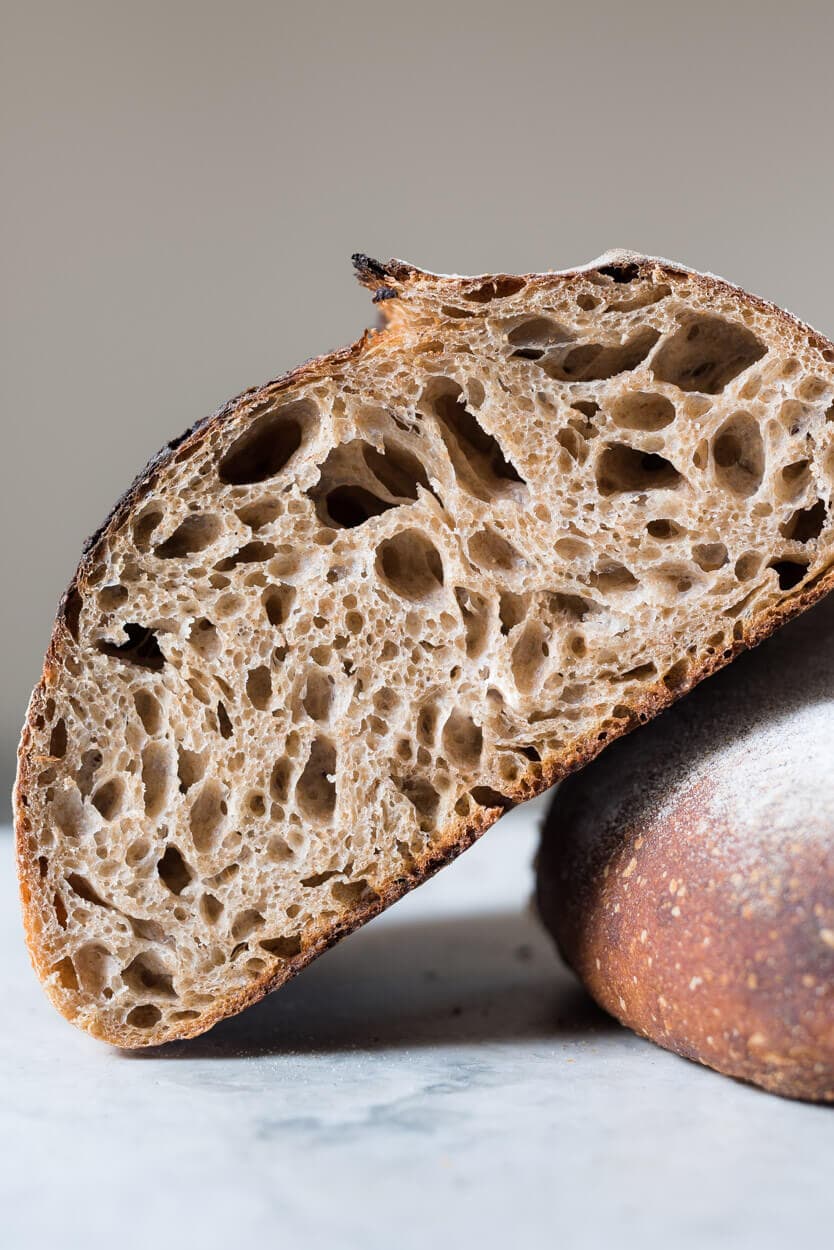
For 50% whole wheat, I couldn’t be happier with the crumb. As you know, the higher you go in whole grains, usually, the denser your bread will be, but I think the relatively high hydration and a mix of flours have helped achieve a really light loaf that has uniform openness throughout.
Taste
This bread has an assertive wheat flavor but not so much that it’s overpowering; it really showcases the stoneground wheat and doesn’t let it play the second role here. There’s a tad more sourness peeking through, but it’s actually a very complimentary flavor to the wheat, adding a touch more complexity and depth. I’m not big on overly sour bread, and for me, this was just right.
If you’d like more sourness, try to proof a bit longer or add even more whole grains, and if you’d like less, do the opposite. Just be wary of the timetable I’ve laid out here when modifying the whole grain percentage. As you know, more whole grains means increased fermentation activity.
I like the idea that this recipe is a starting point for those who might not have a lot of experience working with whole grains (or even if you do!). With this gateway bread, you can adjust the whole wheat percentage up or down to suit you and your family’s tastes. It’s a good jumping-off point with a majority of whole grains and a base formula for our endless tweaking and testing in search of that perfect loaf.
Buon appetito!
Print
Fifty-Fifty Whole Wheat Sourdough Bread
- Prep Time: 24 hours
- Total Time: 24 hours
- Yield: Two 900g loaves
Description
A delicious loaf of sourdough bread with 50% whole grains. This bread is airy, light in hand, and it has a deep, complex flavor profile from the assertive wheat and fermentation flavor.
Ingredients
Levain
- 24g medium protein bread flour (or all-purpose flour)
- 24g whole wheat flour
- 48g water
- 48g ripe sourdough starter
Autolyse
- 453g whole wheat flour
- 214g medium-protein flour (or all-purpose flour)
- 238g high-protein bread flour
- 634g water
Main Dough
- 18g salt
- 143g ripe levain
- 100g water
Instructions
- Levain (12:30 p.m.)
In a small container, mix the Levain ingredients and keep it at a warm temperature for 3 hours. - Autolyse (1:30 p.m)
In a medium mixing bowl, add the autolyse ingredients and mix until no dry bits remain. Cover the bowl and let rest for 2 hours. - Mix (3:30 p.m.)
To the mixing bowl holding your dough, add the levain and a splash of water. Mix thoroughly and strengthen the dough for about 4-5 minutes. Add the salt, another splash of water, and mix until incorporated. Strengthen the dough further if necessary until it’s elastic and smooth. Transfer the dough to a bulk fermentation container and cover. - Bulk Fermentation (3:40 p.m. to 7:10 p.m.)
This dough will need 5 sets of stretch and folds during bulk fermentation, at 30-minute intervals. After the last set, let the dough rest for the remaining time in bulk fermentation. - Divide and Preshape (7:10 p.m.)
Lightly flour your work surface and scrape out your dough. Using your bench knife, divide the dough in half. Lightly shape each half into a round shape. Let the dough rest for 20 minutes, uncovered. - Shape (7:30 p.m.)
Shape each piece of dough into a round (boule) or oval (batard) and place the dough in proofing baskets. - Proof (7:35 p.m. to 9:00 a.m. the next day)
Cover proofing baskets with reusable plastic and seal shut. Then, place both baskets into the refrigerator and proof overnight. - Bake (The next day, bake at 9:00 a.m.)
Preheat your oven with a baking surface or combo cooker/Dutch oven inside to 450°F (230°C).When the oven is preheated, remove your dough from the fridge, score it, and transfer it to the preheated baking surface or combo cooker. Bake for 20 minutes with steam. After this time, vent the steam in the oven or remove the lid (you can keep it in the oven or remove it) and continue to bake for 30 minutes longer. When done, the internal temperature should be around 206°F (96°C).
Let the loaves cool for 2 hours on a wire rack before slicing.
If you use this recipe, tag @maurizio on Instagram so I can take a look!


646 Comments
Hello Maurizio, after perfecting the Beginner’s SD, I’ve moved on to the 50/50 WW loaf but having some challenges. At the end of bulk ferment, I rarely see the large bubbles I see in your illustration. There’s a few emerging just under the skin but nothing significant. The loaves rise fine but the crumb doesn’t exhibit the larger holes I see in your bread. The other issue is aesthetics. I use Rice flour and brush off excess before baking but the end result looks unattractive giving the crust the appearance of 60 grit sandpaper. The saving grace is the nice, healthy fissure opening along the side. In spite of the rough look, the bread is absoluting gorgeous! I really love the earthiness of the wheat and makes for ideal open-face (German Style) sandwiches! It’s my new go-to bread – Thanks!!
Glad to hear things are going mostly well, Billy! I do also love this bread dearly, the flavor is incredible. It’s ok if you don’t see lots of bubbles, but I do find they’re a good indicator of healthy, and strong, fermentation in the dough. The key is by the end of bulk your dough should be smoother, more elastic (strong), and readily holding an edge near the side of the bowl. Perhaps your dough needs a little more time in bulk?
As far as the crust color, you could try steaming a bit more in your oven. Give it a few more sprays of a handheld mister, or open the oven and mist it a bit more after 5-10 minutes of baking. There’s a lot that goes into the coloration of the crust and diastatic malt powder does help in low percentages as well.
I’d say if the flavor and texture is spot on for your liking you’re winning 99% of the battle here! I hope that helps in some way and thanks for the feedback 🙂
Hi Maurizio, I’ve been thinking about trying to use the same flours so see how that affects results, but shipping from Guisto’s and Central Milling seems to be pretty expensive! The flour will be $40 and the shipping $50 for ground. — i don’t know where you get it or if you order online, but do you think that’s worth it… ?
vs. getting a brand that sells via Amazon (evil, i know!) prime – honeyville / bob’s / etc… What do you think? 🙂 Thanks!
Hey! Yes, shipping can be pricey. I usually order in large quantities to try to mitigate that to some degree, but it’s still a little on the high end vs. other flour. I’d say definitely try out other sources and see what you like! If you haven’t looked in your area I’d suggest starting there as well. Sometimes we have access to local flour and we might not even know about it until we do a little digging (unfortunately this is not the case for me). So yeah, try looking local, then various other sources — whatever works for you and your budget 🙂
trying this recipe for the first time! When i mixed my autolyze it was pretty dry- shaggy for sure but not wet or very loose. Is it supposed to be? I am also at 5280 ft in elevation, dry climate. Also, i am using a Lodge combo cooker and definitely had some serious scorching on the loaves after just the initial 20 minutes covered at 500 and 10 minutes uncovered at 500- before even the last final 18 mins of baking. Thoughts on that as well?
I also live at 5280ft and it’s very dry here (in Albuquerque) but it’s also heavily dependent on your batch of flour. You’ll be adding your liquid levain a little later in the process as well as some more water so assess the dough then. If it still feels very stiff add a splash more water to loosen it up. Little adjustments like these are usually necessary, each batch of flour can have different absorbency!
Hope the bake goes well, have fun!
Hey Maurizio, can you discuss what a liquid levain is in more detail please? My starter is a 50/50 flour to water ratio, will this work?
I’ve just finished my third stab at this recipe! The loaves always taste great but the desired crumb/texture remains elusive. On my last attempt, the interior was slightly gummy with a tighter, more uneven crumb than yours (sorry, it’s hard to describe without pictures). There were lots of bubbles at the top of the crust, and the loaf was a bit flat (not domed as you might expect from a boule). I’m struggling to figure out what this means (overproofing? underproofing?) and what to adjust for next time. I should add that I adjusted temperatures/times a bit to accommodate my kitchen, not sure if you need to know those to answer… Thanks again!
Hey, Roshni! It sounds to me like your loaves were either under or over proofed, as you indicated.
There are a few indicators your dough could be going over: sluggish rise in the oven, the score on top of the dough might not open with a nice “ear” and instead just kind of fuse together, the interior will have lots of small holes and perhaps one or two large ones near the top (but no dense areas of unfermented flour), and finally the loaf could be a little on the sour side.
There are a few indicators your dough could be under: explosive rise in the oven, dense interior with potentially scattered large holes, and gummy texture to the interior. Finally, it’s possible the bottom of the loaf might be slightly bowed upward (like the letter “U” — the top will kind of dome).
The best way to diagnose this is to try and fix one at a time. If you feel your loaves are over proofed (based on the description above), try dialing back a little on the bulk and a few hours in final proof in the fridge. If things improve then keep heading in that direction. If not, your dough might be under proofed, in that case head in the other direction.
It can be hard to diagnose and fix issues like this but remain observant and see how single changes to the process change the outcome and make your future decisions based on that. Hope this helps!
Thanks so much! This blog is such an incredible resource – I’ve learned so much since stumbling across it and have completely fallen in love with bread baking.
I am making delicious bread thanks to your recipes, thank you! A couple of questions:
1) I have noticed with all my attempts, when I pre-shape my dough balls, they do not hold their shape well. Is this a sign of under or over proofing? I generally bulk until I see some bubbles and round edges, basically like your pictures but with one or two bubbles only (which usually ends up being 30m or so longer than your suggested time).
2) My oven goes to 550. Should I decrease all the way to 450 for the second half of baking, or just to 500?
Thanks again 🙂
Glad to hear that, Jono!
1) It could be either, unfortunately. But it could also be that your dough is over hydrated and/or just not strengthened enough. Have you tried giving the dough a few more sets of stretch and folds to see if that helps? Then preshape it rather tight if necessary — it might be that you need a few more movements to really develop that skin on the outside. You could also try reducing the water in the dough just a bit, perhaps 5%, and see if that helps bring more strength to the dough.
2) I’d still go down to 450°F.
Hope that helps, let me know how it goes!
Maurizio, thanks for the advice! I did some reading up on the purpose of pre-shaping and realised I was really not doing this part correctly at all. Getting a tighter pre-shape has really helped with the pancaking. Thanks again 🙂
I tried this recipe with a Dutch oven (preheat for an hour at 475, bake covered 20 min, reduce heat to 450 and bake covered 35 min). I found that it didn’t haven’t as much of a delightfully crunchy, caramelized crust as the beginner sourdough recipe. Do you have any thoughts on how to modify the bake temperature/time? Thanks.
It might not be the Dutch oven, it might just be the flour used and this recipe. Typically with recipes that have a higher percentage of whole grain flour you’ll notice a thicker, more substantial crust — much different than the thin crust you’ll achieve on a mostly-white flour bread recipe. I get really great results with the bake times listed here (even in a DO)!
Can you do this recipe with a 100% whole wheat starter? I only have the whole wheat starter and an ischia starter. Which would you go with?
Absolutely! Either would work, just adjust the timeline to suit your starter. For example, your 100% ww starter might ripen faster — just use them at the right time. That starter might also lead to a slightly more sour result, depending on how you manage the rest of the bake.
Hi there! Thanks for this recipe, it strikes a really good balance between informative and approachable. I’ve been getting into sourdough lately, and have been trying out a lot of different recipes and techniques as a way of exploring the possibilities, and I’ve noticed something I’m wondering about. Some of the recipes I’ve tried don’t involve a levain–you simple include your starter in the dough. What is the difference between a sourdough made with a levain, and one made without? What is the thinking behind this? Thanks!
You’re very welcome, Kori! Essentially your starter and levain are the same thing. A levain, however, is a single build (mixture) that ceases to exist when the bread is baked in the oven. Conversely, your starter continues to be fed indefinitely. You don’t have to make a separate levain at all, you could use your starter in a mix directly. One of the reasons we make a levain is to help scale up our starter to cover the requirements of a recipe — if you have enough starter then that also works.
Check out my sourdough starter FAQ for more info on this question (scroll down a bit and you’ll find it)!
I really enjoy this great blog, thank you. I tried making this 50/50 bread for the first time and I’m not sure what I did wrong but the dough was super loose when I put it in the fridge for the night, and when I put it in the oven, it kind of spread out into a low thin loaf. I cut the hydration by 100 grams but still couldn’t get it to have any structure. What do you recommend? Did it need to ferment longer with a few more turns to build more strength? Or should I cut back on the water even more? Thanks!
It sounds like the dough could benefit from either reduced water, more mixing/kneading/stretch and folds, or a combination of the two. I’d suggest dropping the water a little more, perhaps 50g-100g, and then add in another set or two of stretch and folds at the beginning of bulk. See if that helps bring it together to get a stronger dough!
Thanks Maurizio! I actually only use a pan, no DO. I made “My Best Sourdough” recipe and it was unbelievably good! I started at 475 and reduced to 425 and that seemed to help a lot. I may try the DO though and/or cornmeal. If I plan on baking 1-2 x per week, would you recommend I invest in a baking stone?
If you plan to mostly bake in the DO then you won’t really need one. I’d say pick one up (I have a few good ones listed on my tools page) if, at all, you want to try making batards (longer oval shapes), pizza, etc!
Awesome, I’ll do that!
My breads have been awesome! I’m so excited to see how much better they’re getting. One issue I’m having is that my bottom is always very dark, almost burnt looking (not tasting though) and very hard to cut. Just the bottom. Any ideas? I’m going to try “My Best Sourdough” recipe this weekend for the first time.
Right on, that’s great! Progress can be slow sometimes, but we always learn something from every bake.
If you’re using a Dutch oven this is pretty common. Try preheating the oven with the Dutch oven (DO) at a lower temperature to help reduce the bottom from burning too much. Perhaps preheat at 475ºF. If you still get a slightly burned bottom you could sprinkle in some coarse wheat germ or cornmeal into the DO before placing the dough inside, this will help insulate the dough just a bit.
I would also recommend you not place the DO directly on a baking stone. Try placing the stone on the bottom rack and then a few rungs up use another wire rack to hold the DO. This way you won’t get so much direct bottom heat from the heating element. The stone on the bottom will also act as a buffer and prevent too much immediate, direct heat from the element — it should radiate out more consistently through the bake.
In general, I notice when I use a DO to bake I tend to get a slightly more baked bottom than sides and top — this is just the nature of using the DO, in my experience.
First off–thanks for creating such great content and sharing your knowledge on this site! As a relatively new sourdough baker, it’s been an invaluable resource!!
My question is regarding kneading/slap & fold during the mixing vs. stretch & folds during bulk fermentation, specifically if there’s a correlation between more of one or the other in the final bread rise and crumb. In this recipe, you say to stop slap and folds with medium development, and from your 1st bulk ferment photo, the dough looks pretty loose and spreads itself flat in the bowl. Is this method gentler and therefor helping create more air/open crumb in the final product, or what (if any) would be the drawbacks of building more gluten development at the start?
I ask because I’ve tried this recipe a few times, and keep finding that (in comparison to your photos) I’ve over-kneaded a bit… I’ve adjusted the number of stretch and folds accordingly to get to what I think the final dough should be before shaping, but my final loaves are not quite getting the rise and crumb that I’d like. (That could be due to my less than stellar shaping, but that’s another story!!) Thanks for your help in troubleshooting! 🙂
You bet, I’m glad I can help!
The end goal with strengthening the dough is to have it strong enough to provide sufficient structure (to trap gas and rise in the oven) but not so much strength that it inhibits rise. Think about it as a balloon: you want the balloon relaxed and extensible enough to expand out as it fills with gases (from fermentation), but strong enough so it doesn’t expand out too far (and turn into a “pancake”) and eventually deflate. Strength comes from kneading up front (e.g. slap/fold), strength and folds during bulk, and organically through fermentation itself (acid byproducts condition gluten).
I like to do some slap/fold upfront to give the dough strength out of the gate. This way, I don’t have to do as many stretch and fold sets during bulk fermentation. You can change that up, though, and do no slap/fold and instead add sets of stretch and folds during bulk. However, regardless of how you do it, you should stop strengthening the dough when it feels “good enough.” It’s a nebulous term because it’s very hard to articulate through text and even photos — you’ll gain the feel for this as you get experience in baking.
If you feel like the dough is too strong, just adjust as you’d like: reduce slap/fold time or eliminate it, or reduce number of stretch and folds in bulk.
Hope that helps!
Hi Maurizio
I’m an extremely beginner baker, and wanted to move on from the Beginners Sourdough recipe to a recipe with more whole wheat percentage. I’m doing this recipe at a much lower hydration, about 76%, mainly because I don’t own a bench scraper (yet) and I don’t quite have the skilled hands of a pro yet. Would a lower hydration affect the oven-baking or even the fermenting/proofing time? Thanks so much!
Yes, I’ve found reducing the water in a recipe can decrease the fermentation activity in the dough. The key is to really just watch the dough through the whole process and give it the time it needs. It’s likely your dough might need a little extra time in bulk fermentation depending on what your final dough temperature is. Just be ready to lengthen bulk if necessary and it’ll turn out just fine.
Hope that helps!
Hi Maurizio
I tried the 50-50 recipe as above, being a novice sourdough baker I kept to the lower hydration, 78.2 % in my case. The dough only developed gluten after 25 minutes working vigorously on the worktop. After that I bulk fermented it at 82F with gentle stretch and folds at 30 min intervals as described, with minimal rise. The dough became terrible sticky, though, not just a little tacky but proper stick-to-everything-in-sight kinda stick. I wasn’t really able to get anywhere near shaping it, tried for more than 20 mins, but it remained too sticky to release from worktop, fingers, bench knife etc. In desperation, I added a good bit of flour (I would say as much as 100g) and I managed to fling it into my banetons in a more or less round shape. I’ll know the final outcome after baking, but my question is, where did I go wrong: overkneading, underkneading, overproofing, underproofing? Thank you for your insight.
Update after baking: I regret having to report disaster… after retarding at around 70F for 10 hours, loaves rose very well (a bit too well and bubbled over the edges of the smaller banneton), but due to softness and slackness I wasn’t able to get them out into my Dutch oven without loosing a lot of height and airyness. Result: near enough no oven spring and a flat, solid loaf that would be best suited in masonry work… Ah, well, the chickens will love it anyhow. As for me…. upwards and onwards!
Bummer to hear that, Marijn! I’d say try reducing the hydration of the dough next time, that’s my best guess. I might have also said the dough over proofed on you, especially at 82F, but if it rose well enough overnight that might not have been the case. Reduce the hydro down by 5% or so and see if that helps.
Also, 25 minutes is quite a long time to mix/knead the dough, depending on how you’re doing it and your effectiveness. Just mix the dough until it starts to sort of smooth out and hold its shape on the countertop. If it starts to tear excessively all over (a few places is fine) then it’s strong enough. It’s very hard to over mix the dough by hand, but I’m trying to save you a bit of energy 🙂
In the end I’d say the hydration is likely the cause for excessive stickiness. Reducing that will also bring more strength to the dough. Let me know how it goes!
Thanks for your thoughts on that, Maurizio. Today is my day off again, so I’m trying a lower hydration recipe for this time, and if successful I might gradually build up to something more sloppy 😉
I am a pretty new sourdough breadmaker and was so happy to find this blog! I’ve been to a couple classes and have made about 10 breads. The second class I went to was taught by a pretty well-known baker in the bay area but my breads are not turning out. His starter is 2oz starter, 2.5oz water, and 2oz flour, so VERY soupy. The breadmaking process is 3 days long and I think my breads are always overproved because they rise a ton and then collapse to a fairly flat bread. Taste great, but not the shape and feel I want. Over the past few days I’ve been using your directions for my starter and tomorrow I’m going to build my levain and bake on Sunday. I have a few questions and apologies if you’ve answered them in another post:
1) Do I feed my starter tomorrow morning if I’m going to build my levain at 11am or noon?
2) Where do you store your flour? I’ve read that some people store it in the fridge or even the freezer.
3) What should I substitute for rye if I don’t have it?
I’m sure I’ll be asking a ton more as I bake more. Thanks for the blog and for your help!!
It sounds like your dough is over proofing. Cutting back that long proof time should help rein the dough in. Answers:
1) You want to use your starter when it’s mature/ripe (that is, before feeding) to build the levain.
2) I use my flour rather quickly but if I am not, I usually keep it in my fridge. Freezer also works!
3) If you don’t have rye I’d go with whole wheat flour. It won’t be the same flavor but it’ll still be totally delicious.
Hope the bake turns (or turned!) out well — happy baking!
Thank you so much for the response. I ended up making bread on Sunday using your recipe and it was the best bread I’ve made so far! The dough was a bit sticky and the slap and fold was very difficult. I’m making bread today I’ve reduced the hydration to 80% and will see how it goes.
Super awesome to hear that, Daniele!
I made this recipe over this past weekend, Saturday to Sunday. I did a little experiment (this was my first time making whole wheat sourdough), in which I proved one of the loaves for 10 hours per the recipe, and due to my schedule, the other loaf proved for approximately 18 hours. Even with the note about being careful not to overprove this bread, I saw no real difference between the 10 hour proof and 18 hour proof loaves. The loaf that was proved longer was slightly heavier (about 70 grams), but otherwise, essentially nothing was done differently. Both crumbs were fairly open and both loaves rose beautifully! The only place where I’d look to improve is scoring. My scores spread more than they did create an ear, but I attribute that to my skill level in scoring (especially with a high hydration dough). I used only KAF bread flour and KAF whole wheat flour, and actually forgot the diastatic malt. Oops! Haha. Overall, I’m very pleased with it! I even (sort of accidentally) did it at 86% hydration. I didn’t really encounter that much trouble shaping it.
Overall, thanks for the recipe, Maurizio! And do you have any insight into the proving? I’m not a very experienced sourdough baker (this was only my third overall naturally leavened bake, the first two being your beginner’s loaf).
Very interesting experiment! It’s possible the cool temperature in your home fridge really slowed things down for that second loaf. I’d expect a slightly more sour or complex flavor profile, but perhaps not. It’s ok if you didn’t add the malt, KAF BF does already contain some so I’m sure that helped! Glad they both turned out well 🙂
I’ve made countless different sourdough recipes as I’ve been learning and improving my technique. I thought “My Best Sourdough Recipe” was perfect but after finishing this recipe I have found my new favorite. It’s not too heavy with whole wheat taste and my crumb still was open.
I omitted the malt but I’m going to have to order some to try.
Yes, this bread definitely is a tasty one! I love the higher percentage of whole grains and it’s actually a recipe I continue to go back to time and time again.
Thanks for the feedback, Aaron, and happy baking!
Hey Maurizio – last week i had INSANE success with this recipe!
just wondering about the levain – why did you choose those amounts to build the levain? and then why/how did you arrive at 132g levain as the correct amount to add to the mix? what’s the relationship between the levain weight and final dough weight? like…is there a fixed ratio you shoot for?
i hope this makes sense…i’m thinking about this because the levain in the Tartine basic recipe is 20%, while for this recipe it’s 13%. what’s the cause or intent of that difference? thanks!!
Right on, Colin! There’s no fixed ratio for the levain, but I generally like to keep it between 10-20%. When developing a recipe I’ll assess the flours I’ve decided to use for the recipe and take an initial stab at the levain percentage, just based on intuition. Then, I’ll start testing the formula and I’ll adjust the percentage of the levain up or down depending on how the dough is developing and if the dough meets the timetable I’m after (e.g. if the dough takes longer than 4 hours in bulk I’ll increase the levain percentage next time).
Overall I reduced the levain percentage in this formula because there’s a significantly higher percentage of whole grains which speeds up the timetable for a dough.
Hope that helps!
It might not be the steaming method that’s causing the issues with height and interior — it could be caused by the flour or at many parts of the process! There’s no way to attach a photo here but if you’d like to email me one send me a message through the Contact link up top!
I don’t get any smokey smell from the lava rocks. Are you using the ones I linked to on my Baking Tools page? They should be the ones designated for culinary use.
Hi Maurizio, I have made this recipe a few times now using your method of steam in a home oven but my boules are not getting enough height and the crumb is not as open as your pictures. I am following your recipe to a T but I am using Arrow head mills stone groud whole wheat and all purpose. What can I do to achieve more height and more open crumb? Is it possible to attach a photo without it being a link? Edited to add: Using your method of steam with the lava rocks is wonderful for having up to four loafs but the Smokey smell is very instense and bothers me. I had to open all the windows. How do you combat this?
Hey Maurizio, I tried making this recipe, sans malt as well, this is my result, any idea what I could be doing wrong? Another question is, any substitute for rice flour as I have a hard time finding that in Honduras, central america, my makeshift banneton is a colander with a cheese cloth, but no matter the amount of flour it always stuck to the cheese cloth.
photo of failure:
https://i.imgur.com/ttoRMCe.jpg
Antonio — it’s ok if you’re not using malt. I’d say based on your image it looks like your dough is probably under proofed. Make sure your starter is strong and fermenting fully before you use it. From there, you want a mature levain to build your dough. Focus on keeping your dough warm through bulk and let it go until your dough looks similar to mine in the images in this post (and others across my site). You want the dough to have risen well and be nice and bubbly/jiggly in your bulk container — it should look alive and active.
I wouldn’t recommend using cheese cloth to line your baskets. Do you have a fine kitchen towel you could use? I feel like this would provide better non-stick properties since there won’t be holes as large as with cheesecloth. Aside from that rice flour really helps because it has a high scorch temperature and won’t burn in the oven as easily. You could use wheat bran for this as well!
Hi Maurizio! I’m planning on making this this weekend. I just got some freshly milled hard red spring flour from Seylou bakery here in D.C. Anything I should be aware of when using freshly milled whole wheat flour over store bought? Also, I’m not sure I can get my hands on the malt on time – should I make any adjustments as a result?
Hey! It’s ok to skip the malt for this recipe, especially since you’ll be using fresh milled flour. Just keep an eye on two things: the hydration of the dough (usually fresh milled can take on more water, not always, but usually), and also fresh milled flour tends to speed up fermentation so keep an eye on the progress of the dough during bulk. Have fun and enjoy, the taste is going to be great!
Thanks for your reply! Decided to do your beginner sourdough again today instead, as I needed to get it done in the morning and was worried about how sour this would get if I ended up retarding it for 18 hours or so. Do you think it would have been ok? I’ll try and make this one after these loaves get eaten!
It might have been just fine. It really depends on your preference to the taste, and it might have not been all that sour — really depends on how the dough was progressing.
Thanks! I prefer a more subtle sour flavor, and my starter is really active at the moment. Will definitely give this a go next!
Hi Maurizio! I’m planning to make this loaf soon but only have a Dutch oven. I was wondering if the baking times would still be the same and after how long to take the lid off and reduce the oven temperature? Thanks.
Hey there! This will bake up just fine in a Dutch oven. times would be similar but I would reduce the preheat temperature to 475°F. Then when you load the preheated DO turn the oven down to 450°F. Keep an eye on the loaf near the end of the bake, it might bake up slightly faster. Enjoy!
I was thinking of also using a dutch oven. I was thinking of keeping the cover on for 20 mins at 450, and then removing the cover and reducing temp to 425ish for the rest of the bake. What are your thoughts? I know the best course of action is experimentation.
I feel like those times and temps will definitely work, and I know a Dutch oven will also. 425°F is a little low for that second half, so keep an eye on it and bake till it’s done. Go for it!
Hello!! I’m sorry if you’ve answered this before. I’m new to bread baking (as in I’ve never done it beforebut I’m inspired and want to try baking the majority of the bread we eat from now on). I’m so confused when you talk about % hydration. Like 100% hydration. That to me seems like that would mean a liquid, right?? Could you comment on what you mean about % hydration? Thanks!
Emily — not a problem. Have a look at my Beginner’s Sourdough Bread recipe, on that page there’s a full explanation of hydration and how to calculate it!
I bet it was still quite delicious! Large percentages of spelt, while very tasty, most likely won’t have the same aesthetic as a loaf with bread flour — this is mostly due to the nature of spelt and the effect it has on a dough (increased extensibility). I’d suggest trying a 40% spelt, 55% all purpose, and 5% rye and see how that goes. The alternative would be a fifty-fifty with spelt / all purpose — it might not have the same height but it would taste very good!
Just baked the 50:50 wheat bread today at 86% hydration, fresh milled whole grains. Turned out quite nicely baked in both a DO and clay vessel. Wasn’t as tangy as I usually like so I’ll probably increase fridge time a bit. But as you say, I don’t want to over ferment/over proof. Had a blast working with this dough. Sticky but enough gluten development to make it workable. May add some lemon zest next time…a favorite add in my wheat breads. This is probably my most successful higher % wheat bread yet. Thank you!
That’s great! I do love this recipe, it’s a great flour blend and has a subtle sour flavor at each bite — a longer cold proof should bring out some more of that acidity for you.
Thanks for the update and happy baking!
Hi,,, impressive work. I would like to know if i can use my 50% hydration sourdough in your recepies and how to change the water and flour amounts.. thanks alot
Thanks, Lina! Hydration is definitely relative to your flour and your environment. If your dough mixes up fine with that amount of water then by all means, go for it! This recipe, as all of mine are, really, are just guidelines — feel free to adjust them to suit your preference and your environment.
What is didastic malt…tried to find it in the notes below. What does it do to the bread? Could I leave it out? Love the instructions and times when to do everything. I want to make this recipe for this weekend to wow everyone.
Hey there! Thanks for the kind words. Diastatic malt is essentially ground, sprouted barley. It helps add color to the crust and increase enzymatic activity in the dough (I find it adds a little flavor as well). You can find some diastatic malt here for order online. That said, you can also leave it out if you don’t have any, up to you. Hope this helps — happy baking!
In this recipe you add the salt after slap and fold, where as in your “best sourdough” recipe you add the salt before. Is there a reason for this?
I’ve tested both ways over time and really, it’s just a personal preference either way. Sometimes I like to hold back and add it in later in mixing, especially if I plan on doing several stages of mixing as I add water (bassinage), as the salt can tighten up the dough (and scratch my hands, sometimes!).
Do keep in mind, though, that adding salt does inhibit fermentation. So if you’re trying to give the dough extra time to get fermentation kick started that will effect that.
Hope that helps!
Very helpful thanks. A couple more questions about salt…
Do you notice any difference when adding salt directly compared to dissolving in water first then adding?
How much does the salt inhibit fermentation? I was thinking I could add a bit more salt to bring out flavour, but how much? If I double the salt (apart from maybe tasting too salty) is that going to be way too much and the fermentation will take twice as long? Stop entirely?
I’ve not noticed a difference between dissolving the salt in water and just adding it to the dough. Just note that if you’re using salt that’s very coarse you probably should dissolve it before adding it to your dough. I always use fine sea salt so distribution is easier.
I’ve personally never seen a bread formula go over 3% salt — in fact, about 2.4% is the highest I’ve ever done myself. I wouldn’t recommend going too high, but if you were eager to test, go for it 🙂 My recommendation there would be to just watch the dough, since it will ferment slower overall it’ll likely just need much more time before it gets to each milestone in the process.
Hope that helps!
Hi! Thank you so much for all the detailed recipes! I have tried this recipe twice, once with 87% hydration which i got few big holes but very little to no oven spring… after consulting other baking experts on fb, I decided to attempt this again but with a lower hydration of 80% and tried to control the temperature as much as possible. I haven’t been getting much oven spring for both times…what could go wrong? Thank you once again!
Hey, Sandra! Sorry to hear about that. There are a few places where things could go awry. Reducing the hydration was a good move and is what I usually recommend when first trying a recipe — especially since this one has a relatively high amount of water.
First and foremost it’s imperative your sourdough starter is strong and rising and falling predictably. It all begins there, as you know! From there, I’d make sure the dough has enough time (at a warm enough temp) to really rise up during bulk fermentation. Try to nail that Final Dough Temp I list above! You want to see some percentage of rise by the end of bulk and the dough should be smoother and sort of “jiggle” in the container when you shake it. It should not be firm, totally flat, or lifeless looking when you divide. Usually the number one issue I find with people trying this recipe is that they did not let bulk fermentation go long enough. If your final dough temperature is lower than what I list above you’ll need more time in bulk.
However the converse is also true: we don’t want to let bulk go so far that the dough is essentially over proofed. Finding that perfect point for when to divide the dough is a hard thing to do in baking, but the times, dough temperatures, and pictures in my post above should really help you dial this in.
After bulk, make sure to shape the dough tight enough so you develop a nice, taut surface on the dough. The dough should relax during the cold, overnight proof but it should not spread out and feel “weak” or look lifeless.
I’d say focus on nailing that final dough temp, timing the bulk fermentation right, and then shaping nice and tight — this should help get you back on track. Feel free to send me an email through the Contact link at top and send over a few photos of your baked result (exterior and interior) and I’ll see if I can help further!
Hope this helps and happy baking, Sandra!
Thank you so so much for the detailed reply!! Since I usually bake once a week, I keep my starter, which I started this August, in the fridge. And whenever I’m baking a new loaf I’ll take the starter out the night before and feed it once, so during the morning after that I’ll start building the levain. Is that time sufficient for the starter to “wake up”?
I’m going to attempt this recipe again soon and I shall send you some more picture till then! Thank you once again:))))
and I did try to monitor the FDT to ~79F by using the formula given, but since I live in HK where it gets quite hot during this time of year I actually put the flour in the fridge and use ice water to make the dough..so it could actually hit 79F t the very end…
It’s possible only a single feeding will be enough, but I prefer two. Cooling the flour and water is exactly the way to cool down that final dough temp! Great job.
Hopefully the next bake works out better!
Do you have a link to the stoneground whole wheat? I can’t seem to find it on Giusto’s website..
Unfortunately it looks like they are not currently carrying that whole wheat. I’d say sub in any stoneground whole wheat you can find or even their other whole wheat options!
Ahhh, okay. I’m just worried to try something different because I got a bag of central millings high protein fine ground flour, but it still seems like it refuses to make an open bread at all, nothing like following this recipe with red mill.. any other suggestions for whole wheat?
Giusto’s other whole wheat options are also really nice, you could give their Organic Whole Wheat a try!
M – I have been using your recipes and have customized them as well as the baking time/temp because I live at over 7000ft elevation. Recently I switched to using bannetons, and have baked three loaves so far. Every single time, my dough sticks to the banneton. The dough consistency is similar to what I have seen on here. Much of my baking is either with 100% hard spring wheat I get from a North Dakota farmer or with 50/50 of this wheat and KA bread flour. Is my dough too wet? It certainly does not appear to be so. For prepping the banneton, I always mist it, then coat it with KA bread flour. Must I have bread flour here?
Hey! Sounds like you’re prepping your bannetons properly by misting them, but you could try using a 50/50 mix of white flour (bread flour is ok) and white rice flour. I find that white rice flour absorbs quite a bit of moisture and it helps the dough release from the sides more readily.
If that still doesn’t work you’ll either have to use more dusting flour mixture or liners for your bannetons. When I have a very wet dough I do prefer to use liners, it makes cleanup easier, anyways!
Maurizio: Thanks for taking the time to respond. I did manage to get the dough to free itself from the banneton using rice flour. If you get a few minutes, please take a look at my blog (http://crypticlineage.wordpress.com). I would appreciate some feedback on where I can improve my technique.
The fermentation in your dough looks great. I think your thought on over hydration might be right on — I’d try reducing the water a bit and see if that helps get some more rise out of the dough. It could also be that the extra water is making the dough more weak/slack and reducing the water will help bring strength to the dough. I’d give that a shot, otherwise it still looks delicious!
Hi Maurizio,
I’ve made this recipe many times and it has worked out fantastic. I’ve recently got myself 3 x 10 pound bags of local, freshly milled Type 75, Type 85 and Whole Wheat flour. I decided to substitute all the flour in this recipe for the Type 85 (milled a couple days before baking), and followed the same hydration as this recipe. The autolysed dough was certainly wetter than normal, and by the time I came to the slap and fold it was a big, sloppy mess that I could not strengthen. I added a few more folds in fermentation but at this point I realized the hydration was too high for the flour.
I have two questions. Firstly, if I realize I have put too much water in, is there any way to save it once it gets to the slap and fold stage? Can I add more flour or is it too late?
Second, can you think of any reason why there would be such a difference in hydration? By my understand Type 85 is basically half and half – but I am thinking because every flour is different particularly with fresh versus store bought, it’s all something you need to experiment with.
Thank you for all of your wonderful recipes Maurizio!
Great to hear that, Courteney! I don’t like to add flour in once the dough is in bulk fermentation, at that point I feel it’s a bit too late. However, before that I find it’s not a problem at all. I’ve talked with some bakers in the past who have added flour at the first fold during bulk but to me this would be difficult — if your dough really doesn’t seem salvageable you could try it and see how it works!
Each miller can have a different specification for what “type 85” means. It might not be exactly like 50/50 to your miller, you can try asking them what percentage extraction their type 85 is to give you an idea of how much bran/germ is left in the final product. When a miller specifies something as “type 85” they are indicating the ash content of the flour.
One note I’d say is with fresh milled flour you could try reducing the autolyse time all the way to zero and see if that helps. With some fresh flour I’ve noticed auto really works against me and it becomes hard to strengthen the dough back up after it slackens out.
Hope this helps and happy baking!
Hey, Tim! You can definitely change things up so they better fit your schedule. Just push everything in the timeline out a few hours and it’s all good. Also, if you need to speed things up (within reason) keeping things warmer will help, and conversely, if you need to slow things down keeping them cooler will work in that situation. Finally, if you want to proof the dough a little bit longer in the fridge overnight you probably have at least 1-2 hours leeway on when you can get it into the oven and still be safe. Home fridges are really cold at 38-40°F!
Hope that helps and so glad to hear your bakes have turned out so well!
Thanks! I’ll try and extend the fridge time a bit then.
Is this supposed to go straight from the fridge to the oven? I had trouble following the instructions. Usually I let it come up to room temperature but this recipe initially seemed to suggest going straight from the refrigerator. I had great gluten development yesterday but this morning I didn’t get much oven spring. Just wondering if cold dough was the culprit. Thanks!
Yes, I almost always go straight from fridge to oven. Baking cold dough like this wouldn’t cause an issue with oven spring (in my experience), but of course it’s all very dependent on how your dough is fermented when you remove it from the fridge. If the dough has fermented too much by the time it cools down in the fridge this could cause a lack of oven spring (essentially over proofed dough). You can usually tell this is the case if the dough has some visible weak areas to it before baking, it spreads instead of springs up, and the interior shows signs of intense fermentation with lots and lots of small holes throughout. Those are general things to look for but typically the case.
Conversely, if the dough is drastically under fermented you could let it sit out on the counter in the morning for a bit to get some more warm proof time to further fermentation. I don’t often do this because i like to score cold, tight dough for a clean “ear” but if the dough needs it, it needs it.
Sorry, I know these are vary vague suggestions but it’s hard to provide concrete steps for you to take to achieve more oven spring. I can say that typically a lack of oven spring is either due to over proofed dough or dough that’s not been shaped sufficiently tight and thus spreads instead of springs up.
I hope this helps, Andy!
Yes, thank you! I’m still relatively new to sourdough, and I’ll admit I’ve been a little loose with timing and the signs of properly proofed dough. It’s one of those things that I know makes a big difference but still seems a bit mysterious to me. Thanks!