


I call this batch number 33 of the Tartine sourdough country bread recipe, while it may actually be my thirty-third pair of these I’m not 100% positive. I know for sure it can’t be any less, but it’s probably more. On to the entry.
Another Sunday, another pair of Tartine sourdough country loaves shaped and proofing. My family has come to expect this bread to be on hand during the week, and in the rare case where we have to buy some bread from the grocery store, we are always disappointed. Baking bread is a relatively simple act when you boil it down, and yet getting that perfect loaf out of the oven does not always work out — but I still strive forward.
If you’re brand new to baking sourdough, read my Beginner’s Sourdough recipe post first, it has longer in-depth explanations on every step in the baking process!
Sunday started out a bit lazy; waking in the later morning after attending a friend’s birthday party the night before. I stumbled into the kitchen and took a look outside to see completely clear skies—a good sign a warm day was ahead. Given the rising temperature, I knew Sunday would be a day of quick dough handling and preparation. As you can see, even my German shepherd Arya (yes, that Arya) was a bit lazy this morning. I suppose too many rabbits, pigeons, and tennis balls chased the day before; oh, what a life.

Although the leaven was prepared later than usual on Saturday night, it was ready to go (left-hand side image below). As you can see, the bubbles on top indicate there was significant fermentation activity overnight, and judging by the smell (like ripe fruit, almost a hint of vinegar), hopefully, it didn’t go too far.
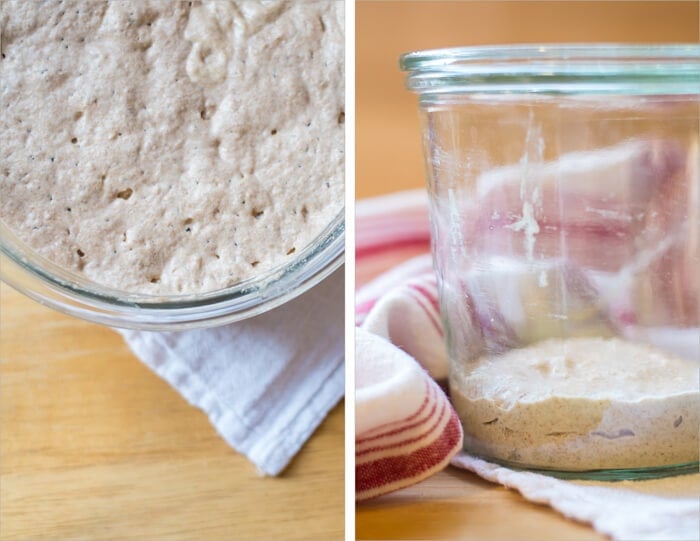
Over my starter’s lifetime, I’ve experimented with using different flour and grains and have settled on a formula that my particular strain seems to thrive on. Instead of following Chad Robertson’s Tartine starter formula in his book where he feeds 50% whole wheat, and 50% all-purpose, I feed my starter 100% rye flour. I’ve found that my starter shows noticeable activity when fed rye exclusively. If you’re interested in reading about how to create and manage a sourdough starter like mine, head over there and read on.
Also, if you’re one who frequents Instagram, head over and check out my Instagram feed. I typically post many “daily bakes” and those behind-the-scenes shots that sometimes don’t make it into these posts!
Tartine Sourdough Country Bread Recipe
Prepare the leaven – 12:00 a.m.
The night before you plan to prepare your dough, mix the following, lightly cover, and set out on the counter overnight:
| Weight | Ingredient | Baker’s Percentage |
|---|---|---|
| 31g | Mature sourdough starter (100% hydration) | 28% |
| 110g | Whole Wheat Flour | 100% |
| 116g | Water | 105% |
Mix the flour + water, autolyse – 9:00 a.m.
For this loaf, I decided to try and tweak the whole wheat to white bread flour percentages. I still wanted some of the WW taste and texture, but a bit more “white” in this loaf. Due to the WW reduction (from the last Tartine recipe), I’ve also reduced the amount of water to 79%.
Note that this is not a traditional “autolyse,” which only has water and flour mixed, but this is how Chad performs this step in Tartine—let’s follow suit for this bake. In my more recent baking adventures, I no longer mix flour, water, and levain for this step.
Gather the following:
- 250g of your new leaven
- 300g whole wheat flour (I’m currently using Great River Organic whole wheat flour)
- 700g unbleached all-purpose white flour (King Arthur)
- 20g salt
- 740g water and 50g water (reserved for step 5, below)
Method:
- Add 250g leaven to your large mixing bowl
- Pour in 740g water and mix with your hands until the leaven is completely dispersed
- Add 700g white flour and 300g whole wheat flour and mix with your hand until all the dry bits of flour are gone
- Cover your bowl with a towel, or if in a dry climate, plastic wrap and let autolyse for 30 minutes
- After 30 minutes, add 20g salt on top of the dough and slowly pour the remaining 50g of your reserved water on top. Squeeze the dough with your hand to incorporate the salt throughout
- Now reach your hand under the dough and pull the side up and over onto itself. Continue to do this as you spin the bowl; grab, pull, and push. Do this just until the dough comes together and becomes super sticky. Generally, this will only be between 5-10 turns
- Transfer your dough to your plastic or glass container, set a timer for 30 minutes
Next, we tackle the bulk fermentation step.
Bulk Fermentation
At this stage, we want to do four sets of turns, plus 1 – 2 hours of rest on the counter. A “turn” consists of reaching under your dough, grab the bottom and pull up the dough on top of itself. Do this four times, one of each side of your container (if it’s square, that is). Additionally, you want to do this rather vigorously. The stretch up and down on itself is what gives the dough strength.
- 10:10 a.m. – Turn 1
- 10:40 a.m. – Turn 2
- 11:10 a.m. – Turn 3
- 11:40 a.m. – Turn 4
- 11:40 a.m. to 1:40pm – Rest on Counter
Pre-shape – 1:40 p.m.
When the dough has risen about 20-30%, and you see a bunch of little air pockets throughout, it’s ready for pre-shaping. Take the dough out of the container onto your *unfloured* work surface.
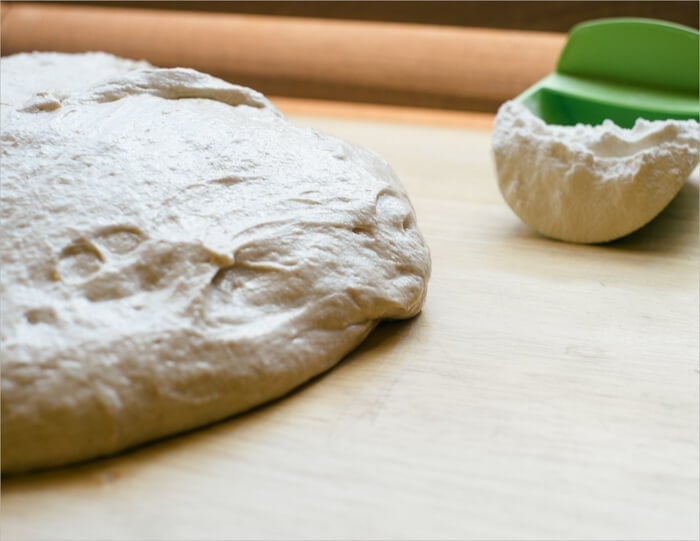
Sprinkle some flour on top of your dough and divide into two halves. Take a half, flip it over and pull each of 4 edges from under onto the top. Then, flip the folded dough over, so the seam is on your work surface. You want to form loose boules here by using your hand and your dough knife. Your work surface grabs the bottom of the dough slightly as you spin the dough around to make a little ball. Repeat with the other half and cover (I cover with two inverted mixing bowls) for 30 minutes.
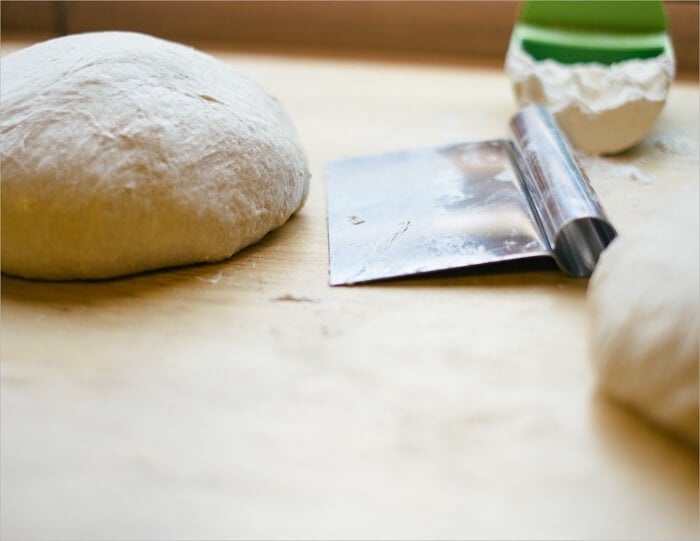
Shape – 2:10 p.m.
The resting dough should have spread out, but not quite into a pancake shape. If it has formed a pancake, you can strengthen it by pre-shaping one more time and waiting another 40 minutes.
Flour the top of one of the boules and flip it over with your lightly floured hand and dough knife. Take the part of the dough that’s closest to you and fold it up and over in half. Take the part that’s to the right, stretch it out as far as it will stretch, and fold it up and to the left. Repeat with the left side and the side of the dough farthest from you. Then take the edge that’s closest to you, pull it up and over again towards the back. When performing this last motion, you will lift the entire dough up and over until the seam side is now down on your work surface.
Spin the dough using your two hands to shape into a boule. As you slightly pick up the dough and spin it, the bottom snags the unfloured work surface and creates tension. I do this several times to create a very taught surface on the top of the boule. Sometimes small air bubbles will be visible.
If you’d like to shape this dough as a batard instead of a boule, check out my batard shaping guide.
Proof – 2:20 p.m.
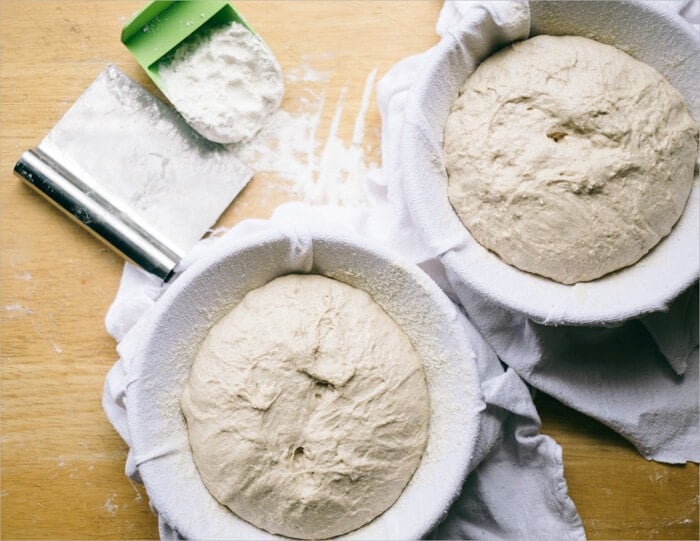
Place towels into small mixing bowls or proofing baskets and dust with white rice flour. These bowls will hold the dough as they proof in the fridge overnight. Take your taught boules and place them into the floured bowls with the seam *up* facing you. I place each of my bowls into plastic bags and then into the fridge.
Score + Bake – 9:00 a.m.
Gather your tools:
Speaking of tools, if you’d like to see all the tools, I use when baking head over to my tools page and take a look.
The first of these sourdough loaves was retarded for 18 hours. The Tartine formula lists an 8-hour cool fermentation in the fridge but 18-20 hours seems to be the sweet spot for me as my bread takes on a complex flavor with this extended fermentation time. It also seems to help open up the crumb more than what you would typically see; I strive for that light and soft interior.
In the morning you first want to get your oven ready. I place the rack in the bottom third of the oven. Turn your oven on to 450°F (230°C) and let it preheat.
Once your oven is preheated, get your dough ready. I bake this dough straight from the refrigerator—no warmup time is necessary. Take one of your loaves out of the fridge, cut a circular piece of parchment paper, and place it on top of the bowl. I then place a pizza peel on top of the parchment paper (and bowl) and invert the whole thing quickly to get the dough out of the bowl and onto the paper + peel. Get your razor blade out and score the top of the loaf to allow the bread to expand while rising in the oven. For these sets of loaves, I scored one with my “Roman numeral three” pattern and the other with a single long slash.
Quickly take out the shallow half of your hot combo cooker and drag in the parchment paper and dough.
Cover with the other half of the combo cooker and bake for 20 minutes with the lid on. After this time, open the oven and lift off the combo cooker lid (you can leave it in the oven to the side), close the oven, and bake for an additional 35 minutes. These times and temps are a drastic change from the Tartine book, but I’ve found them necessary due to my elevation and climate. I want the crust to be nice and dark brown.
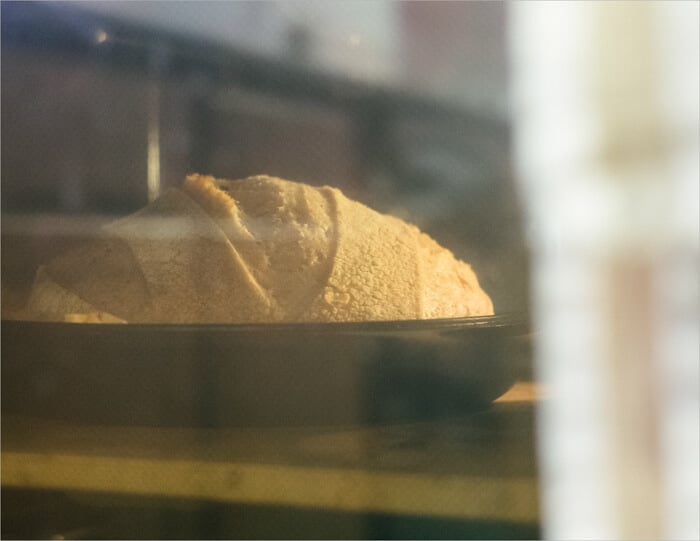
After pulling the loaves from the oven, I cool them on a wire rack for at least one hour before cutting into them. Cutting too soon can cause the crust to harden drastically and the inside to become quite dense. Easier said than done, however.
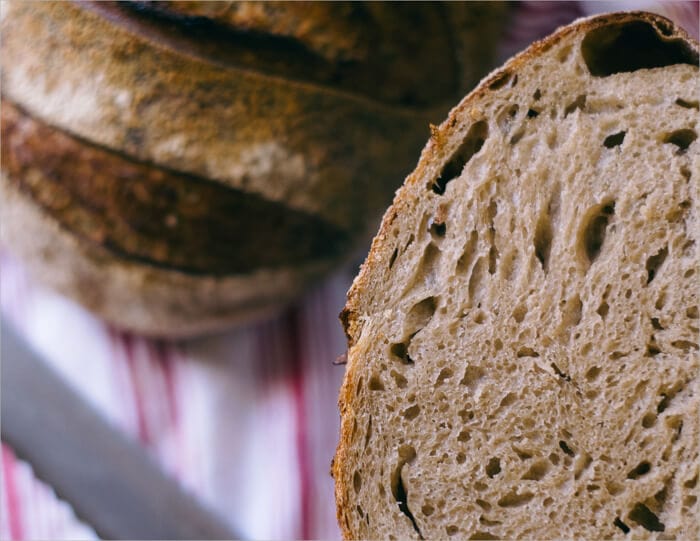

What a pair of beautiful loaves this morning. There’s no doubt the lazy Sunday morning/afternoon turned out to be a success in the kitchen, and this Tartine sourdough country bread recipe couldn’t be more delicious.
Buon appetito!
Now that you’ve attempted this recipe try your hand at the higher hydration version for a bit more challenge, and an even better tasting loaf!
If you use this recipe, tag @maurizio on Instagram so I can take a look!


374 Comments
Even though I am new to the world of artesian baking, this bread came out perfect. Thank you so much for sharing. And I finally GOT the part about counter resting and strengething the dough at pre-shaping stage. And it did work! I also used rye starter – came out perfectly. Though, I did some modifications: I rested my loafs in a fridge for only 6 hours (I was sooo afraid to overproof them), and I baked at 470 – 25 min and 450 – 25 min . Once again – thank you. And I will definetely try your other recipes.
That’s great, Victoria! Sounds like you’re well on your way now. Let me know if you have any questions in the future and happy baking!
Hi Maurizio, I have a 2 question regarding the Tartine bread, I have made two loafs recipe from the book, one band son the same day which came out great! The second baked the day after straight from the fridge top came out completely flat. Not sure what went wrong could it be the size? One was bigger than the other or cause I baked it straight from the fridge.
Second question how can I have more bubbles in my starter and loaf the bubble comes always very small
Thanks!
Hey, Alia. Baking straight from the fridge is not a problem, I do this all the time. It might be that your dough overproofed during the overnight rest in the fridge, or it wasn’t shaped tightly enough (or had enough strength) and if put in a large proofing basket/bowl, it would just spread to fill the bowl. I’d say try reducing your bulk fermentation time and/or proof time to help avoid over proofing. If it’s a shaping issue, be sure you shape tightly enough so the loaf holds its shape on the counter after you’re done.
Unfortunately there isn’t a single thing that leads to a more open interior in a baked loaf of bread. First, the flour used is very important, it needs to be strong enough (protein) and have the proper gluten properties to trap the gasses produced during fermentation. For example, no matter how hard you try with rye flour, the gluten properties in the grain just won’t lead to an open interior.
From there, a very strong and well-fed starter is important — it all begins there. Fermentation in general is so critical, it’s worth spending some time really stepping back to look at how your starter is performing and how well-fermented your dough is during bulk fermentation and the final proof. Without strong fermentation your loaf will never rise to its full potential.
Again, sufficient dough strength through mixing, and also organically through fermentation, is also important. Think of your dough as a balloon: you want it strong enough to trap gasses and expand in the oven, but not so strong that it won’t relax and expand out. Finding this sweet spot takes some practice.
I also find that, and this depends on the dough you’re working with, a very gentle preshape and shape are key to maintaining an open interior. If you’re rough with the dough during these times the delicate interior will quickly break down and become more dense. That said, the dough does still need enough strength through shaping to hold its shape during baking.
I hope this helps!
Hi Maurizio! Thank you so much for all this info, yes it makes total since, I just had another issued with rebaking this recipe. When I got the dough from the basket to score, the have completely lost character and starter too ooz which is very hard to transfer to the Dutch oven. So how can I have a strong thick exterior , I did same day fermentation around 3 hrs and proofing 3 hrs. Thank you!
It’s likely the dough was either over proofed, it wasn’t shaped tightly enough (or didn’t have enough strength), or both. Be sure to shape the dough tight before you place it in the proofing basket, it should be able to hold its shape on the counter after you’re done shaping. You could try reducing that final proof time as well.
Hey Maurilio – the recipe calls for 700g of white unbleached APF.. why the change from white bread flour out of curiosity?
*maurizio (haha)
Depending on the flour you have, I find most “bread flour” has a very high protein percentage (usually around 13-14%) and can result in a gummy interior. Nowadays I tend to use as little high protein flour as I can in a recipe because I like the more tender, delicate interior I achieve from a lower protein flour. This is just my experience/preference!
Hmm. Glad to have found this comment. Reading this I can relate to the bread flour being more gummy (have not yet made enough loaves to have made that connection). Also, I would have though the gluten would be stronger in the bread flour but I have to work the absolute heck out of it to get the gluten strong enough. The standard stretch and fold for the bread flour just leaves it a watery mess. (I noticed Marina was having a similar issue in a comment below with bread flour) Takes 20 to 30 minutes of slap and folds on a bench to get it to hold any shape. With APF the normal stretch and folds work just fine. Strange because there is only 2% difference in the protein between the bread flour and APF I’m using.
But I have also noticed most bread flours also have thiamin and folic acid added. Not sure what effect that has, if any. But I don’t really want that in my bread. If I’m making sourdough, the more natural the better.
Hey Maurizio, this tartine recipe will be about my 6th loaf from your blog, really enjoying it. One thing I’m consistently getting is quite a dense crumb and thick crust though, have done some higher hydration and this one at 79%, same thing. Any ideas? Using a dutch oven.
Cheers!
Hey, Simon! Glad to hear that. Based on the description of your loaves it could be that they are slightly underproofed. There are a few indicators your dough could be under: explosive rise in the oven, dense interior with potentially scattered large holes, and gummy texture to the interior. Finally, it’s possible the bottom of the loaf might be slightly bowed upward (like the letter “U” — the top will kind of dome).
Make sure to build your levain from a starter that’s strong and mature (meaning it’s risen to it’s peak height before you take some to use). From there, bulk fermentation is very important! Make sure your bulk fermentation goes sufficiently far, you want the dough to look smooth, it should have risen considerably, and have bubbles here and there. If you tug on the dough a bit it should offer resistance to your tugging, it’ll feel stronger.
Hope that helps, let me know how it goes!
Hi Maurizio, I am quite new in the sourdough world and after a few decent breads I am having a problem. Let’s see if you can help me! I have tried two times your 50-50 Whole wheat bread and both times was pretty much a disaster. Everything looked very good, as in your pictures and descriptions, until the end of the bulk fermentation, but when I have taken the dough out of the container for pre-shaping it, the dough was kind of “liquefied” , it had lost all structure and it was impossible to work. I still backed the bread after letting it proofing overnight, but the result was of course a bread with no volume and a very wet and sticky crumb. The first time I thought it could be because of the malt, but well, that was not the problem. Anyway , exactly the same happened to me in my two attempts to bake the basic Tartine country bread, This is quite frustrating….I am thinking that the problem is my flour, that is too weak for the amount of water (in the second tartine attempt I also tried to reduce it to 70%, but it didn’t help) and then the gluten net is not strong enough to tolerate the turns during the bulk rise. I leave in Germany and I have used a normal bread flour with ca. 11 % proteins. What do you think about it? Can you give me some tip for a new try (procedure or type of flour for example? ). I would really appreciate it! Thanks a lot in advance!
Hey, Marina! Yes, it likely sounds like a flour/hydration issue to me. I would drastically drop back the water in your recipe, go all the way down to 65% and see if that helps. That protein percentage (11%) is on the lower side for a bread flour, it sounds like it’s not able to handle higher hydration and/or the acidity from long fermentation. You might also want to try and drop the bulk time a bit, perhaps 15-30 minutes, and see if that helps.
Another approach would be to try these things and also try a different flour, just to test. See how the bread develops over time through bulk. If you can find a flour that’s suited specifically for bread, all the better.
From there, a larger preferment (levain) might also help bring strength to the dough. After trying the above, you could try increasing the levain percentage in the final dough by 5% and see if that helps. Know that doing this might mean a shorter bulk fermentation.
Let me know how it goes!
Hi again! thanks a lot for your very quick reply! You motivated me to give it another try :-)! Now the problem will be “only” to find a better flour here… I’ll let you know! 😉
Hello,
About to bake only my 3rd loaf. The first two recipes I followed me had me knead the dough. This tartine recipe does not mention kneading at all. Is the folding during bulk, then the folding, stretching and spinning during shaping take place of traditional kneading?
Can you clarify…
Thanks
Yes, that’s right. The traditional “Tartine method” has no kneading upfront at all, strength is built up in the dough organically through fermentation and stretch and folds during bulk. I find that these days I do prefer a little folding/kneading/slap and fold before bulk fermentation to give the dough a little strength going into bulk, and then finishing it off with stretch and folds. However, it is definitely possible to follow this post and do no kneading at all!
I’m a bit confused… you said you reduced the hydration to 74%, but in the recipe it says to add 740g of water and then 50 more grams. Wouldn’t this make it 79% hydration?
Yup, you’re right there’s a typo there (after all these years!). The hydration isn’t down to 74, it’s more like 79%. Thanks for catching that!
You say you use 100% rye for your starter – & then say to see your post on creating a starter. But in the starter post, you only use 100% rye on the very first day, then it’s half rye, half all purpose, changing even to 100% all purpose, or “your own choice”
Will 100% rye help my bread become stronger?
I’ve been using half rye for a while now, but I’m not seeing many bubbles any more & it never got so excited it climbed to the top of my jar. Any thoughts? What is the effect on my final bread of a starter that is 100% rye vs one that is 100% all purpose?
In my starter creation post I use 100% rye flour just to get it created and fermenting. Whole grain rye flour is chock full of nutrients that help feed beneficial bacteria/yeast and I’ve found it a great place to start when making a new sourdough starter. After the first day I start to taper off the use of rye flour but you can certainly continue using rye if you’d like — in fact, you can keep your starter fed with 100% rye flour as many bakers do.
I wouldn’t say using all rye flour will make your starter “stronger,” you can have a super strong starter using any blend of flour, you just might notice more fermentation activity when using large percentages of rye flour (again, lots of nutrients!). With large percentages of rye flour you’ll notice less overall rise because rye flour doesn’t have the same gluten properties as traditional wheat (e.g. hard red wheat), and thus it won’t trap gasses produced during fermentation in the same way. This is fine, it’s just different.
Assuming all is equal, in my experience 100% whole grain rye starters tend to impart a bit more sourness in the end loaf — this isn’t necessarily the case, though, it really depends on how the starter is maintained and eventually used.
Hope this helps!
Hi Maurizio,
I have a question for you: what is the point of adding water with salt? It is very difficult to incorporate, so I was wondering… Thanks!
Olga — the water actually should help you incorporate the salt. It’s mean to help dissolve the salt fully when mixing it into the dough. If you didn’t add water with the salt, it might clump together in the dough and never fully disseminate through the dough!
Maurizio,
Thanks a lot for your response! But wouldn’t it be better to just dissolve salt in the water instead?
Yes, you can absolutely do that!
Hi Maurizio,
I just made my first batch of Tartine loaves which is my first foray into sourdough. I am pretty pleased with the result. Inside looks beautiful, crust is pretty good though didn’t get quite as “crusty” as I would have liked. The thing missing is a strong sour flavor. There is only a hint at best of the sourness and then a slight aftertaste of it. Is this likely a problem with my starter?
Thanks!
Glad to hear your bake burned out great, Lila!
There are a few things you can do to try and increase the sourness of your bread — and your starter is just fine. First, you want to use your starter, and levain, when it’s very ripe. If it rises up to a certain height, let it sit there for a bit before you use it. If it starts to fall that’s ok too, just try to catch it right before, or after, it falls. That mature, ripe starter/levain has much more acidity than if used when it’s more on the “younger” side. Just be weary that your dough fermentation rate might be a bit faster than previous, keep an eye on it during bulk fermentation and divide the dough when it looks ready.
Additionally, you could try using some rye flour in your final dough mix. Rye helps stimulate more acid production for a more sour flavor. I wouldn’t go overboard on the rye, though, as the more you include the more dense your loaf will be. It’s up to you on the percentage, but even 5% plays a big role.
Finally, if you can try to push the cold proof in the fridge. There’s a limit of course, but if you could go even a few more hours you should notice more sourness.
I hope this helps & happy baking!
Hi – the recipe I have is super similar to this but the stretch and fold/bulk fermentation process is 3-4 hours instead of 2 — what’s the difference in outcome if bulk fermentation is longer? Thanks!
For the amount of levain I’m using, the temperature of the dough, and other parameters I find 3-4 is what’s needed to sufficiently perform the first rise on this dough. There’s no real set outcome one way or another, it really just depends on the dough you’re making and the environment — one formula might require a longer bulk duration to develop the dough sufficiently. Regardless, I always like to let bulk fermentation go for at least 3 hours, I find this produces the bread that I’m after. I hope that helps!
Thanks! I noticed in your outline, you do the “turns/punchdowns” for 2 hours, or 4 times, then let it rest for 2 hours. The version I have, the punchdowns are performed for 4 hours, then bench rest for 20 mins. My loaves are dense … could it be that I am overdoing it?
I don’t “punchdown” my dough, just stretch and fold. It’s usually a pretty gentle process, there’s no degassing of the dough in my approach.
It could be that you’re over strengthening or degassing too much. It’s hard to say, it’s not my typical approach to making bread 🙂
Hi Maurizio,
Our summer temperatures have been up and down like a yoyo and I’m having a difficult time with the basic Tartine loaf.
I use to make a perfect loaf but 3 times now I’m having a poor outcome. The DDT is between 78-80 when its in the proofer. My room temp is anywhere between 70-75 these past 2 weeks. Just before the bench rest at the end of the 4 hours of bulk fermentation, the dough is billowy and showing a good number of bubbles. I’ve put my oven on and brought the room temp up to 76 degrees. But as soon as I put it on the counter the bubble deflate leaving holes in my bread and the dough spreads. This happened last week but there was enough of a lift that I continued anyway. After the retard in the fridge for 8 hours the liner was very wet. My dough is very wet even though I reduced the water by 75grams. I hope you can help because its very disappointing when I made such great bread in the past.
Hey, Sharon. It’s hard to say what’s happening here but perhaps the dough is going a bit too far in bulk? You might want to try reducing the water in the dough just a bit more, perhaps 25-50g, and then try and divide it a bit sooner to see if the dough has a stronger feel to it. If it goes too far it does eventually become very sticky and loose. Those dough temps seem just fine to me. Usually when I hav a FDT of 78F I’ll let the dough sit at room temp for bulk, which means it’ll slightly cool by the end, perhaps down to 76F. The key is to divide it at the “right” time regardless of the temperature. Look for the signs of a complete bulk: smoother, a nice dome to the edge where the dough meets the container, and if you tug on it you should feel some strength and resistance. If you do the same formula over and over you’ll be able to spot these signs a little easier. This will help you draw correlations between how a dough looks and feels when you divide it, to how it ends up working out in the oven.
I hope this helps — keep me posted!
So excited to be baking this bread for the first time! Your guide has been incredibly helpful, thanks for being so thorough. Do you measure the internal temp of your loaves after baking, and if so, what temperature do you aim for?
Glad to hear that, Alice! I don’t usually measure, but you’ll want to ensure your loaves are at least 205°F or so to make sure they’re baked all the way through. Happy baking!
Hi Maurizio,
I have a question about the actual baking part – so you preheat the oven for 1 hour with a pizza stone on the middle shelf. Do you also preheat the combo cooker for the full hour? (I’ll be using a Le Creuset Dutch oven if that changes anything.) Additionally, do you then bake with the combo cooker on top of the pizza stone? Thank you for sharing your bread endeavours with the world!
Hey, Laura! Yes, preheat the combo cooker as well. Note that some Dutch ovens cannot be preheated empty but I do believe the LC should be ok. Back when I wrote this post I did bake with the combo cooker on top of the stone but nowadays I do not. The reason is the bottom of your dough might get a little too hot and burn a bit with the pot on top of a massive stone — it’s just too much retained heat. Now I keep the stone on the bottom rack and then bake with the pot on a rack above.
Happy baking!
Hey Maurizio,
I’ve been making a few of the loaves from Tartine #3 and I’ve been following a few recipes (minus the wheat germ as I haven’t been able to get any as yet) and I’m curious about your thoughts on ‘high extraction wheat flour’. I usually use a percentage of whole what flour but thought I’d try sifting the whole wheat flour for these recipes and it seems like it has barely any bran left once sifted. Perhaps the bran in my flour is quite large and if it were ground more finely there could be some bran left. It seems pointless sifting it all out! I might try the same recipe using 50% whole wheat and 50% bakers flour, as Chad suggests to make the high extraction instead and see what the difference is.
I’m going to try your best sourdough recipe and see how that goes – how fine is your whole meal flour? Do you think it makes much of a difference to the outcome of the recipe? I wondered if I blitzed the bran (in a spice grinder) and added some back in whether that could be a half way point (as I don’t have a mill as yet).
I saw your recipe using wheat germ – did you persist with it? Perhaps if you’re leaving more bran in, then you don’t need to add back the germ?
Also, I’m curious whether it’s my imagination, or if batard loaves get more spring than boules? I’ve got a round dutch oven so it’s my only option until I get a baking steel and/or my new oven installed when we renovate.
Thank you!
Bec
Bec —
Yes, very hard to nail down exactly what Chad means when he says high extraction. He does indicate he sees 50% whole grain and 50% bread flour as a close approximation, but I do know at some millers it’s more like perhaps 30% whole grain and 70% white flour. In either case, the key is that there is more bran/germ left in the flour than white flour, but not so much that it’s whole grain. If you’re sifting, you could try weighing the milled flour, then sift, then weigh the result and see what you have left. Divide the two numbers and you’ll arrive at your extraction percentage. Typical white flour is around 65-75% extraction, I believe, so you want to shoot somewhere higher than that. When working on those recipes I typically use Central Milling Type 85 (or any Type 85) flour.
Yes, I find the finer the whole grain flour the better it seems to perform. Mine is quite fine.
I recently picked up another bag of wheat germ and have been meaning to test with it again. You’re right, it’s a great way to add back in nutrition and treat it as more of a mix-in instead of flour, if that makes sense.
I do find that the batard shape encourages a more open interior and more spring. Throughout the years I’ve found my loaves shaped as a batard have a significantly more open interior when compared to a boule, but it might also be due to how I shape boules. Hard to say!
Happy baking 🙂
Hi Maurizio,
Ah, great idea, I hadn’t thought to weigh it like that. Turns out the wholemeal flour is about 83% extraction and looking again at Tartine, Chad suggests that high extraction should be 85% so it’s close.
I thought I’d try baking the toasted buckwheat loaf again (which I’d made the week before), but I blitzed the bran and added it back in – just to see if it was more manageable to have a finer wholemeal flour and if it was similar to the sifted loaf. It turned out ok, much more manageable than if I’d used unsifted/blitzed wholemeal but it was a little under done, perhaps slightly over fermented, or too much water and our oven is broken so we can’t tell what temperature it is anymore so it needed longer at a higher temperature. Anyway, it was good to find experiment with the bran and I will continue to play with this.
Also, I just wanted to say thanks for the delicious pancake recipe which we regularly enjoy 🙂
Right on, I hope the bread turned out great for ya! And yes, those pancakes are so, so good… I make either those or sourdough waffles here every weekend 🙂 Happy baking!
Hi Maurizio
I decided after a summer long hiatus from baking to try this recipe. I swapped out whole wheat for White Red Fife. I only made half of the recipe, and found that the 370g of water was a lot – I ended up adding a bit more flour – but not much. I have to say, it was a great loaf of bread! I liked adding the starter with the flour right from the beginning. Anyways, I had really great rise and crumb and a wonderful flavor – mild not sour at all.
thanks Maurizio
That’s awesome to hear, Sharon! Red Fife is such flavorful flour, I love the results. I do notice that sometimes RF isn’t able to take on excessive amounts of water, best to be conservative when using that flour and work it up slowly as confidence increases. Thanks for the update and happy baking!
Have you used a stand mixer with this recipe?
I have not! It would work quite well, though, just look for the same signs of dough development as described above. In other words, don’t over mix the dough since we’re expecting to give the dough some folds during bulk to add strength. If you want to mix more in the machine, just know you’ll reduce the number of stretch and fold sets to compensate.
Hi Maurizio,
I made the Basic Country Bread recipe in the Tartine Bread book which calls for 200 grams leaven, 900 grams of white flour and 100 grams of whole wheat. Your recipe calls for 250 grams of the leaven 700 grams white and 300 whole wheat. When you change the flour ratio do you always have to change the amount of leaven you use? Is it okay to change flour ratios in recipes without making other changes?
I adjusted the levain percentage because I was doing this bake in the winter when cold temperatures were causing things to really slow down in my kitchen. Increasing the levain is one way to help keep up the pace and fit the schedule I was after. No, you don’t have to change the amount of levain when you change the flour ratio, but you still might need to adjust the numbers if you’re changing the amount of flour you’re mixing in. Keeping the quantities the same ensures you’re still following the recipe as outlined.
If you need some info on how all this works, check out my section on Baker’s Math in my Beginners Sourdough Recipe post.
Hope that helps!
I baked this morning and the loaves are beautiful, but I just cut one loaf in half and tasted a slice. It’s delicious, but the bread is sticky. Why would that happen? Is it underdone? The outside is dark and crispy.
There’s a few reasons this could happen. First, if the hydration is too high for your flour it can lead to an overly wet or gummy interior. If the dough feels “soupy” or very “slack” then try pulling back the water percentage by 5% and see if that helps.
Second, as you suspected, make sure to bake your loaves completely. The interior should register around 208°F or higher.
Finally, if your loaf is under proofed then this will typically lead to a gummy or “wet” textured interior. Make sure your starter and levain are very vigorous and strong when you use them. This is very important! From there, make sure to bulk ferment your dough fully (use the images you see in my posts to guide you on what the dough should look/feel like). You want the dough to be alive and aerated before you divide and shape. From there, a full and complete proof is also very important.
Let me know if one, or more, of these helps!
Im having an odd issue that I can’t seem to resolve. Whenever I remove my dough from their baskets to bake, the basket is quite wet. I have been making breads for 3 years and although amazing the scoring isn’t smooth and quick nor does it have the “ear” I use to get in the beginning. I’m assuming the 2 issues are related. I’ve read Canadian flour and our humidity gives cause to lessen the water amount which I’ve also done. My fridge is at 41 degreesF.
Hey, Sharon! Sorry for the delayed reply. If it’s overly wet in the basket that could be from dough that’s over hydrated or kept in a very humid environment, like you indicated. I’d try reducing the water a bit more to see if that helps.
Additionally, make sure you’re strengthening the dough sufficiently through the whole process. I’ve found that dough that has sufficient strength removes much easier from the proofing basket, of course! The fact that you’re not getting a desirable ear might also indicate a lack of dough strength — reducing the hydration will definitely bring more strength to the dough, but also more mixing and/or sets of stretch and folds during bulk should help.
Let me know how it goes!
Hi Maurizio, firstly – I love your website and your instagram and the perfect loaf is my go-to place for all things sourdough related. Your instructions are always clear, with beautiful pictures, and the passion you have makes reading really enjoyable. Thank you!!
I have also been having the same problem as Sharon – I have tried this recipe twice now, first from Tartine Bread and second from your site. The dough feels wet but strong when I’m stretching and folding, then when the time comes for pre-shaping it is almost impossible to handle without re-applying flour to my hands each time I touch the dough – very sticky. It’s then very difficult to manipulate into boules – the dough gets caught on my skin and the counter even with generous amounts of flour. It does feel light and full of air though, but once into a proofing basket it basically flattens out, so that when it’s turned out for baking it doesn’t hold it’s shape and barely rises in the oven.
Does this mean too much hydration? I understand that a more hydrated dough can be more difficult to handle, I guess I’m not sure whether the issue is the hydration level or my experience at handling wet dough.
Thanks for the kind words, Simon, I really appreciate that! Glad to hear my site and IG feed have helped so much.
Yes, it sounds like you should try this recipe with 10% less water in the mix and see how that goes. It could be a combination of things as well: too high of a hydration, lack of fermentation in the dough, and insufficient dough strength. They’re all actually related, in a way, and reducing hydration should help with potential problems 1 & 3. For issue 2, make sure your starter (and levain) are performing strongly and used when they’re at the peak height. This is critical! Fermentation not only leavens the dough it also strengthens it through organic acid production (which naturally strengthens the gluten).
Let me know how this next attempt goes with reduced water!
Quick question, under bulk fermentation, do I do the 4th turn at “11:40” and turn the dough out onto the counter for an hour or leave it in the container for another half hour? ? Because ‘pre-shape’ has me taking the dough out of the container on the first step first step at ‘1:40’?
Sorry if this is very basic, I’m new to bread making!
BTW You have an awesome website, thank you for being here!
Thank you for your help!
Joe
Thanks for the kind words, Joe! After the 4th set of turns (stretch and fold) at 11:40 a.m., leave the dough in the bulk container until the divide shape (2 hours).
Happy baking!
Just finished making this recipe. This is our favorite so far. I have made the Beginner’s Sourdough twice and both turned out great. This one is my husband’s favorite. He likes a lighter, thinner crust so I kept the lid on the whole time (checked it twice during baking). I found that is was over 200 degrees 10 min. before the cooking time in my oven. Thanks so much for taking time to post all of this information. It seems that your starter instructions and bread recipes are the ones that work best for me. You would think that our environments are so different that I may need to make adjustments (I am on the east coast at sea level) but they are always perfect.
Thanks so much for the feedback, Laura! It goes to show just how versatile sourdough cultures are in general — they can live anywhere! This is one of my first recipes I ever baked and I have done it so many times now, it’s a winner for sure.
Happy baking and thanks again!
Love your site.
Have made something like this tartine loaf twice a week for about 3 months. Dutch oven or steam at home methods.
Generally don’t make the leaven the night before, just start with active starter and take it from there. Often will add about 1/8t of dry yeast (not really sure why, but have had some very flat loaves without it)
Crust is great, crumb is nice and even, and it tastes wonderful. No complaints…. BUT
The crumb is usually less ‘big-holey’ than yours and I really really don’t get a decent oven spring, or even any at all.
I’m happy to keep experimenting, but not really sure where I am going wrong… is it over proofed maybe? I do about:
1 hr autolyse
2 hrs S&F
2/3 hrs to rise, then
14hrs in a fridge at 47F…
is there a way to tell when the proof is done?
Glad to hear that, Luke! There are many places things could go awry, but my initial gut reaction is that you might not have sufficient strength in your starter, you’re cutting bulk short, or just a lack of fermentation in general. You don’t have to build a specific levain but make sure you use your starter when it’s nice and ripe otherwise the entire process will be slowed down. From there, try to monitor the temperature of your dough at the beginning of bulk (and throughout, if you can) — it’s best to keep the dough warm around 75-80°F all the way through bulk. At the end of bulk you want to see your dough risen significantly and it should be bubbly and alive looking. The dough should look smoother than when you started and if you tug on a bit of it you should feel that strength and resistance.
The “poke test” is usually a good indicator to determine when proof should be stopped but it’s less reliable when the dough is proofed in the fridge (the dough gets firm from the cold temperatures). The duration of the proof really depends on how fermented the dough is when you put it in the night before: if the dough is very well fermented the proof can be shorter, and vice versa. Determining this comes with experience but I find, generally, most home bakers tend to under proof their dough.
I hope this helps somehow!
Thanks Maurizio! I tried last night with a slightly shorter proof and got a better spring. No yeast this time. I agree that my starter might not have previously been at its peak. I’m going to go through your starter page again and maybe try some rye in it for next time.
Sourdough is taking over my life. Need to get used to doing a bigger batch of 5 or 6 loaves for the week on the weekend!
Hi maurizio.
Love your blog. Gave your starter a shot. Im up to day 3 and its looking ok, not as bubbly as yours but keeping my hopes up. Little question about you levain here. Why dou you prepare such a big amount if you only use 250 grams?
Best regards,
Sandra
Hey there! Keep going with the starter even with the lapse in activity — it’ll eventually pick up and you’ll see more strength. I used to make more levain than was necessary (and this is how it was done in the Tartine book) but it’s not mandatory. You really only need to make enough levain to cover the requirement in the dough mix, later. Just make sure to keep the same ratio of flour, water, starter.
I’ll update this post soon to build less levain! Happy baking 🙂
Hi Maurizio – I made this loaf for the first time and have had reasonably good results: Beautiful crispy crust, soft crumb, good flavour and good rise. It was also the first time I baked in a DO which gave great oven spring. However, my loaf was slightly gummy inside and, unfortunately, the greaseproof paper I used to lower in my dough, somehow got baked on to the bottom of my loaf. I can’t peel it off or shift it! What can I do to resolve these hiccups? Should I bake the loaf for an extra 5 mins? I baked it at Fan 230C for 20 mins then lowered to 200C for another 20 mins with lid off. I don’t want to risk baking at higher temperatures as it might give too hard and dark crust. What about the gummyness – any ideas? Love your blog btw. Thanks, Brigitte.
Glad to hear your bake went pretty well! The gumminess could be due to either over hydration (too much water in the dough mix) or under proofing. If you got a lot of explosive rise in your loaves I’d lean towards under proofed dough. Make sure to keep the dough warm during bulk and take bulk all the way until it’s complete. You want the dough to look nice and smooth compared to how it looked right when you started bulk fermentation. The dough will also feel more elastic (it’ll want to resist stretching) and will look “stronger.” I’d suggest you try to push bulk perhaps another 30 minutes and see if that helps — the key here really is to watch the dough and how it’s developing rather than a set time period.
I wouldn’t increase the temperature of the oven, that probably won’t help with the baking paper issue. The best advice I can give there is to make sure your dough is shaped tight enough so it doesn’t snag and stick to everything. When you turn the dough out to the parchment paper try to avoid it creasing or folding up into the dough as that’ll just make it stick more. You’ll get this part of the process down with more practice, I’m sure of it!
I hope that helps, happy baking!
Maurizo – I recently converted my starter to all rye (100% hyrdration) and used an all rye leaven to bake a Country Blonde. This meant that I used less leaven in the final dough. One of the things I was trying to see was if I could retard the proof time longer to allow more flexibility in when I could bake. I refrigerated the two loaves after shaping and baked the first about 20 hours later and it turned out very nice. I baked the second loaf at 40 hours and it also turned out nice, but expanded much more and had bigger holes in the crumb. I’m curious if you have experimented with using less leaven and found it can prolong a retarded proof. My percentages (including leaven) were: White Flour 92.2%, White Whole Wheat Flour 5.1%, Rye Flour 2.7%, Water 79.9%, Salt 2.3%.
Hey, Sean! Really interesting results. One of my techniques to lengthening the entire process is to reduce the levain percentage (and especially so when using high percentages of whole grains or fresh milled flour). I see the whole process as a continuum — if you shorten bulk just a bit (or decrease levain, increase salt, etc.) it could mean you could leave the dough to proof in the fridge longer since you’re not pushing bulk as far, risking an over proof situation. If I need to lengthen the time in the fridge I’ll typically do this, or, if using a dough retarder, I’ll lower the temperature to slow things down further.
I hope that helps!
Hey! Quick question – if, instead of whole wheat bread flour, you had to choose between whole wheat or bread flour, which would you go with? What do you think the difference will be? Thanks!
They’re essentially two completely flour types. Bread flour is white flour, so that means a high percentage of the bran and germ are sifted out. Whole wheat almost always refers to flour that’s 100% whole grain (although, confusingly this can be a grey area) so it retains all of the wheat berry: bran, germ, endosperm. More whole grains mean more nutrition (and flavor) but this can sometimes result in a more dense loaf of bread.
I’d say use whatever you’d like, really! It depends on what type of bread you’re after here and what you’d like to modify it into. If you’re after a mostly-white loaf of bread — a “country” style loaf — then use the bread flour.
I hope that helps!
Hi Maurizio! I have been obsessively reading your blog since starting a starter two weeks ago, and I’m happy to report it has finally floated! I’m looking into baking with it now – just a quick question for you: if the starter is 50% rye, should the leaven be 50% rye as well? Or will the starter make a good leaven with whole wheat flour (is bread flour ok too)?
Excellent, really happy to hear that it’s floating! You can absolutely change the flour type of the leaven from your starter, it doesn’t have to be the same. I often change my leaven from my starter depending on the bread I’m making. I hope that helps and sorry for the late reply!
Hi! Follow up question–what are signs of overproofing? I keep baking these dense but delicious flat loaves… not sure why… I follow recipes obsessively!
Tracy: there are a few indicators your dough could be going over: sluggish rise in the oven, the score on top of the dough might not open with a nice “ear” and instead just kind of fuse together, the interior will have lots of small holes and perhaps one or two large ones near the top (but no dense areas of unfermented flour), and finally the loaf could be a little on the sour side.
Keep that dough warm all the way through the entire process up until you put it in the fridge for the cold proof! Have a look at my new post on the importance of dough temperature for more detail on this.
Hope that helps!
Hi! That helps a lot! I hope you can see this, but it’s a picture of my first successful loaf – all because of your helpful posts. 🙂 https://scontent-yyz1-1.cdninstagram.com/t51.2885-15/e35/24331856_1753760774643730_8780993008116957184_n.jpg
Thank you! Grateful to you for taking the time to pass along your learnings.
I’m glad I could help, Tracy! Your loaf looks spectacular — nice bake!
I know Chad’s recipe calls for using 1 tablespoon of the starter for the leaven build, but yours is calling for 55g (which was more than double a tablespoon of the starter for me). Why do you suggest so much more?
The amount of starter used to make the leaven really depends on a lot of factors (flour, temperature, time, …). For me, 55g was required to get my leaven mature in the timeframe I had to let it ripen. You can certainly go for 1T, just give it the time it needs to become mature — that’s the most important factor.
Hope that helps!
I don´t have a combo cooker, what can I use instead?
If you have a baking stone you could load your dough on the stone and then use an oven safe metal bowl that’s tall enough to place over the dough and trap any steam. This works very well! Additionally, you could use any thick-sided pot that has a sealing lid (i.e. a Dutch oven or cloche).
Finally, you could bake your loaves directly on the baking stones like I do nowadays. Have a look at my post on Baking With Steam in Your Home Oven for details.
Hope this helps!
Hi, Misha! Thanks for the pictures. Fermentation activity in your starter, in the dough and in your resulting loaves looks nice and strong — this is great. It looks to me like the hydration of the dough might have been too high and your dough might not have been strengthened enough to handle it (or your flour isn’t able to handle that high of a hydration). I’d suggest dropping the hydration by 5% next time and see if this helps bring strength to the dough and make shaping easier.
If you still have issues. you might be fermenting too long (or at too warm of a temperature) during bulk fermentation. Keep an eye on the temperature of your dough, I’d say keep it near 78°F to 80°F, and generally 4 hours is sufficient. If the dough starts to feel soupy and feel slack by the end of bulk it might be going to far, reduce the time or temperature to correct.
I hope this helps and happy baking!
I’m about to try your beginner’s sourdough recipe! I’m in Southern California, about 20 minutes from the coast. Weather right now is 70s and 80s and I’m in a city that is a bit elevated for coastline, but by no means in the mountains. Should I track closer with Chad’s oven temps or yours? Any other major recs given how my climate differs from yours? Your site is so helpful and amazing — thanks so much for sharing your knowledge! -Nick
Hey! Chad’s temps might be more accurate for your location, but mine will also work you’d just need to keep an eye on it near the end to make sure it doesn’t go too far. So yea, I’d go with Chad’s and then bake till it looks done to your liking! No other real recommendations other than have fun with it!
Rad – thanks for the quick reply! Loving your insta feed too!
You bet and thank ya! Happy baking 🙂
Hi my name is Diana and this is my first time making tartine bread, and I follow all the steps my dough was looking very good smelled great had all the air pockets you want but it was very wet from beginning to end I baked it and when I cut in to it after 1 hr of rest it was still wet. My question is where do you think I went wrong. I did use whole wheat flour and not whole wheat bread flour . That’s what I had in my pantry. My oven also turns on and off during baking would that have an effect on it. Would love to hear your thoughts on this. Thank you for your time
Hey, Diana! It could be that you over hydrated your dough or it just wasn’t fully baked out, and thus the gummy/wet interior. I’d first focus on the oven: is there any way you can stop the turning on and off? If you have another oven-safe thermometer (those ones you can hang inside), it might be helpful to stick that in there and monitor the temperature during the entire bake. Sometimes ovens can be very misleading.
If you’re still having issues you could try reducing the hydration of the dough by 5-10% and see if that further helps. Depending in your environment and your flour this might be very necessary.
Hope this helps and happy baking!
hi Maurizio, this is my first time at bread making and I got stumped at the mix! I used 1000g of organic strong white bead flour and 740g of water. It always felt it needed more water, but as it was my first time and there were no photos or descriptions at this stage I did not know…? Any descriptions and photos would really help. (every other stage is filled with great photos!:-) The pulling and turning was hard work and felt I was ripping it apart and the stretching did not stretch far without tearing. I am just about to put 1st loaf in and will wait to see what happens! Steuart and Natalie
Update. Just baked, left for an hour… Bread had good crust and flavour, but was very dense…
Hey! You might want to look around here at some of my more recent posts, they have quite a few more photos. Specifically have a look at my Beginner’s Sourdough Bread post, lots of photos in there!
It could be that your dough was too strong and needed more water, especially if it felt overly dry or really hard to work with. High protein flour can strengthen up quickly as well.
An overly dense loaf can be the result of many things, but I like to first focus on starter strength and fermentation. Make sure your starter is rising and falling predictably when you feed it, and then when you make your levain from it use it when it’s most mature.
I hope these tips help!!
Hi Maurizio, I have found bulk fermenting overnight suits my schedule – starting about 7pm with mixing and folding etc. In the morning I shape and bake. I have found that I don’t need much of a second proof. It seems to work. But wondering whether a short second proof is an issue – less than an hour. It certainly doesn’t effect the taste. And seems to rise nicely. I would appreciate your thoughts
Hey, Jill! No, your method works just fine. Of course there are many ways to make bread, a cold bulk works very, very well. I’ve been experimenting more and more with this method and hope to have a writeup here on my process but it’s essentially what you’re doing. That final proof time will vary and, as you’ve been doing, the key is to just bake the dough when it’s ready! This could be 1 hour or 4, depending on the dough and ambient temperatures.
Hope that helps and happy baking!
Thanks Maurizio, it does. Its been an interesting process. I went too cold to begin – mixing with water out of the fridge. Experience has shown me the yeasts need a little bit of warmth to do their job. Provided my room temperature is in a range of 24-18 deg C for the entire proofing it will take 8-10 hours which suits my schedule. I was also over proofing by allowing a 3-4 hour second proof and not getting a good result. I still have a disaster every now and then but I am looking and learning rather than just allowing a given time for the second proof.
Love your site BTW. It has been very inspirational in my quest for a great sourdough loaf. My starter is now over 12 months old and I am getting great results taking some info from you and some from Tartine. Now looking forward to experimenting with some of your other loaves.
That’s great to hear! Following a timeline strictly never really works out with baking bread, that’s why I always try to lay out a set of visual and tactile cues so readers can adjust their timetable to suit their particular dough.
Thanks so much for the kind words, happy that you’re enjoying my website! Lots of good info here for baking not only bread — our starters are incredibly versatile, and giving, things. Happy baking!