


It’s back to school for most, and planning for speedy and healthy lunches is imperative whether your kiddos are physically attending school or staying home. And if you’re like us here, easy lunches are the best lunches. Enter the mighty sandwich. Sandwiches slathered with crunchy peanut butter—you’re not eating smooth peanut butter, are you?—and homemade jelly, a mozzarella, tomato, and basil layer-cake-sandwich, or a classic tuna salad sandwich are always on rotation here.
But taking the humble sandwich to the next level requires the ideal bread. It helps the mundane transcend the standard measure. And while this site has pan bread recipes abound (I guess I do love good pan bread), this tangzhong sandwich bread is so delightful it’s quickly floated to the top choice for, as my kids call it, “square bread.”
That’s not to say my classic pain de mie or whole-grain pan loaf isn’t a treat, but this bread brings a certain softness to the crumb that’s hard to achieve without high hydration or added enrichments. And yet, in pre-cooking a portion of the total flour used in this recipe, you’ll do just that.
This pre-cooking technique, commonly called tangzhong, is classic for enriched bread such as Japanese-style shokupan (milk bread), and it’s a handy technique for bringing a level of softness to a loaf without excessive fat or oil addition. A healthier version, if you will.
What is Tangzhong (Pre-cooked Flour)?
The tangzhong technique (also known as water roux or simply pre-gelatinized flour) is cooking raw flour and a liquid to approximately 150°F (65°C). At this temperature, the starches in the flour will gelatinize, similar to how the exterior of a bagel gelatinizes when you boil the dough. This process turns the mixture into a sticky starch paste added to the dough during mixing and brings incredible softness to the final baked bread.
This upfront cooking is a small step at the beginning of this recipe, but one that results in more tender and fluffy bread without the need for other enrichments such as butter, oil, or eggs.
A quick roundup of the benefits of incorporating pre-cooked flour (or tangzhong) in your bread dough:
- Adds tenderness and an open interior without the use of eggs, butter, or sugar
- The dough can have lower hydration but still achieve a soft texture
- Prolongs the shelf life of the bread (and coupled with natural fermentation, which already preserves, this might be the best sandwich bread yet)
Check out my guide to making tangzhong for more information on this technique.
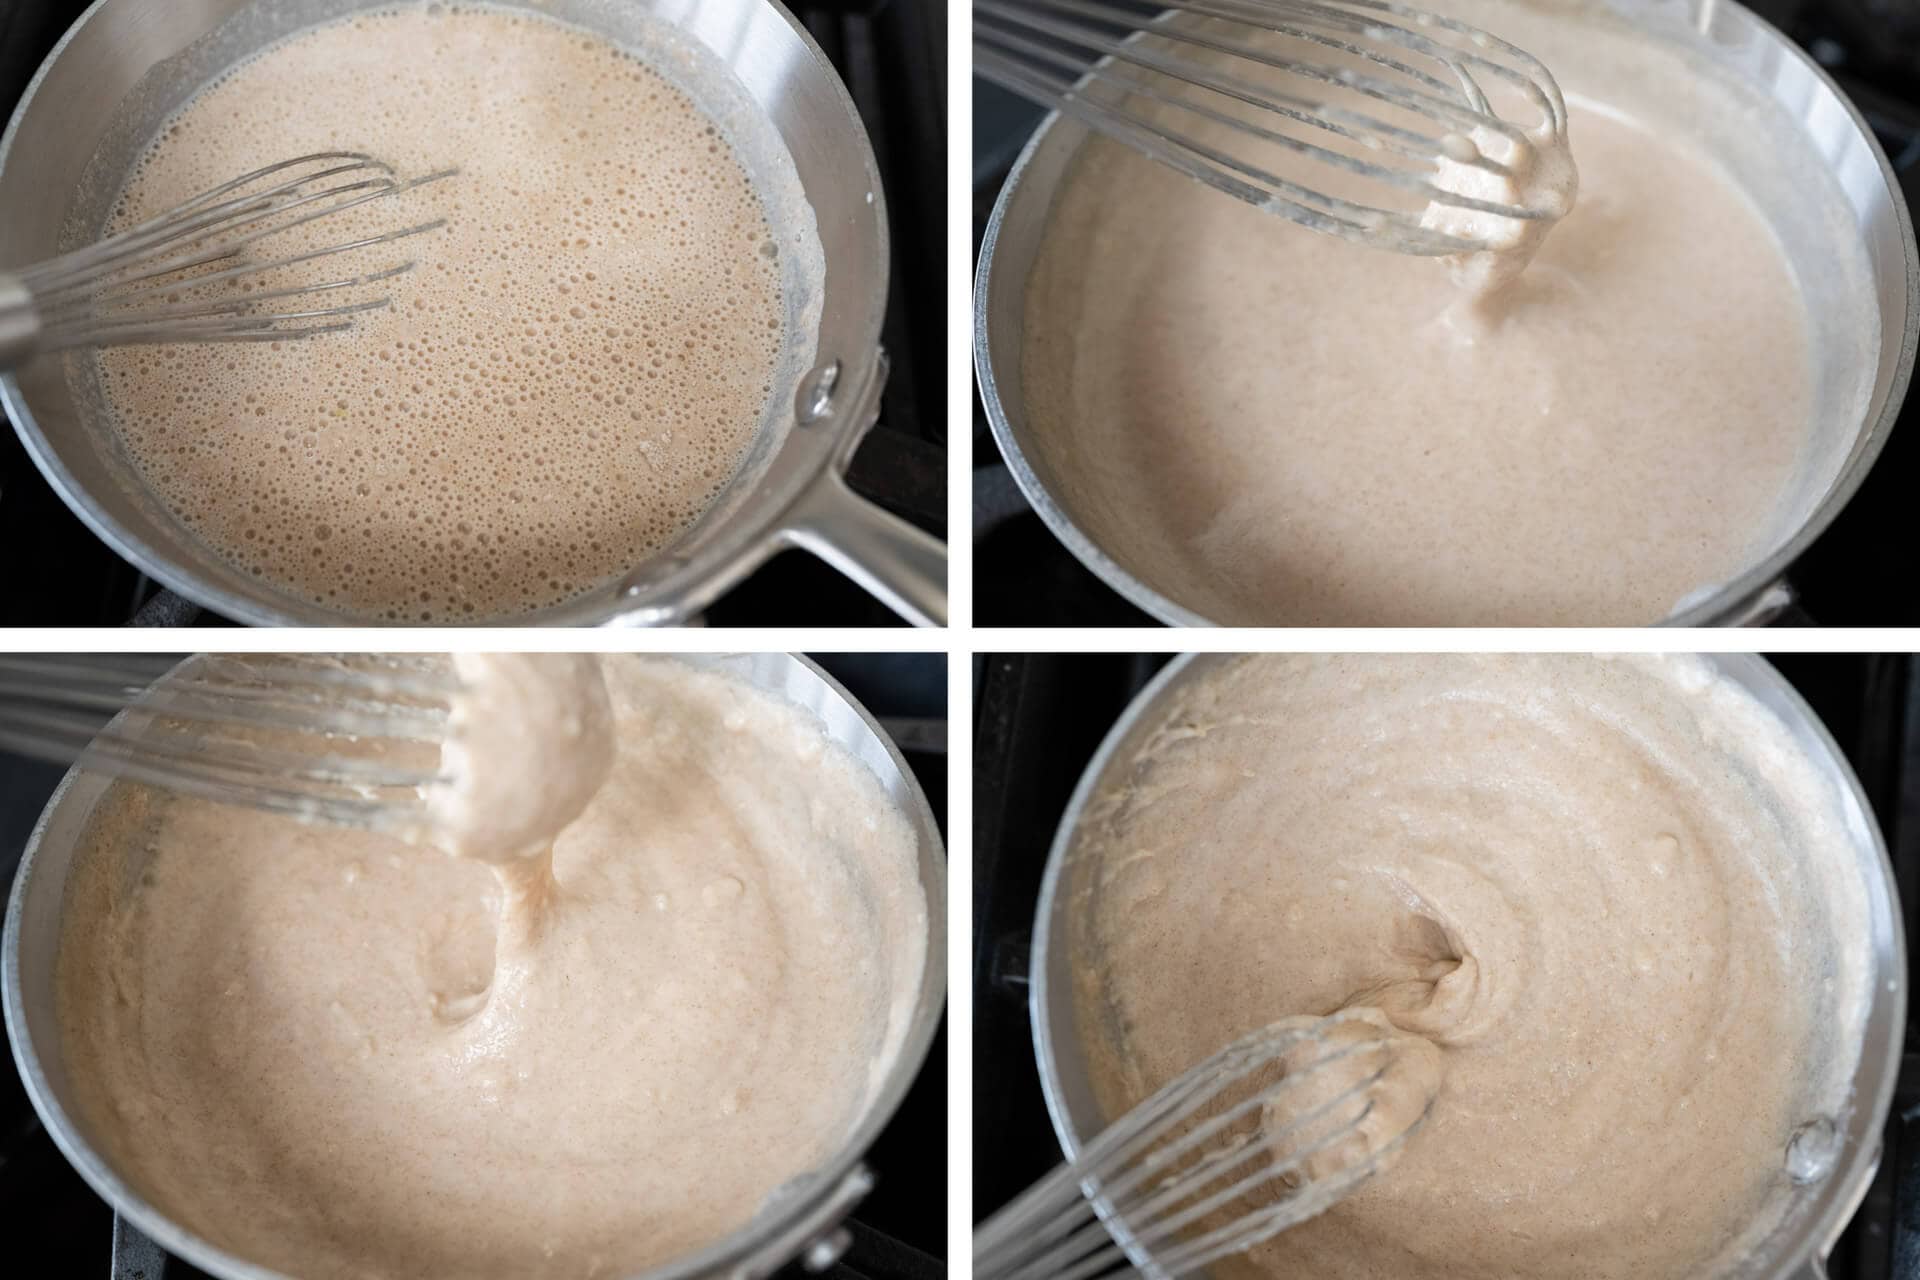
In the top left, the flour and milk are combined and whisked vigorously over medium-low heat. After a few minutes, the top-right shows the mixture starts to thicken. Continue to whisk, and don’t worry if you find small clumps here and there. The bottom-right shows the mixture sufficiently thickened and ready to remove from the flame. It will feel similar to a cooked porridge and be hard to whisk any further. Then, let the tangzhong mixture cool and add it as any other ingredient during mixing.
Flour Selection
Any medium-protein bread flour (around 11% protein) or all-purpose flour will work well in this recipe. I’ve made this with King Arthur Baking All-purpose with excellent results. And similarly, for the whole wheat portion, any whole wheat flour will work well.
Baking Schedule
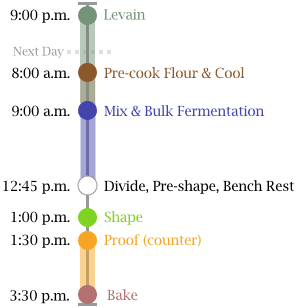
This tangzhong pan bread is a direct bake, meaning it’s baked the same day you mix (except for the levain, which is created the night before).
Overnight proof option: while I don’t call for this dough to be retarded (cold proof overnight), this can be done if it’s better for your schedule. Simply place it in the fridge after it’s shaped and in the Pullman pan, then bake first thing in the morning.
Tangzhong Sandwich Bread Formula
For tips on how to calculate baker’s percentages or how to modify this formula, see my post on baker’s percentages (baker’s math).
| Total Dough Weight | 1,800 grams |
| Pre-fermented Flour | 11.00% |
| Levain in final dough | 25.96% |
| Yield | 2 x 900g pan loaves |
I love using my 9x4x4″ USA Pan Pullman pan (without the lid) for sandwich bread. Not only does the nonstick liner mean the loaves always remove cleanly, its straight sides mean neat slices perfect for sandwiches or toast.
But if you’re looking for how to make this recipe work in a different pan, see my post on shaping a sandwich loaf.
Total Formula
Desired dough temperature: 77°F (25°C). See my post on the importance of dough temperature for more information on dough temperatures.
The rows marked tangzhong below are the two ingredients cooked ahead of time, but they are still counted toward the formula’s overall percentages. In other words, the 8% whole wheat flour is still counted toward the total flour in the formula and is not an “extra” addition.
| Weight | Ingredient | Baker’s Percentage |
|---|---|---|
| 74g | Tangzhong: Whole wheat flour (Giusto’s Whole Wheat Flour) | 8.0% |
| 296g | Tangzhong: Whole milk | 32.0% |
| 693g | Medium-protein bread flour or All-purpose flour (~11% protein, Central Milling Artisan Baker’s Craft or King Arthur Baking All-Purpose) | 75.0% |
| 157g | Whole wheat flour (Giusto’s Whole Wheat) | 17.0% |
| 65g | Olive oil | 7.0% |
| 37g | Honey | 4.0% |
| 453g | Water | 49.0% |
| 17g | Salt | 1.8% |
| 10g | Sourdough starter | 1.1% |
Tangzhong Sandwich Bread Method
1. Prepare Levain – Night before mixing, 9:00 p.m. (Day one)
| Weight | Ingredient | Baker’s Percentage |
|---|---|---|
| 101g | Medium protein bread flour or all-purpose flour | 100.0% |
| 101g | Water | 100.0% |
| 10g | Ripe sourdough starter | 10.0% |
Mix the following ingredients in a container and leave covered to ripen at about 78°F (25°C) for 12 hours overnight.
2. Prepare the tangzhong (pre-cook flour) – 8:00 a.m. (Day two)
| Weight | Ingredient |
|---|---|
| 74g | Whole wheat flour |
| 296g | Whole milk |
Be sure to do this ahead of time to give the pre-cooked flour time to cool before mixing.
Milk alternative: If you want to avoid using milk in this recipe, substitute out the dairy milk in the roux, below, for water (or something like oat milk).
To a medium saucepan, add the flour and milk listed above. Turn the heat to medium-low and cook, whisking continuously, until the mixture thickens and becomes like a paste, about 5-8 minutes. In the beginning, whisk vigorously to break up any flour clumps, and be diligent about this near the end to avoid burning. The mixture won’t seem to do anything until it reaches a critical heat point, be patient; it will thicken.
Once it transforms into a viscous paste (something like oatmeal porridge), remove the pan from the heat and spread it out on a small plate to expedite cooling. Set the tangzhong aside until called for when mixing.
3. Mix – 9:00 a.m.
I used my KitchenAid stand mixer to mix this dough, but it’s possible to make this bread without a stand mixer by mixing everything together by hand in a mixing bowl. To do this, you’ll need to mix for around 10-15 minutes, depending on your technique (slap and fold will work really well!).
| Weight | Ingredient |
|---|---|
| All | Tangzhong (see Tangzhong above) |
| 591g | Medium-protein bread flour |
| 157g | Whole wheat flour |
| 65g | Olive oil |
| 37g | Honey |
| 351g | Water |
| 17g | Salt |
| 213g | Levain (see Prepare Levain, above) |
Mixing water temperature note: I used cold water from the fridge to mix this dough, mostly because my pre-cooked flour was not fully cool by the time I needed to mix. Be sure to take the temperature of the pre-cooked flour and other ingredients into account to get close to the final dough temperature listed for this recipe.
Use my mixing water temperature calculator to quickly help you determine what to heat or cool your water to so it meets the desired dough temperature for this recipe.
To the bowl of a stand mixer fitted with the dough hook attachment, add the pre-cooked flour, flour, water, ripe levain, honey, olive oil, and salt. Mix on low speed for approximately 2 minutes until the ingredients come together, and no dry bits remain. Increase the mixer speed to medium (2 on a KitchenAid) and mix for 8-10 minutes until the dough starts to clump up around the dough hook. It won’t completely remove from the bottom of the bowl, and it will still be shaggy. See the image of my dough right after transferring to its bulk fermentation container.
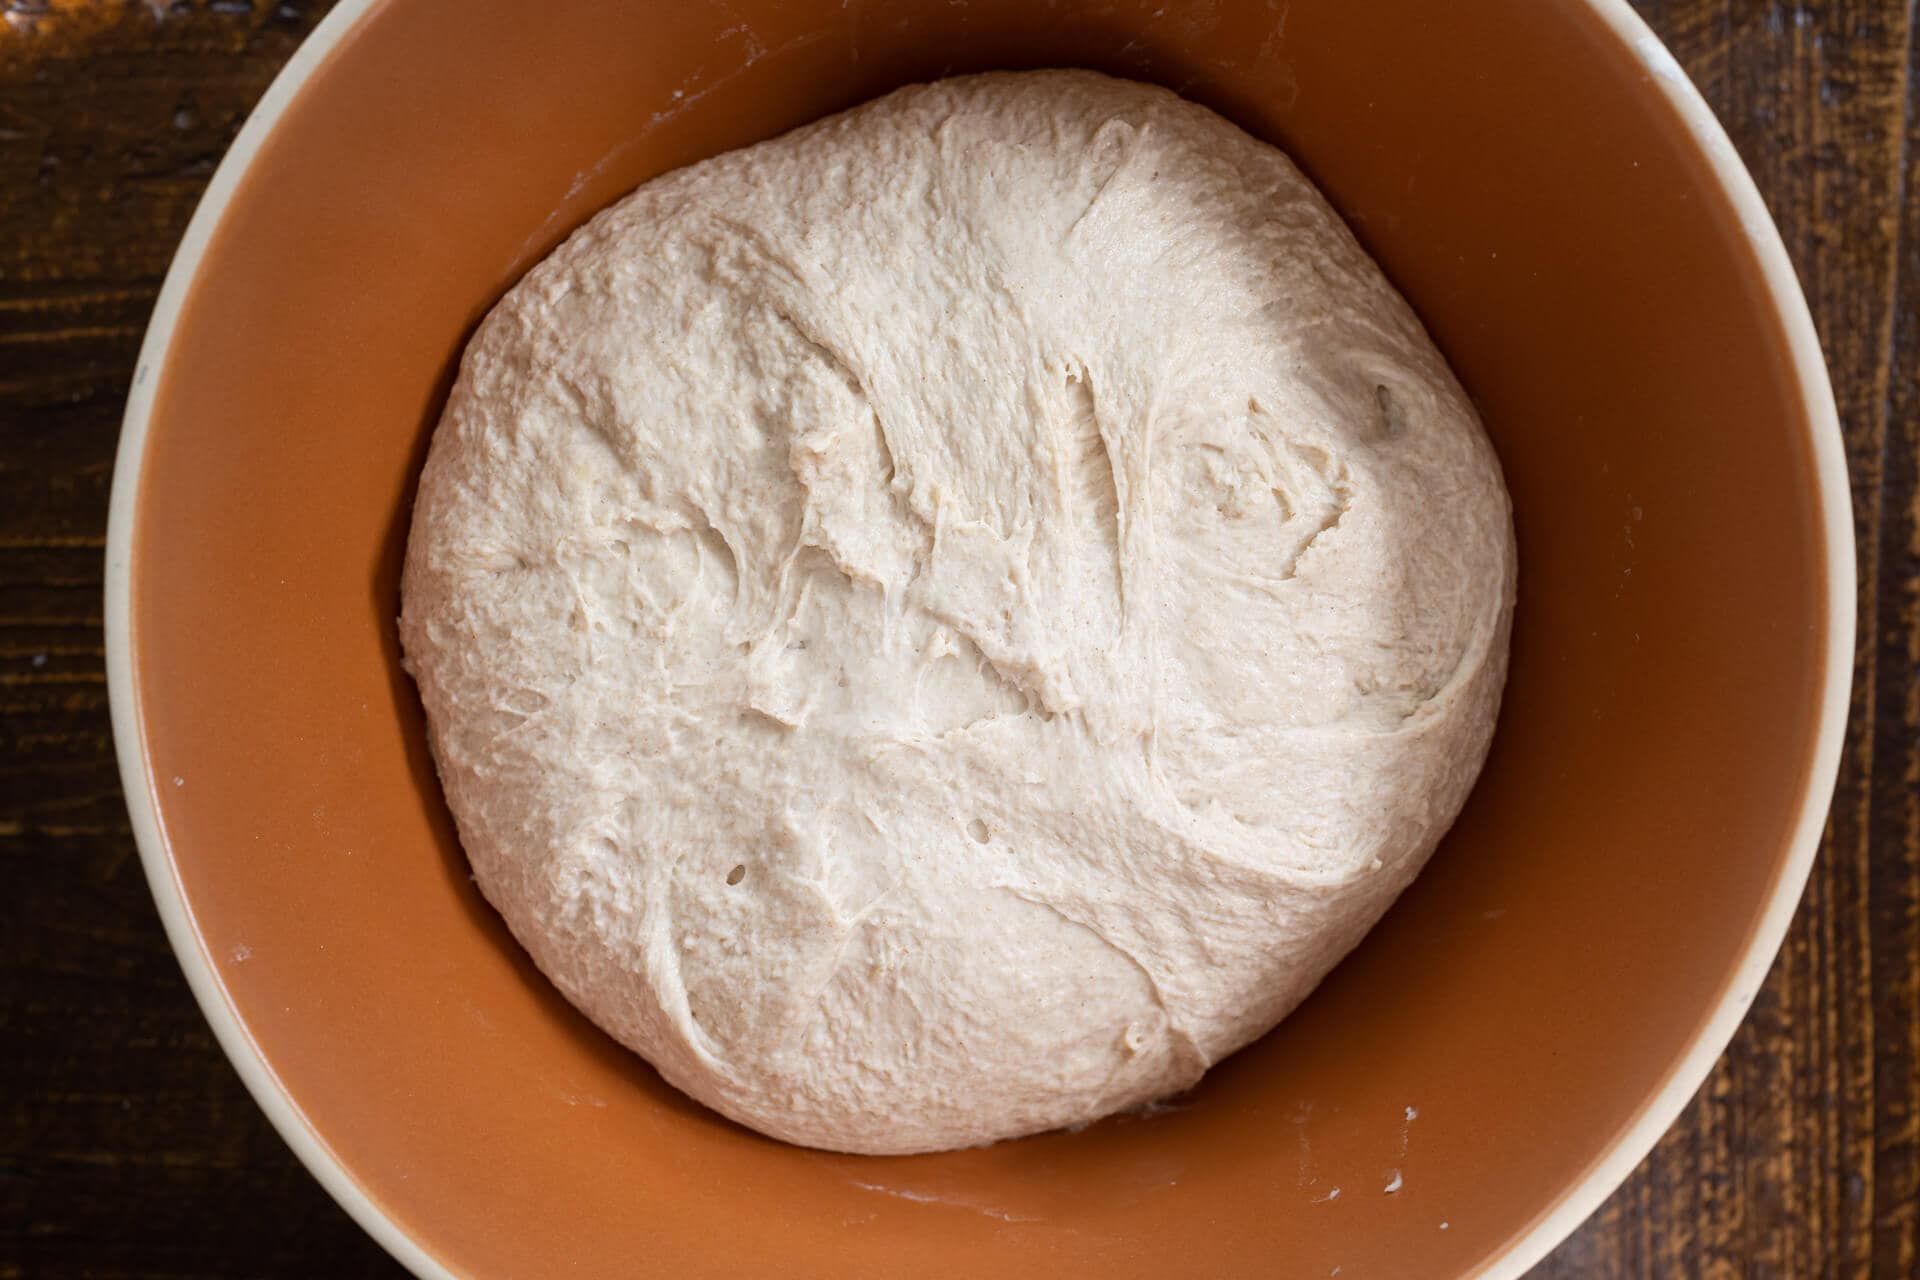
Transfer your dough to a bulk fermentation container and cover.
4. Bulk Fermentation – 9:15 a.m. to 12:45 p.m.
At room temperature, around 72-74°F (22-23°C), bulk should take about 3 1/2 hours. Give this dough three sets of stretch and folds during bulk fermentation (first rise) at 30-minute intervals, where the first set starts after 30 minutes from the start of bulk fermentation. For each set, wet your hands, grab one side and stretch it up and over the dough to the other side. Rotate the bowl 180° and perform another stretch and fold (this forms a long rectangle in the bowl). Then, rotate the bowl 90° and do another stretch and fold. Finally, turn the bowl 180° and do one last stretch and fold. You should have the dough neatly folded up in the bowl.
After the third set, let the dough rest for the remainder of bulk fermentation.
5. Divide and Pre-shape – 12:45 p.m.
Uncover your bulk fermentation container and gently scrape the dough out of the bowl onto a clean work surface. Using a bench knife, divide the dough directly in half and pre-shape each piece into a loose round. Let the rounds relax uncovered for 30 minutes.
6. Shape – 1:15 p.m.
First, lightly oil your Pullman pans with olive oil or another neutral oil. While this isn’t strictly necessary when using a USA Pan Pullman pan, it’s a little insurance just in case.
I shaped this dough in my typical method for shaping a pan loaf. Check out my guide to shaping pan loaves for detailed instruction.
Once the dough is shaped into a long tube, transfer each to their pan, seam-side-down. At this point, you can sprinkle on any toppings you’d like, I added white sesame seeds to one loaf, and instant oats to the other.
7. Proof – 1:30 p.m. to 3:30 p.m. (2 hours room temperature)
Cover the pans with a large, reusable plastic bag and seal shut. Let the dough proof at room temperature, around 72-74°F (22-23°C), for 2 hours.
Overnight proof option: before the 2 hour counter proof, cover the pans with bags and place them in your home refrigerator to proof overnight. Bake them the next morning as indicated below. Expect a slightly more sour flavor.
8. Bake – 3:30 p.m. (pre-heat oven at 3:00 p.m.)
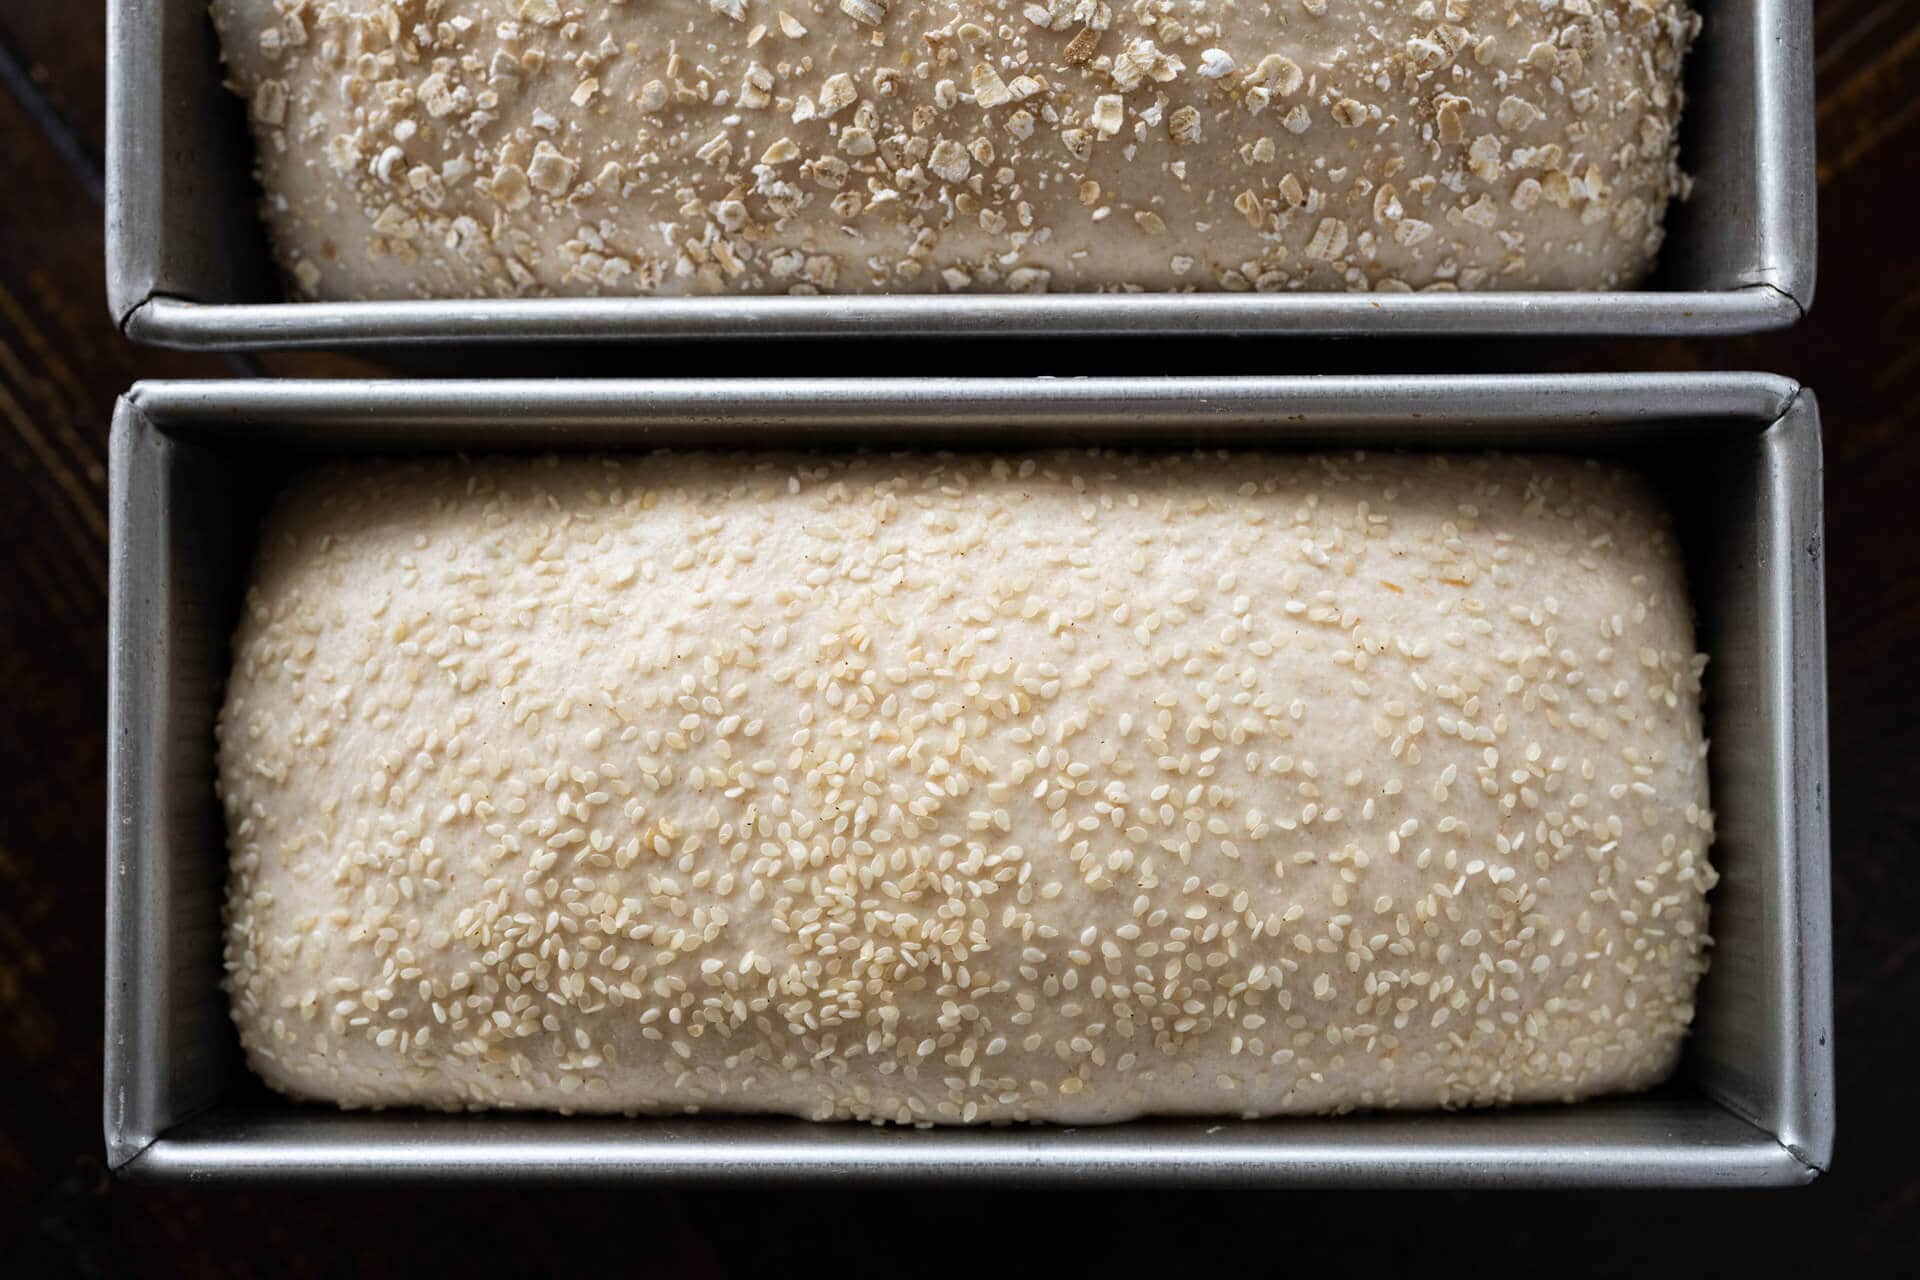
Check on your dough: it should have risen just below the top of the Pullman pan and be very light and airy to the touch (see above). If it’s not quite there, give it another 15 minutes and check again.
I steamed the oven for this bake as described on my post on baking with steam in a home oven.
Preheat your oven, with rack at the bottom third run and a pan with lava rocks on the bottom, to 400°F (205°C).
Once your oven is preheated, remove your proofed loaves from their bags and slide them into the oven. Carefully pour a cup of ice into the pan with lava rocks at the bottom of the oven and quickly close the oven door.
Bake at 400°F (205°C) for 20 minutes with steam. After this time, vent the oven, remove the steaming pan(s), and close the oven door. Bake for an additional 30-35 minutes until the top is well-colored and the internal temp is around 205°F (96°C). Remove the pans and gently knock out the loaves onto a wire rack. Return the loaves to the oven to bake for an additional 5 minutes without their pans to add extra color to the bottom and sides.
Let the loaves cool for 2 hours before slicing to ensure the interior is fully set. These will store incredibly well as described in my post on how to store bread.
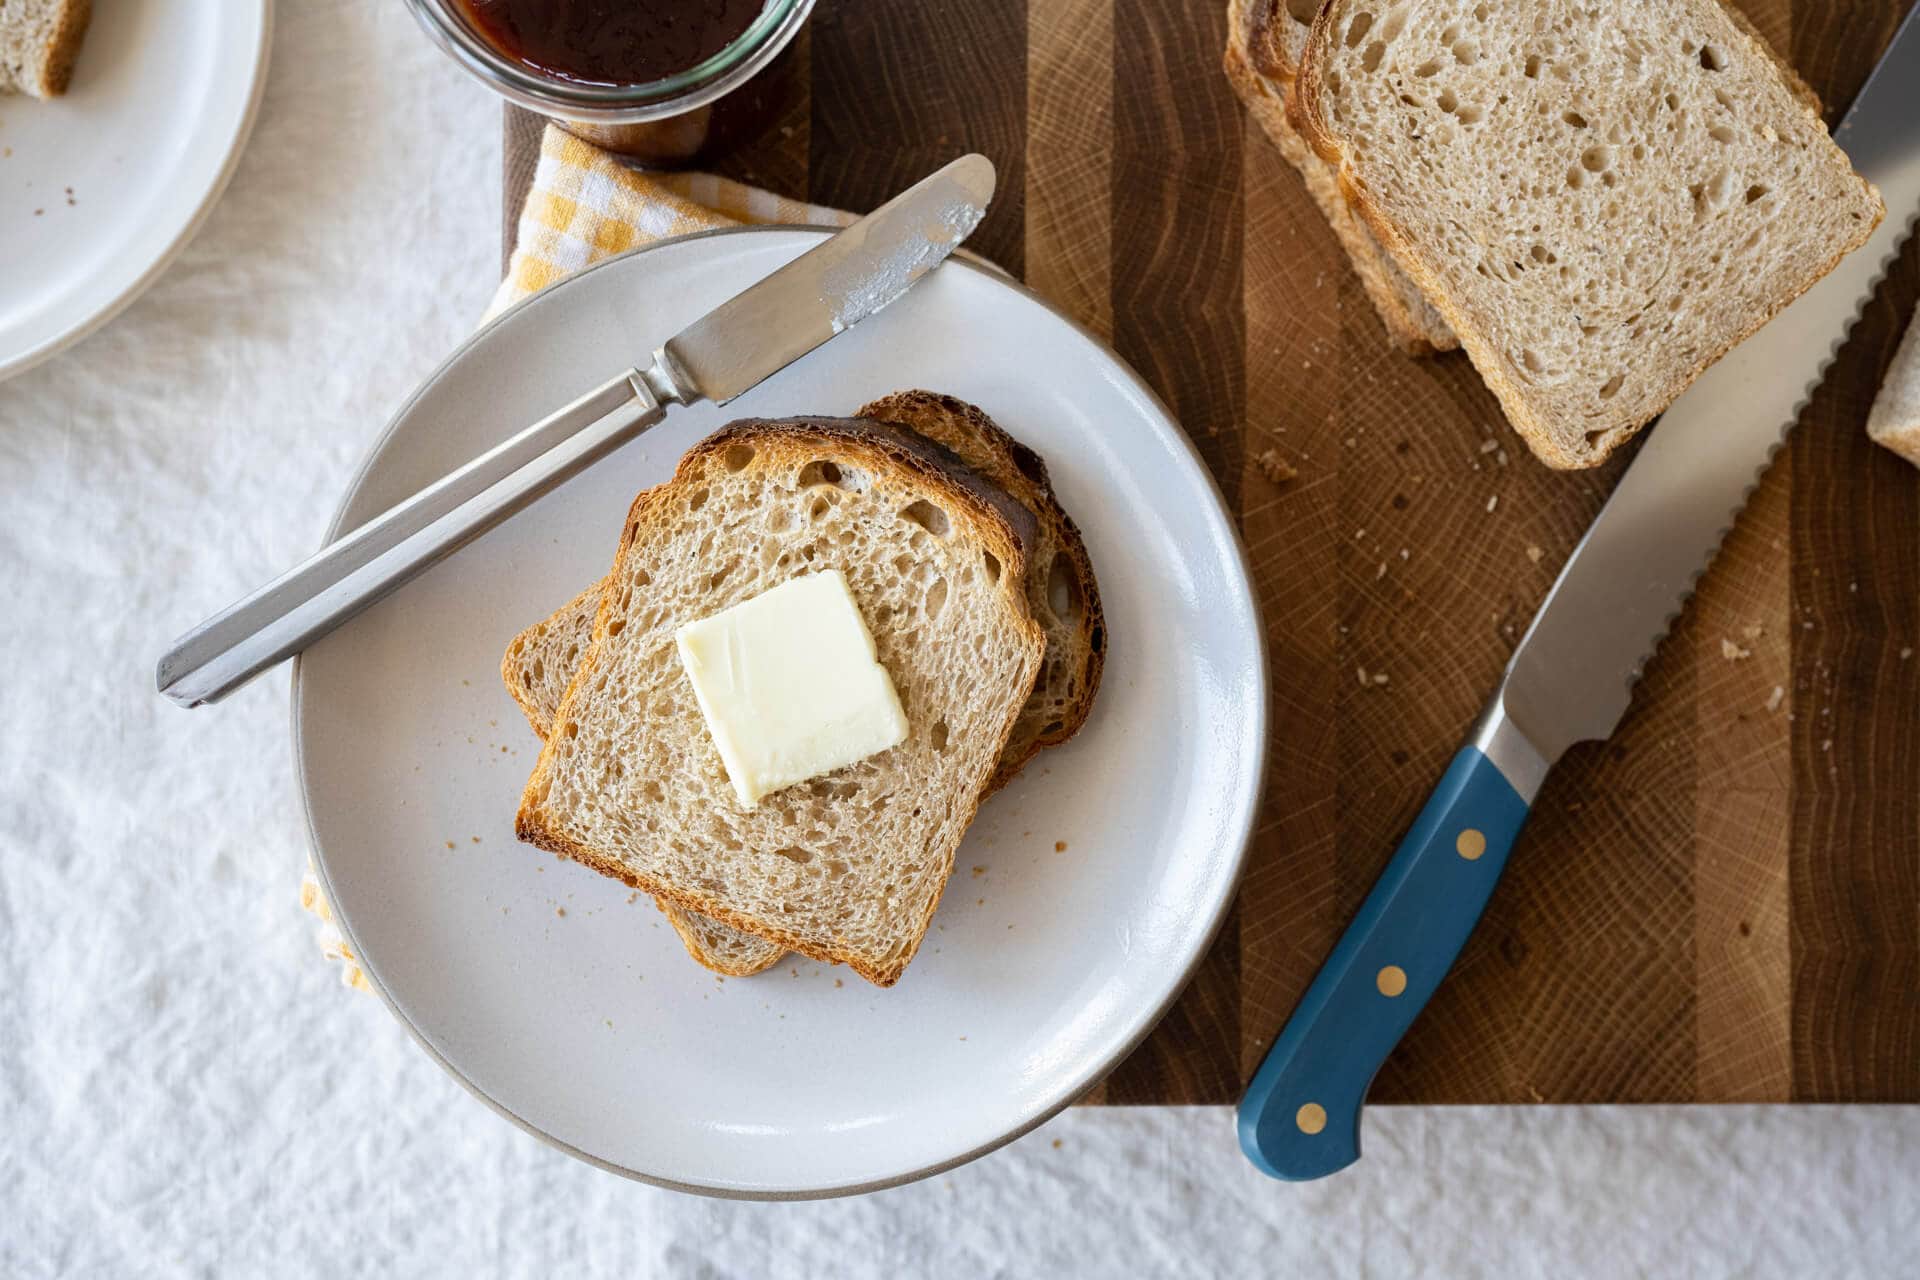
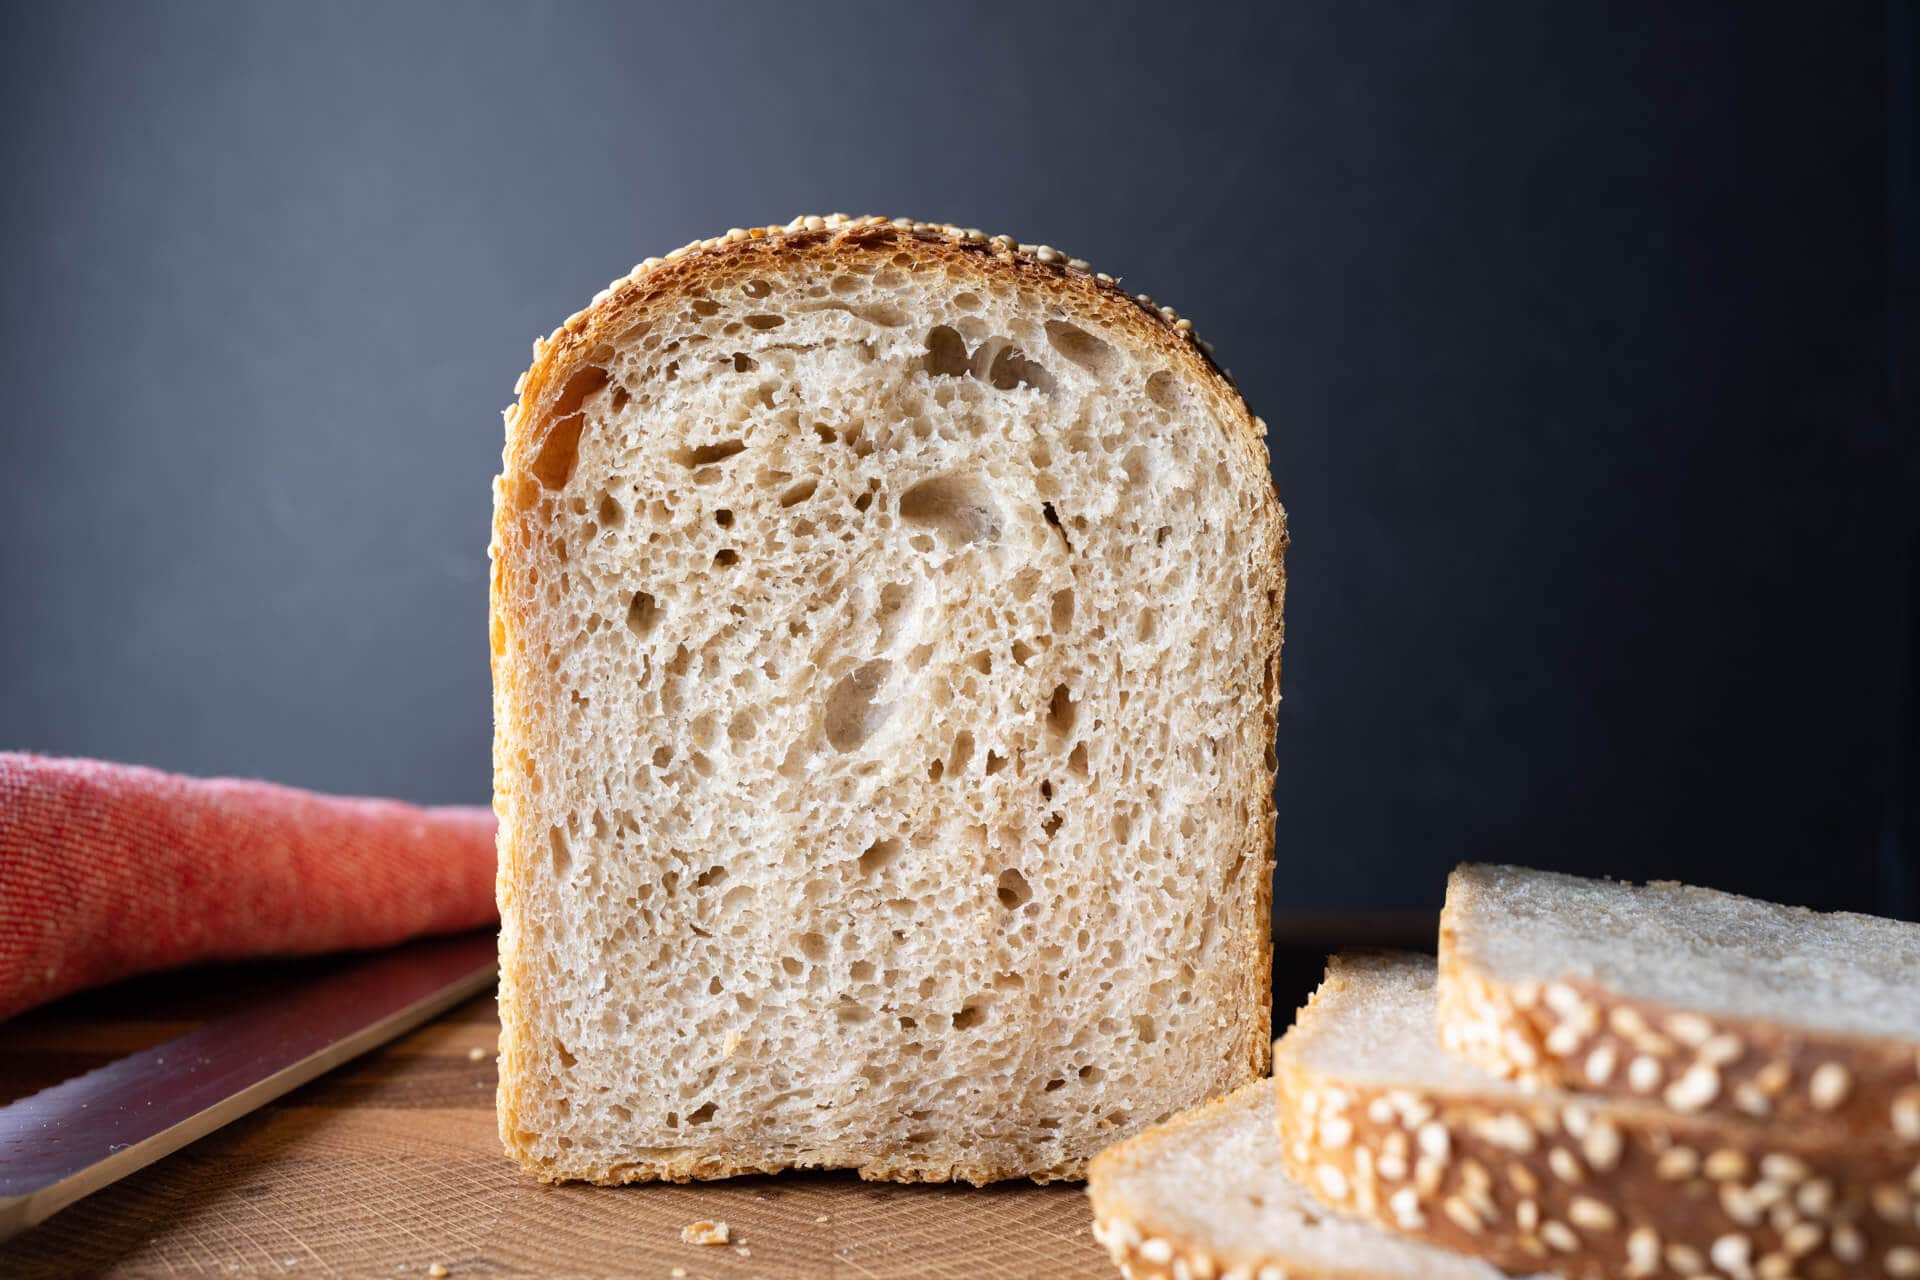
This bread has a delightful flavor that has little sourness. The overnight, mild levain with all white flour helped to this end as did the direct bake (no overnight cold-proof). The sourness that does slyly peek through comes at you at the very end of each bite, a gentle, but welcome, pop of flavor.
What I love about this bread—besides the tender interior, flavors created through natural fermentation, and flavorful, wheaty abundance, of course—is the shatteringly thin crust that forms when a slice is toasted (see above). We have the Pullman pan to thank here, and while a mouth-melting slice of bread is delightful, the added crunch in each slice is downright satisfying. And I think this might be the secret success of this bread: it’s soft, without excessive oil, eggs, or butter, for kiddos to love it, but still shores up enough strength to carry any ingredient you throw at it.

As I finish typing up these final words, I still can’t get the idea of crunchy peanut butter out of my mind. Shall we confess it’s time, yet again, for another amped-up PB&J? Buon appetito!

Tangzhong Sourdough Sandwich Bread
- Prep Time: 19 hours
- Cook Time: 55 minutes
- Total Time: 19 hours 55 minutes
- Yield: 2 loaves
- Category: Sourdough, Sandwich Bread
- Cuisine: American
Description
This bread has a delightful flavor that has little sourness. The overnight, mild levain with all white flour helped to this end as did the direct bake (no overnight cold-proof). The sourness that does slyly peek through comes at you at the very end of each bite, a gentle, but welcome, pop of flavor.
What I love about this bread—besides the tender interior, flavors created through natural fermentation, and flavorful wheaty abundance, of course—is the shatteringly thin crust that forms when a slice is toasted (see above). We have the Pullman pan to thank here, and while a mouth-melting slice of bread is delightful, the added crunch in each slice is downright satisfying. And I think this might be the secret success of this bread: it’s soft, without excessive oil, eggs, or butter, for kiddos to love it, but still shores up enough strength to carry any ingredient you throw at it.
Ingredients
Levain
- 101g medium-protein bread flour
- 101g water
- 10g ripe sourdough starter
Tangzhong
- 74g whole wheat flour
- 296g whole milk
Main Dough
- all the tangzhong
- 591g medium-protein bread flour or all-purpose flour
- 157g whole wheat flour
- 65g extra virgin olive oil
- 37g honey
- 351g water
- 17g salt
- all the levain
Instructions
- Prepare levain (Day one, the night before mixing, 9:00 p.m.)
In a small container, mix together the levain ingredients and keep at 78°F (26°C) for 12 hours. - Prepare the Tangzhong (Day two, 8:00 a.m.)
Add the tangzhong ingredients to a medium-size saucepan. Turn the heat to medium-low and cook, whisking continuously, until the mixture thickens and becomes like a paste, about 5-8 minutes. - Mix (9:00 a.m.)
To the bowl of a stand mixer fitted with the dough hook attachment add the Main Dough ingredients. Mix on low speed for approximately 2 minutes until the ingredients come together, and no dry bits remain. Increase the mixer speed to medium (2 on a KitchenAid) and mix for 8-10 minutes until the dough starts to clump up around the dough hook. It won’t completely remove from the bottom of the bowl, and it will still be shaggy. Transfer your dough to a bulk fermentation container and cover. - Bulk Fermentation (9:15 a.m. to 12:45 p.m.)
Give the dough 3 sets of stretch and folds at 30-minute intervals, where the first set starts 30 minutes after the start of bulk fermentation. - Divide and Preshape (12:45 p.m.)
Scrape out the dough, divide it in half, and preshape each half into a loose round. Let rest for 30 minutes, uncovered. - Shape (1:15 p.m.)
Lightly oil two 9x4x4-inch Pullman pans with olive oil or neutral oil. Shape each piece of dough into a tube shape and transfer it to the pan. Top with sesame seeds, rolled oats, etc. - Proof (1:30 p.m. to 3:30 p.m. at room temperature)
Cover the pans with reusable plastic and seal shut. Let the dough proof for 2 hours at 72-74°F (22-23°C). - Bake (3:30 p.m.)
Preheat your oven, with a rack at the bottom third run and a pan with lava rocks on the bottom, to 400°F (205°C). Bake at 400°F (205°C) for 20 minutes with steam. After this time, vent the oven, remove the steaming pan(s), and close the oven door. Bake for an additional 30-35 minutes until the top is well-colored and the internal temp is around 205°F (96°C). Remove the pans and gently knock out the loaves onto a wire rack. Return the loaves to the oven to bake for an additional 5 minutes without their pans to add extra color to the bottom and sides. Let the loaves cool for 2 hours on a wire rack before slicing.
Notes
This bread can also be proofed overnight to bake the next day. At the proof step (#7), instead of proofing on the counter, retard the dough to the fridge (covered). Any time the next day, remove the dough from the fridge and bake straight away.
A full-fat nut or oat milk or water can be used to make the tangzhong.
What’s Next?
For another tangzhong recipe, check out our ultra-soft and delectable sourdough cardamom rolls.


512 Comments
I made this bread today and it was so easy and the result was wonderful. Moist and tender inside with a crispy crust. This will be my go to loaf. I made two loaves, but was wondering, can I make one loaf in a 13×4 Pullman?
I made it in a large Pullman pan yesterday. I scaled the dough up to 1250g per Maurizio’s suggestion and it came out great. Probably could’ve gone higher to 1300 or even 1350g.
Thanks for your replies! I’ll give it a try, too.
Awesome, Shermin! I’ve been recommending 1250g as that’s the dough weight proportionately scaled up, but I haven’t tested it. I’m going to very soon and report back!
I tried this recipe yesterday, and unfortunately, like my last three (2x pain de mie, 1x cinnamon raisin boule) breads, it seems like my fermentation and proofing are woefully slow. My first cinnamon raisin and pain de mie attempts worked as expected. Though my doughs seem to always be a bit shaggier than the photos here.
But now, it seems I am unable to see telltale signs that bulk fermentation is active or completed. So after a tasty, but more sour and short pain de mie last week, so I thought my starter could be sad? (but it looks happy, easily doubles or more), so I fed it twice a day for a week before making this bread (AP, WW, and/or rye).
I used the levain at what I think was peak ripeness, I used an extra 5g of starter in the levain. This dough seemed pretty wet (I used the non-revised hydration levels). I added about 40 grams more flour (still slack) and two extra sets of stretch-and-folds and let bulk fermentation go for ~5.5 hours. It still it didn’t look very fermenty, I used a clear bowl this time and not much change was visible. But, I forged ahead.
I pre-shaped and shaped and the dough felt like it was holding gas/was jiggly. But then the proofing was super slow and did not rise nearly as much as I would have expected, so after a 6 hour proof I baked the loaves (about 14 hours after making the water roux). Bubbles in the loaf during proofing (sign of a too short bulk?).
They split, I expected that but thought it might be worse to push baking to the next morning. Is this splitting due to poor shaping or underpoofing? From my story does anyone have any suggestions about what I might do to improve my bread? (I generally use Lindley Mills flour (AP, rye, super sprout wheat) and KA whole wheat, and chlorine-free water).
The bread tastes great.
photo: pullman pan after ‘proofing’ 940 g
photo: glass pan after ‘proofing’ 805 g
photo: baked
photo: cross section pullman loaf
Hey, Michael! That splitting is very interesting, indeed. I might suggest first trying the recipe as-is without using rye or sprouted wheat, just to see if we can eliminate those variables. Be sure to use your levain after 12 hours or so kept at room temperature—it should be bubbly and have a sour aroma, but not smell like “wet paint” or overly alcoholic (if it does, you need to use it sooner). If your loaf was excessively sour, it might have gone the other way and over proofed. I don’t think poor shaping is at fault here, my guess is a fermentation issue and perhaps the flour you’re using!
Thanks for the reply. To clarify, I followed you recipe except for the 5 extra grams of starter in the levain. I was trying to reveal that I feed my starter a mixture of whole wheat, rye, and AP. But … I’ve been thinking that it might be the starter. It’s active, but maybe not with the right ratio of critters to successfully/consistently raise dough. It never smells yeasty; during the ‘build up’ it smells like porridge, but then at ‘past peak’ it smells solvent-y. So, I am going to try this out again with a ‘powerhouse’ starter from a friend and see how it goes. I’ll report back. The bread is delicious, just trying to get that rise. Cheers.
Ok, sounds like a good plan to me. Keep me posted, very curious!
I’m really glad you post these types of formulas. Everyone is so obsessed with super open crumb sourdough breads these days that I think we forget just how good other styles of breads can be. I made this sandwich bread the other day based on your formula. It may have overproofed a little, but was still really great. Thank you for posting on your blog regularly. I really appreciate it!
You’re very welcome, V! It’s all about flavor and eating quality, regardless of what the interior looks like 🙂
Thanks for the feedback, I really appreciate that!
Is it possible to bake this loaf without steam?
Maurizio mentioned that you can use a loaf pan with a top or an egg wash. I used an egg wash without steam and it came out great.
I’ve made this with an egg wash and it was wonderful, just as @disqus_hldUD4GzWv:disqus suggested below.
Made this yesterday and it came out great. This will definitely replace the beginner’s sourdough as our go-to bread for sandwiches, especially as school(ish) is getting started. When mixing in the stand mixer, I found that the dough started to clump around the hook *much* quicker than 8-10 minutes — more like 2-3 minutes. I let it go for another couple of minutes, but would it be better to wait the full 8-10? stop after 2-3 if it’s clumping properly? or something in between? Also I used the egg wash since it seemed a lot easier than steam; how big a difference would steam make? Is it worth trying? Thanks!
Glad to hear that! I’ve been using it for my kid’s school lunches as well, they love it. If you’re seeing the dough clump up quickly that’s just fine, mix for less time. That’s a sign for strength in the dough, and if you’re seeing clumping earlier it might be strengthening quicker (because it’s stronger flour or could even use more water). Egg wash is just fine, I chose steam here for those who wish to avoid using eggs. Happy baking!
After cold proofing, is better to let it warm up or straight from the fridge to the oven?
Straight from fridge to oven.
2 questions: is the honey necessary because I like to avoid added sugars, and I know beginner question, but is it as simple as halving of ingredients to make only one loaf?
Halving is that straightforward, just divide everything by two! Up to you on the honey, but it is in there for a reason 🙂
Hi Maurizio, I’ve been plugging away at mastering your ‘perfect sourdough’ and have finally succeeded with bread I’m proud of and happy to eat (and share)! So yesterday I had 2 levains ripe and ready, (comparing two different strains) used one in the ‘perfect loaves’ and decided to use the other to try out this new recipe for sandwich bread.
It was certainly sloppy to start with, and I don’t have a mixer with a dough hook so it had to be by hand. Well the dough slapped far and wide, including over my husband’s
iPad and the overhead hanging pans!
But it did come together and resulted in a lovely soft and surprisingly firm dough for preshaping. I had to use a 6 inch square cake tin and a standard barcake tin, and they both baked well, the square one rising to about 4 inches.
Posted a pic for you on Instagram under my rainymilne account, the crumb isn’t as airy and open as yours but the bread is so good! Delicious and soft yet wholesome tasting, hoping some will survive from breakfast to become sandwiches.
Thank you so much for sharing all your fantastic knowledge and recipes and supporting my humble efforts with your online tools.
Glad to hear my other recipe is working out! It’s a challenging recipe, but worth the work put in. The loaf came out wonderful! Id say next time, yes, drop the water just a bit, perhaps just 50g, and see how that goes. You’ll likely get a more open interior and a lighter loaf. But it’s looking delicious from here–enjoy!
Thanks for this recipe. Do you bake with convention? So excited to bake this
You’re very welcome, Anthony! No convection with this bake.
After enjoying your other sourdough recipes, I decided to give this a shot. Mine did not rise as much as yours and seems quite heavy. You mentioned using a ripe levain, but I wonder if it was too ripe in my case? Could that be the cause?
I’d say it’s not likely too ripe, but it really depends on the rest of the process and how closely you stuck to the recipe. If the dough was excessively warm and proofed too long, yes, it could have over proofed on you! Generally, if the interior has lots and lots of little holes (with no dense spots), with perhaps some larger holes up top, it might have gone too far.
Thank you. My family loved the bread and I was being too critical of my loaves. If they were a little taller, they would have been perfect. Small holes, light and cuts beautifully. I lathered PB, honey and banana on a slice for a treat. Next time, I will heed the temp to stay below 80, like you said, for a better rise. Oh, and I wanted to share, I love the USA Pullman pans that I purchased through your link!
All of us bakers are our harshest critics! I totally understand, believe me. Aren’t those pans great? They’re seriously the best. I make everything in them, even banana bread and other quick breads. Happy baking, Louise!
I’m being picky, I know I am, so I’m sorry. However:
Levain: 101g + 101g + 10d = 212g, not “Total Yield = 213.3g”
Formula in “3. Mix – 9:00 a.m.” calls for 368g pre-cooked flour, but 74g whole wheat flour + 296g whole milk = 370g pre-cooked flour.
Also, the sourdough starter has 4-5g flour and 4-5 g water in it – goodness knows what the yeasts weigh!
I know a couple of grams doesn’t make a difference – I don’t weigh my ingredients that accurately, and we all add flour or water to get the dough consistency right, so please just take this as proof-reading, not criticism.
I appreciate the information on tangzhong – I’m new to baking, so I haven’t come across this before and it looks really interesting. I’ll be trying it this weekend.
Posts about proof-reading, and then puts a ‘d’ instead of a ‘g” in the first line (sigh).
Thanks for pointing that out, Martin! It’s all small amounts in the end and all of those are due to rounding—it’s hard to measure out sub-gram precision for home baking! So I have to take a stance and round some of them. That said, I went back and fixed those up, thank you!
I would also add, that tang zhong, after cooked, would always weigh slightly less than the sum of ingredients, as ther is some evaporation in the process, Mine was around 350 once prepared
I just wanted to check with you that this recipe yields two loaves? Is that correct? Thank you! Am going to try it out this week!
That’s correct, 2x900g loaves. Let me know how it goes, have fun!
Came out great! I had to add a bit more flour, replaced milk with a mix of water and mayonnaise as my partner is lactose intolerant, and left out the olive oil. I baked in the cast iron loaf pans – no need to return bread to oven for browning. Yummy!
Awesome, Rita! So glad to hear that. You’re right, a cast iron loaf pan (like a Staub) would be excellent with this bread! Enjoy 🙂
Okay, I gave it a shot. The dough was very wet. I’m wondering if my roux was not cooked down enough, although it was a pretty think paste. I baked the bread in a couple of ceramic loaf pans, which are a bit wider than your recommended pans, so my loaves are shorter. It was not necessary to brown the side and bottom rind, as the whole loaf browned up very nicely in the 50 minutes it was in. The color of mine is much darker than yours.
I posted a photo on the Facebook page.
Glad it worked out well for the most part! I just went through and checked out the numbers a bit after your comments. I’ve gone ahead and lowered the hydration a few percentage points as it seems most have flour that can’t take quite as much water (which is ok, just needs adjustment!). If you give it another try I’d be interested to hear how it works out! Otherwise, I hope you’re enjoying it! Which Facebook page?
I posted it on a different “the perfect loaf” Facebook page by mistake. I am anxious to give it another try, but have promised a friend that I will produce a gluten-free sourdough loaf for his wife. Maybe next week.
I think I figured out the problem Linda McElroy and I experienced … on the “print” version of the recipe, at least, the “mix” step (3) calls for 579 grams medium protein bread flour, whereas the “total formula” calls for 679 grams. Am I misreading something, or is it that simple? Thanks!
Nope, that’s not it. The 679 grams includes the 100 grams of flour that goes into the levain.
Thanks – of course, you are absolutely right. That’s why there’s 100g less water as well in Step 3. No clue, then!!
That’s right, for mixing you should just have 579g flour, the other flour was used in the roux and levain. It’s likely the flour you’re using just isn’t able to take the same water as the flour I have here (and it’s very dry here as well). I might go up and put in some wording about holding back water during mixing, only adding it in if it feels like it can take it. How did it turn out? And what flour are you using?
Thank you so much, Maurizio! I used King Arthur AP and whole wheat. It was right after unseasonable humidity in San Francisco, which may have affected the absorption ability.
The bread is tasty and has a nice texture, but just a little dense. Not complaining at all… it’s going fast at my household!!! Thanks again!!
Fey, I’ve gone through and reduced the hydration (the water portion) of this recipe a bit to make it more approachable!
This is wonderful bread! I am in the tropics and I use my car as a proofing box, opening the windows to adjust the temperature. Man does this stuff rize fast!
This is the most sophisticated bread I have ever eaten! Scrumptuous!
So glad to hear it turned out well, Jim!
Awwww dammit. Loaves are in and I realised I forgot the salt! Is that going to ruin them?
Great recipe btw and thanks for all the inspiration.
as far as i know, salt controls the fermentation… so things may get kind wild in your fermentation!
Yeah, they’re pretty sour. Lesson learnt!
😉
Happens to us all, Raoul! The best advice I have there is to prepare a mix en place (weigh out everything and place it on your work surface before beginning), this way you know your counter needs to be clear when you’re done, and in doing so, everything is in the mix! This is how I do it here every time 🙂
Hi, can I use something to replace the honey? Or can it be disguarded altogether?
I’ve used both maple syrup and agave successfully as a replacement for honey. Think I prefer maple syrup.
I’d go with maple syrup as @disqus_hldUD4GzWv:disqus suggested!
What went wrong? My roux weighed in at 300g, not 360g. My levain weighed in at 200g, not 209g. When I added all ingredients to the mixing bowl it looked like pancake batter after mixing for 5 minutes. I had to dump in a bunch more flour, I didn’t even bother to weigh, but it was at least 1 ½ cups worth. I’m doing the bulk fermentation now, but I’m pretty sure it will need more flour, I just wanted to wait and see. I did check my scale and a stick of butter came in at the proper weight. I make the Tartine country loaf frequently, and I think I know how to weigh ingredients! 🙂
That’s ok if you’re a little short on the roux and levain, there can be some lost in processing there. It sounds like over hydration, though! Definitely add more flour as necessary. The roux should have thickened up quite a bit, especially since it’s whole wheat flour. Next time, let’s try holding back 100g of water from the recipe–I’m sure this will help quite a bit!
The roux thickened up substantially, I used Bob’s Red Mill ww flour. I used Cairnspring Mills hard white spring wheat flour, something I have never used before. Will definitely hold back on the water next time. Thanks Maurizio for your response.
I think I’m having the same issue … I’m about 3 hours into the bulk fermentation, and I’m crossing my fingers! Thanks for the helpful questions and response, Linda and Maurizio!
Yeah, I think holding back on the water is a good idea. Since the roux is susceptible to great variation in hydration, holding back water is the right thing to do. For me, I will skip the KitchenAid mixer next time and mix by hand. The mixer failed to pick up all the dry flour in the bottom of the bowl and I ended up have to finish mixing by hand.
Hi, big fan! Just to confirm, your bulk fermentation here is typically 3.5 hours, with 3 folds every 30 minutes during the first 1.5 hours? And then you let the dough sit, undisturbed, for the remaining 2 hours? Making some assumptions based on your other recipes I’ve made.
That’s correct!
Can’t wait to try this for next week’s sandwich bread! I just baked 2 loaves of your Pain de Mie otherwise, I would have been trying these today. Thank you for sharing such beautiful and delicious recipes with us.
Excellent, Christine! That’s a keeper as well (and one I make so, so often). Let me know how you like this one—happy baking!
Baked late last night and our family had it this morning for breakfast. This sandwich bread is light and airy, but sturdy. I really enjoy the thin and crispy crust with the creamy soft interior and just the slightest tang to the finish. It’s my youngest daughter’s new favorite sandwich bread! My oldest daughter is more partial to the Pain de Mie. I guess I’ll just have to alternate between the two recipes. 😊 Thanks again for such wonderful recipes!
Happy to hear that, Christine! Thanks for circling back with the feedback as well. A little sandwich loaf diversity can only be a good thing 🙂 Enjoy!
That could work, but it is so quick and easy over the stove!
Is it possible to do the complete recipe using only whole grain einkorn flour?
You could, but it really would take modifications!
Wish there was a gluten free version of this. Beautiful recipe! Thanks for sharing.
Thank you, Fran!
I have a USA Hearth Bread Pan. Newbie question…….does that work? Searching for a recipe for that pan
That’s an interesting looking pan! I’d say give it a try but you might end up with a squatter loaf, depending on how you shaped it.
Newbie mistake……..buying a pan online without knowing what you are doing!!!!!!!!!!!!
That’s ok, you can use it for many other styles of bread! I’d say try my beginner’s sourdough bread recipe with that pan, it’ll be great.
This looks awesome and I’m going to try it this week. If I wanted to use 9.25×5.25 or a 10×5 pan would you recommend scaling the recipe appropriately? Seems like a subtle difference but I do want a nice big loaf!
Perfetto! I went ahead and made it as you have it here but in two 8.75×4.75 pans and it came out beautifully! And so delicious! I topped one with white and black sesame seeds and left the other plain. We are in heaven! Next week I’ll try scaling it up a bit for a larger loaf. Grazie Maurizio!
Fantastic, Lisa! Glad to hear they worked out well. I’d say shoot for 1250g for a 13″ Pullman pan, if that’s what you have on hand. Happy baking and thanks for reporting back!
I’ve been using a microwave, a la Cooks Illustrated, to make the paste when I make Tangzhong rolls. Super simple – though it has been for much smaller quantities. Might be worth a try? Whisk flour and milk together in a bowl until no lumps remain. Microwave, whisking every 20 seconds, until mixture thickens to stiff, smooth, pudding-like consistency that forms mounds when dropped from the end of the whisk into the bowl
That’s a great idea, I’ll give this a try, too!
Hi Maurizio,
Could you use a non-dairy milk in replacement of the whole milk? Looks delicious!
Thanks 🙂
I had the same question 🙂
Oh he replied further down that you could even do it with water, so non dairy should work really well
You could go with all water for that portion!
I’m currently making two loaves with canned coconut milk in place of the whole milk. The dough has a wonderful light coconut smell and I’m sure the result will be amazing. I’ll let you know!
Good idea! I’m thinking of using oat milk but am interested to hear your results!
That sounds delicious
Would it be okay to make the roux the night before?
I haven’t tried this yet, but it’s high on my list to try. I’d say as long as it’s kept covered to avoid drying out, that should work just fine.
Maurizio – This looks awesome and I’m going to try it this week. I’ve been wanting to do a tangzhong and prefer a sourdough so this is the best of both worlds. If I wanted to use 9.25×5.25 or a 10×5 pan would you recommend scaling the recipe appropriately? Seems like a subtle difference but I do want a nice big loaf!
Yes, I’d scale up slowly in testing. It’s hard to estimate with pans (because it also depends on the flour in the dough and how high that loaf will rise!), and I have a set scale for the ones I have. Maybe for the 9.25 x 5 pan go up to 950g first—that’s my guess!
Hi Maurizio. First-time commenter! Just a couple of quick questions. I have the USA Pan Large Pullman Loaf pan (13x4x4), and I’d like to use it instead of making the two smaller loaves. My instinct here is to simply reduce the size of the dough to about 1350g total. Sound right to you? If so, would you leave the levain and tangzhong at the same quantities and reduce the rest of the added flour/liquid? Btw, I made your simple focaccia recipe last week with rosemary and capers and its probably my favorite bread I’ve ever baked 🙂
Another commenter discussed this, I’d probably start at 1250g total weight (increasing the dough weight by 1/4 as the pan is roughly 1/4 larger) and see how that goes. No, I would scale everything up proportionately (so the tangzhong component would increase as well).
Awesome to hear that about the focaccia, Dror! I make it so, so often here… When people come over (pre-pandemic, of course) they almost can guarantee I’ll have one in the oven.
Happy baking!
Just fed my starter this morning after pulling it out of the fridge! Maybe I’ll have to give this one a shot.
Kismet 🙂
I have a question about the milk. I never buy full fat milk, would using 1% or skim change the recipe? Thank you.
That’ll work just fine. You could also use water in place of the milk.
If I use a pan with lid, should I bake without steam in the oven?
That’s right, if you use a lid there’s no need for steam. You could also do an egg wash and skip the steam.
So without a lid but doing an egg wash would do the job? Thanks!
That’s right, I did this in testing and it worked out really well. You’ll get a nice shiny top crust. So to sum up, choose one:
1) use an egg wash (no steam required)
2) use the pullman pan lid (no steam required)
3) no lid, steam required
I have a stupid new baker question. My loaf pan is 7x4x4, should I still use the same amount of dough or decrease it?
I’d decrease, perhaps down to 800g or so!
The USA Pullman pan is 9 x 4 x 4. So if the 9″ pan holds a 900 gram loaf, the 7″ pan should hold a 700 g loaf comfortably — 800 g is probably still too much!
If you do the maths, a 7x4x4 tin has 77.7% of the capacity of a 9x4x4, so Maurizio is quite right!
I did do the maths. His loaf is 900 g. 77.7% of 900 = 699.3 g, which I rounded to 700.