


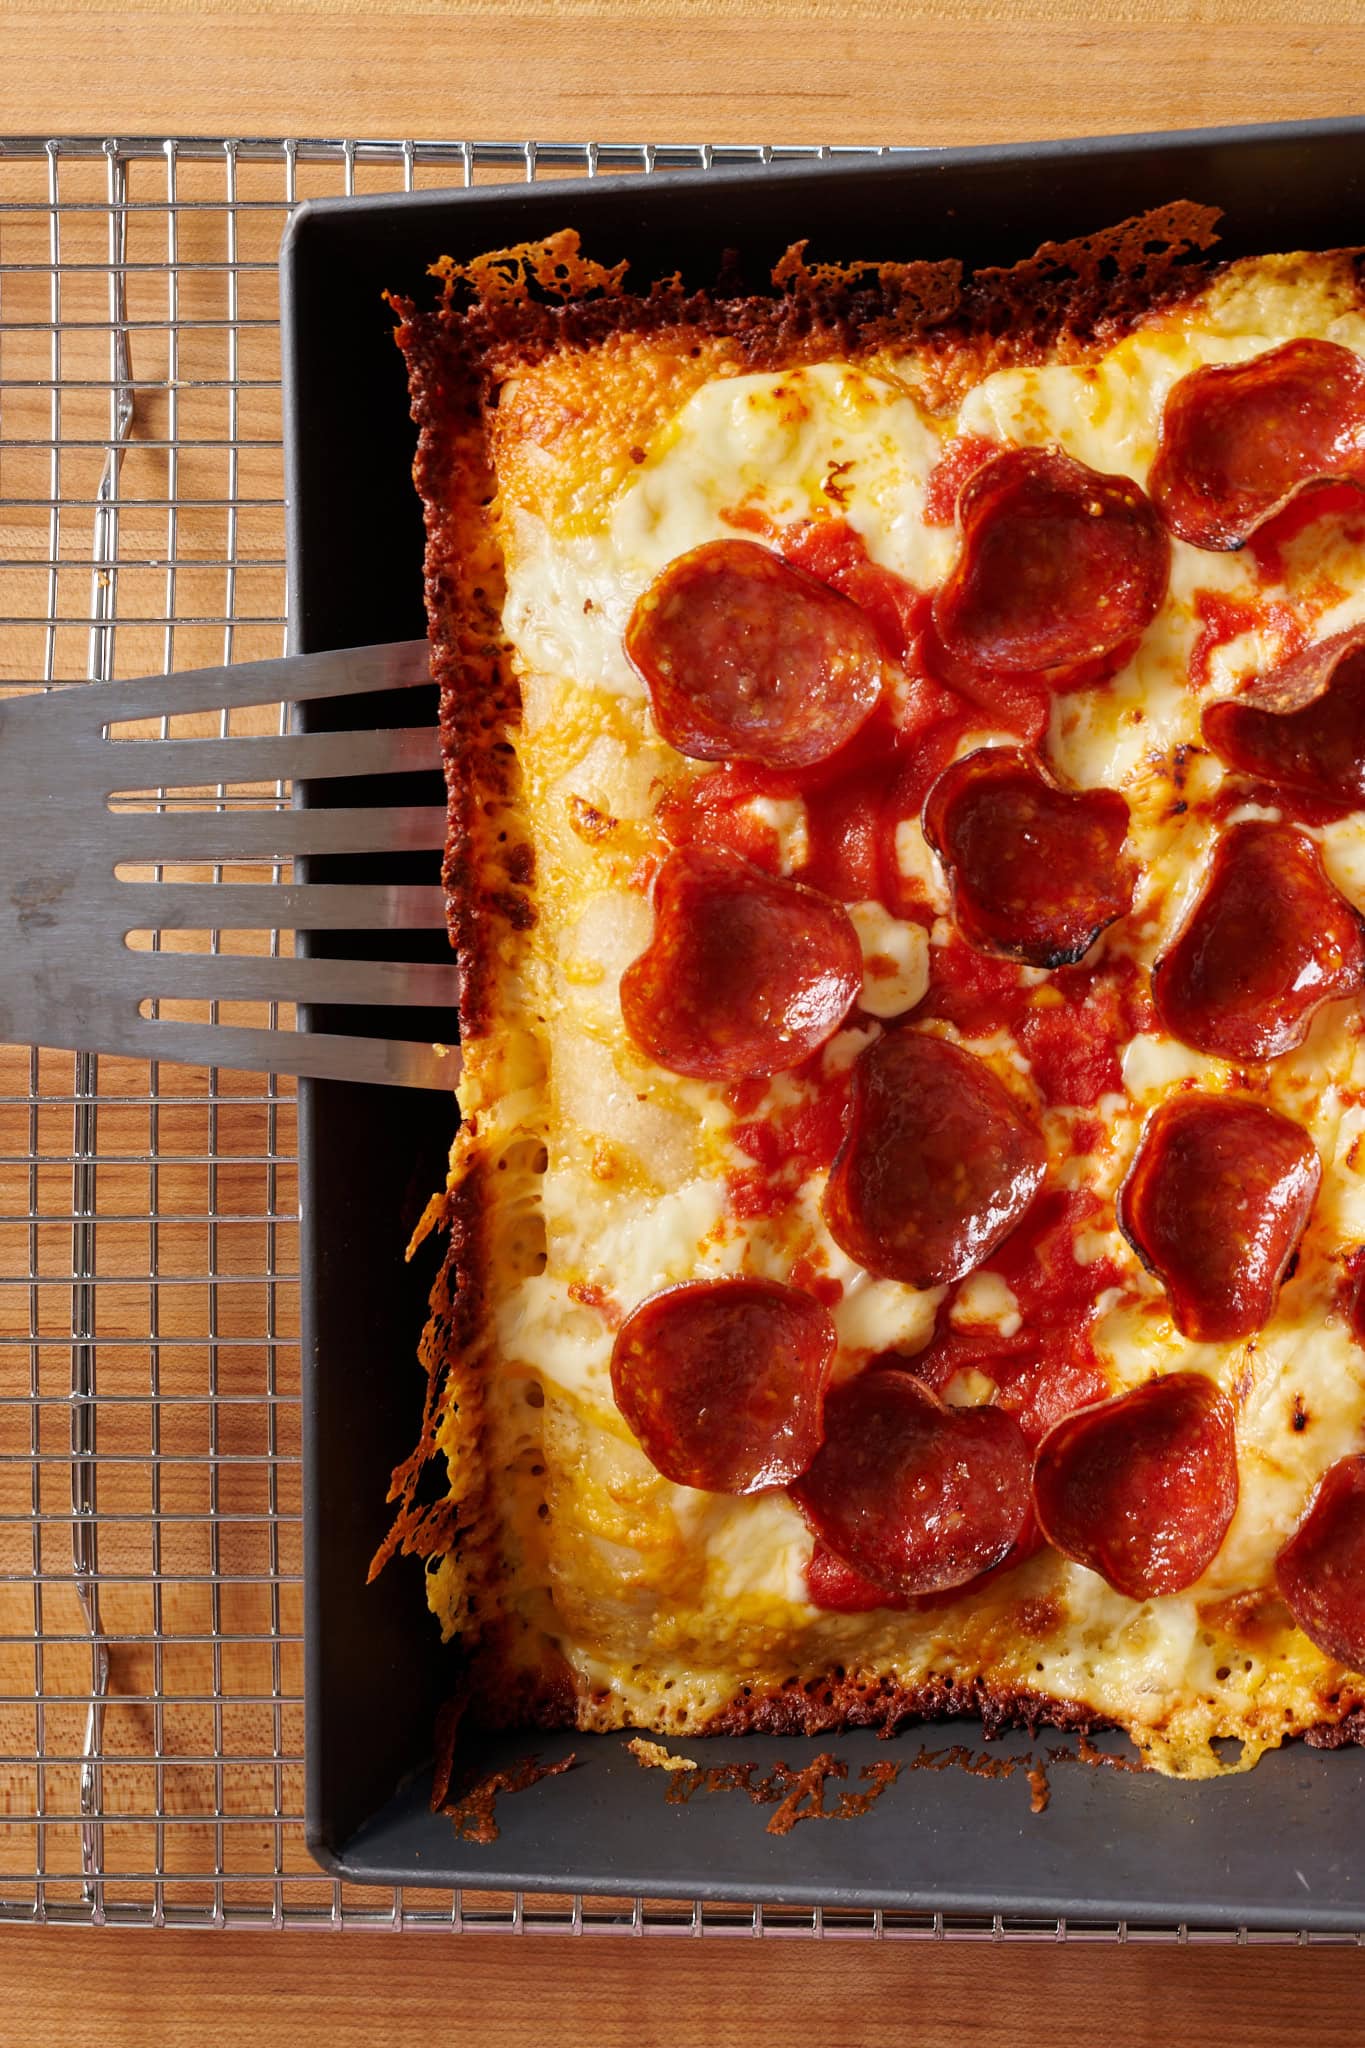
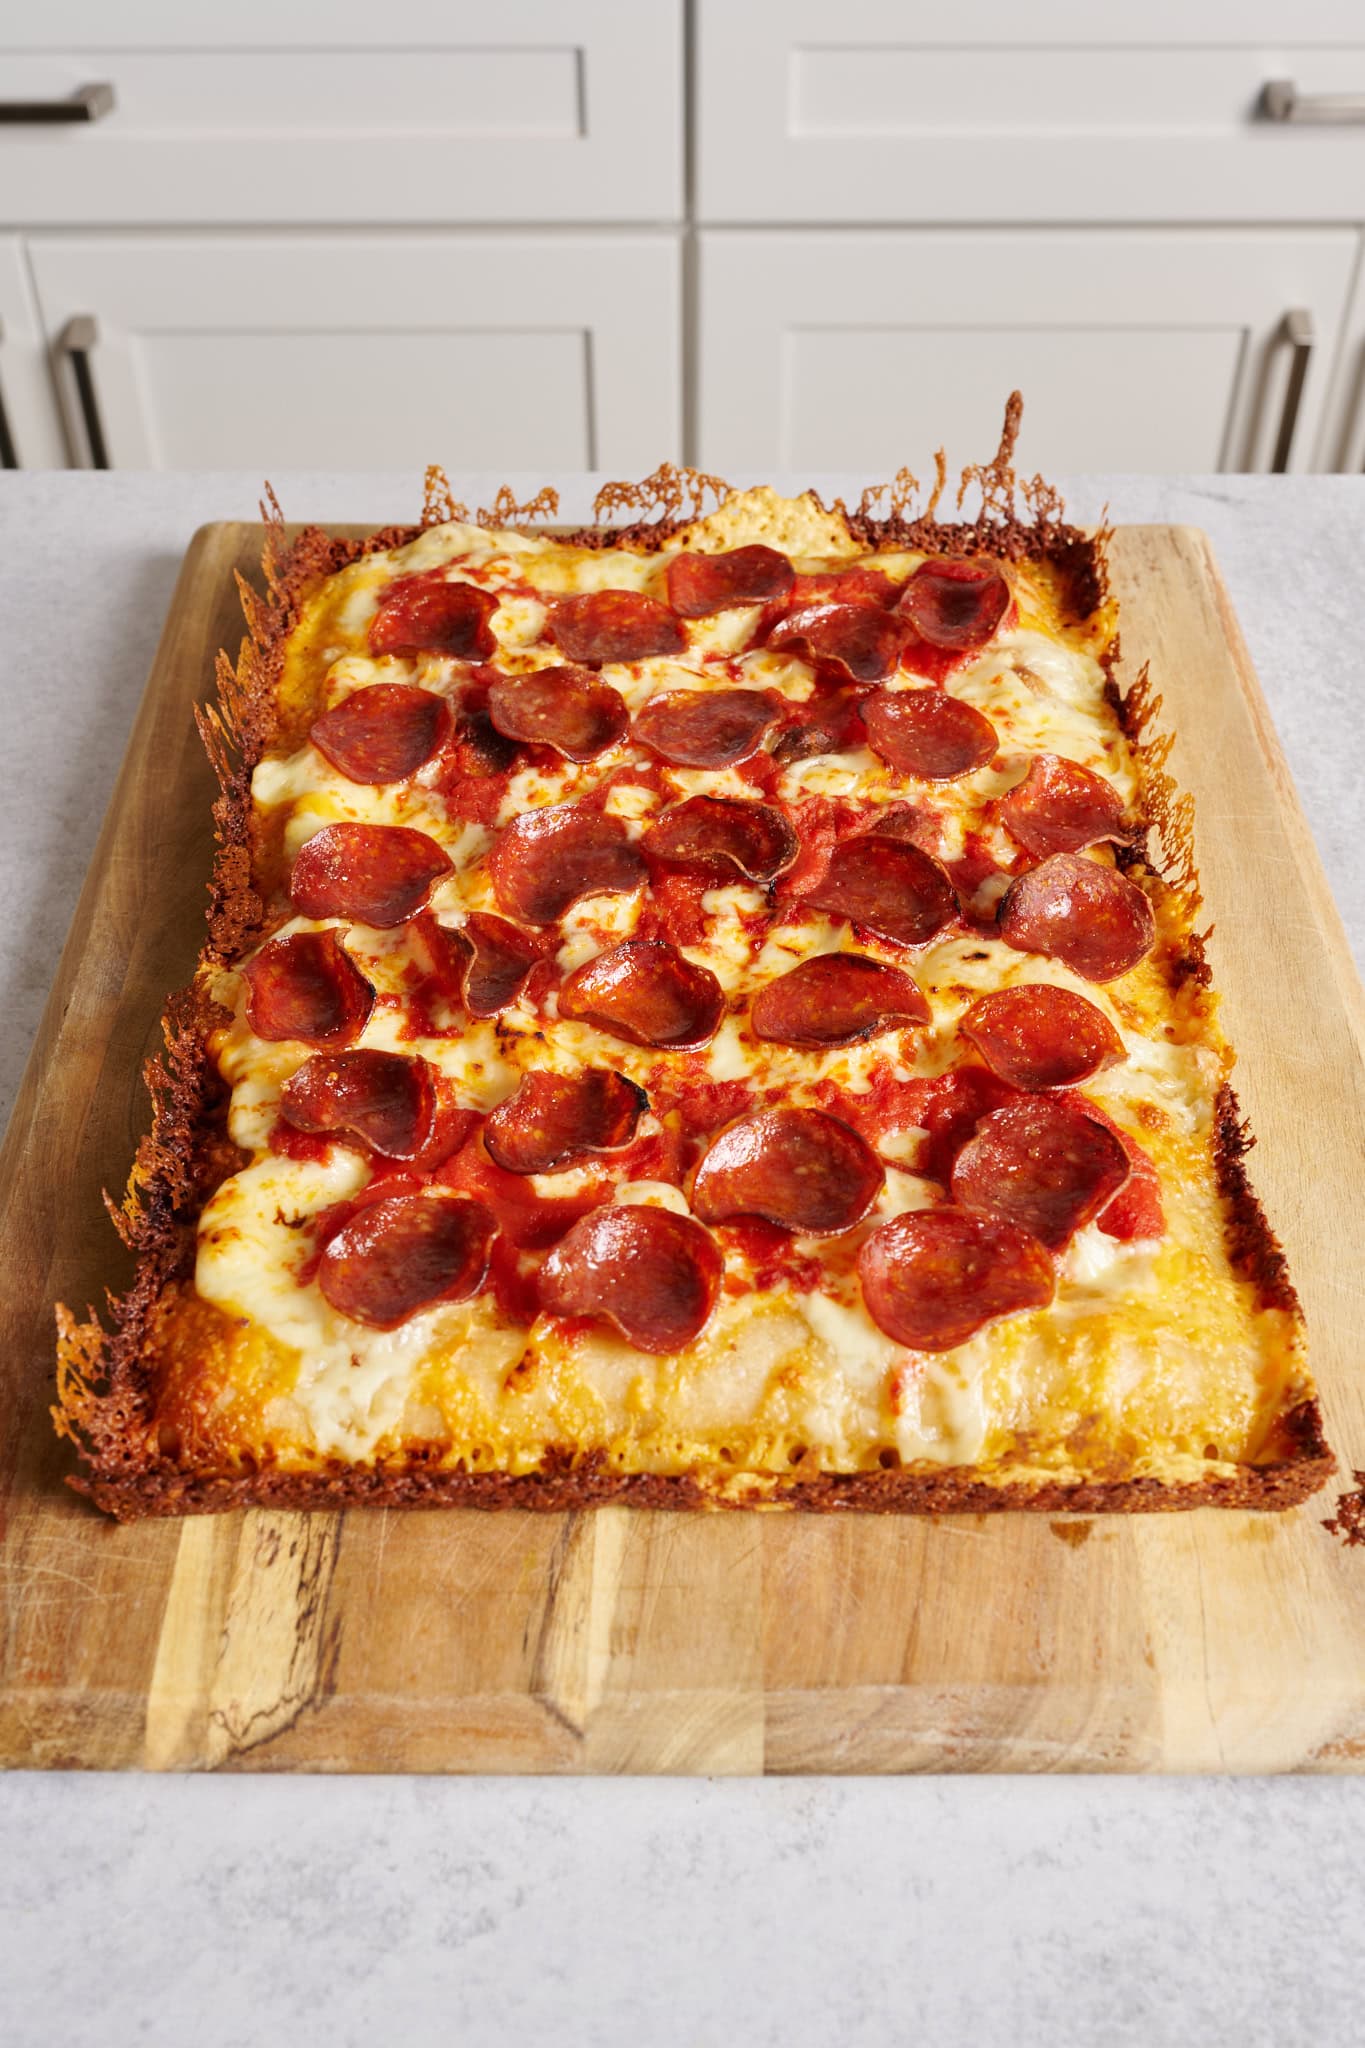
As the cheese sizzled and the singed pepperoni crackled, immense joy spread across my face. Pulling this rectangular cheesy slab from the oven might have been the best thing I did the entire week. The crispy lacework edge stood tall like trees along a thin forest perimeter, a border of crunchy, cheesy deliciousness. And that was just the beginning.
For a long while, I’ve considered making a proper Detroit-style pizza. Finally, the right motivation arrived this past week in the form of Alexandra’s latest cookbook, Pizza Night: Deliciously Doable Recipes for Pizza and Salad. Over the past week, I’ve flipped through it, oohing and ahhing on just about every page. Her book is brilliant; it pairs often-cheesy and often-savory pizza with an often-overlooked yet almost mandatory light counterpart: salad.
These salads—not just average weeknight salads, mind you—keep the meal light and palate varied. But what’s more, they could be an entire meal on their own if pizza wasn’t served alongside. In fact, many of these salads are so standout that I could even—gasp—save the pizza for later and gobble up the entire salad without a cheesy distraction.
But today, we’re here for pizza. I mean, just look at this (and the excitement on my face):
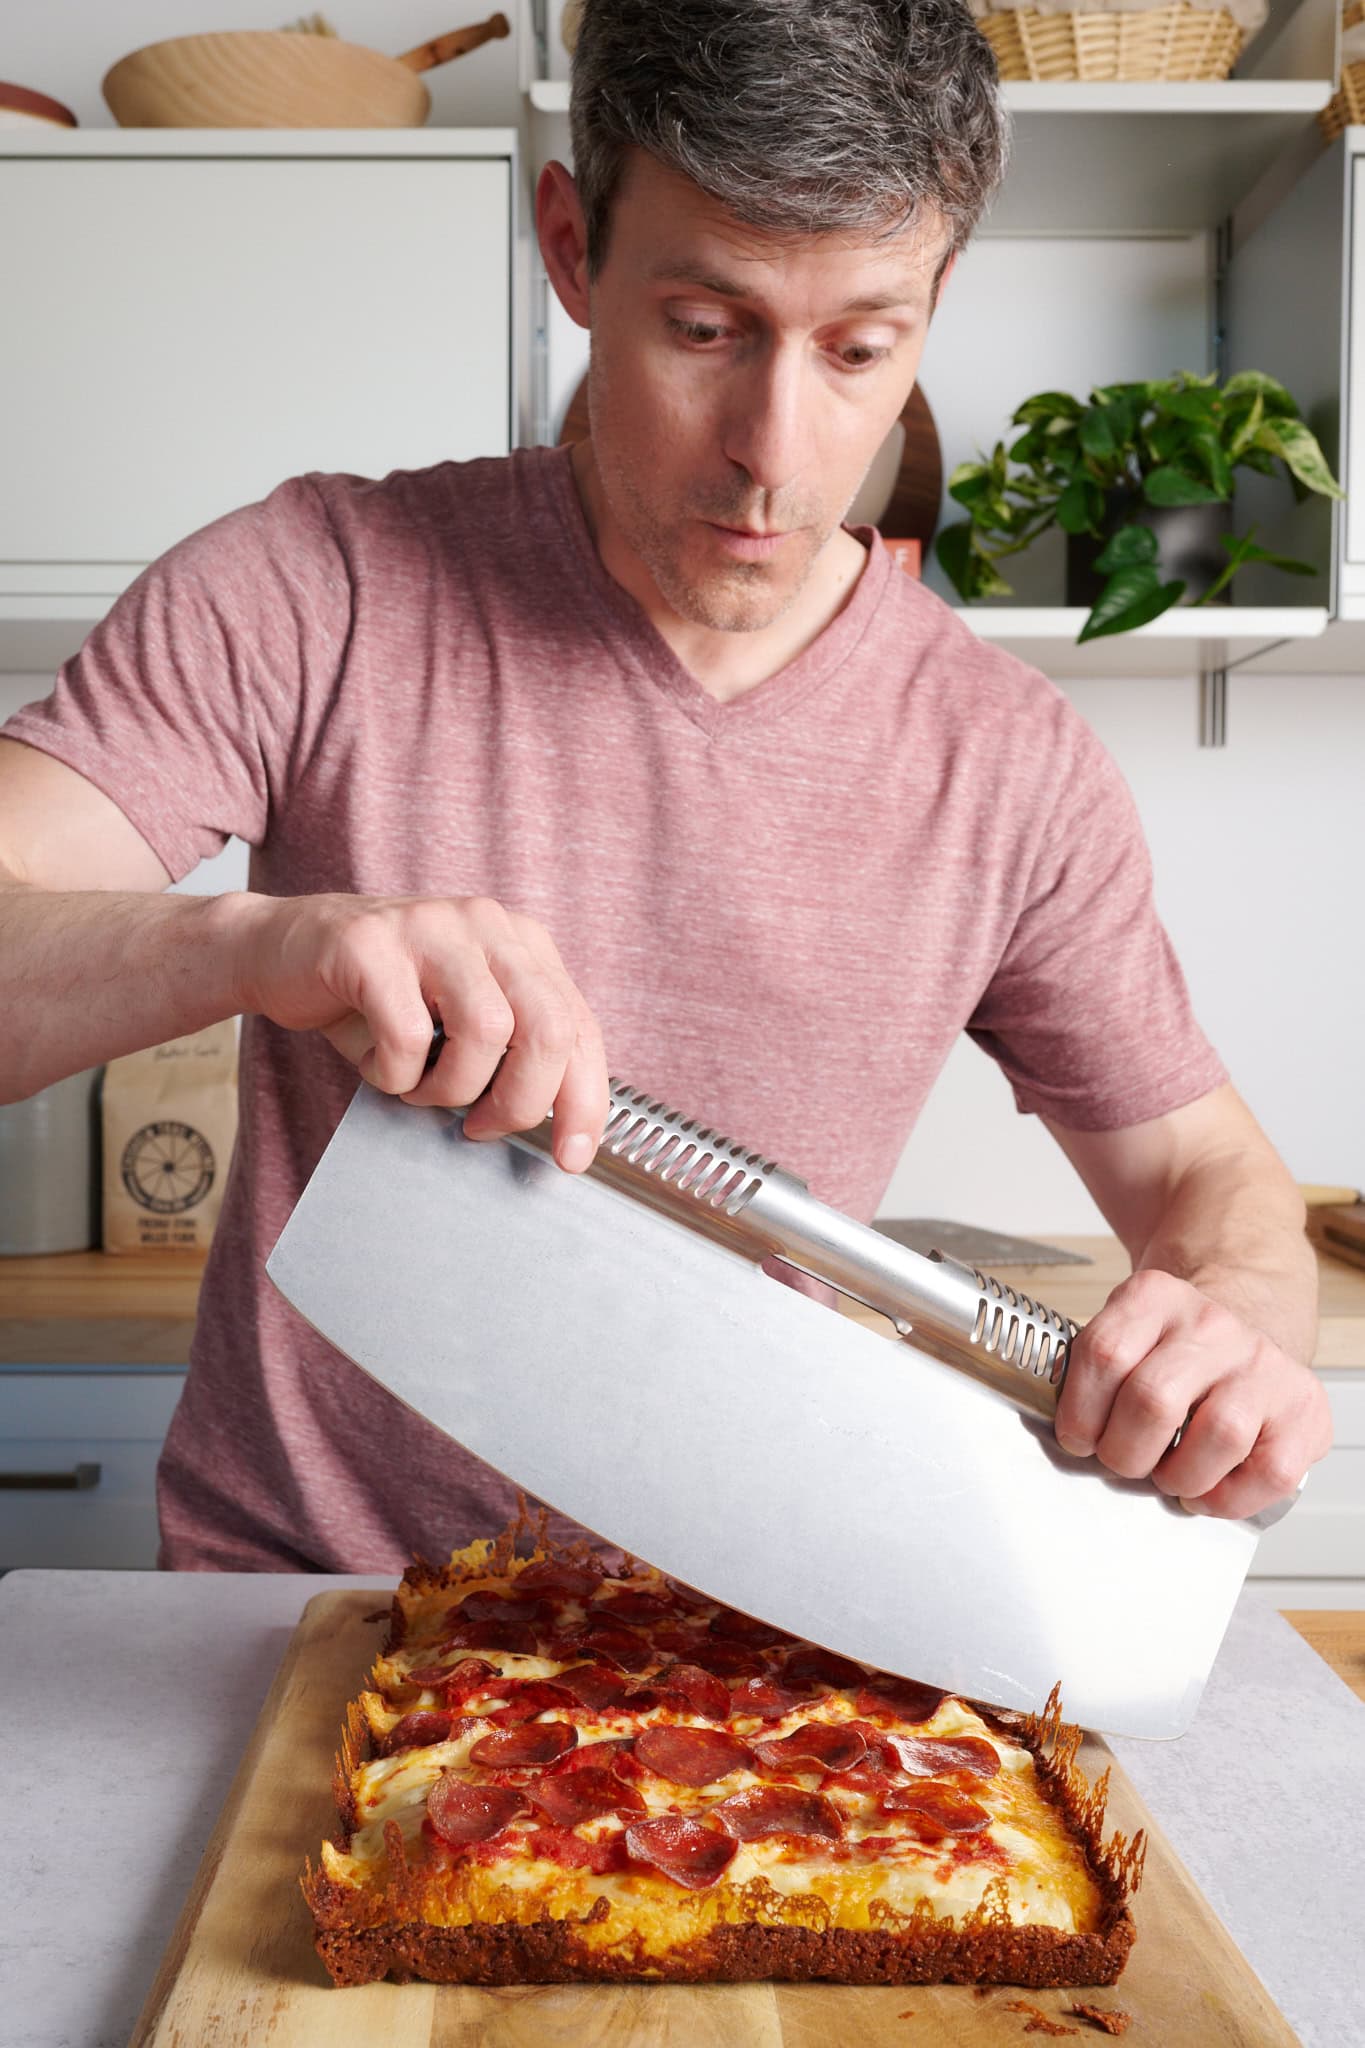
Buckle up, we’re about to take an exciting drive to Detroit.
Real Quick: Why I Like This Detroit-Style Pepperoni Pizza:
- Easy dough prep: The dough uses a single flour type and can be mixed by hand or in a stand mixer
- Flexible schedule: You can mix the dough in the morning and make pizza that night or refrigerate it for 1 to 3 days
- Crowd pleaser: A pan pizza is easier to make when feeding guests; you bake it once, and everyone eats at the same time
- Top it with what you got: I love pepperoni on this pizza, but feel free to go with sausage, peppers, bacon—whatever you have in the fridge!
- Use your sourdough starter: making a dedicated levain for this pizza dough is unnecessary. Use your ripe sourdough starter
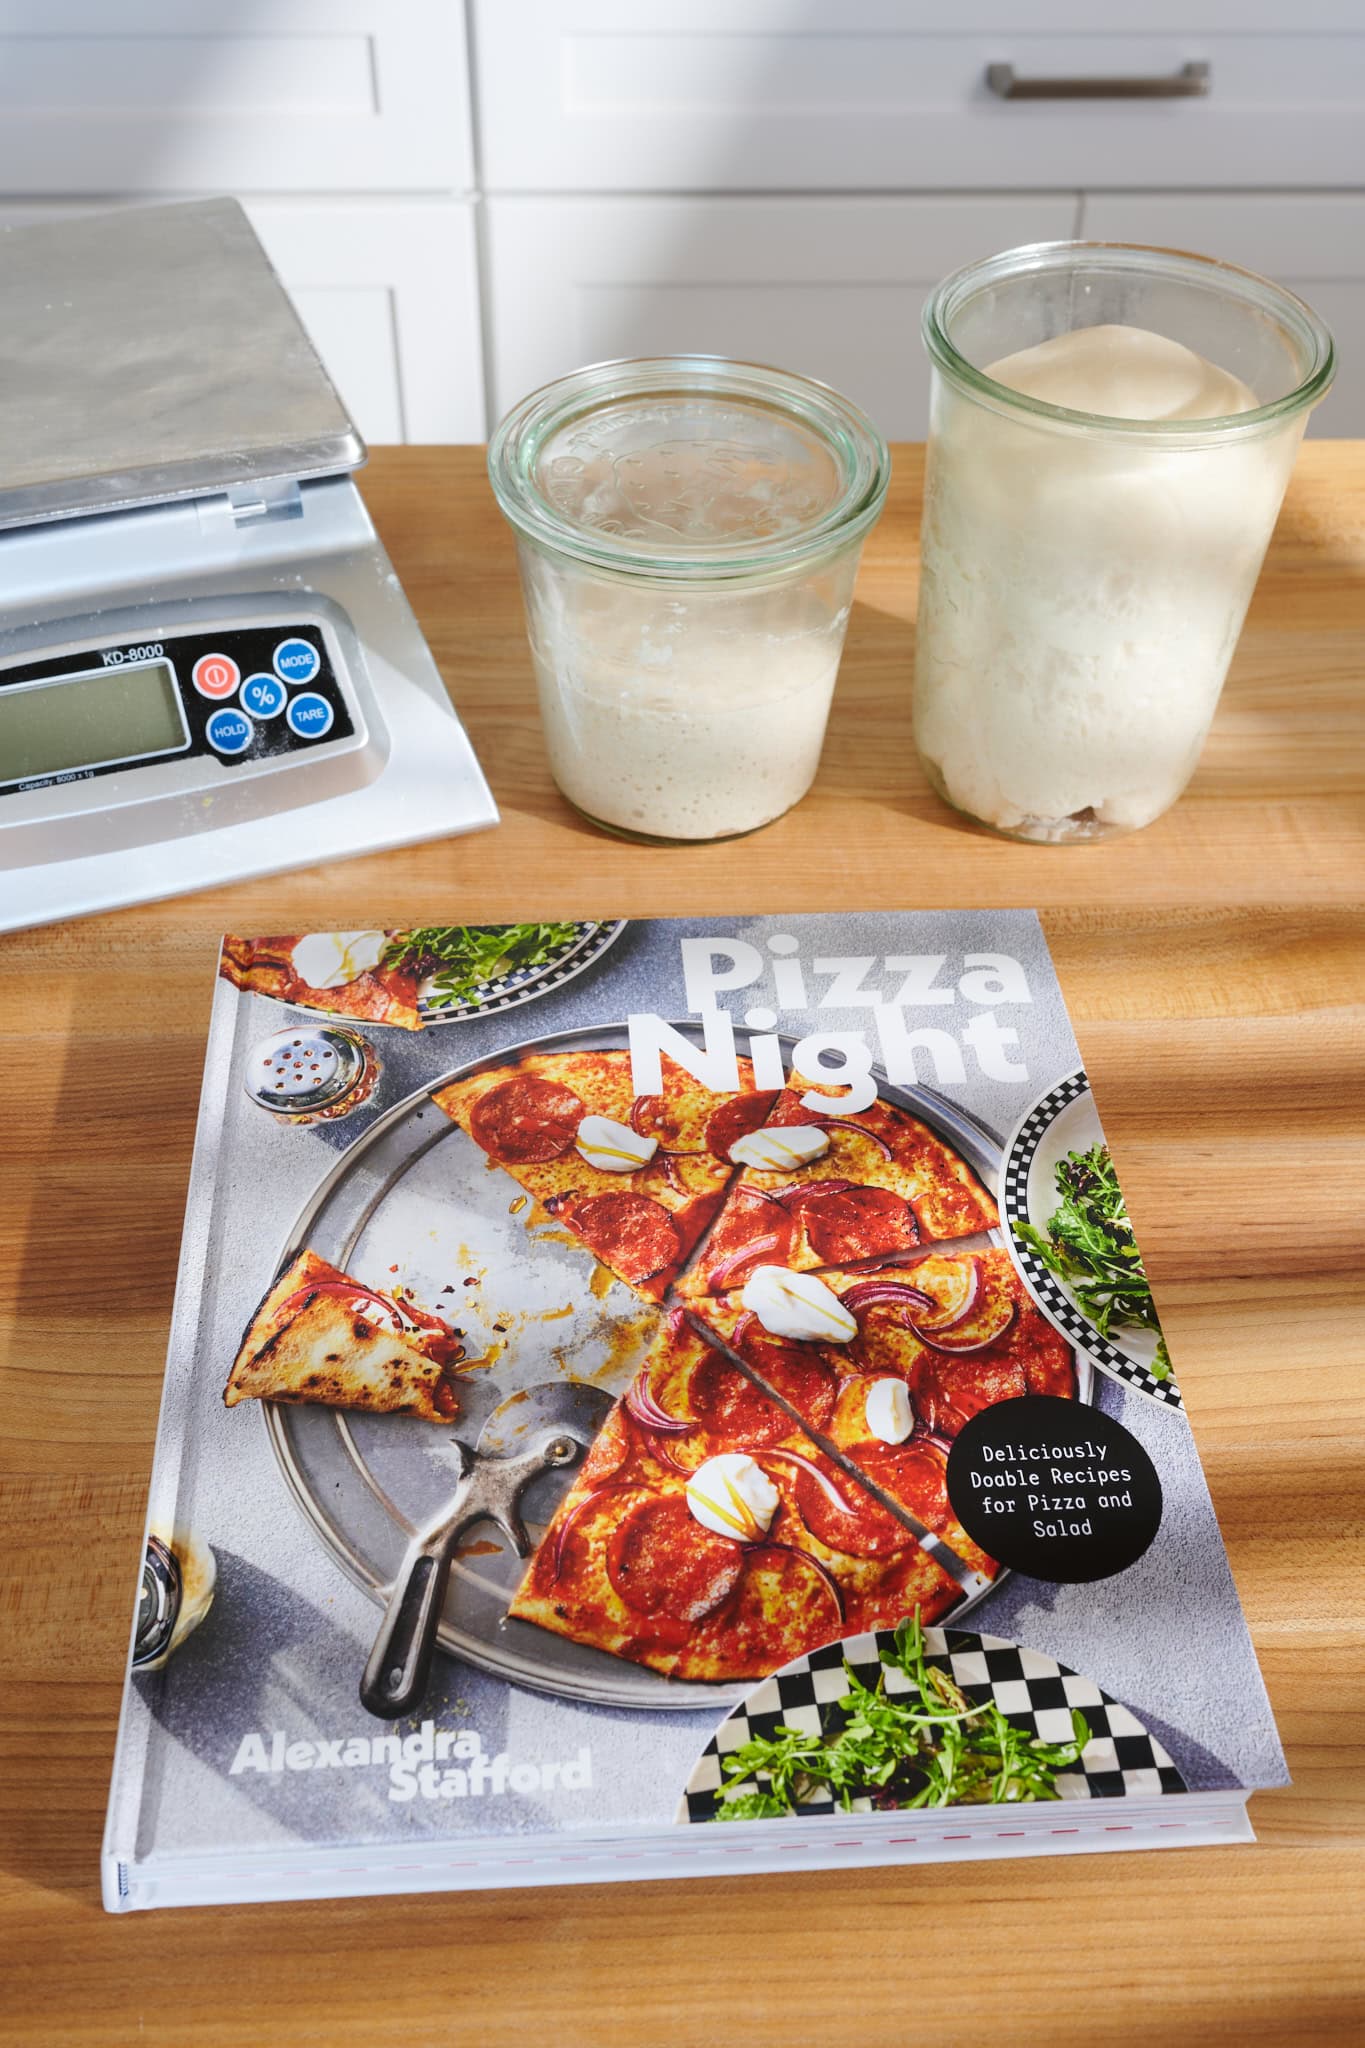
More About The Pizza Night Cookbook
I’ve been a fan of Alexandra’s for years. Her website, Alexandra’s Kitchen, is a tour de force, an extensive collection of successful recipes for every occasion and every mood. What I love most about her style, though, is that she’s thoughtful and detailed, never leaving readers wanting more explanation—and her new cookbook is no different.
The book starts with various doughs for different pizza styles: Neapolitan pizza, pan pizza, and even gluten-free pizza. Then, with these doughs in the toolbelt, she provides an arsenal of sauces, toppings, and dressings to spice things up. Further, her book is divided into seasons, giving convenient inspiration for seasonal cravings and vegetable availability. I just love her book, and I think you will too.
Watch Me Make This Detroit-Style Pizza
I’ll take you from start to finish in this quick YouTube short. Look at that cheesy crunch!
In this post, I’m going to dig into the various components of making a Detroit-style pizza:
But first, what exactly is Detroit-style pizza anyway?
What is Detroit-Style Pizza?
Detroit-style pizza hails from Detroit, Michigan, and is rectangular in shape and baked in a steel pan. The pizza is thick, chewy, and loaded with cheese—often Wisconsin brick cheese. When preparing this pizza, cheese is placed first on the dough (which can be parbaked) and spread all the way to the edge of the pan, resulting in an incredibly crisp and caramelized cheesy crust (a “frico” crust). After the cheese is added, toppings are usually next followed by dollops of tomato sauce.
In my book, crispy pepperoni is the only way to pepperoni.
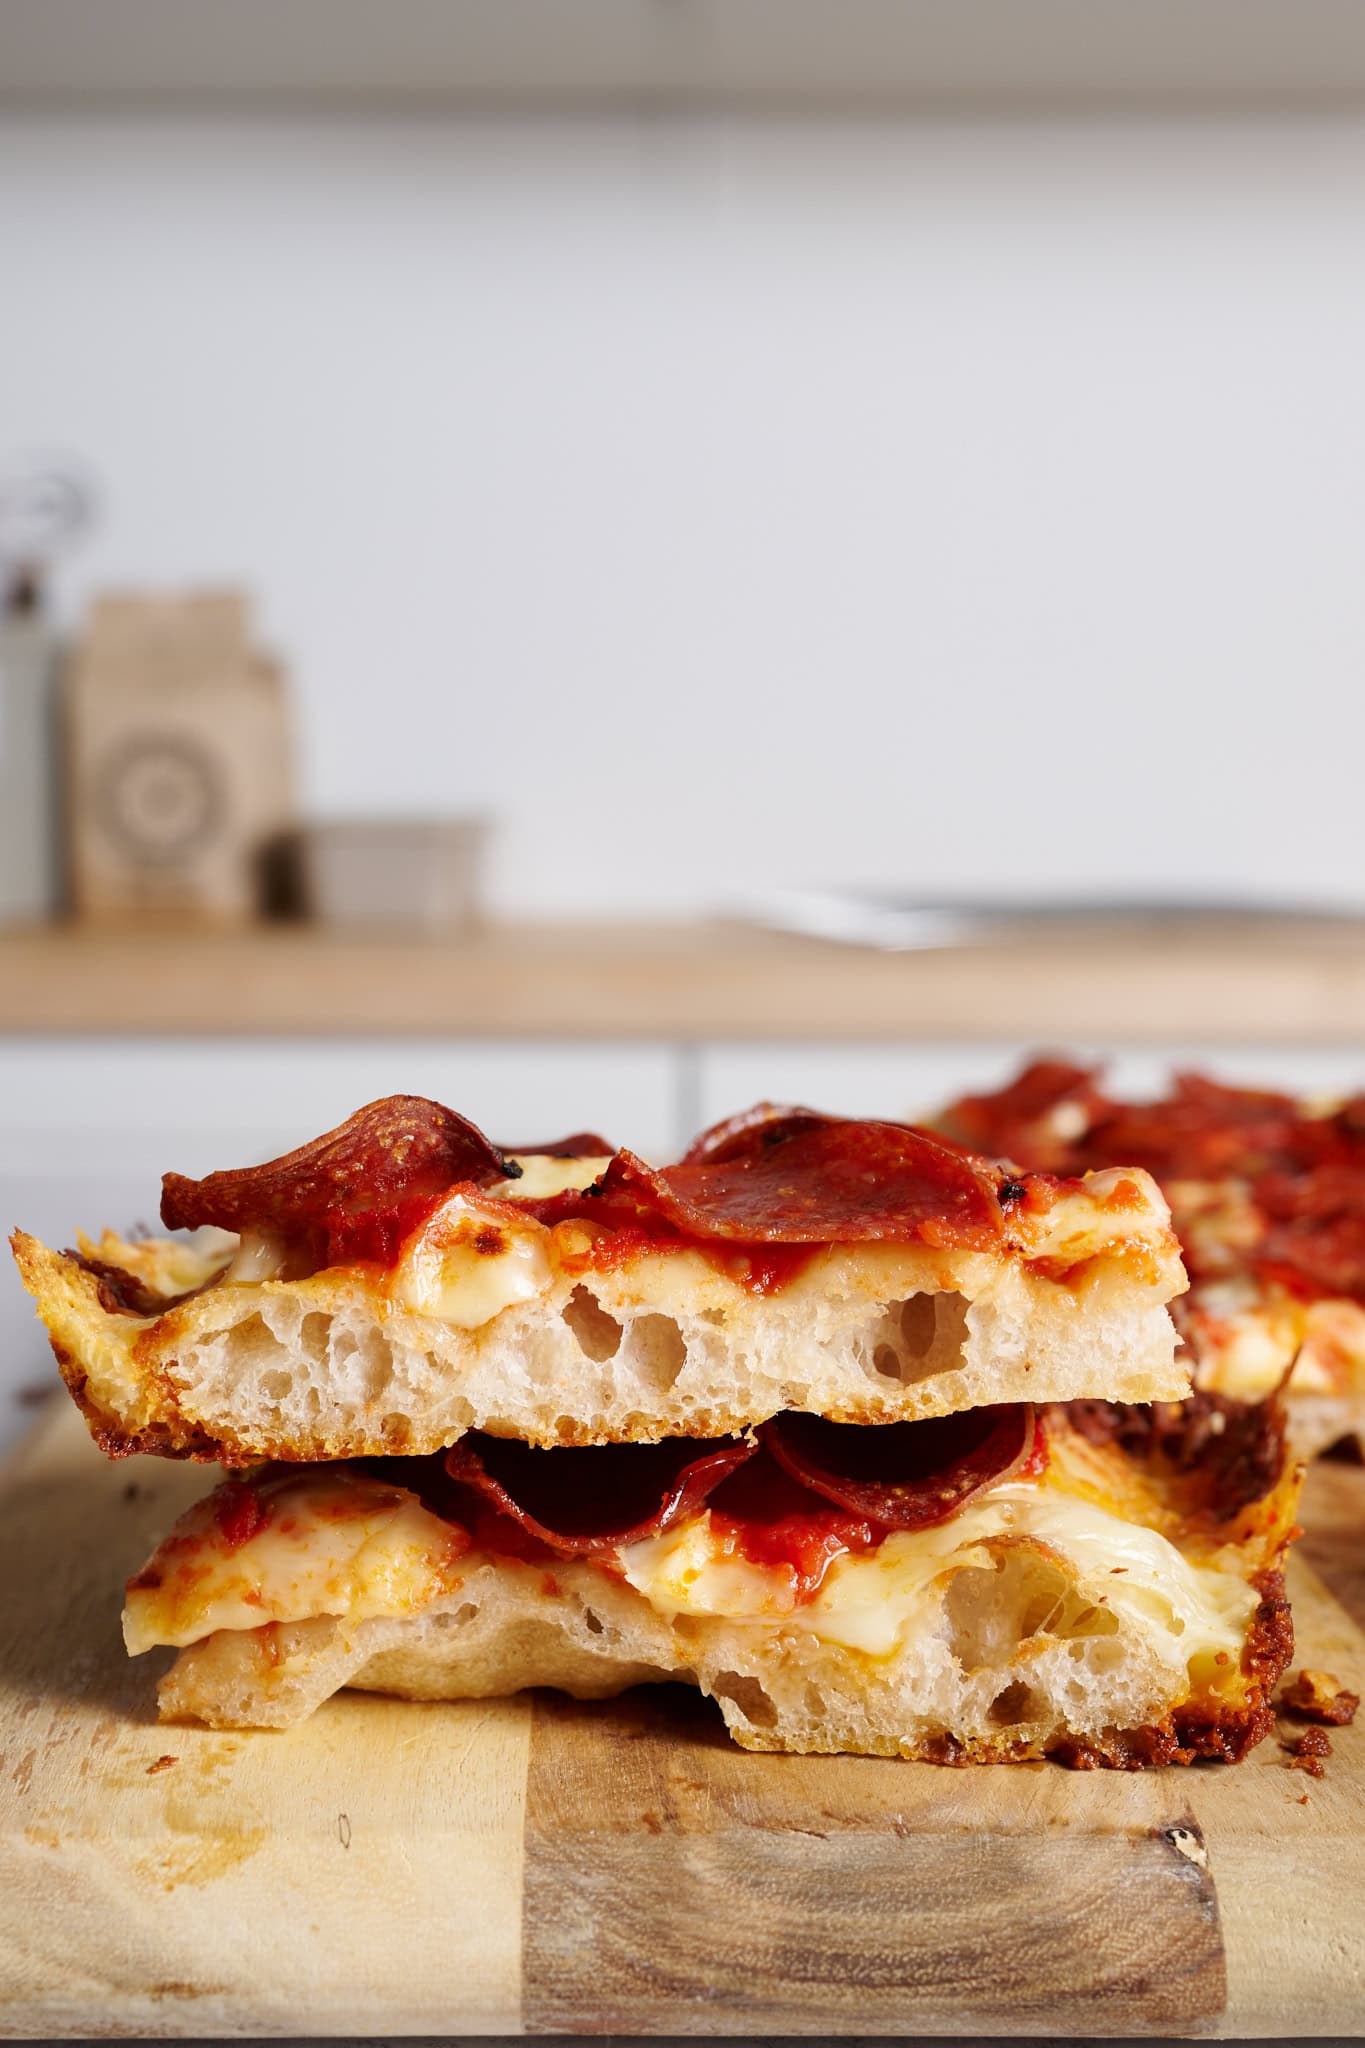
In testing this recipe, I followed Alexandra’s advice and played with the topping order just a bit, adding the pepperoni last to the top of the pizza stack. Yes, this is a small break in tradition, but as she says, and I completely agree, by adding them last, you get crispy pepperoni edges. In my book, crispy pepperoni is the only way to pepperoni.
Pizza Thickness: Detroit-style versus Sicilian versus Grandma
There’s often confusion between the various square and rectangular styles of pizza. Generally, Sicilian (or even Roman style, or pizza al taglio) is the thinnest, followed by Detroit, Grandma, and Chicago deep dish.

Detroit-Style Pizza Flour Selection
One of Detroit-style pizza’s hallmarks is its chewy crust. Using a lower protein flour, like all-purpose flour, is definitely an option, but in testing, I had the best results when using stronger, high-protein bread flour like King Arthur Baking Bread Flour.
Not only will the higher protein content of the flour give you a chewier result (much like it does in bread), but it’s also a stronger foundation for a higher-hydration dough—which is exactly what this sourdough Detroit-style pizza demands.
If you only have all-purpose flour in your pantry, consider reducing the dough’s hydration by 50g to better suit that lower protein flour.
What is The Best Cheese For Detroit-Style Pizza?
Oh, how I went down a cheese rabbit (mouse?) hole with this Detroit-style pizza.
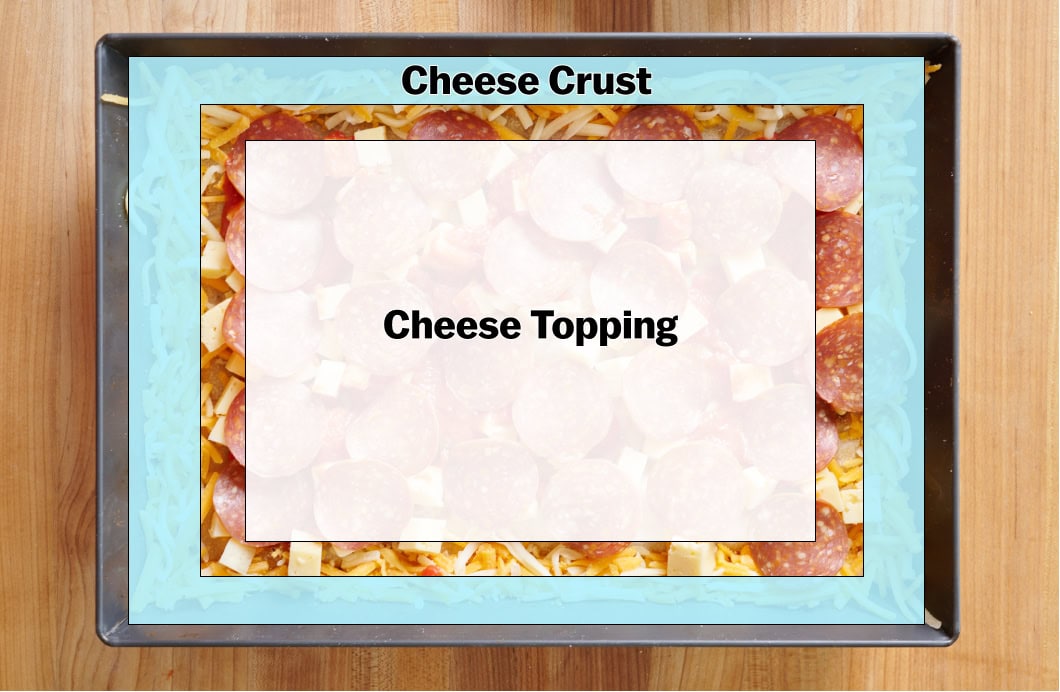
To thoroughly test and get the cheese selection just right, I ordered several varieties of cheeses and even tried custom blends to get close to the flavors one would expect with a Detroit pie.
This pizza is a little unique in the fact that it calls for a blend of several types of cheeses (see diagram above) place in a very particular way:
- Cheese topping (the cheese in the very middle): Wisconsin brick, buttercäse, or a mixture of mozzarella and Monterey Jack
- Cheese crust (the cheese along the perimeter): a mixture of low-moisture whole milk pre-shredded mozzarella, and pre-shredded cheddar (I used mild yellow cheddar)
Let’s look at the different cheese options for each section.
Cheese Toppings
This is the cheese that goes into the center of the pizza, surrounded by the cheese crust. For this area, I first looked to the classic Wisconsin brick cheese, then some alternatives that get you close—and may even be your preference (I’m looking at you, butterkäse).
Topping Cheese: Wisconsin Brick
Traditionally, Wisconsin brick-style cheese is the star of the show on Detroit-style pizza. This soft-ish cheese is prepared uniquely and made into brick form (interestingly, its name comes from the bricks cheese-makers used to help remove moisture from the cheese). It’s slightly tangy in flavor and tastes quite buttery and rich because of its higher fat content. It melts incredibly well for pizza, providing even coverage without clumping or uneven melting.
The downside to using Wisconsin brick cheese is that it’s hard to source. I couldn’t find it in any market here, so I had to order it online. I ordered several varieties in testing. A notable one was the mild brick from Widmer’s Cheese Cellars, and another surprisingly good (and more economical) one was the Wisconsin brick from Cheesers).
However, I did find a very tasty and easy-to-find alternative…

Topping Cheese: Butterkäse
Butterkäse means “butter cheese” in German, and this semi-soft cow’s milk cheese certainly has those buttery rich vibes, especially when melted on top of the pizza. It has a delicate flavor profile and has a very slight tang, similar to Wisconsin brick. Additionally, it melts wonderfully, providing even coverage and minimal pooling or liquefying.
The fantastic thing about this cheese is that it was easy to find at my local market! For me and my Detroit-style pizza, this will be my go-to cheese.
Topping Cheese: Make Your Own Blend
If you can’t find Wisconsin brick or butterkäse cheeses, a suitable blend would be a 50/50 combination of whole milk mozzarella and cheddar, or even better, Monterey Jack (which has a little more tang to it).
Cheese Crust
What is a Frico Crust?
A distinctive feature of Detroit-style pizza is the deeply caramelized cheese edge that forms around the rectangular pizza during baking. This golden, crispy, and incredibly flavorful “frico crust” is formed by cheese along the perimeter melting against the metal pan during baking.
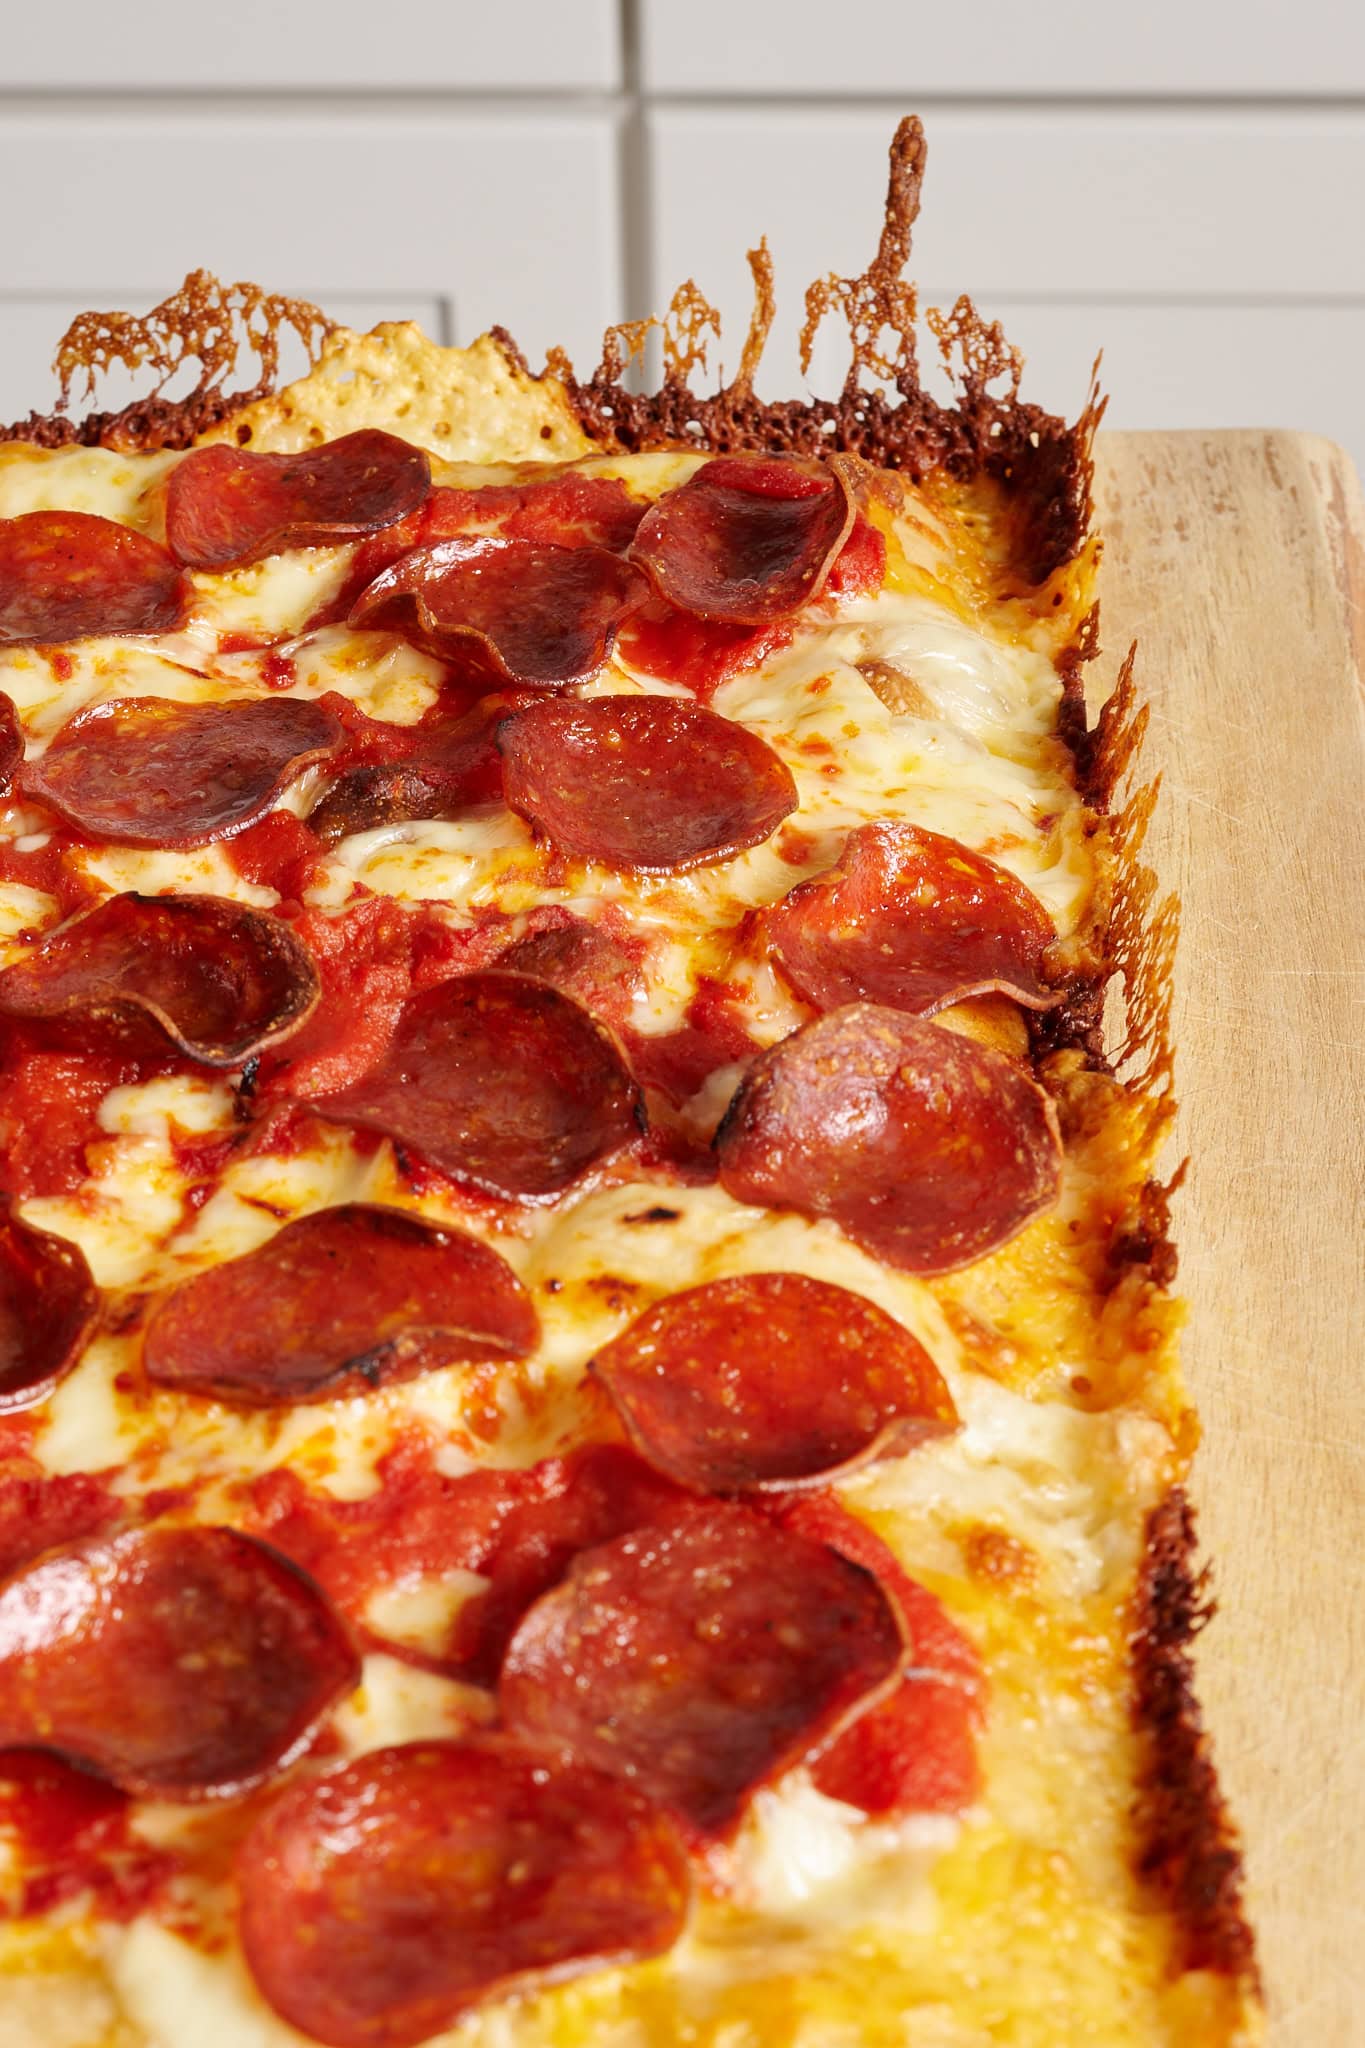
Interestingly, frico is an Italian dish from Friuli-Venezia, a region in northeast Italy. It’s similar to the Swiss rösti, which is often made from potatoes. In Italy, it’s often made with heated and melted cheese until the cheese turns lacey and crispy.
What is the Best Cheese For a Frico Crust?
The best cheese for making a crispy and sturdy frico crust on pizza is pre-shredded cheese. I’ve been using a mixture of shredded mozzarella and yellow cheddar cheese for maximum flavor and just the right level of crispiness. It helps if the shredded cheese is slightly thicker, not finely shredded.
Alexandra mentions in her book that pre-shredded cheese is the best to form a frico crust due to the starches present in pre-shredded cheese packs. I tested this and found it to be absolutely true: if you shred your cheese from a large block, it melts too fast, becoming a liquid cheese that pools rather than stands tall.
Detroit-Style Pizza Sauce
With my sourdough pizza, I usually use a simple sauce that’s not cooked for a fresh and bright tomato flavor. But, this Detroit-style pizza calls for cooked tomato sauce to be traditional and for a slightly different flavor profile—more intense, herby, and a little punch of garlic.
I followed Alexandra’s recipe for her Simple Tomato Sauce. See the recipe steps below for instructions on making her cooked tomato sauce.
The Best Pan for Detroit-Style Pizza
Since Detroit-style pizza is much thicker, it needs a deeper pan. Hands down, the best pan for making this type of pizza I’ve tested with is the 10 x 14-inch LloydPans Detroit Style Pizza Pan. This Detroit-style pizza pan is made of hard-anodized aluminum, is practically nonstick, does not require seasoning, and conducts heat incredibly efficiently for a crispy crust every time.
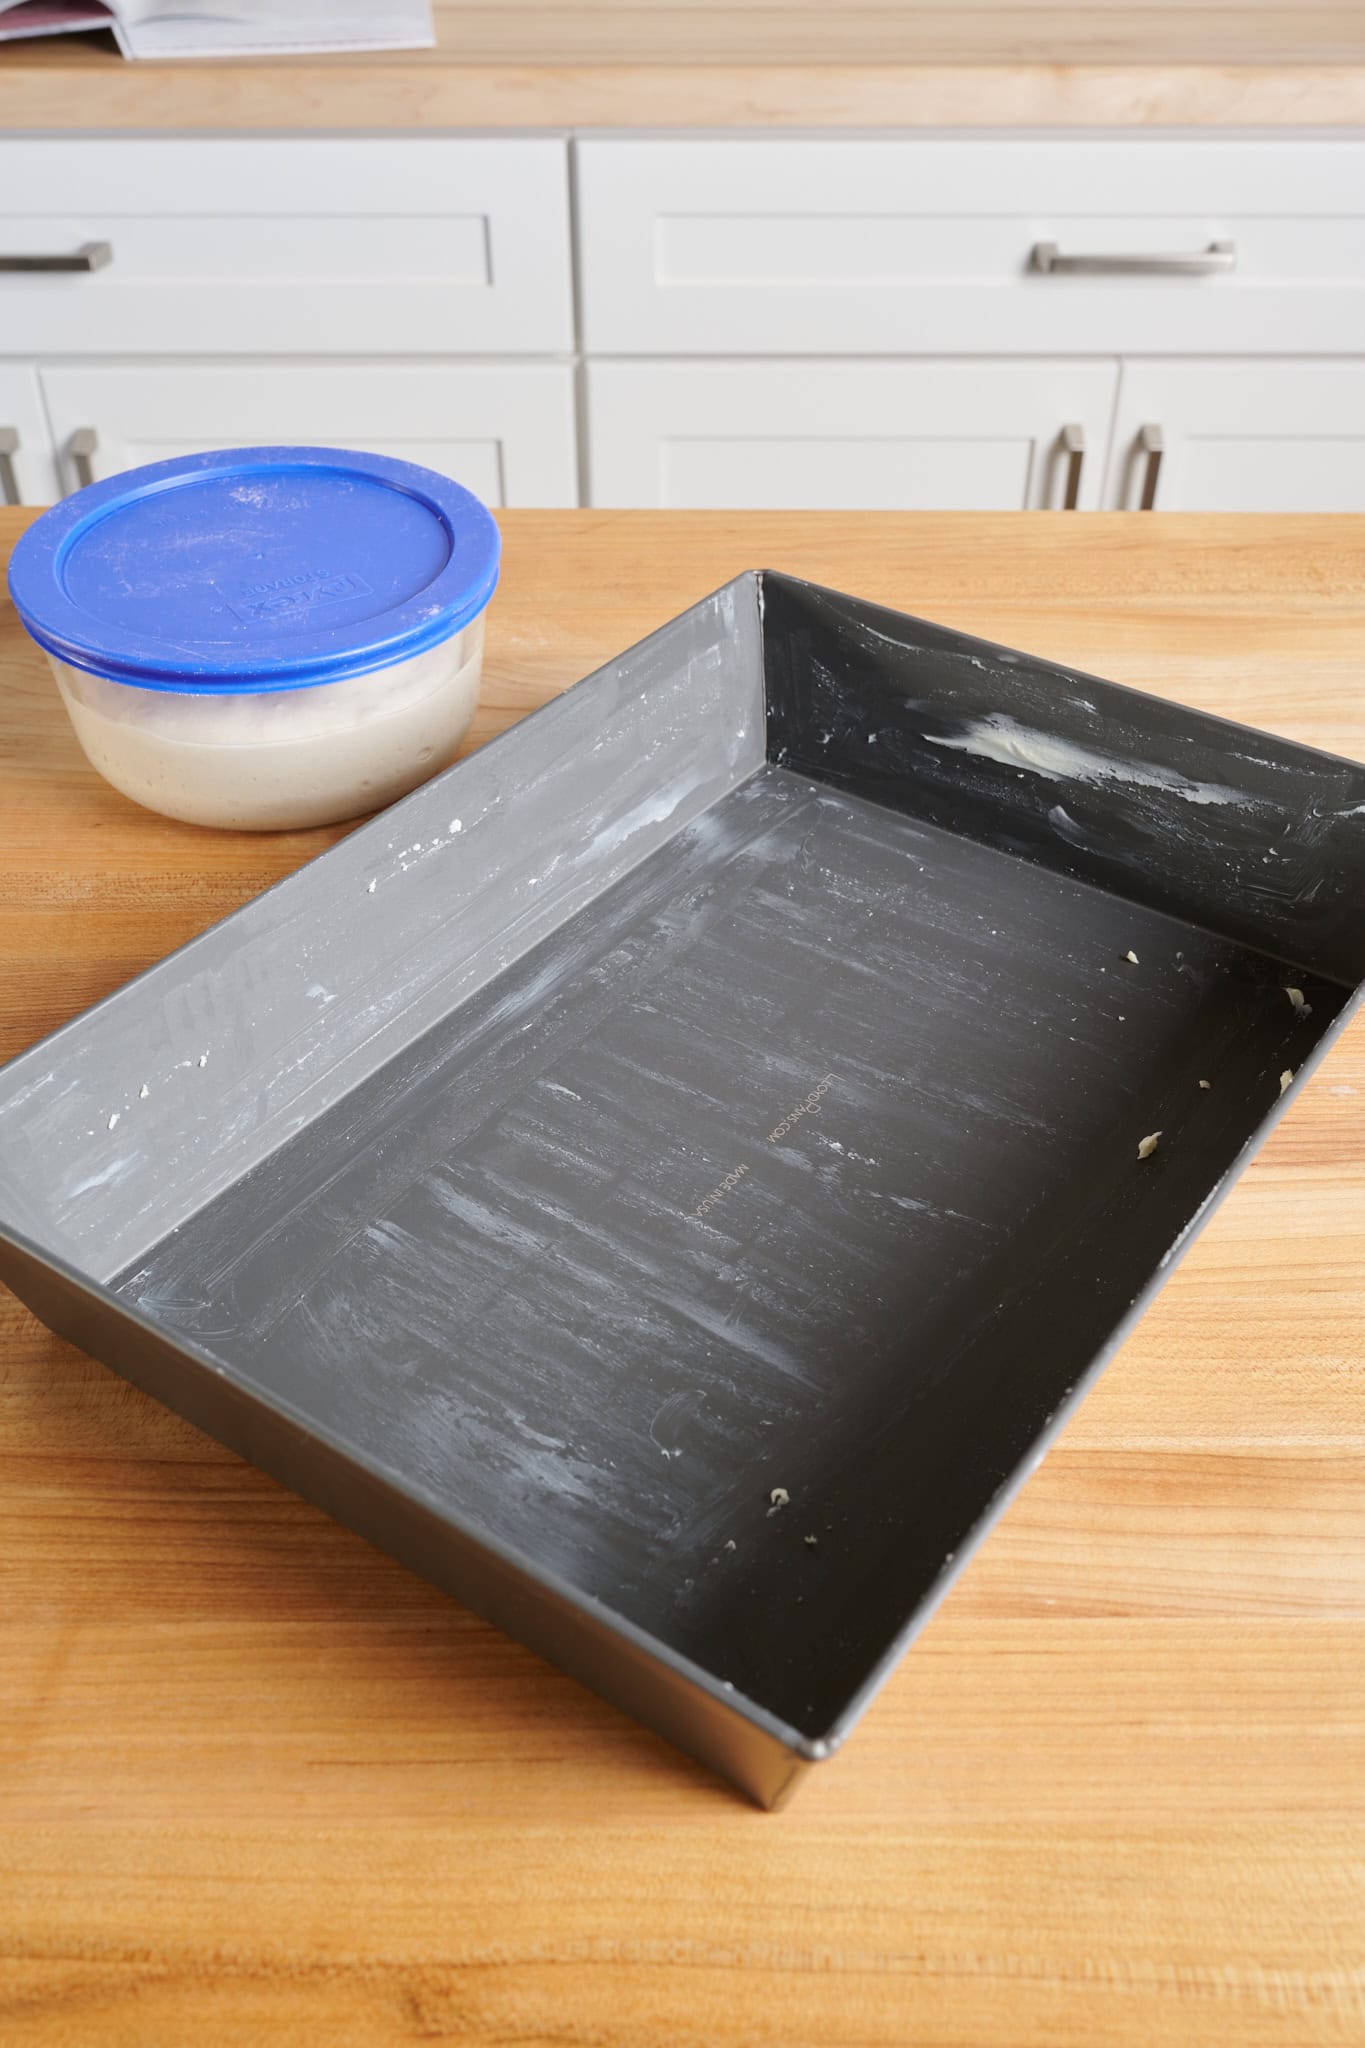
I’ve been baking with LloydPans (like with my focaccia pugliese) in my kitchen for many years, and they’ve slowly replaced all my baking sheets and other pizza pans. I also love that they’re made in the USA by a small company dedicated to quality.

Baking Schedule
This recipe can be made all in a single day (direct dough) or split over two days (cold proofed). I’ll show the two-day process, which I find brings more flavor and is much more flexible in terms of timing.
If you want to bake this pizza the same day you mix it, instead of balling the dough and cold-proofing it, divide it and place it directly into the pizza pan (you can ball one half of the dough and refrigerate it for later). Then, follow the instructions after I remove the dough from the fridge and put it in the pan.
A Look Into My Detroit-Style Pizza Dough Creation
I took Alexandra’s recipe as inspiration and, as she mentions in the book, used my sourdough focaccia dough recipe as the base of this pizza, but then modified it to be similar to her yeasted dough recipe.
Here’s how I modified my sourdough focaccia recipe for this pizza:
- Scaled up the dough to 600g per pizza for a slightly thicker pie (and to better support the toppings)
- Increased the dough hydration (76 to 78%) for a lighter and fluffier dough
- Increased the salt percentage significantly (Focaccia is topped with coarse salt before baking, so the salt percentage in the dough is low. Increasing the dough’s salt percentage aligns it more with a typical pizza dough.)
- Used 100% high-protein white flour (instead of a mix of AP and high-protein) for more structure and chew
- Removed the olive oil from the dough because extra tenderness isn’t needed
Detroit-Style Pizza Dough Formula
Vitals
This Detroit-style pizza dough formula makes two pizzas. If you’d like to make only a single pizza, halve all of the ingredients (as explained in my guide to baker’s percentages).
| Total Dough Weight | 1200 grams |
| Hydration | 78.0% |
| Pre-fermented Flour | About 8.9% (flour in sourdough starter) |
| Yield | Two 10 x 14-inch Detroit pizzas |
Total Formula
Desired dough temperature: 78°F (25°C). See my post on the importance of dough temperature for more information on dough temperatures.
| Weight | Ingredient | Baker’s Percentage |
|---|---|---|
| 600g | High-protein white bread flour (King Arthur Baking Bread Flour) | 100.0% |
| 469g | Water | 78.0% |
| 16g | Fine sea salt | 2.7% |
| 114g | Ripe sourdough starter | 19.0% |
Additional Ingredients
1 tablespoon extra-virgin olive oil, for the pan
2 tablespoons unsalted butter, at room temperature, for the pan
Pizza Toppings
| Weight | Ingredient |
|---|---|
| 113g | Pre-shredded cheddar (mild or sharp) |
| 57g | Pre-shredded mozzarella cheese (low moisture, whole milk) |
| 170g | Freshly cubed butterkäse, Wisconsin brick, or a mix of Monterey Jack and Mozzarella |
| Pepperoni (natural casing is best) to cover |
Simple Cooked Tomato Pizza Sauce
| Ingredient |
|---|
| ¼ cup extra-virgin olive oil |
| 2 cups finely chopped white or yellow onion |
| 3 garlic cloves, minced |
| Kosher salt |
| Pinch of crushed red pepper flakes |
| ½ cup white wine |
| 1 (28-ounce) can undrained peeled whole San Marzano tomatoes (I like Bianco DiNapoli) |
| ½ cup packed fresh basil leaves |
Detroit-Style Pizza Dough Method
1. Mix – 9:00 a.m.
| Weight | Ingredient |
|---|---|
| 600g | High-protein white bread flour |
| 469g | Water |
| 16g | Fine sea salt |
| 114g | Ripe sourdough starter |
I like to mix this dough in my KitchenAid stand mixer, but you could use a larger bread dough mixer or mix this dough by hand.
Using a Stand Mixer
To the bowl of a stand mixer, add the flour, water, salt, and ripe sourdough starter. Mix on speed one for 1 to 2 minutes until the dough comes together, and no dry bits remain. Then, turn the mixer up to speed two and mix for 5 minutes.
Let the dough rest in the mixing bowl for 10 minutes.
Then, turn the mixer to speed two and mix for 2 to 3 minutes until the dough is cohesive.
Mixing By Hand
To a large mixing bowl, add the flour, water, salt, and ripe sourdough starter. Using a dough whisk or wet hand, mix the ingredients together until they form a shaggy mass. then, using a wet hand, reach down into the bowl on one side and stretch the dough up and over. rotate the bowl and perform this stretching and folding action again. Repeat for 3 to 5 minutes until the dough smooths a bit and loses some shagginess.
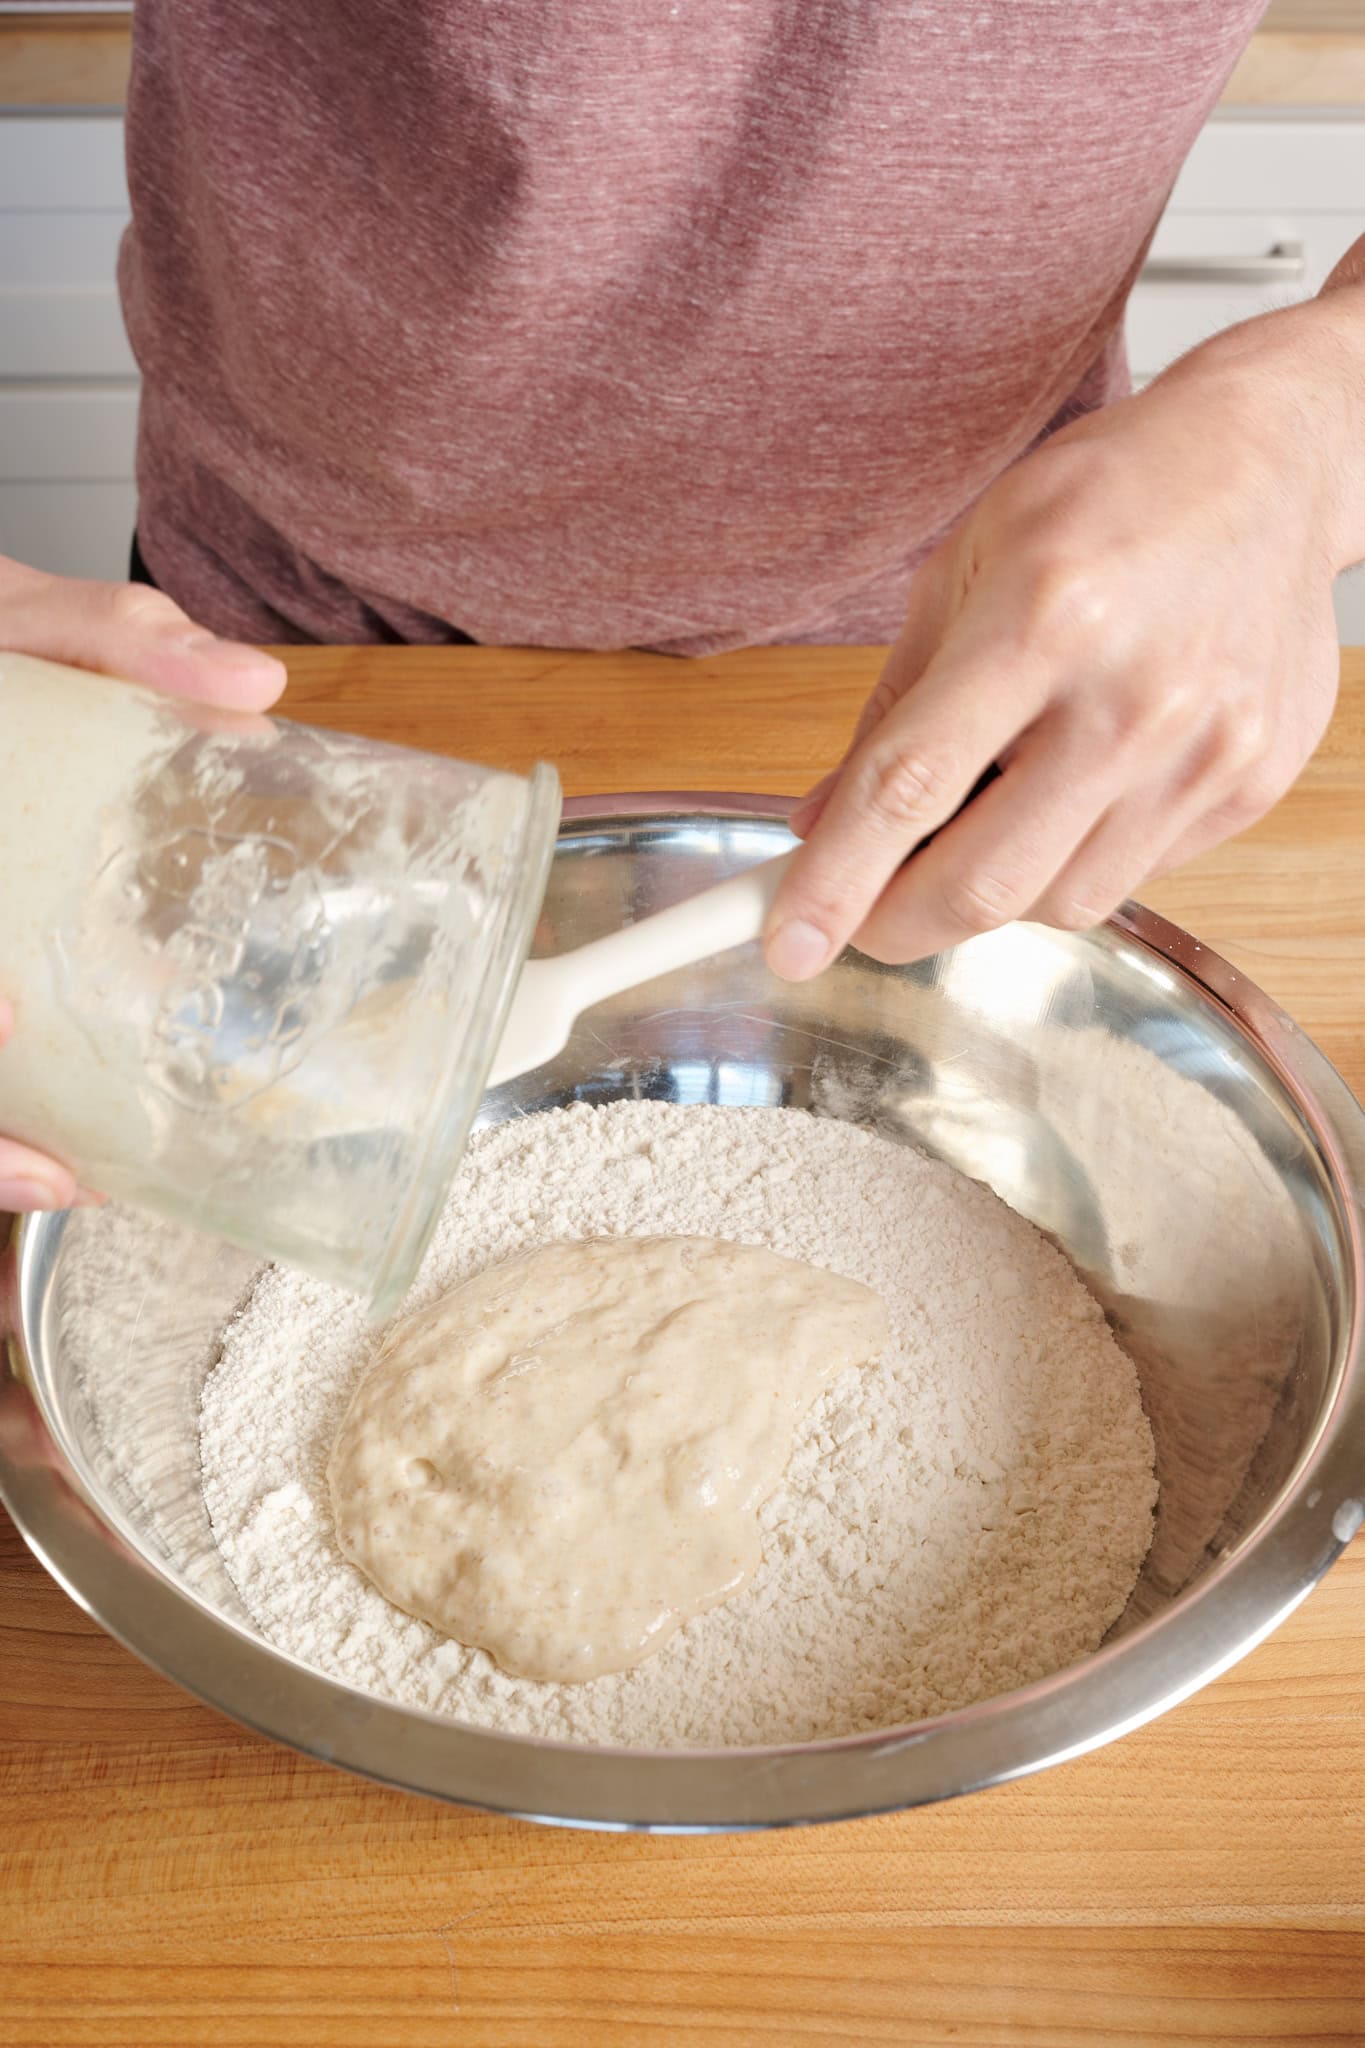
At the end of mixing, the dough will be smoother but still very soft and slack. It should not be soupy or excessively wet (if it is, add a little bit of flour and mix it in). Transfer the dough to a container for bulk fermentation and cover.
2. Bulk Fermentation – 9:30 a.m. to 12:30 p.m.
At warm room temperature, around 74-76°F (23-24°C), bulk should take about 3 hours. This dough needs four sets of stretch and folds, spaced out by 30 minutes during this time.
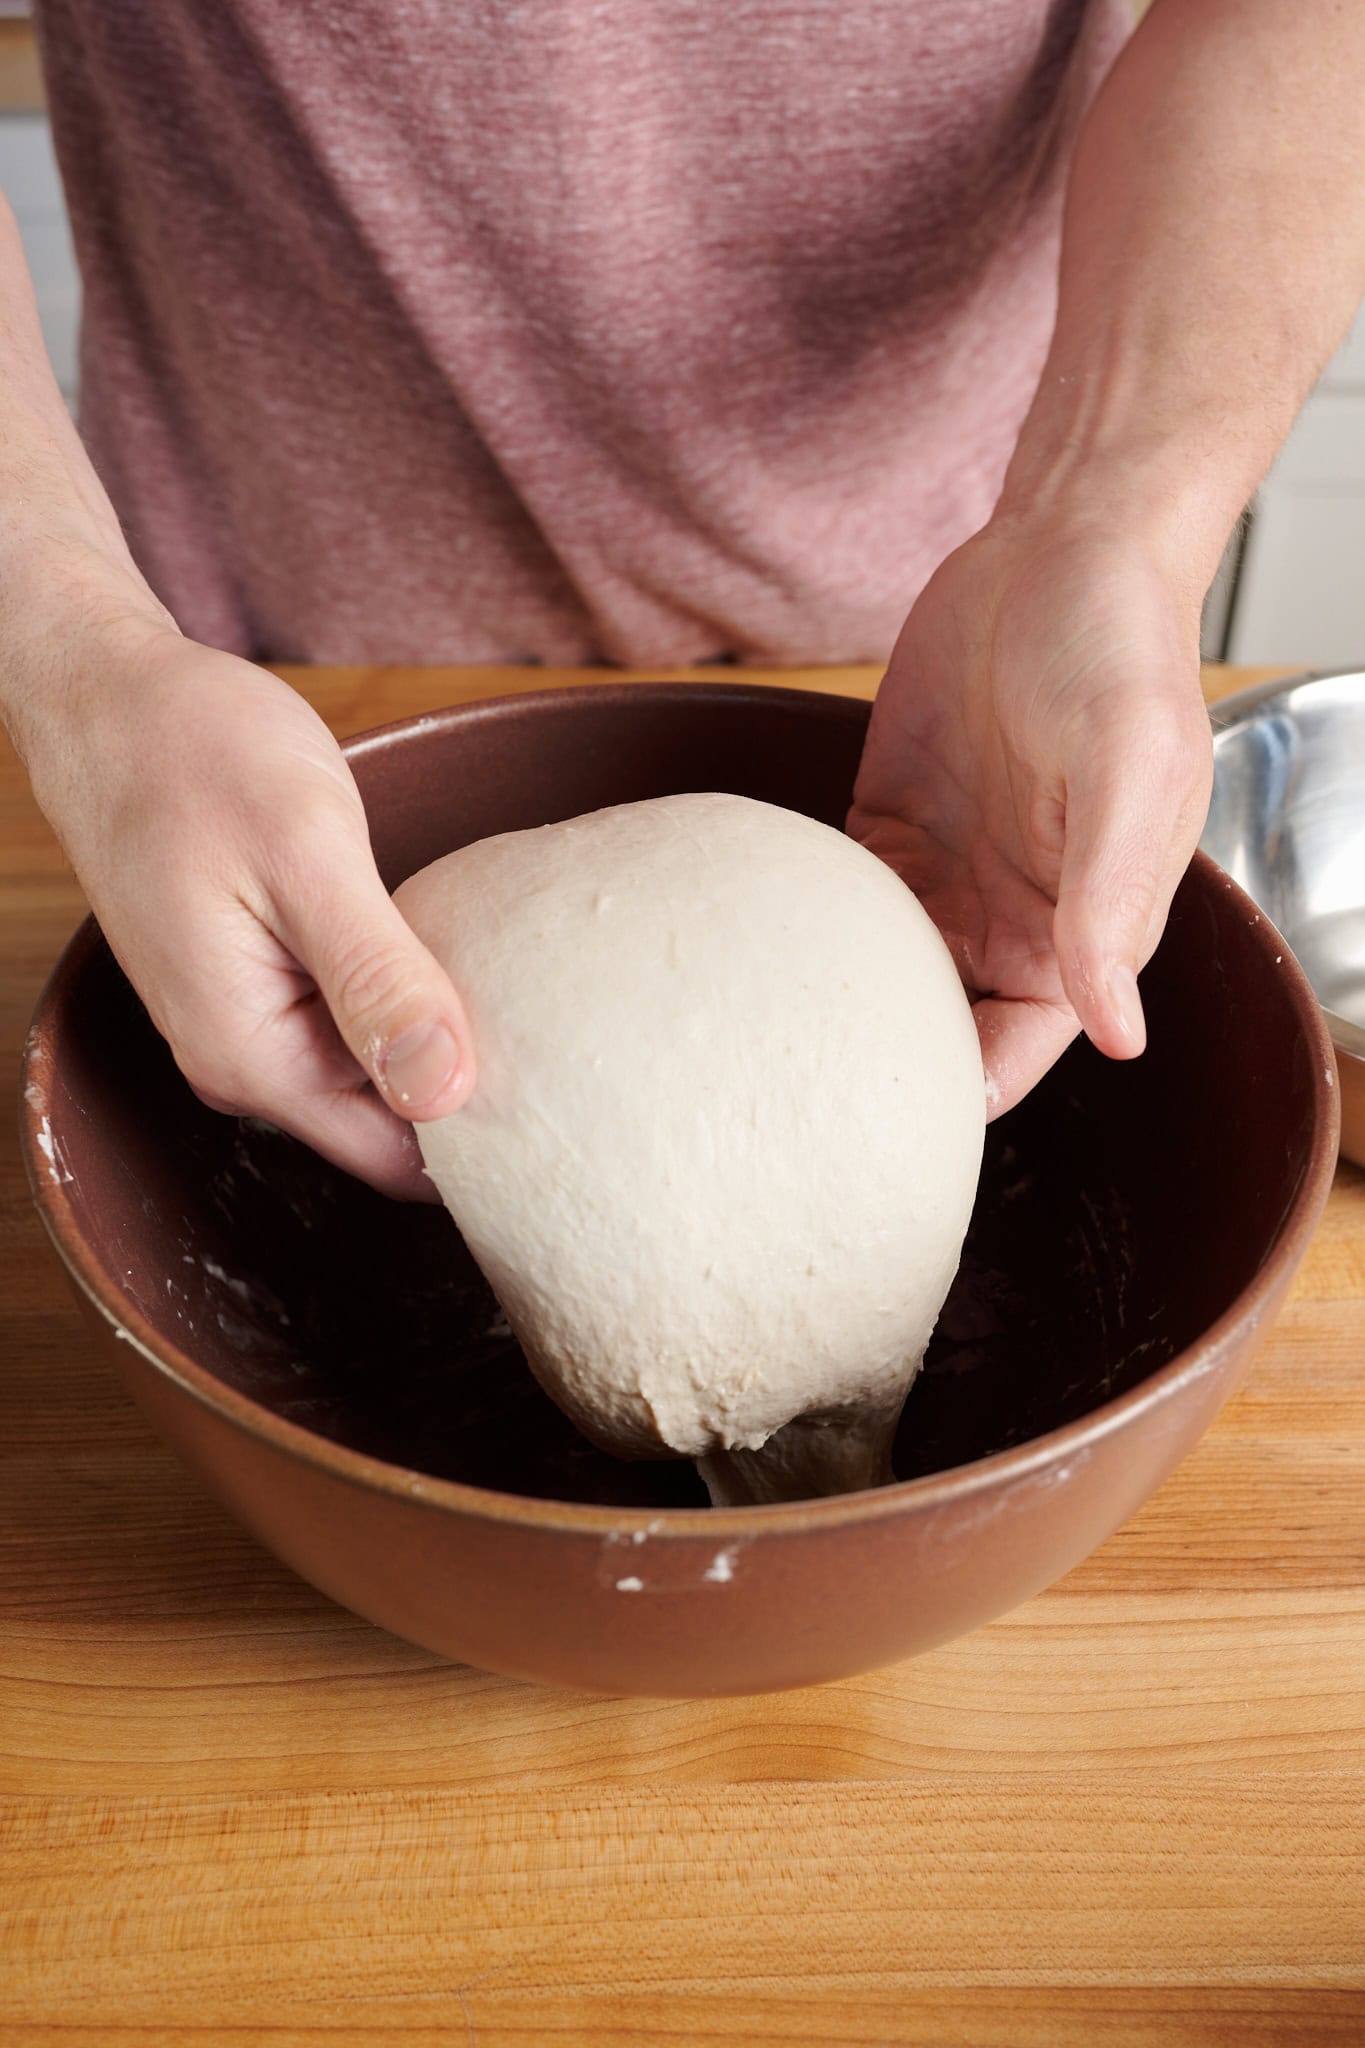
This is a wet and extensible dough, so I like to give it four sets of vigorous stretch and folds. After the first 30 minutes in bulk fermentation and using wet hands, grab the north side of the dough in the bulk fermentation container and stretch it up and over to the south side. Then, grab the south side of the dough and stretch it up and over to the north side. Repeat in the east-to-west and west-to-east directions for a total of 4 folds.
Give the dough three more sets of stretch and folds at 30-minute intervals. After the last set, let the dough rest in the container until the end of bulk fermentation.
3. Divide and Ball – 12:30 p.m.
Grease a pizza dough tray or two individual 4-cup glass containers with olive oil.


Gently scrape the dough out to a clean work surface. Using floured hands, divide the dough in half. Preshape each piece into a very tight ball with no seam on the bottom. Given how highly hydrated this dough is, I like to preshape this dough on the work surface using a bench knife, similar to preshaping bread dough. After balling, place each ball into the prepared dough tray with even spacing between, or into a single container.
4. Cold Proof – 1:00 p.m. to 12:00 p.m. (the next day)
Place the containers into the refrigerator overnight or for up to 3 days.
5. Warm Proof – 12:00 p.m. to 4:00 p.m.
The next day, liberally butter a 10 x 14-inch Detroit-style pizza pan with about 1 tablespoon of butter. According to Alexandra, the butter helps the dough color better on the sides and bottom, but also helps it remove cleanly from the sides of the pan when baking.
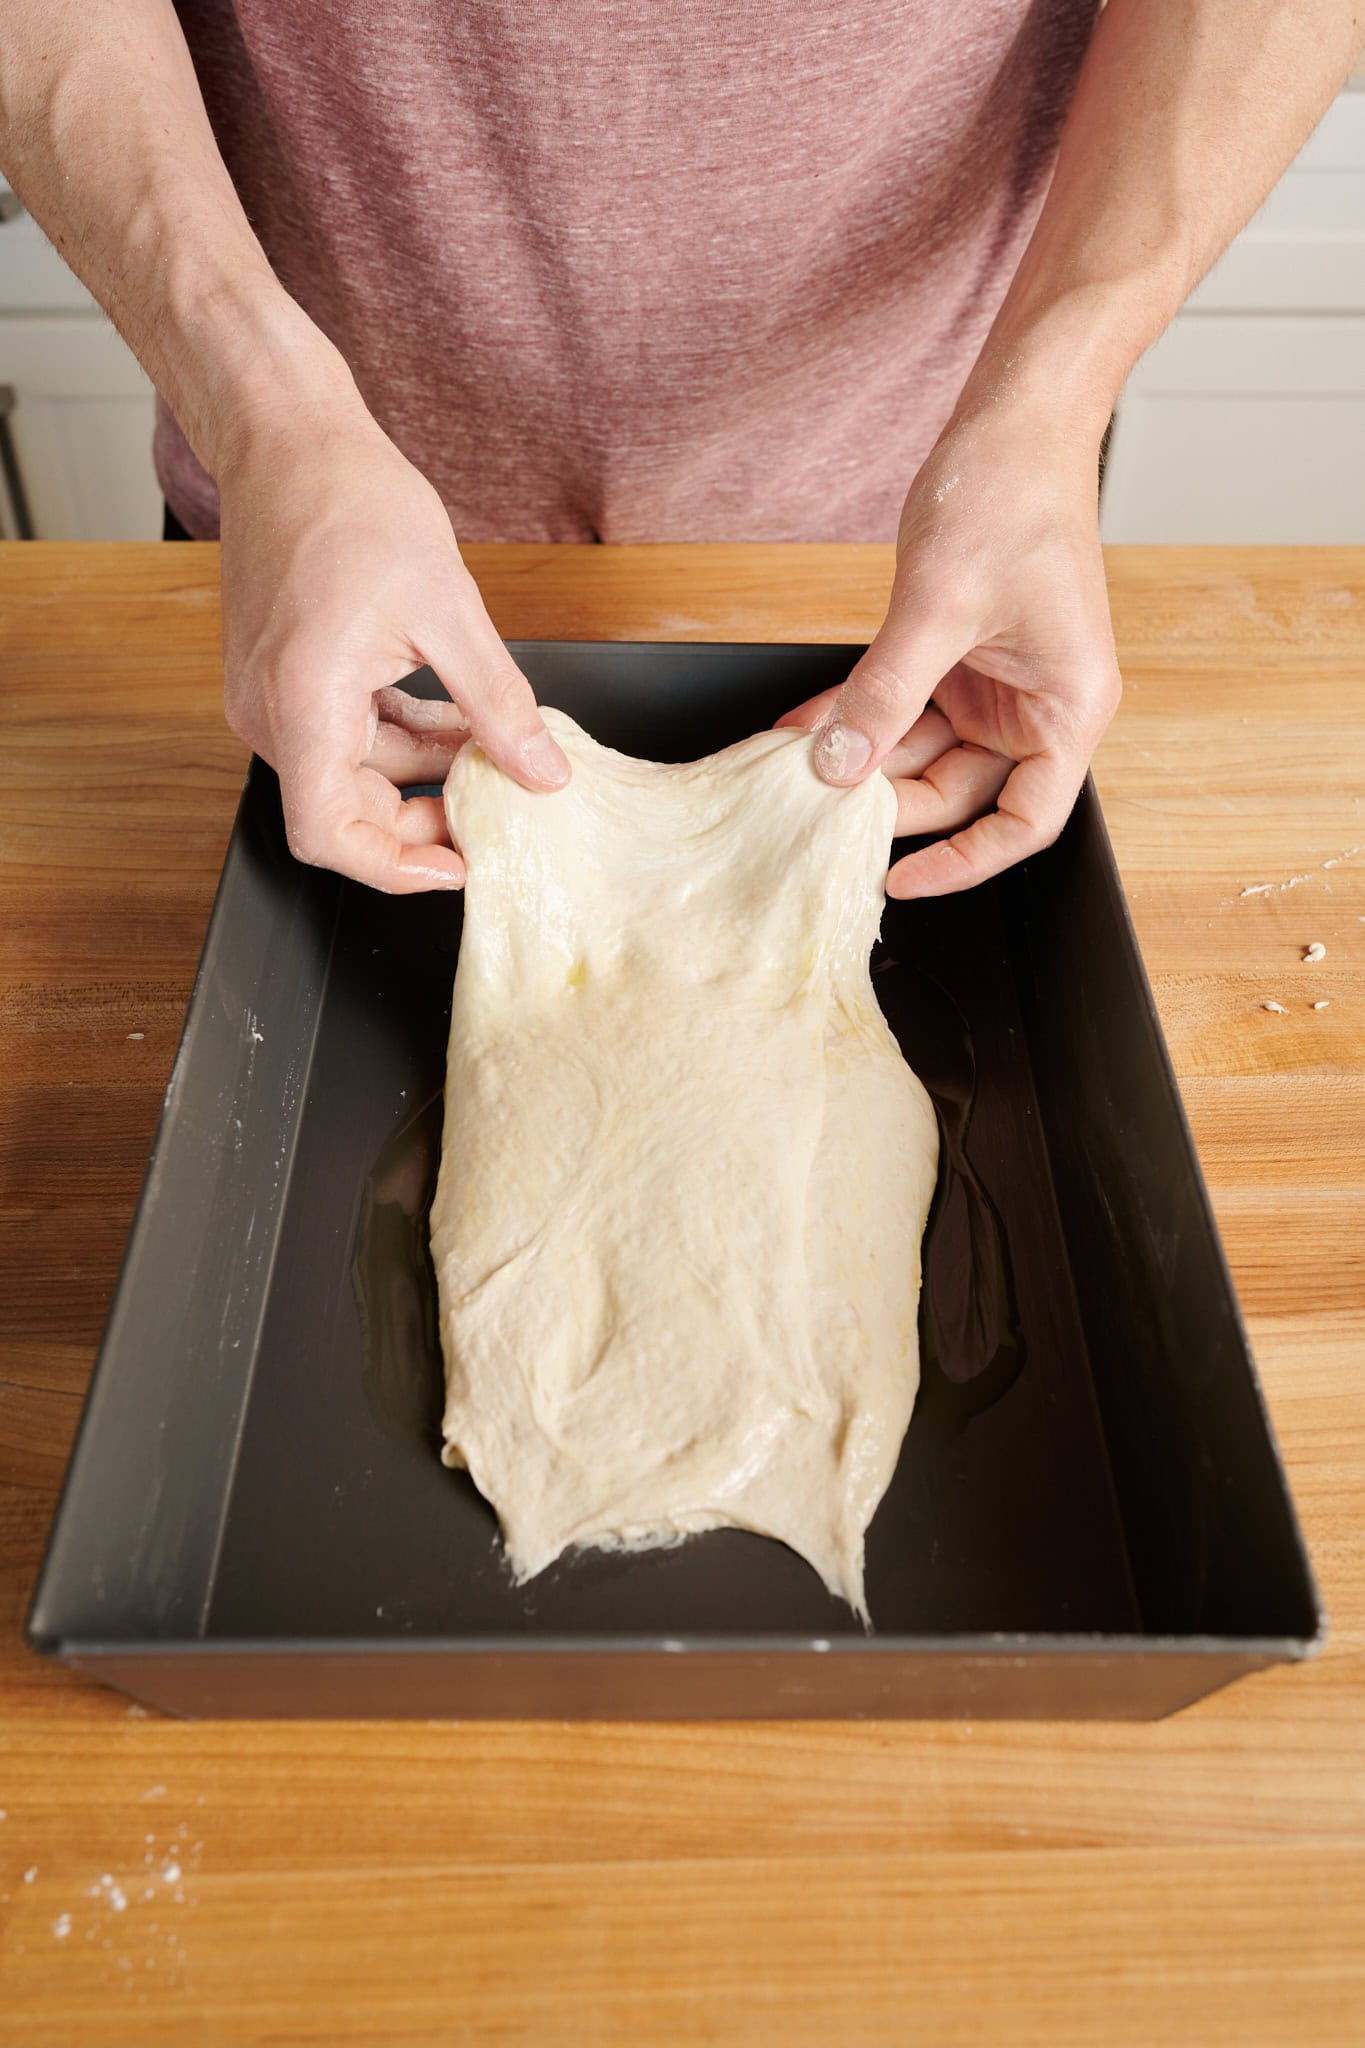
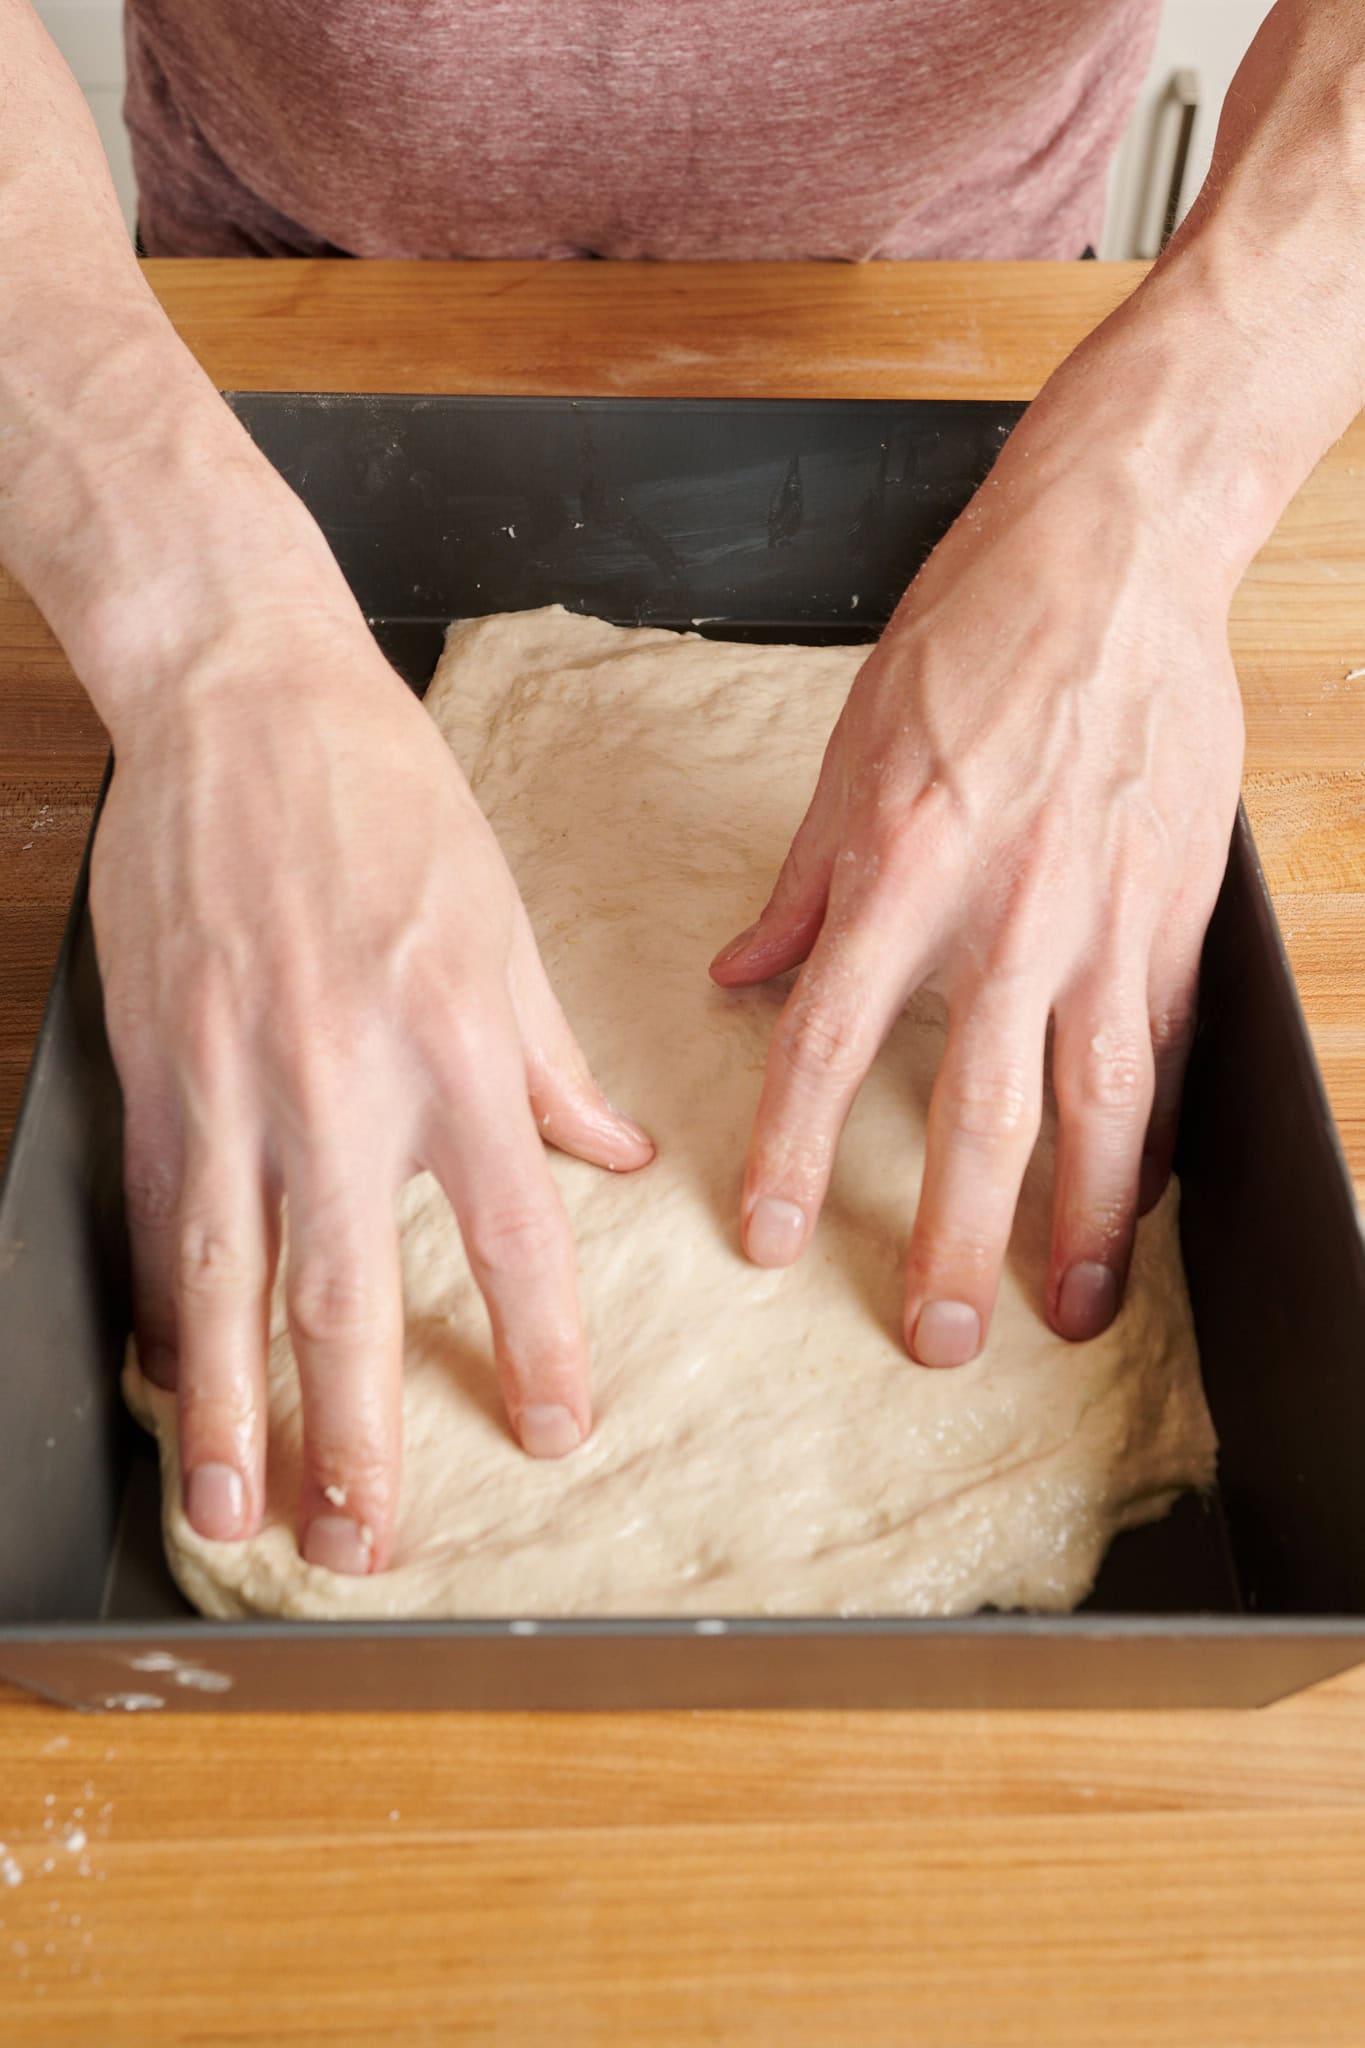
Pour a glug of olive oil into the center of the pan, take one container of dough out of the fridge, uncover, and gently scrape it out on top of the oil. Using wet or oiled fingers, flip the dough over to coat the other side in olive oil, and gently stretch it out to better fit the dimensions of the pan. It’s okay if the dough doesn’t completely stretch out.
You can leave the second dough ball in the fridge for up to 2 days.
Cover the dough and set a timer for 1 hour. After an hour, come back and, with wet fingers, gently stretch the dough a little further toward the edges.
While the dough is proofing, prepare the sauce.
6. Prepare Tomato Sauce – 3:30 p.m.
| Ingredient |
|---|
| ¼ cup extra-virgin olive oil |
| 2 cups finely chopped white or yellow onion |
| 3 garlic cloves, minced |
| Kosher salt |
| Pinch of crushed red pepper flakes |
| ½ cup white wine |
| 1 (28-ounce) can undrained peeled whole San Marzano tomatoes (I like Bianco DiNapoli) |
| ½ cup packed fresh basil leaves (about ½ ounce) |
In a medium pot, combine the oil, onions, garlic, and a pinch of salt. Set over high heat and as soon as the onions and garlic begin simmering, stir, reduce the heat to low, cover, and cook for 10 minutes.
Uncover, stir in the pepper flakes, increase the heat to high, and add the wine. Simmer for 2 to 3 minutes to dissipate the alcohol. Using scissors, snip the tomatoes into smaller pieces as you add them to the pan. Season with a generous pinch of salt and cook at a gentle simmer for 15 minutes.
Transfer the sauce to a blender or food processor, add the basil, and puree until smooth (if using a blender, be sure to let the mixture cool before blending). Taste and adjust with more salt if needed. Store in the fridge for up to 1 week or in the freezer for up to 3 months.
7. Top and Bake – 4:15 p.m.
About an hour before the end of proofing proof, begin preheating your oven with a rack in the middle to 500°F (260°C) and with a baking surface—I like to use my Baking Steel—inside on the rack.
Once your baking surface is preheated, baking this sourdough Detroit-style pizza is done in two phases:
Step 1: Parbake Dough
Using oiled fingers, dimple the dough aggressively but try to steer clear of perimeter (leave about a 1/2-inch border).
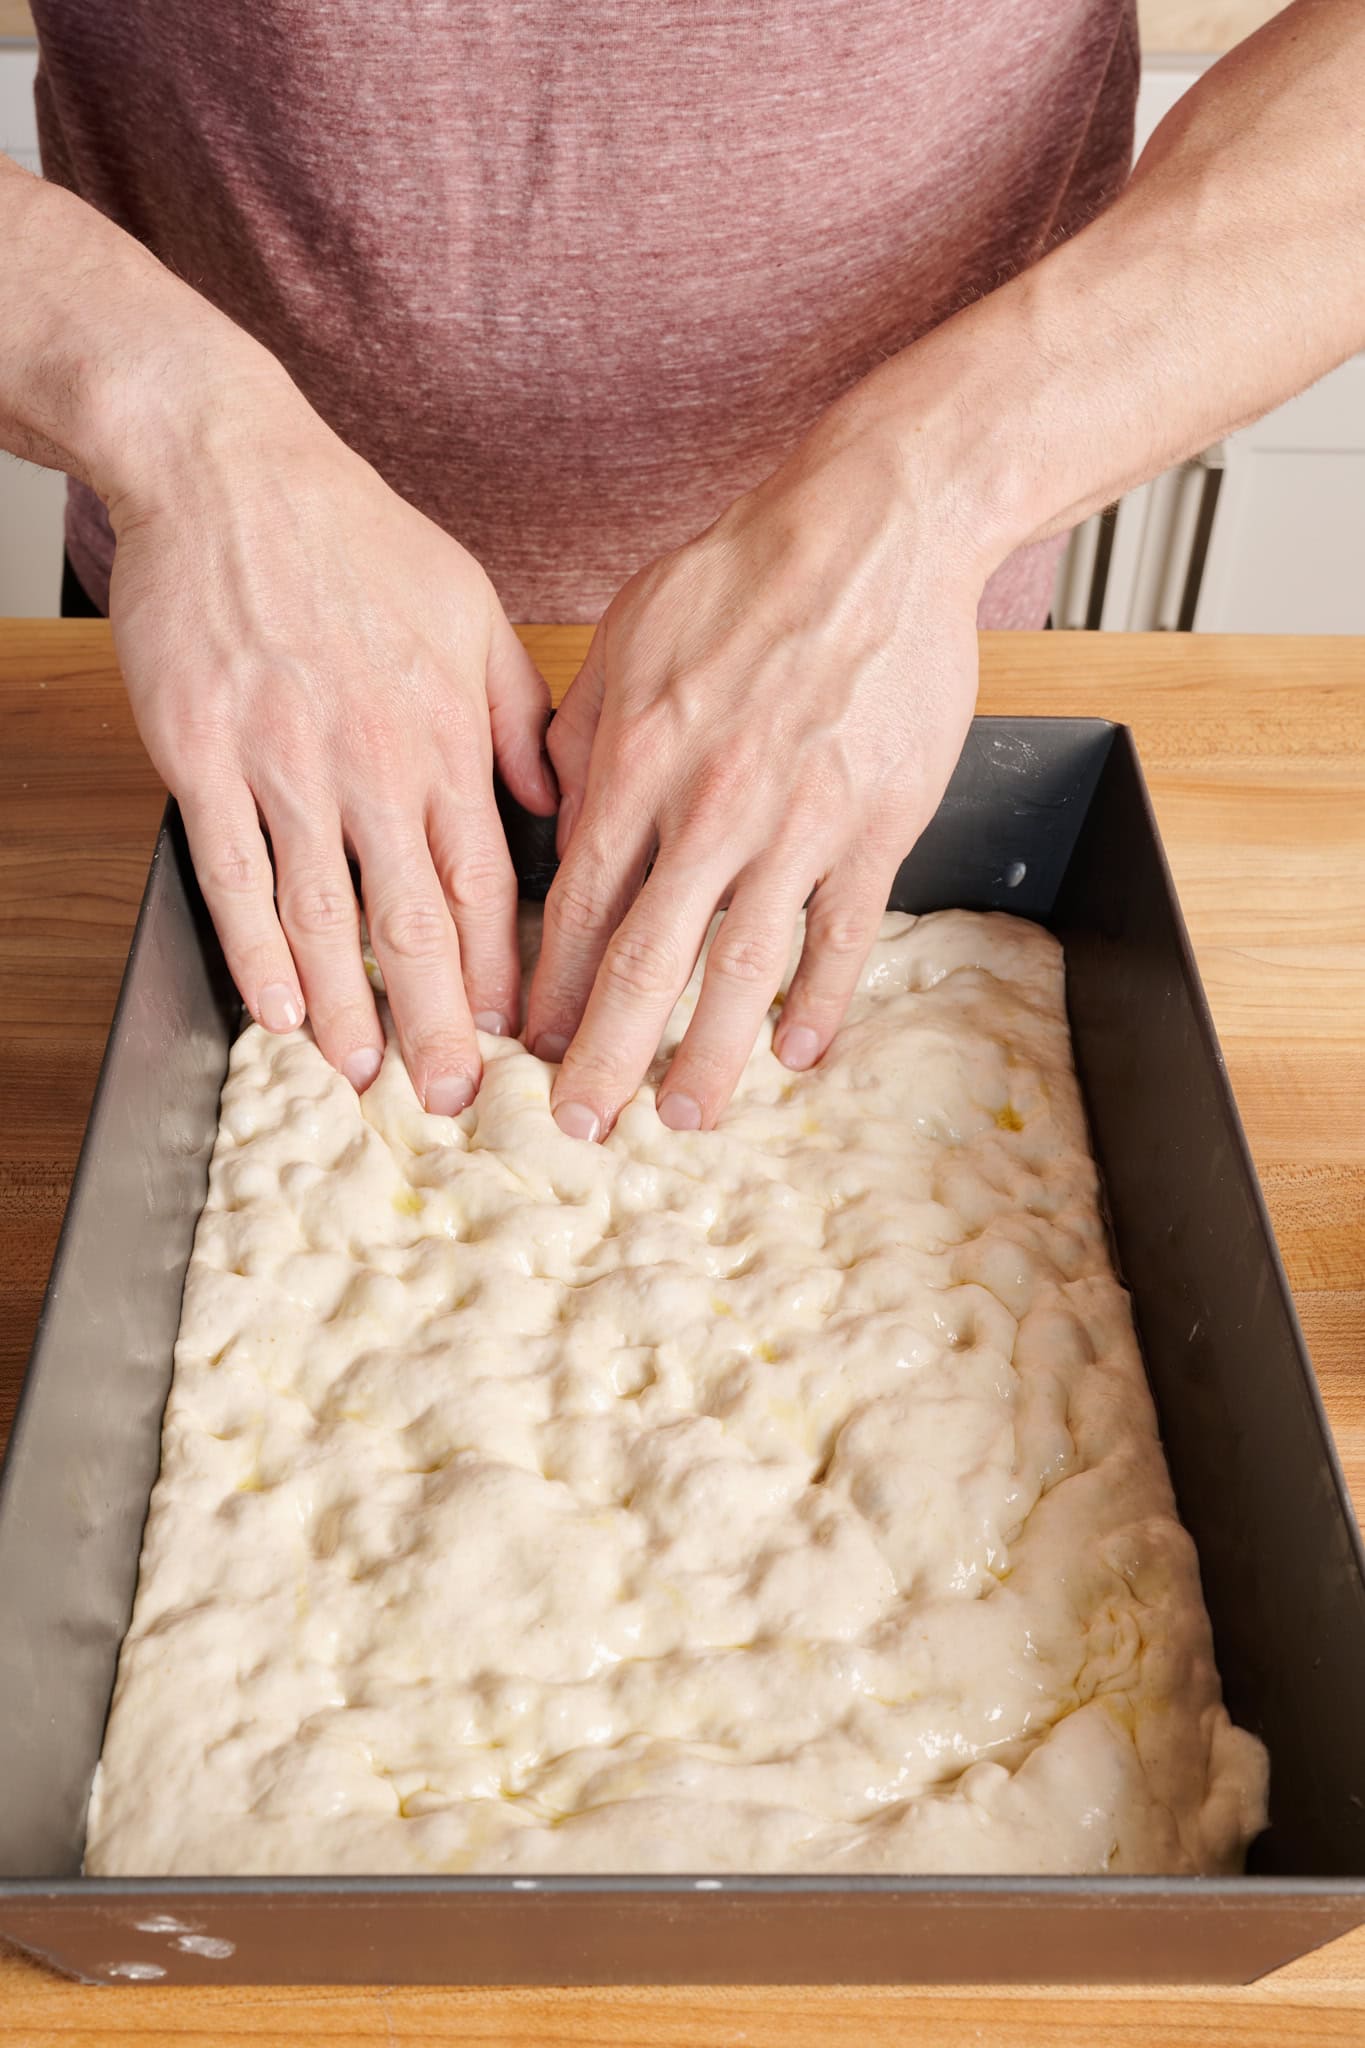
Slide the pan onto the baking surface and bake until the dough has puffed, slightly removed from the sides, and the top is lightly colored, about 8 to 10 minutes. Remove the pan from the oven and using an offset or fish spatula, remove the parbaked crust to a wire rack.
Parbaking helps the crust shrink a bit, as you can see below. This will give us room to sneak in some (okay, a lot) of cheese around the edge to form the frico crust.
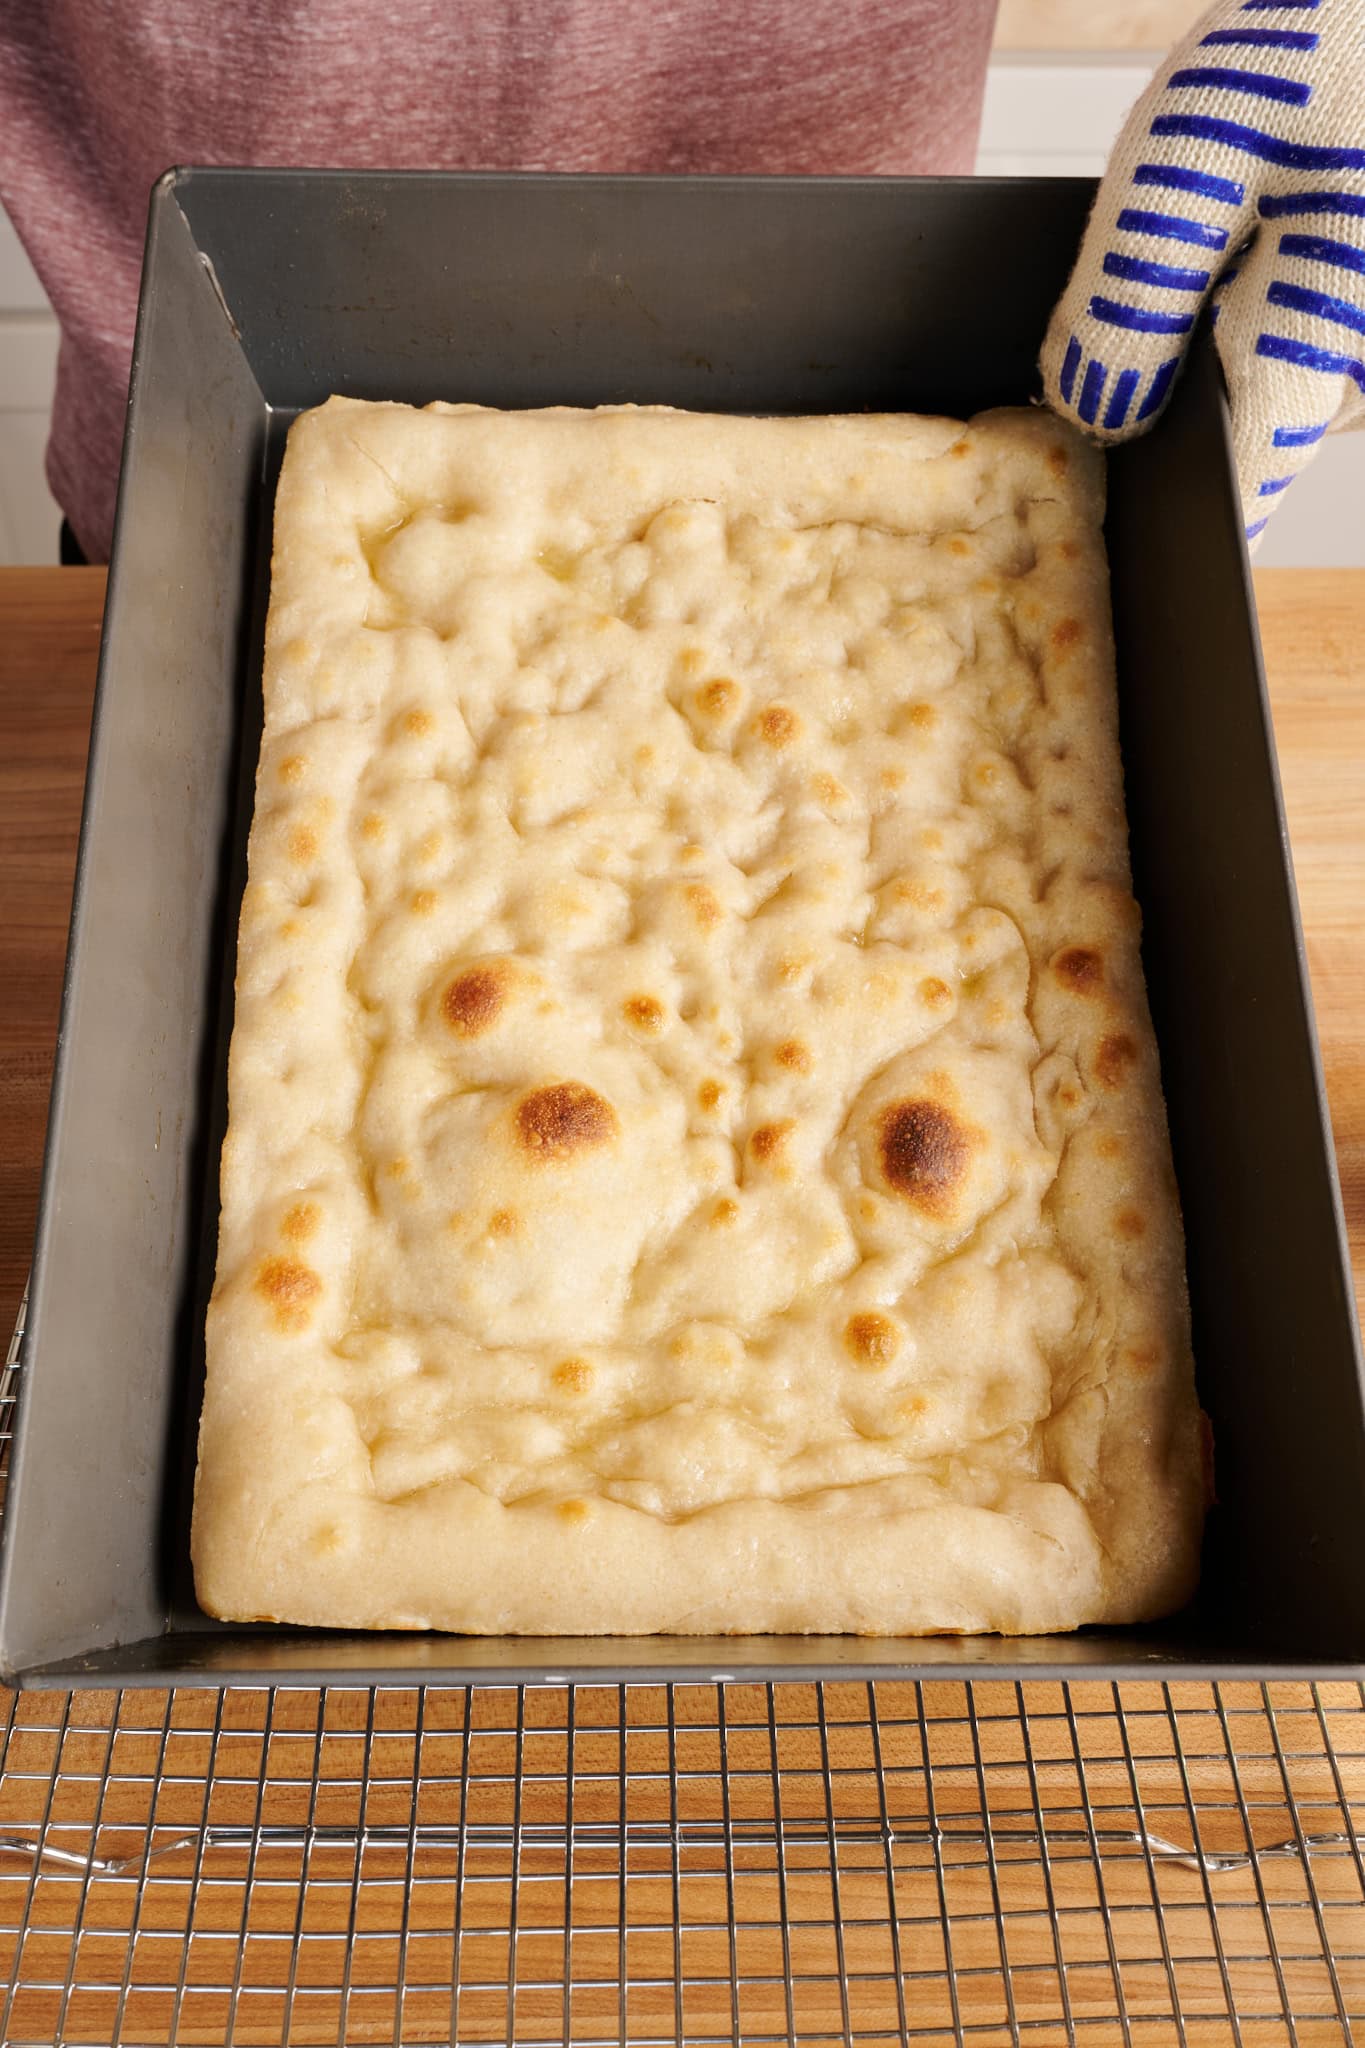
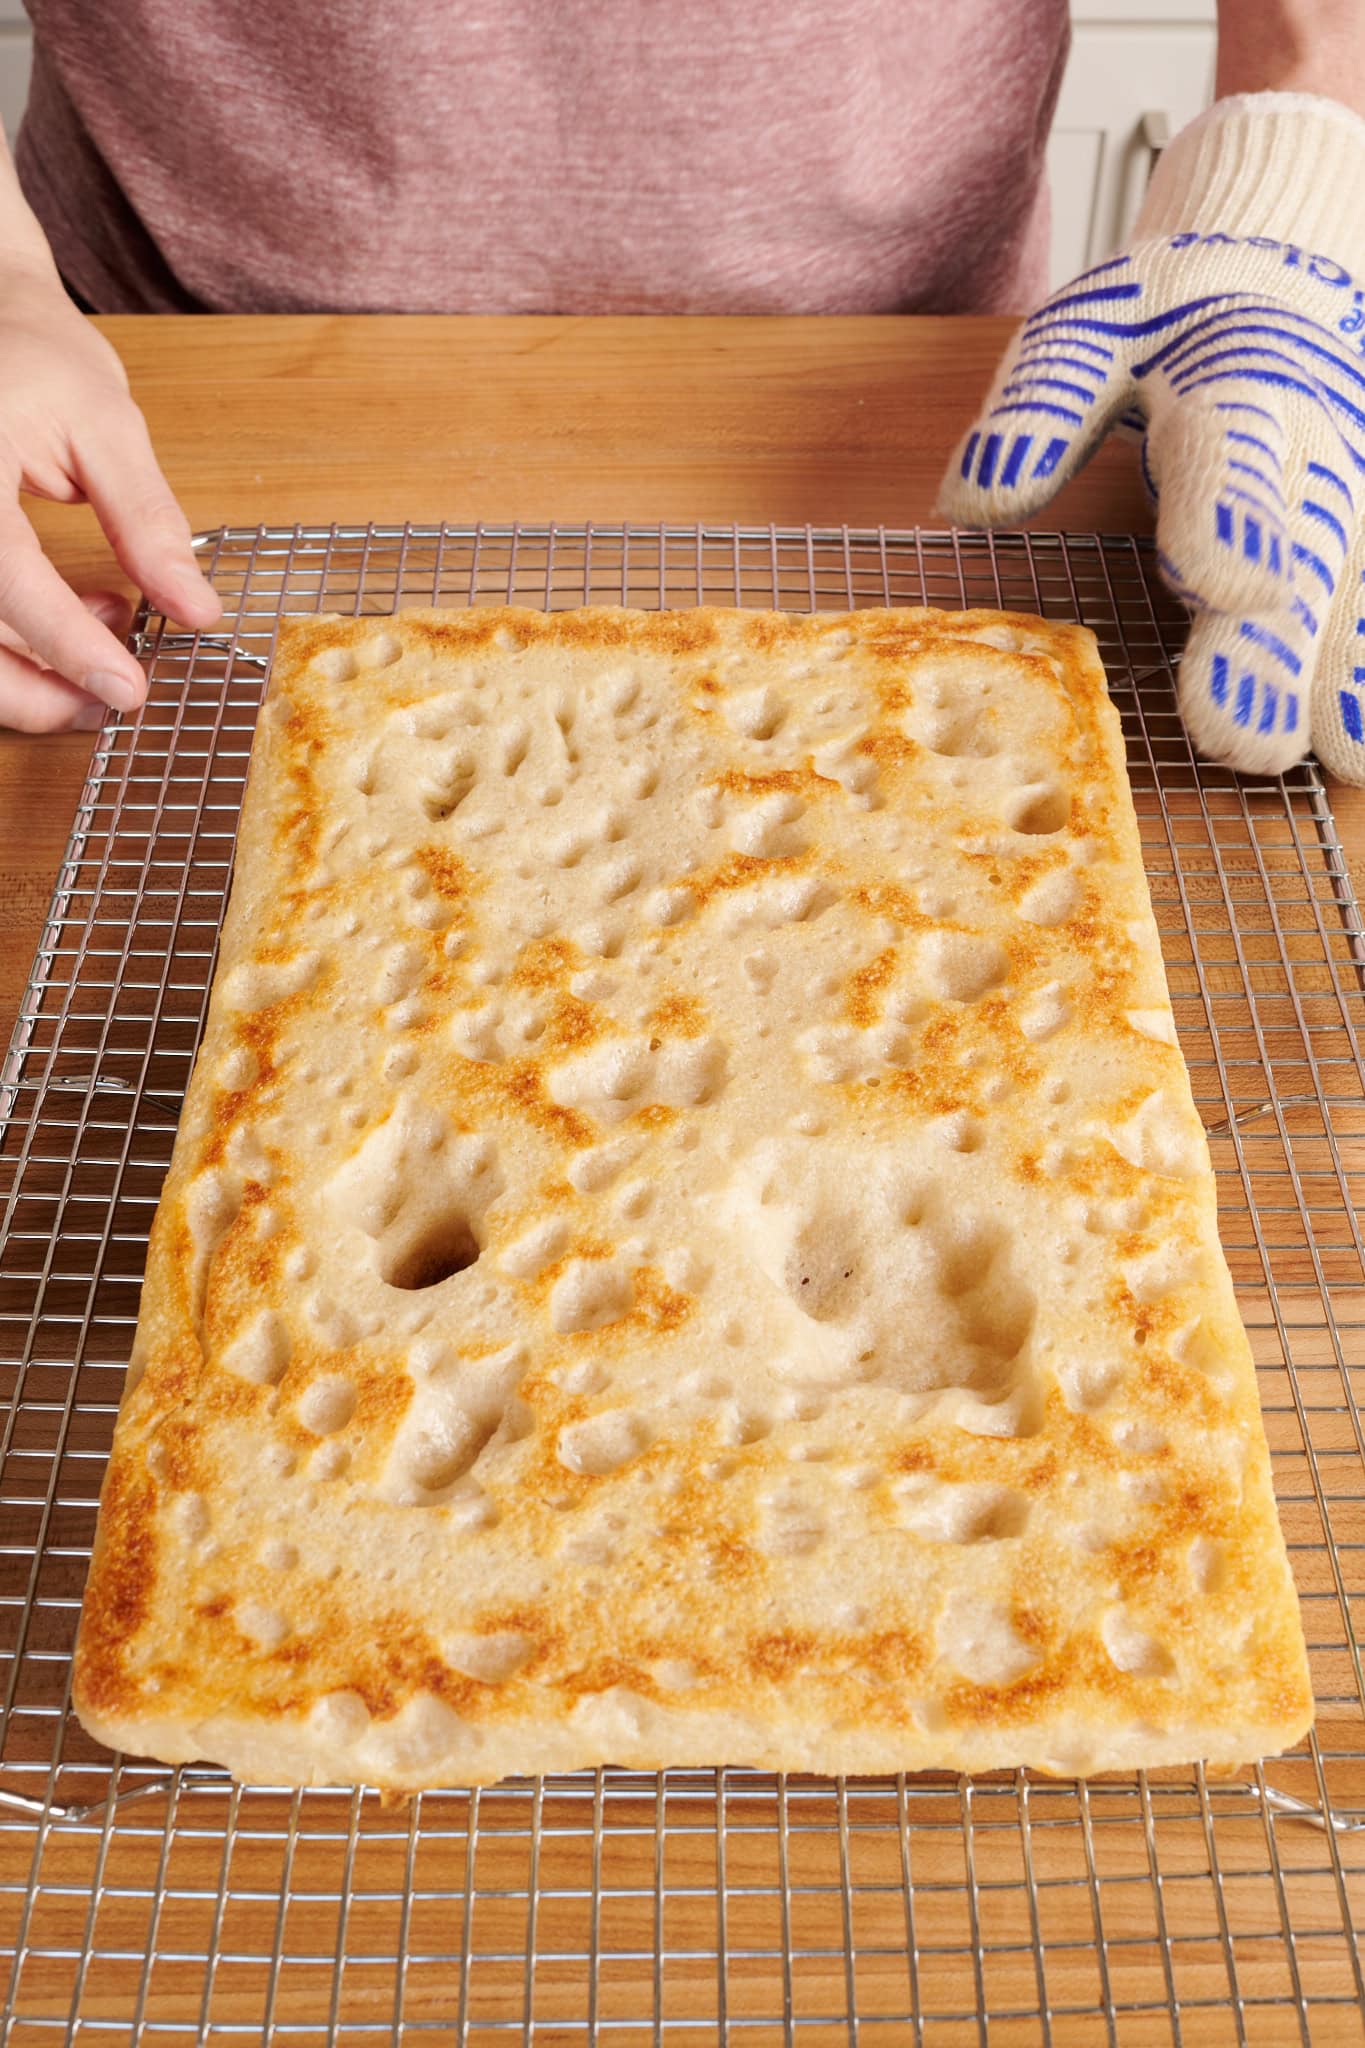
Flip the crust so the top is facing down on the wire rack and leave it to cool for 20 minutes. Don’t clean the pan, we’ll be using that again soon.
Reduce the oven temperature to 475°F (245°C).
Step 2: Spread Toppings and Finish Baking.
In a medium bowl, combine the shredded cheddar and mozzarella and cube the butterkäse or Wisconsin brick cheese. Place the crust back into the pan bottom-side down.
To make the frico crust, spread the shredded cheese mixture around the perimeter of the crust. I like to lean it against the metal to get as much height as possible.
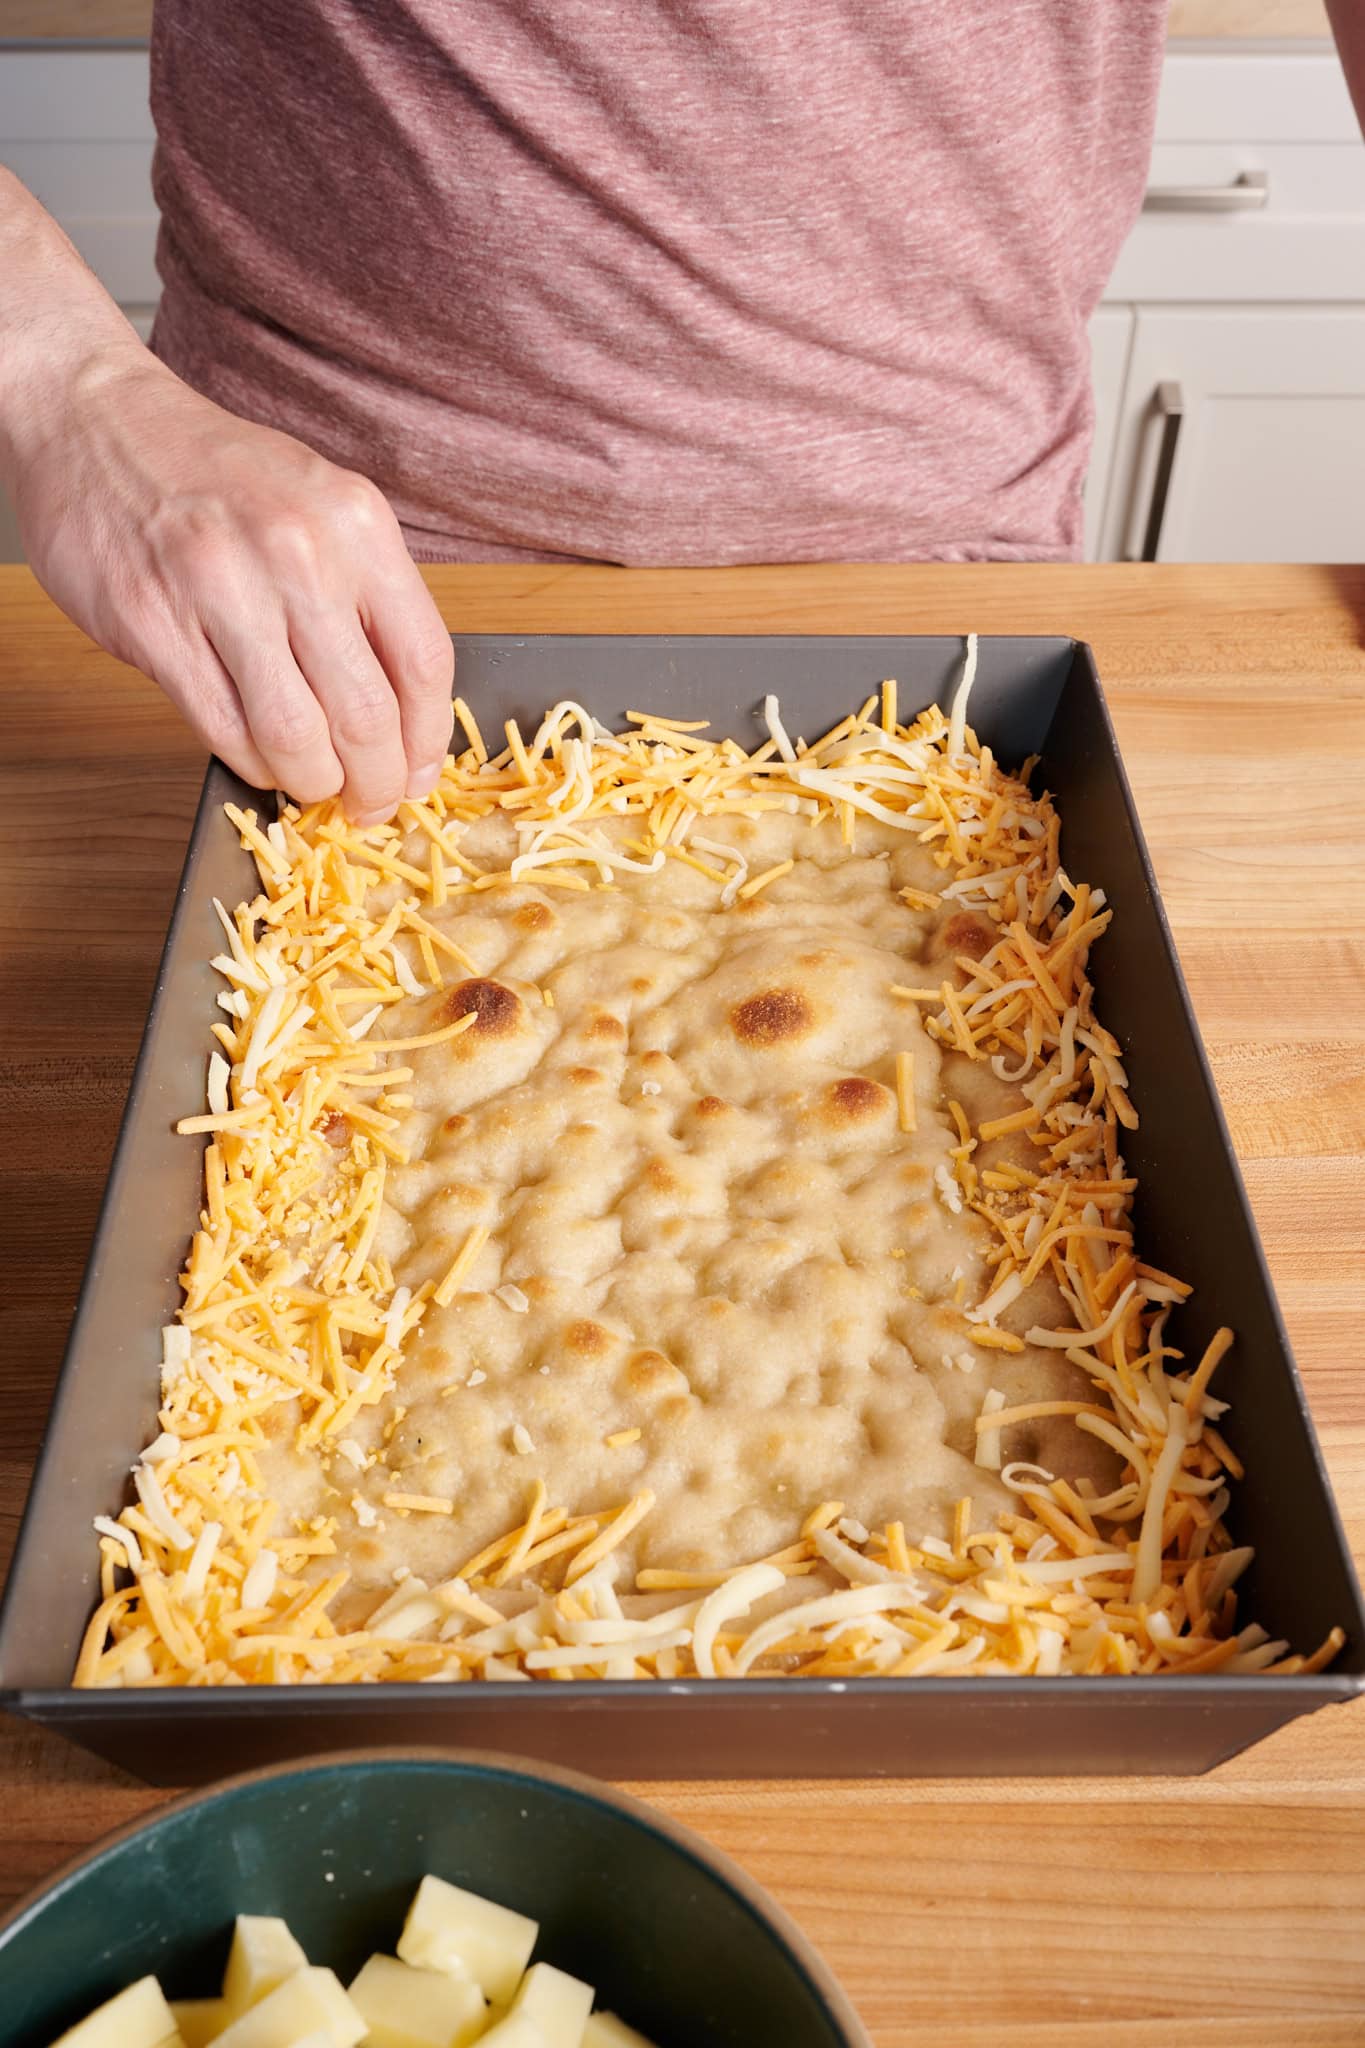
Next, spread the cubed cheese over the surface of the crust inside the shredded cheese perimeter. Then, dollop and spread 1/2 cup of the tomato sauce (it will not feel like enough sauce, but trust me, it is) evenly over the top. Finally, spread the pepperoni over the sauce.


Slide the pan into the oven on top of the baking surface and bake until the edges are crispy and caramelized, about 10 to 15 minutes. For me at high altitude, it took a full 15 minutes for the cheese to be fully melted and singed, and the crust to be ultra-crispy.
Remove the pan from the oven and let the pizza rest on a wire rack for 5 minutes. Carefully run a thin metal spatula around the edges to release the crust and transfer the pizza to a cutting board and cut with a pizza wheel (or the fantastic LloydPans mezzaluna pizza rocker knife).

Sourdough Detroit-Style Pepperoni Pizza
- Prep Time: 32 hours
- Cook Time: 45 minutes
- Total Time: 32 hours 45 minutes
- Yield: 2 pizzas
- Category: Lunch, Dinner
- Cuisine: American, Italian
Description
A thick, cheesy, chewy, and wonderfully tasty rectangular pizza with a cheese frico (crispy) crust.
Adapted from Alexandra Stafford’s Pizza Night.
Ingredients
Dough
- 600g high-protein white bread flour
- 469g water
- 16g fine sea salt
- 114g ripe sourdough starter
Toppings
- 113g pre-shredded cheddar cheese (mild or sharp)
- 57g pre-shredded mozzarella cheese (low moisture, whole milk)
- 170g freshly cubed butterkäse, Wisconsin brick, or a mix of Monterey Jack and Mozzarella cheese
- Pepperoni to cover
Simple Cooked Tomato Sauce
- 1/4 cup extra-virgin olive oil
- 2 cups finely chopped white or yellow onion
- 3 garlic cloves, minced
- Kosher salt
- pinch of crushed red pepper flakes
- 1/2 cup white wine
- 1 (28oz) can undrained peeled whole San Marzano tomatoes
- 1/2 cup packed fresh basil leaves
Instructions
- Mix – 9:00 a.m.
To the bowl of a stand mixer, add the flour, water, salt, and ripe sourdough starter. Mix on speed one for 1 to 2 minutes until the dough comes together, and no dry bits remain. Then, turn the mixer up to speed two and mix for 5 minutes. Let the dough rest in the mixing bowl for 10 minutes. Then, turn the mixer to speed two and mix for 2 to 3 minutes until the dough is cohesive. Transfer the dough to a container for bulk fermentation and cover. - Bulk Fermentation – 9:30 a.m. to 12:30 p.m.
At warm room temperature, around 74-76°F (23-24°C), bulk should take about 3 hours. After the first 30 minutes in bulk fermentation and using wet hands, grab the north side of the dough in the bulk fermentation container and stretch it up and over to the south side. Then, grab the south side of the dough and stretch it up and over to the north side. Repeat in the east-to-west and west-to-east directions for a total of 4 folds. Give the dough three more sets of stretch and folds at 30-minute intervals. After the last set, let the dough rest in the container until the end of bulk fermentation. - Divide and Ball – 12:30 p.m.
Grease a pizza dough tray or two individual 4-cup glass containers with olive oil. Gently scrape the dough out to a clean work surface. Using floured hands, divide the dough in half. Preshape each piece into a very tight ball with no seam on the bottom. Given how highly hydrated this dough is, I like to preshape this dough on the work surface using a bench knife, similar to preshaping bread dough. After balling, place each ball into the prepared dough tray with even spacing between, or into a single container. - Cold Proof – 1:00 p.m. to 12:00 p.m. (the next day)
Place the containers into the refrigerator overnight or for up to 3 days. - Warm Proof – 12:00 p.m. to 4:00 p.m.
The next day, liberally butter a 10 x 14-inch Detroit-style pizza pan with about 1 tablespoon of butter. Pour a glug of olive oil into the center of the pan, take one container of dough out of the fridge, uncover, and gently scrape it out on top of the oil. Using wet or oiled fingers, flip the dough over to coat the other side in olive oil, and gently stretch it out to better fit the dimensions of the pan. Cover the dough and set a timer for 1 hour. After an hour, come back and, with wet fingers, gently stretch the dough a little further toward the edges. - Prepare Tomato Sauce – 3:30 p.m. (while dough proofs)
In a medium pot, combine the oil, onions, garlic, and a pinch of salt. Set over high heat and as soon as the onions and garlic begin simmering, stir, reduce the heat to low, cover, and cook for 10 minutes. Uncover, stir in the pepper flakes, increase the heat to high, and add the wine. Simmer for 2 to 3 minutes to dissipate the alcohol. Using scissors, snip the tomatoes into smaller pieces as you add them to the pan. Season with a generous pinch of salt and cook at a gentle simmer for 15 minutes. Transfer the sauce to a blender or food processor, add the basil, and puree until smooth (if using a blender, be sure to let the mixture cool before blending). Taste and adjust with more salt if needed. - Top and Bake – 4:15 p.m.
About an hour before the end of proofing proof, begin preheating your oven with a rack in the middle to 500°F (260°C) and with a baking surface—I like to use my Baking Steel—inside on the rack. Using oiled fingers, dimple the dough aggressively, but try to steer clear of the perimeter (leave about a 1/2-inch border). Bake until the dough has puffed, slightly removed from the sides, and the top is lightly colored, about 8 to 10 minutes. Remove the pan from the oven and remove the parbaked crust to a wire rack. Flip the crust so the top is facing down on the wire rack and leave it to cool for 20 minutes. Reduce the oven temperature to 475°F (245°C). In a medium bowl, combine the shredded cheddar and mozzarella and cube the butterkäse or Wisconsin brick cheese. Place the crust back into the pan bottom-side down. Spread the shredded cheese mixture around the perimeter of the crust. Next, spread the cubed cheese over the crust’s surface inside the shredded cheese perimeter. Then, dollop and spread the sauce evenly over the top. Finally, spread the pepperoni over the sauce. Bake until the edges are crispy and caramelized, about 10 to 15 minutes. Remove the pan from the oven and let the pizza rest on a wire rack for 5 minutes. Carefully run a thin metal spatula around the edges to release the crust and transfer the pizza to a cutting board and cut.
Notes
The parbaked pizza crust can be cooled, placed into a large airtight bag, and kept at room temperature for up to 2 days or 3 months in the freezer.
Detroit-Style Pizza FAQs
Can I cold-ferment Detroit pizza dough?
Yes. After bulk fermentation, divide and ball the dough and place it into an oiled and sealed container. Place the container into the refrigerator for 1 to 3 days.
What is the best pan for Detroit-style Pizza?
A steel or blue steel rectangular pan is best for Detroit-style pizza. A steel pan conducts heat efficiently and results in a crisp, golden crust.
How thick is Detroit-style pizza?
Detroit-style pizza is thicker than Sicilian-style pizza but thinner than grandma-style pizza (and much thinner than Chicago-style pizza).
What’s the Difference Between Detroit-style Pizza and Sicilian Pizza?
While both pizza types are rectangular and thick, Sicilian pizza is usually baked on a shallower sheet pan versus the deep blue steel pan used for Detroit-style pizza. This results in a Sicilian pizza crust being denser, sturdier, and more bread-like. Additionally, many Sicilian pizza doughs include semolina (durum) flour, commonly used in Italy for pasta, bread, and pizza.
Can I freeze this pizza dough?
Yes, you can. After balling the dough and placing into the proofing container, place it into the freezer for up to 3 months. Note I find that while this works, the resulting pizza doesn’t rise quite as high. Instead, I much prefer freezing the parbaked crust.
What’s Next?
Go get Alexandra Stafford’s cookbook Pizza Night and revel in the glory that is pizza every week of the year. It’s a life I certainly want to live.
If you need more help with sourdough pizza, drop by The Perfect Loaf’s ultimate guide to pizza for help with dough preparation, ingredient sourcing, recipe inspiration, and more.
Buon appetito! 🍕
“Pizza Night” Copyright © 2024 by Alexandra Stafford. Published by Clarkson Potter, an imprint of Crown Publishing.”


94 Comments
Hey, just double checking…is the cheese toppings totalling 340g for one or two pizzas? Ta Nic
It's for one pizza 🙂
Hello! Thank you for your detailed recipes and guides! Your site is my go-to sourdough resource. I tried this recipe today and while it looks and tastes great, it’s kind of soggy and the bottom didn’t get crispy and brown. I don’t have a baking steel and used an upside down cookie sheet. Thoughts about why I didn’t get a crispy, brown bottom?
It's likely because of the sheet pan. You can try baking it for longer to bring more color!
Hi when the base is removed to cool how long can I store them for like this before topping and second bake?
You could keep it overnight if you needed to. You can also freeze them.
I just put the whole thing in 1 pan. :/ I’ll let everyone know how it turns out! Lol
It was good! Maybe a little TOO tall, but my kids didn’t complain. 🙂 I cooked it an extra 10 min b/c I was paranoid it would be doughy with the extra thickness.
Ha ha. Nothing wrong with an extra thick pizza!
Hi Maurizio,
I am an avid sourdough baker and love your detailed recipes. If I don't have pre-shredded cheddar and mozzarella cheeses, can I mix a little cornstarch with cheeses I have shredded for the same effect? Thank you.
That's a great question, Christine. I have not tried this!
If using AP, how would I need to scale the water?
A reduction by some amount. I'd start by reducing (hold back) about 30g.
Hey Maurizio! Is it possible to to skip the cold proof and jump straight into a warm proof. I'm wondering if it's possible to make this into a same day recipe. Thank you!
Also, do you think I could freeze the dough? If so, at what stage would be best?
For pizza dough, you can skip the cold proof and do a 3-4 hour room temp proof after shaping into balls. The dough won't have quite as complex flavor but will still make great pizza.
I don't usually recommend freezing pizza dough. I'm doing tests with this now, though 🙂
Have fun, Cindy!
Hello. Big fan of your recipes! I’m making this for a party at someone else’s house. Can I par bake the crust, let it cool, top it about an hour before I go to the party and bake there? Or would it be better to assemble there right before the final bake?
Thanks so much for the kind words about my recipes!
I recommend assembling and topping the pizza right before the final bake at your friend's house. Par-baking can work, but you'll get the best results with a fresh bake – the crust will be crispier and the cheese will melt more evenly.
If you shape the dough balls ahead of time, you can bring them in an oiled container. Just be sure to give them time to come to room temperature (about 1-2 hours) before stretching and baking.
Keep the dough covered until you're ready to use it and bring all your toppings prepped and ready to go. This way you'll get that fresh-from-the-oven pizza experience that everyone loves!
Let me know how it turns out! 🍕
I have a 14 inch cast iron, can I use that instead for similar results? If so how much final dough do you think I’ll need? Thanks in advance!
Hard to say, I havent tested in a pan like this. I think it would work find as-is tho!
I’m going to give this a shot this weekend. I know the dough makes two pizzas, but are the cheese amounts toppings for both or just one pizza?
Great question and I should have this listed here. The sauce will do multiple, but the cheese weights are appx for one pizza. If you buy that cheese, though, you'll definitely have more than what's listed in the recipe.
Great! Thanks for your quick response!
Hi Maurizio! If you don't have a baking steel, should I just move the pizza pan lower in the oven? I've seen some Detroit pizza recipes say to place right on bottom of oven (if able).
Yes that'll work, Adam. I think the tought there is to get it closer to the heating element, if your oven has it on the bottom.
When I put the dough in the fridge to cold proof, should I cover the dish with a towel/lid or leave it uncovered?
I cover airtight.
Husband is from Detroit, and Detroit style is by far our favorite pizza. I was so excited to find this recipe and even bought the pan. However… either I am doing something wrong or we like our Detroit style much thicker because I have made this recipe three times, and despite how beautifully the dough rises in the proofing I have yet to get two crusts thick enough. It makes one crust slightly too thick so I think next time I think I will make 3/4 of the recipe and make one perfectly thick crust. Thank you so much for all you do for the sourdough community. Your website is my go-to reference for pretty much all sourdough baking.
Thanks so much for the comments, Maria! I would say that yes, this dough isn't a super thick Detroit style pizza. Since there's so many toppings, I was going for a slightly thinner crust, but I can see wanting some thickness, too. Going with 3/4 of the recipe will probably land you spot on. Let me know how it goes next time you give it a try, I'd like to test this as well.
I really appreciate the kind words and the comments, thank you! I'm here to help 🙂
Thank you so much, Maurizio. This is an easy to follow terrific recipe. The pizzas came out of the oven looking beautiful even though I used a 9×13 pan & a Chicago Steel large round deep dish pizza pan 14-1/2×14-1/2 (had to make the crust a little thinner on this one). Because of unexpected changes in plans, this cold proofed for 2 days & had risen quite a bit in the fridge but it was a breeze to work with & made a nice crust.
Will make again
So glad to hear it worked out well for you Diane! I find this dough can rest longer in the fridge, too, and be just great. Enjoy and happy holidays!
Hi there, Maurizio If i use a 9×13'" pan, will it matter than it is not a carbon steel & do we use all the dough for 1 pizza of this size? Dough is bulk fermenting now.
Hi, looking for some advice as to what i maybe doing wrong, after i parbake it and let it cool, when i put it back into the pan and start topping with cheese the crust has shrunk and there is a gap btw the pan and crust that the cheese falls into, is this as expected? Thanks for help.
Hey Kat! Yes, that gap is to be expected! In fact, you kind of want that, this way, you can place cheese in there and it's ultimately what creates the frico crust 🙂
Thanks so much for the reply. I use your book daily and want to thank you for publishing it.
Could you explain what the purpose is of parbaking and turning it upside down on the rack?
Means, a lot to hear that, Kat!
Parbaking does a few things: ensures the crust is fully baked when the toppings are done, too (otherwise the crust takes longer), it helps the crust shrink which lets you fit cheese along the edge to make the frico crust, and finally, brings a little more crunch to the crust! Turning it upside down on the rack is just an easy way to get it out of the pan 🙂
Hi, How do I know when bulk fermentation is done? Is the dough supposed to double in size, have a dome on top, and lots of bubbles? Or am I supposed to wait until the 3 hour fermentation time is up and separate the dough at that time? Thank you!
Dome and slightly bubbly, yes!
When wanting to use a parbaked crust from the freezer, do you let it thaw first or bake it from frozen? If the latter, do you make any bake time or temp adjustments? Thanks! Absolutely love this recipe!
I thaw it in the fridge overnight. Then, take out, top, and follow baking process!
Hi Maurizio,
What about baking in Gozney Dome? Has anyone attempted for Detroit style?
Thanks
Should work just fine in there!
When using a baking steel and a Lloyd’s pan for this recipe, do you place your Lloyd’s pan directly on top of the steel? Or do you put the steel on a lower oven rack and place the Lloyd’s pan on a higher rack? Thanks.
Right on top 🙂
Could kneading the dough with a dough hook on a mixer be a replacement for the stretch and fold?
Yes, you can do that. The more you mix, the less you'll need stretches and folds.
I talk about it, here in my guide to bulk fermentation:
https://slimlife.fit/guides/the-ultimate-guide-to-bread-dough-bulk-fermentation/%3C/a%3E%3C/p%3E
On the mixer topic – is a dough hook the best attachment while using a mixer?
Thanks – I am a big fan!
Hi – just a bit confused as only used one ball of dough for the pan and placed the other one in the fridge. Was I supposed to place two shaped balls into the pan? If so I made an error and it will be a thin crust pizza, I guess.
Just one ball per pizza! It's thinner, yes, but it shouldn't be "thin crust pizza" by any measure (see my photo of the crust above)!
Thanks – it didn’t really work for me in the pan and oven, but the next day I divided the 2nd ball of dough into 2 and made a normal pizza in my electric pizza oven and they were fantastic!
Love this pivot, Trish!
Had to come and say thank you for doing a Detroit style pizza dough (I had written in to suggest it back in the winter and I am so chuffed that you’ve done both this and a Jewish rye as requested <3). Really really enjoy this, I’ve been using your focaccia recipe as a Detroit style pizza dough base for years but of course had issues with the final bake getting a bit soggy, splitting the dough in two is genius (and delicious, because more pizza!!).
Hey, Quincy! Ahh so glad to hear this worked well for you. I love that you've used my Focaccia dough because that's exactly what I thought of to start with this recipe! Enjoy 🙂
Alexandra Stafford’s cookbook is wonderful; 52 pizza recipes (some quite interesting!) with unique salad suggestions for each! I am working on my first iteration of this recipe, and one of the dough balls blew the lid off the 4 cup container in the fridge overnight. The other is now warm proofing, and I am excited to get it into the oven!
Edit: Flavor is outstanding, but I did not heed the "no more than 1/2 C sauce" and, well, I used too much sauce! That said, this was fun to make and I am looking forward to making this on a regular basis. Thanks!
Her book really is fantastic, super well written and put together! Glad it worked out well for ya, MD!
Hi! Is it possible to use a 9×13 pan? Between a pretty serious budget and small space, I cannot really get this 10×14 pan right now. If I were to scale this to 9×13 would you change the flour quantities at all?
Thank you!
I use my 9×13 USA Pan for this all the time, or a half cookie sheet with do in a pinch if you have one with decently raised edges (I have the Nordicware pan set that was at Costco many years ago and they have held many a pan pizza and even full focaccias quite well).
Really great suggestions here, Quincy.
Yes, absolutely!
After the cold proof, do we put the ball of dough in the pan and stretch it when it’s still cold?
Or do we let the ball warm proof in the pan for 3-4 hrs then start stretch the dough to fit the pan? That’s how I did it when I used Alexandra Stafford’s recipe before.
My cold proof is almost done, excited to try it!
P.S THANK YOU for showing the time’s! So helpful
After cold proof, yes place the dough in the pan and stretch it while it’s proofing and warms up. It’ll need more time to proof because it was cold, and it’ll give you time to stretch.
I hope it turned out great, Jacki. Please report back!
I baked this yesterday, it turned out great. Thanks, as always, for the recipe and techinque. I was curious as to why you decided to par bake. Traditionally, the Detroit pizza makers to not par bake (I have been eating Buddy’s for sixty years). I followed your suggestion. I loved the result, except for one thing, how much the crust shrunk. I had a good half inch gap at either end so the ends did not touch the pan, making the cheese crust difficuilt to make right. I think next time I try without the par bake. The toppings should keep the crust from shrinking so much, sort of like pie weigts. Thanks again for a great adaptation.
Love the feedback, Mark. The parbake helps color the crust on the bottom, but also that shrinking helps eke in a bit more cheese at the edges to create more of that “frico crust”. However, I’d like to test this more without parbaking for that option, too.
I also parbake my pizza al taglio to get more crispness in the crust.
If you go that route please report back!
Thanks, Maurizio. I will let you know when I bake it again without the parbake. My recollection is that the reason the toppings are under the cheese in a traditional Detroit Style pizza is that without the parbake it takes a long time to bake these; the toppings would burn if not protected by the cheese. Also, the sauce is cooked because it was applied after the pizza was baked. That way it did not make the crust too wet and did not burn by being on top; hence, the sauce applied on top in stripes.
Hey Mark, did you ever get to this again without parbaking? Just curious how it worked for you. I've been skipping the parbake here lately and I thnk I prefer it this was as well.
Hello! This looks amazing! Any chance this would work with freshly milled wheat (I’m guessing we would need to increase the water?). I’m thinking Kamut might work well. What are your thoughts? Thanks so much!
Yes, khorasan (Kamut) would work super well with this recipe. I would expect to need more water in the dough, too.
One quick note: I think where it says “Scaled up the dough to 600g per pizza for a slightly thicker pie (and to better support the toppings)”, you might mean 300g per pizza? The total recipe contains 600g of flour but it yields 2 pizzas. 🙂
No that’s correct. It’s not just the flour, you have water in there and other things—there’s more weight than just that! The total dough weight is 1,200g.
Just made this today using some organic heritage wheat flour and it was incredible!! Thanks so much, I’ve been excited to make one of your recipes for a long time and this was an utter pleasure to bake and eat!
Oh so glad it worked out well for ya, Aaron! Love the flour choice, too 🙂
Are you saving the 2nd dough ball for a separate pizza? I’m unclear on if both dough balls are needed or if the other is an extra for another day. Thanks 🙂
Saved for another day! I’ll update the instructions a bit 🙂
When I can’t find brick cheese I use a 50/50 mix of mozzarella and muenster. It tastes pretty authentic to me.
I haven’t parbaked the crust when I’ve made it. I may give it a try. I don’t think Buddy’s in Detroit parbakes their crust.
Oh, I love the idea of using Muenster; I’ll have to try that, too! Yea, I don’t think parbaking is”traditional,” but it really helps get a well-colored crust on the bottom—just be sure not to bake it so far that it really starts to firm up. Just a touch.
Hi Maurizio, I only have glass baking pans. Any type of modification to consider when using it? Looks delicious!
That’ll work but you’ll have to adjust the bake time… Usually glass takes longer!
This looks good! I will definitely order the suggested cheeses. Would you reduce the amount of dough for a 9 X 13 pan to maintain correct crust thickness?
I would, yes, but it wouldn’t need to be by much, Larry! Let me know what you think when you make this 🙂
We really liked this! I went with Widmer’s Wisconsin Brick. It had a nice tang somewhat in-between mild cheddar and mozzarella. It came in a 2.25 lb block so I’ll see how this will go on other dishes. I also sprung for the Lloyd pan, the dark finish really made a great crispy edged cheese which was the star of the show. This is going in rotation, I’m wondering if Fontina cheese will be a good replacement for the Brick when it’s not on hand. I’m making this again tonight, but instead of pepperoni, I’ll saute bell pepper and onion.
Sounds delicious Larry. Just saw your comment. I have Widmer's here, too, and it's so good.
When mixing the dough with a stand mixer are you using a dough hook or paddle attachment?
Dough hook!