


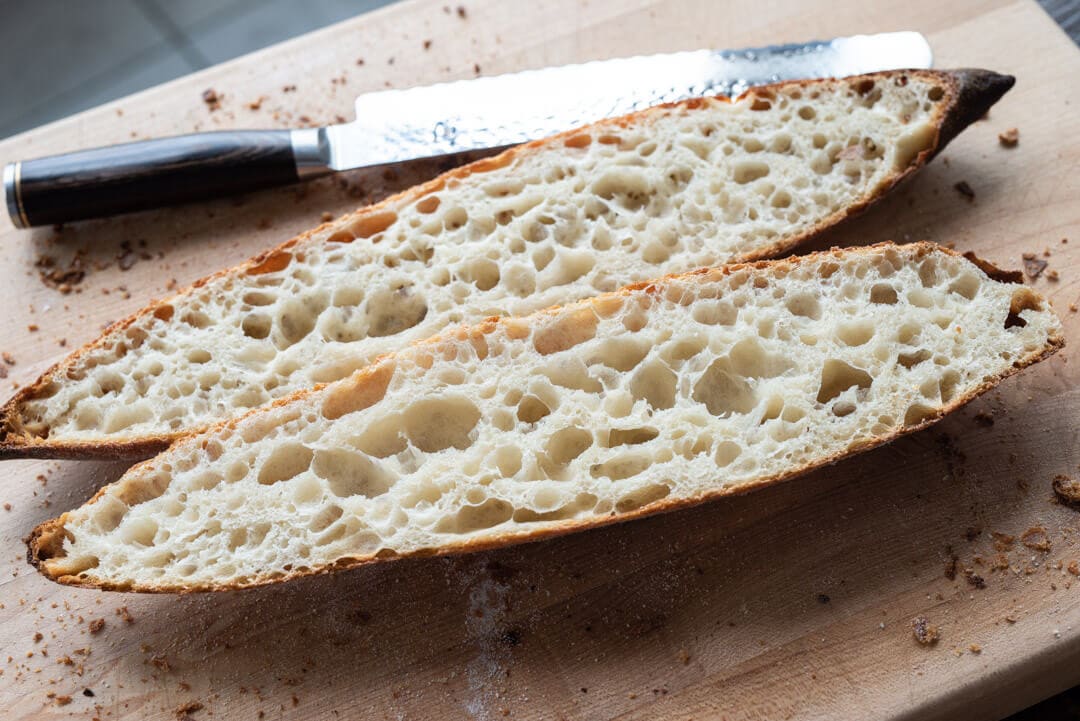
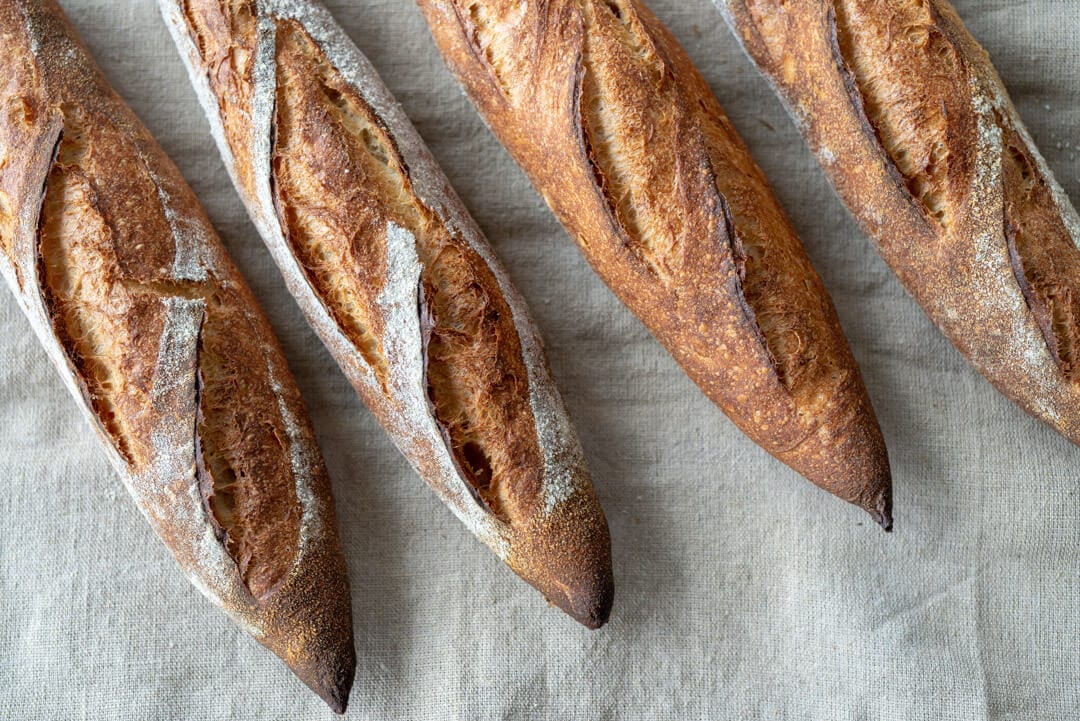
I’ve fallen hard for these pointy sticks. Their beautifully exaggerated shape starts with a thick center and transitions into dangerously sharp ends. Crust color ranges from the periphery of black to almost-too-light, a contrast that elicits stares. A creamy and tender interior that’s so porous it soaks the butter inevitably spread thick during moments of eager anticipation. A sourdough baguette recipe is a tricky thing, but when everything lines up just right, all your past shortcomings discovered in testing vanish in an instant.
As with many things with baking, they simply require practice.
These sourdough baguettes do take concerted effort and practice, but the results are absolutely worth the work. Ok, technically, these are demi-baguettes, given their shorter stature and reduced dough weight, but the nature of this bread holds to the ideal. The slender shape, thin crust, and delicate interior simply exude baguette, even if their specs are a little skewed.
I’ve been working on this recipe relentlessly, and if you follow me on Instagram, you know this, but all the work put into these revolves around the simple fact baguettes are just plain challenging.
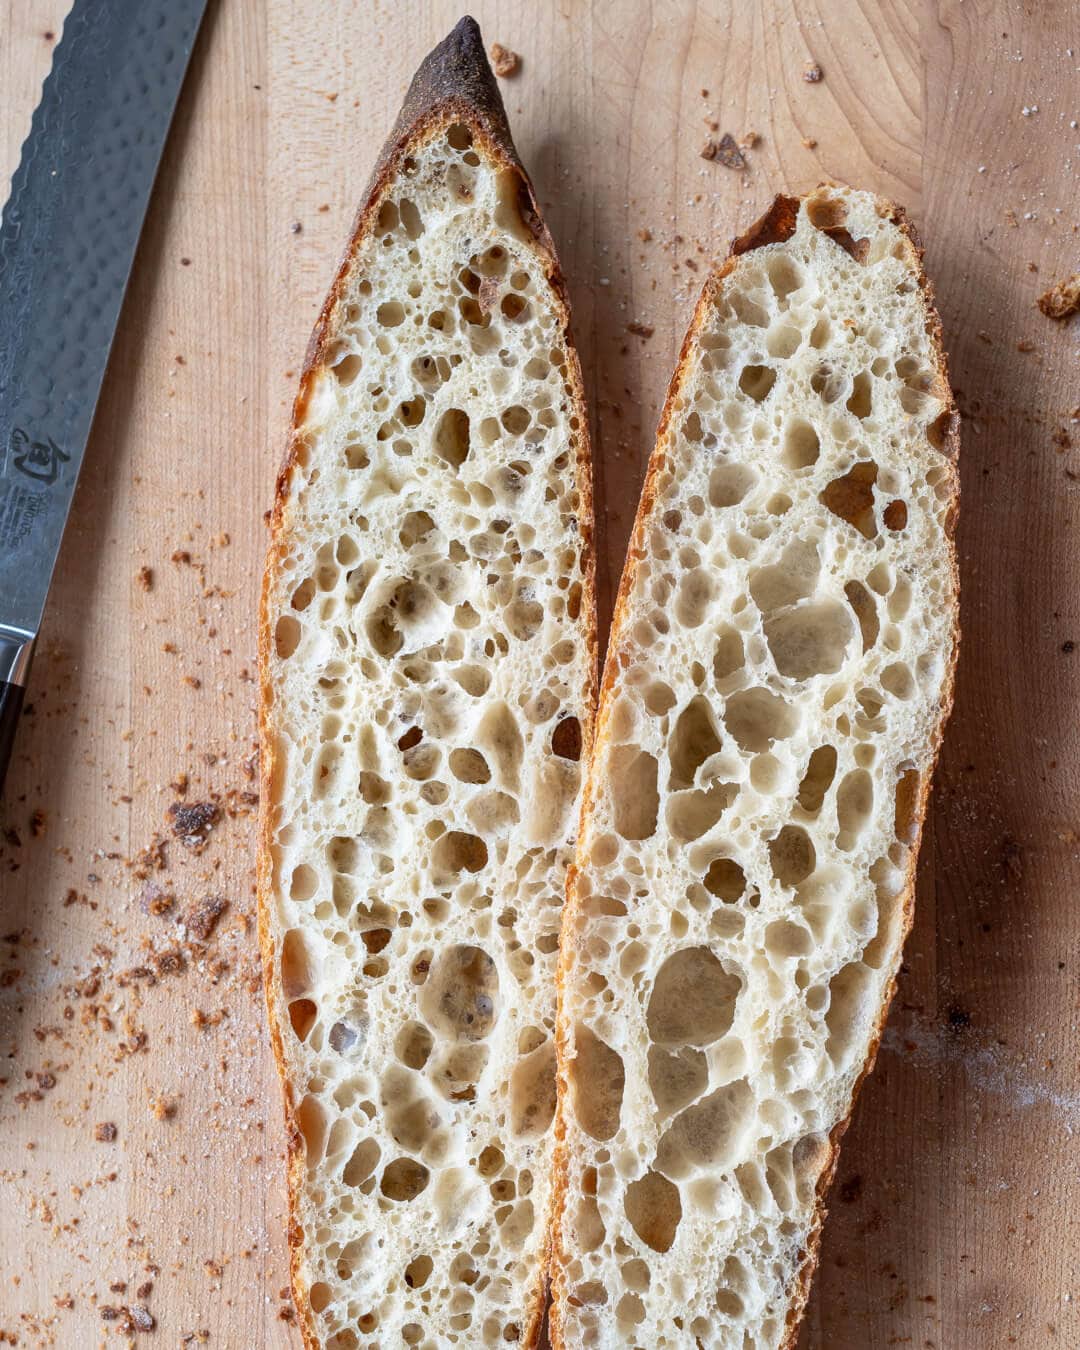
I find that beyond the required attention to fermentation, flour selection, hydration adjustments, cold versus warm bulk decisions, and seeking that correct proof point, there’s the matter of coercing the dough delicately into the correct shape.
As with many things with baking, they simply require practice.
Their challenge stems from the fact that even small shaping mishaps will show themselves quite clearly in the end result. There’s a reason why many bakers consider baguettes to be one of the hardest breads to make. A benchmark of sorts. But even if the shape or the interior isn’t exactly perfect, they’re always delicious. Plus, the more you make them, the more the process slows down internally, and the more all the small adjustments add up to large improvements.
Because shaping these sourdough baguettes can be frustrating at times, I’ve written an entire guide to shaping baguettes—complete with a video (which is also included below) to help illustrate things in real time. Be sure to give that a read—and even a bookmark—for when you’re in the kitchen and need a helping (virtual) hand.
Let’s talk about flour.
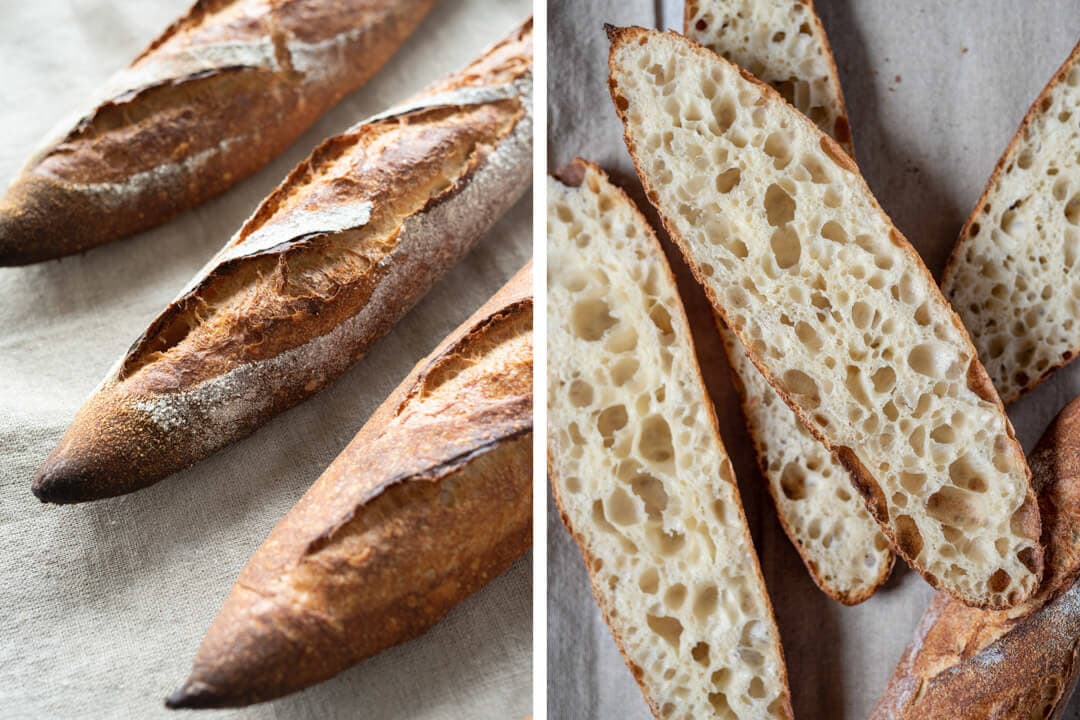
Sourdough Baguette Flour Selection

In my early iterations of this formula, I worked in 10% spelt flour. My intention was to introduce more extensibility in the dough along with the classic and wonderful flavor of spelt. After many trials, I decided to drop the spelt mostly because, with medium-protein white flour and hydration at around 70%, coupled with a length autolyse, this dough had plenty of extensibility.
Baking Schedule
The entire process is split up over the course of two days. This affords you the option to bake the baguettes the next day when you want them—for breakfast, lunch, or even dinner.
Similar to my Kamut demi-baguette recipe, I utilized a short warm bulk fermentation followed by a longer, cold bulk fermentation. When I tested cold-proofing these baguettes in shape, the results always yielded a slightly thicker crust compared to a warm final proof. Further, a cold bulk also adds to the flexibility and convenience of this dough.
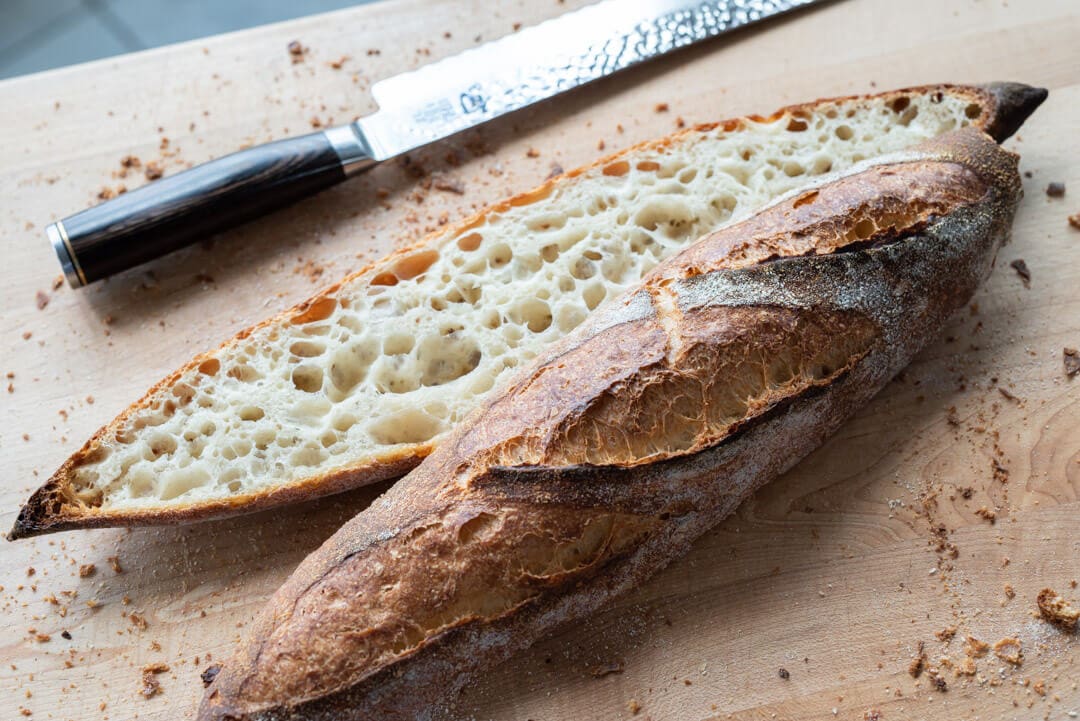
Sourdough Baguette Recipe
Update: I recently updated this sourdough baguette. It is now the same recipe that’s in my sourdough cookbook—and believe me, the results are significantly better than the previous version!
Vitals
| Total Dough Weight | 2,000 grams |
| Pre-fermented Flour | 6.5% |
| Hydration | 70.0% |
| Levain in the final dough | 17.4% |
| Yield | 6 x 325g sourdough baguettes (appx 14″ long) |
Total Formula
Note that this is the Total Formula which lets you know all the ingredients, in baker’s percentages, that you need for this recipe. Scroll down to the Method section for what you need in each step.
Desired dough temperature: 78°F (25°C) (see my post on the importance of dough temperature).
| Weight | Ingredient | Baker’s Percentage |
|---|---|---|
| 1143g | White flour (about 11.5% protein; Central Milling Artisan Baker’s Craft Plus) | 100.0% |
| 743g | Water 1 (Levain and autolyse) | 65.0% |
| 57g | Water 2 (Mix) | 5.0% |
| 21g | Salt | 1.8% |
| 37g | Ripe sourdough starter, 100% hydration | 3.3% |
Method
1. Prepare the levain – 9:00 a.m
| Weight | Ingredient | Baker’s Percentage |
|---|---|---|
| 74g | White flour (about 11.5% protein; Central Milling Artisan Baker’s Craft Plus) | 100.0% |
| 74g | Water 1 | 100.0% |
| 37g | Ripe sourdough starter, 100% hydration | 50.0% |
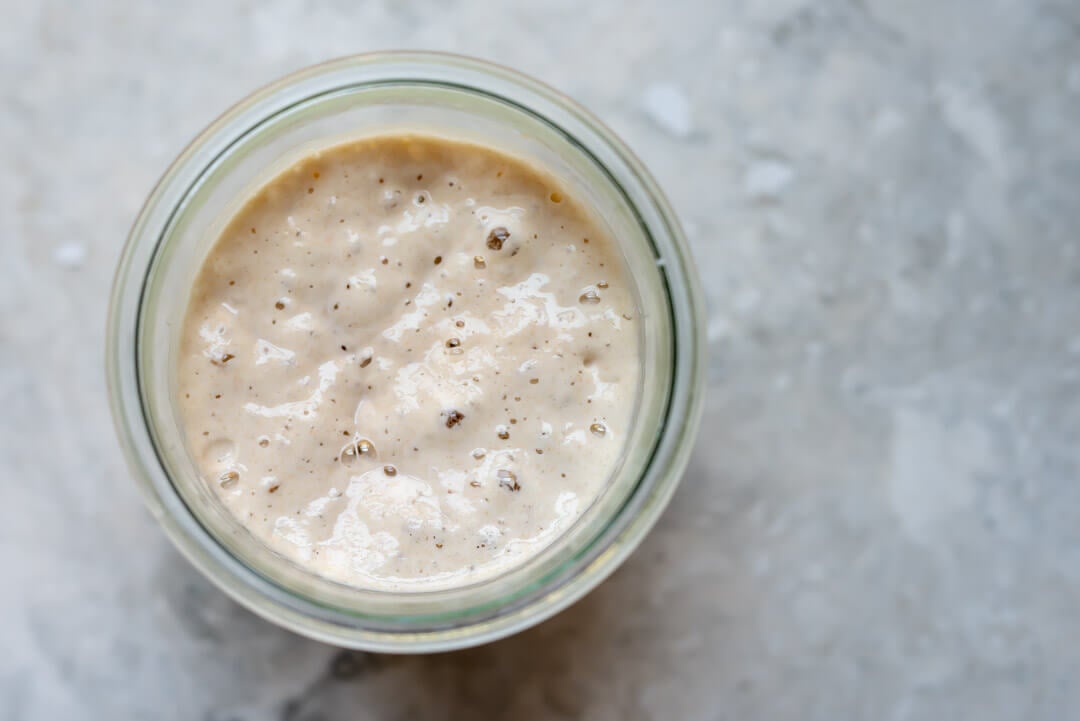
Use your sourdough starter when ripe, mix the above ingredients in a jar, and leave them covered at a warm temperature, 74-76°F (23-24°C), to ripen for 5 hours.
2. Autolyse – 1:00 p.m.
| Weight | Ingredient |
|---|---|
| 1068g | White flour (about 11.5% protein; Central Milling Artisan Baker’s Craft Plus) |
| 668g | Water 1 |
Warm or cool the autolyse water so that the temperature of the mixed dough meets the FDT (final dough temperature) of 78°F (25°C) for this recipe. Place the flour and water 1 in a large bowl. Use wet hands to mix until no dry bits remain; the dough will be shaggy and loose. Use a bowl scraper to scrape down the sides of the bowl to keep all the dough in one area at the bottom. Cover the bowl and place it near your levain for 1 hour.
When making sourdough baguettes, I like to use the autolyse technique to help gain extensibility in the dough and also reduce the total mixing time.
3. Mix – 2:00 p.m.
| Weight | Ingredient |
|---|---|
| 57g | Water 2 |
| 21g | Fine sea salt |
| 186g | Ripe levain |
Add the salt and levain to the top of the dough that was just in autolyse and use a splash of water 2 to moisten. With wet hands, mix thoroughly. Add the remaining water if the dough feels like it can handle it. Next, knead the dough for a few minutes using either the slap and fold technique or folds in the bowl. For this dough, I kneaded for about 5 minutes until the dough smoothed and became elastic.
With sourdough baguettes, I find spending a few more minutes developing the dough upfront helpful in achieving a more open crumb. A spiral mixer can help mix this dough quicker and more effectively.
Transfer the dough to a bulk fermentation container and cover.
4. Warm Bulk Fermentation – 2:15 p.m. to 4:45 p.m.
This warm bulk fermentation will last a total of 2 hours and 30 minutes. During this phase (of the two-step bulk fermentation phase), give the dough three sets of stretch and folds, starting 30 minutes after the beginning of bulk. After the last set, let the dough rest untouched until the full two and a half hours.
5. Cold Bulk Fermentation – 4:45 p.m. to 9:00 a.m. (next day)
After the warm bulk fermentation, place the covered bulk fermentation container in the refrigerator overnight.
6. Divide and Preshape – 9:00 a.m. (next day)
My baguette dough, when removed from the fridge, had plenty of activity but was not exceedingly gassy or risen. The dough was active yet relaxed.
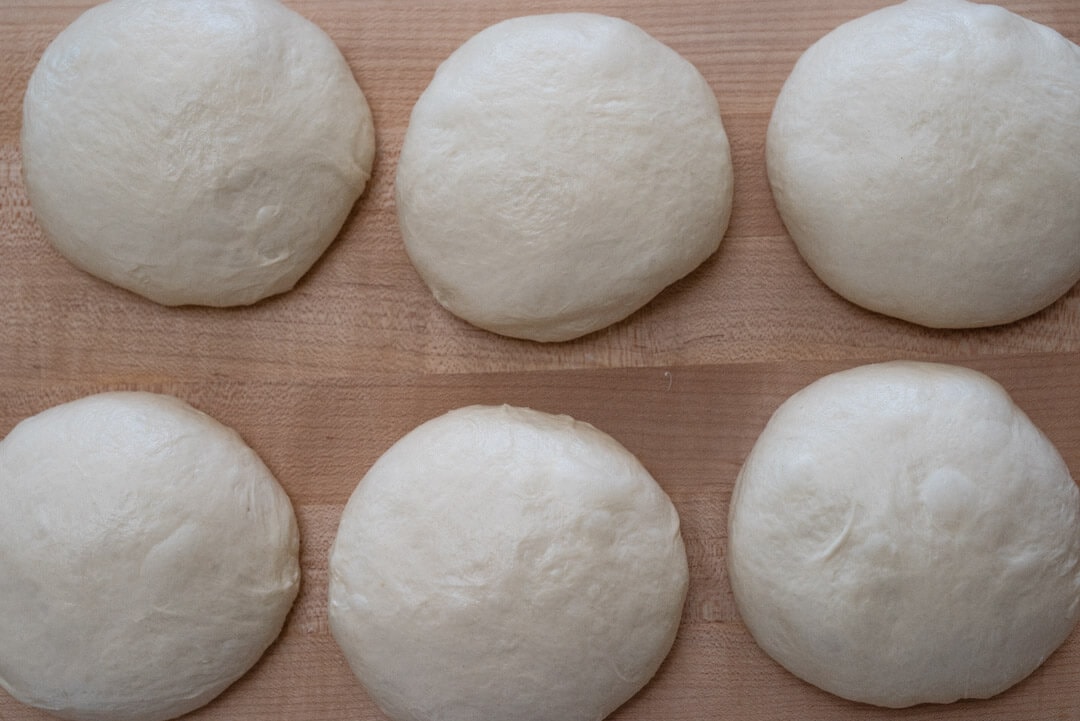
Gently scrape the dough from the bulk container to an un-floured work surface. The dough will feel cold, slightly damp, and firm. Divide into 325g pieces and preshape the pieces of dough into rounds (my preference) or rough tubes. Because the dough is cold and firm, very little bench flour is needed to pre-shape.
Let the preshaped dough rest for 35 minutes, uncovered.
7. Shape – 9:50 a.m.
Prepare a board with a couche (aka baker’s linen) or a large kitchen towel and place this next to your work surface.
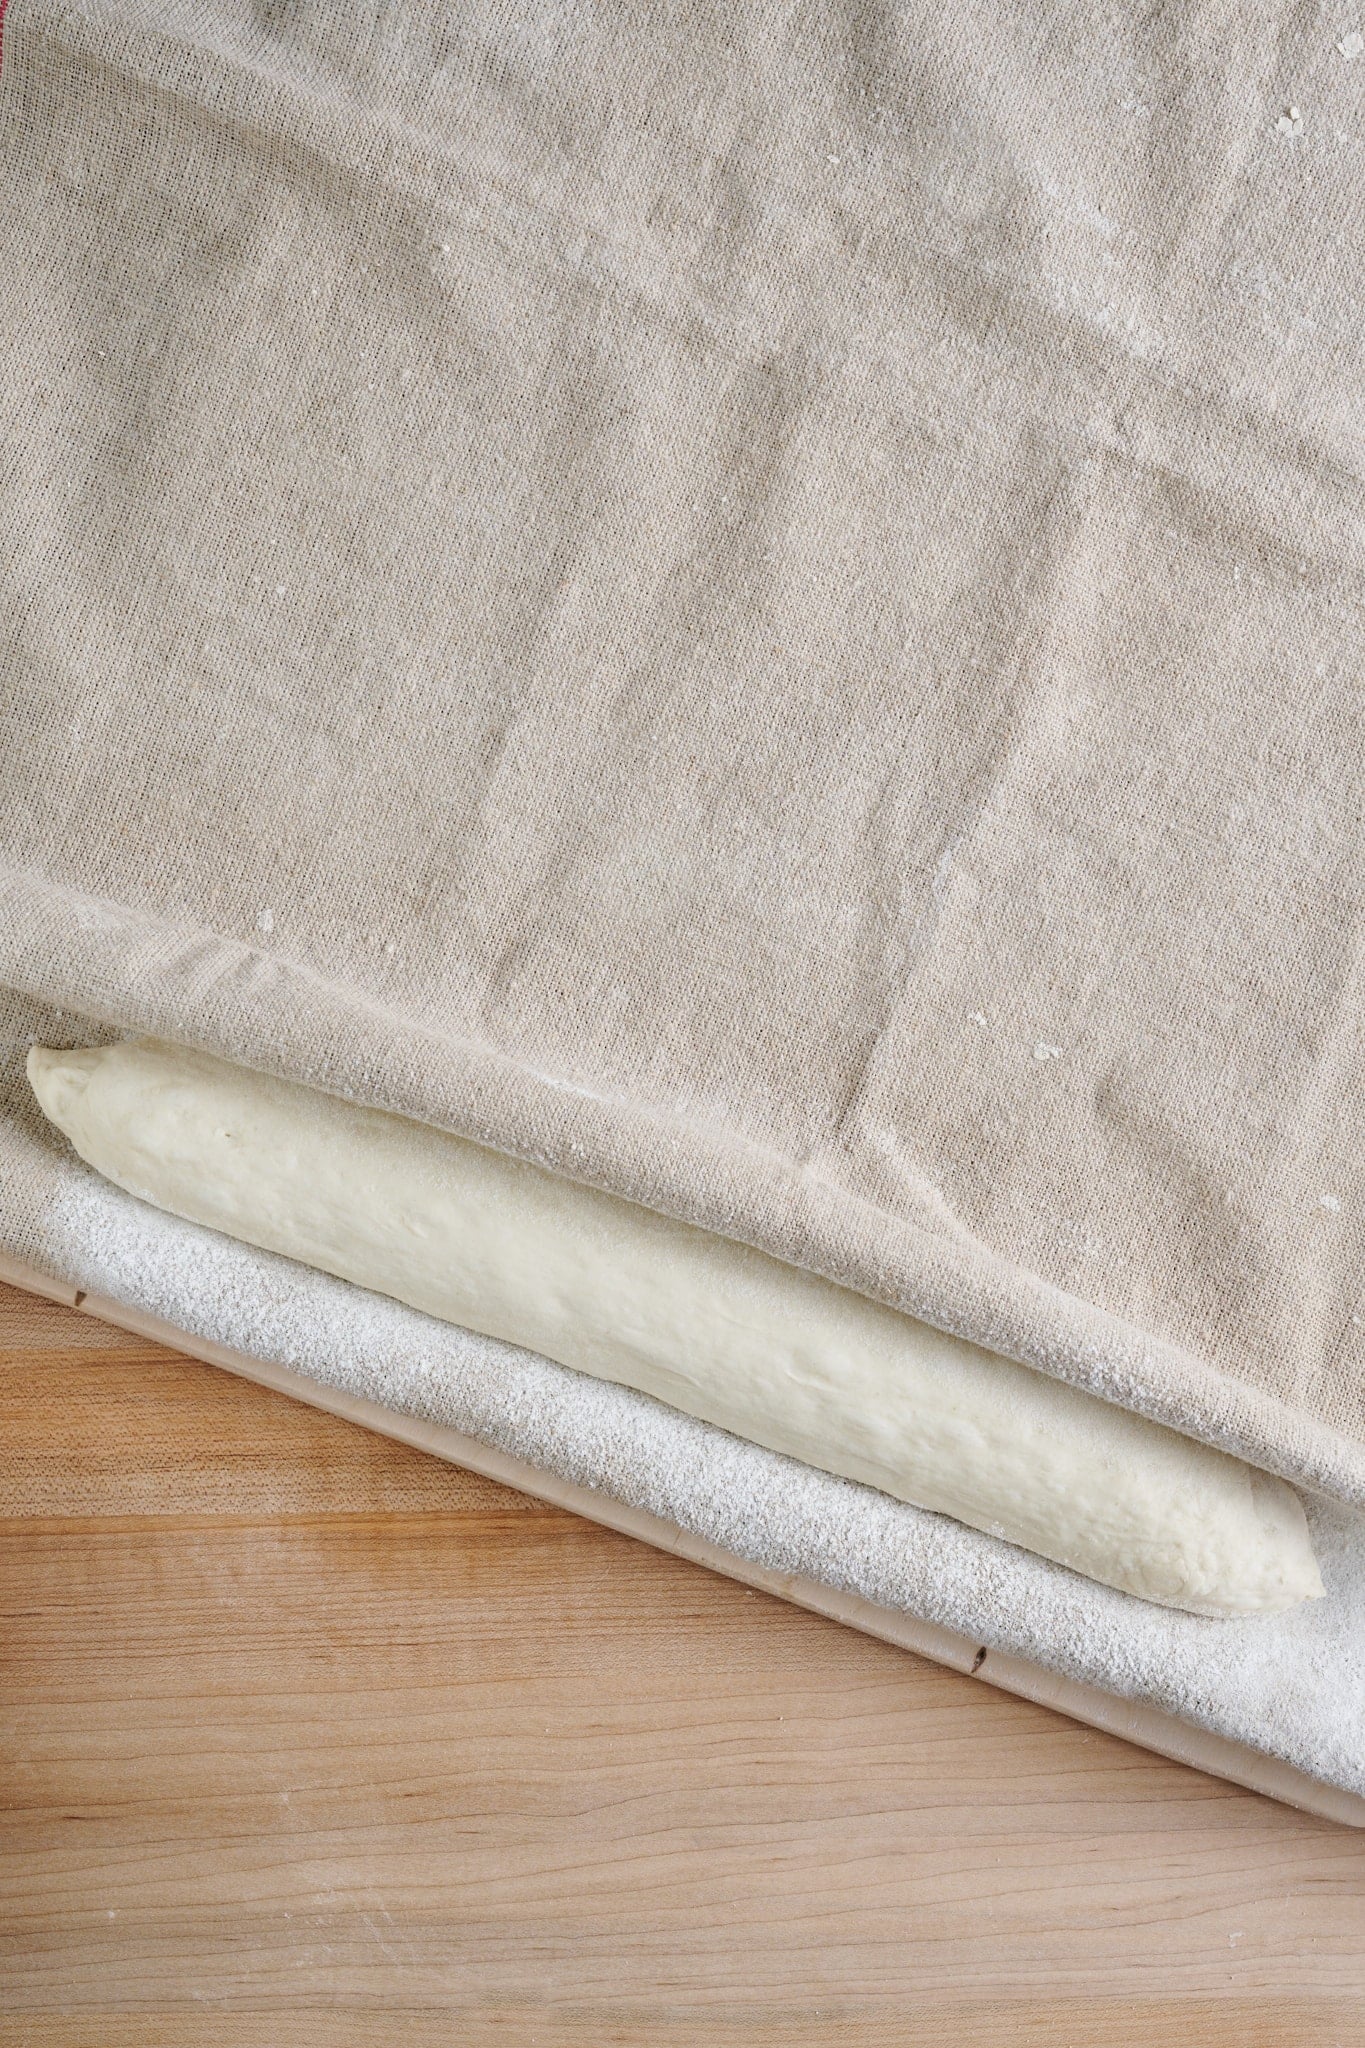
At one side, where you will start laying down shaped baguettes, roll a section so that it stands up by itself, creating a strong edge (see above). Then thoroughly and evenly dust flour on a 3- to 4-inch-wide strip down the couche, from farthest from you to nearest, where the first piece of shaped dough will sit.
After the preshaped rounds have rested for 35 minutes, shape each piece into a long baguette, approximately 14″ long for the home oven (or as wide as your baking surface).
Watch the quick video below for my step-by-step approach to shaping.
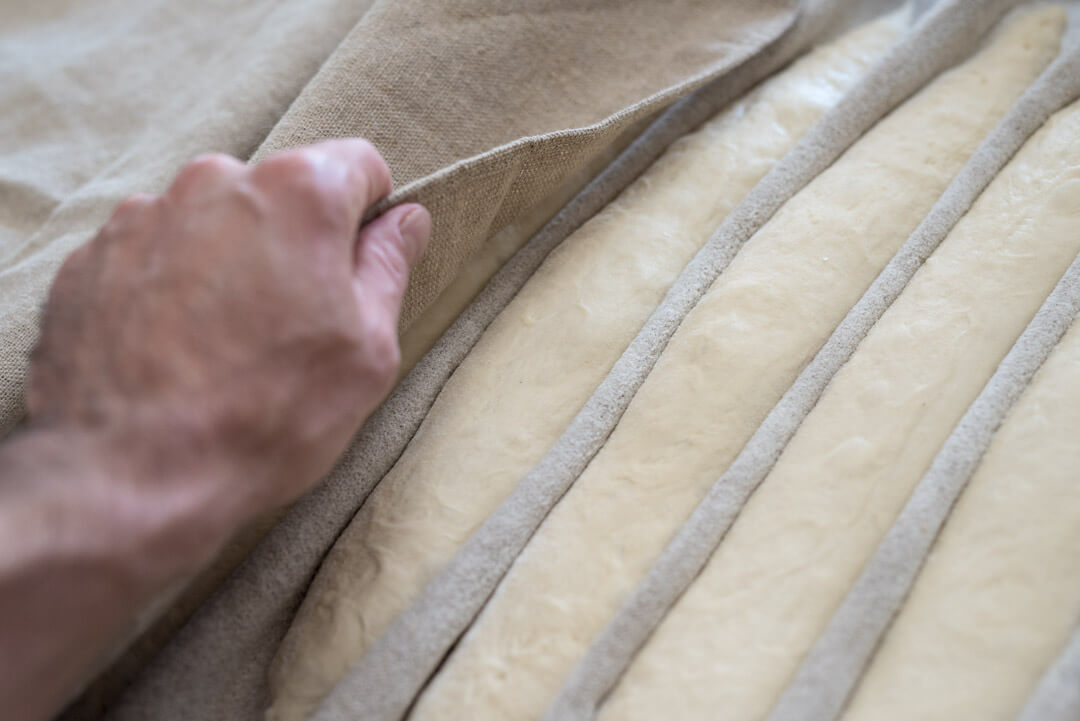
Once you’ve shaped a piece, place it in the flour-dusted channel on the couche, seam side up. Then, using both hands at the edges, pick up and drag a little of the couche toward the dough (like making a pleat in the couche) to form a matching wall of the channel to hold the dough while it’s proofing. Once the new wall is formed, it will look like the dough is nestled between two straight walls.
Flour a new strip down the couche on the other side of the newly formed wall in preparation for another piece of dough. Repeat this process for all the preshaped rounds.
Shaping baguettes requires practice through repetition (see my baguette shaping guide page for more instructions). Try not to get discouraged when shaping; take it slow and focus on one motion at a time.
8. Proof – 10:15 a.m. to 12:00 p.m.
Keep your proofing board away from drafts, as the dough can quickly develop a crust on the outside. It may help to drape the edges of your linen over the shaped baguettes or cover them loosely with plastic. If you cover it with plastic, be aware the dough may stick.
Proof the pieces until they pass the poke test, about 1 hour and 45 minutes at room temperature.
9. Bake – 12:00 p.m.
Preheat your oven to 450°F (230°C) for an hour with baking stone/steel inside.
If you only have one baking surface, divide the baking into two sessions. Bake three baguettes first, and chill the rest in the fridge for the second session.
Prepare a pizza peel with parchment paper matching the width of your baking surface.
Grab the end of the couche and pull it out, moving the piece of dough away from the rest. Then, using a dough transfer board (a smaller pizza peel or a small cutting board could also work), place the board inside the baguette (the side closest to the rest of the dough pieces). With the hand holding the couche, quickly flip the dough onto the peel by tugging up and slightly over the transfer board. The baguette should now be seam-side down on the transfer board.
Repeat until you have three pieces on the peel.
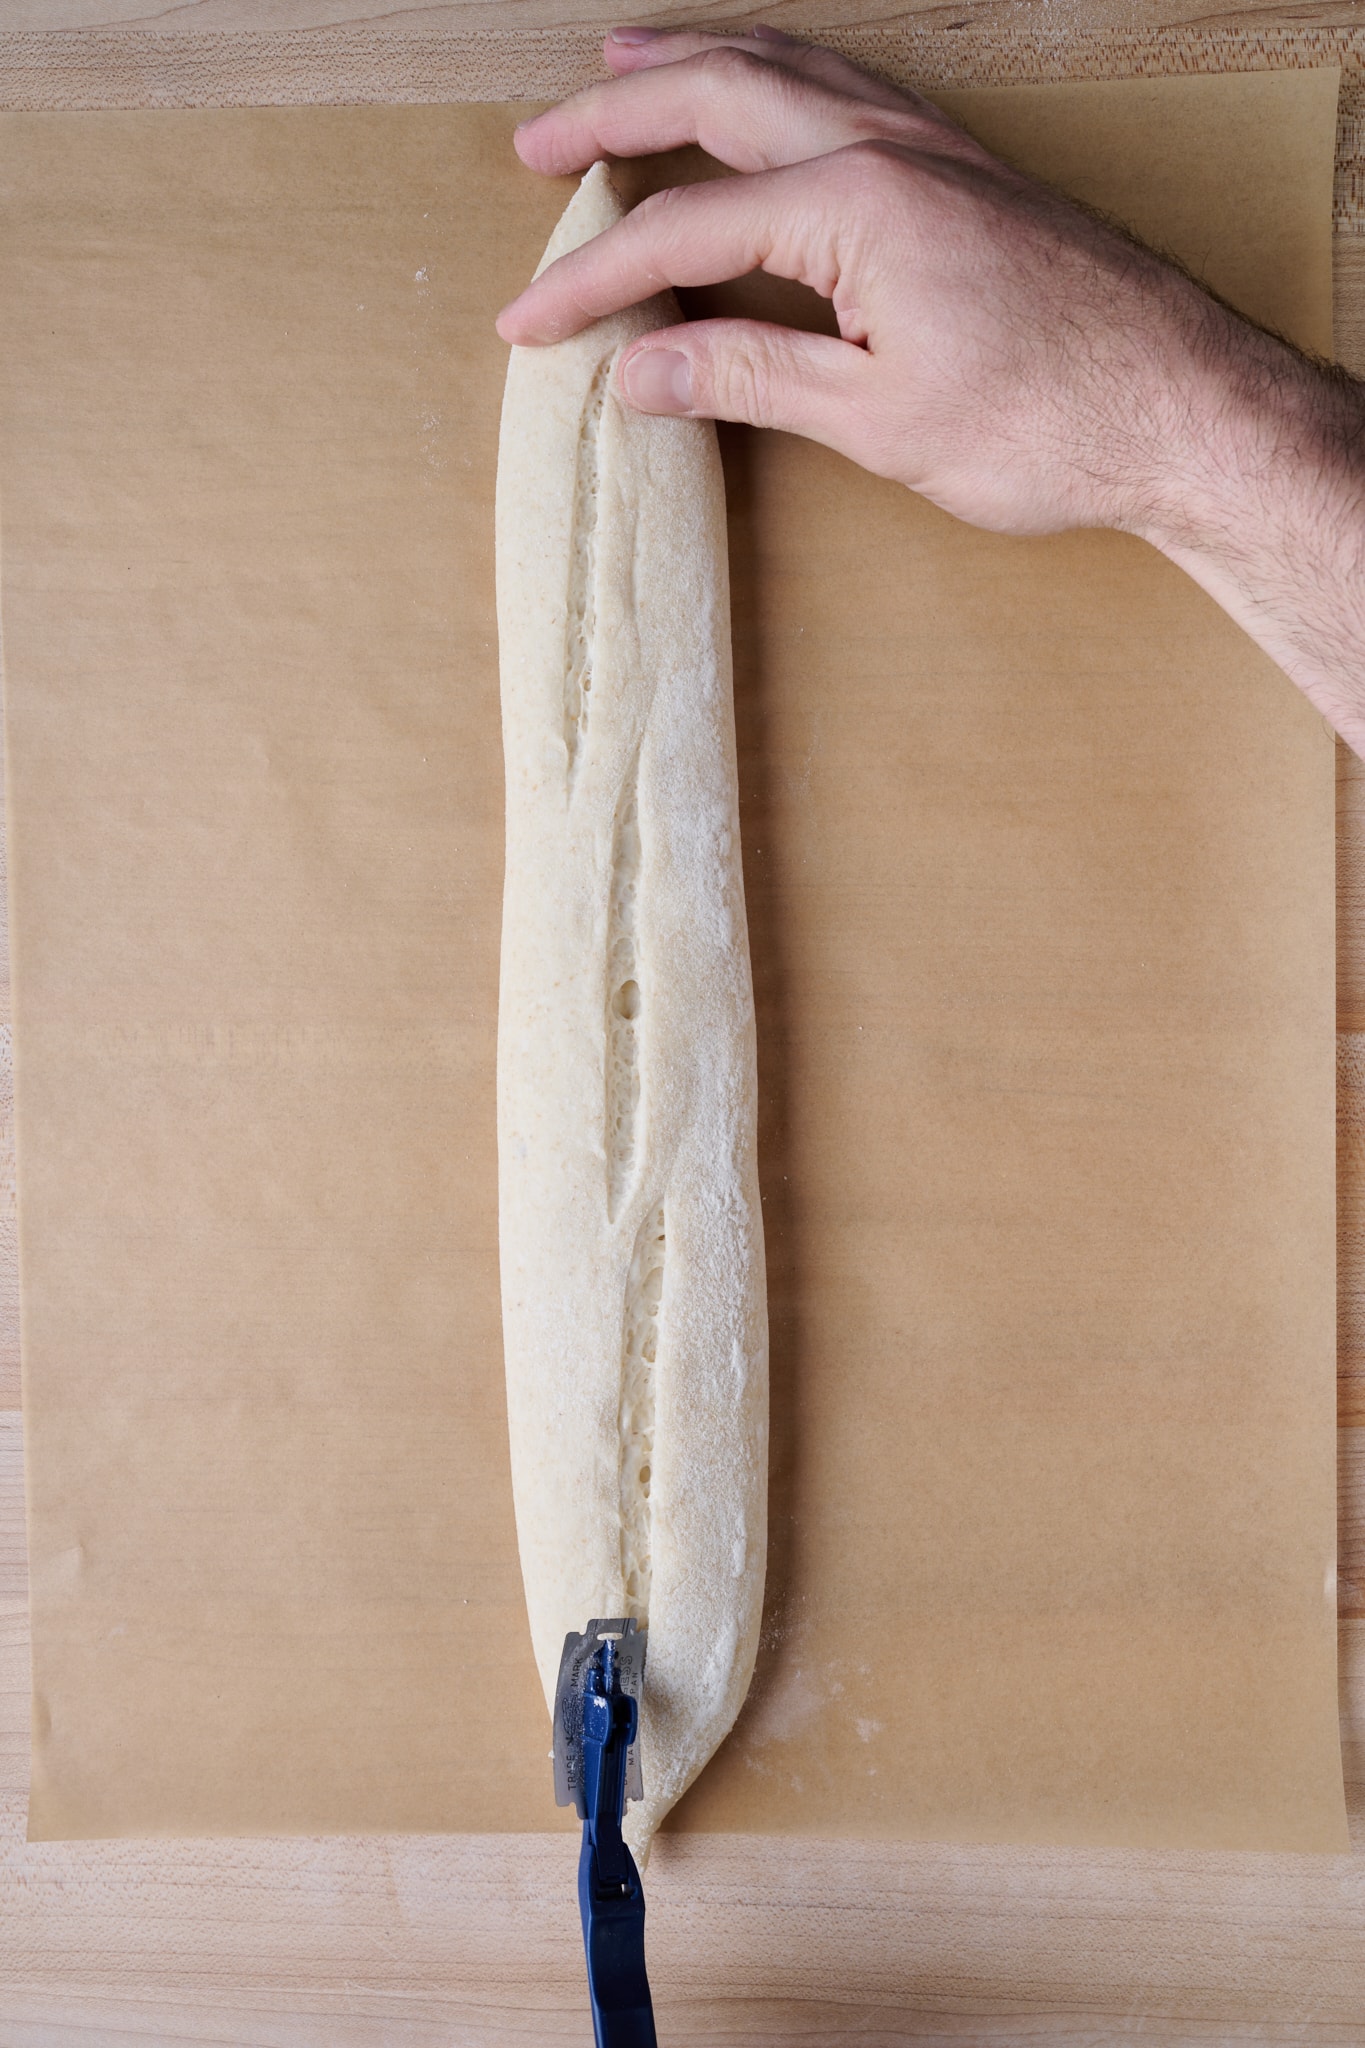
Score each baguette with three overlapping slashes (see below).
Transfer the dough onto the baking surface in the oven using the parchment paper. Next, steam the oven and bake for 20 minutes. Remove the steaming pans and bake for another 20-25 minutes until done.
Cool on a rack. Repeat the process for the remaining baguettes in the fridge.
I steamed my oven in my usual way, described here in my post on how to steam your home oven for baking.

Sourdough Baguette Recipe
- Prep Time: 24 hours
- Cook Time: 45 minutes
- Total Time: 24 hours 45 minutes
- Yield: 6 baguettes
- Category: Lunch, dinner, snack
- Cuisine: French
Description
These exquisite sourdough baguettes have a delicate wheaty flavor with malty notes from the caramelized crust. They’re perfect for breakfast (pan con tomate anyone?), lunch, or even just a snack with a spread of butter on top.
Ingredients
Levain
- 74g white flour (about 11.5% protein)
- 74g water
- 37g ripe sourdough starter, 100% hydration
Autolyse
- 1068g white flour (about 11.5% protein)
- 668g Water
Main Dough
- 57g water
- 21g fine sea salt
- 186g ripe levain
Instructions
- Levain (9:00 a.m.)
In a small bowl mix the Levain ingredients. Cover the jar and keep it at a warm temperature for 5 hours. - Autolyse (1:00 p.m)
In a mixing bowl, add the Autolyse ingredients until no dry bits remain. Cover the bowl and let rest for 1-hour. - Mix (2:00 p.m.)
Add the salt and levain to the top of the dough in autolyse and use a splash of the remaining water to moisten. With wet hands, mix thoroughly. Add the remaining water if the dough feels like it can handle it. Knead the dough for a few minutes using either the slap and fold technique or folds in the bowl until the dough smooths and becomes elastic. Transfer the dough back into the bowl. Transfer the dough to a bulk fermentation container and cover. - Warm Bulk Fermentation (2:15 p.m. to 4:45 p.m.)
This dough will require 2 sets of stretches and folds during bulk fermentation at 30-minute intervals. After the second set, let the dough rest, covered, for the remainder of bulk fermentation. - Cold Bulk Fermentation (4:45 p.m. to 9:00 a.m.)
After the warm bulk fermentation, place the covered bulk fermentation container in the refrigerator overnight. - Divide and Preshape (9:00 a.m., the next day)
Gently scrape the dough from the bulk container to an un-floured work surface. Divide into 325g pieces and preshape the pieces of dough into rounds (my preference) or rough tubes. Because the dough is cold and firm, very little bench flour is needed to pre-shape. Let the preshaped dough rest for 35 minutes, uncovered. - Shape (9:50 a.m.)
Prepare a couche and dust it with flour. Shape each piece of dough into a baguette shape. - Proof (10:15 a.m. to 12:00 p.m.)
Proof the pieces until they pass the poke test, about 1 hour and 45 minutes at room temperature. - Bake (12:00 p.m.)
Preheat your oven to 450°F (230°C) for an hour with baking stone/steel inside. Divide the bake into two sessions if you only have one baking surface. Bake three baguettes first, and chill the rest in the fridge for the second session. Prepare a pizza peel with parchment paper matching the width of your baking surface. Grab and end of the couche and pull it out, moving the piece of dough away from the rest. Then, using a dough transfer board (a smaller pizza peel or a small cutting board could also work), place the board to the inside of the baguette (the side closest to the rest of the dough pieces). With the hand holding the couche, quickly flip the dough onto the peel by tugging up and slightly over the transfer board. The baguette should now be seam-side down on the transfer board. Repeat until you have three pieces on the peel. Score each baguette with three overlapping slashes. Transfer the dough onto the baking surface in the oven using the parchment paper. Next, steam the oven and bake for 20 minutes. Remove the steaming pans and bake for another 20-25 minutes until done. Cool on a rack. Repeat the process for the remaining baguettes in the fridge.
Sourdough Baguette Recipe FAQs
Why are these scaled to 325g?
This dough weight makes for baguettes that fit my home baking surface at 14-inches long. It makes for a fatter baguette in the end, but one that’s perfect for the home oven.
Why is scoring difficult with baguettes?
One (of the many) reasons I like to do a cold-proof with almost all my other doughs is because scoring is much easier. When the dough is warm, it’s easy for your blade to drag and get stuck. My best advice is to use a new, super-sharp blade and make your cuts as smooth and fast as possible. If you notice you didn’t cut through the skin of the dough sufficiently in the first pass, lightly drag the blade inside the cut to give it a little help.
Why do cold bulk fermentation with baguette dough?
Doing two-day fermentation is a great schedule for home bakers (and pro bakers, too!), so I do like to use the fridge; it brings a little more flavor. This means you’d either have to do cold bulk or cold proof in shape. Doing the latter gives these a slightly thicker crust since the dough will be exposed to cold temps when they’re in their final shape. Therefore, I opt for cold bulk fermentation to keep a thin crust (it’s also easy to shape cool dough!).
What’s Next?
This sourdough baguette recipe results in exquisite delicate baguettes. The brittle crust grounds the eating experience and gives added body to the otherwise tender bread. It’s through this contrast that the bread is elevated to the next level—a baguette with a soft, flimsy crust would be a sad baguette indeed.
I’ve said it before, and I’ll probably say it a million times more: fermentation is a mysterious and beautiful thing. I hope you try this recipe and you show up to your next gathering with an armful of exquisite and incredibly delicious pointy sticks.
To continue with the baguette theme, try your hand at my green olive filoncini, which are kind of like an Italian version of baguettes‚ but twisted!
Or, if you’re looking for a large, crusty loaf, my sunflower and sesame sourdough has loads of flavor and are a go-to recipe when you want to impress.
Buon appetito!


455 Comments
Any adaptations for fresh milled flour? I’m trying the Kamut baguette with Hard White Wheat instead of Kamut (I don’t have Kamut,) but love this recipe so much I’d like to just use this one instead.
You might expect the dough to need a bit more water and you’ll likely see an increase in activity in the dough—keep an eye on it in bulk and divide as necessary!
Hi! Your shaping video link is broken.
Can i leave these in the fridge any extra day? I planned to bake today but now prefer tomorrow?
I’ve left these up to 5 days in the fridge… they were wonderful! Definitely more of a sourdough taste which we loved!
So now I make a full recipe and shape/bake throughout the week :).
Shaping video looks good! You can leave them in the fridge for longer but expect a little less right and more sourness.
Hi Maurizio, Any chance you can show pictures or a video of how you get the baguettes off the couche into the oven? I’ve tried this 3 times now with different levels of success but feel it shouldn’t be this difficult. I’m not in a hurry by any means and love following your posts.
Yes, this is a great suggestion. I’ll add it to my list of things to capture next time! I’ll add it to my baguette Guide page.
Thank you!
Any luck baking these baguettes in the Rofco? I’ve had a few attempts but struggling with timings and temp? Who doesn’t love a good baguette?
Thanks for all your great info and baking tips!
Yes, I’ve had great results in my Rofco as well. Generally baguettes benefit from a slightly hotter bake, so I really crank the heat on them. They bake quickly, too! I’ve still been dialing in the times and temps, I’ll try to update this post with findings.
Hey Maurizio, love your recipes, but I’ve tried these a couple of times now and I’ve been struggeling with the interior ending up really dense. I thought this could be overproofing.
As I live in Norway I don’t have access to the same flours, but I’ve found a few different ones I like. Using this recipe I used my main go-to white flour, however I didn’t really think of the protein content of the main portion 🤦♂️ So I ended up using only flours containing 13% and 14%.. I guess this might be the reason, perhaps in addition to overproofing?
Anders — hard to say whether it’s over or under proofing! If you’re seeing bubbly and active dough after the bulk in the fridge, it might be going over. If so, try to put it into the fridge earlier and see if this helps.
Hi Maurizio, I tried these but got little rise after cold bulk fermentation. My fridge is 37 and yours is 39, but can that make such a huge difference? Should I try warm bulk fermentation the next time? I have no problem with the beginner’s sourdough bread proofing in the fridge, but the bulk fermentation happened outside the fridge. I know my starter is okay, as the bread came out just fine. Can one try using more leaven? Thanks.
I’d try leaving the dough out longer before putting it into the fridge.
What type of flour should I use for the couche? I use rice flour for my bannetons. Is that a good choice here? I’ve made a number of your loaves here (thank you!) but this will be my first attempt at baguettes.
You can use rice flour or white flour — for baguettes I tend to just use white flour on the couche. Both work well!
Thanks maurizio! I ended up using a combination of rice and bread flour. Proofed a little longer before refrigerating. My first baguettes were a success! Tagged you on insta. Thanks again 🙂
I know you use a retarder. The fermentation time seems short considering the % of pre-fermented flour and, then using it young. I am wondering if you are retarding a little warmer than 38F.
The crumb is absolutely gorgeous, it was surely fermented and shaped to perfection. Gorgeous bread!
Danny
Thanks, Danny! This dough was retarded in my home fridge, but it might have taken longer to cool down fully given the larger rectangular tub used.
I just wanted to know what temperature is your refrigerator at for the cold bulk fermentation, as that should help me to gauge how long it should be in mine. Mine is currently at 37F which seems to be a bit cooler than most fridges and could explain why it seems to not rise quite as much. Thanks!
Mine is usually around 39°F.
Hi Maurizio – amazing site! I’ve baked a few successful sourdough recipes but this one has left me scratching my head. As a reference I’ve successfully shaped and baked baguettes with non-sourdough recipes, but after trying twice on the above recipe I’m at a loss. The baguettes come out extremely flat, hold very little shape during proofing and the crumb is dense and very moist (not in a good way). For the first attempt I followed the instructions above exactly (time of day, cold bulk etc) the only variable was the type of flour I used which was T65 stone milled of French origin and containing 10% protein. After the additon of the levain and additonal water the dough was very wet but I proceeded. The levain activity and post cold bulk stage had very similar appearance to your reference images above. Shaping was ok, but I could feel they lacked some stiffness. At proofing they slowly collapsed and never recovered, I thought perhaps it was some variance in temperature (it was a warmer day) that had lead to overproofing, or that perhaps it was the lower protein content flour used and so I attempted the recipe again again. This time with especial caution. I went for a 50/50 mix of the T65 flour and a stronger bread flour with 12.5% protein content. I reduced the reserved water from 100g to 60g and ensured the levain was at peak; that there was clear activity after the stretch and folds before the cold bulk and closely watched the proofing baguettes (shaping went better this time) but to no avail – I had an almost carbon copy repeat of the first attempt. I’ve attached some pics of a baguette for you to see the result Baguette
Crumb
Cross Section
I did notice the second time round that the dough continued to be very wet despiute the reductioins in additonal water and the stronger bread flour used. I have worked with wet doughs before and can slap and fold until they start to form structure and surface tension comes into play, but these really do seem to be wetter than even relatively high hydration mixes.
My starter is fed on a dark rye and unbleached white flour 50/50 mix at a 1:2:2 ratio and rose as expected when creating the levain, passed the float test etc. Dough passed the window test before shaping so I don’t believe it’s a lack of gluten structure either. I proofed until the poke test seemed spot on forthe second attempt to avoid any overproofing concerns.
Any help would be much appreciated.
Thank you for the amazing reseource otherwise.
Wow, very flat. It might be the dough is dramatically over proofing on you, especially if you’re seeing collapse during proof.
Survivorist, I had the EXACT SAME result as the bread in your pictures, and I used all strong bread flour following the recipe in all the proportions. Did you find what was happening to your bread?
Any tip would be appreciated.
Maurizio, the website is amazing!
@disqus_Z0Zdbz0Kta:disqus @survivorist, I had the exact same experience with my first attempt! I’m on my second now. I let the levain proof for an additional hour– it nearly tripled in volume and was clearly ready to go. After incorporating it into the final mix, I also let the dough warm bulk for twice as long; it wasn’t showing very many bubbles, but 2x warm bulk time seemed like a good test (it was 79 degrees the entire time). I’m sort of surprised the pre-fermented flour is only 4%. Could it be that the flour (I’m using KAF AP) makes *that* big a difference?? For what it’s worth, I make the Tartine BCB consistently well (so this isn’t my first attempt at sourdough or something).
Hello, I have tried to make these twice now and I’m not sure what I am doing wrong. Hoping someone can give me some insight. Both times I ended up with what looks to be Fool’s Crumb – a few large holes, tunnels. Not the multiple, even, random holes that you should have. Does anyone have any thoughts??
Sounds like under proofed dough, that’s usually the cause for large holes and dense spots. Be sure to let the dough far enough at room temp bulk before placing in the fridge!
Hi Maurizio – Thank you for your wonderful site. I have learned so much! I’m wondering two things:
1. Can I substitute whole wheat flour at 14% protein for the high protein bread flour at13%?
2. If I adjust the hydration to 68% from 73% do I need to adjust anything else in the recipe?
Thanks for taking the time for all us new bread bakers out there!
Protein content doesn’t matter that much so the Whole Wheat will work just fine. Honestly, I wouldn’t adjust the hydration because whole wheat absorbs even more water that white. Adjusting the hydration to 68% will work, it will just lead to a slightly less airy crumb. Also, you dont need to change anything else if you do choose to adjust the hydration.
Thanks Jeremy. I really appreciate your thoughts, I think this site is the best!
If you add the whole grains then there’s no need to adjust hydration, it’ll likely even out. You’ll end up with a slightly more dense baguette with potentially some sourness, but whole wheat would be great!
Thank you Maurizio. I appreciate your thoughts and time to answer my questions. Hopefully you are healthy and safe.
Thank you for this recipe and all your recipes, they are perfect! If i wanted to use just one kind of flour (just AP flour, or just high protein bread flour) would this recipe still work? Thanks!
Yes for sure. I’d go with the AP flour.
Hi, I attempted this recipe twice, and both times resulted in more “flat” baguettes, but with an open crumb. I am using Organic Artisan Bakers Craft Plus for 100% of the flour, as I do not have anything else on hand. I am not quite sure what I am doing wrong. Perhaps they are not proofing long enough? I also have a problem with them sticking to the couche despite putting a lot of flour on before hand, which makes me think that perhaps since the dough is wetter from the fridge and cold temperatures, it can cause some sticking. I also have a gas powered oven, so perhaps this could be the cause, as getting moisture to stay in the oven, and not be vented out, is quite difficult. Do you have any thoughts? Any help would be amazing!!
I’d say if you’re using all ABC try dropping the hydration 2-5% to compensate. Be sure to use your starter when very ripe to make the levain, then the levain very ripe when mixing into the dough. Also, you could try letting the dough go longer in bulk at room temp before fridge.
In the Levain Mix table, the weights are all equal, but the Baker’s Percentages say 100, 50, 100. Am I reading it wrong?
Typo — thanks for pointing that out, it’s now fixed!
Thank you!
Hi I made this recipe yesterday, it’s the fourth time I’ve made it and I was so excited they came out perfect and they were the best baguettes I ever made.
Thank you for posting it.
Awesome, Gary! Thanks so much for reporting back and enjoy!
@disqus_oarjCw94n7:disqus , do you follow the recipe exactly as written? I’ve tried twice now and both times the warm bulk produced verrrrrry little fermentation activity. I’m on the verge of just doubling or tripling the levain amount!
Yes, I do my bulk fermentation in a proofing box at 78 degrees and mine definitely takes longer maybe four hours
Hi, a number of your recipes call for “bread flour, malted”. I note this seems to be a thing in the USA. I’ve not come across it here in the UK though. Perhaps I’m looking in the wrong place, or for the wrong thing.
Some of your recipes, ie pizza, say to use Diastatic Malt. This I have found but not yet used. Waiting for a pizza steel.
I’m wondering if adding diastatic malt powder to normal bread flour would result in a similar outcome as malted bread flour?
I’m very new to baking so please excuse me if this is a really stupid question.
I’m really enjoying the depth and background you go into with your recipes. I feel like they are helping progress from a fairly dumb follower of recipes into someone that has more of an idea about what’s actually going on and what to look for during the process. I feel like the more I learn the more ignorant I am. I think that’s normal though. Just enjoying the journey for now.
I’ve seen him replied in other posts something along the lines “sure, add 0,5% diastatic malt to the total flour weight”, to replace malted flour. I may be wrong and cannot find the original reply, but it’s a small amount and you could not go wrong with that. Diastatic malt only accelerates a bit the fermentation, because the enzymes in it break down carbohydrates into simpler sugars. In higher amounts it can make crumb gummy, so beware.
Thanks 😊 I have a batch on the go now where I tried it at about 1%. Will see how that goes
Your flour might already have malt added, always check the “ingredients” list if there is one. But yes you could add malt if you want to bring a bit more color to the crust and help aid fermentation — I like to start at 0.5% and work up if necessary. Too much can result in a gummy interior and overly red crust, though, so be liberal.
Hi Maurizio,
I made this dough alongside a batch of your weekday sourdough. Using some new bread flour from a nearby mill made all the difference in the world and finally got my batard to hold shape. The baguettes on the other hand… well they’re in the oven now and it’s hard to look at them without laughing. Two problems I’m hoping you can shed some light on:
1. Shaping was as challenging as expected, but now I’m thinking I approached it wrong. They had no surface tension coming out of the couche and were impossible to score. I’m wondering if the rolling action is supposed to create tension in a similar way to dragging a boule to tighten it up.
2. Judging by the poke test, my loaves seemed overproofed just about an hour in to the room temp morning proof. I don’t think I left them in the fridge too long. Does that mean I took bulk fermentation too far?
Thanks as always!
1. The rolling action isn’t so much to tighten, it’s the folding and sealing steps that provide that structure.
2. Sounds like they might have gone over during the room temp proof portion. If they needed a tighter shape AND were slightly over proofed it would be hard to score. Next time a last-minute thing you can do is toss the couche with dough into the freezer or fridge for 10 minutes or so, just until they are cold to the touch. This cold skin will help them keep their shape a bit and make it easier to score.
Hi there,
First of all it is great website, loved it so much! I am beginner in sourdoughs but I love to bake, found this website very detailed and helpful! So far I made beginner bread and my sourdough babka is in the oven now, and I have tried this recipe for baguettes.
For some reason my baguettes came out flat from the oven, I tried already second time and result is the same. Could you let me know why could it be?
I read that maybe my oven not steamed enough but not sure if this is only one reason.
Any suggestions?
I also not sure about how thick the dough should be, because first time when I made it was thick enough, and second time was kind of on a runny side
If you’re doing a cold bulk fermentation be sure the dough has fermented enough before you place it in the fridge. You want to see some rise to the dough and it should feel alive before you place it in the fridge.
Hi there,
I’ve been baking basic and sometimes flavoured sourdough boules and loaves for several months now, so thought I would take it to the next step and try a baguette! I’m reading through your recipe, and got stuck in the weights/baker’s percentages in the levain. I read through your beginner’s sourdough tutorial on the baker’s percentages, but I’m still confused as to why starter, flour, and water are all calling for 47g when their percentages are 100, 50, and 100% respectively.
Thanks for any help you’re willing to give! I’m new to your site but love it so far!
Best,
Chrissy
I was wondering the same!
Was a typo — now fixed!
Typo — fixed!
Hi Maurizio,
I’ve made this sourdough baguette recipe several times. My baguettes come out of the oven beautiful and fragrant. They are delicious with a hint of sweetness that I have not accomplished with any other recipe. It is incredible!!. The crumb of my baguettes is open towards the center of the breads, however in the perimeter it seems closed. If you make a transverse cut, you see open holes in the center surrounded by a very closed crumb. I’m wondering if there is something I can do to get a more uniform crumb.
Thank you in advance,
Carolina
Carolina — glad to hear that! Usually dense areas on the outside are from shaping, in my experience. As long as you’re seeing even fermentation throughout and are confident it’s fully fermented, focus a bit on the shaping step (these are challenging!), try not to tighten the exterior membrane of the dough excessively which can degas that area.
I made a mistake that in retrospect I should have foreseen, but it underlines a small confusion the recipe. Obviously, most of it uses bakers percentages, except one key part. Step 2 has you reserve 100 g. of water when preparing the autolyse. However, since I was using half the flour, my mixture ended up being drier than it would have been. And then in Step 2: Mix, when I added the 100 g. of water, it was a mess. The stiffer dough couldn’t absorb the water and I ended up with a lake of milky water and tough, stringy dough floating in it. I had to add more flour to get it under control. Not sure what’s going to happen. In restrospect, when halving, I should have just reserved 50 g. of water for the Mixing phase. Yeah?
That’s correct! Sorry about that confusion, but yes, if you halve the recipe you need to halve everything.
Hi Maurizio, my local french cafe sells half-baked frozen baguettes that we bought in the past (until I learnt to bake my own thanks to you ).
Do you think fully or half/75% baked baguettes are best to freeze? Obviously if not fully baked, I’d throw them in the oven to finish them off. Thanks!
I’ve never done this!
Hi Maurizio, I must congratulate you for this wonderful recipe!! I can’t say that I followed it to a T (only had Bob’s Red Mill bread flour, for example), but I can say with confidence that this is the best baguette I’ve ever had on this side of the Atlantic!! My French husband also agrees ^^
I’m wondering, though, why the crust of my baguettes seems a bit shiny – especially compared to the nice dry-looking crust you achieved. What do you think would have caused this? I was perhaps a bit over-protective and covered my baguettes very well during the last proof. I was bothered by a too-sticky dough when I went to score as well. Otherwise, could it be related to my steam setup? I normally make a hearth love in my dutch oven, so this is one of my first times using steam. I followed your instructions almost exactly – a pan with rags and water, a cast iron I poured water into, and an extra spritz with the spray bottle at the moment of loading the baguettes and 10 minutes later.
Glad to hear that, Olivia! Usually a super shiny crust is from excessive steam in the oven, but I find these actually work well with a heavy dose of steam at the beginning. You could try removing the steaming pans a little earlier to see if this helps!
Hello, what happened to my baguettes. I followed the recipe perfectly and used very active starter. The baguettes turned out extremely flat and dense and had to throw them away.
There are SO many factors that could have affected that. If you are more specific maybe i could help.
I had this same problem with my first attempt. I’m fairly sure it’s not the levain (I successfully make other sourdough breads). The two other potential issues that would lead to flat loaves are 1) not enough warm bulk or 2) overproof, either during the warm bulk or after the final shaping. Correct?
Yes, that’s right. Generally, if you end up with a totally flat loaf I’d lean toward over proofing. A cold bulk fermentation can be difficult to time as it really depends on how the dough is progressing. As long as you use your starter when it’s ripe to make the levain, and then the levain when just ripe to mix into your dough, that should get you on the right track from the get-go. From there, dough temp is very important!
Thank you Maurizio! That makes sense. Is the concept of a “young levain” indicative of the fact that you’re using the levain when it’s still got quite a bit of rise left in it (we’ll before it’s about to collapse), or are you trying to catch *just* before it’s about to collapse?
A photo of how the dough should look right before it goes into the fridge would be helpful!
I know there are so many variables, but in general, how much more fermentation actually happens during cold bulks, like the one in this recipe? Is there a rule of thumb to use, e.g., 12 hours of cold-bulking is about equal to 1 hour of warm bulking?
Hi Maurizio,
I’ve just finished my first bake and I love these baguettes! I was wondering what your knowledge is on “doubling” recipes? In this case I’m looking to quadruple the recipe to make 24 baguettes at once: does this directly “double” the length of time for the leaven to mature, along with drastically increasing the bulk fermentation and amount of folds necessary? My last question has to do with the gumminess of my bread: I have had problems with gummy crumb in most all of my loaves and don’t know what to attribute it to? It happens more often when I’m using local turkey red wheat berries at a higher percentage, but I wonder if it could be due to my starter? Thanks again for all your help so far!
Happy to hear that, Torrey! When using baker’s percentages, as I do here at my site, you can halve, double, triple, etc., with no problem. Just literally multiply the ingredients by 2, 3, … and it’ll work just fine. That’s the point of baker’s percentages (the percentages I have in my tables): you can scale the quantity of everything up or down while the percentages (or ratios) stays the same.
A few suggestions on gumminess:
– If the hydration is too high for your dough it can lead to an overly wet or gummy interior. If the dough feels “soupy” or very “slack” then try pulling back the water percentage by 5% and see if that helps.
– Make sure to bake your loaves completely.
– If your loaf is under proofed then this will typically lead to a gummy or “wet” textured interior. Make sure your starter and levain are very vigorous and strong when you use them. This is very important! From there, make sure to bulk ferment your dough fully (use the images you see in my posts to guide you on what the dough should look/feel like). You want the dough to be alive and aerated before you divide and shape. From there, a full and complete proof is also very important.
I hope that helps!
Thanks for a great recipe, Maurizio!
I’m in the countertop bulk fermentation stage and was hoping to bake them same-day, and I’m at 3.5 hours since mixing the 1-hour autolyse with the levain, salt, and water. I used 95ºF water at all stages because my doughs are generally a bit slower. That said, my starter is very active (2.5x rise in 3 hours) and my levain was also quite active.
3.5 hours post-mix, though, and I’m not seeing great expansion or bubbly from the dough. It’s stored at 79ºF, dough mass is 78ºF. I’m wondering if it’s my flour used. I recently switched to Shepherd’s Grain to source locally, but am having difficulty with their All Purpose flours. Was using King Arthur bread flour before, and it was great. Shepherd’s Grain has low-gluten and high-gluten all purpose flours (Dark Northern Spring Wheat and Hard Red Winter Wheat respectively, plus malted barley in both) – with some experimentation with my boules, I’ve settled on a 50/50 mix of these to get relatively close to the results I was getting with King Arthur’s Bread flour.
So, for these demi-baguettes, I went with – for a half-batch – 264g SG Low-Gluten Flour, 322.5g SG High-Gluten Flour (not including levain).
Thoughts?
You’re welcome, David. Temperatures sound good and it sounds like you’re using a ripe/mature starter, so that’s good as well. It certainly could be the lower protein content of your flour, you wouldn’t see the same strength of course, which would translate to less rise and gas-trapping ability. Have you tried dropping the hydration? If the dough feels too wet you could drop it slightly to see if that helps bring about more strength.
Another approach would be to mix up a stiff levain to use for this, perhaps around 60-65% hydration, and increase the percentage of levain in the recipe by 5% (a lot, but it’s worth a test). The decreased water should bring more strength to the dough while also decreasing extensibility (which we generally want, but if we’re looking for more strength it might help to move in the opposite direction) and the stiff levain should further decrease extensibility due to decreased protease activity in the dough. A few ideas to test next go!
Let me know how this (and next) batch go, if you would!
I have been wanting to make a stiff levain…
Yes, after handling the dough for pre-shaping, I think the hydration is just too high for this mixture of flour I used. Do higher-gluten flours typically absorb less? Still figuring that bit out. Also can’t get protein % from the mill. 🙁
I got them to pre-shape after a 6 hour bulk ferment, so still faster than my normal overnight bulk ferment, but I normally let my boule dough get *super* bubbly and expanded before shaping and refrigerating.
I’ll definite report back once I’ve done another batch! I think these ones will turn out pretty well though.
It’s not a for sure thing that higher protein flour can handle more water, but generally, this is what I’ve experienced.
Sounds like progress at least! Keep at it. I’ve found that sometimes the most challenging flour I’ve worked with has had the best texture and flavor… It’s just a battle 🙂
Well, the baguettes turned out pretty dang great, especially for my first time. No complaints!
Excellent, David! Thanks for reporting back and enjoy (with butter!) 🙂
Hi Maurizio! Thanks for the recipe! The first time I’ve tried the taste was amazing. However, the baguettes had uncontrollable bursts throughout the surface. Any ideas? I might try:
1) Deeper scores
2) Hotter oven
Thoughts?
Also, I found 40min to bake too much. The baguettes were pretty dark. Is it normal? Should I just them less in the oven?
Best,
Mary
Hey, Marilene! Sorry for the delay. It’s likely they were under proofed. Scoring could also be an issue, like you guessed (if there’s not enough of a “weak” area for them to expand into, they’ll just rupture erratically). I’d try proofing them a bit longer, perhaps 30 minutes, and see if that helps! And yes, if they darkened too much, bake for less time or drop the temp midway through the bake. I like to really shock these into springing up with high heat in the beginning, though.
Happy Holidays!
Our Christmas morning tradition is Eggs Benedict, so I started making English Muffins about five years ago. I’ve tried at least a dozen recipes and techniques over the years as I like to have some year round. None of them come out quite the same way as commercial, with the open crumb. Craggy, yes, but the holes just weren’t the same. I tried the Tartine version using the baguette dough and they were very close, but still not quite there. This year, I made a double batch of your baguette formula and used half for English Muffins. They were perfect! Instead of forming baguettes, I rolled it out and cut rounds to place on a baking sheet dusted with cornmeal. Let them proof a bit (maybe 30 mins?), then pan fried in a cast iron skillet with ghee. Just beautiful and so easy. Will try to get a nice pic on Instagram, but only 3 are left!
Thanks for that, Tracey! This is something I grew up with and I’ve had it on my list to do for so long — glad to know my baguette dough will work well for them. I’ll try this soon!
Did you cook them free-form in a pan or inside rings? I’ve seen some use rings to hold their shape while they cook.
Thanks again and sorry for the delay!
Cutting them with a round biscuit cutter, and then free form in the skillet worked fine. The dough holds its shape just fine on its own. I’ve used rings with wetter (almost batter-like) versions, but these are so much better. Next I’d like to try a WW version.
Right on, I’ll cut this was as well — that was my plan. WW would be awesome!
Has anyone tried freezing these after they’re baked? It would be nice to be able to pop the ones I don’t eat tonight into the freezer and then defrost them as needed.
I’ll routinely freeze larger loaves by copiously wrapping them in plastic and then into a freezer bag — it works quite well. However, with these I fear they might get quite hard and develop a super thick crust. It’s worth a shot, though!
Thank you! I undercooked them by about 15 minutes and then froze them, wrapped in plastic and in a freezer bag. Then, I took them out and baked them for about 13-15 minutes at 425 F. It worked quite well!
Right on, glad to hear that — thanks for reporting back on how it worked. Enjoy!
Hey Maurizio, I’m in the process of making these baguettes and just shaped them. For some reason, at the rolling step of shaping I can’t get my dough to roll. It just kind up slides up and down on my countertop. Any ideas?
Sounds like a similar issue to @will_lafleur:disqus , below. You want your counter to have some stickiness/resistance to it, but not so much the dough tears and sticks too much. In my baguette shaping videos, you can see how it slightly sticks but releases with confident motion.
Because your dough is sliding, I would say it’s not sticky enough to slightly tug on the counter. You could try a wood cutting board lightly dusted with flour if your counter is too slippery!
Thanks, we’ll give that a try!
Hey Maurizio, thanks for this incredibly detailed and super fantastic recipe. I made it for the first time and I’ve got a question about the rolling of the baguette into shape: the dough felt great after the cold proof and all the way up to the point of rolling (I even got the folding down pretty well) but when I try to roll it into shape it felt like there was either too much flour and the dough doesn’t roll but rather slithers like a snake and gets longer, with no recoil; or else there is not enough flour and the dough sticks to my surface, preventing any rolling at all (both on my walnut cutting wood board and on the smooth unknown counter-top material). Could it be my technique? Is the dough not quite right? Do I just need a more seasoned board? Thanks!
You’re very welcome! I answered @disqus_El0NQPLYlW:disqus question above, very similar to yours. If the dough is super, super extensible and spreads easily it might be that it’s not strong enough (mixing/kneading/stretch and folds) or it has over proofed. You do want the surface of your work area to be slightly tacky, this is why I love wood so much (I have a Maple board that I lightly dust with flour).
I hope this helps!
Yes, a wood board helped a lot! The dough seems to be acting properly on it, now it’s just a matter of getting the technique…
One last issue, if you don’t mind. I’ve got a new linen proofing couche and even after heavily flouring it, it was still a bit stickier than I’d have hoped. Is it a matter of using the linen more, or perhaps some rice flour will help here, as it does with other loaves?
Thanks!
They do definitely get better and more “non-stick” with use. Until they reach that point, the best approach is to heavily flour it (I use white rice flour) when using. It also is important for your dough to be shaped smoothly and tight enough so it doesn’t easily come apart and lose shape.
Hello Maurizio,
One question for you. What happens if I add my 47g of active sourdough starter to the entire flour and water mix and never create a levain? Is there a taste or texture difference by creating the levain instead of just adding the active starter to the whole mix and creating the baguette/bread that way?
Would appreciate your thoughts on this. Thanks
Nima — you can certainly do this and skip the levain phase altogether. Just be sure to use your starter when it’s mature and ready like you would a levain. After all, when you think about it, a starter and levain are really the same thing (assuming the recipe is using the same flour blend, hydration, and temperatures) 🙂 Happy baking!
Maurizio, the baguettes tasted amazing! The dough was very flexible as I did a fairly long cold proof and short final proof. So please with your recipe and tips. I will definitely be making them again and again as I work on my shaping skills. Thank you!
Super glad to hear that, Conni! Thanks so much for the update on your bake 🙂 Enjoy!
Hi Maurizio!
I noticed that your fermentation times for this dough are, in total, quite low relative to similarly hydrated doughs, i.e. your pizza dough recipe. Is there a reason why the fermentation time on this is significantly shorter or why the initial bulk ferment is only 2 hours?
I’ve been trying to devise a NY style pizza dough recipe, and followed some similar fermentation times and dough makeup as the one listed above, and the dough came out very under proofed.
Would love any thoughts you might have on this!
Hey, Matt! First off, bread dough and pizza dough a two very, very different things. While this dough might seem like it has minimal fermentation time, the cold bulk in the fridge pushes the dough along quite a bit, and the final, warm proof on the counter finishes it off. Bread, like these baguettes, has to rise quite a bit whereas a pizza doesn’t really rise all that much, if you think about it.
Compared to my typical pizza dough, yes, it does have less fermentation time, but again these are two very different things.
For pizza I like to push fermentation time to 2-3 days (I’ve even done 4) and it works just fine. With bread, there’s a lot more riding on the strength of the dough: to rise high and full, the dough really shouldn’t be pushed past ~80% of the maximum fermentation of the dough (this last 20% of rise happens rapidly in the oven as the dough heats).
My suggestion would be to start with a pizza dough recipe and tweak that one to your liking. You can push the proof super far if you’d like, or keep it short. For a NY style, I might keep it at 2 days max and see how that turns out. You definitely don’t want the hydration drastically high with a dough like that, either!
Keep me posted and let me know if I can help.