


Learning how to bake bread in a Dutch oven is the first task many undertake when embarking on their bread-baking journey at home—myself included. Introducing steam in the home oven—a beneficial component in bread baking—can be a challenge, and a sealed pot makes this process simple and unassuming. During the initial stages of baking, steam is released from the dough into the sealed pot, where it is trapped and keeps the dough moist. This humid environment allows the bread to rise high and promotes a crispy and shiny crust.
In this comprehensive guide to baking bread in a Dutch oven, we’ll look at:
- Why using a Dutch oven (like this one, which is my favorite) to bake bread is a good idea (and what it does for your bread dough)
- The baking time and temperature necessary for baking in a Dutch oven
- How to avoid burning the bottom of your bread dough
- Links to my favorite (and high-quality) Dutch ovens
Real Quick: Why Bake Bread in a Dutch Oven?
A Dutch oven helps mimic the environment many professional bakers have in a bakery: a moisture-sealed chamber with intense, (mostly) even radiant heat. The Dutch oven’s thick cast-iron walls provide ample thermal mass, ensuring a temperature-stable baking environment. Additionally, the sealed interior traps steam, a beneficial component of baking bread. Moisture in the oven during the early part of baking allows your bread to rise fully, deepens the crust color, and finally adds a level of shine to the exterior.
Video: Watch Me Bake Bread in a Dutch Oven
Here’s a quick video showing how I use a Dutch oven in my kitchen to bake sourdough bread:
How To Bake Bread in a Dutch Oven, Step by Step
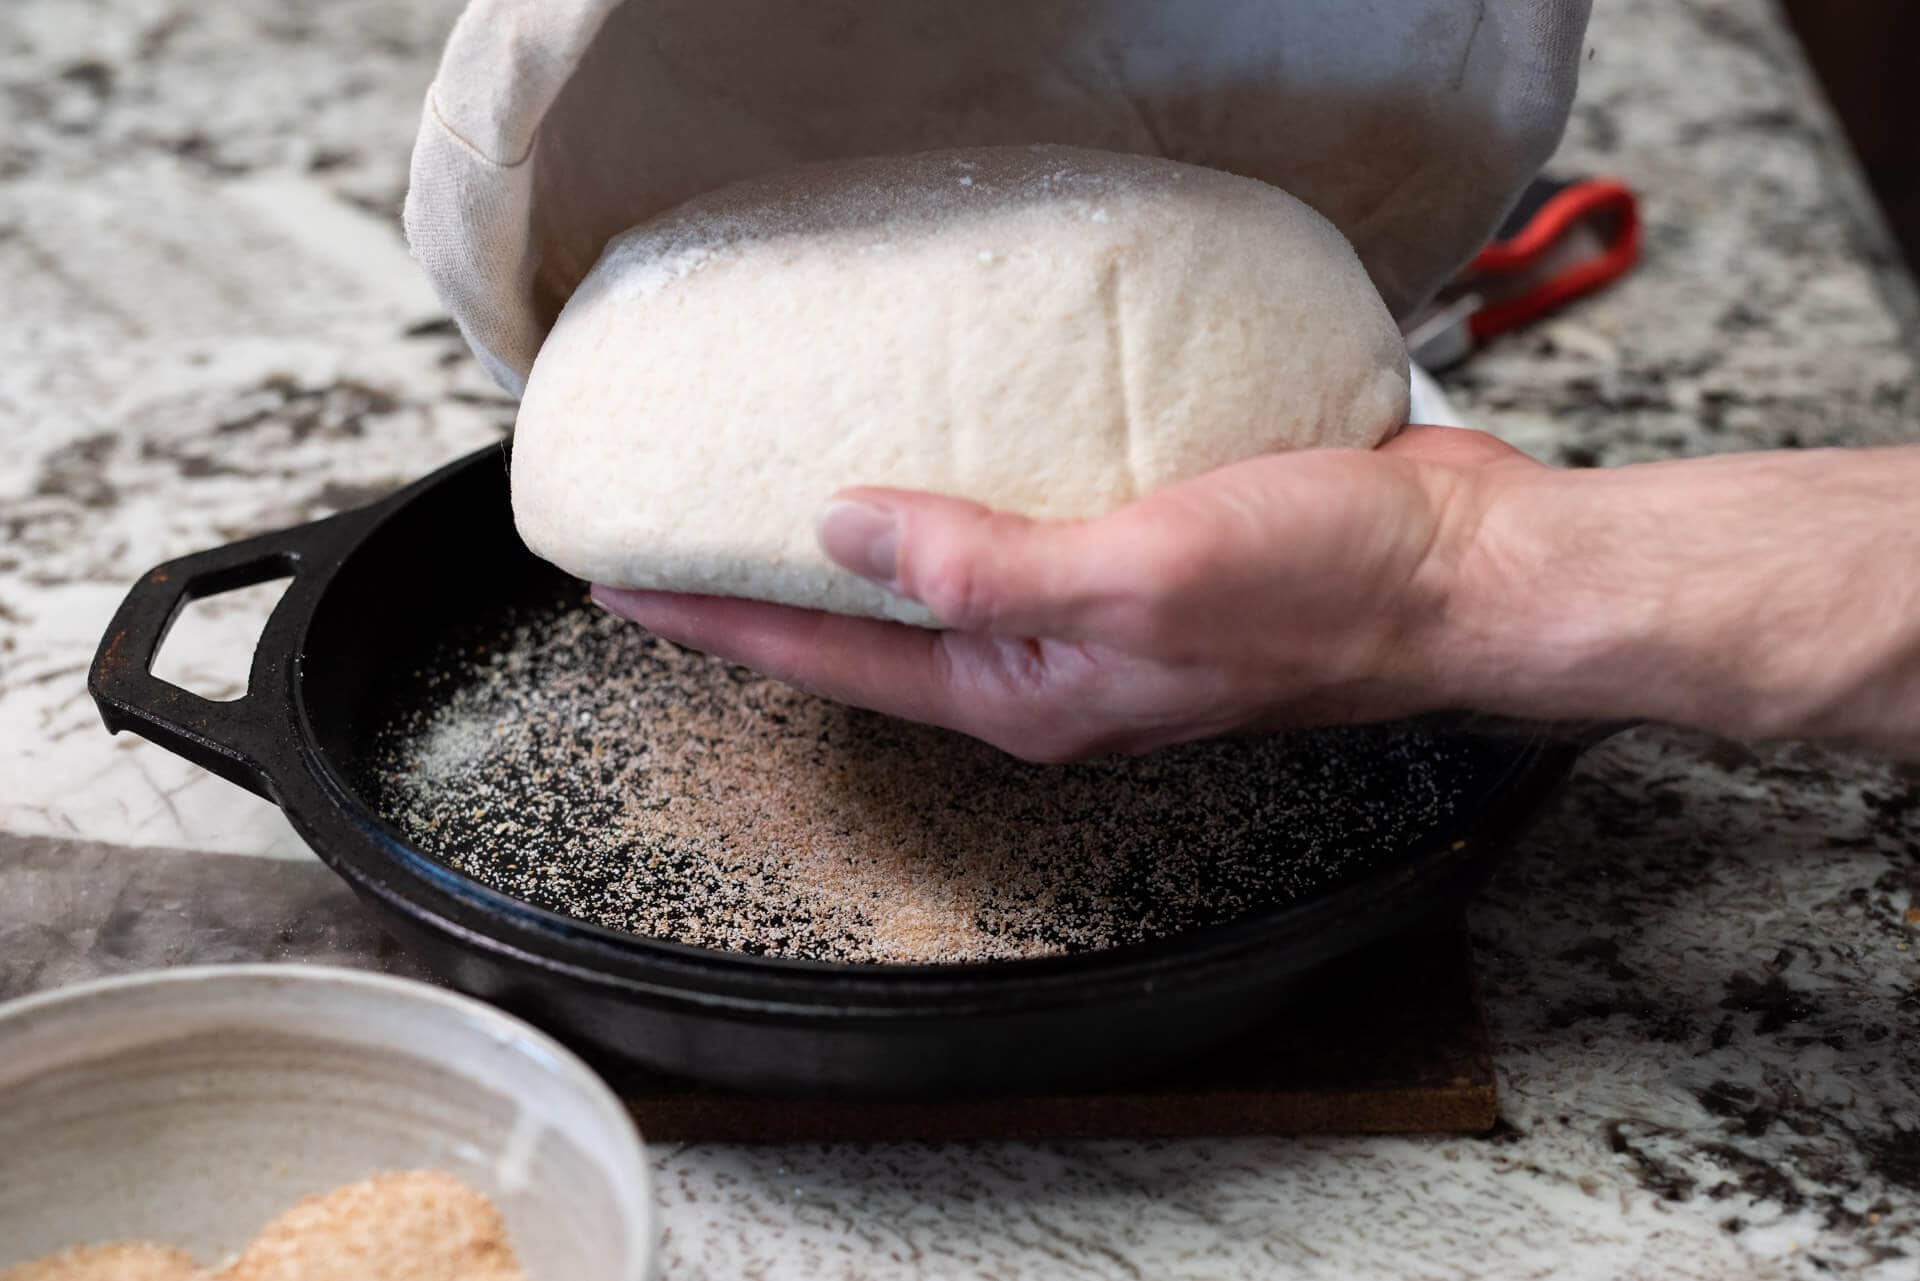
My method for baking bread dough in a Dutch oven:
- Preheat your home oven to 450°F (230°C) with a Dutch oven inside for 30 to 45 minutes
- Line a pizza peel, inverted baking sheet, or cutting board with parchment paper
- Turn out your proofed bread dough onto the parchment paper (trim the paper to fit, if necessary)
- Score your dough
- Slide the parchment paper with the dough into your preheated Dutch oven and return it to the oven
- Cover with the lid and bake for 20 minutes, covered
- After 20 minutes, remove the lid from the oven and continue baking per the recipe (typically 25 to 35 minutes)

When finished, a free-form loaf should have an internal temperature of around 206° to 208°F (96° to 97°C) when fully baked.
As with most things in baking, you might have to adjust the baking duration and oven temperature to suit your environment. See my guide to baking bread at high altitude if you’re a high altitude baker.
Should I Preheat a Dutch Oven When Baking Bread?
Yes, I always preheat my Dutch oven before baking bread dough inside. I’ve tested using a cold Dutch oven, and I don’t get the same oven spring or final loaf volume as when I bake bread dough in a preheated Dutch oven.
How To Remove Your Baked Loaf From a Dutch Oven
When your loaf is finished baking, use a pair of oven-safe gloves to carefully reach down into the pot to remove the bread. The crust will be fully hardened off by this time, so there’s no worry of collapse.
Additionally, if you baked your bread dough in the Dutch oven on a piece of parchment paper as I recommend here, you can lift the corners of the parchment to remove the baked loaf.
Why Bake Bread in a Dutch Oven (Or Any Sealed Pot)
A Dutch oven helps increase loaf volume
Without steam in the oven during the first part of baking (when oven spring occurs), the rapidly expanding dough quickly forms a hard crust on the exterior. This early crust formation limits optimal oven spring and reduces overall loaf volume, resulting in a squat, dense loaf.
Conversely, when you provide adequate steam, the exterior of the dough remains moist and supple, allowing it to expand and stretch further before starches gel and the crust hardens and sets.
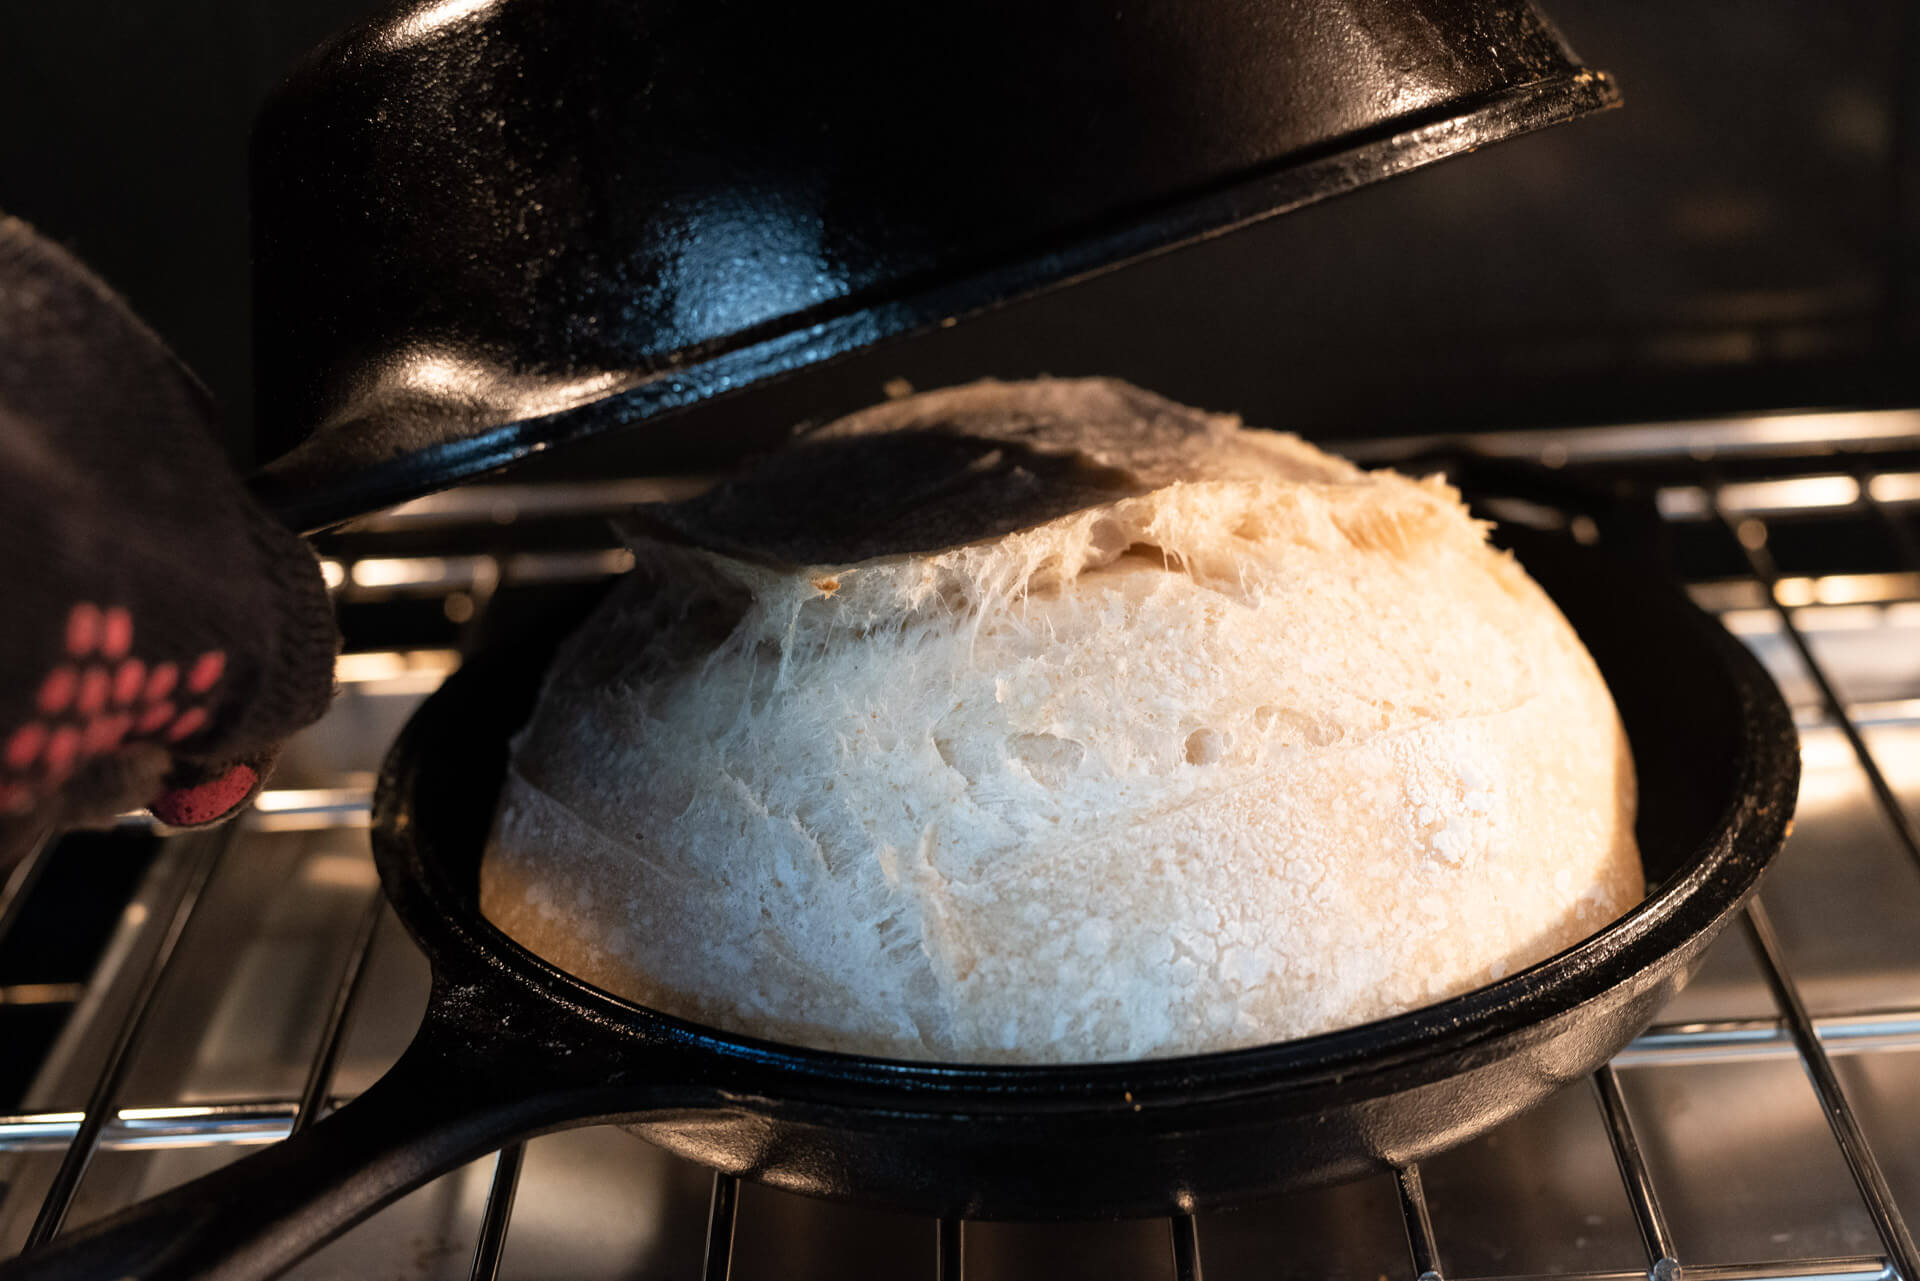
It doesn’t require much steam to provide benefit. When the pot is sealed during the first 20 minutes of baking, the moisture escaping from the dough provides the right environment to encourage optimal loaf volume.
Use a Dutch oven for a deeply colored and shiny bread crust
There’s little as elegant as a crust that’s well-colored with a gradient from almost-white to a deep mahogany—the contrast is striking. Add to this a subtle catch of light and shininess: your mouth starts watering even before the intoxicating aroma surrounds you.
As Jeffrey Hamelman states in his book BREAD, the reduced temperature on the exterior of the loaf allows the enzymatic activity to continue for longer. This activity, which has been happening throughout the entire fermentation process, continues to “unlock” sugars that contribute to crust color during baking.
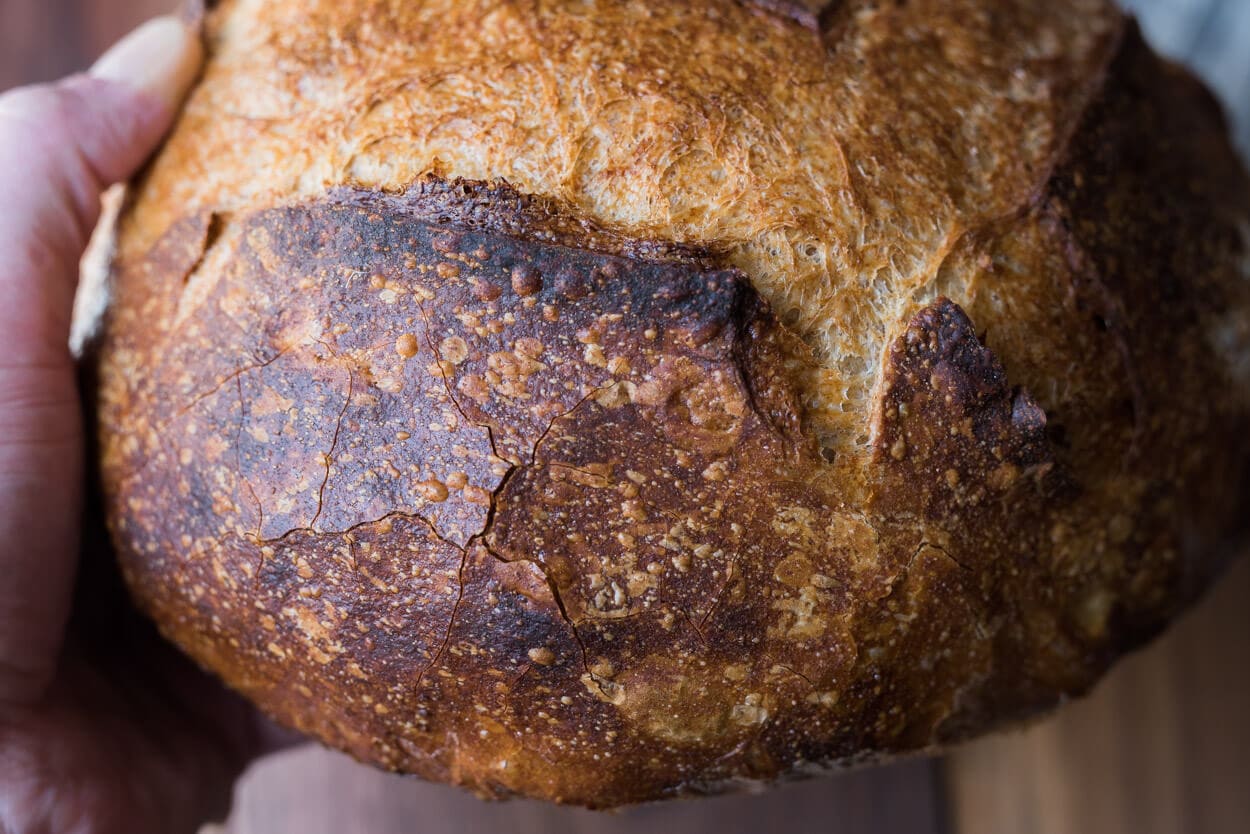
A well-steamed oven also promotes starch gelatinization: in the presence of heat, starch molecules on the exterior of the dough begin to absorb available moisture (hello, steam), start to swell, and eventually pop to form a thin liquid layer (starch gel). This layer finally bakes hard, forming a thin, crispy exterior with a subtle shine.
As we discussed earlier, steam in the Dutch oven’s closed environment settles on the outside of the dough, forming a thin layer that prevents the temperature from rising too quickly. This helps ensure the exterior of your loaf doesn’t darken before you finish baking the interior.
With all these benefits, baking in a sealed pot is a good idea. However, there are some issues with the method, the biggest being a thicker and possibly burned bottom crust. Let’s take a look at a few ways to help mitigate this issue.
How To Keep The Bottom of Your Bread From Burning
In my experience, baking in a Dutch oven typically produces a slightly darker bottom, even with the suggestions below. However, using one or more of these will significantly reduce this darkening.
My methods for ensuring the bottom of my loaf doesn’t burn when baking in a Dutch oven:
- Do not bake bread dough inside a Dutch oven on top of a baking stone
- Reduce the oven temperature during preheating
- Insulate the bottom of the Dutch oven with a baking sheet, baking stone, or even a single sheet of aluminum foil
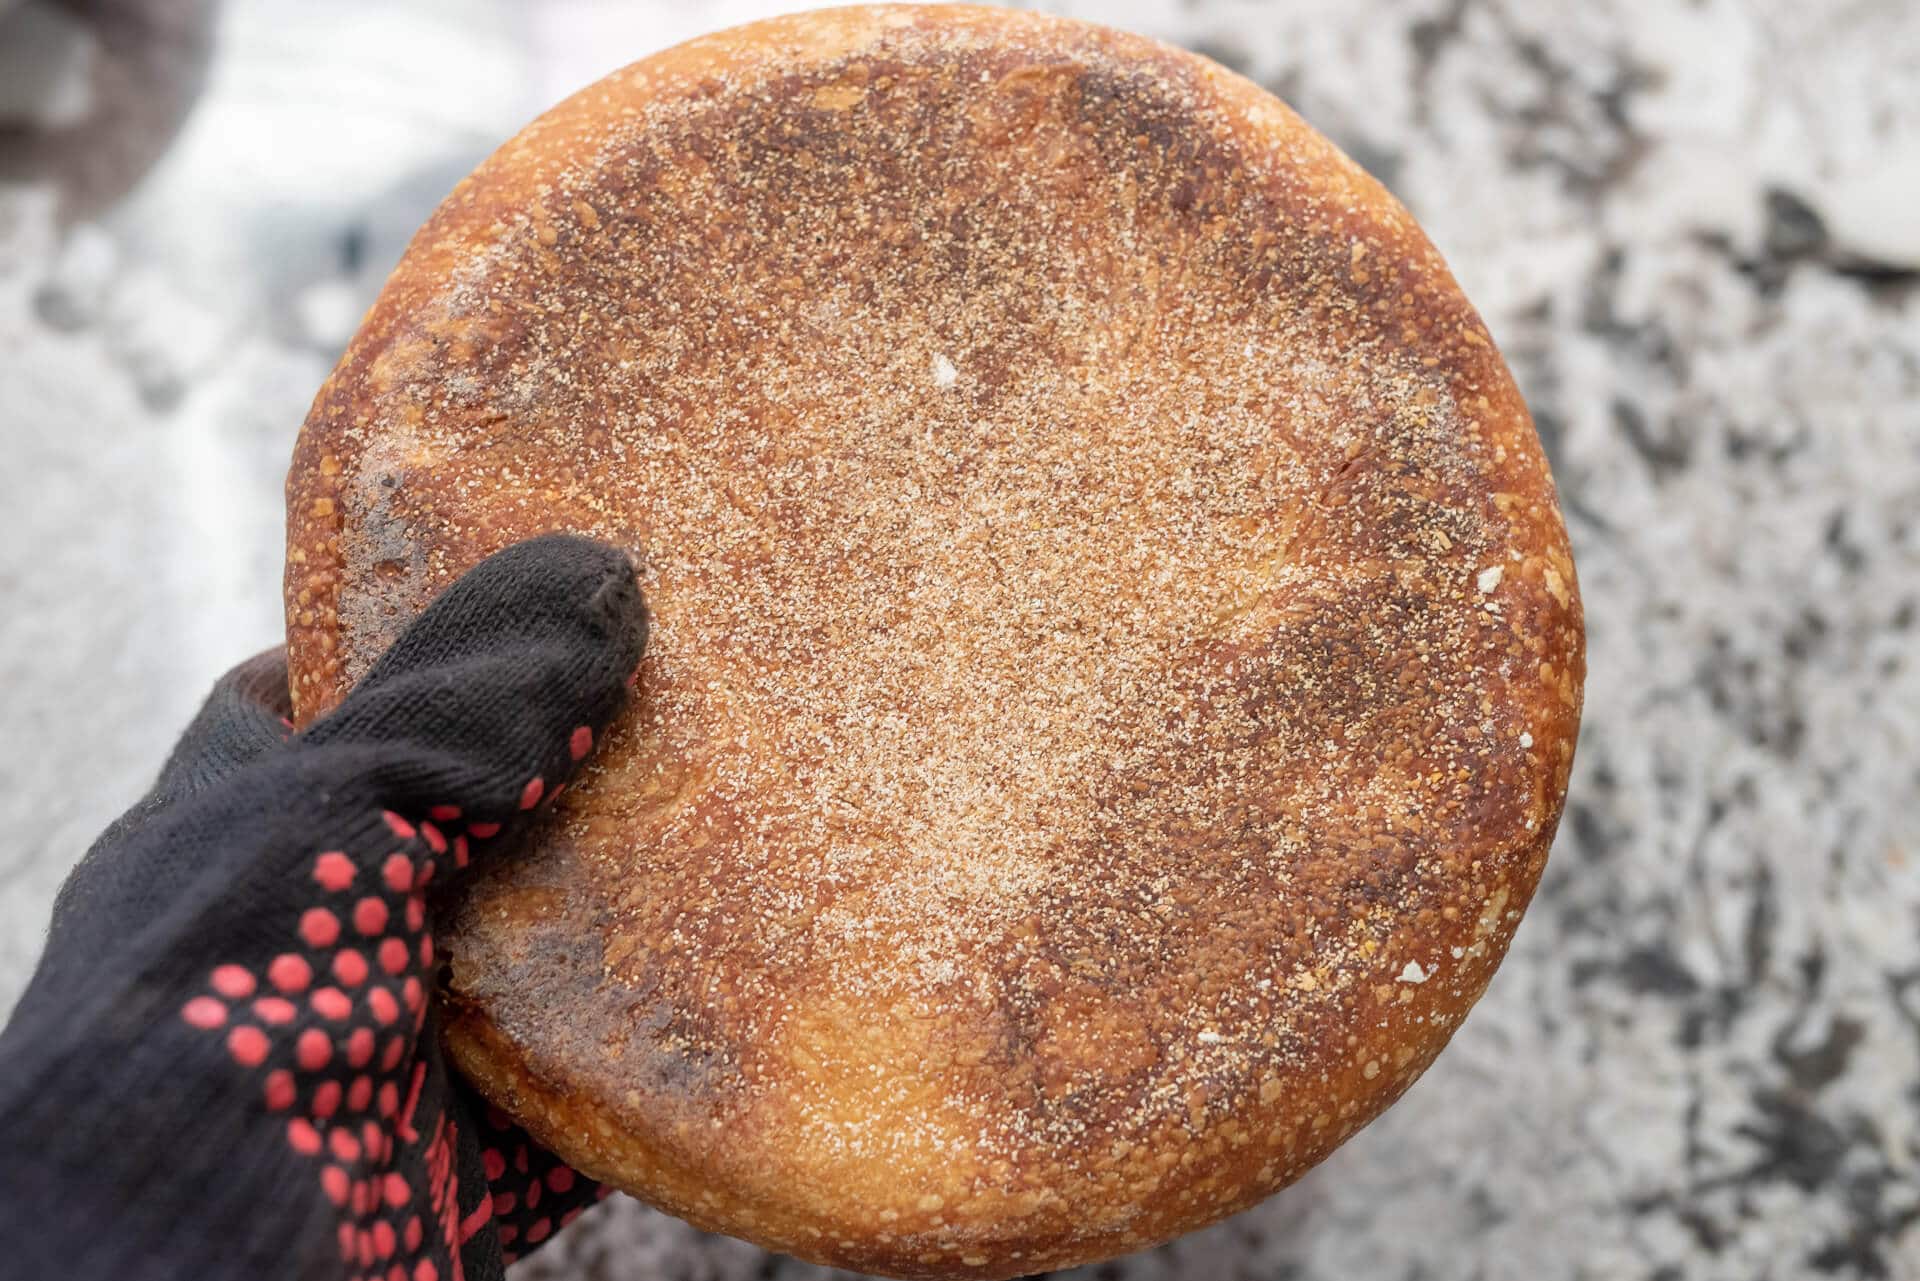
- Add coarse cornmeal or wheat bran to the Dutch oven before adding your dough
- Use two pieces of parchment paper below the dough
- Remove the dough from the Dutch oven when it’s almost finished baking
Let’s look at each method to help prevent bread dough from burning.
1. Do not bake bread dough inside a Dutch oven on top of a baking stone
The first important thing is to ensure you are not baking with your Dutch oven on a baking stone, or even better, a Baking Steel. When the oven has finished preheating, the stone and the cast-iron pot will be far too hot, resulting in scorched or burned bread.
2. Reduce the oven temperature during preheating
The first approach is to modify your baking temperatures. If you find the bottom crust is burning or becoming too thick, reduce the preheat temperature. For example, some of my recipes here call for a 45-minute preheat at 450°F (230°C); you could reduce it to 425°F (218°C).
3. Insulate the Dutch oven with a baking sheet or stone
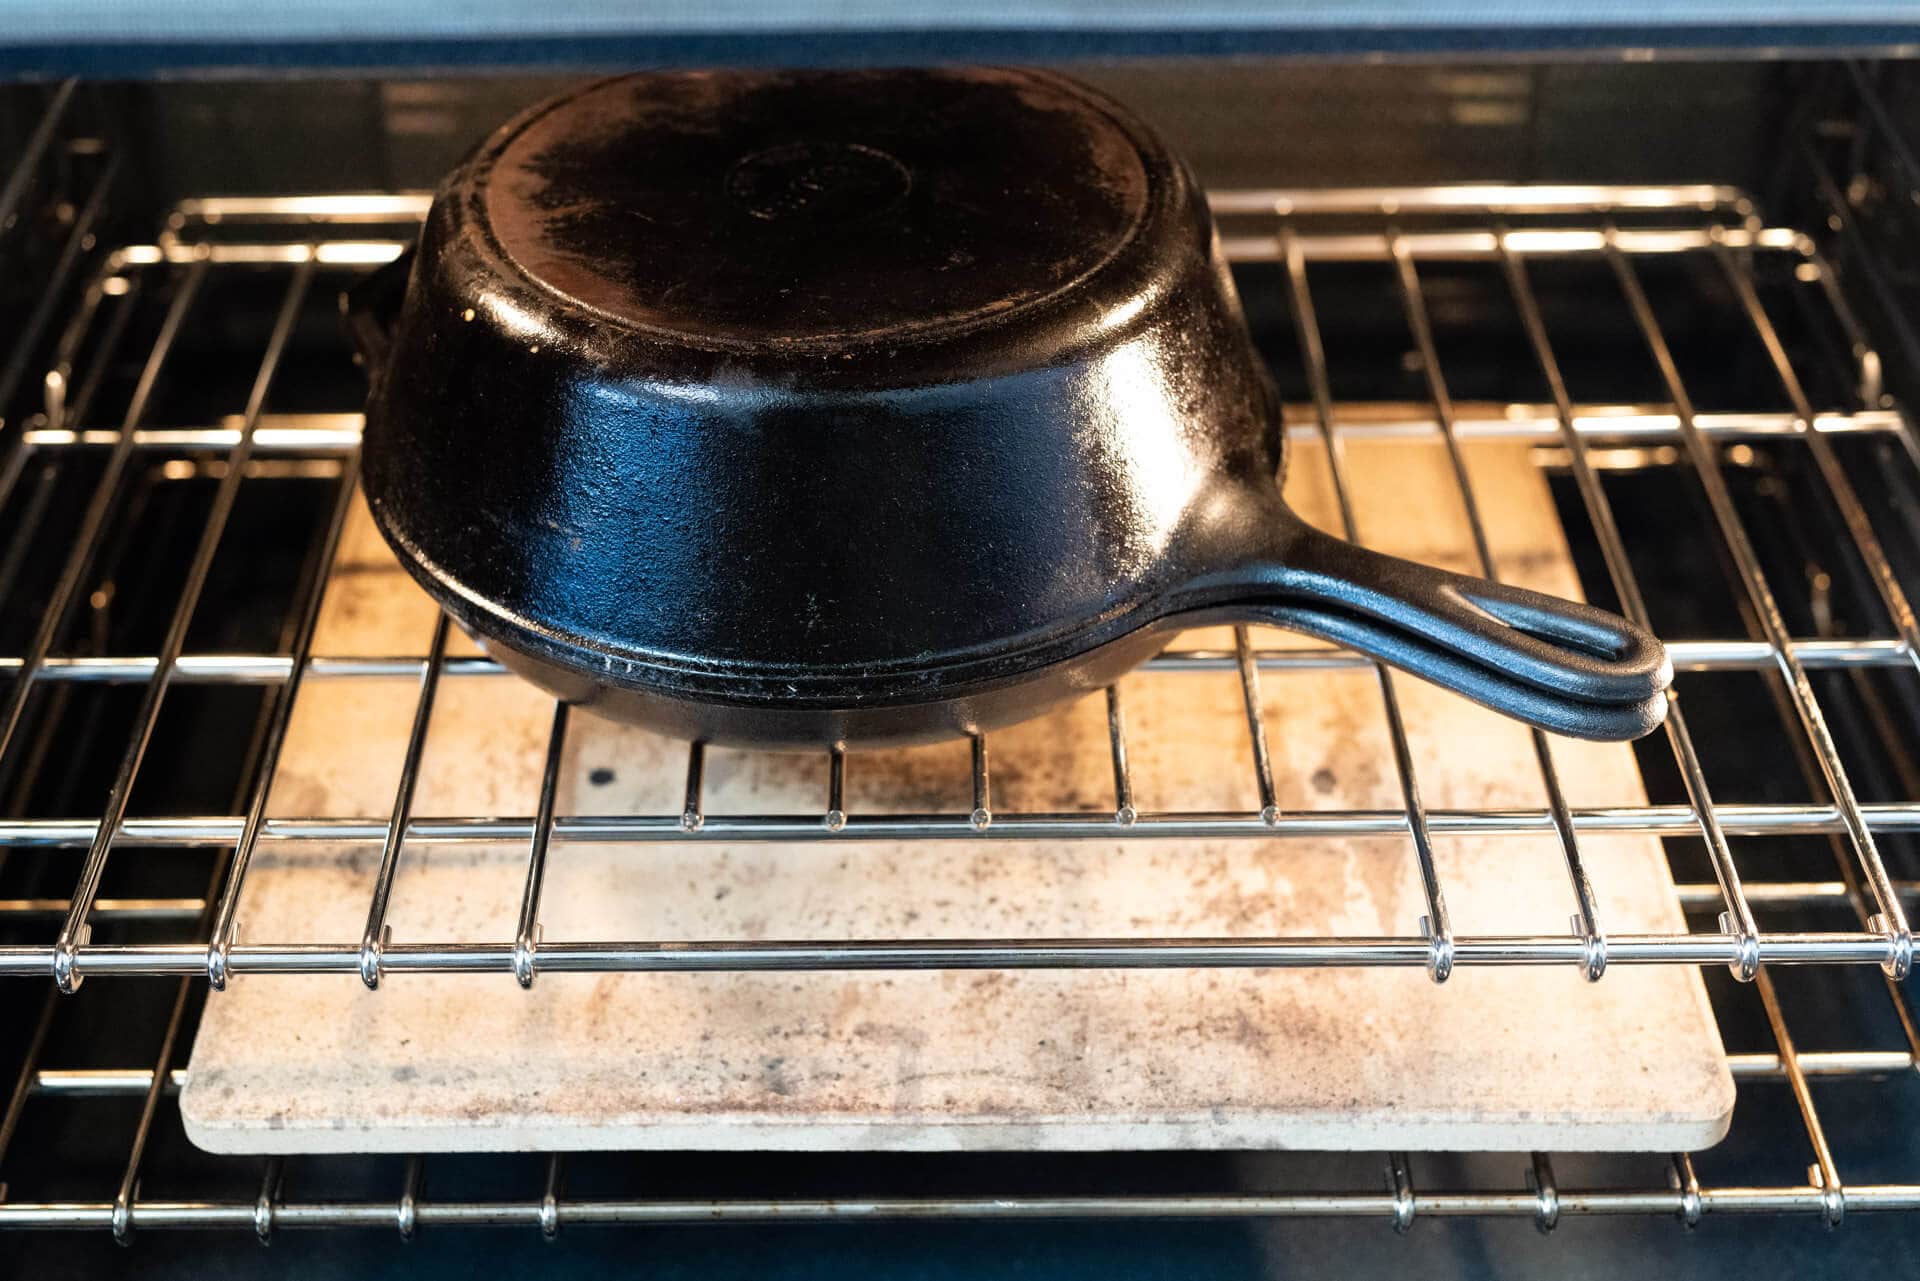
Most ovens have a bottom heating element that can provide far too much heat on the bottom of your dough, especially if you place the rack too close. An insulator, such as a baking sheet or stone, can provide enough thermal mass between the heating element and your dough. This will help insulate your dough when the heating element kicks on, which happens often.
Place a rack on the bottom of your oven, and then place another one or two rungs above that. Place your baking surface on the bottom rack. Then, use the rack above to hold your Dutch oven when baking.
Additionally, a thin aluminum baking sheet, or even a single layer of aluminum foil, placed underneath the Dutch oven will help reflect most of the infrared heat from the bottom of your home oven.
4. Use coarse cornmeal or wheat bran
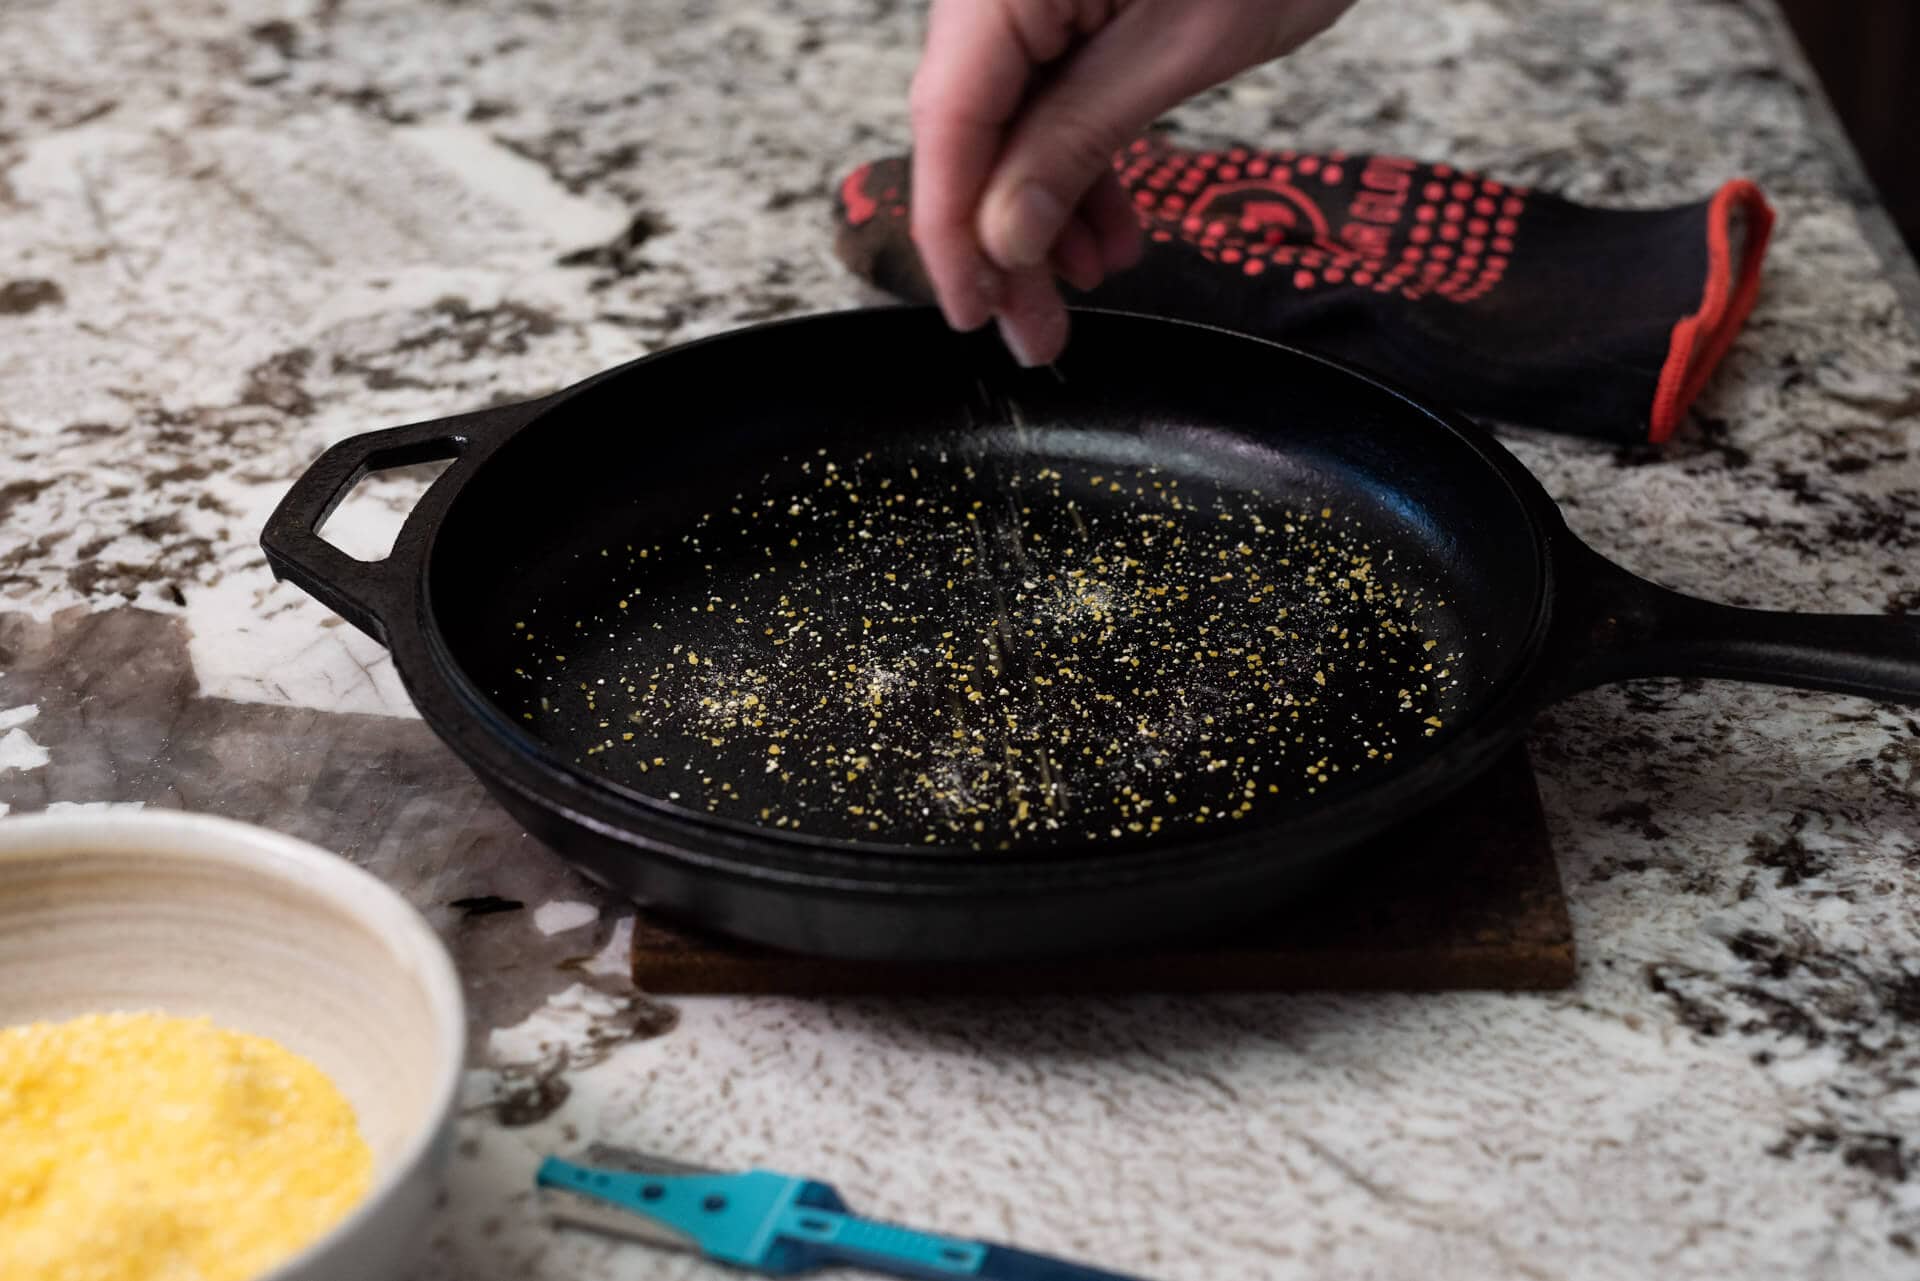
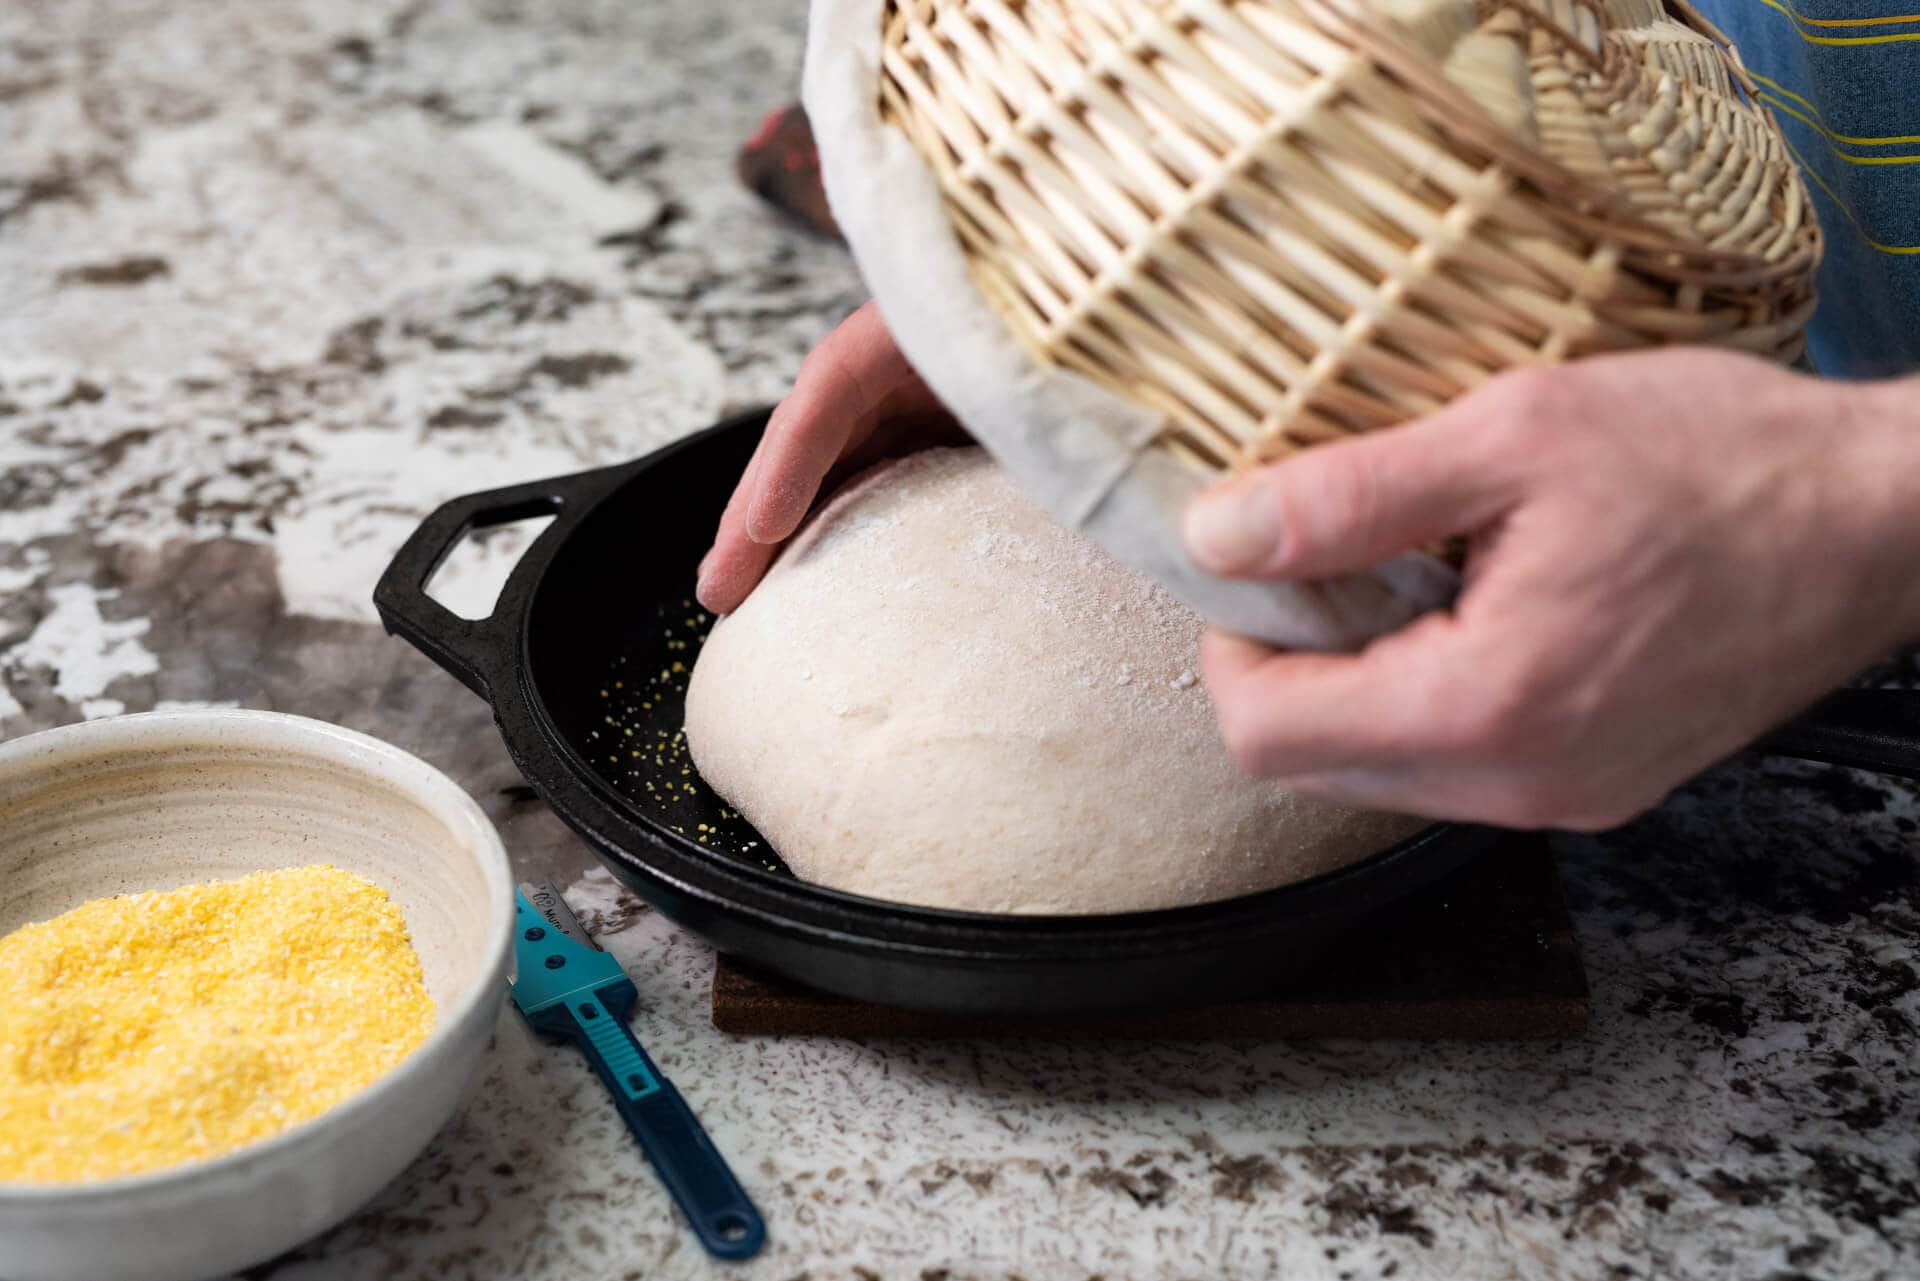
Coarsely ground corn (polenta or corn grits) works exceptionally well to provide a thin layer of insulation between your dough and the Dutch oven. This layer helps keep the dough from sticking to the cast iron while also lifting it to prevent burning.
Sprinkle a generous amount of coarse corn onto the preheated pan just before turning your dough onto it to score. Cover the pot with the deep end and center it over your baking stone insulator, as shown above.
If you frequently mill your own flour and have a sifting screen, save the wheat germ or bran you sift out. These coarse particles (which you can always add to the dough later) perform a similar function to the corn.
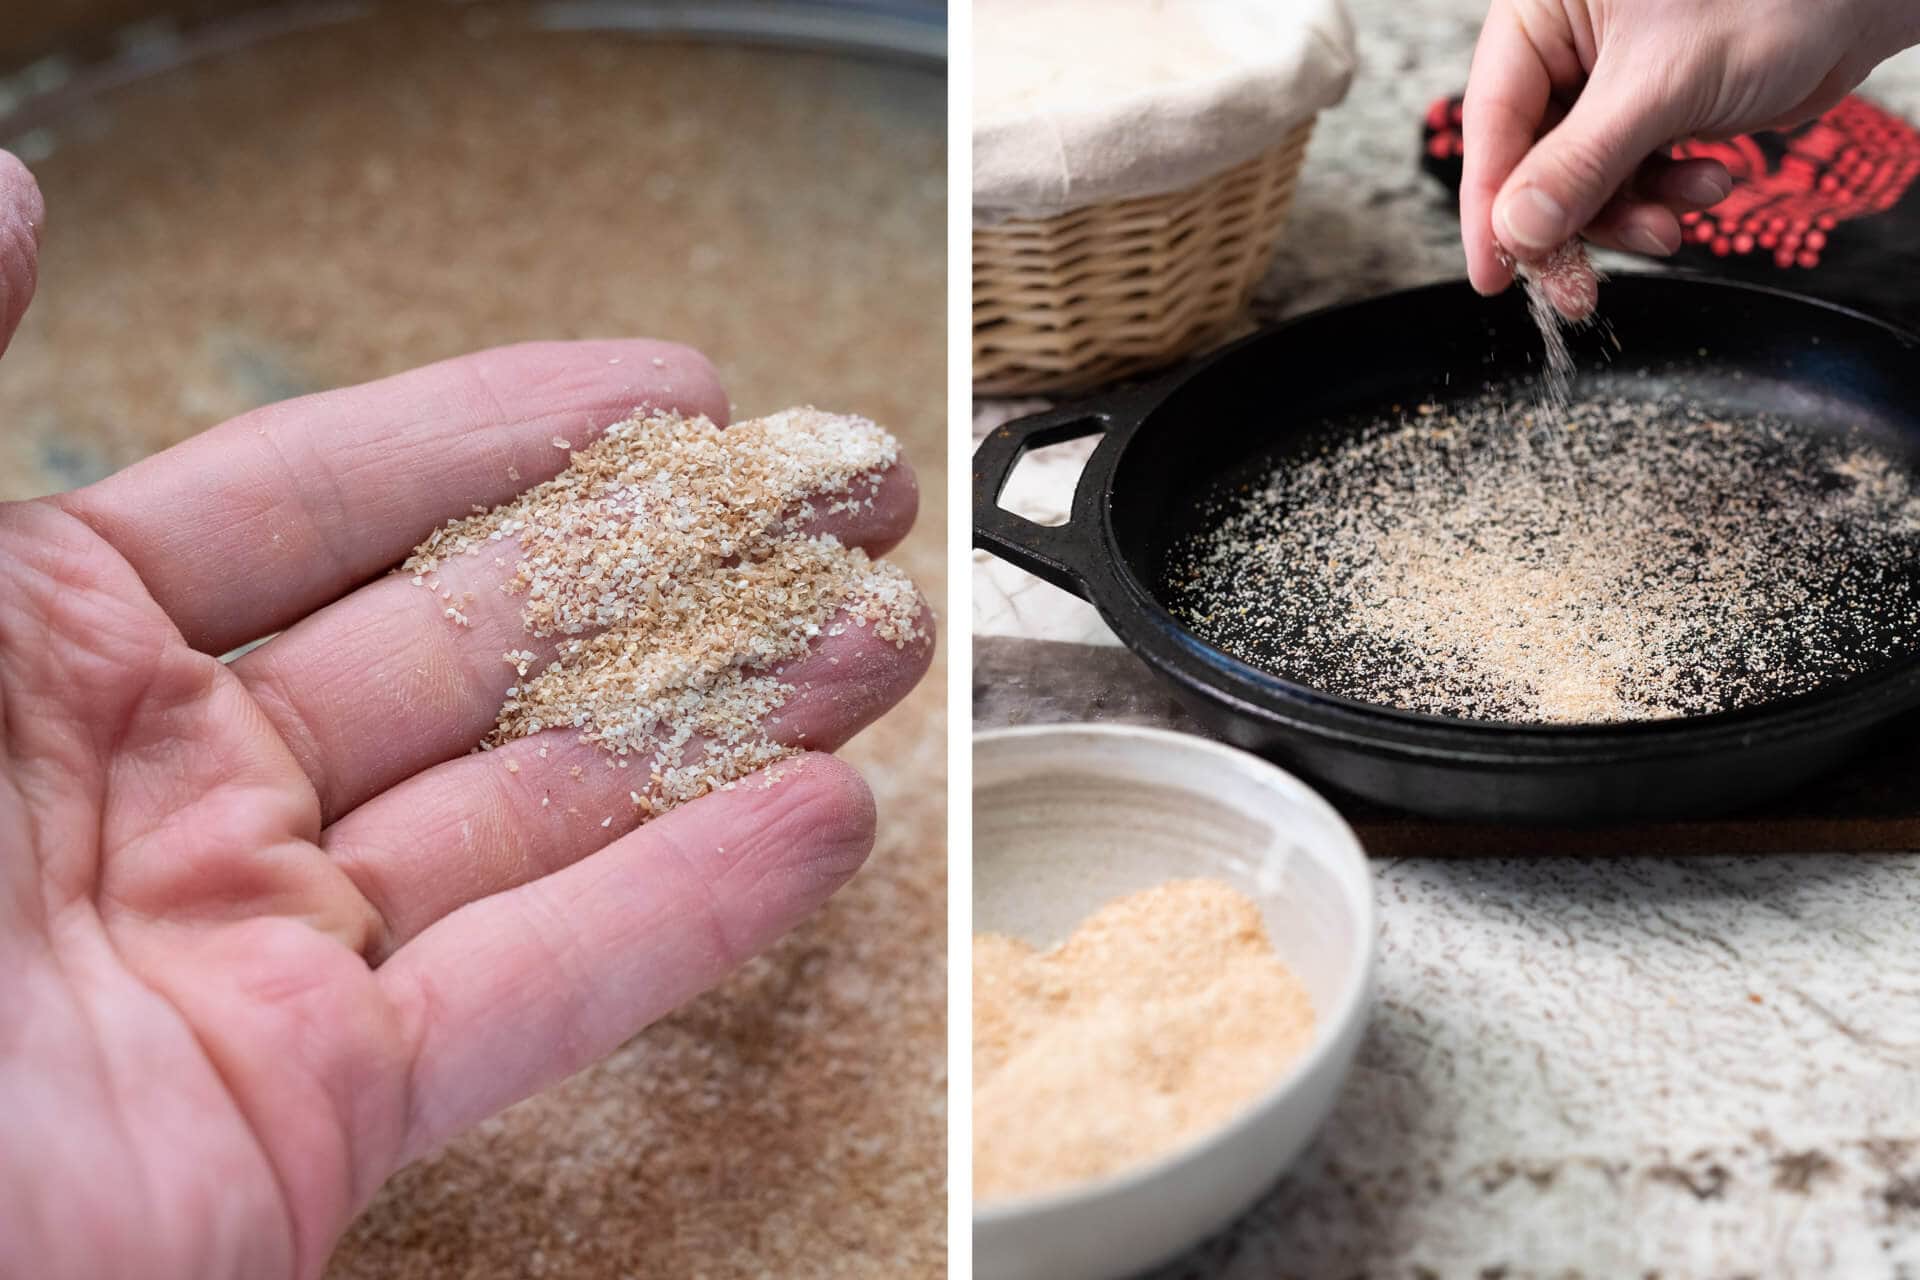
The image above shows the large germ/bran particles I’ve sifted out with my sifting screen. The fine, high-extraction flour falls through my screen into a bowl that I can add when mixing my bread dough. Then, I collect these larger bits to either add to the dough as porridge or use to coat the bottom as insulation.
Bake on two pieces of parchment paper to help prevent burning
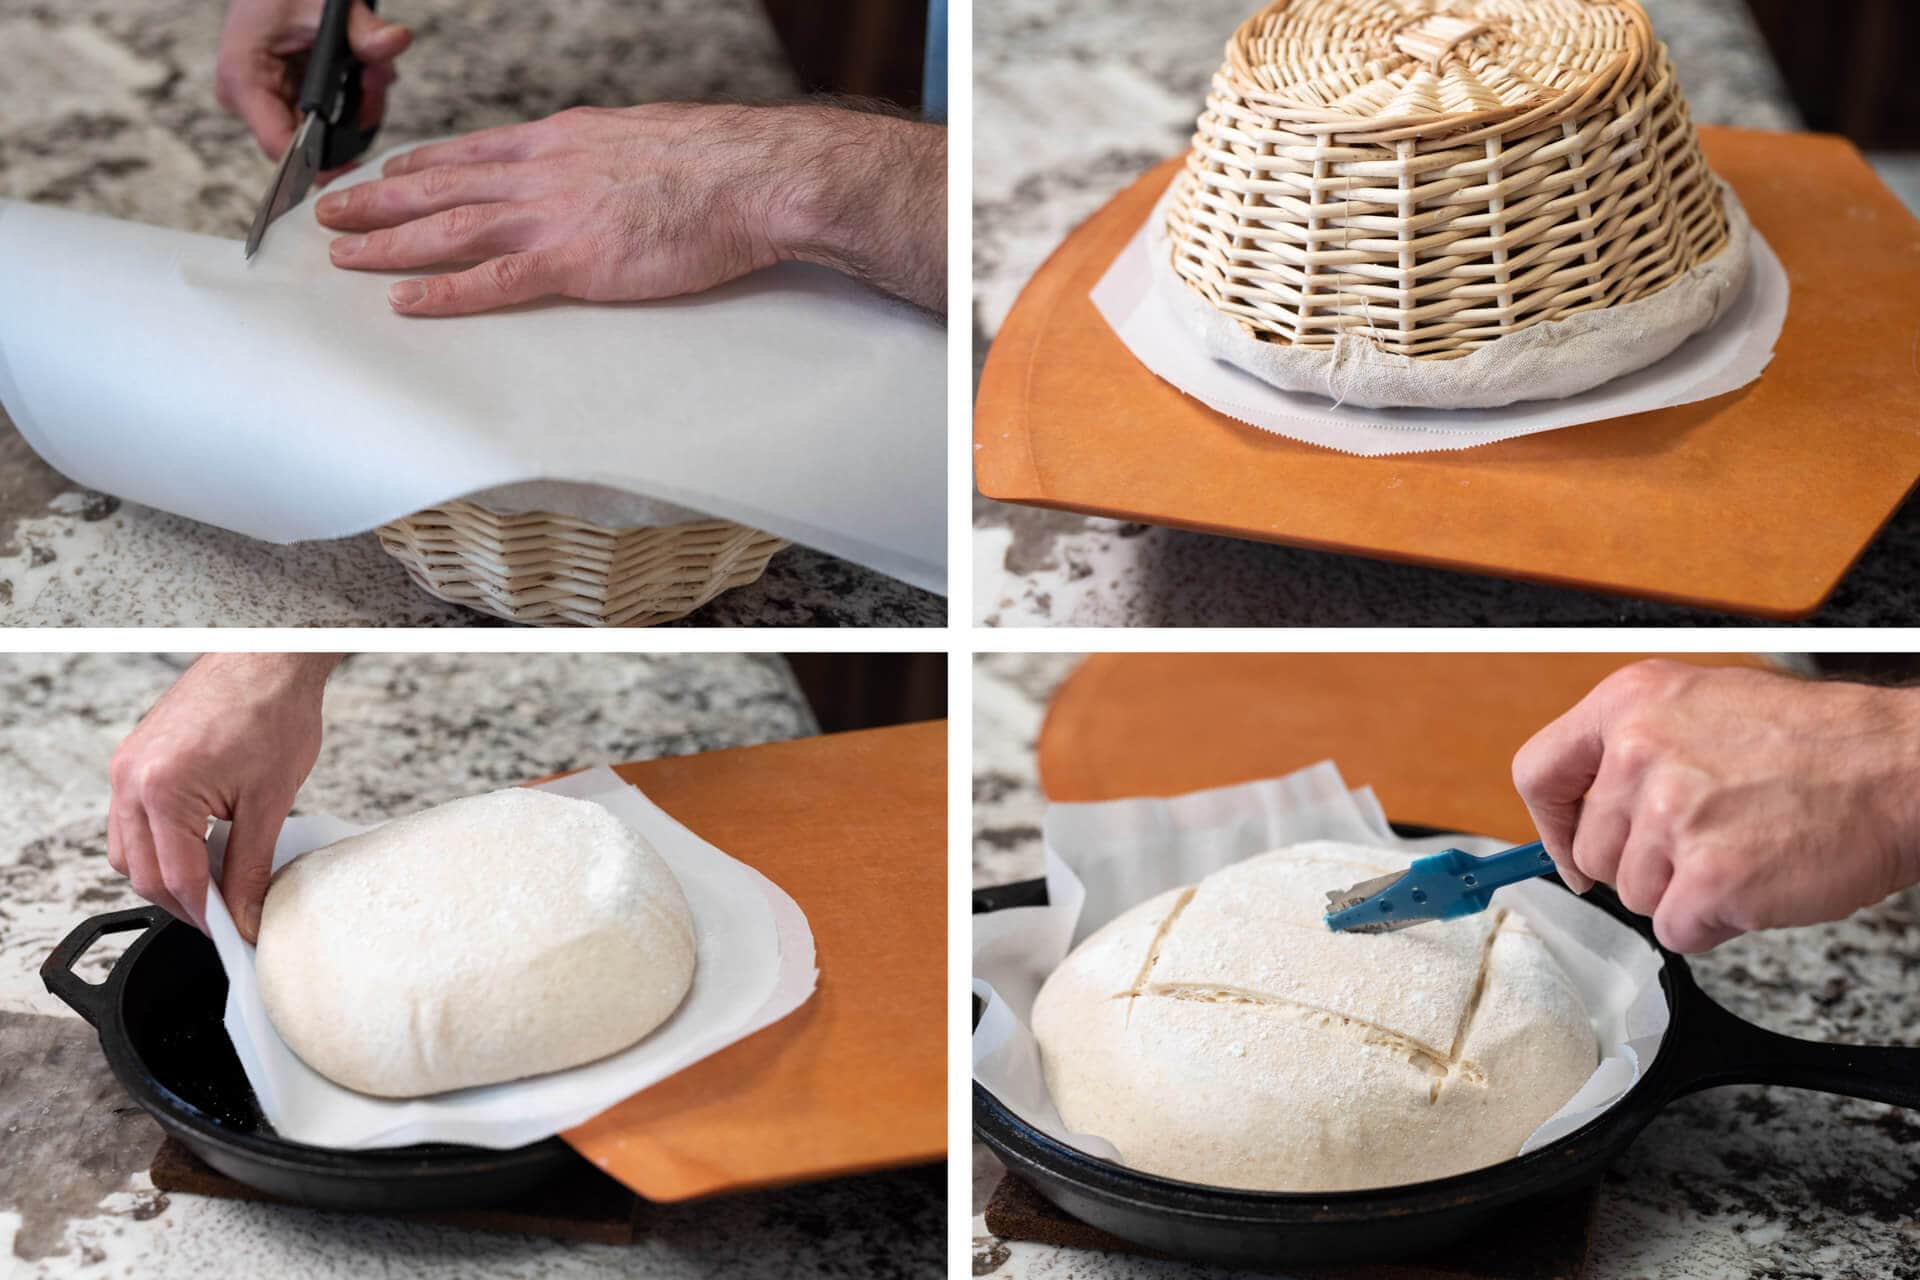
As you might have noticed in my Beginner’s Sourdough recipe, I typically use parchment paper (I love this natural, non-stick option) to help drag dough into the blisteringly hot Dutch oven. As I describe in that recipe post, lay a sheet of parchment paper over your proofing basket containing the dough, and cut it to fit. Invert the basket on a pizza peel, slide the parchment into the preheated Dutch oven, score the dough, and bake.
In this approach, you will follow the same process as before, except you’ll layer two pieces of parchment on top of each other to help further insulate the dough.
Additionally, you can sprinkle coarse corn (as discussed above) into the pan before you drag it into the parchment holding your dough. The corn will not stick to the dough, but it will help further insulate it and prevent burning.
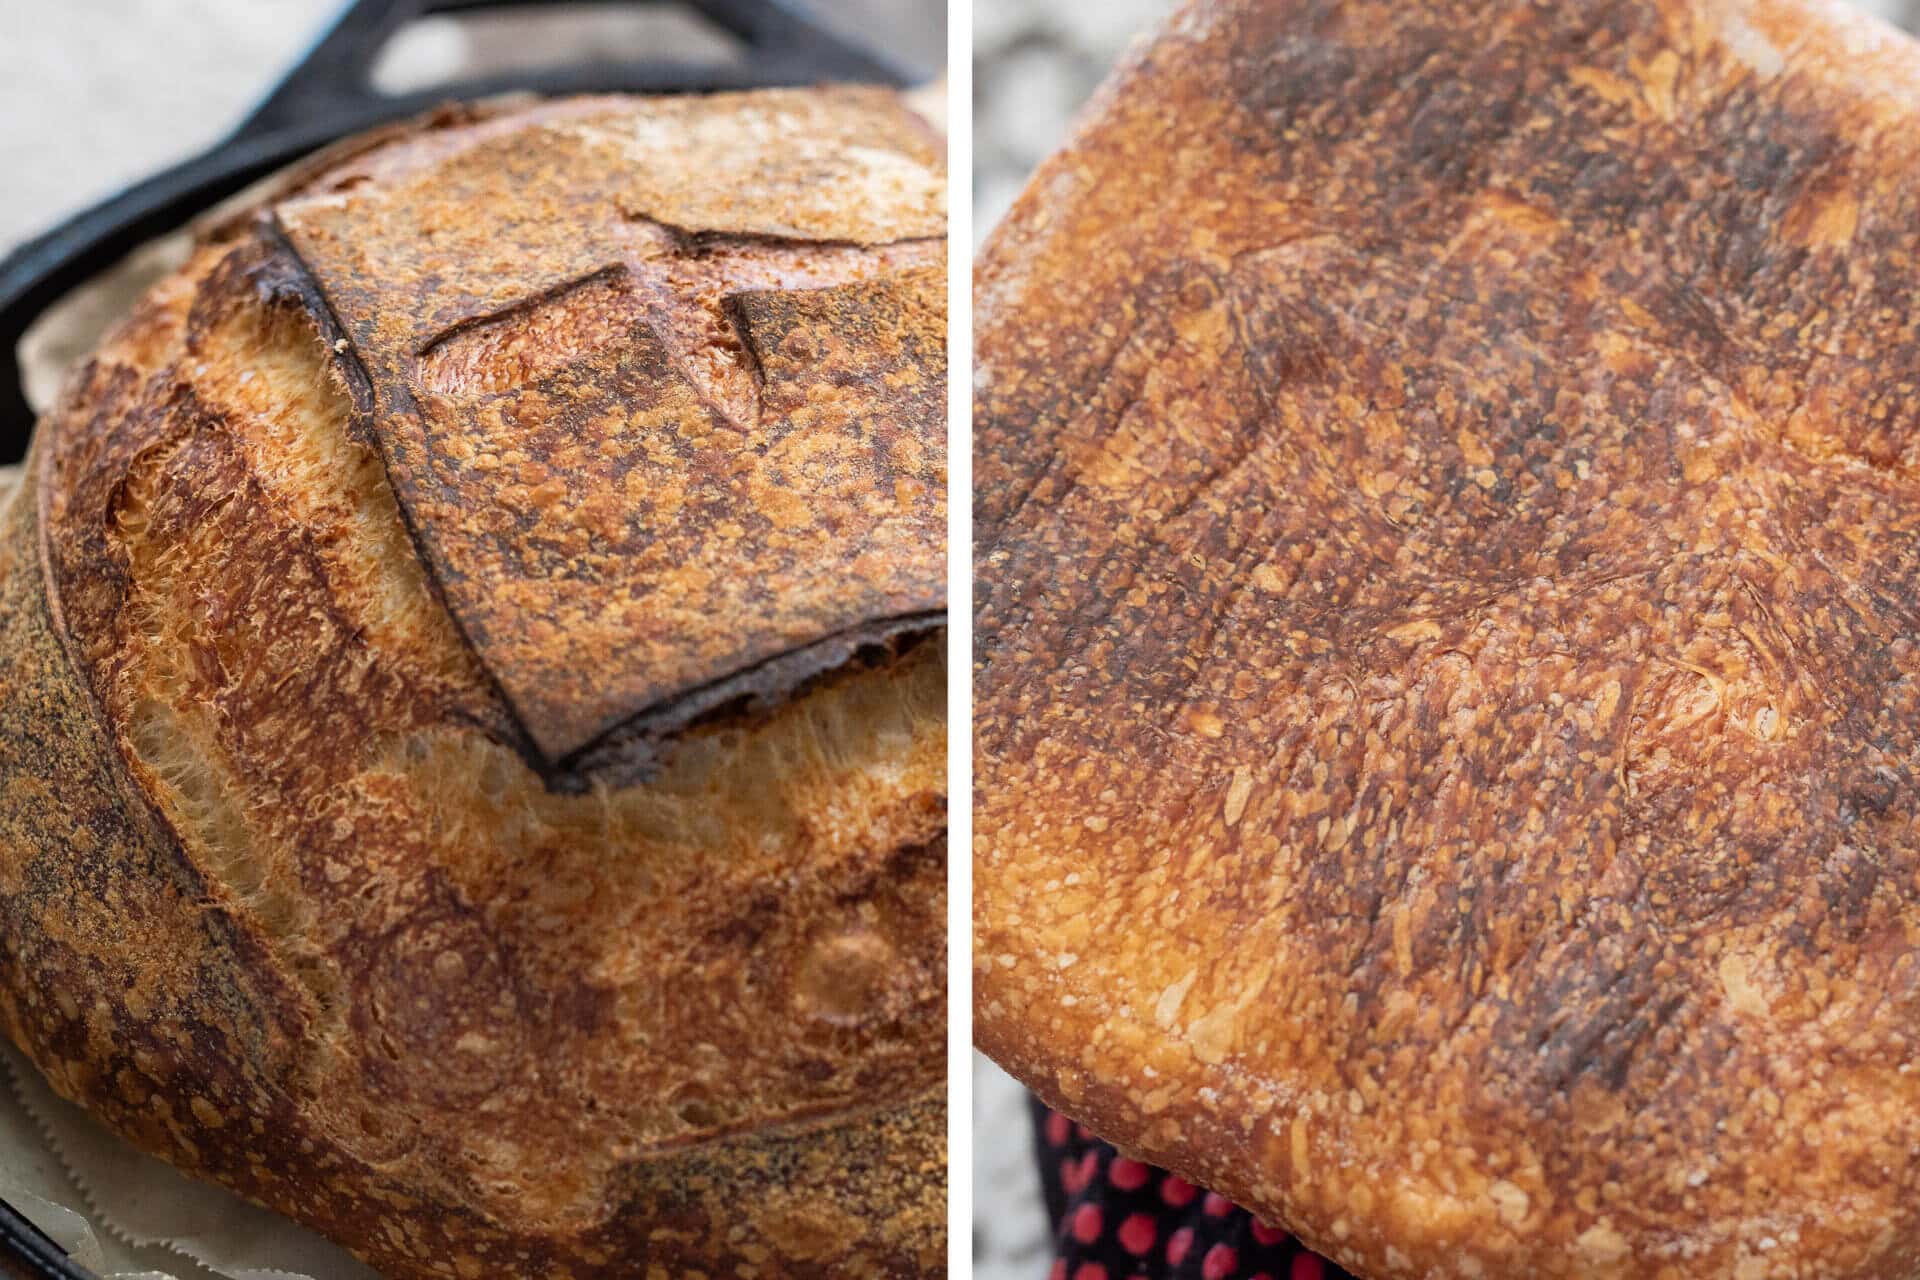
To prevent burning, remove the dough from the Dutch oven when it’s almost done
Another method to help prevent burning your bread dough in a Dutch oven is to remove it once the crust has set, about 30 minutes into baking. This means the dough has baked for 20 minutes with the lid on (and with steam), then uncovered and baked for another 10 minutes.
By this time, the crust should be a pale golden brown and sturdy enough to gently lift the dough from the Dutch oven to finish baking on the oven rack.
Additionally, remove both sides of the Dutch oven and the parchment paper at this time and continue baking until done.
Recommended Dutch Ovens and Combo Cookers
There are many types of Dutch ovens (lidded pots) and combo cookers out there, made from a range of materials, shapes, and sizes, and at varying quality levels. Any Dutch oven or combo cooker will work for baking bread if it’s oven-safe up to 450°F (230°C) and has a tight-fitting lid.
The following is a list of my favorite Dutch ovens for baking bread. I’ve used the following pots for years, and they’ve helped me make countless loaves of sourdough bread.
Note that some pots cannot be preheated empty, so check with the manufacturer if you are unsure.
3.2 Quart Lodge Combo Cooker
| Maximum dough weight | 900g |
| Material | Cast iron |
My favorite Dutch oven (or combo cooker, as Lodge calls it) is the Lodge 3.2-quart cast-iron combo cooker. I’ve been using the same combo cooker since I started baking bread many years ago, and it still looks new. It’ll likely last a lifetime.
This pot is extremely versatile, and I use it for a myriad of other kitchen tasks besides baking bread. I frequently use it to make the wonderful Tartine French toast and crispy-bottomed sourdough cinnamon rolls, and the deep end makes a mean roast chicken.
I’ve comfortably fit bread dough sizes from 500g to 900g in the pot. As with all cast iron, keep it seasoned.
The Dutch Oven Is Heavy. Is There A Lightweight Option?

Instead of using a heavy pot to bake your sourdough bread, the new Baking Shell is a metal cover that traps steam and weighs just over 1 pound! If you struggle to move your Dutch oven in and out of the oven, the Baking Shell is perfect for you.
How Do You Bake Bread Without a Dutch Oven?
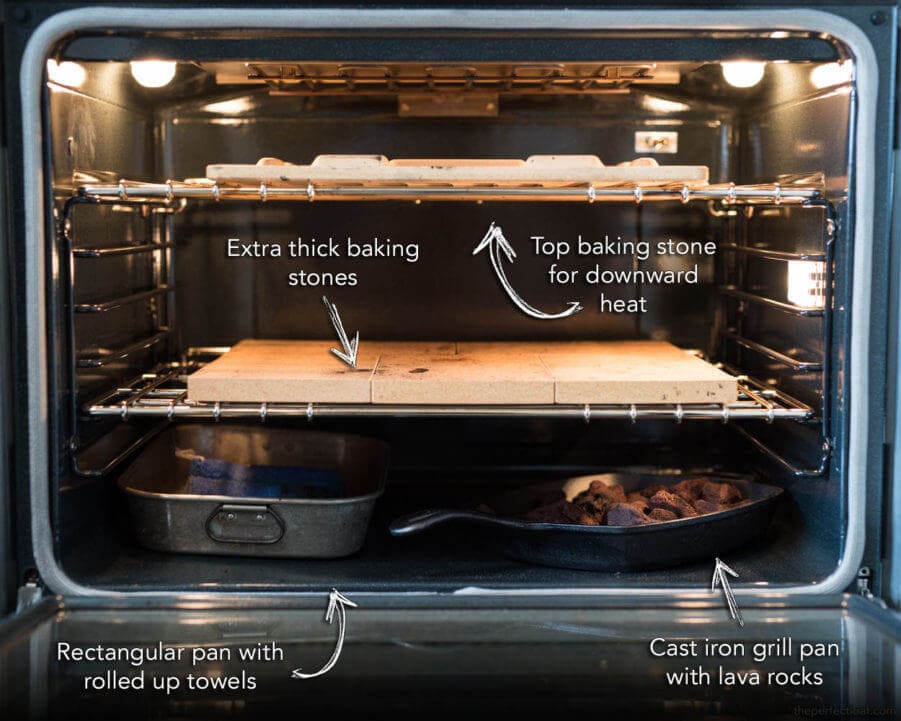
While using a Dutch oven to bake bread is straightforward, I still enjoy steaming my home oven and baking my sourdough bread directly on a baking surface. With this alternate method, it’s easy to bake two long bâtards (even up to 1.2 kg if your surface is large enough).
Ultimately, use whatever method is most comfortable for you and that you use often for the bread you bake. And if you’re like me, you might often switch between methods.
Baking Bread in a Dutch Oven FAQs
Do you oil a Dutch oven when baking bread?
No, no oil is necessary to bake bread in a Dutch oven.
What is the best size Dutch oven for bread?
I like to use a 4 or 5-quart Dutch oven or a 3.2-quart combo cooker for baking bread. These sizes are large enough to accommodate most bread recipes. If you have a larger Dutch oven, that will work just fine, too.
Should I preheat a Dutch oven when baking bread?
Yes, I always like to preheat the Dutch oven inside my home oven before baking bread. I find a preheated Dutch oven helps encourage maximum oven spring (the amount the dough rises in the oven) at the start of baking.
Can I reuse the parchment paper used to bake bread?
Yes, absolutely! I typically use the same square of parchment paper two to three times before needing a new one.
Why did my sourdough bread burn on the bottom?
It likely was baked for too long at too high a temperature. Reduce the bake time and temperature until it no longer burns. Use the suggestions in this guide post to help reduce burning on the bottom of your bread dough.
Do I have to season my Dutch oven?
Yes, I periodically season the Dutch oven I use to bake my bread—it is cast iron after all. I simply apply a thin layer of vegetable oil to the entire pot.
What’s Next?
And now that you’ve baked a loaf (or two), be sure to read my guide on how to store baked bread to ensure it stays fresh for as long as possible!
If you still have questions about the baking process or are looking for tips on scoring your dough before baking, see my full guide to baking sourdough bread.


351 Comments
Hello Maurizio – I too have the Lodge Combo Cooker and I love it. But, I was reading your post on the olive bread and you mentioned that you use your Lodge cooker BUT also shaped your dough into a batard….. Correct?? If so, what is the maximum weight of dough could I bake in the Lodge when it’s a batard instead of a boule? Thank you!
Ah, I’d say it’s probably more like a stubby boule (round) 🙂 For a batard, it’s much better to bake directly on a baking stone/steel like I show in post on steaming a home oven. If you want to use a pot, you could also check out the Challenger Breadware pan. The Lodge is fantastic for rounds, and I still use mine to this very day for that (and French toast)!
Yes, I did see that Challenger pan. I have been using my Oval Le Creuset for batards. But, I really wanted to minimize the amount of bread baking equipment in my oven. LOL!! Love your videos, blogs, and insight.
I am new to sourdough and have baked three so far. First one was kinda flat but tasty still, second one was perfect in my opinion and the third I believe I over proofed and it didn’t oven spring as my second one.
My Q.
What are your thoughts on cold oven starting? I actually have baked all three of my sourdoughs with cold oven start. Temp is set to go up to 475 and it takes about 20 min to get there. So if I bake for an hour, it’d be in 475 temp for about 40 min. I leave the cover of my double DO on for the whole time.
I do want to try your olive sourdough for I LOVE olives. I just wanted to check with you though if you would be against baking your recipe to start in cold oven.
Thank you for your post!!!
I’ve not tried this! The initial shock from the high heat of the oven really helps with oven spring, in my experience. I know King Arthur has done tests with a hot oven but cold Dutch Oven inside, and I believe they came out with good results with that method (the post is at their blog). I’d say if it’s working for you, go for it! But I do notice significant kick from the dough when placed in a very hot oven.
FWIW I am baking with a cold Le Creuset cast iron pot in a cold oven then set it to 230C fan. I’m baking for a total of about an hour and experimenting with when to open the lid to crisp up the crust. I think it’s going well, though my loaves are a little tacky inside (I think I need to play with hydration)
As a newbie, I’ve been working to improve my bread, with generally better loaves each of the last six weeks. I’ve been doing the bulk ferment on one day with the scheduled folding, then putting it in a basket with dishtowels for 12 hours, then into a 500-degree preheated Staub dutch oven. When I uncovered the dutch oven after 20 minutes this week, the loaf had finally given my a fantastic oven spring and I thought I had finally pulled it off. But after another 20 minutes baking uncovered at 450, the loaf had actually gone down almost an inch. The bread still had a fairly open texture and tastes great, but still isn’t quite what all the photos show or what I saw happening initially. So why did it actually come back down after such great initial spring? Is this normal? Should I have left the lid on longer? Am I baking it too hot?
What would it be the temperature for a combi steam oven?
Hi, this recipe for cooking times works great, but the thing I noticed that was missing is the cool down, how long before removing from the dutch oven and when to bag……
I can answer this….you should let the loaf cool for a few hours before cutting or bagging. I usually cook in the morning and then don’t cut into it until at the earliest lunch but more often dinner. I typically keep mine wrapped in a tea towel rather than bag it because we eat it so quickly, but if you’re going to bag it wait a good long time or it will get soggy.
Hi I have a 7 qt Lodge Dutch Oven and I’m going to bake your Beginner recipe tomorrow. Should I divide the 1800 g into two loaves as per the instructions, or just bake one large loaf? I’m concerned that my Dutch oven is too big!
That is a big DO, you could go either way, whatever is your preference. The smaller size in the DO will still work well.
Thx for the reply. I have done a few rounds of baking since my original post. Ive only done the half recipe bake (about 900 g each bake) The big Dutch oven does work well for that size loaf – if the ball and proofing basket is tight enough to keep the loaf relatively tall. When the lid comes off of the DO, It helps prevent burning if I put a few balls of foil under the loaf in thr pot
Will my Dutch oven crack if I put cold dough into it to bake? A recipe is calling for me to do that, and I’m worried because I’ve cracked a pizza stone doing that before.
I personally have not had this happen with many different DO’s, but I would contact the manufacturer if you’re worried!
I have both a 7 1/2 qt oval Kirkland enameled Dutch Oven and an 8 qt round Staub. Should I be adjusting anything when using these larger Dutch ovens? I’d prefer not to have to buy two smaller ones. Although I was looking at the Lodge L8DD3 (5qt) to use as a slightly larger combo cooker…
Just curious, why does your beginner recipe recommend cooking at 450° the whole time but this recommends 500 -> 475 -> 450? Is one of these newer and your new recommendation, or is the 500 -> 450 recommended here specifically for a dutch oven, not a combo cooker?
I’ve been slowly changing this, I find better results at 450°F these days, no need to go up to 500°F (and it helps reduce bottom burning). I’ll update this post!
I have a 4 quart round Le Cruset pot. It looks like a half recipe of “The Perfect Loaf” weighs 900 gm’s. Will it fit in my pot?
Thank you!
Yes, that should fit just fine!
I’m going to be baking with your beginners sourdough recipe tomorrow! It’s bulk fermenting right now. My question is whether I have to do shallow-side down when baking. The Dutch oven I have has a handle and curve on the top, so it wouldn’t be possible to set the bread on the lid/shallow portion and cover it with the deeper pot. Would that still be okay? I’ve made a few loaves (just started my sourdough journey!) and had success with this before but am now realizing that lots of folks instruct to do the Dutch oven upside down! Thanks so much!
The shallow side only applies to a “combo cooker” style pan as I have shown in the post. With a dutch oven, definitely place your dough in the deeper side and then cover with the lid!
Thanks! I figured as much but haven’t ever heard of a combo cooker, so I wasn’t sure. Thanks again!
Hey, Ryan. I notice this is a common thing when baking in a DO, crusts are just thicker all around. It might help introducing more steam into the DO when you load the dough by spritzing the top of the dough and/or placing an ice cube in there before you put on the lid. Aside from that, it’s kind of the nature of baking in one. I find I get a much thinner crust when I bake directly on a baking surface.
BREAD is one of those books where everything in it is highly recommended to read 🙂
Hello. My parchment gets stuck to the bottom of the loaf. This time I tried wetting the parchment paper and squeezing excess water out ( a trick I learned in Italy for baking) , but although it added extra moisture which was good, it stuck even more. Any suggestions to avoid this?
Hey, Jennifer. I’ve heard of this happening with some brands of parchment but I have not seen this happen a single time here. I use Reynolds brand and also Kirkland Signature from Costco — I’ve never had an issue with either of these. Recently I bought a large pack of these pre-cut natural parchment pieces and these have also had zero sticking!
You can always try to bake without the parchment. In this case I’d sprinkle a layer of cornmeal/polenta on the bottom of the preheated pan, then place the dough in — this should help as well!
Hello! A quick question on oven settings- do you bake on “static” or “convection” for the temps/times listed in your recipes? Thanks so much!
No fan, no convection 🙂
Hello from NY! I’ve been really enjoying baking your recipes. I have done the beginners sour, the Best Sourdough (my favorite) and just baked off the Tartine #33. I have been using my deep dutch oven and have been sprinkling cornmeal on the bottom of the pot and also doing the double layer of parchment. The first bake which was best sourdough stuck terribly to the parchment. The second one I did was your Best Sourdough. I sprinkled cornmeal on the bottom of the loaf before I put the parchment on and flipped it. This still stuck but not as bad without the cornmeal. The one I did today I used a little more cornmeal and it stuck a little less again.
Is there another trick I can do to prevent sticking to the parchment? I used medium cornmeal because that’s what I had. Would course work better?
Thanks for your time! Tomorrow I am going to try your higher hydration Sourdough! Can’t wait.
Thanks so much for your response
Hey, Kara. I mentioned this above: I’ve heard of this happening with some brands of parchment but I have not seen this happen a single time here. I use Reynolds brand and also Kirkland Signature from Costco — I’ve never had an issue with either of these. Recently I bought a large pack of these pre-cut natural parchment pieces and these have also had zero sticking!
Another option would be to remove the loaf from the parchment partway through the bake after the crust has fully set (and then return the loaf to finish baking directly on the wire rack), but I fear it might already be stuck by that point.
Another option would be to skip the parchment altogether and just use liberal cornmeal!
Thanks so much for your response. I changed up the parchment and you’re absolutely right. The bread slid right off!
Hi
I’m new to baking Sourdough bread.
My first batch is made with 700g of flour but suggests the dough it cut into 2, so 2 separate loaves.
Temps I used was 260C 20 mins lid on Dutch oven, drop to 230C for 10 mins lid on then lid off at 230C for 15-25mins to brown.
I did this and took it out on the last times for 20 mins as it was a deep brown colour. I used the just fan setting on my oven.
The loaf looked great and tasted lovely, had a lot of holes in the bread but it was a but doughy in texture. I must add I left my dough in the fridge to do it’s last proving in baskets overnight. Then straight in the oven.
I have an Leisure CS110F722 range which has 3 ovens. The main oven is a combi, with a variety of settings I can use.
Just fan, fan with extra heat top and bottom, fan with extra heat at the top and a setting with just heat top and bottom no fan.
I also have an AEG Competence Steam oven.
What am I doing wrong?
Also can I make one larger loaf out of the mixture and if so how do I change the baking times please?
Hoping you can help me.
Steph
Sheffield
Based on the description of your loaves it could be that they are slightly under proofed. There are a few indicators your dough could be under: explosive rise in the oven, dense interior with potentially scattered large holes, and gummy texture to the interior. Finally, it’s possible the bottom of the loaf might be slightly bowed upward (like the letter “U” — the top will kind of dome).
Make sure to build your levain from a starter that’s strong and mature (meaning it’s risen to it’s peak height before you take some to use). From there, bulk fermentation is very important! Make sure your bulk fermentation goes sufficiently far, you want the dough to look smooth, it should have risen considerably, and have bubbles here and there — it should look alive. If you tug on the dough a bit it should offer resistance to your tugging, it’ll feel stronger. Give the dough the time it needs in bulk fermentation! If you have to give it another 30m or hour to see these signs, do so. It’s important for this step to go sufficiently far for the dough to have enough fermentation activity before its proof.
Hi! I’ve got maybe a funny question. How tall should the pot be? Most of the sites I visit that sell Dutch Ovens dont mention the height, and I want to make sure my loaf has room to grow. I’ve got my eye one that is 14 cm (about 5.5 inches) in height, would that work? Thanks in advance for your answer!
I think it lists the specs for the 3.2qt Lodge on the page I’ve linked above!
Hi! Your site is amazing and your guides are the best I’ve found. I get great texture inside the bread and the crust looks lovely after a bake. But it is sometimes quite difficult to cut, even with my bread knife. What’s a good way to soften the crust a little bit?
Thanks, Joe! I mentioned this to Ryan, above: I notice this is a common thing when baking in a DO, crusts are just thicker all around. It might help introducing more steam into the DO when you load the dough by spritzing the top of the dough and/or placing an ice cube in there before you put on the lid. Aside from that, it’s kind of the nature of baking in one. I find I get a much thinner crust when I bake directly on a baking surface.
I often encounter that same issue. What helps, in my experience, is to wrap the loaf in a tea towel as soon as it comes out of the oven until it has cooled down thereby trapping a good deal of the evaporating steam.
Hello Maurizio!
Sorry to bother you, but I have tried and tried to make this sourdough. But my interior of the dough is always 203, not 208: the dough always seems sticky, gooey or raw. I have tried increasing the heat and backing time, but still no luck.
thanks!
That’s strange. It does sound like it needs to bake longer to get that interior temp up. However, if it just never reaches 208-210F that might be ok, just bake it longer until the interior is fully baked through. It sounds to me like your dough needed more time to bake.
Another thing that might be happening here is your dough is underproofed. There are a few indicators your dough could be under: explosive rise in the oven, dense interior with potentially scattered large holes, and gummy texture to the interior. Finally, it’s possible the bottom of the loaf might be slightly bowed upward (like the letter “U” — the top will kind of dome).
Make sure to build your levain from a starter that’s strong and mature (meaning it’s risen to it’s peak height before you take some to use). From there, bulk fermentation is very important! Make sure your bulk fermentation goes sufficiently far, you want the dough to look smooth, it should have risen considerably, and have bubbles here and there. If you tug on the dough a bit it should offer resistance to your tugging, it’ll feel stronger.
Hi Maurizio! This is so thorough and helpful! Thank you so much!
I just got my first dutch oven — 4qt Cocotte by Staub. Before I start baking in my dutch oven, I wanted to make sure I won’t damage by preheating it empty in the oven. Their customer service rep said I could preheat the dutch oven inside the oven and the lid can take up to 500’F. But I’m still super cautious and anxious! You recommended to use lower temperature (i.e. 450’F instead of 500’F) for preheating for enamel dutch oven like mine. If that’s the case, once I put the dough in the dutch oven, should I bake it in the same temperature (450’F) or increase it (to 500’F)?
Also, what difference does it make if I preheat my dutch oven with the lid on top of the bottom part VS lid on the side? It’s advised by the manufacture that the lid doesn’t get placed on a hot stove, and I’m not sure if I shouldn’t let the lid placed on the oven rack while being preheated.
I also just purchased the exact Staub dutch oven and I am wondering the same things! I think I will preheat at 475F and go down to 450F once the dough is in. I would also like to know about the lid on the side or can we just remove it entirely once the crust is ready for browning? Thanks!
See my reply above, Tammy!
I would preheat and bake at 450F. The Staub rep I talked in the past also confirmed they can be preheated empty. I’ve used mine many times this way without issues, but I totally understand the anxiety around it — I’d say max 450F and your bread will bake up just fine, no need to go higher.
Not sure what the difference would be preheating open or closed, I usually preheat my pots open with the pieces side by side on the oven rack! Once you are done steaming, the lid can be removed from the oven.
Awesome! Thank you so much for clarifying! Can’t wait to try!!
Hi there! I baked my first loaves a couple weeks ago in my oval creuset dutch oven and they look and tasted amazing. However, even though the crust had great color and seemed hard enough, when I tried to cut with my bread knife the crust would not hold its shape, just decompressing, making it really difficult to cut. This problem persisted for almost a week until the bread was stale enough to hold its shape. When baking, I preheated the oven and dutch oven to 500 for an hour, put bread in with lid on for 20 min, then reduced heat to 450, took the lid off and baked for another 30. Any idea what might have gone wrong? Or is it just supposed to be like that? Thank you for this amazing resource!
It sounds like there might have been too much steam in the oven (although you did remove the lid), the loaf was over hydrated, underproofed, or under baked. Try reducing the water a bit in the recipe if the interior was sticky/wet. If your loaves are rising erratically in the oven and have large holes with other areas inside that are dense, try bulk fermenting for longer or proofing for longer. When baking, make sure the interior temp is around 208-210F.
Can you use a convection oven
I don’t usually, but if you’re baking in a pot you could. Just keep an eye on the bake, it’ll likely take less time and you might have to reduce the temperature earlier (I’d still do 20m with the lid on, though).
Hi Maurizo,
Thanks for sharing your experience here! It’s an amazing resource. Question on the dutch ovens. Are you using them upside down? The Lodge Combo cooker has a flat ‘lid’ that seems to be used as the base in your examples? I have a Le Creuset dutch oven and the shape of the lid (it’s not flat) + knob would seem to make it unsuitable for baking. Am I overthinking or missing something?
Yes, you can think of it as upside down. The Lodge Combo skillet-looking lid is used as the base. The reason is so you don’t burn your hands reaching down into a pot when you place the boule on it.
The Lodge can be used either way, I prefer to keep the deep side down and the easier-to-lift lid on top. If you’re using a Dutch oven, yes use the deep side on bottom and shallow lid on top.
Hi Maurizio, I was getting ready to make my first sourdough tomorrow morning and then after reading this post realized that my enameled Dutch oven made by Cuisinart is only rated for 350 degree temperatures!
Are there any workarounds for this Dutch oven or other options? The only other covered cookware I own is a thick stainless steel All-Clad turkey roasting pan, is there any way to make this work? Most stores are unfortunately closed right now.
Just for posterity, because I had no other option, I used my turkey roasting pan with 2 layers of parchment paper and my first loaf came out pretty well! A little low volume and every so slightly overcooked on the bottom, but I consider it a success given it was my first time making bread.
I think with the extra volume of the roasting pan compared to a dutch oven, it’s less humid inside, so next time instead of 20 minutes covered + 30 minute uncovered, I might try 25 + 25, maybe even 25 + 20
I have the Lodge combo cooker on order, though!
Hey, Xeren! Ahh, so sorry I missed your message. I was going to recommend just that: use the turkey pan! I like your modifications, give it a little more time in the steam section but another idea would be to throw in 1-2 ice cubes inside the pan with your dough (to the side of the dough). Then drop that lid on quickly. This will get that whole chamber extra steamy.
Hope this works well till the Lodge comes, you’ll love it. Happy baking!
i’ll give the ice cube trick a try! thanks so much for all this fantastic information!
Hi Maurizio, I just bought Emile Henry No Knead Bread Pot. I have small problem. I use my countertop Breville oven but my pot is a little to high. Next time I heve to measure first. The lid is not flat, looks like pot on the pot. I am thinking to cover something. Do I need this space between pot and lit for some reason?
Just enough space to ensure the rising loaf doesn’t hit the top of the lid/oven/cover!
Hi Maurizio, I noticed sometimes you have recipes where you do 20 min in the 500′ oven, then turn the temp down a bit and bake another 10-15 min with the lid on, before finally taking it off. How do you decide when to prolong the bake with the lid on? (As opposed to your default, as described here?) Thanks!
Hey, Lina. I always bake the bread with the lid on for the first 20 minutes or so of the bake — this is essential to trap steam in the pot and give your bread that nice rise and shiny crust.
Right! I apologize, I wasn’t clear…I know you always bake with the lid on. To clarify, I noticed in this recipe for 100% WW, after the usual 20 min, you turned the temp down to 450′ and cooked with the lid on for another 10 minutes. Is this because it’s a WW recipe, so you’re trying to increase the spring? After what percentage WW would you decide to prolong the lid-on part of the bake? Thanks!
(https://slimlife.fit/100-whole-wheat-sourdough/%3C/a%3E%29%3C/p%3E
Ah, gotcha! In that recipe I was just testing that baking method. I can’t honestly say it made that much of a difference given the fact that at that point most of the benefit from steaming the oven has likely passed. I’d go either way: remove the lid @ 20 mins or @ 30 mins. Sorry about the confusion!
Is Le Crueset an acceptable Dutch Oven brand? That’s the only cast iron pot I have at home!
Yes, Le Crueset will work very well! Just be sure your lid doesn’t have the plastic knob or it will melt at high heat in the oven (you can unscrew and remove it or keep the metal one in place if that’s what you have).
Hi Maurizio, thank you for an amazing website. I have a question about the timing of baking 2 loaves when you only have one dutch Oven. I only make one loaf at a time now but would like to increase it to 2. I start the dough the night before and leave it to rise on the counter. The next morning, I shape it and rise it in a banneton on the counter for a little while and then bake it. Can I bake one loaf and leave the other in the banneton for the extra hour before baking?
Hey, Marion. It really depends on how far the proof has gone with the dough, if it’s close to over proofing it won’t last out while that first one bakes. I would stick the loaf waiting to bake in the refrigerator while the first one bakes! This will slow fermentation and keep it a little longer before it’s turn in the oven.
Hey Maurizio, quick Q — do you have a recommendation for oval banneton size relative to dough weight? I have a 8qt Oval Le Creuset DO which measures about 11″ long at the interior base and while I’d like to use as long a banneton as possible, I’m worried about getting not giving the loaves enough room to spring. Let me know if you have any thoughts or recs. Thanks so much.
It’s hard to give an exact dough weight and banneton length because it really depends on how tightly their shaped, and other factors. But I would say you could fit 700-1kg in that pot, if shaped properly to fit. My recommendation would be to start somewhere small and work up with each successive bake. I use 14″ long bannetons but I do shape the dough tight enough so it stays mostly in the middle of the basket when proofing. If the dough relaxes out too far it might not fit in your pot.
If you can find a 10″ long banneton that would be the safest approach!
Good ideas. Thank you!
Hi
Superb article, as always. Many thanks – your articles were what it took me to ‘arrive’ with sourdough breads.
I use a fan setting as the dough is protected by the pot. So I have no problems with over cooked bottoms. No heat shield needed.
Thanks for the kind words, Kevin, and I’m glad to hear my website has helped! As you said, if your dough is covered in a pot it works just fine to use the convection setting. Happy baking!
Another superb article. Thank you.
However, with great respect to Jeffrey Hamelman: The surface of the loaf heats rapidly. Especially if a pre-heated pot is used. Can enzymes really be working over say about 60 deg C? I very much doubt it.
I came across this beauty. Do you think it is with the 175$ CAD?https://www.cookstore.ca/media/catalog/product/cache/1/image/700×440/9df78eab33525d08d6e5fb8d27136e95/8/1/81eskvqz9ul._sl1500_.jpg
Looks mighty nice, to me! I’m not sure about that particular cloche, but be sure it’s ok to preheat that empty in the oven before using it — the instructions included will let you know.
I use both a Sassafras dome and a Dutch pot. They both work equally well, but:
The Lodge Dutch pot was 1/2 the price and does more jobs… Such as making a superb griddle for flatbreads.
The cast iron wins on being able to charge with more heat than a ceramic too. Also the cast iron top and base can each be heated rapidly on a hob before being loaded with dough and going into the oven allowing higher temperatures to be reached.
And, sprizing with water is safe with cast iron and a definite no, no with a ceramic.
Finally. I have the Henry Baguette ceramic. Its good, but the stoneware of the Sassafras seems much superior to the Henry. It is denser and stoneware is a completely fused ceramic making it more heat and thermal shock tolerant.
Just a pennies worth.
Just ordered the lodge combo cooker! Very excited to see what the difference will be, if any. I’ve only done two batches so far, but using a large stock pot (thinner walls) and a not-so-tight lid. Still made tasty bread, but didn’t rise as much as I think it could have if it was sealed in. As always thank you for all the info you share with us!
Excellent, Adele! I’d imagine you’ll notice an improvement. Happy baking!
I’m wondering what size combo cooker you use. I see so many saying I need a 5-6 quart but your link to this Lodge takes me to one that’s 3 quarts. I’ll be baking my first loaf soon and I’m really freaking out lol. I want to ensure I have enough room. I started to by a 4 Qt Dutch oven just minutes ago, I really liked it too; but it was 4 quarts so I decided against it. What size do you use and/or recommend? I love your site too. I‘ve learned so much the past two weeks just following your instructions. Thank you so very very much.
I use the one linked on my baking tools page, it’s a 3.2 QT Lodge. Glad you’re enjoying my site and finding it useful — happy baking!
Pops,
I bake my bread in the 3.2 Quart Combo Cooker, it also also makes my frittata, omelettes, and breakfasts generally, in the short skillet and it seldom leaves the center of my stove-top unless to be packed for a camping trip. That said the below listed 5 Quart Double Dutch Oven shares many of the 3.2’s virtues; I actually think Lodge used to call it their 5 Quart Combo Cooker [[ by the way the 3.2 and this 5 Quart are of the same diameter and the tops and bottoms are INTERCHANGEABLE; not something you would do all the time, but the shape of the 3.2 tapers considerably and if you needed a straighter profile the 5 Quart bottom has it ]].
Walmart lists them under these names and has good photos:
Lodge Pre-Seasoned 3.2 Quart Cast Iron Combo Cooker, 2-Piece Set, LCC3
Lodge Pre-Seasoned 5 Quart Cast Iron Double Dutch Oven with Loop Handles
Hi Maurizio. First…I love your website and can certainly see why you have won awards. The energy and quality you put into the content definitely shows the love and passion you have for baking. Please don’t stop. I am looking for some advice. I have been baking sourdough for a couple of years after taking a workshop that a local artisan baker was offering. He openly recommended your website as a great source of reference. The basic recipe that he taught was a country wheat with 87% hard white unbleached bread flour, 8% soft whole wheat and 5% hard whole wheat. My levain is a 10% inoculation from my chef which is usually 60% AP and 40% rye. Hydration of the dough is about 70-75% as I play with the water a bit. The dough is baked in a gas oven in a lodge dutch cooker starting @ 550F for 5 min (covered), 475F for 15 min (covered) and 450F for 20 minutes (uncovered). Final temp after baking is 209F. Now the advice…Generally I get a pretty decent result with the exception that I am not getting as open a crumb as I would like. The dough mass springs quite nicely and the texture and taste are quite good. I am trying to figure out what variable (yes there are many) I need to change to get a better crumb. I have been wondering like the previous post if the heat in the gas oven is part of my problem or could there be other factors that I should consider. Looking for suggestions. Thanks and look forward to your sage advice. Richard
Thanks for the kind words, Richard, sorry for the late reply. Your recipe sounds good and everything else sounds similar to my process as well. It’s hard to say what’s holding you back at this point from achieving your ideal — but of course, there are so, so many places in the process where things could need adjustment. A few tips:
Unfortunately there isn’t a single thing that leads to a more open interior in a baked loaf of bread. First, the flour used is very important, it needs to be strong enough (protein) and have the proper gluten properties to trap the gasses produced during fermentation. For example, no matter how hard you try with rye flour, the gluten properties in the grain just won’t lead to an open interior.
From there, a very strong and well-fed starter is important — it all begins there. Fermentation in general is so critical, it’s worth spending some time really stepping back to look at how your starter is performing and how well-fermented your dough is during bulk fermentation and the final proof. Without strong fermentation your loaf will never rise to its full potential.
Sufficient dough strength through mixing, and also organically through fermentation, is also important. Think of your dough as a balloon: you want it strong enough to trap gasses and expand in the oven, but not so strong that it won’t relax and expand out. Finding this sweet spot takes some practice.
A full and complete bulk is also very important. Cutting bulk fermentation short before the dough is sufficiently fermented will hinder the development in final proof.
I also find that, and this depends on the dough you’re working with, a very gentle preshape and shape are key to maintaining an open interior. If you’re rough with the dough during these times the delicate interior will quickly break down and become more dense. That said, the dough does still need enough strength through shaping to hold its shape during baking.
Sorry for the long winded answer but really all of these things are important! Each part plays into the next and overall what we’re searching for as bakers is balance. Balance between the extremes in each phase of the process.
If anything in the above doesn’t strike a chord, let me know. I’d say if you have a few photos of the exterior and interior, email them over to me (contact is in my About page) so I can see if we can diagnose. I hope this helps!