


These days it seems I seldom bake bread comprised of only a single flour. Usually, my mind busily weaves together a formula of different flours after I decide on an end goal. The end goal is my compass, dictating the direction as I work backward to make it happen: the flavor from this flour, this one is extra nutritious, add some extensibility with this one, perhaps a bit of color with this other, and maybe some added strength, if necessary. Lately, though, I’ve been focusing down on a formula comprised in total of ancient einkorn wheat flour. I’ve baked with einkorn many times in the past at less than one hundred percent of the total formula (and my einkorn miche is always my go-to for large dinners) but pushing the percentage of einkorn results in unique sourdough bread.
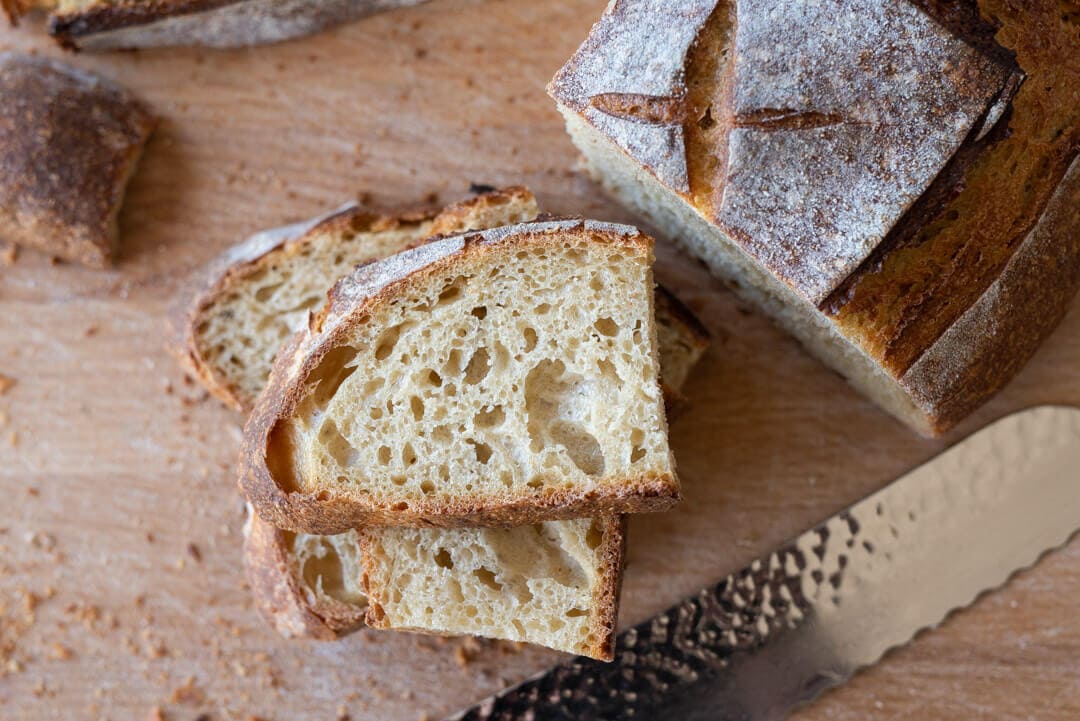
Out of the oven, this bread has a captivating crust: rustic fissures with golden undertones and hints of burgundy. The golden boules, as I like to call them, that have that perfect balance between tender interior and substantial, toothy exterior. The rich and tangy flavor pairs so well with a variety of foods. My favorite use, and right now in perfect seasonal timing, is to use it as a base for fresh chopped tomatoes, basil, extra virgin olive oil, and a dash of balsamic.
The warm—perhaps the best way to describe it—the flavor of the crumb stands up to and balances out, the acidity in the tomatoes and vinegar. It also makes some of the best toast with cultured butter and fresh preserves. The interior crumb of this bread stays moist for days after baking. The rich, warm flavor seems to even amplify as the bread ages a few days after baking. It’s one of those bread, like 100% fresh milled whole grain, where I like to let sit at least half a day (or even until the next day) before slicing. Although, I won’t blame you if you cut into it shortly after taking it out of the oven, a treat we all have to try at least once.
Let’s first discuss einkorn flour selection and then get into a few challenges I’ve discovered with this grain and my proposed solutions.
Einkorn Flour Selection
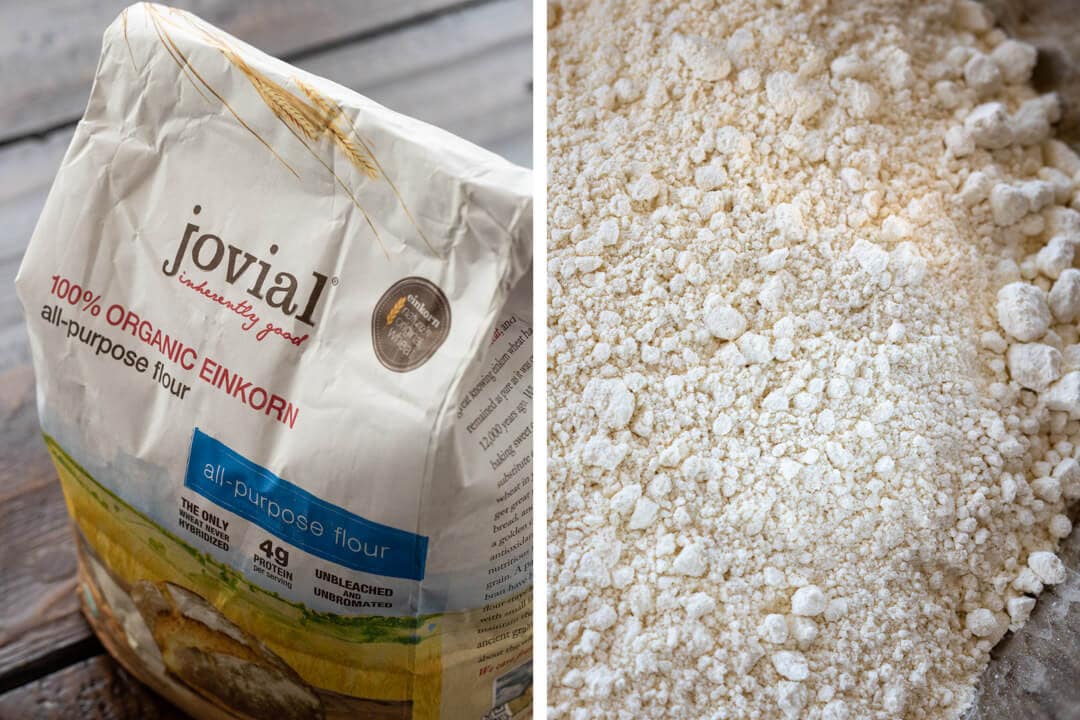
For this formula, I used Jovial’s organic all-purpose einkorn flour. Their flour has a beautiful creamy complexion, and it clumps readily in hand (indicating plenty of natural oils present). In working with their einkorn for my previous miche, I milled their whole berries just before mixing and included the resulting flour at 100% extraction (whole grain). For this bake, I wanted to push the percentage of einkorn flour and use all-purpose in an attempt at an all-einkorn hearth bread.
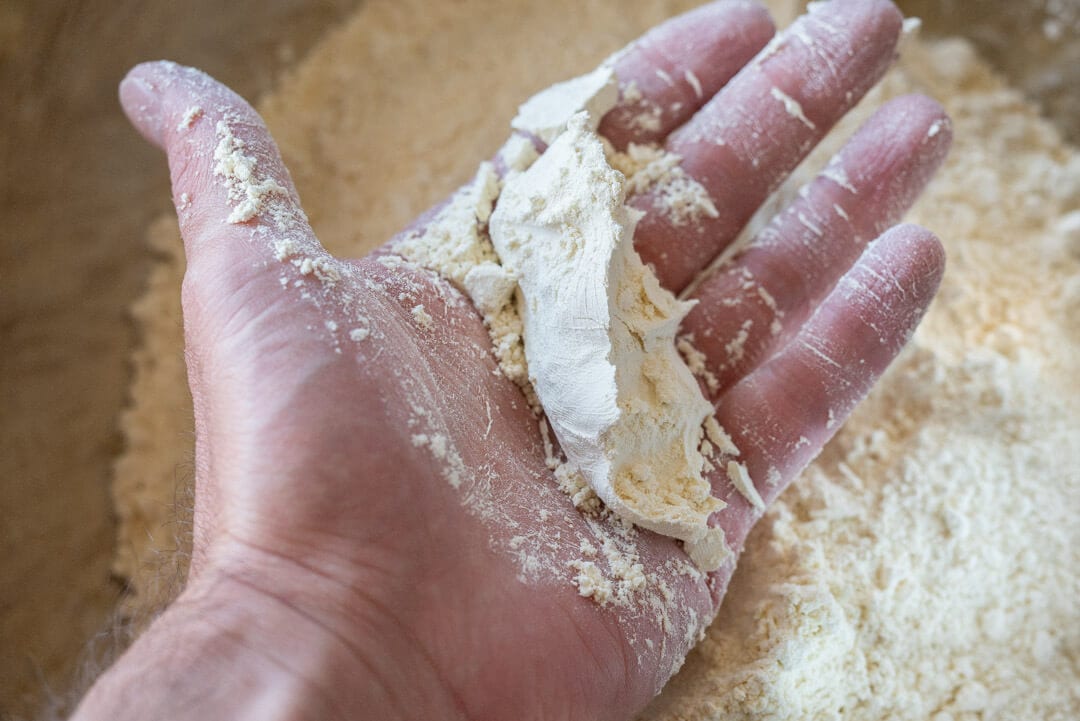
Upon mixing einkorn with water, you’ll notice it has a silky, smooth texture. It tends to break apart easily, feels sticky, and makes mixing by hand a little challenging. If you have a danish dough whisk and are accustom to using it, this might be a good time to take it out. Additionally, I’ve found it to be rather picky with hydration: if you push it too high, the dough will quickly become unusable. As I said above, be conservative with the water through mixing and only add it if the dough feels and looks like it’s able to take more. More on mixing and hydration in the next section.
Nutrition
Studies have shown there are health benefits to eating ancient einkorn wheat. In addition to being a good source of dietary protein and some vitamins (especially B vitamins and thiamine), einkorn has been shown to have higher carotenoid (antioxidant) levels, particularly lutein, also known as “the eye vitamin.” And while einkorn is high in protein, it’s gluten levels are relatively low. Thus some who are sensitive to modern wheat seem to do fine with einkorn sourdough bread (of course, each person is different. Einkorn does contain gluten, so it’s not suitable for those with Celiac disease).
For more einkorn nutrition information, including comparisons between einkorn and modern wheat, head over to Jovial’s website.
Einkorn Sourdough Bread Recipe
This dough formula would also make an excellent pan bread.
This recipe yields a relatively challenging dough to work with. However, the following section will discuss some of the observations I’ve made and techniques used when working with this grain. Additionally, and as always, feel free to adjust the timing and formula to align with your particular flour and comfort level.
My goal was to produce a hearth style loaf, but if you find the dough very slack and hard to handle, you can always use a bread pan to make sandwich bread. The structure of the pan will help keep the dough from spreading and make shaping much easier.
Observations and My Approach
Hydration
In my testing, I found the best results, regarding final taste and texture, with the dough at 75% hydration. While 75% hydration may not seem drastically high, always remember this number is directly related to the grain you’re using. In other words, the percentage doesn’t mean much taken out of context; it only becomes meaningful when compared to the flour you’re using (and perhaps even that particular batch of flour). Further, there is no point to increasing hydration if you don’t see a benefit from it — we don’t push the number to push the number. At 75% hydration, the dough is slack and sticky and requires a deft hand when preshaping and shaping.
If this is the first time you are working with einkorn at 100%, I’d suggest you start with 65-70% hydration and work it up through a few successful bakes, if desired.
Mixing
Mixing this dough by hand is challenging because of the sticky nature and low gluten properties of the grain. I found the best approach was to keep my very hands wet (using the mixing water, not adding more) through the mixing process. If you have a Danish dough whisk it might help aid mixing. I also avoid slap and fold kneading or any dough work on the counter — it’s done all in the bowl, relying on several additional sets of stretch and folds during the bulk to finish strengthening.
Pre-shaping and Shaping
Be sure to pre-shape and shape the dough tight using well-floured (or use water) hands. A tight pre-shape will help impart critical structure to the dough after dividing, setting the stage for a uniform and tight final shape. The dough should show its strength with defined edges when it’s placed in the proofing basket. I have more details, with a picture of the result, in the Shaping section below.
Fermentation Activity
I find this flour leads to an incredibly active dough. In testing, I ended up over proofing an early trial of this dough. To remedy this, I dialed back my levain percentage and employed a stiff levain to help. I would also avoid pushing the cold proof any further than 12-14 hours. Even though in a home fridge the dough is kept very cold at 38-39°F (3-4°C), the dough can quickly overproof.
Einkorn Sourdough Starter
To ensure this bread is truly 100% einkorn, you’ll have to convert your starter over to an all-einkorn sourdough starter if you don’t already maintain one. An alternative to this would be to create a second starter from your current one and feed it einkorn flour for a few days to convert it over. I’ve made this recipe with both a modern wheat starter (my typical sourdough starter) and also an all-einkorn 100% hydration variant—both work equally well.
Ok, on with the formula!
Vitals
| Total Dough Weight | 2000 grams |
| Pre-fermented Flour | 3.50% |
| Hydration | 75% |
| Yield | 2 x 1000g boules |
Einkorn Sourdough Levain
In testing this formula, I found the best performance, taste, and timetable when using a stiff einkorn levain. Even though the flour I’m using is sifted (all-purpose) and not whole grain, this dough can quickly overproof at warmer temperatures. To offset this I found myself gravitating to a stiff levain at a very low pre-fermented flour percentage. Mostly, I treated this all-purpose flour as I would whole grain.
At 100% inoculation (the percentage of ripe starter used to build the levain) my levain was ready to be mixed into the dough after 3 hours at 77-80°F (25-27°C).
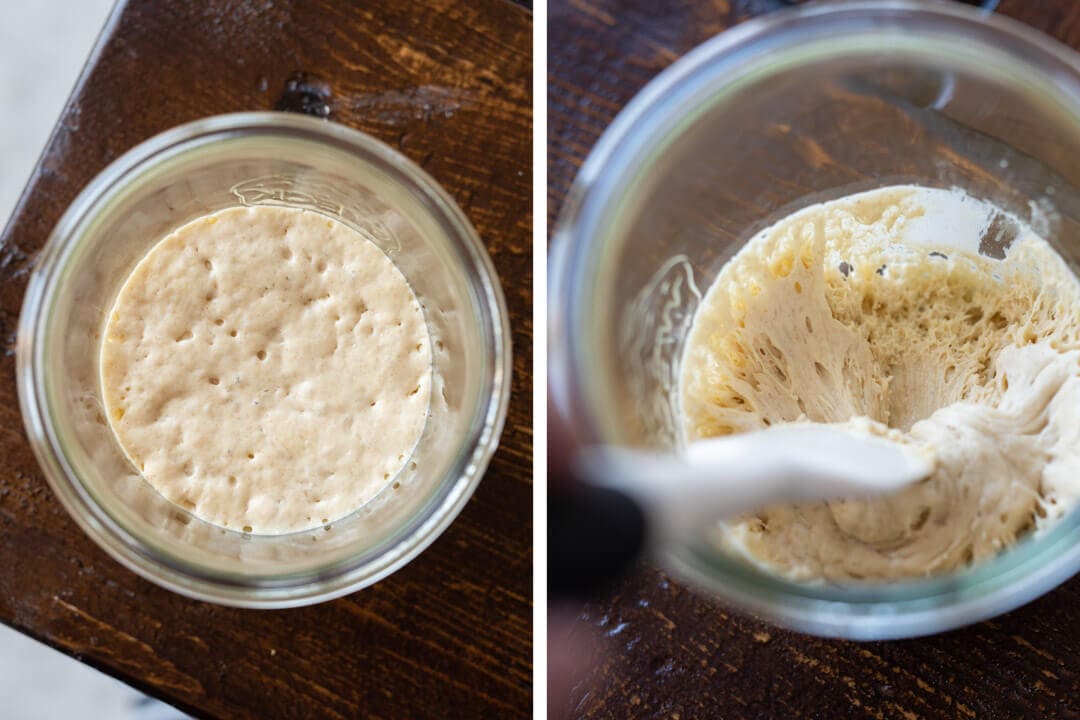
When assessing readiness, look for a leveling off of the “dome” that is created as this levain is ripening. Additionally, you’ll see significant aeration at the sides, and if you gently poke at the top, it’ll give readily under pressure. This levain is a fast build: it ripens from the first feeding to maturity in only 3 hours. The high inoculation percentage and warm temp expedite the timetable. If you’d like to lengthen this build to better fit your schedule, drop the inoculation down to 50% ripe starter and it’ll be ready around 5-6 hours.
| Weight | Ingredient | Baker’s Percentage |
|---|---|---|
| 39g | Ripe sourdough starter (100% hydration) | 100% |
| 39g | All-purpose einkorn flour (Jovial organic all-purpose einkorn) | 100% |
| 17g | Water | 45% |
Dough Formula
Target final dough temperature (FDT) is 76-77°F (24-25°C). For more information on final and desired dough temperatures, have a look at my guide to the importance of temperature in baking.
Note that the baker’s percentages listed below are with respect to the final dough ingredients and do not take into account the levain.
| Weight | Ingredient | Baker’s Percentage |
|---|---|---|
| 1066g | All-purpose einkorn flour (Jovial organic all-purpose einkorn) | 100.00% |
| 6g | Diastatic malt powder (optional) | 00.52% |
| 811g | Water | 76.09% |
| 22g | Salt | 2.07% |
| 95g | Ripe, stiff levain (see above) | 8.89% |
Method
1. Stiff Levain – 10:00 a.m.
Build the levain (everything listed in the Levain section, above) and store somewhere around 77°F (25°C) ambient until ripe, about 3 hours.
2. Autolyse – 12:45 p.m.
Einkorn has little in the way of extensibility: it tends to tear and fall apart when stretched. I experimented with varying autolyse times between 15 minutes and 1 hour and didn’t notice any significant improvement to extensibility or improved mixing. Here, I opted for a short 15 minute autolyse to give the flour time to hydrate fully. If this isn’t convenient, skipping the autolyse period would also work.
If you choose to autolyse, add the called for flour, malt powder, and all but 150g of the mixing water to a bowl and mix together by hand. Cover the bowl and let rest for 15 minutes.
3. Mix – 1:00 p.m.
To the bowl containing the flour and water from the autolyse step above, break up the ripe, stiff levain on top and add a splash of the reserved water. Mix by hand, or with a dough whisk, until well combined. The mix will be very wet and almost look like it won’t hold together. Perform folds in the bowl to add strength for 5 minutes. Mixing in the bowl keeps things relatively clean and contained.
Let the dough rest for 10 minutes, covered.
Add the salt to the top of the mixed dough with a splash of the reserved water. Mix thoroughly. At this time assess the dough: does it look like it can handle the remaining 150g of water? If so, add the water, if not, omit the remaining water.
It’s essential to hit the 76-77°F (24-25°C) desired dough temperature for this dough, use an instant-read thermometer (like my trusty Thermapen), and make sure the temp of your dough is in this range.
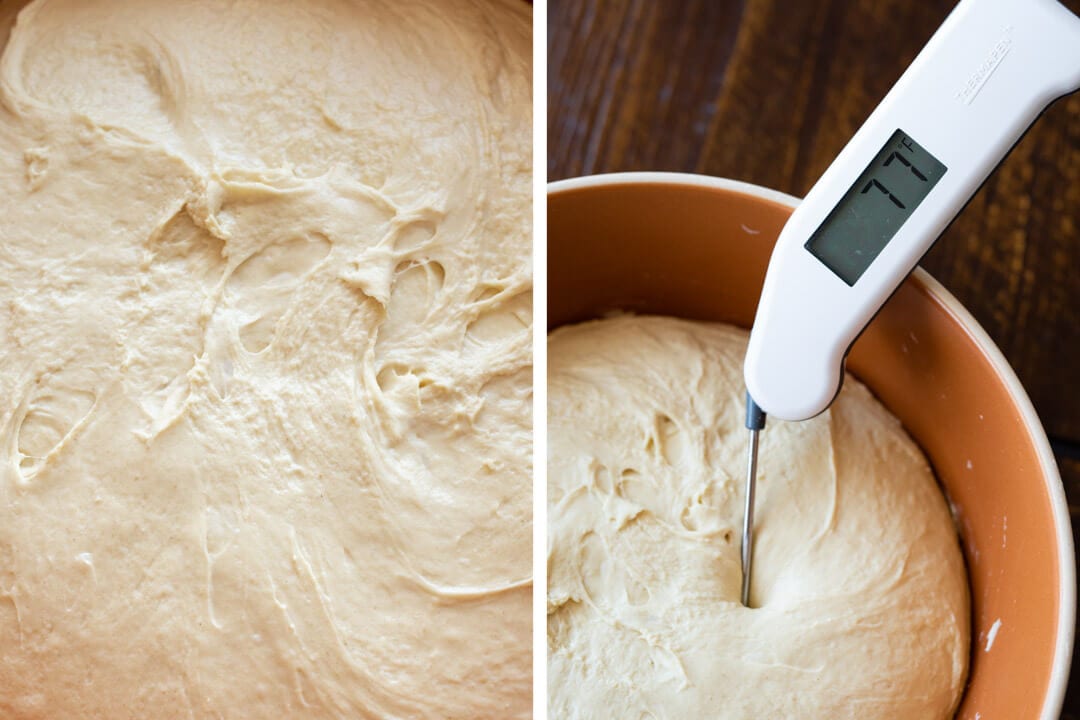
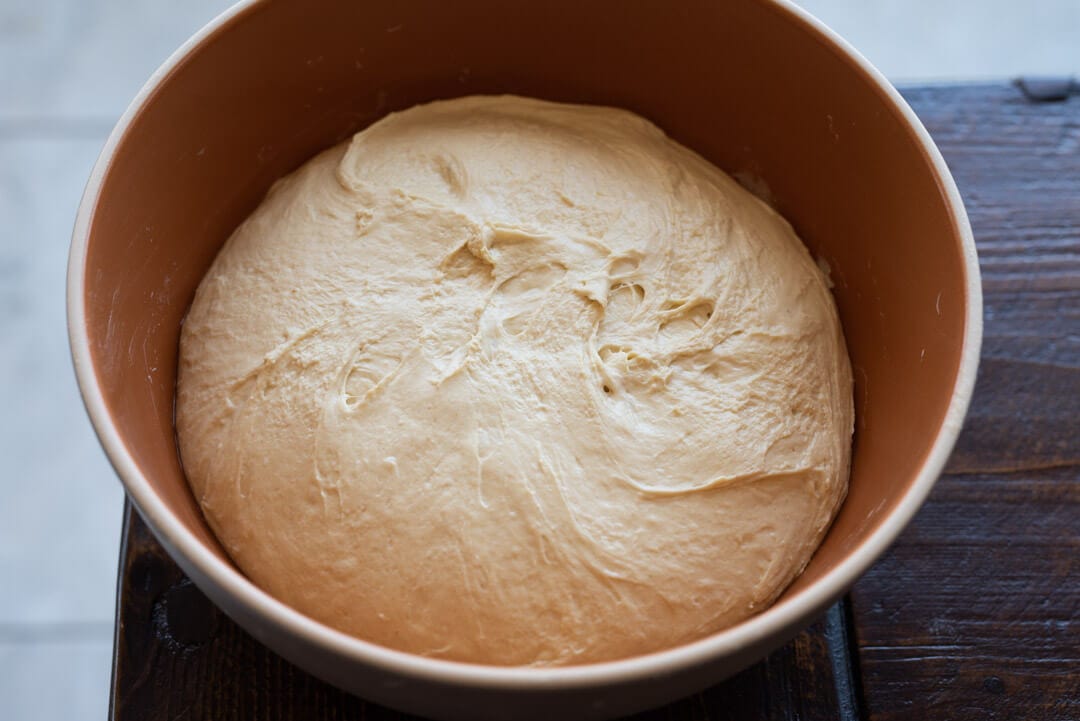
Transfer the dough to a tub or thick-walled bowl for bulk fermentation.
4. Bulk Fermentation – 1:20 p.m. to 4:50 p.m.
Perform a total of 5 sets of stretch and folds during the bulk. The first set is 15 minutes after the start of bulk, and the second set is 15 minutes after that. From there on, the remaining sets are 30 minutes apart. After the last set, let the dough rest for the remaining bulk fermentation time.
If you nailed the final dough temperature, and it’s kept fairly warm, the dough should be ready to divide after 3 hours and 30 minutes.
5. Divide & Preshape – 4:50 p.m.
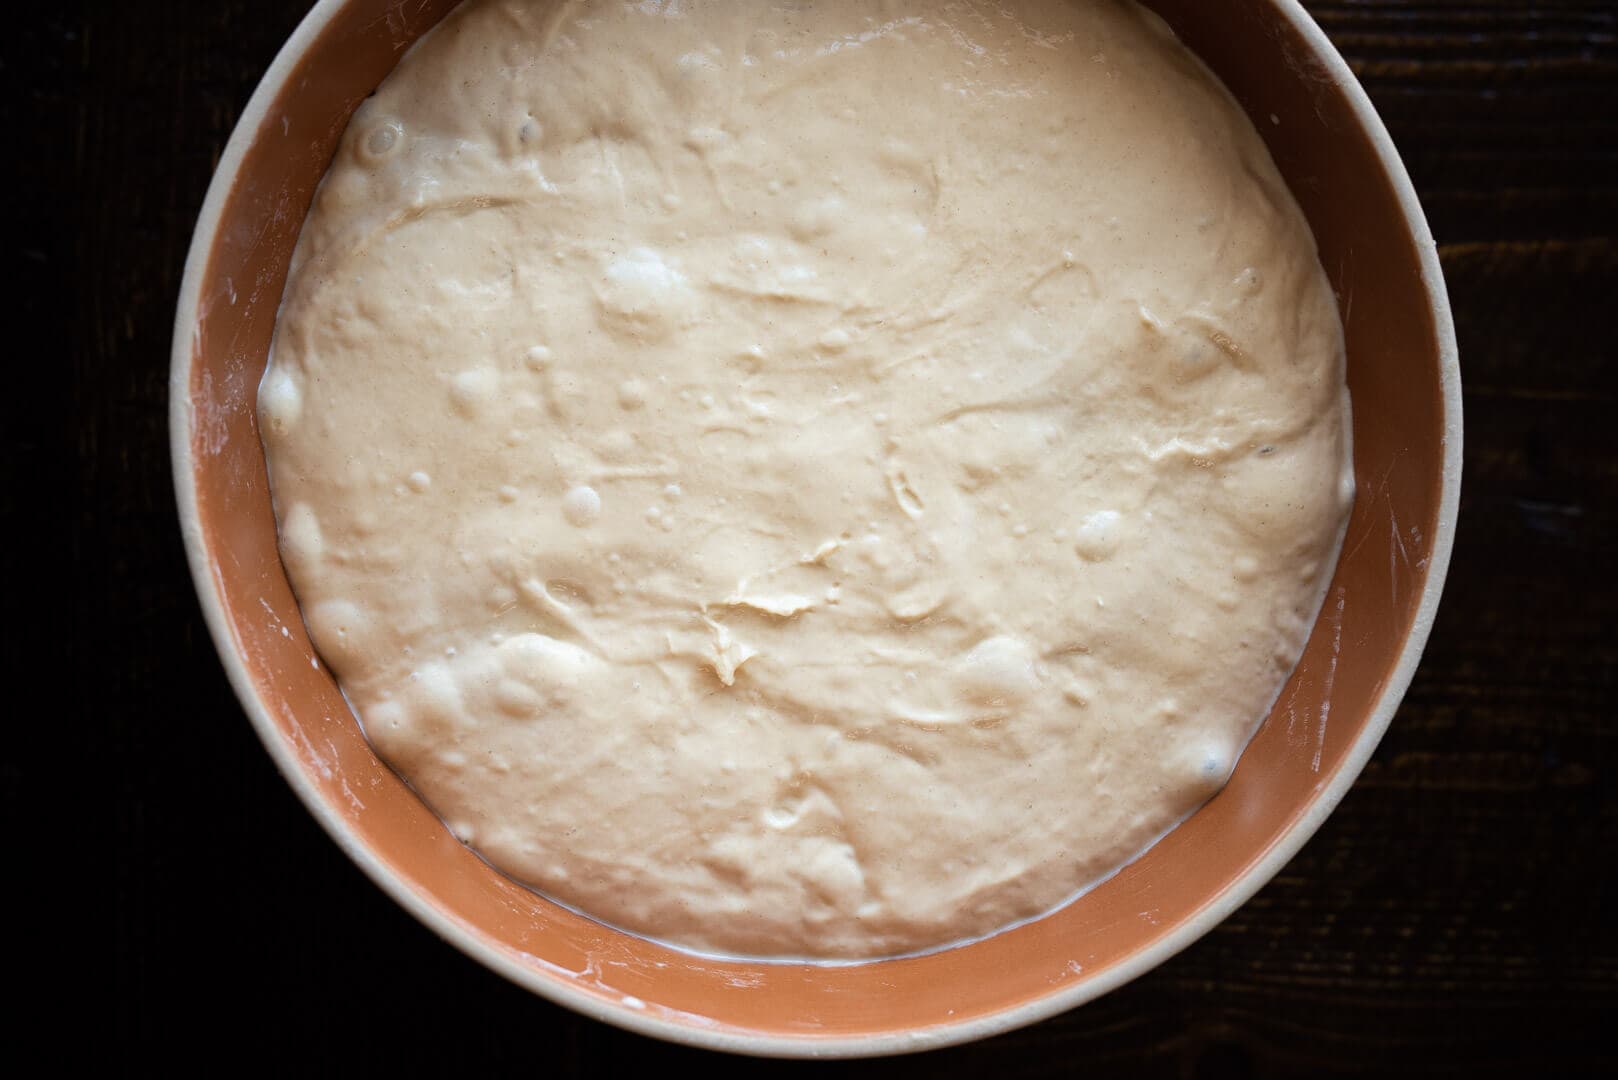
At the end of bulk, as seen below, the dough will have risen some (perhaps not as much as you might be accustom to), be smooth on top, and show signs of healthy fermentation. If you gently shake the bowl, the dough mass will jiggle. Dump the dough from the bulk container to a lightly floured work surface. The dough will be wet, sticky to the touch, and will likely want to spread some. Using well flour hands and a bench knife, divide the mass in half and shape each half into tight rounds. This can be challenging; use as much flour as needed and shape as tight as possible.
Let the dough rest for 15 minutes, uncovered. Keep an eye on the dough, if it starts to spread quickly, skip the remaining rest time and proceed directly to shaping.
6. Shape – 5:05 p.m.
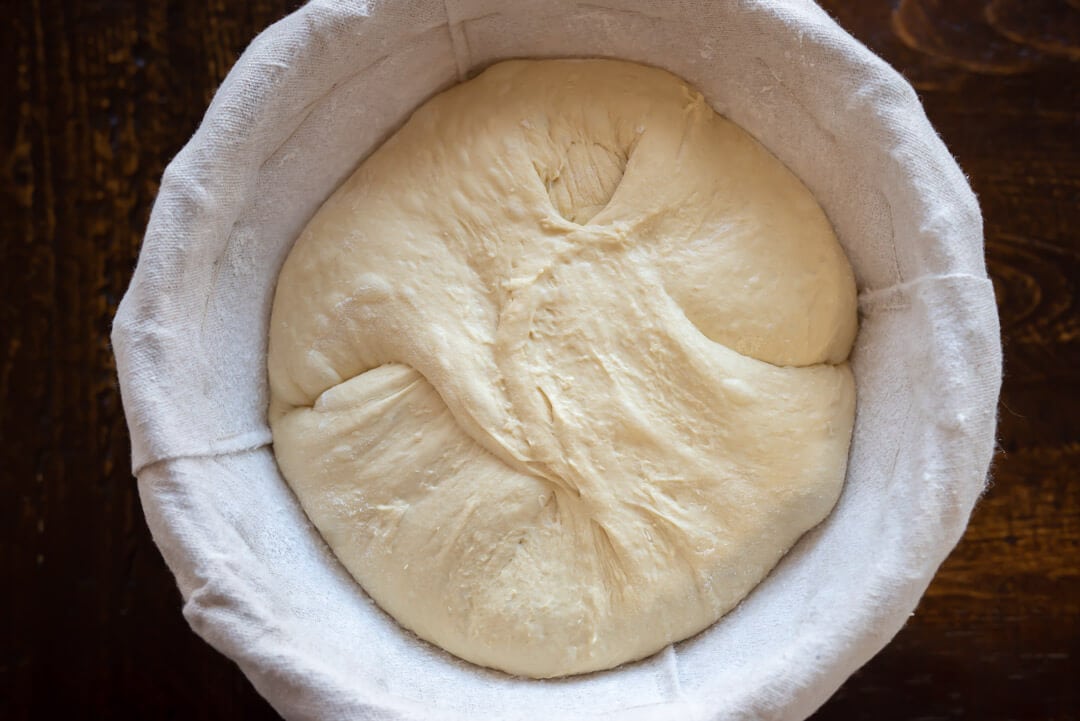
Liberally flour your shaping area and the top of your rested, and relaxed, rounds. Using a bench knife and your hand flip one round over. Fold the bottom up to the middle. Then fold each side, left and right, over to the other to form what looks like an open envelope in front of you. Then, grab the top and fold it up and down to about the middle. You can then flip this whole package over and use both hands to drag the dough down towards you as your pinky fingers create tension. If the dough needs more tension, slightly rotate the mass and continue to drag down with both hands. Repeat as necessary. Using your bench knife invert the round into a proofing basket liberally dusted with white rice flour. To encourage maximum rise the next day, be sure to shape each round tightly. After you place the shaped round in the basket, I found performing two “tucks” of the dough to help it keep shape (see above). Using wet or floured hands, grab the very side of the dough with two hands opposite each other and gently pull up and over to the center to seal. Rotate the boule and repeat the tucks at the opposite ends (you’ll end up with four flaps overlapping in the center).
7. Proof – 5:15 p.m. to 7:30 a.m. (the next day)
Cover each basket with plastic to prevent it from drying out as it proofs overnight. In my home fridge at 38°F (3°C), I proofed this dough for 14 hours.
8. Bake – Preheat oven at 6:30 a.m., Bake at 7:30 a.m.
I baked these boules on my Baking Steel in my oven (see my post on how to steam your home oven for baking), but you could also use a Dutch oven or combo cooker. I baked one round at a time, but you might be able to fit both on your baking surface.
Preheat your oven with baking stone/steel for one hour at 450°F (230°C).
Prepare a pizza peel and two pieces of parchment paper. Remove the dough from the fridge, uncover the baskets, and turn out the dough from the proofing basket onto the parchment that is resting on the pizza peel. Score the dough with a bread lame as desired, and load into your preheated oven by dragging in each piece of parchment holding the dough.
Bake for 20 minutes with steam. Then, remove the steaming pans from inside the oven (or remove the lid to your combo cooker) and bake for an additional 30-35 minutes, or until done, without steam in the oven.
Once fully baked, let the loaves cool on wire racks for at least one, preferably two, hours.
Conclusion
While there might be a few challenges in working with this dough, with practice it yields an outstanding einkorn sourdough bread. The result is a solid, flavor-laden loaf that is sure to delight. Due to the gluten properties of einkorn, you won’t achieve a tall rise out of this bread, but that’s beside the point — it’s all about flavor, texture, and nutrition here. The subtle, tang from natural fermentation paired with the warm, round taste of einkorn results in a truly memorable bread.
Crust
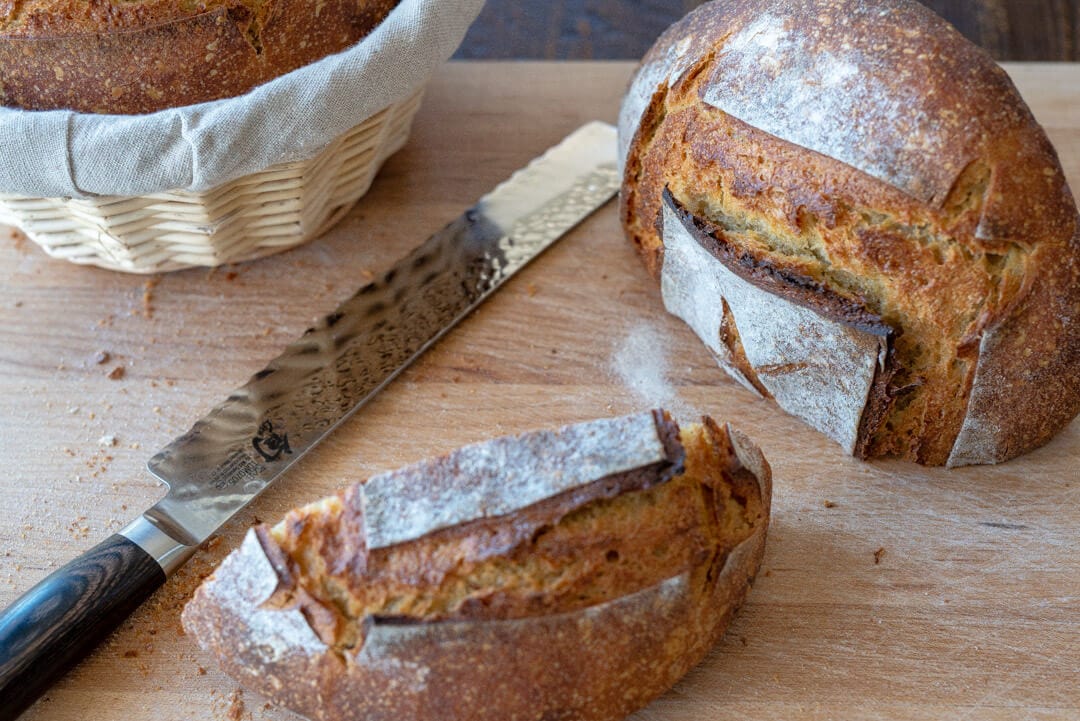
The crust is rugged and deeply colored, igneous even. It’s this kind of crust that has me reaching for the bottle of extra virgin olive oil each time I happen to walk by the cutting board. And to be honest, that happens a little too often on the day this bread is baked.
I like a heavy dusting of white rice flour in the proofing baskets to provide a little aesthetic contrast, a slight reprieve, to the well-colored exterior. The crust is always the first thing you see when you pick up a loaf of bread, and when you see one like this, it’s hard to resist the urge to cut—or even tear—forthwith.
Crumb & Taste
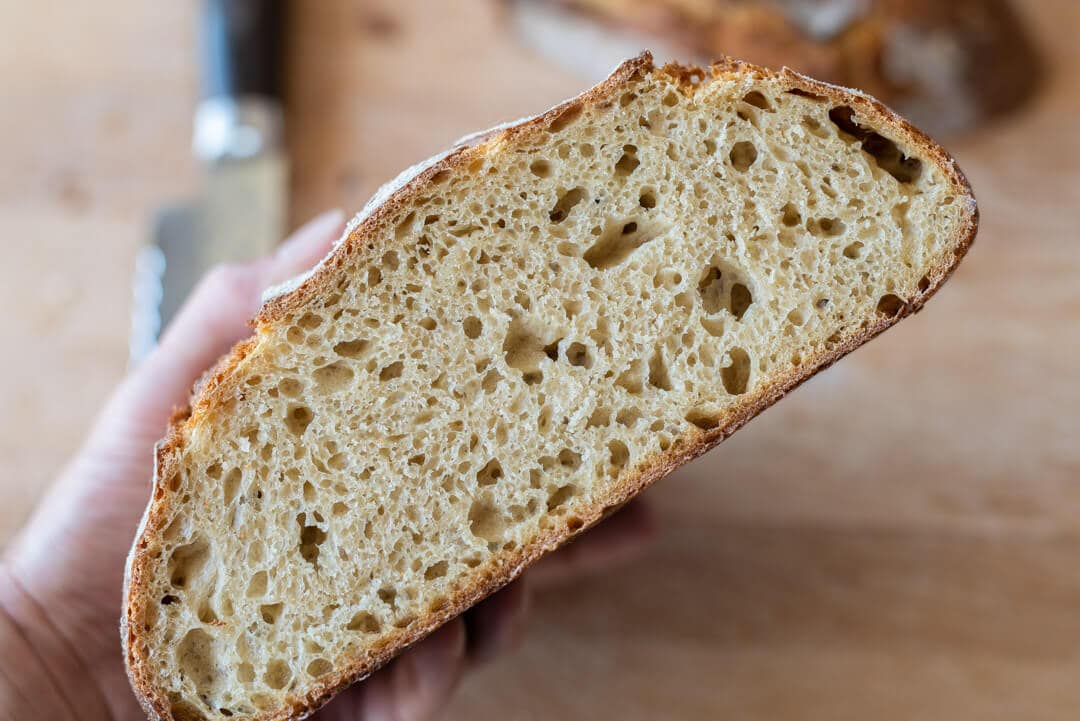
When well fermented, the interior is light and uniformly open. This is a substantial loaf of bread, but through proper fermentation each slice has levity to it, providing just the right amount of chew. The tender interior texture is rather surprising: even days after baking this bread seems to hold on to its moisture, retaining that tenderness and soft chew much longer than expected. Still, be sure to store your bread properly for maximum shelf life.
Thanks to the stiff levain and lengthy fermentation timeline this einkorn sourdough bread has just the slightest of tang at the end of each bite. This subtle sourness heightens your sense of taste, allowing the rich, yet sweet, the flavor of the grain to fully express itself. I would venture to say this bread ranks up there with some of the most flavorful I’ve made.
Thanks so much to Jovial for sponsoring the development of this einkorn recipe and for this post! As always, the opinions and content here are my own.
If you use this recipe, tag @maurizio on Instagram so I can take a look!
Einkorn Sourdough Bread FAQs
The dough is very sticking when mixing, how can I make this easier?
I find hand-mixing this dough in the bowl to be easiest. A dough whisk might help keep your hands clean during the initial stages of mixing. From there, keep your hand moist when doing folds in the bowl to prevent the dough from sticking. My recipe relies more on stretch and folds during bulk fermentation than strengthening the dough up front so don’t worry if the dough isn’t super smooth at mix-time.
The dough is hard to shape, what can I do?
While einkorn is high in protein, its gluten properties aren’t the same as modern wheat. This results in a dough that can be overly sticky and wet by the end of bulk fermentation. If you’re having trouble shaping, try reducing the hydration of the dough next time (see the section below for the formula at 70% hydration). This will help bring a lot of strength to the dough, making it more manageable during shaping.
Why doesn’t the dough rise when I bake it?
While there could be many causes for this, my initial guess is usually over-proofed dough. Try reducing the proof time in the fridge by 2-4 hours and see if this helps eke out more rise.
I’m not getting a nice ear when I score and bake, what gives?
This dough will not yield a super high ear (the area that lifts up on a loaf where it’s slashed). Other causes could be a dough that’s over proofed, not shaped tight enough, or simply not scored deep enough.
What’s Next?
If you’re looking for another large loaf, my Hop Miche, made with a dark, malty stout, has all the lovely qualities of a large loaf (keeping quality! Incredible crust! Delicate crumb!) but with a rich and earthy flavor.
Happy baking!


171 Comments
I meant this last week and it was the best spread. I have ever eaten when it comes to einkorn! It was a mess at first, but it baked up OK and it had a nice texture and not near as dense as the other recipes. I’ve tried. I am tickled and I’m making it again today!!
So glad it worked out for ya Geneva! Einkorn is a tricky grain to work with, but the flavor is fantastic.
Thank you for this recipe. I don’t see the formula you mentioned for 70% hydration listed anywhere on this page, am I missing it?
This is so crazy bc today May 2 I was struggling with my first loaf of einkorn and it wasn’t working out, so I went to my bookshelf to check your Perfect Loaf book. I went to the index, and there was nothing under einkorn! I laid my head down on your book and almost cried in frustration! Now a few hours later I see this updated post on einkorn just today!
Yes, unfortunately the book was already too long to include any einkorn in there. Next one! 😉
I would love it if you made a YouTube video specifically for the einkorn loaf! Your information here is so helpful, but I’m a visual learner. Thanks for sharing all your best tips!
Working on these things, Abbey! Thank you 🙂
That will be great! I do agree!
I second this! A step by step video would be so helpful.
I followed your recipe for creating stiff starter from 100% hydration starter. Thereafter what is the ratio of stiff starter, einkorn flour and water for maintenance of the stiff starter?
He said a stiff Levin – using a 100% hydration starter- 39 g starter/ 39 g flour/ 17g water…
Hi. My einkorn starter is already a stiff starter I feed 1:2:3 as I get the best consisted rise in my starter with this. How would I adapt the preferment to work with this?
I have whole wheat einkorn flour from Bluebird Grains. How might I adapt this recipe to use whole grain einkorn?
Thank you, Maurizio, for all of your great tips. I have your cookbook and I’m loving it.
I have a question about milling my own all purpose einkorn flour. What grain is used for that?
I should clarify.. is there only one einkorn berry? Or are there different ones? I’m just wondering why you referred to it as all purpose einkorn.
I want to get einkorn berries and want to make sure that I get the right ones. Thanks!
Hi Kimberly,
As far as I know, there’s only one variety of Einkorn, although it’s grown in different regions so perhaps there are variations depending on where it’s grown. I always use Jovial and purchase my berries directly from them (check for coupon discounts or their own sales, makes a big difference). Their berries, grown in Italy, are consistently clean and pure and always organic, and I trust all of their products implicitly. Go to their web site to learn more about them and their products, along with several how-to bread-making videos: https://jovialfoods.com/our-founders/. Regarding A/P einkorn flour, Jovial also produces and sells an 80% extraction flour (meaning only 20% of the bran is removed) that is their A/P. I purchase that from them, as well, and usually use a 50/50 mix in the breads I make. I have also sifted my freshly-milled whole-grain einkorn, as well, but that often takes more time than I have.
(*One note: I know I sound like a Jovial commercial, but I have no ties to them or economic incentives from them. Carla Bartolucci, the owner, has had a tremendous influence on me regarding my bread baking. Being gluten intolerant, I’ve been gluten-free for over ten years and have finally found a flour that makes “real” bread that everyone in my family loves. I am indebted to Carla for my bread-baking journey, especially when I found out in 2021 that Carla sadly passed away.)
Wondering if I need to change anything if milling my own flour. Just received my Mockmill 200 and some Einkhorn berries and am incredibly excited to mill and bake! Thanks in advance for your time and suggestions.
Hey there! If you’re milling your own, it’ll be 100% whole grain (unless you sift). It will need more water added to the dough, and I might actually try the first bake with the dough in a pan and make a sandwich loaf. That way you can see how the dough feels the first bake through.
Thanks, Maurizio! I am going to try this tomorrow.
Hello, wondering if you completed this bake with 100% whole grain Einkorn, i.e., un-sifted? if so, how did it turn out? Thanks!
Hi! Any videos of any of the steps that would be helpful?
Hey, Tara! I have lots of videos for these steps (I’ll update this post to include some). In the meantime, check out my technique videos on my YouTube channel:
https://www.youtube.com/@theperfectloaf
I used the whole wheat Einkorn and my bread cake out delicious but I think under-proofed? It didn’t rise much, it is very dense (which is expected from whole wheat I think) and had big holes and not consistent crumb.
I didn’t have a thermometer so not sure about the dough temp.
Any suggestion what to do different next time I try?
There are a few indicators your dough could be under: explosive rise in the oven, dense spots in the interior with potentially scattered large holes, and a gummy texture to the interior. Finally, it’s possible the bottom of the loaf might be slightly bowed upward (like the letter “U” — the top will kind of dome).
Make sure to build your levain from a starter that’s strong and mature (meaning it’s risen to it’s peak height before you take some to use). From there, bulk fermentation is very important! Make sure your bulk fermentation goes sufficiently far, you want the dough to look smooth, it should have risen considerably, and have bubbles here and there — it should look alive. If you tug on the dough a bit it should offer resistance to your tugging, it’ll feel stronger. Give the dough the time it needs in bulk fermentation! If you have to give it another 30m or hour to see these signs, do so. It’s important for this step to go sufficiently far for the dough to have enough fermentation activity before its proof.
Check out my guide to proofing for a bit more help, too:
https://slimlife.fit/guides/proofing-bread-dough/%3C/a%3E%3C/p%3E
This seems like too much dough for the larger Pullman loaf pan, maybe use 3/4 of it and the rest for rolls?
Yes, that’ll work, Karen!
Hi Maurio, I’d like to make a sourdough loaf with a mixture of einkorn and soft red wheat flour. What would you recommend for the percentages? Tia. Ellen
Good Morning! – is this recipe and the seeded sourdough in your book ? I can’t seem to find them but they may be called something different in your book?
This einkorn recipe is not in my cookbook, unfortunately!
Rather than shaping a boule, can I use this recipe for a sandwich loaf, and if so, what size pan should I use? Thanks.
Yes, absolutely. You could use two 9x4x4 Pullman pans!
I would like to adapt this for sourdough Einkorn dinner rolls. Any suggestions?
Just divide the dough into smaller pieces, maybe 90g each. You could proof them on a sheet pan, then brush with an egg wash before baking. Or instead of an egg wash, steam the oven!
You can use any starter for this!
I made a very nice looking, behaving starter following instructions. It was doubling in size in 8-10 hr. I am making the levain now, using the 39g/39g/17g mixture. This is very dry….it’s been sitting at 77-80 for two hours and it doesn’t look like it’s activating at all? Is is too dry to activate? any ideas?
You might want to increase the hydration to help increase fermentation activity as well.
Do you think it would still work ok if I were to use straight liquid starter instead of building a levain for this recipe?
Yes!
Hi Maurizio, first of all, thank you for the recipe! Though it was a bit challenging to handle the dough (plus some overproofing) my einkorn bread ended up better than expected. It resulted in a slightly dens and a relatively sour bread. Although it is a bit too sour to my liking I do appreciate the complex tanginess of the einkorn. The next time I make this again I would aim for a milder bread. Using the sourdough straight in to the recipe is very convenient to me. How do you think this would influence the flavor of the bread?
Hello, Thanks for your great info. Have you tried to use Durum flour with Einkorn? Do you use diastatic malt powder in all of your breads? I have not used it yet. Is it worth using? Thank you, Mike
I’ve used durum quite a bit, but I don’t think I’ve done so with einkorn! I use malt in many recipes, yes, but not all. Most of my flour (especially from Central Milling) is already malted, but I do find using a vey small percentage to help with fermentation and crust color. If used too much, though, can cause a reddish colored crust and gummy interior.
Hi Maurizio,
I have to start by saying thank you, again. You provide so much valuable information, and so beautifully.
I have some questions about flours – I am gluten intolerant and have been baking with spelt and some einkorn. I have ordered 25 lbs of organic whole grain einkorn from einkorn.com and am anxiously waiting for it to arrive.
I have struggled some with the all-spelt loaves I’ve been making. They’re not bad, but they’re far from perfect! 🙂 I have been reading about extensibility, elasticity, different types of flours, etc. in an attempt to get better results, and in re-reading you all-einkorn recipe, I got confused.
In that recipe, you note that einkorn is “low gluten” and you explain that you experimented with autolysing the dough to increase extensibility. That completely confused me. I thought that the ancient flours were considered high-extensibility? I went looking around and found some studies of the ancient grains – one study I found (https://www.ncbi.nlm.nih.gov/pmc/articles/PMC6769531/) noted that einkorn, emmer and spelt have much higher ratios of the GLIA/GLUT gluten proteins than modern wheat.
Common wheat is most suitable for bread making, because the flour forms a viscoelastic dough with a high gas
holding capacity when it is mixed with water. In contrast, flours of ancient wheats yield softer dough with low elasticity
and high extensibility because of their poor gluten quality [1,9,10,11].
It is generally accepted that gluten proteins are one of the most important factors determining the baking quality of
wheat flours. Gluten proteins are storage proteins and classified into gliadins (GLIA) soluble in aqueous alcohol and
glutenins (GLUT) soluble in aqueous alcohol only after reduction of disulfide bonds. Not only the amount, but the ratio
between GLIA and GLUT (GLIA/GLUT) has been shown to be responsible for good baking quality. GLIA/GLUT of
common wheat is typically 1.5–3.1 [12,13], but a recent study showed that the GLIA/GLUT of ancient wheats was much
higher (spelt: 2.8–4.0; emmer: 3.6–6.7; einkorn: 4.2–12.0) [11]. However, only samples grown at a single location were
used in this study and it is known that the soil and climatic conditions combined with fertilization have a large impact on
protein quantity and quality. We previously identified the GLUT content and GLIA/GLUT as good predictors of baking
quality and, thus, high bread volume of flours from both modern and ancient wheats [11].
Then there’s this – https://www.einkorn.com/wp-content/uploads/2009/12/Grain-Nutrition-Comparison-Matrix.pdf, which shows the protein content of einkorn and spelt as either higher or comparable to modern wheats.
So it seems that the different behavior of the ancient grains in baking is due to the different ratios of GLIA to GLUT, not to the overall protein content. The research article I quoted from above says that “Not only the amount, but the ratio between GLIA and GLUT has been shown to be responsible for good baking quality.”
On the Einkorn.com website, they say that “Einkorn’s protein structure…has a higher ratio of the soluble to insoluble proteins. 2:1 in fact. Whereas, modern wheat and other varieties has a ratio of .8:1. Insoluble proteins are difficult for the body to digest. Einkorn’s 2:1 ratio in soluble protein to insoluble may lend to another reason of why it’s easier to digest.”
I’d say that’s probably also why the dough can so easily become over-hydrated? What about extensibility issue? It seems like rather than increasing extensibility that it would be elasticity at issue? Or am I over-thinking this?
Kathy
I just pulled this out of the oven. I baked it at 230 degrees Celsius in my Haussler mono electric brick oven. Cooked for 20 minute with steam and 22 without. It split down the sides, despite adequate use of the lame. Interesting look. I did get oven spring and an ear, which I didn’t expect. Can’t wait to cut into it. I have einkorn berries that I bought from Pleasant Hill Grain. How would the recipe need to change to use fresh milled einkorn.
Glad it turned out mostly well, Deborah! With freshly milled flour, you’ll likely need to increase the hydration of the dough.
I followed the leaven posted for this recipe, insured ambient temperature was warm, but after 3 hours, it had nice bubbles on top but definitely not “stiff”. What could have been wrong? Many Thanks!
So from an inauspicious start I am sitting here smelling the most amazing fragrance wafting from my oven. I am going to be hard-pressed to wait an hour, let alone two. Details forthcoming.
I bought the wrong flour, whole grain einkorn, and not enough. I used regular all purpose for the remainder.
I way overshot on the final dough temperature, about 81F. In order to compensate I left the dough in a cooler location and forgot. So you’re getting the idea. In the end I allowed bulk fermentation to go until the dough looked right, though I could not discern any jiggle. I shaped the dough into boules, but they slipped on my granite counter. To get tension I had to push under then tuck when I got them in the basket. So disaster anticipated, but I baked them in a dutch oven the next day and couldn’t be happier. They rose very high. The last slices, three days later were the best. The bread seems to go from a granular to a silkier texture with time.
So this is my second time working with einkorn. The first with a starter. Let’s just say it has a high learning curve. I completely over hydrated. It was a large gelatinous blob that I was chasing across the work surface. I managed to finally contain it enough to scoop it into some loaf pans. The result was delicious, but nobody else will ever see or taste this. I will lick my wounds, order more einkorn and go back in.
Yes, it’s a challenge to be sure. It’s very, very sensitive to over hydration and the dough in general is sticky and harder to handle. The flavor and nutrition is worth the ordeal, though! And once you get a feel for the dough, it seems to get easier every time.
This recipe was great! I was a little worried during the bulk fermentation that I had messed something up — I ended up leaving it for an extra hour and a half because it didn’t look bubbly enough or have the “jiggle” that the recipe mentions to look for. My temperature control was not great and it was probably lower than recommended, so I think the extra time helped. Even when I shaped and transferred to the fridge, there were fewer air bubbles than expected and not much jiggle. But low and behold, the bread came out so well! It’s got a nice sour twang to it and it feels hearty but with a very pleasant texture. Will make again!
So glad to hear the loaf turned out well, Amy!
Like others, I had to proof for much longer- the whole process took 48 hours. But OMG- worth waiting for- I made the loaf with kalamata olives. Possibly the best bread I ever ate? Got my Einhorn flour from Bench View Farms online. This bread is amazing.
Wow, that’s a long duration—great job on the modifications as needed!
If I skip the overnight cold proof and do a shorter warm proof, how long would you proof for and at what temp?
I’d say around 1-3 hours, temperature depending.
I ordered whole grain Einkorn freshly milled from einkorn.com and am trying this recipe today. Sifted to remove the bran and hoping for a lovely loaf!
I hope it turned out great, Joyce!
I have einkorn berries and a home mill. Could I make this bread using freshly milled einkorn flour? Wondering if I would need to sift out the bran to make it more akin to the all purpose einkorn you used, or if I could use as is and make adjustments (I’m assuming that might mean to shorten the fermentation and proofing times, but not totally sure). I’m trying to make for a friend who (might be) slightly gluten sensitive, so trying to keep it to 100% einkorn, which is why I opted for this recipe instead of your einkorn miche. Thanks for your wonderful recipes!
Jacqueline, I only had one bag of flour which wan’t enough to make the full loaf. I adjusted the ingredients to suit the amount of flour I had. I made the levain the same as the directions called for. My dough formula was as follows: 850g Einkorn flour, 659 of h20 but held back 100 grams, 75 grams of levain and 17 grams of salt. I ended up using about 30-40 g of the water held back. The bread turned out wonderfully! It is very sticky to work with and my dough was a little on the stiff side. I baked it in a combo cooker. I might try a loaf pan next time. This amount would fit in a pullman.
Does it work to half this recipe?
Yes, did this today. Prepared levain as given but used 1/2 of it for recipe. Boule is fermenting in my frig now.
Thank you for this!!! It worked perfectly! It’s delicious but I’d love to add some whole wheat flour to the mix but afraid of messing it up (and don’t have einkorn whole wheat right now – just bob’s red mill). What would you recommend?
Its fine, you can mix flours, I do so both for starter and the actual loaf
Do you happen to have a video of your shaping technique? I’m trying to follow the einkhorn sourdough perfectly, but using milled at home Eikhorn.
I finally tried your method, I have been wanting to but the dough being so hard to work with scared me 🙂 I have been using Jovial’s classic boule recipe which is foolproof and a great easy loaf and is my go to recipe. However, I find mine always turned out a bit dry as compared to what I think it should be and higher hydration was something I wanted to try. The loaves turned out great. The crust was awesome and the crumb was almost exactly what I was going for, much lighter. I was a little scared and didn’t use all of the water but I think I will next time as I think I can get it even more open and lighter with the extra water. It was hard to shape, but well worth the pain. Thanks for this method, my proof times were a lot longer than yours but for the most part I followed your instruction exactly. I will try it with all of the water next time and see how it turns out! Thanks!