


This recipe isn’t about bread or sourdough starters, and at first glance, it might seem out of place on a website revolving around natural fermentation—seeing as there’s, gasp!, no fermentation at all—but read on and I know you’ll see the fit. A canelé is a small French pastry containing a mix of vanilla, rum, egg, butter, sugar, and flour. They’re quite challenging to make, requiring patience, practice, attentiveness, and perseverance. But the result? A small treat with a deeply caramelized shell and a soft, custard-like interior. The enticing look of these little pastries plays all too well to seduce, and their aromatic mix of burnt sugar, rum, and vanilla seals the deal. With interest piqued, questions ensue from those unfamiliar, and after trying, a steadfast disciple is born. In other words, when you make them, be sure to make extras.
The history of the canelé (also known as the cannelé, canale, cannelé de Bordelais, and canelé de Bordeaux) is conflicted. There are several origin stories, all of which sound perfectly plausible, but as is commonly the case, hard to verify. You might spot similarities with other French pastries as caramelized sugar with eggs and butter will never steer you wrong, but the ingenious thing about these is how the ultra-conductive copper molds impart intense heat on the thinnest outer layer of the batter. This creates a super crunchy shell with extreme contrast between the shell and the pudding-like interior.
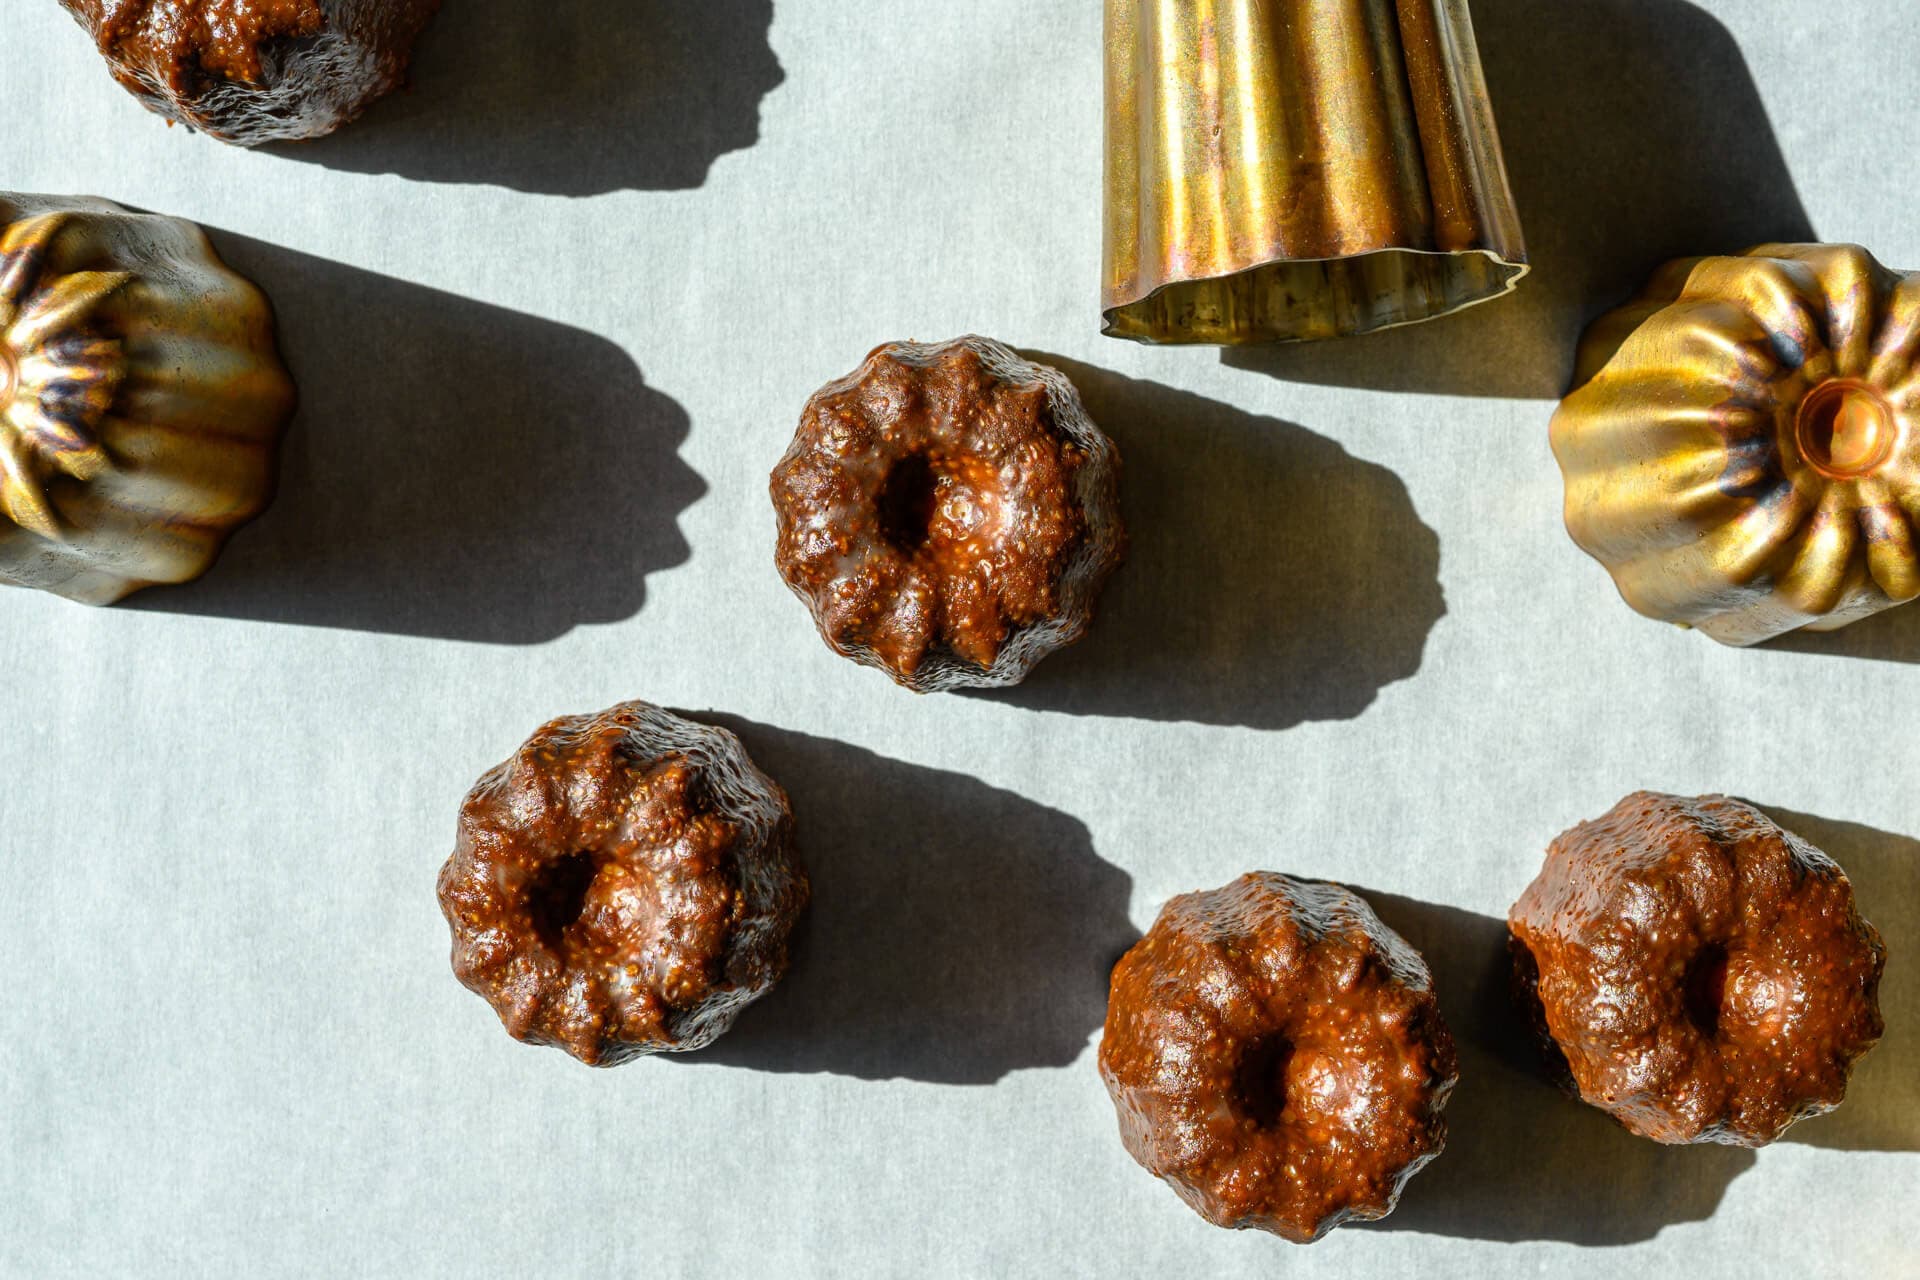
To reiterate, these canelé don’t require any fermentation whatsoever. However, much like baking bread they do require precise measurement, attention to process, and arguably the most important factor: careful oven management. To make these pastries you essentially mix up a batter a few days before you want them ready, let the batter rest a few days in the fridge, then pour it into the copper molds after they’ve been seasoned with beeswax (to make them nonstick). Finally, bake them until dark, very dark.
I was first inspired to make these after reading the wonderful Tivoli Road Baker (highly recommended), whose recipe got me started down the rabbit hole of making canelé in my home kitchen. After countless attempts, I’ve finally arrived on a ratio of ingredients and a process that works very well for the home baker. Keep in mind that canelé are similar to bread in that they won’t be exactly the same each time. In fact, just like many products made by hand, they vary slightly from bake to bake — which is part of the charm. Each a little different in their own way, which is the right way.
I have to warn you: this is a long post with lots of information, but if you’re like me, you’ll find these are absolutely worth the effort. And, as is true with baking bread for me, it’s the challenge that makes them all the more rewarding. I’ve heard it said that panettone is the Mt. Everest of baking, well I think these might be the Mt. Everest of pastry baking.
Ok, are you ready for a challenge?
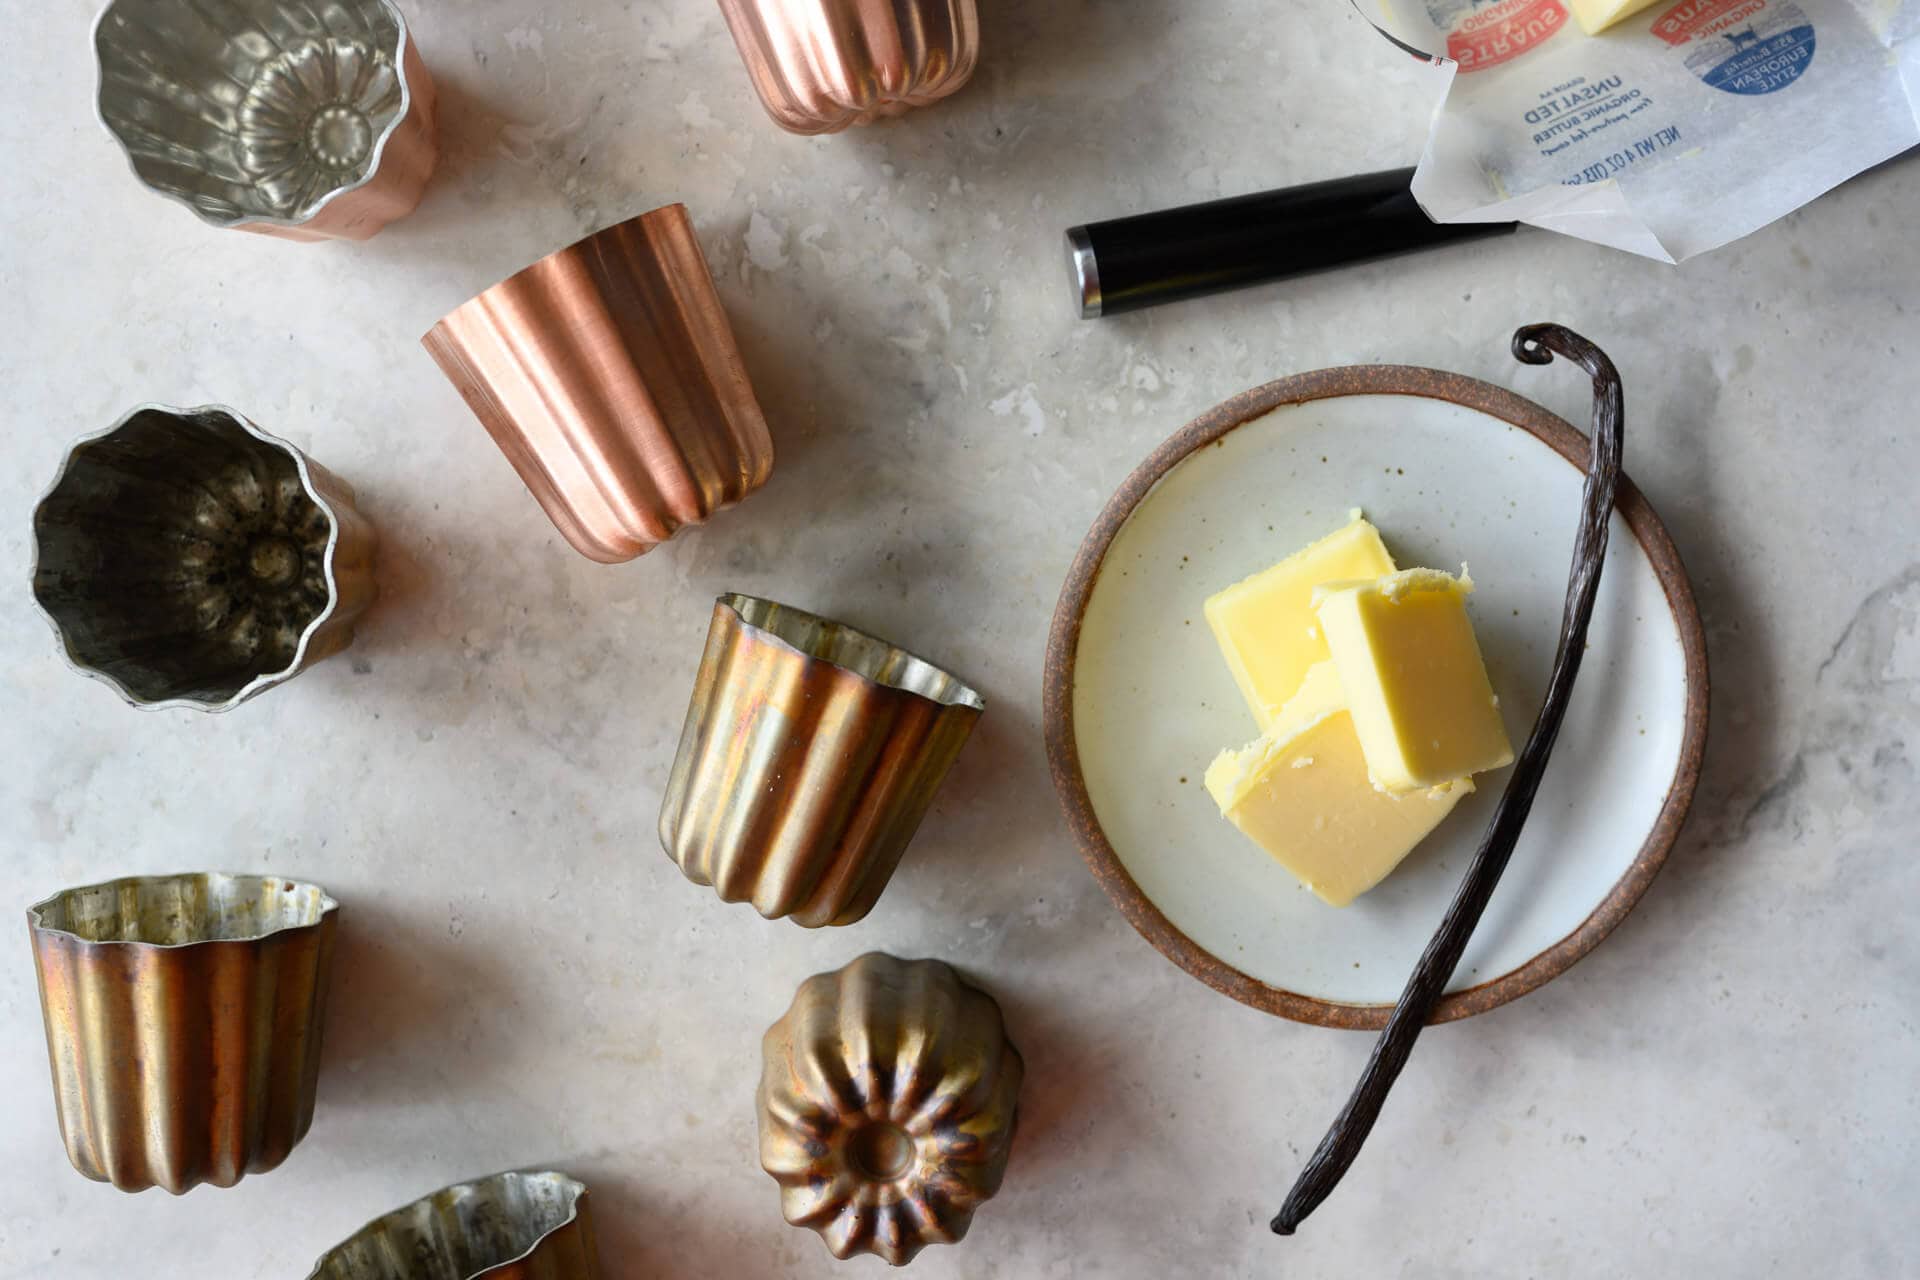
Useful Tools
First, let’s go over a few tools I highly recommend: heavy-duty oven gloves, sturdy aluminum baking sheets, and a Baking Steel.
Oven Gloves
Using thick, oven-safe gloves on each hand makes dealing with the baking sheet and smoking hot canelé molds a lot easier. This is especially true when you’re reaching into the oven to check when they are done.
Baking Sheets
I’ve tried using aluminum baking sheets of various sizes and found the quarter and half sheets to work the best. If you’re doing a small batch of canelé, say 5 or so, then I like to use quarter sheets that fit completely on top of my Baking Steel. If using a half sheet, be sure you don’t have any canelé molds not directly over the Baking Steel below the sheet.
Be sure your trays are of high quality. If the tray is thin it may warp right when you place it on the smoking hot Baking Steel — they won’t be ruined, but they’ll cause the batter to rise unevenly. Using a good quality quarter baking sheet seems to help alleviate this warping issue, and the entire sheet fits perfectly on my Baking Steel.
Baking Steel
A while back I switch from baking the canelé straight on a baking rack to a baking stone with a huge improvement in the final product. Eventually, I changed to using my Baking Steel and further improvements were immediately discovered.
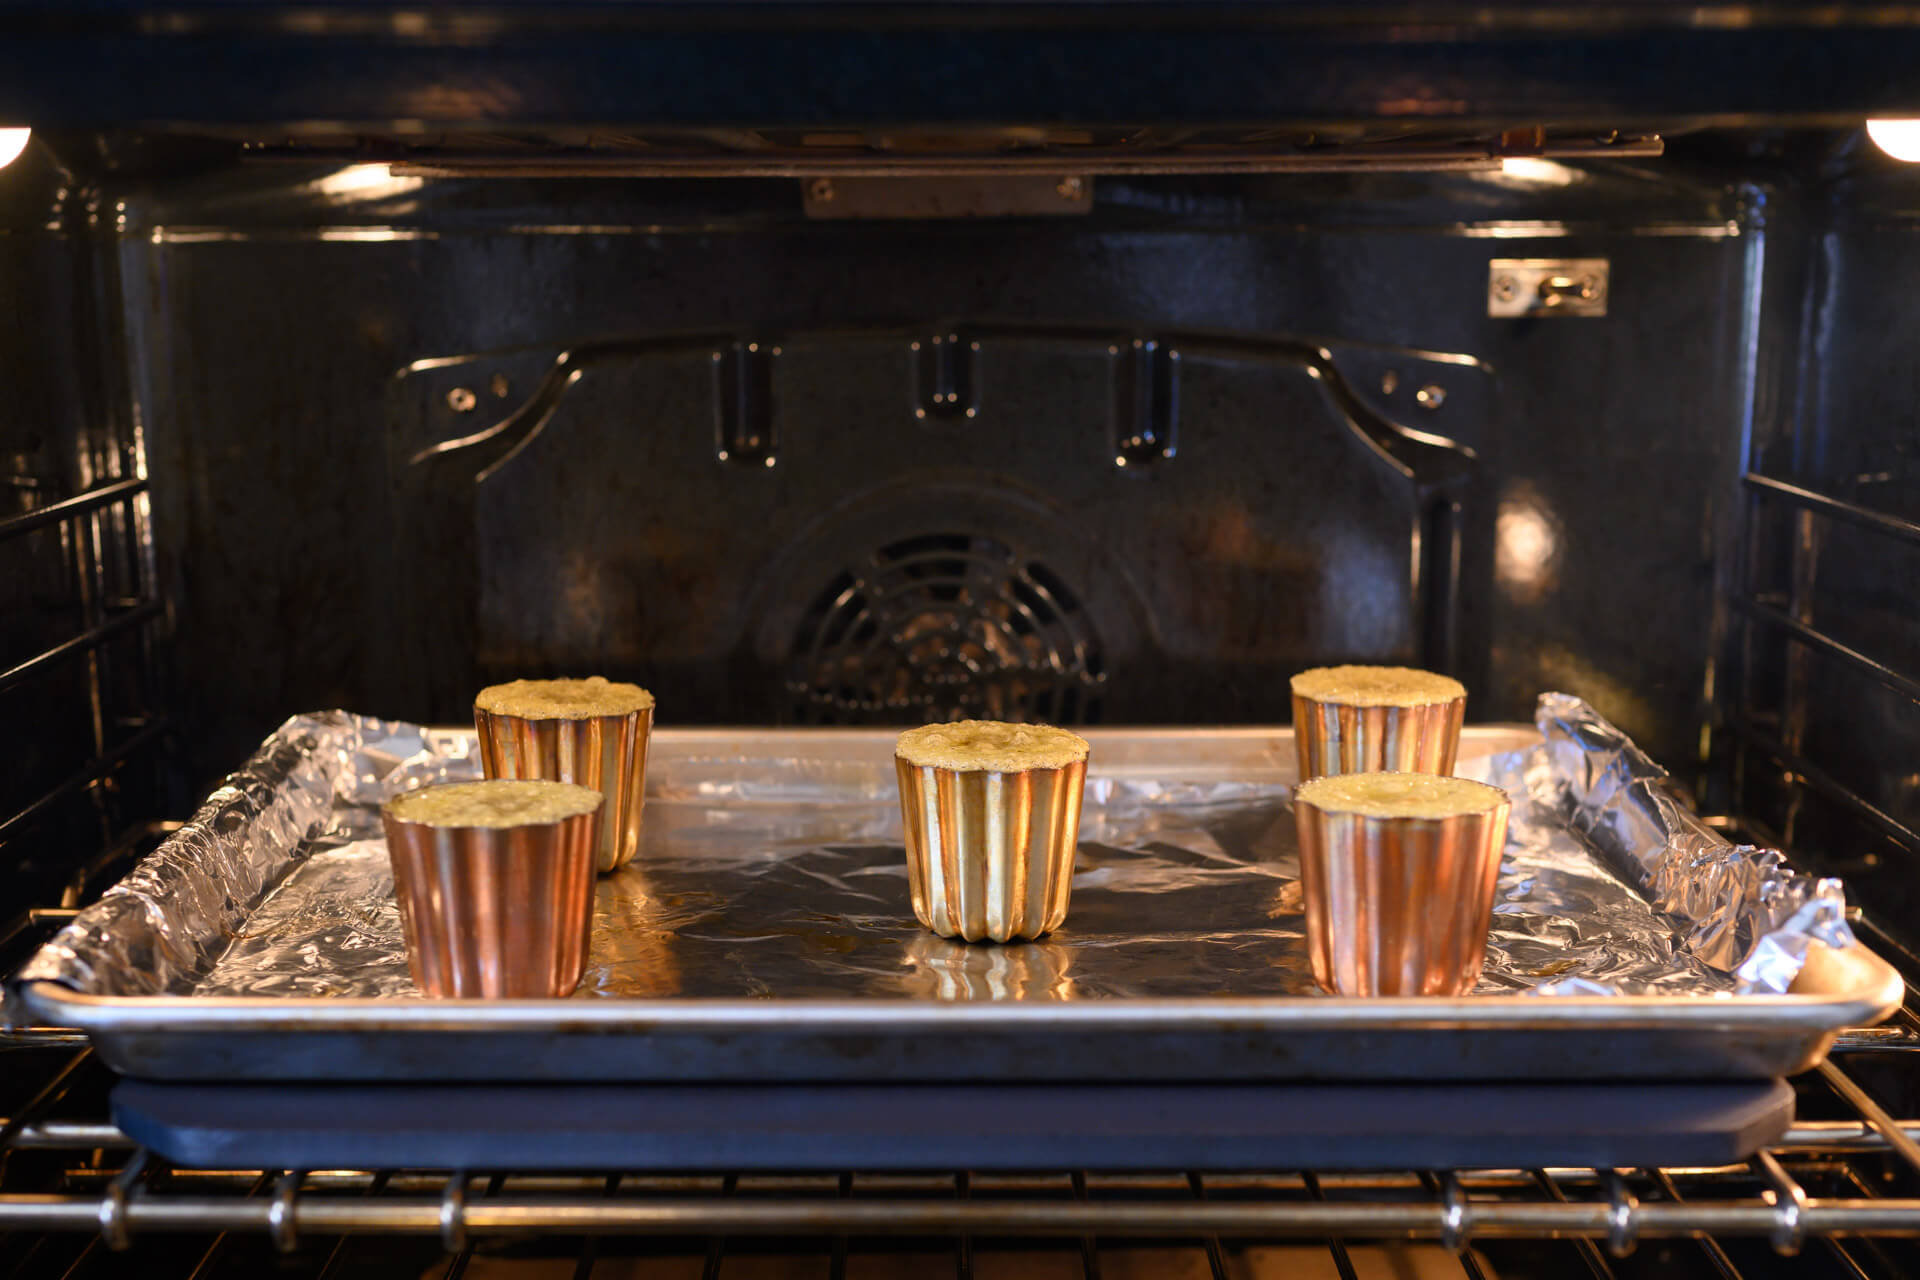
Because the steel gets so hot and efficiently transfers its “stored” heat to whatever is placed on top, it more effectively shocks the batter into baking faster. Using the Baking Steel also helped to alleviate the common issue where the top of the canelé is white (“cul blanc,” as they say) and the rest of the crust is dark.
Batter Storage
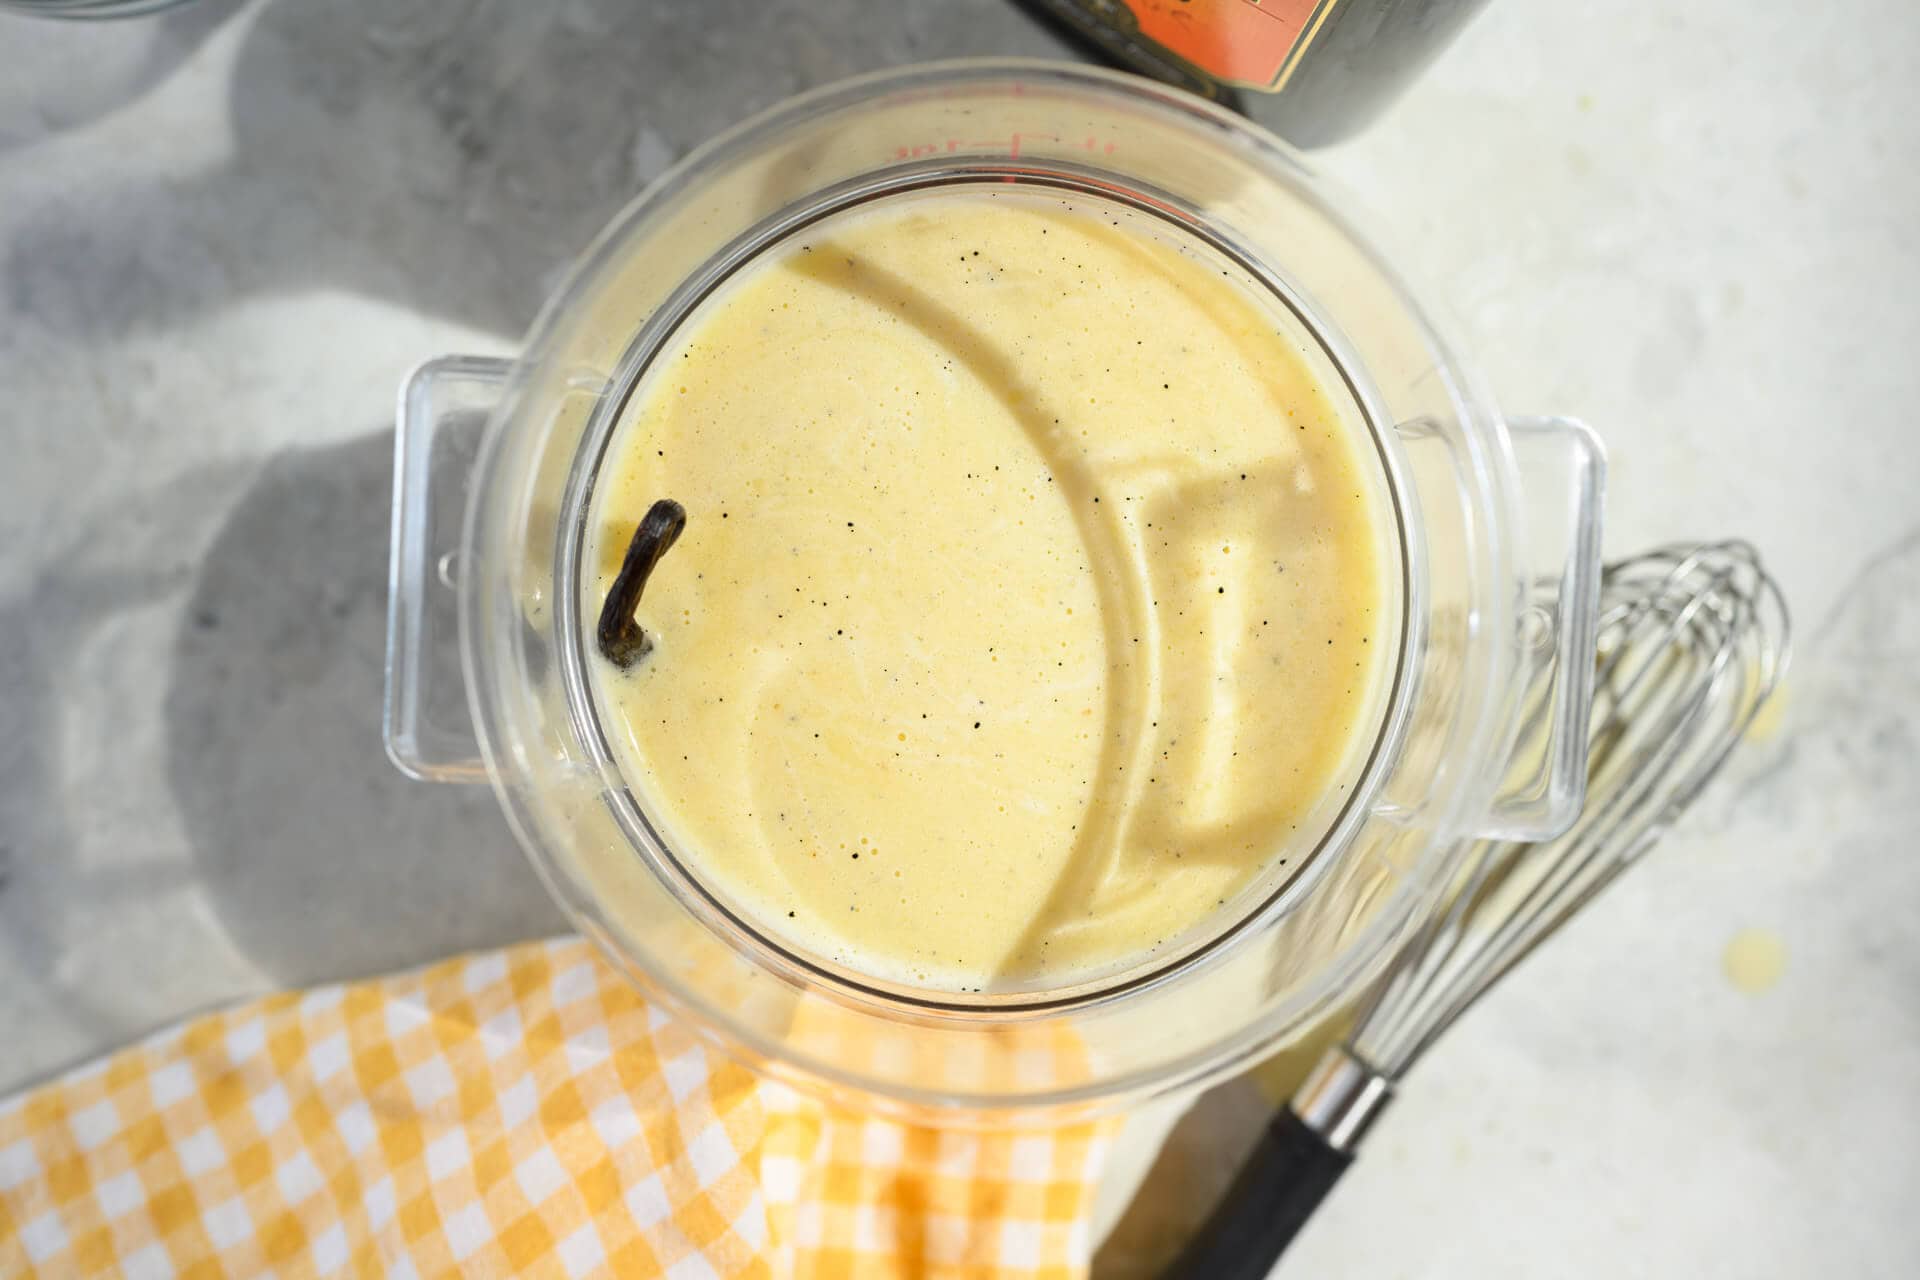
After making the batter it needs to rest for at least 48 hours (or up to 4 days) before using. I like to keep the batter in 1-quart Cambro containers (seen below) in the fridge during this rest. The containers conveniently hold all the batter and have a tight-fitting lid. On bake day, I gently whisk the batter to reincorporate, then pour it out into a measuring cup with a spout to fill the molds.
Canelé Molds and Seasoning
Copper Canelé Molds
Many argue that proper canelé should be made in tin-lined copper molds. I haven’t tried using anything other than copper so I can’t comment on other options (such as silicone canelé molds), but I do know the tinned Mauviel 2-inch (5.5 cm) canelé molds work incredibly well. When properly seasoned (more on this below) I have yet to have any sticking issues. They produce canelé with a deeply caramelized crust and a soft, tender interior — just what we want.
As recommended by the manufacturer, avoid cleaning the molds with any harsh abrasive or anything metal. After using them, I simply wipe them down with paper towels to ensure any burned-on crust is removed. I never wash them.
First-Time Seasoning
Tinned copper canelé molds require seasoning before their first use (like you would season carbon steel or a cast iron pan). It’s a simple process and only needs to be performed once, after which you’ll only have to lightly coat the interior of the mold with liquified beeswax.
I like to use organic, 100% odor-free beeswax to line my molds. I find beeswax works incredibly well at preventing sticking and also adds a touch of flavor to the final canelé. Some bakers prefer a mix of 50% beeswax and 50% clarified butter — this is another option.
To begin the initial seasoning, preheat your oven to 350°F (175°C).
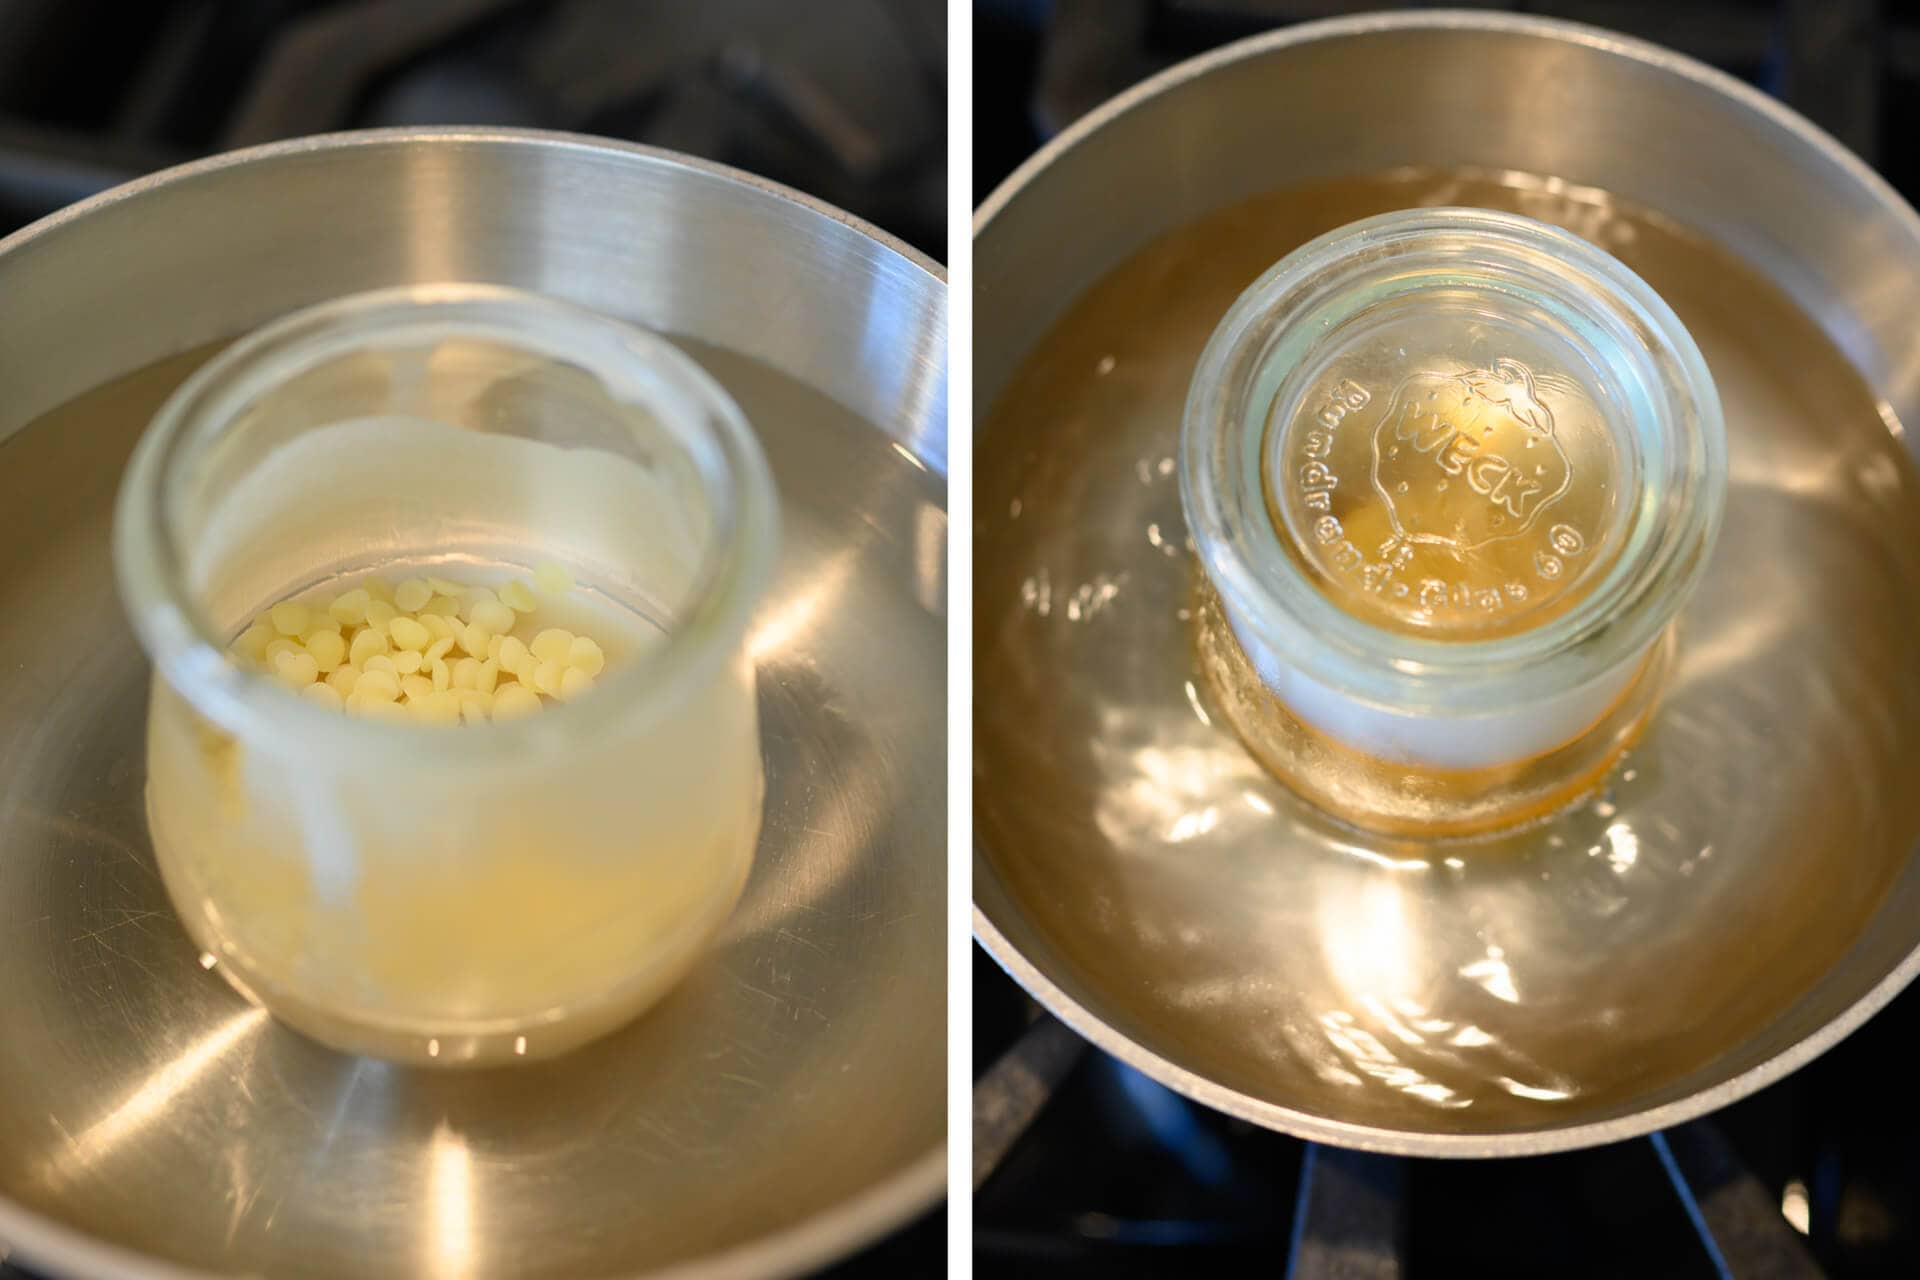
While your oven is preheating, melt your beeswax. Because I buy beeswax in pellets, I simply add the pellets to a glass jar (I use these Weck jars to melt and then store the wax for future use) and place the jar inside a saucepan with just-simmering water (do not excessively heat the wax) to liquify. Turn the stove to low to keep the wax liquid.
Next to your oven, place a piece of tin foil or parchment paper underneath a wire cooling rack to catch any excess wax drippings. Additionally, line a half or quarter baking sheet with tin foil and place the molds on the sheet, open side up. Once your oven is preheated, place the sheet with molds in the oven and bake for 2 minutes.
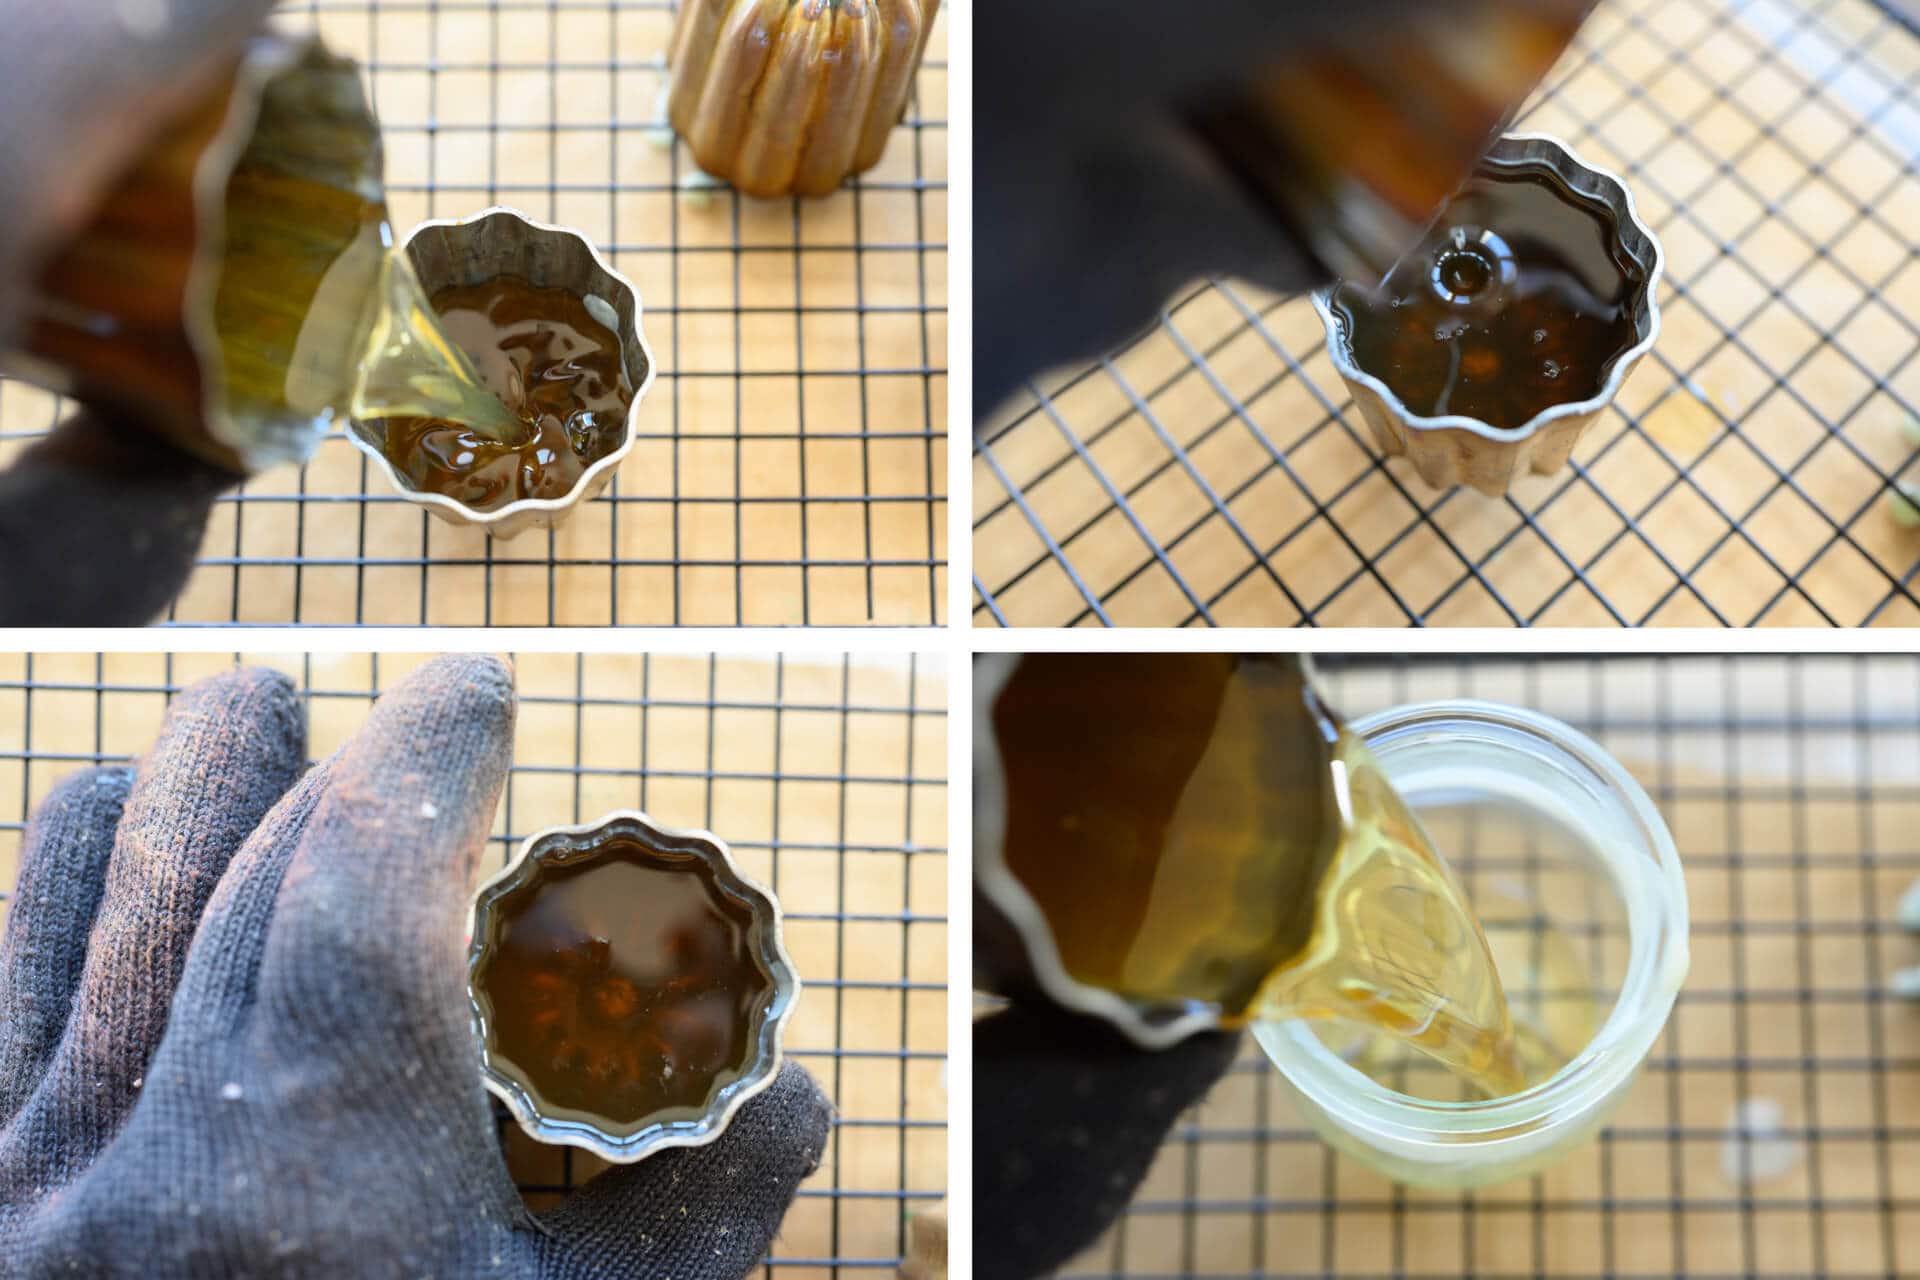
After 2 minutes, remove the sheet from the oven. While wearing oven-safe gloves on each hand, carefully pour the melted beeswax into one of the molds so it fills almost to the top (top-left in the photo above). Swirl the beeswax around slowly to coat, and pour the beeswax to the next mold (top-right, above). Place the seasoned mold open-side-down on a baking rack so the excess wax drips out to the tin foil. Continue pouring the wax from one mold to the next until all have been processed, then pour the remaining wax into the glass jar originally used for melting (bottom-right, above). You can store the wax, cooled, in the jar for the next batch of canelé.
Now, place the molds back on the baking sheet (without cooling rack but on top of tin foil) open-side-up and bake at 350°F (175°C) for 10 minutes. After this time, remove the sheet and pour out any wax that may have pooled at the bottom of the mold. Then, let the molds cool. Repeat the entire seasoning process one more time.
Now your molds have undergone their initial seasoning and this double-seasoning process won’t need to be performed again. The first time you bake these you won’t have to quick-season them, but every time after you will.
Important Tips Before Beginning
I find most of the problems I encountered when making these early on were due to really small issues that added up to bigger problems. This section has some of the tips and tricks I’ve found to help make these canelé a higher quality, more consistently. Don’t skip through this section!
Measuring Ingredients
As with sourdough bread, I prefer to measure out these ingredients by weight for accuracy. When dealing with the whole eggs: use a cracked eggshell to remove some of the white if it’s over the called for amount. And similarly, for the egg yolks I use the shell to drain the white, then pierce the yolk in the shell and pour out just enough to make the required amount.
Oven and Heat Management
Arguably the most important factor when making these is heat management. The first section of the bake requires intense heat to sort of “shock” the batter and force it to start forming a skin, or shell (this is why I like using a Baking Steel). If your oven is too cool when baking you’ll end up with uneven coloring across the finished result.
I find my oven works best when I’m making 5 of these at a time. I typically make 5 one day and then save the rest for another. A side benefit to only baking a few at a time: I prevent myself from eating two or three right once they cool. The guilt of eating almost an entire batch is too much to bear. When I do all 10 at once it works, but the batter rises up out of the mold a little more. This is because the oven temperature drops a little too much with all of them in at once. And speaking of batter rising from the mold…
Batter Rising from Mold
If at any point you see the batter start to rise up too high above the edge of the mold during baking, don’t panic. As long as this isn’t excessive, by the end of the total bake time, most of the rise will have collapsed into the mold. In fact, a little rise out of the molds is expected and just fine.
I’ve found rising like this is usually due to insufficient oven heat (and also could be an issue with over-waxed molds, creating too much heat insulation). To alleviate, you could try increasing the temperature of the oven next time.
Pale, Dented Bottoms
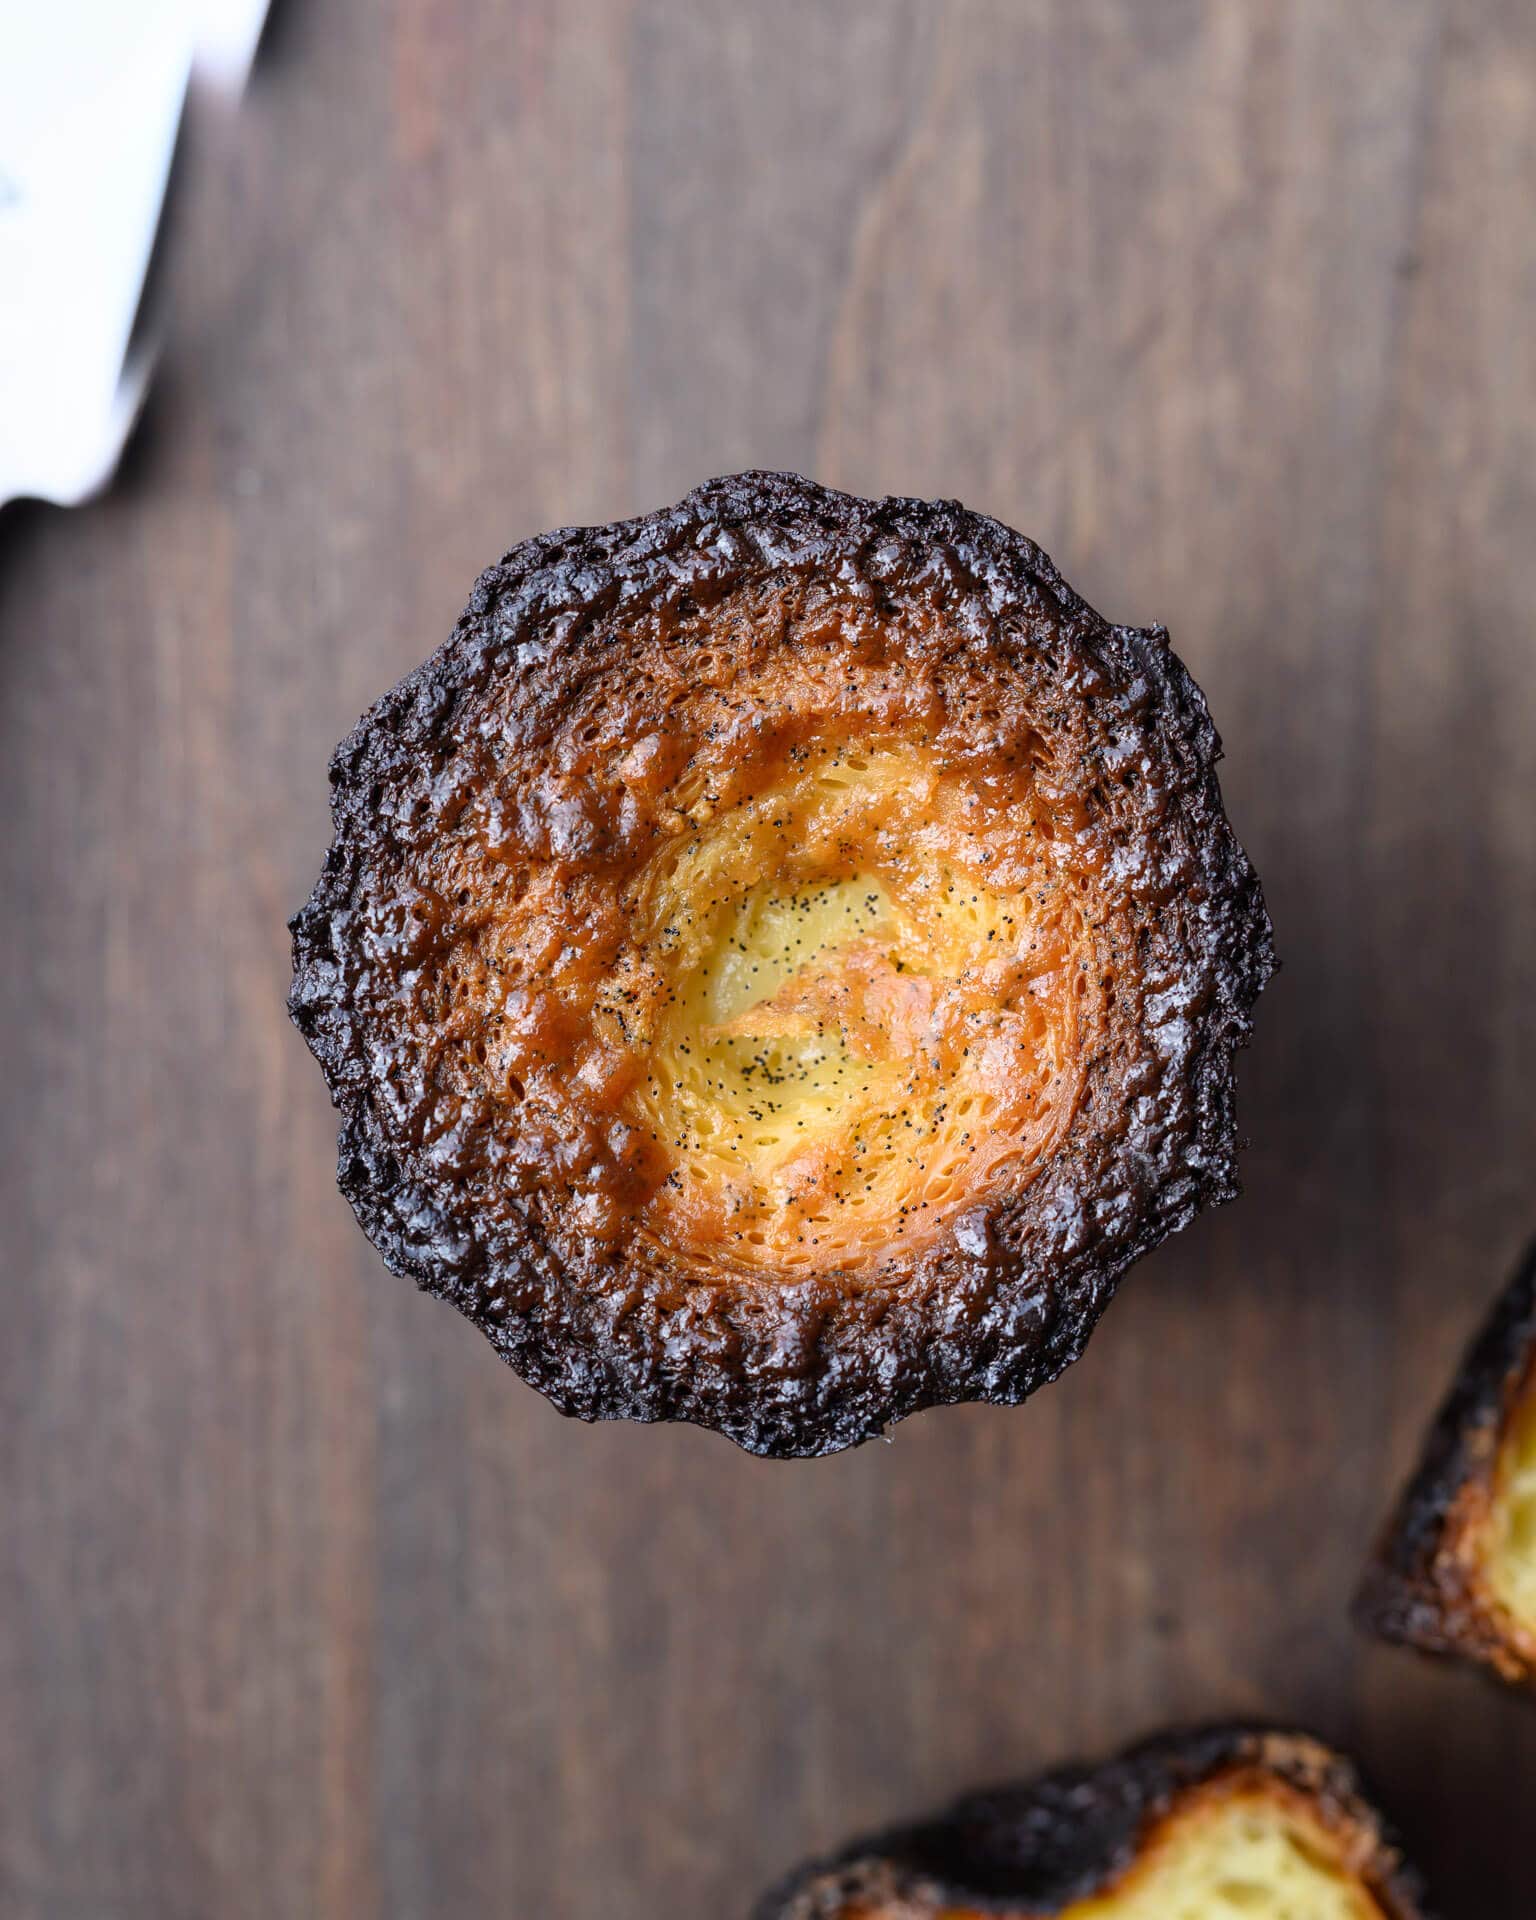
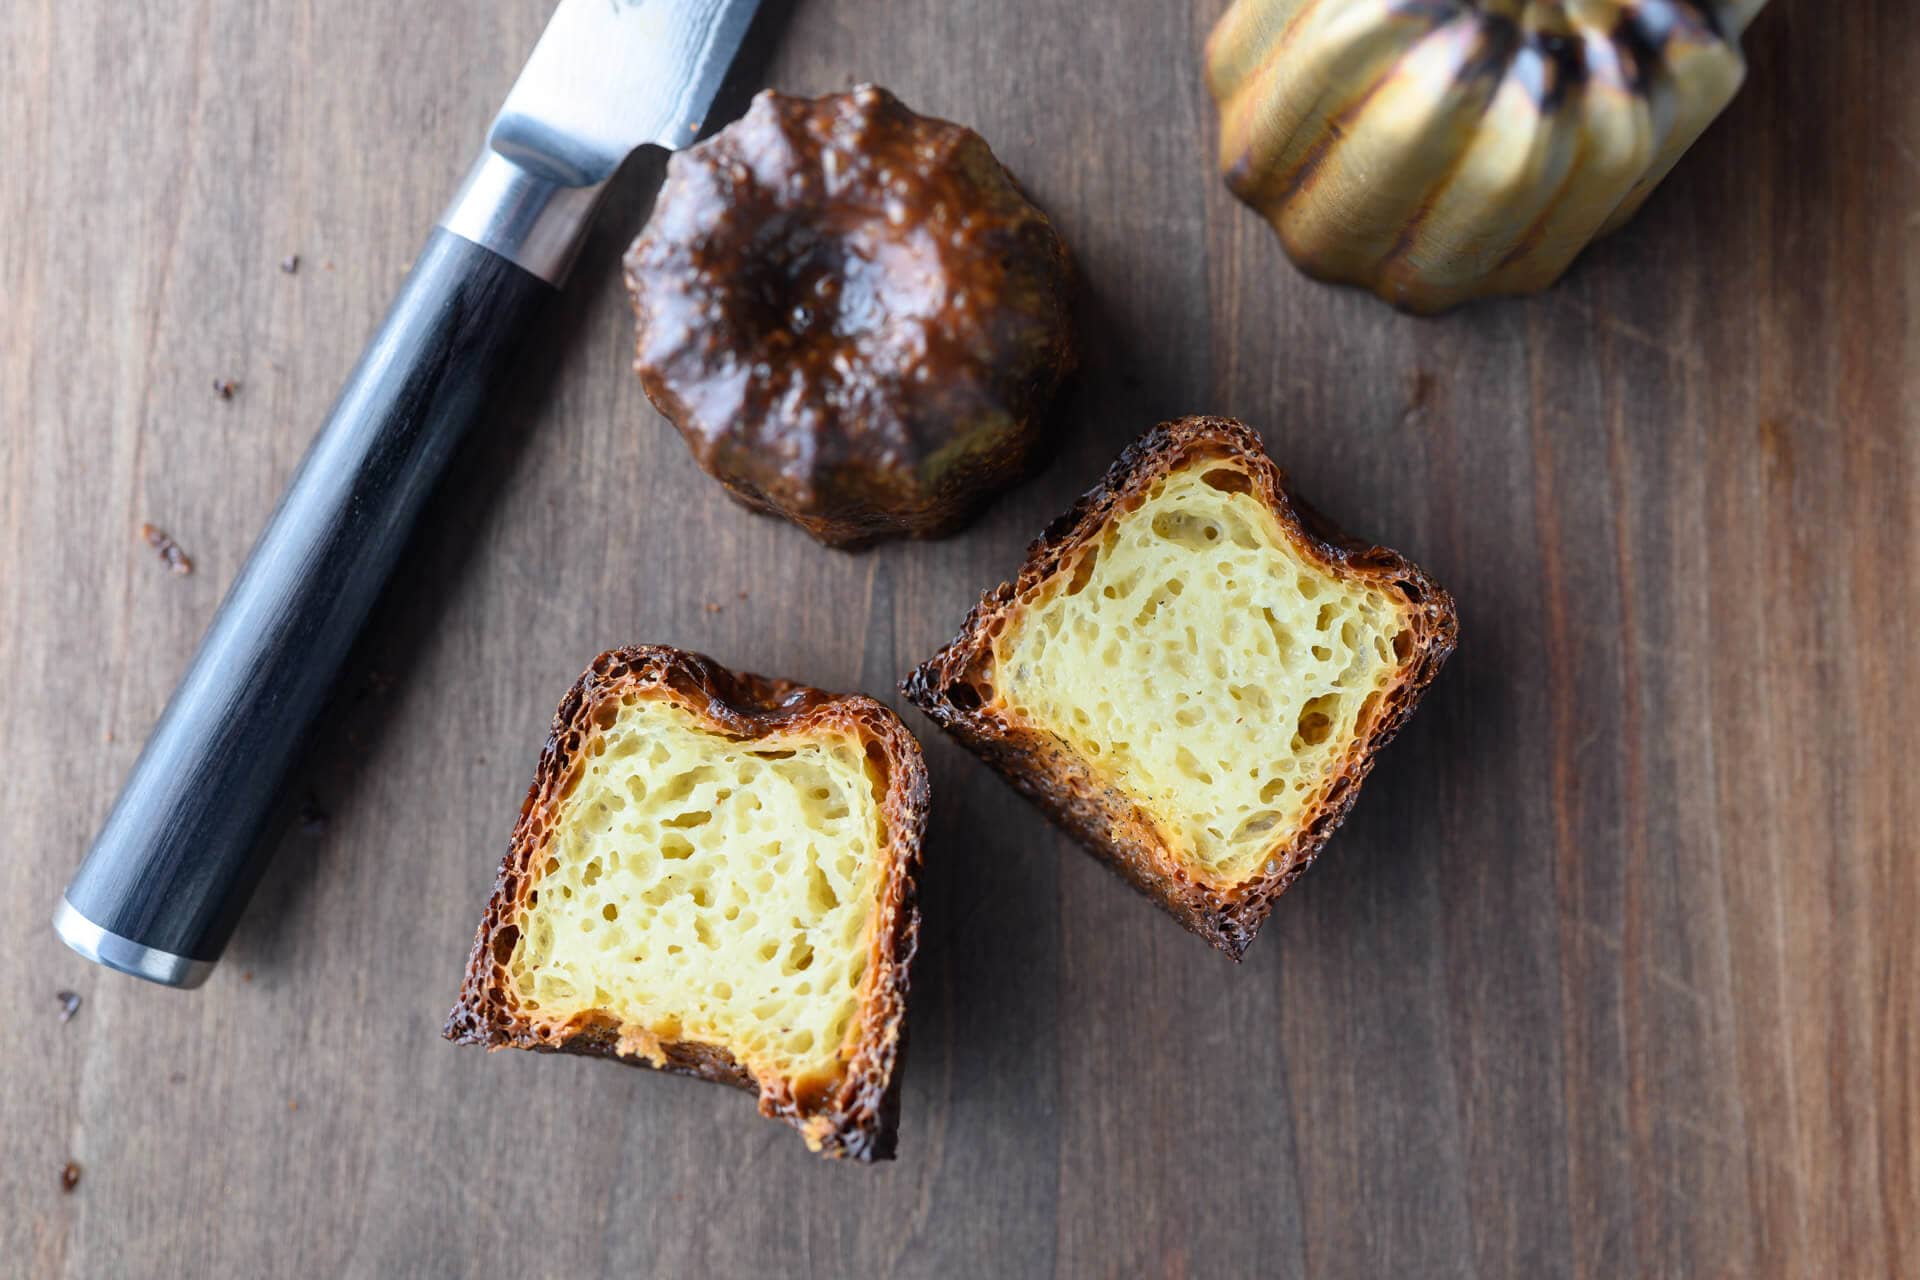
It’s normal for the bottom of the canelé to be a little pale and not fully brown (see image right). Additionally, I’ve found sometimes they cave in ever so slightly as liquid pools there when baking. My feeling is, a little of this is ok, as long as it doesn’t get excessive.
Canelé Recipe
Vitals
| Yield | Ten to twelve 75 g canelé (pre-bake). I usually get 11 or 12 in my 2″ molds. This depends on how diligent you are about wiping out every container thoroughly and salvaging every bit of batter. If you only have five molds, you can make one half one day and the rest another. |
Batter
| Weight | Ingredient |
|---|---|
| 475g | Whole milk |
| 200g | Confectioner’s (powdered) sugar (it’s important to use powdered sugar as it has some corn starch, which adds to the texture.) |
| 95g | All-purpose flour (I prefer lower-protein flour; even pastry flour would work well) |
| 85g (about 2 medium) | Whole eggs |
| 35g (about 2.5 medium yolks) | Egg yolks |
| 45g | European style butter, unsalted (I like Straus, 85% butterfat) |
| 20g | Rum (I like Bacardi Reserva 8-year). The amount of rum is rather low compared to other recipes, but I like more of a hint. |
| 1/4 teaspoon | Sea salt |
| 1 | Vanilla bean |
| As needed | Food grade, organic beeswax |
Method
Day One—Prepare Canelé Batter
Add the milk and the butter to a saucepan and bring up to 185°F (85°C), stirring occasionally. The butter will have melted, and the mixture will start to foam slightly at the edges. Remove from the heat and transfer to a medium-sized bowl or large glass pouring vessel. Scrape the seeds from the vanilla bean and add both the seeds and pod to the warm mixture. Let this all cool while you prepare the rest of the ingredients.
In a large bowl, sift together the flour, confectioner’s sugar, and salt. Note that it’s very important to sift these together as confectioner’s sugar tends to clump.
Add the whole eggs and egg yolks to a plastic cup or narrow pitcher. Blend together using an immersion blender (this helps blend the eggs thoroughly without incorporating air). Alternatively, you can use a whisk to blend them together, just avoid working in too much air.
At this point, be sure the milk mixture is mostly cool, if not, place it in the fridge for 15 minutes, then proceed. Remove, but reserve, the vanilla bean from the cooled milk mixture and slowly stream in the egg mixture while stirring. Then add the rum.
Pour the milk/egg/rum mixture batter through a fine-meshed sieve over the dry ingredients. Gently combine everything with a whisk (do not over mix or incorporate air) until combined and no lumps remain.
Pass the entire mixture once more through a fine-meshed sieve into a storage container with a lid (again, I like these 1-quart Cambro). Add the reserved empty vanilla bean to the container, cover, and place in the fridge for 48 hours.
Day Two—Rest Canelé Batter
Let the batter rest for 48 hours before baking the canelé. You could use them after 24 hours, but I’ve found it best to wait a full 48 hours for full flavor and a better texture.
Day Three (or up to five)—Bake Canelé
Quick-Season Copper Molds
This is a quick-seasoning step that applies a thin layer of beeswax to the mold before baking to ensure the canelé remove cleanly.
Make sure to use copper molds that have already been fully seasoned (see First-time Seasoning section, above).
Follow the steps in the First-time Seasoning section but perform this only a single time. After you do the 10-minute bake with wax, be sure to pour out any wax that may have pooled at the bottom of the mold (otherwise the tops of the canelé will take forever to bake fully). Once the molds have cooled a bit, place them on a plate and into the freezer for 30 minutes.
Do ahead: this quick-seasoning can be done any time with all the molds. After they’ve cooled, place them in a covered container in the freezer and store there until you’re ready to bake the canelé.
Bake
Place a Baking Steel (or, if you don’t have one, a baking stone, although I find the steel to work best) on a rack in the middle of your oven. While the molds are in the freezer, preheat oven to 450°F (230°C) for 1 hour. Yes, it’s necessary to preheat this long to ensure the Baking Steel/stone is thoroughly preheated.
Line a half or quarter baking sheet with tin foil and remove the rested canelé batter from the fridge. Whisk the batter (but don’t incorporate any air) to blend together the ingredients so they form a homogenous mixture (this might take 1-2 minutes). Transfer the batter to a measuring cup with a spout.
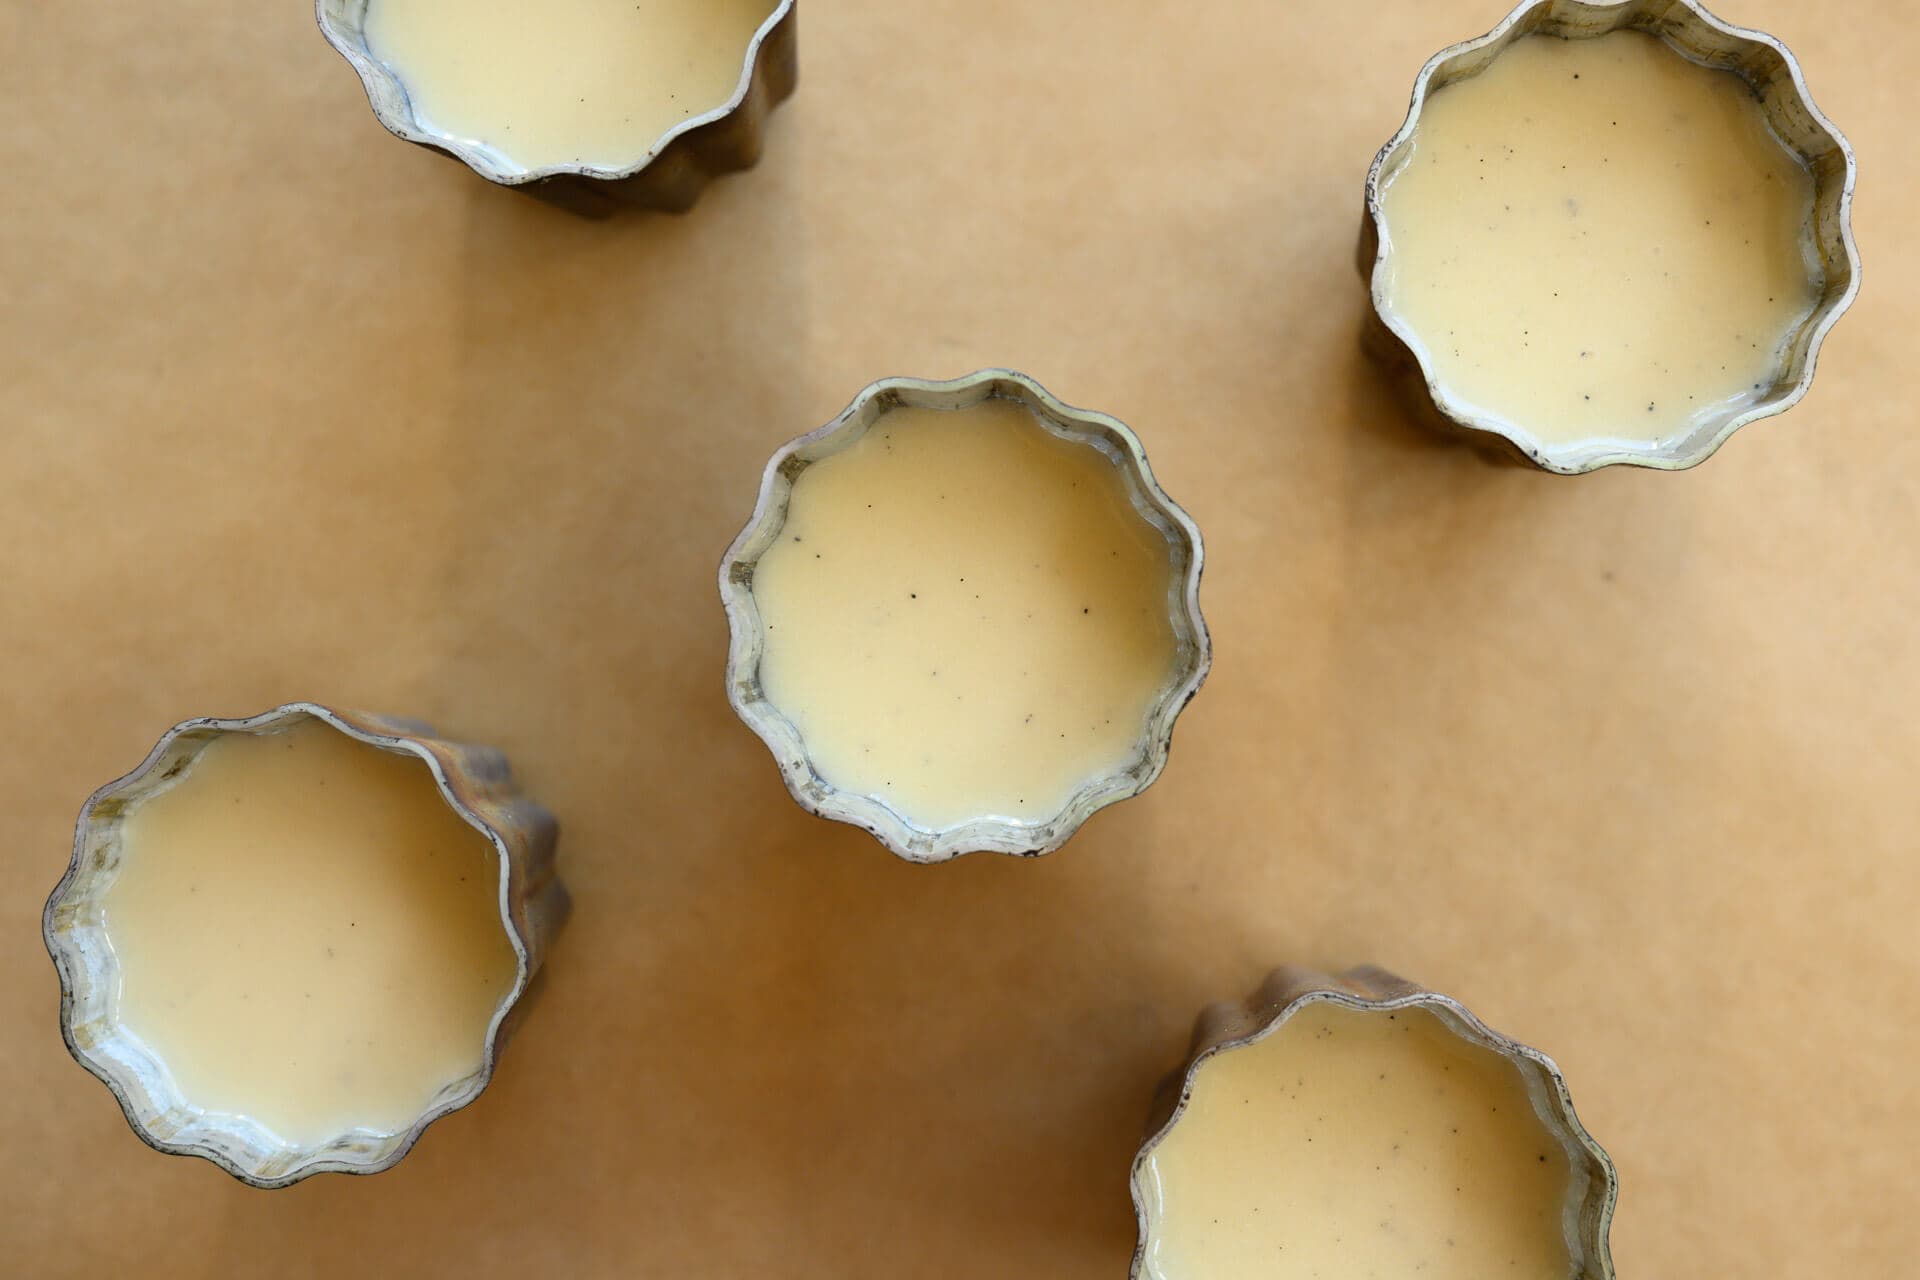
this is the applied beeswax seasoning to make them nonstick.
Pour 75g of batter (about 1 cm from the rim) into each frozen mold and place it on the prepared baking sheet with foil. Space them evenly on the sheet and place the sheet on the Baking Steel in the oven. Be sure the molds are direcly over the Baking Steel in the oven.
Bake for 15 minutes at 450°F (230°C).
After 15 minutes, quickly open the oven door and rotate the baking sheet 180°. Then, turn the oven down to 350°F (175°C) and bake for 50-60 minutes.
Keep an eye on them in the last 10 minutes of the bake time, these can quickly go from perfect to burned. In the image below, you can see how the crust looks when they went just a little too far in the oven (only 4 minutes more caused this!). They tasted fantastic except for a hint of burnt carbon flavor (to me at least).
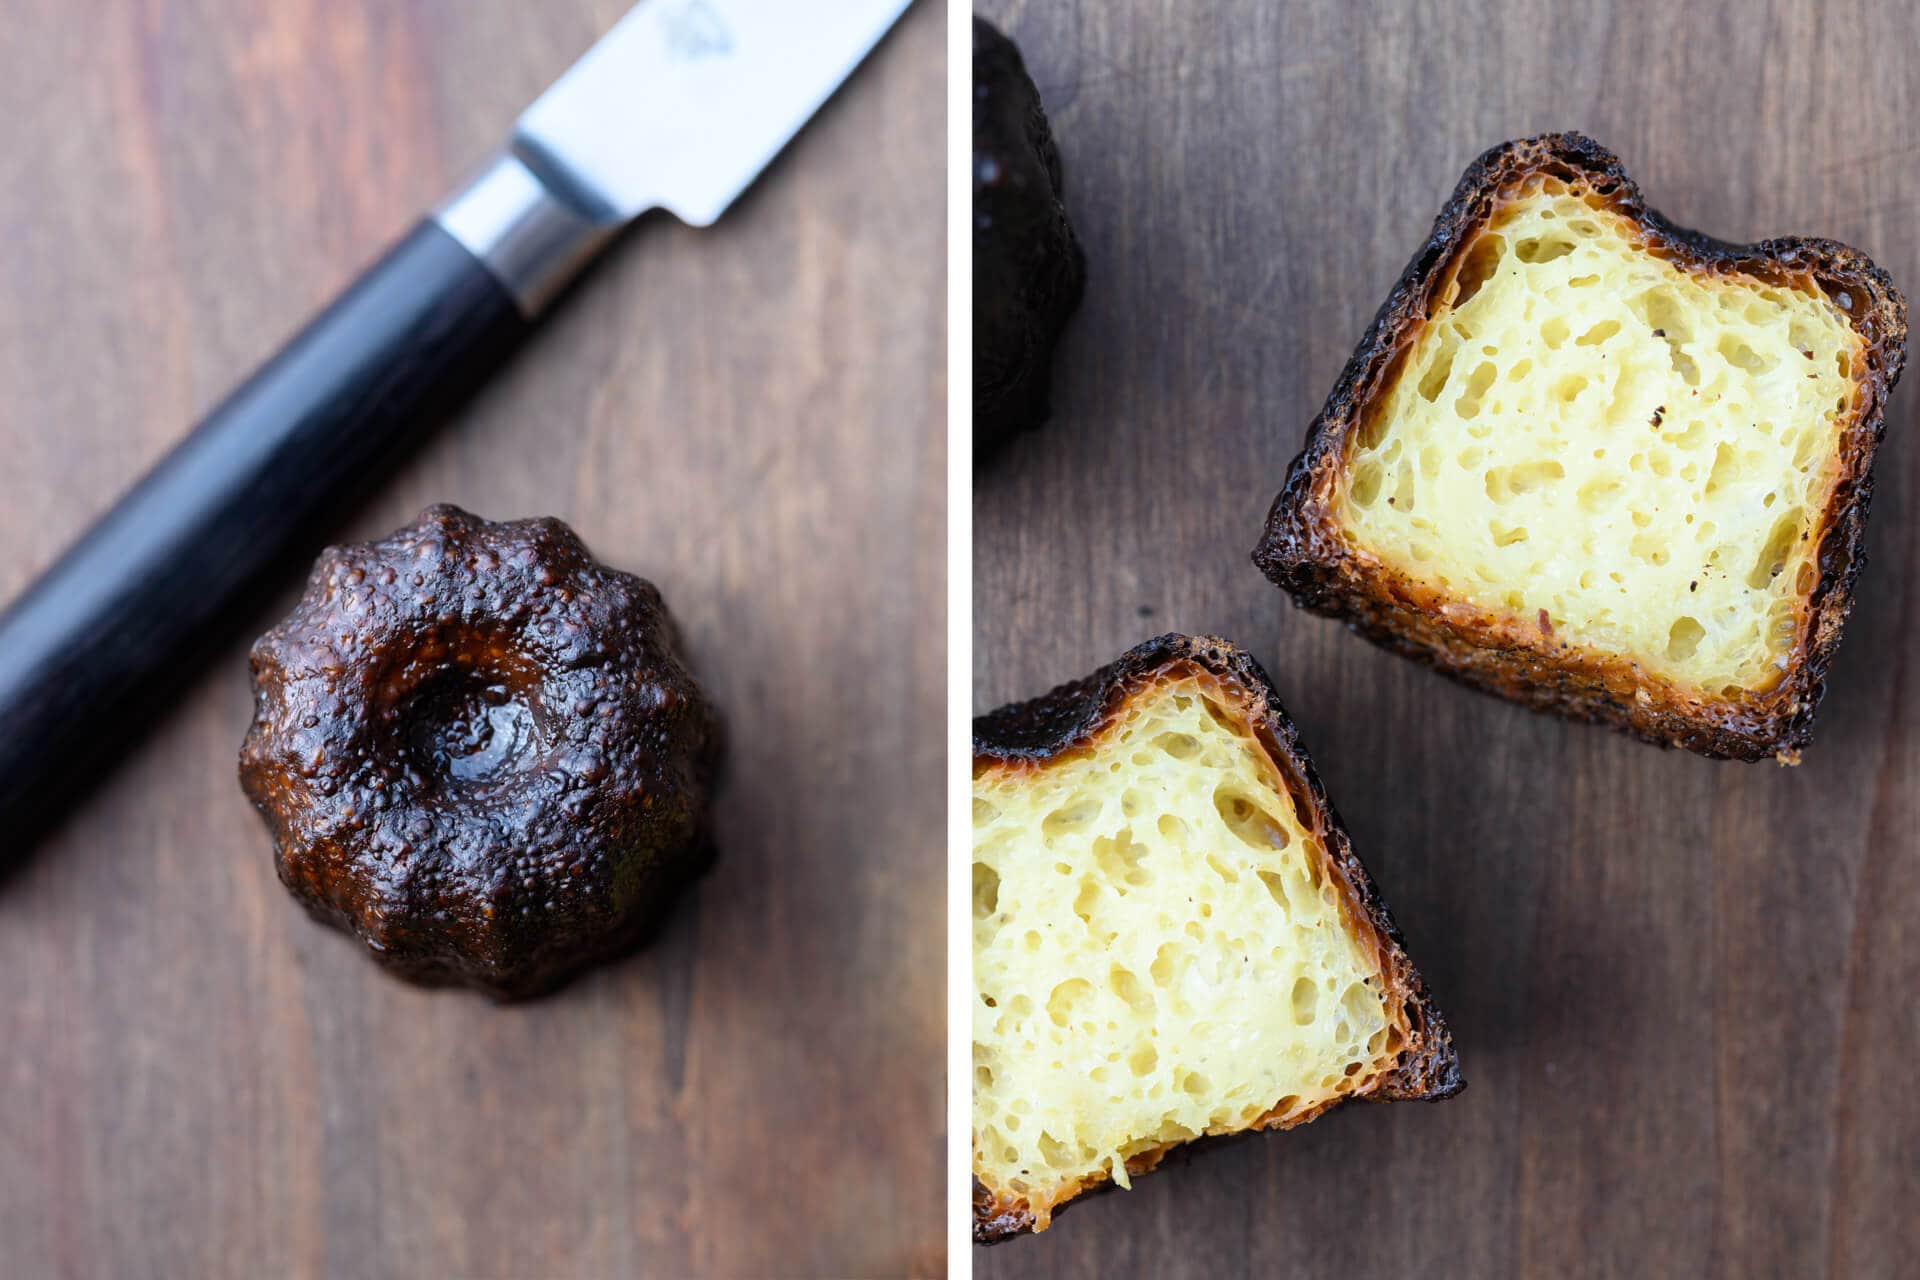
Some canelé will bake faster than others. Using gloves, check each canelé to see if it’s done by turning it out onto a cooling rack above a layer of tin foil on the counter. If the canelé is uniformly dark all over, it’s finished. If you find the top (the “crown”) is still pale-colored, or the color is not uniform, return it to the mold and place bake on the baking sheet in the oven. Check again in 5 minutes. As mentioned above, the bottom of each canelé will be a little pale in color compared to the sides and top. This is to be expected.
Keep an eye on the canelé in the last 10 minutes, these will quickly go from perfect to burned.
When all are finished, let the canelé cool on the wire rack for 45 minutes to 1 hour until hardened. They are best the day they’re made, but I found they can be blasted under the broiler for a minute or two and crisp up rather well the next day. Alternatively, you can bake half the batter one day and finish the rest the next.
When all are finished, let the molds cool and wipe them clean with a paper towel. Do not wash the copper molds.

Conclusion
When you make an exquisite canelé, it’s one of the most satisfying baking pursuits. You achieve something that’s at the same time characterized by extreme delicacy and heavy substance. The opposition between these two is what brings these so much eating pleasure. And! The hint of vanilla and rum peek through the eggy, buttery, custard-like interior elevates the well-tuned concert of flavors to maximum satisfaction.
Yes, the molds are very expensive, the planning and attention to process require a concerted effort, and you’ll likely have some less-than-stellar results, but I’ll say it outright: the prize is worth the investment and the endeavor. A classic French pastry with a sublime flavor made right from a home oven—how satisfying.
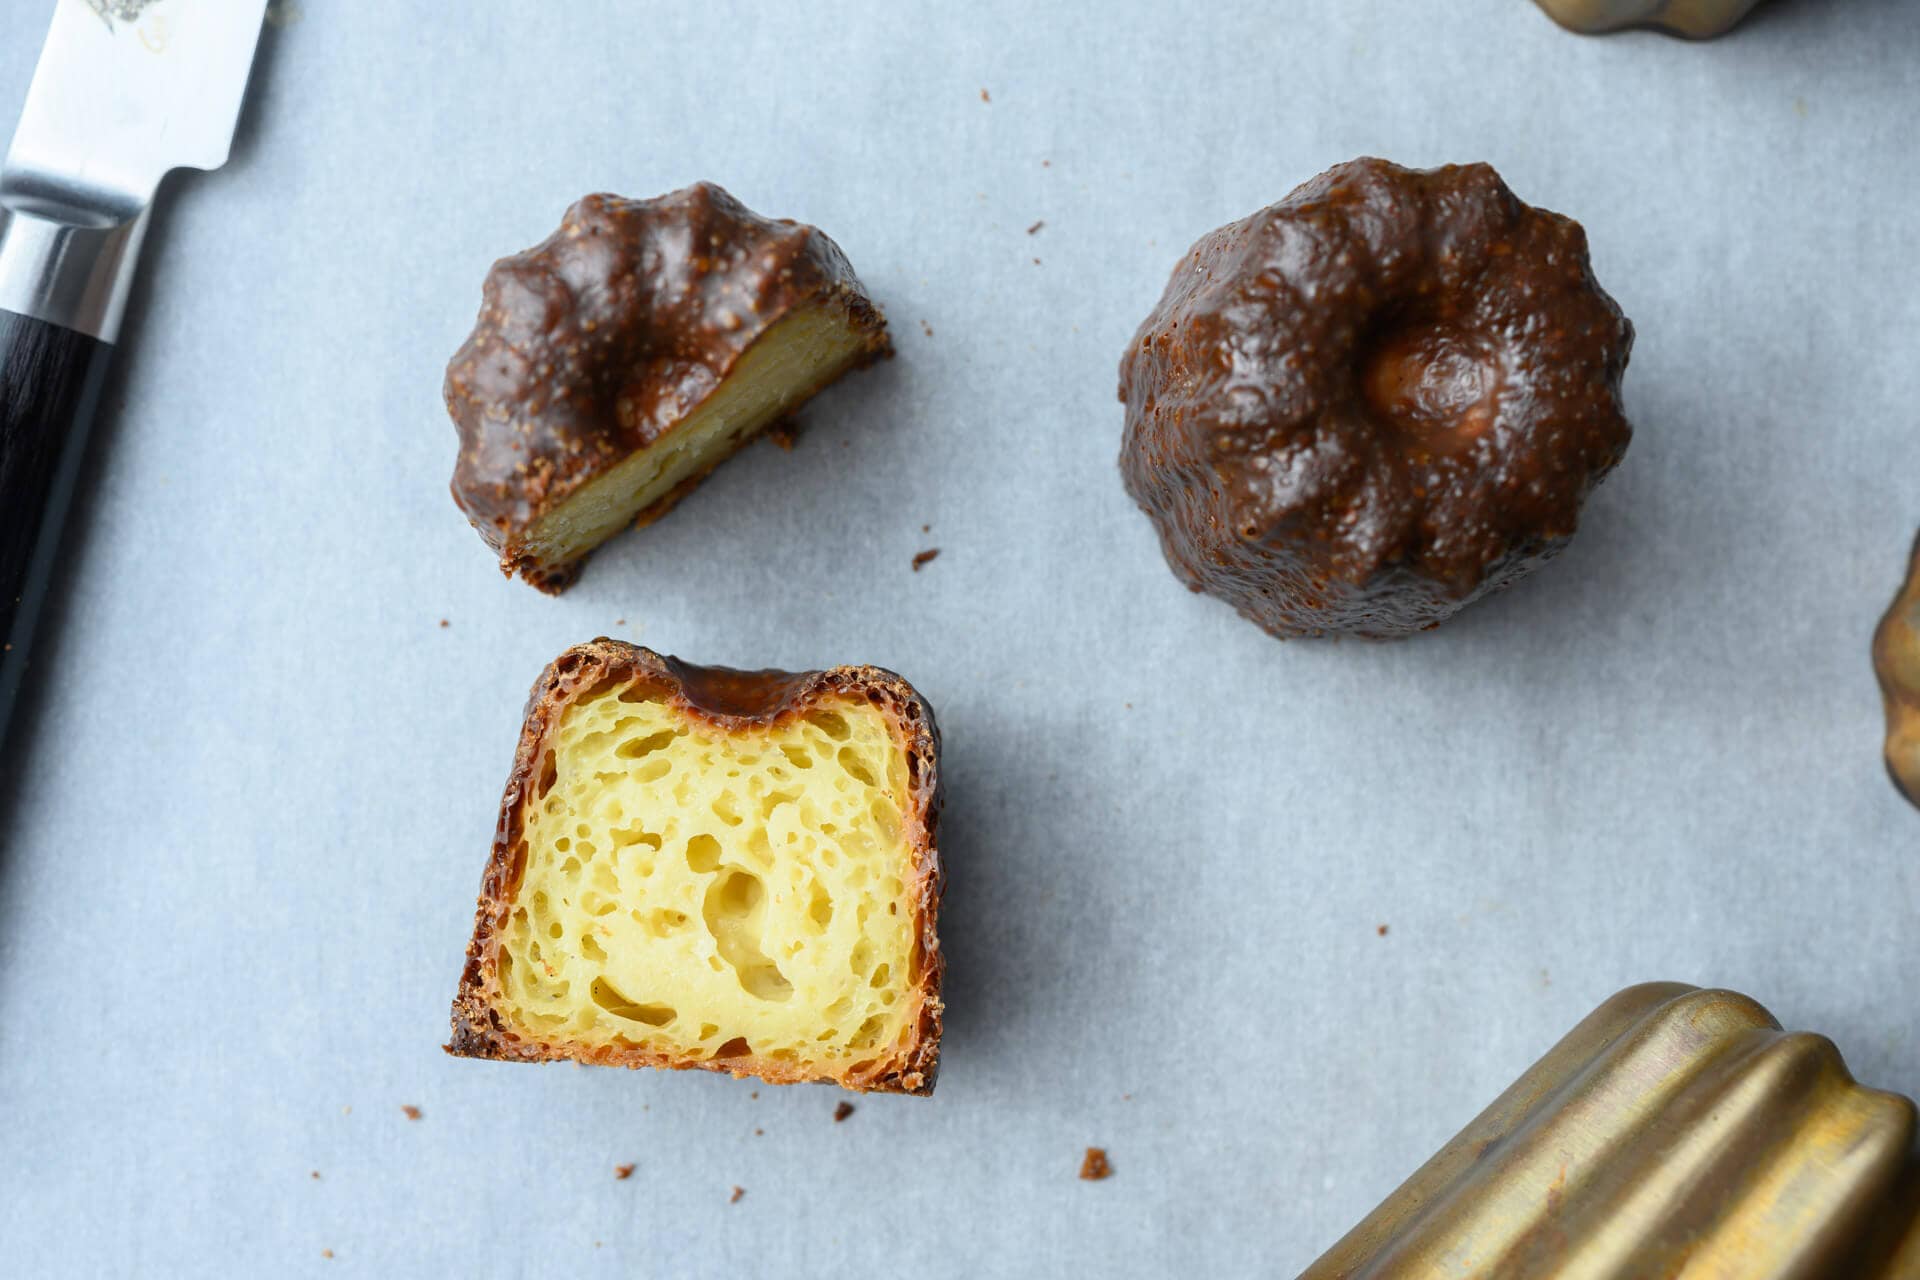
Well, there you have it, my treatise on making one of the most wonderful pastries I’ve ever eaten. I’ve been working on these—and this post—for a long, long time and I hope this helps you on your way to the land of canelé success. If you have any tips, pointers, or things you’ve tried to make these more consistent, I’d love to hear from you in the comments!
Happy baking and bon appétit!
Print
How to Make Canelé
- Prep Time: 2 hours
- Cook Time: 75 minutes
- Total Time: 3 hours 15 minutes
- Yield: Twelve 75g canelé
- Cuisine: French
Description
A canelé is a small French pastry containing a mix of vanilla, rum, egg, butter, sugar, and flour. They’re quite challenging to make, requiring patience, practice, attentiveness, and perseverance. But the result? A small treat with a deeply caramelized shell and a soft, custard-like interior.
Ingredients
- 475g whole milk
- 200g confectioner’s sugar (powdered sugar)
- 95g all-purpose flour
- 85g (about 2 medium) eggs
- 35g egg yolks
- 45g European style butter, unsalted
- 20g rum
- 1/4 teaspoon sea salt
- 1 vanilla bean
- Food grade beeswax (as needed to season and line molds)
Instructions
- Day One (Prepare batter)
Add the milk and the butter to a saucepan and bring up to 185°F (85°C), stirring occasionally. Remove from the heat and transfer to a medium-sized bowl or large glass pouring vessel. Scrape the seeds from the vanilla bean and add both the seeds and pod to the warm mixture. Let this all cool while you prepare the rest of the ingredients.
In a large bowl, sift together the flour, confectioner’s sugar, and salt. Add the whole eggs and egg yolks to a narrow pitcher. Blend using an immersion blender.
At this point, be sure the milk mixture is mostly cool. Remove, but reserve, the vanilla bean from the cooled milk mixture and slowly stream in the egg mixture while stirring. Then add the rum. Pour the milk/egg/rum mixture batter through a fine-meshed sieve over the dry ingredients. Gently combine everything with a whisk (do not over mix or incorporate air) until combined, and no lumps remain. Pass the entire mixture once more through a fine-meshed sieve into a storage container with a lid. Add the reserved empty vanilla bean to the container, cover, and place in the fridge for 48 hours.
- Day Two (Rest batter)
Let the batter rest for 48 hours before baking the canelé. You could use them after 24 hours, but I’ve found it best to wait a full 48 hours for full flavor and a better texture. - Day Three (Quick-season copper molds)
This is a quick-seasoning step that applies a thin layer of beeswax to the mold before baking to ensure the canelé remove cleanly. Preheat your oven to 350°F (175°C).While your oven is preheating, melt your beeswax in a small saucepan over medium-low heat. Next to your oven, place a piece of tin foil or parchment paper underneath a wire cooling rack to catch any excess wax drippings. Additionally, line a half or quarter baking sheet with tin foil and place the molds on the sheet, open side up. Once your oven is preheated, place the sheet with molds in the oven and bake for 2 minutes.
After 2 minutes, remove the sheet from the oven. Carefully pour the melted beeswax into one of the molds, so it fills almost to the top. Swirl the beeswax around slowly, and pour the beeswax into the next mold. Place the seasoned mold open-side-down on a baking rack so the excess wax drips out to the tin foil. Continue pouring the wax from one mold to the next until all have been processed, then pour the remaining wax into the glass jar originally used for melting.
Next, place the molds back on the baking sheet (without cooling rack but on top of tin foil) open-side-up and bake at 350°F (175°C) for 10 minutes. After this time, remove the sheet and pour out any wax that may have pooled at the bottom of the mold. Then, let the molds cool. Place the molds into the freezer for at least 30 minutes until you’re ready to bake the canelé.
- Day Three (Bake)
Place a baking steel on a rack in the middle of your oven. While the molds are in the freezer, preheat the oven to 450°F (230°C) for 1 hour.
Line a half or quarter baking sheet with tin foil and remove the rested canelé batter from the fridge. Whisk the batter (but don’t incorporate any air) to form a homogenous mixture. Transfer the batter to a measuring cup with a spout. Pour 75g of batter (about 1 cm from the rim) into each frozen mold and place it on the prepared baking sheet with foil. Space them evenly on the sheet and place the sheet on the Baking Steel in the oven.
Bake for 15 minutes at 450°F (230°C).
After 15 minutes, quickly open the oven door and rotate the baking sheet 180°. Then, turn the oven down to 350°F (175°C) and bake for 50-60 minutes. Keep an eye on them in the last 10 minutes of the bake time; these can quickly go from perfect to burned.
Using gloves, check each canelé to see if it’s done by turning it out onto a cooling rack above a layer of tin foil on the counter. If the canelé is uniformly dark all over, it’s finished. If you find the top (the “crown”) is still pale-colored, or the color is not uniform, return it to the mold and place bake on the baking sheet in the oven. Check again in 5 minutes.
When all are finished, let the canelé cool on the wire rack for 45 minutes to 1 hour until hardened. They are best the day they’re made but reheat well with a minute under the oven broiler.
When all are finished, let the molds cool and wipe them clean with a paper towel. Do not wash the copper molds.
Notes
Be sure to season your canelé molds before their first use.
It’s best to let the batter rest for at least 48 hours after mixing (and this can be extended to up to 4 days).
Troubleshooting
Do I have to use copper molds to make canelé?
It’s hard to compete with the efficiency and effectiveness of copper. I haven’t tried silicone molds, so I can’t comment on how well they work, but for me, copper is the way to go.
Why do my canelé end up with a white top?
During seasoning, you might have too much beeswax pooling at the mold’s top (the crown). Be sure to let the wax drain out after you fill them by turning them over (so the open side is facing down) on a wire rack.
Additionally, it could be that they’re not done baking. Check the top of each one upon taking it out of the oven; if it’s not done, return to the oven for 5 minutes more. A Baking Steel/stone helps with this issue.
Why is the outside of my canelé nice and crispy but the inside hard (and not custardy)?
You’re likely baking these too long at too low of a temperature. Try increasing the temperature of the long portion of the bake by 25°F (4°C) and pull them from the oven sooner. Be sure not to exceed around 450°F (230°C) if you’re using tin-lined molds.
Can I use regular granulated sugar instead of confectioner’s sugar (powdered sugar) to make canelé?
The confectioner’s sugar has a small amount of corn starch added, which helps the batter attain a more custard-like mouthfeel. If you switch to granulated, I’d recommend adding corn starch to compensate, but I can’t say exactly how much, as I haven’t fully tested this.
What is the best way to remove beeswax from a cooling rack?
I use paper towels to remove as much as possible from the cooling rack once the wax has cooled. That gets probably 90% of it, the wax kind of chips off into the trash can. For anything left, I use warm water to melt it and scrub it off with a sponge.
What’s Next?
For more decadence, read through my dark chocolate-cherry sourdough bread—yes, it’s as good as it sounds.
If you use this recipe, tag @maurizio on Instagram so I can take a look!


133 Comments
Hey Maurizio – just about to bake a batch of 4 after leaving batter 4 days in fridge. Two questions:
1. Should the batter also be cold when poured into the moods and into oven?
2. Convection – on or off? And if on, same temps (450 & 350) or reduce by 25F?
Buon anno!
Hey! It’s fine if the batter is cold. I use convection (as I mention in the post above!).
Just attempted my first ever batch and mine turned out a bit sunken, with hollow centers. Seems like the custard became a blob on the bottom with a large air pocket space above it making it hollow. Any idea what I did wrong?
Did you stir the custard after it was removed from the fridge?
Hello Maurizio, I have the exact same issue – canelés end up hollow with a dense blob inside. We are required to blend it with an immersion blender and I wonder whether I overblend the batter. Any thoughts are much appreciated. Thank you!
This was a new posting for me. I have my own apiary so I am always looking for ways to use the wax I also harvest. You are a great instructor. Right out of the cage they were great! I like to think of them as the French equivalent to a glazed donut, but much better.
Whoa, that’s amazing, Jeffrey! Would be incredible to use truly local bee’s wax! Glad to hear they came out great 🙂
Like a Yorkshire Pudding with added rum and Vanilla. Great recipe and description. Thank you.
Sounds right to me, John! Thanks for the kind words 🙂
Thanks for posting such a detailed recipe. I have had success on the first batch of 4 and then a series of failures and various things I did to fix failures did not help. I thought hard…what I was doing was this: I poured 75g of batter from large pitcher into a small pitcher and then into the mold….in that process, some batter remained in the small pitcher. Canele from that mold came perfect, the second one was acceptable and rest of the 2 had blond butts. On the last batch, I poured just 70g of batter per mold. Also, rotating the pan as instructed after first 15 minutes and then again midway through rest of the time helped. I just wanted to post my story to give some ideas to other who may be having issues. Have fun baking and workout/lift hard at the gym so you can eat all the failures without any unwanted weight gain ;-).
Glad to hear things are going mostly well, Kat! That’s very interesting regarding the pitcher. I wonder if the remaining batter in there was thicker, maybe the contents settled and you had more flour there. I’ll have to think about this! And yes, you’re right, extra exercise needed 🙂 Enjoy!
Have you tried making caneles with einkorn? If so, how would you sub the einkorn for the AP flour? Thank you!
Yes! They came out incredible, actually. I simply swapped out 100% of the ap for einkorn. AP einkorn would be excellent, and I’ve even done whole grain (not quite as much rise and openness, but still great).
Hi there Maurizio,
about what temperature do you think the batter should be going into the oven. I’ve had limited success making canele and seem to get marginally different results between batch 1 and 2 if I leave the batter out on the counter while the first batch bakes. Generally, my issue is (like others) canele popping out of the mold, cooking, hardening, and then not falling back into the mold. Do you think the starting batter’s temperature matters?
That’s a really great question. I can see reasons why the temperature might matter, and reasons why it may not. I would probably opt for freezing the molds again between batches, then pouring the batter in and baking as you would the first batch—that is, if you’re getting good results there. I guess my suggestion is to try and keep the conditions the same for each batch, because it sounds like what you’re running into shows that temperature does matter!
Hi Maurizio,
I have fallen into the rabbit hole of canele making. Just bought some Mauviel canele molds. However, I noticed that the inital ‘shocking’ of the batter happens at 246C. However, since Mauviel molds are tin-lined & tin has a melting temperature of 231C, would baking the molds at 246C affect the tin lining? Re-tinning services are not available in my country so I am quite fearful that I would shorten the lifespan of my moulds.
Thank you in advance for the advice!
Hey, JT! I would recommend not exceeding around 230°C (450°F) with the molds. Lately, this is the max temperature I’ve been going up to with mine as well (and have seen equally great results). I’ll update the post. Good luck on the process, it’s a lot of fun and so worth the effort! Keep me posted on how it’s going 🙂
Hey, Michelle! I would say you’d likely use the same amount of 50/50 and I do here with pure beeswax. It should just be a light layer inside the mold, too much and the canele will rise up out when baking!
I’ve found the wax can pretty much last indefinitely, if it’s just 100% beeswax. If there’s butter in the mix, I’m not sure, but it would likely spoil at some point.
You’re right, the success of this recipe has a very small threshold… It comes down to minutes.
If you use the baking stone, be sure it’s 100% fully saturated with heat—a long preheat is necessary for any surface with these. You can use an IR thermometer to verify.
These are a very difficult pastry to nail 100% of the time, that’s why they’re held with such high regard when the come out perfect 🙂
Hi Maurizio,
I have been trying out your canele recipe for the past few months. The recipe is awesome! But sadly not always have good results.
Recently what I experience is that the canele grow very tall and when removing from mould it got stuck. It have tearing look at the side of the canele and also don’t have crust on the side.
Do you think is my oven heat of the beewax coating that causes it?
May I know how thick of the beewax do you coat your canele mould?
I always tend to wash my canele mould because it always stuck.
Sorry that I have a lot of questions about canele 😭
Would like to hear from you soon.
Cheers
Ivan
Glad to hear it’s been going mostly well, Ivan! They are indeed quite temperamental. I’ve seen several reasons they pop out excessively: 1) too much beeswax, causing what I think is a temperature insulation issue (meaning, they don’t get hot enough, or too hot), 2) the oven is not hot enough (be sure to preheat your baking surface!).
The wax coating should be very, very thin. If you follow the steps in my post, most of the wax should slide out when you turn them over to let them drain. If there’s too much wax, you’ll have issues with them rising too much (in my experience).
Hi Maurizio,
I have been trying out your canele recipe for the past few months. The recipe is awesome! But sadly not always have good results.
Recently what I gave is canele grow very tall and when removing from mould it got stuck. It have tearing look at the side of the canele.
May I know how thick of the beewax do you coat your canele mould? I always tend to wash my canele mould because it always stuck.
Would like to hear from you soon.
Cheers
Ivan
Hi Maurizio. I’ve been down the rabbit hole of canele for almost two years and after having some pretty great success I’ve fallen off the bandwagon recently for no apparent reason. I’ve been trying various ingredient amounts, combining methods and bake times/temps. I have an aluminum Chefmade 12 cavity non stick mold I’ve gotten great results with but in the last 4-5 months things have just been off. Cul blanc, slightly mushroomed bottoms etc.. I am going to tee up your recipe and will be buying a baking steel and copper molds. I’ve found a cheaper source for it seems high quality copper molds. Not sure if you will allow this as they are not an affiliate of yours. I have no financial interest in this company, just came across them in a google search. Made in France and shipped from Bordeaux. $13.00 each inclusive of shipping.
https://www.laboetgato.fr/en/11_moule-a-canneles
I’ve used your site for sourdough as well and want to thank you for sharing all of your thorough expertise.
Hey, Vance! Sorry for the delay. Those molds look good (and no worries about posting links). I’m curious, how did they turn out? Did you get out of your canele rut?
Thanks for the response Maurizio. My copper molds have not arrived and I have yet to try your recipe with my existing molds but will very soon. I’ve been using a recipe that uses 3 Tbsp cornstarch in addition to 120 grams of AP flour and I’ve discovered that small amount of cornstarch lends a softer/denser/more “custardy” crumb than recipes I’ve used which have no corn starch. I’ll post results once I receive my copper molds and I try your recipe.
Ah, very interesting! Yes, that’s once reason I use powdered (confectioner’s) sugar as it has a smidgen of corn starch.
I just picked up a set of silcone canele molds I’m hoping to test with soon!
Hi! I’ve made this a couple of times already using your recipe and they’ve turned out fantastic! I was wondering what your thoughts were on freezing them? So after they’re baked perhaps?
Glad to hear that, Maria! I think it’d be possible, maybe blasting them under the broiler after they’ve thawed in the fridge? I don’t think you’ll have top quality that way, but it might be worth a test!
Hey Maurizio, thanks for the awesome detail on your recipes, especially this one! I made the canelé today and for a first attempt, came out pretty well.I used a heavy non-stick aluminum mold (12 cups) and only filled the outside cups. They were done after 30 minutes at 350 degrees on a sheet pan, on a baking stone. Got the dreaded ‘blond butt’ and next time I think I will set the mold on foil right on the baking stone rather than on a pan. Again, thanks for the terrific site.
You’re very welcome, Deb! Glad to hear they came out pretty well. They are challenging but so worth it. Yes, going right on the stone will likely help. Also, be sure that stone is fully saturated with heat by preheating for whatever time is necessary (I’ve been bitten by this “cold stone” in the past!). Have fun and enjoy 🙂
It’s been pretty much impossible to find vanilla beans this year. I have some high quality vanilla paste, which says 1 tbsp = 1 vanilla bean. Would this substitution throw off the recipe?
Hey, Allison. I’ve not used paste, but I think it’ll work just fine! If you give it a try (and I think you should), let me know how it works out. I, too, have been having trouble finding beans and I’m almost out.
Will do! Thank you.
Using the paste worked very well. I was worried, with such precise measurements, that adding a tbsp of liquid might be problematic. In fact, for some reason I added 2 instead of 1. I’ve never made these before, nor even tasted them, but my friends tell me that I “nailed it.”
I also accidentally boiled the milk instead of scalding it and then added the vanilla. But I was a bit worried that the boiling would wreck something so to be safe I did it over again correctly. It wasn’t a total loss, as the boiled mixture with cocoa powder, sugar, and Courvoisier turns out to be quite tasty.
Anything with Courvoisier tastes good to me 🙂
Glad to hear they turned out great! Well, since we’re all hurting to find vanilla beans at the moment, glad to hear this is a viable alternative! Thanks so much for reporting back.
How does this compare to the Tivoli Road bake time and temp? In the book it’s a substantially lower temp for a very similar amount of time. Thinking about attempting your bake and theirs
For me, the higher temp has been more consistent here in my home oven (as is using the Baking Steel). That super high heat and shock prevented too much rise out of the molds — it’s working really well for me!
Great article! The tip with about the baking stone helped a lot. Thank you!
Happy to hear that!
I love your recipe
Hi, I would like to ask you a few questions for my school projects. Questions are mostly about the forming process and the exterior also the interior of the Canele. I want to know the factors that effects the forming process , how the caramelized exterior coming from?, and Is the classic shape of the Canele (inspired by doric shape) existed for some reasons? Does it effects anything? heat?
Thank you in advance.
Hello, Maurizio.
I have finally received all the pieces needed to get me started on this adventure. I do have a quick question though: do I need to sift the flour after I measure/weigh the right amount? Or do I use it unsifted? Thank you in advance,
Yana
Followed your directions exactly and these turned out perfect on the first attempt. Thank you 🙏🏼
https://imgur.com/a/91Vx0d3
Oh these came out just perfect! They’re a challenge but so worth it. Thanks for sharing and enjoy!
hi i am going to try your recipe for the Canele
After 4 years of having copper canelé/cannelé molds in the back of a drawer, and 2 years of living in France (where it can actually be quite hard to find good canelés outside of the Bordeaux region!), I finally made a batch. I used a cast iron skillet sitting on top of a cast iron pizza pan in lieu of a baking steel, and it seemed to work just fine: https://imgur.com/gallery/IkANKQZ
That worked out super well, I agree! Thanks for sharing that, always great to see these baked nicely 🙂 enjoy!
That worked out super well, I agree! Thanks for sharing that, always great to see these baked nicely 🙂 enjoy!
Comments on your Imgur page are one of a kind :^]
Hello,
Were you using a convection oven or conventional oven for this?
I mean with/without the fan on?
Thanks!
Thip
No fan with the times and temps listed above, but you could use the fan and reduce the time/temps accordingly.
Thank you, your method works great! They came out perfect!
So glad to hear that, Thip! Enjoy 🙂
Hello! Could you please help me? I have a convection professional oven. What temp and time I have to turn? I haven’t the opportunity to switch off the convection. I also have the deck oven. What is more convenient or better for your canele? And how to be sure that the wax is enough? And if more than necessary, how to remove?
Hard, to say, sorry! It really depends on the oven. You could start with the temps I have listed and then turn them down if you’re not turning off convection (it’ll be “hotter” in the oven). Determining the exact amount of wax is difficult as well, but the method I outline above works very well. If they don’t remove from the molds cleanly, you do not have enough.
Hello Maurizio,
I hope you and your family are well.
I am ordering a copy of The Tivoli Road Baker and I wonder if you have any other book recommendations? I have also gone through the list on your site.
Today is the start of the weekend bake. This weekend it is going to be two 50/50 Sourdough Loafs and two Spelt,Rey and Whole Wheat Loafs. I also want to experiment with sourdough croissants. Have you had any experience with them?
Have a great day.
Regards,
Chris
Thanks, Christopher, likewise! I love The Tivoli Road Baker, such a great book. If you’ve looked at my list, those are my core books I always recommend to just about everyone.
I have done some work with sourdough croissants, but not enough to post on it yet — they are quite challenging! I hope to have something up here at some point, though 🙂
I hope your bakes go well — happy baking!
I spent many months coming up with a recipe and wrote a short single subject self published cookbook on this wonderful pastry. While nothing performs as well as copper the new nonstick carbon steel come very close. So close that I will probably sell my copper molds.
This is the brand I bought and tested.
https://smile.amazon.com/gp/aw/d/B01MYX458X
Those do certainly look interesting! I’d be willing to give that a shot, but like you said, once you have the coppers it’s hard to switch off of them… Thanks for sharing that, I might pick some of those up in the future!
HI Maurizio, my recipe ( Adapted from https://www.youtube.com/watch?v=CNnx5hS1kgA) it works really fine for me where canele came out with nice brown crust (I use copper mould where i had season it prior using it the first time) and inside was nice and custardy. Each time canele came out easily without sticking.
However, recently I’ve notice canele sticks a lot to the copper mould which i don’t understand why. I had to use sticks or chopstick to loosens sides to remove canele out from copper mould. Do you know why it sticks? Does it mean i have to re-season copper mould again?
Another issues was, recently, canele bottom popped up like cake pop, even after the end of baking it with temperature lowered down, it still have the rounded bottom instead of flat bottom. Again, have you encountered similar scenario?
I reckon it was too much egg white(maybe sometimes i should be very precise in eggs measurements) and also i use castor sugar. Previously i used half castor sugar and half brown sugar(cane sugar in US). Do you think its because of too much egg white and castor sugar was the culprit?
Would love to hear from you soon!
Regards,
Ka Ling
What a lovely video. Yes, I would likely wash the molds out really well and perform the seasoning process again. If they’re properly seasoned, you should have no sticking at all (I’ve never had any stick!).
In my testing, yes, I definitely had them pop up from the molds. Usually, for me, this is when I didn’t have enough heat in the oven (they didn’t harden off fast enough and kept rising, rising, and rising).
The important thing with powdered sugar (confectioner’s sugar) vs. caster sugar is PS has cornstarch in it whereas caster is just straight sugarcane. I’ve tried in the past with caster sugar, though, and things worked just fine (but there are also many other variables to consider in the formula!).
To be honest, it’s hard to diagnose just one element in this recipe because they all seem to be dependent variables, trying to isolate a single one is very hard to do.
I hope this helps in some way!
I’ve checked a few different grocery stores and can’t find European style butter. I eventually found Plugra butter at Whole Foods. It doesn’t say “85% butterfat” or “European Style” but it does say “Extra creamy” so I’m going to go with that, but does anybody have any recommendations on where to find European style butter?
Hey, Greg. Plugra will work really well for this recipe, I’ve used it many times and things turned out just right. I usually get my euro style butter from Whole Foods, they have some USA made higher butterfat options as well from Strauss (very good) and Organic Valley.
Hi, you said that a small batch would be about 5, but how many would you make to use up all the batter in this recipe? Thanks
As I show in my “yield” row in the recipe, above, this recipe makes between 10-12. Usually I can make 12, but sometimes one or two less depending on how diligent I am about scraping the containers clean.
Maurizio – I’ve just followed your cannelés recipe step-by-step. After the first 15 minutes in the oven, my cannelés have popped right up and out of their molds, like popovers! I am assuming I unintentionally incorporated too much air into my batter (?). I’ve got some batter left, so I am wondering if you have tips for salvaging what’s left and maybe achieving a proper cannelé! Cheers
Hey, Meredith! It’s normal for them to pop up, but they shouldn’t excessively do so. Did they eventually settle back down in the mold by the end of baking?
There are several reasons that could cause them to pop up and for me, I saw it the most when I accidentally lined the molds with too much wax. This can be hard to assess, but if you think this is the case, and it looks like there might still be a lot of wax lining the mold, you could try seasoning them with less or even just using them as-is with the assumption there’s enough to prevent sticking.
The other reason I see this happen is when my oven isn’t hot enough to shock them into place. Be sure you’re preheating your oven super hot, and if you’re using a baking stone or baking steel (highly recommended!!) it also needs to be fully saturated with heat.
My feeling is air in the batter might not cause too much rise in the mold, it’s likely one of the other two issues (in my experience).
Let me know how it goes. These can be frustrating but they’re worth the effort 🙂
Great suggestions – I’ll give it another go. No matter their shape, though, the flavour of these are spot on. Thanks for another great recipe!
You’re right, it’s just aesthetics, they’re still delicious. You’re very welcome, keep me posted!
I just tried for the first time and had the exact same thing as Meredith happen. After 20 min, I rotated the sheet, then closed the oven. I checked 10 min later, and they all practically rose right out of the molds. I’m using Gobel non-stick aluminum molds. One thing I didn’t do was freeze the molds after coating them (only with clarified butter BTW). Could it be an issue with non-stick?
I fear this might be due to the molds you’re using. I haven’t tried using aluminum and I’m wondering if they’re not retaining enough heat to shock that exterior to set. I don’t think it’s an issue with the non-stick, but more of heat-related problem.
I have slowly been collecting the ingredients I need for the Cannelles. I bought organic beeswax from a supplier by the bar…small bar…I heard the recipe originally is 300 years old. When the wines were clarified with egg whites, but then what do you do with the yolk?…the vineyards would donate the yolks to the local monastries…whom would make these lovely little cakes and give them out daily to the street children. They would get their daily blast of protein and rum…what a great idea.
The slow acquisition for these is the way to go, helps offset that initial sticker shock. I love that back story, I sure wouldn’t mind being a kid in that village! Thanks for sharing and let me know how you get on with these, I love them so.
what size steel? 1/4, 1/2 ?? Does it matter?
In the end I think either will work very well. I have the thicker one, and while it retains and transmits heat exceptionally well, it is heavy!
I have had canelé molds for about a decade and haven’t had the guts to try. This will be my Christmas staycation project! Thank you.
Perfect timing! And these are just right for the holidays. Let me know how it goes — have fun!
I am so going to make these once I get all the proper supplies….I am salivating already😋😋
Awesome, Donna! Let me know how you like them, I’m positive you’ll love ’em!
This is by far the most detailed and helpful post I’ve ever seen on canelé. Thank you––these are beautiful! (I do wish the copper molds weren’t SO expensive, but I’m glad to know that my baking steel will come in handy.)
Thanks so much Pamela! Yes, the molds are super expensive, but you could do as I did: buy one every once in a while, eventually you’ll have enough 🙂 Let me know how it goes!
I have used both copper and silicone moulds with success. Obviously, the latter are much cheaper*. I bought my Cu moulds during a visit to Bordeaux and the shop recommended using non-stick sprays rather than the more complicated beeswax method. Although I have plenty of beeswax (I actually purified some last week from beehive cappings) I used the spray in the copper moulds.
*I bought the silicone moulds through Amazon and the first ones were stolen in transit. I suppose some UPS driver’s wife is using them for making ice-lollies:-)
I’ve heard good things about the silicone ones from other bakers as well — that’s great! Whatever works. I think nonstick spray could work just fine, but I like to keep it mostly traditional with these and the beeswax does add a slight floral note to the finished product. However, the tradeoff is that it’s more work!
Hah! Yes, I’m pretty sure they wouldn’t know what they were and what to use them for 🙂
OMG THANK YOU THANK YOU THANK YOU THANK YOU!!! XOXOXOXO
– girl meets rye
I knew you’d like these 😀 Let me know how it goes, they’re a lot of work but oh so worth it!
Do I have to bake the canele immediately after seasoning for the first time or can I season and then bake a few days later?
Nope, you don’t have to bake with them immediately. After seasoning fully, place them inside a freezer ziplock back and put them in the freezer. They’ll keep pretty much indefinitely in there this way and are ready to go when your batter is!
thank you! I just saw that note on your post as well.