


I was intimidated to make my first loaf of sourdough bread. I’d heard others talk about flat and dense loaves—dough that never rose. It wasn’t until I read a sourdough book cover to cover and painted it with post-it notes, highlights, and dog-eared pages that I felt ready to put my newborn sourdough starter to work. I bought flour. I filtered water. I measured. I mixed and kneaded. I folded ever-so-gently while I held my bread until, hours later, I pulled my first sourdough from the oven.
I had my wife taste it. “Pretty good,” she said. “Yeah, pretty good bread.” Only later did she fess up that it was “actually just okay, to be honest.” But all-in-all the bread had a nice rise, a crunchy and well-colored crust, and it did taste great considering it was my first loaf of any kind of bread. And you know what? We ate the entire thing.
This Beginner’s Sourdough Bread post has several videos where I walk you through each step of the sourdough bread-making process. Be sure to see the end for a complete video walkthrough of me making this recipe!
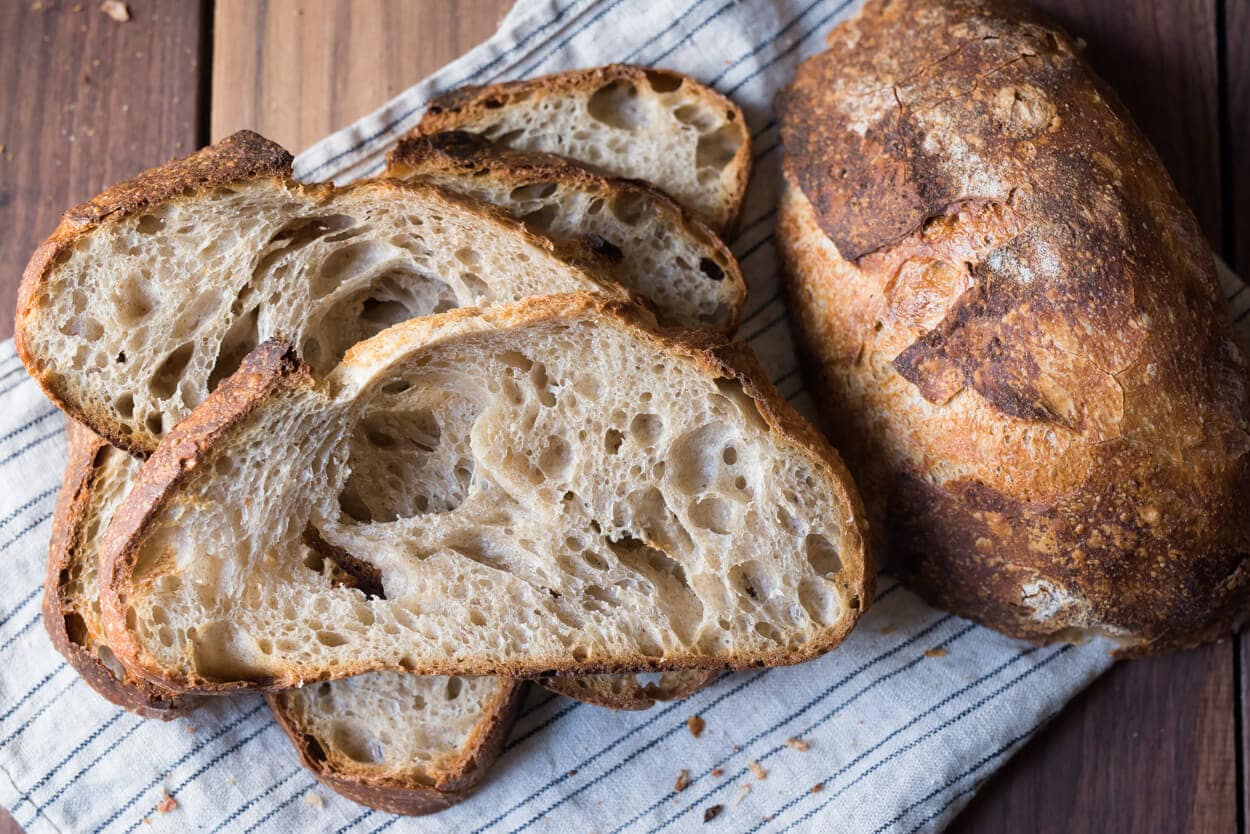
As the new obsession set in, I started making fresh sourdough bread for every meal. There was something about the whole bread-making process that I found captivating. It was–and still is–exciting to mix such elemental ingredients and to see them produce beautiful, life-giving sustenance: it is modern-day alchemy. It’s such a simple thing, and yet it brought me so much joy to see my family and friends tear into a freshly baked loaf that I wanted to bake every day of every week.
This recipe will give you confidence as you take your first steps in baking sourdough bread from your home kitchen.
Starting to make your first loaf of sourdough bread can be daunting. That’s why I’ve put together this beginner’s sourdough bread tutorial and recipe—it will give you confidence as you take your first steps in baking sourdough bread from your home kitchen. This how-to guide starts with explaining baking terms and definitions so that we will have a common vocabulary once we get to the recipe.
And then, each step of the process has lots of information to ensure you understand what is happening and what to do. But, before we go on this beginner’s sourdough bread recipe, let’s first take a look at what sourdough bread is.
What is Sourdough Bread?
Sourdough is a specific type of bread created through a natural fermentation process involving suitable bacteria and wild yeasts in the environment (i.e., the air and even a baker’s hands) and, most importantly, on the grain itself. A sourdough starter culture is used to seed fermentation in new dough when making sourdough bread.
Generally speaking, bacteria are primarily responsible for producing organic acids (lactic acid and acetic acid) that contribute to sourdough bread’s flavor, texture, and storage qualities. The wild yeasts produce carbon dioxide gas and ethanol during fermentation. When this gas becomes trapped in the dough’s airtight gluten matrix, the dough begins to rise, resulting in a final loaf of bread with a light and airy texture.
All recipes on The Perfect Loaf are naturally leavened; in other words, you won’t find any commercial yeast or instant yeast here. There’s nothing inherently wrong with commercial yeast, but I prefer to make bread this way because of the wonderful flavor and texture, the health benefits like increased bioavailability of minerals and nutrients, increased keeping quality thanks to the acids generated during natural fermentation, and the fact that it requires so few ingredients (just three!) to make something so delicious.
For a high-level look at each step of the sourdough process, read through the Beginner’s Guide to Sourdough Bread →
Creating a Sourdough Starter
It all begins with a sourdough starter. Before we look at how to make sourdough bread, you need to create a healthy sourdough starter that shows consistent signs of fermentation each day. Creating a sourdough starter is easy: mix flour and water for a few days in succession, and eventually, thanks to the bacteria and wild yeasts on the grain, natural fermentation will begin.
If you’d like to look at how I feed my starter daily, look at my sourdough starter maintenance routine. In this guide, you will see the visual and aromatic cues to look for when your starter is ready for refreshment (feeding).
While waiting for your sourdough starter, let’s look at some terms bakers often use to discuss the various parts of the bread-making process.

Baker’s Terminology
Sourdough starter
A starter is a mixture of flour and water you allow to ferment naturally. You’ll refresh (feed) the starter indefinitely to keep the fermentation active and healthy, and you will wait for it to become fully ripe before you use any of it to make bread.
When you want to make bread, you take a small amount of your starter to create an off-shoot called a levain (see below). See my post on starter creation to read more about the starter and learn how to make one.
Levain (or leaven)
A levain is made by mixing a small off-shoot of your ripe starter with water and flour and allowing it to ferment before mixing it into a dough. You can always use your starter directly to make sourdough bread, but a levain is a small off-shoot that allows you to adjust the flour, hydration, and ripening schedule (which have implications on the bacteria and wild yeast balance).
Also, unlike your sourdough starter, which lives on as its own entity, the entirety of the levain goes into the dough and has the same fate as the bread itself: to be baked in the oven. See my post on what a levain is and how it’s different from a sourdough starter for more information.
Autolyse
Some recipes utilize a step called autolyse (“auto-lease”). It occurs at the beginning of bread baking and is a step in which only flour and water are mixed together and left to rest. The goal of autolyse is to initiate enzymatic activity in the dough to help draw out sugars from the flour. Additionally, it helps increase dough extensibility (the ability for the dough to stretch out without tearing).
In most cases, increased extensibility is good as it helps the dough expand and fill with gasses, resulting in a light and airy loaf. See my in-depth post on the autolyse technique for more information.
Bulk fermentation
The dough’s first rise is called bulk fermentation. After mixing the flour, salt, and levain into a dough, you put it all into a bowl or container, cover it, and let it rest. The dough will undergo a fermentation process during this critical step. Bacteria and yeast begin to generate organic acids and alcohols and leaven the dough, which will translate to flavor and rise in your final bread.
For more on this critical step in the bread-making process, see my in-depth guide to bulk fermentation.
Proofing
The proof is the dough’s final, or second, rise after the dough has been divided and shaped and lasts until the dough is finally baked in the oven. During this time, the dough continues to ferment, further strengthening and leavening it. I typically proof at a cold temperature in the refrigerator (also called “retarding”).
In my ultimate guide to proofing, I talk about how to spot when the dough is finished rising and ready to bake, plus a whole lot more.
Final Dough Temperature
The final dough temperature (FDT) is the dough’s temperature after mixing all ingredients. The dough’s temperature is important because it’s the main factor that affects fermentation strength: a warmer dough will ferment faster than a cooler dough.
Naturally, each component (levain, the flour, the water, and the ambient environment) has a temperature. While most of these are out of our control, we can easily adjust the water temperature, which enables us to change the FDT of the entire dough to meet whatever the recipe calls for.
I have a handy water temperature calculator you can use to quickly figure out what you need to warm or cool your mixing water to get the dough to the right temperature.
Or, so you don’t have to do any calculations, here’s a quick cheat sheet for this Beginner’s Sourdough bread recipe:
| If your kitchen temperature is | Warm or cool the mixing water to |
|---|---|
| 68°F (20°C) | 98°F (37°C) |
| 70°F (21°C) | 94°F (34°C) |
| 72°F (22°C) | 90°F (32°C) |
| 74°F (23°C) | 86°F (30°C) |
| 76°F (24°C) | 82°F (28°C) |
| 78°F (25°C) | 78°F (25°C) |
| 80°F (26°C) | 74°F (23°C) |
If your kitchen is outside of these temperatures, my guide on the importance of dough temperature in baking will walk you through calculating exactly what to warm (or cool) your mixing water to so your dough meets the FDT for any recipe.
Baker’s Percentages (Baker’s Math)
Baker’s math, or baker’s percentages, helps bakers adjust the actual quantity of the ingredients up or down, depending on how much bread they want to make. I write all the formulas on The Perfect Loaf in baker’s percentages, where all ingredient weights are a percentage of the total flour weight, which always adds up to 100%. Read through my introduction to baker’s percentages for a more in-depth explanation (including how to scale up and down a bread recipe).
TPL Members (the baking community here) have access to all the recipes here at The Perfect Loaf in spreadsheet form, making scaling up and down recipes as simple as changing a few numbers.
Baking Tools
There are a few necessary tools for baking your first loaf of this beginner’s sourdough bread. The following might look like a long list, but you probably already have many of these in your kitchen—There are a few tools necessary for baking this beginner’s sourdough bread. Note that one item is absolutely necessary: a kitchen scale. If you don’t have a kitchen scale, please consider buying one. Measuring flour with cups and scoops is entirely inaccurate!
- combo cooker like a Lodge 3qt. cast iron combo cooker or a Le Creuset Dutch oven that can withstand 500°F (260°C) in the oven and has a well-sealing lid
- large mixing bowl to mix your dough by hand
- two medium kitchen bowls to proof your dough
- two kitchen towels or a tea towel to line the proofing bowls
- bench knife to cut and shape the dough
- plastic or silicone bowl scraper
- kitchen scale that measures in grams
- instant-read thermometer
- white rice flour for dusting proofing bowl
- blade for scoring your dough (a “lame”), or a razor blade, sharp knife, or scissors
- fine-grain sea salt
- parchment paper
- pizza peel (or cutting board)
- heavy duty oven mitt
- the best bread knife for cutting your sourdough bread
You can find a full list of all the tools I use when baking on my baking tools page.
The Importance of Dough Temperature
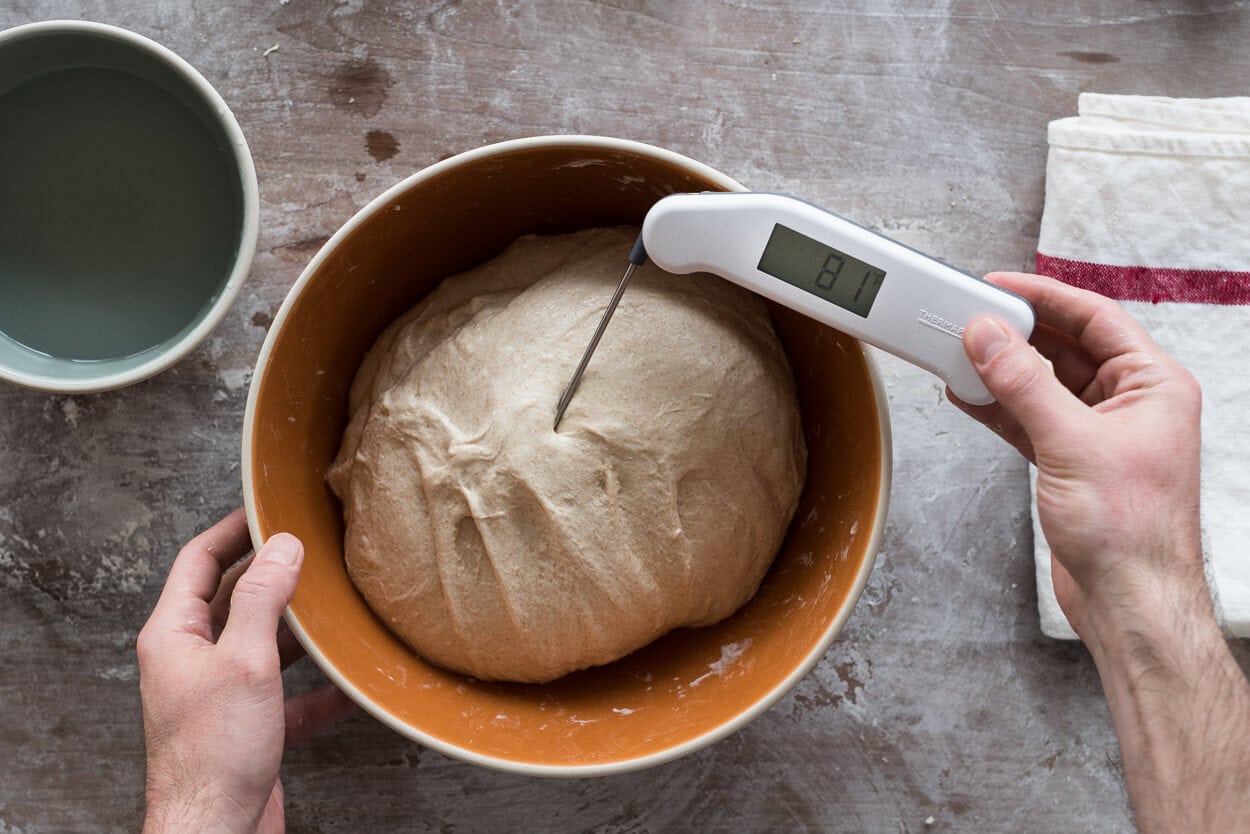
When I first started baking, I didn’t quite grasp how important temperature is in the bread-making process. I always like to say: Treat temperature as an ingredient, just as flour, water, and salt are ingredients. What I mean by that, practically, is that if one day you mix with water that is 70°F (21°C) and then a week later mix with water that is 80°F (26°C), you will get drastically different outcomes.
Temperature determines the amount of fermentation activity you’ll see. Lower temperatures generally mean less activity; therefore, things will take longer. Higher temperatures generally mean more activity; therefore, things will take less time. Working with consistent temperatures will ensure consistency in your bread baking, and you’ll get the desired results in terms of flavor, rise, texture–well, everything.
Treat temperature as an ingredient, just as flour, water, and salt are ingredients.
If it’s cold where you’re baking, see my tips on how to bake sourdough bread in the winter. And conversely, if it’s warm where you are, see my post on how to bake in the summer. These guides will help ensure your loaves have the best flavor and volume.
Flour For Baking Bread
I used commonly available supermarket flour for this recipe: Bob’s Red Mill Artisan Bread Flour, Bob’s Red Mill Whole Wheat Flour, and Bob’s Red Mill or Arrowhead Dark Rye Flour. These are great flour choices, but any of King Arthur’s offerings are equally suitable. I chose “bread flour” as it has a higher protein percentage than all-purpose flour, which helps bring significant strength to the dough so that less mixing and kneading is required–it also makes things a bit easier for your first loaf of bread.
As you’ll hear me mention throughout this site, I do like to use as little high-protein flour in my recipes as possible as I find it leads to a slightly chewier, gummy interior—or be sure to use it in the correct way.
Baking Schedule
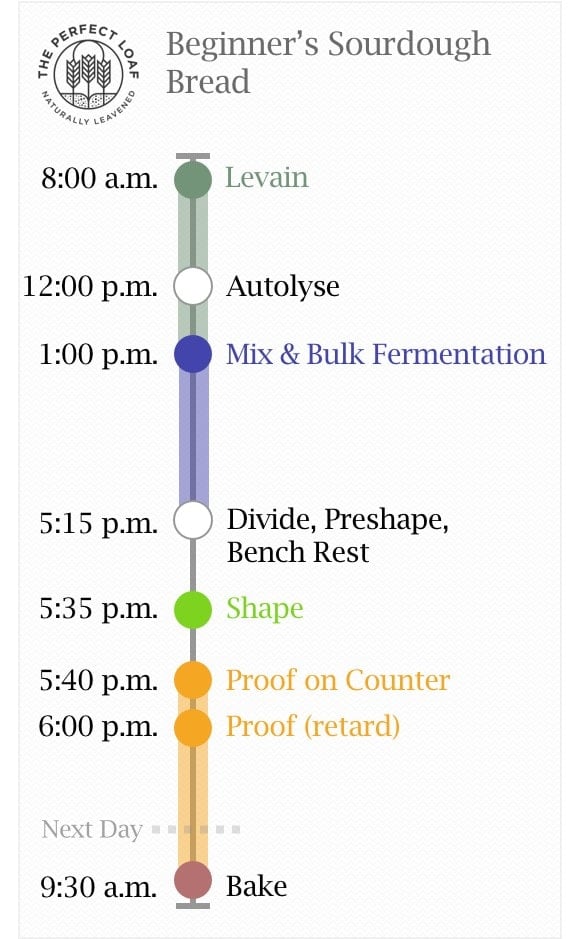
This beginner’s sourdough bread is a two-day-long process where the bread is mixed and prepared on day one, cold-proofed (retarded) in the fridge overnight, then baked on day two.
I love the convenience of this type of schedule: most of the work is done on the first day, then the dough can be left in the fridge until the next day, when it can be baked in the morning, afternoon, or even the evening.
The baking schedule to the right shows you a high-level view of what step takes place and when.
Beginner’s Sourdough Bread Formula
Now we get to the formula for the beginner’s sourdough bread formula. I start every recipe with two tables: Vitals and Total Formula. The Vitals table gives you a high-level view of the contents of the dough, as well as how much the recipe makes (in this case, two loaves). The Total Formula table lists the ingredients needed for the entire recipe and their respective amounts.
Vitals
| Total Dough Weight | 1,800 grams |
| Pre-fermented Flour | 7.5% |
| Levain in final dough | 20.3% |
| Hydration | 72.0% |
| Yield | Two loaves |
Total Formula
| Weight | Ingredient | Baker’s Percentage |
|---|---|---|
| 811g | Bob’s Red Mill Artisan Bread Flour | 80.0% |
| 152g | Bob’s Red Mill Stoneground Whole Wheat Flour | 15.0% |
| 51g | Bob’s Red Mill Dark Rye Flour | 5.0% |
| 730g | Water | 72.0% |
| 18g | Fine sea salt | 1.8% |
| 38g | Ripe sourdough starter, 100% hydration | 3.8% |
Beginner’s Sourdough Bread Method
1. Levain – 8:00 a.m.
| Weight | Ingredient | Baker’s Percentage |
|---|---|---|
| 38g | Ripe sourdough starter (100% hydration) | 50.0% |
| 38g | Bob’s Red Mill Stoneground Whole Wheat | 50.0% |
| 38g | Bob’s Red Mill Artisan Bread Flour | 50.0% |
| 76g | Water | 100.0% |
Remember: the levain is an off-shoot of your continually maintained sourdough starter and is likewise composed of bacteria and yeasts. You make this levain well before you mix the dough, so it has time to ferment, and eventually, it’s added to the dough to seed fermentation.
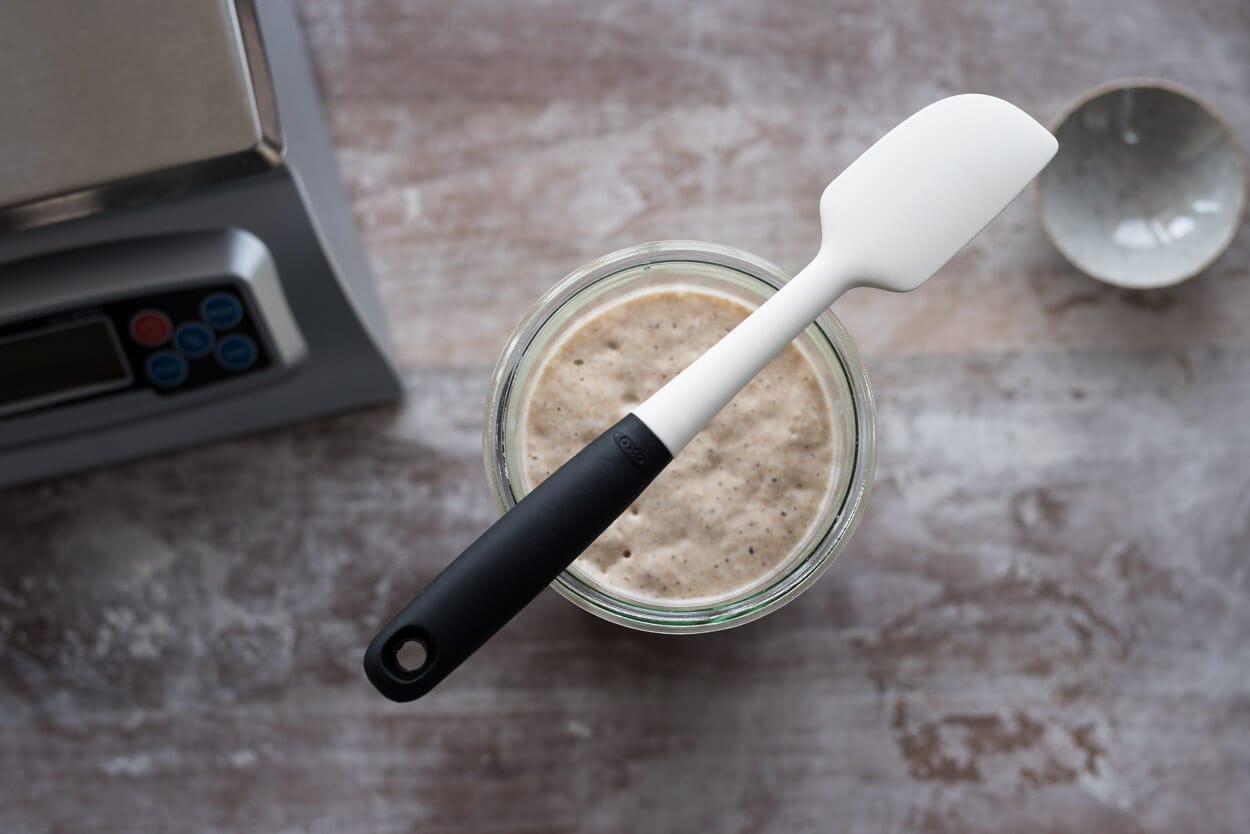
Mix the ingredients in the table above in a clean jar (I use the same sourdough starter jars) and leave it at warm room temperature, 74-76°F (23-24°C), for 5 to 6 hours. When it’s ready, it will be expanded, bubbly on top, inside, and at the sides, and have a slightly sour aroma. The photo below shows my levain before it goes into my dough mix.

2. Autolyse – 12:00 p.m.
| Weight | Ingredient |
|---|---|
| 773g | Bob’s Red Mill Artisan Bread Flour |
| 114g | Bob’s Red Mill Stoneground Whole Wheat Flour |
| 51g | Bob’s Red Mill Dark Rye Flour |
| 603g | Water (this has 50g less than the overall formula, reserved for Mix step below) |
The desired dough temperature (DDT) for this dough is 78°F (25°C). As described in the temperature section above, we will try to get the dough to this temperature right at the end of mixing (which is also at the beginning of bulk fermentation).
Warm or cool the autolyse water so the mixed dough reaches the FDT for this recipe. Place the flour and the water called for in the table above in a large bowl. Use wet hands to mix until no dry bits remain; the dough will be shaggy and loose. Use a bowl scraper to scrape down the sides of the bowl, keeping all the dough in one area at the bottom. Cover the bowl and place it near your levain for 1 hour.

Note that the autolyse stage does not incorporate salt or the levain in any way since the autolyse is a long one hour. Adding the levain to the autolyse would mean fermentation would begin, which could end up overproofing the dough. Salt is rarely added to an autolyse because the salt would diminish enzymatic activity during this time, which is precisely why we are doing an autolyse. The autolyse and levain are two separate entities that will be mixed together later in the process.
3. Mix – 1:00 p.m.

| Weight | Ingredient |
|---|---|
| 50g | Reserved water (this water was held back in the Autolyse step) |
| 18g | Fine sea salt |
| 190g | Ripe, 100% hydration levain (from Levain, above) |
Use your instant-read thermometer to take the dough’s temperature and compare it to the FDT for this recipe. If it is higher, use cold water for the reserved water; if it is lower, use warm water.
At this point, your autolyse is complete and your levain is ready—it’s time to mix and strengthen the dough. If the dough feels very wet and shaggy, do not use all of the reserved 50g of water; use only a splash to help incorporate the salt and levain. If the dough feels good to you, use all the reserved water.
To the autolyse, add the ingredients in the table above (salt, reserved water to help adjust dough hydration and consistency, and levain). I like to spread everything on top of the dough and use wet hands to pinch all the ingredients together. Transfer the dough to a container or thick-walled bowl for bulk fermentation.
Take the temperature of the dough to get your final dough temperature. If your FDT is below 78°F (25°C), next time use warmer water, and conversely, if it’s above 78°F (25°C), use cooler water. Cover the dough.
4. Bulk Fermentation – 1:10 p.m. to 5:10 p.m.
At 74-76°F (23-24°C) ambient temperature, bulk fermentation should go for about 4 hours. Perform 3 sets of stretches and folds during bulk fermentation, spaced out by 30 minutes.
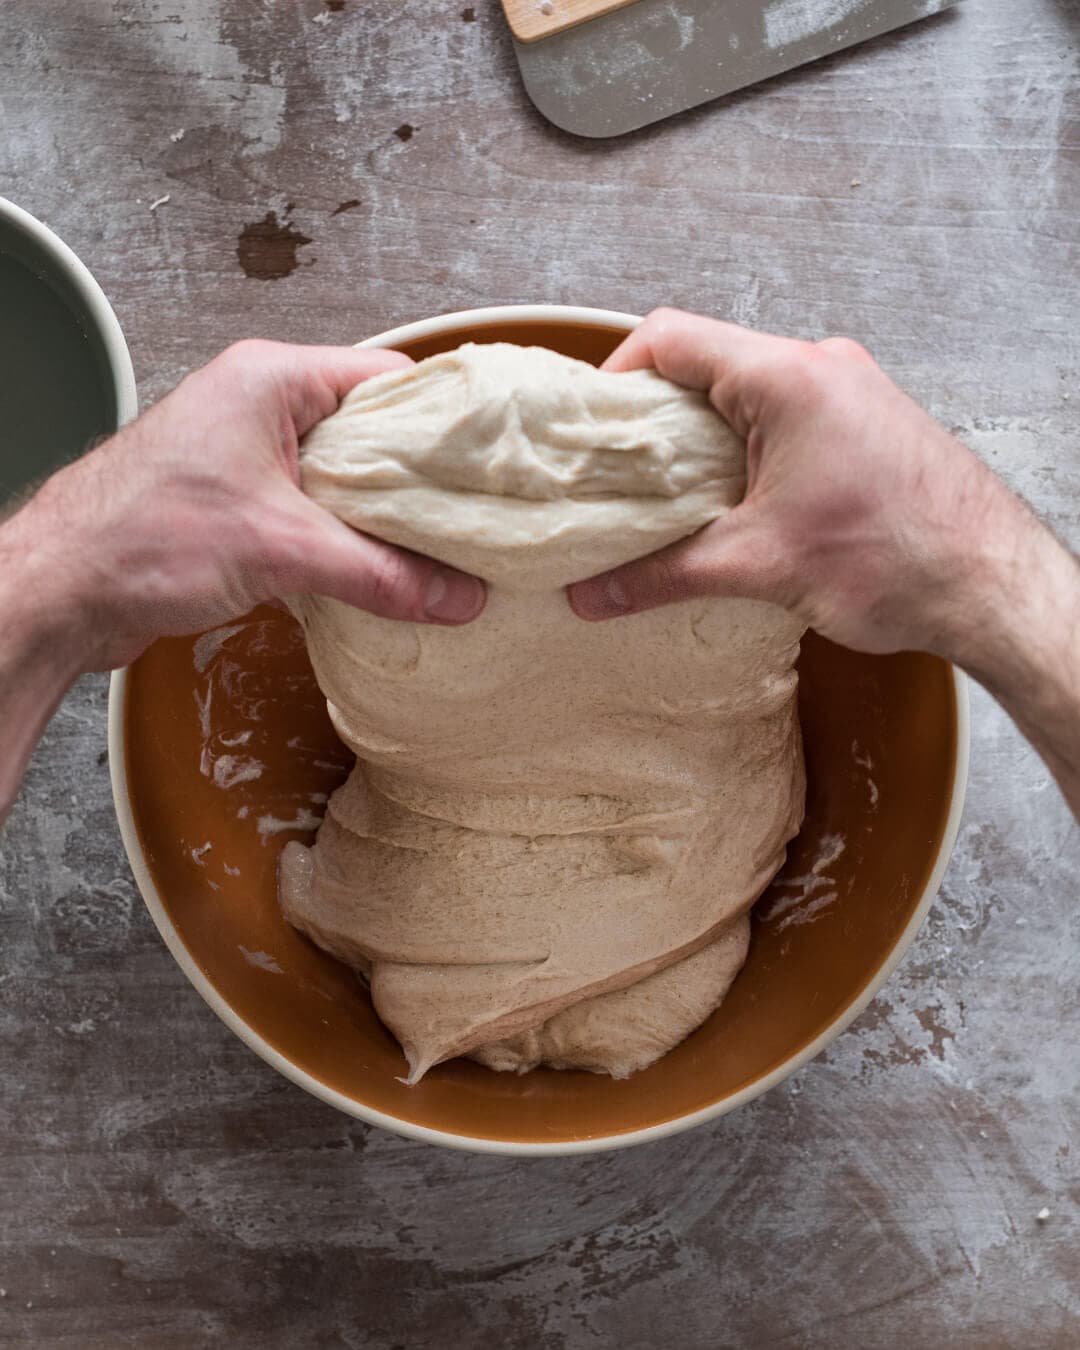
Each set of stretches and folds consists of 4 folds: one each at the North, South, East, and West sides. Wet your hands with a little water to prevent sticking, and then lift one side (North) of the dough with two hands. Stretch the dough high enough so you can fold it completely over to the other side. Rotate the bowl 180° and do the other side (South). Finish the other two sides (East and West) to complete the set. Let the dough rest for 30 minutes, covered, between sets.
In the video below, you can see how I stretch and fold this dough during bulk fermentation.
After the third set of stretch and folds, let the dough rest for the remainder of bulk fermentation. During this time, fermentation aerates the dough (making it rise), continues to strengthen it, and further develops its flavor.
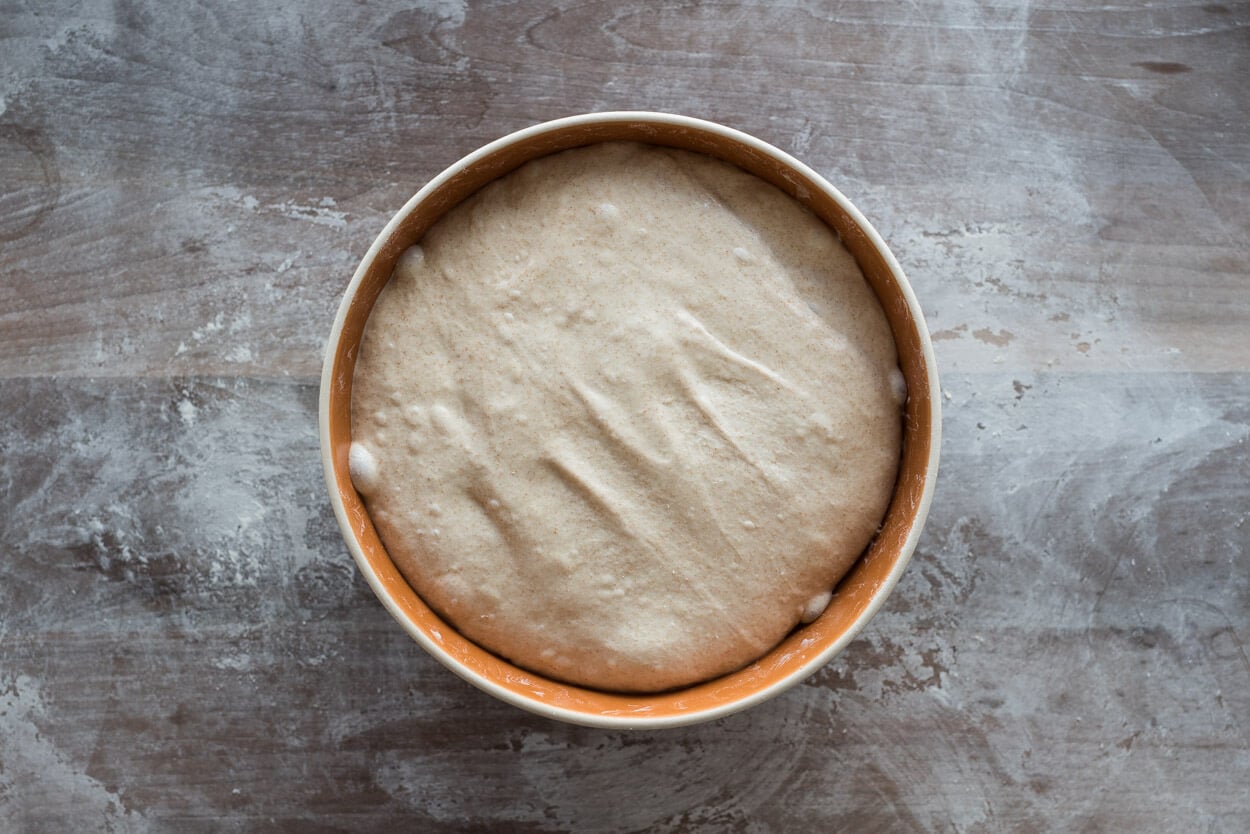
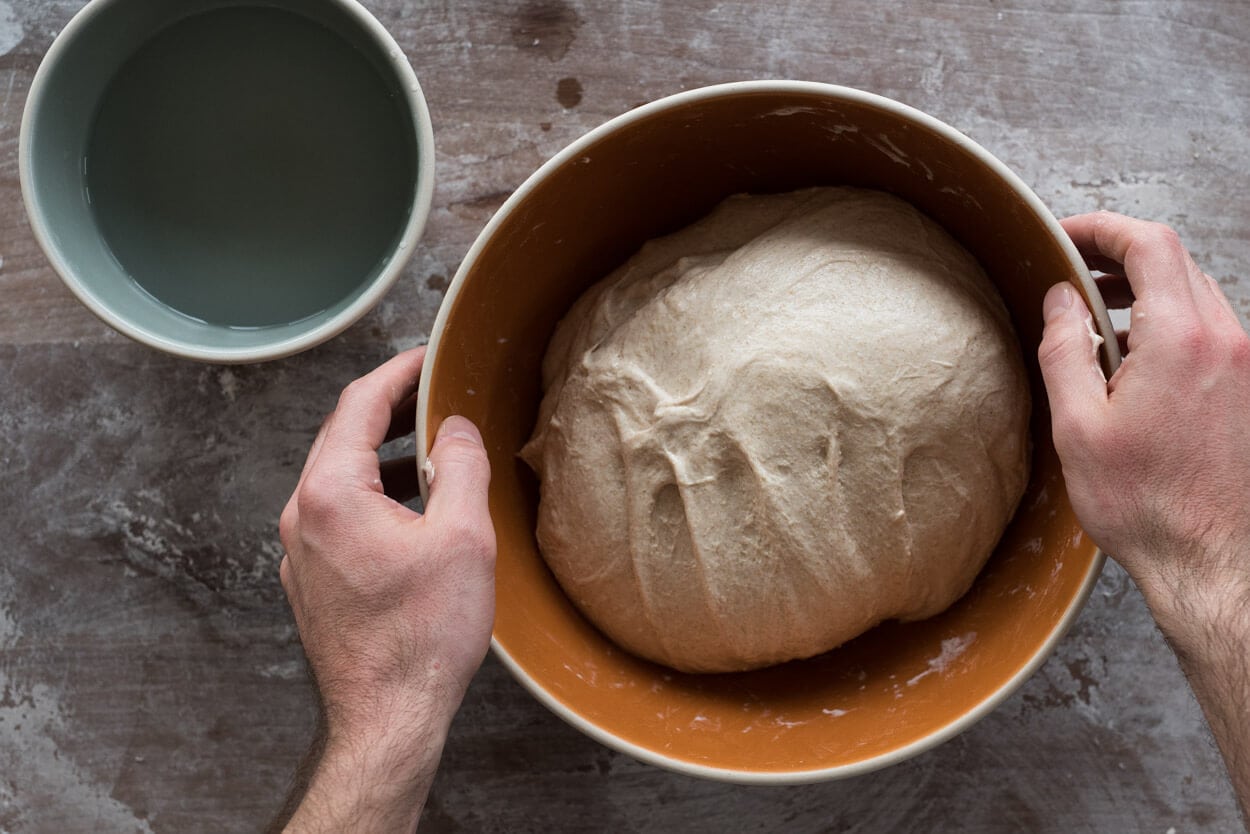
At the end of bulk fermentation, your dough should have risen by 20% to 50%. It should show some bubbles on the top and sides, and the edge of the dough where it meets the bowl should be slightly domed, which indicates strength. In the photo above, you can see all these signs. If you don’t see these signs, leave it for another 15 minutes in bulk fermentation and check again.
5. Divide and preshape – 5:15 p.m.

Lightly flour a work surface. Using a bowl scraper, gently scrape the dough onto the work surface and use your bench knife to divide the dough directly in half. Using your bench knife in your dominant hand, and the other hand wet (or floured, if you prefer) to reduce sticking, turn each half of the dough on the counter while lightly pulling the dough towards you. This gentle turning and pulling motion will develop tension on the dough’s top, forming a circle.
Preshaping bread dough is an often overlooked step, but it sets the stage for successful shaping later. See my guide to preshaping bread dough for more information.
Let the dough rest for 25 minutes, uncovered.
In the video below, you can see how I preshape this beginner’s sourdough bread dough:
6. Shape – 5:35 p.m.
If you’re new to shaping bread dough, check out my guide to shaping a boule (a round) in addition to the steps below.
Lightly flour the top of your dough rounds and the work surface. Working with one round at a time, flip the round so the floured top is now down on the floured work surface.
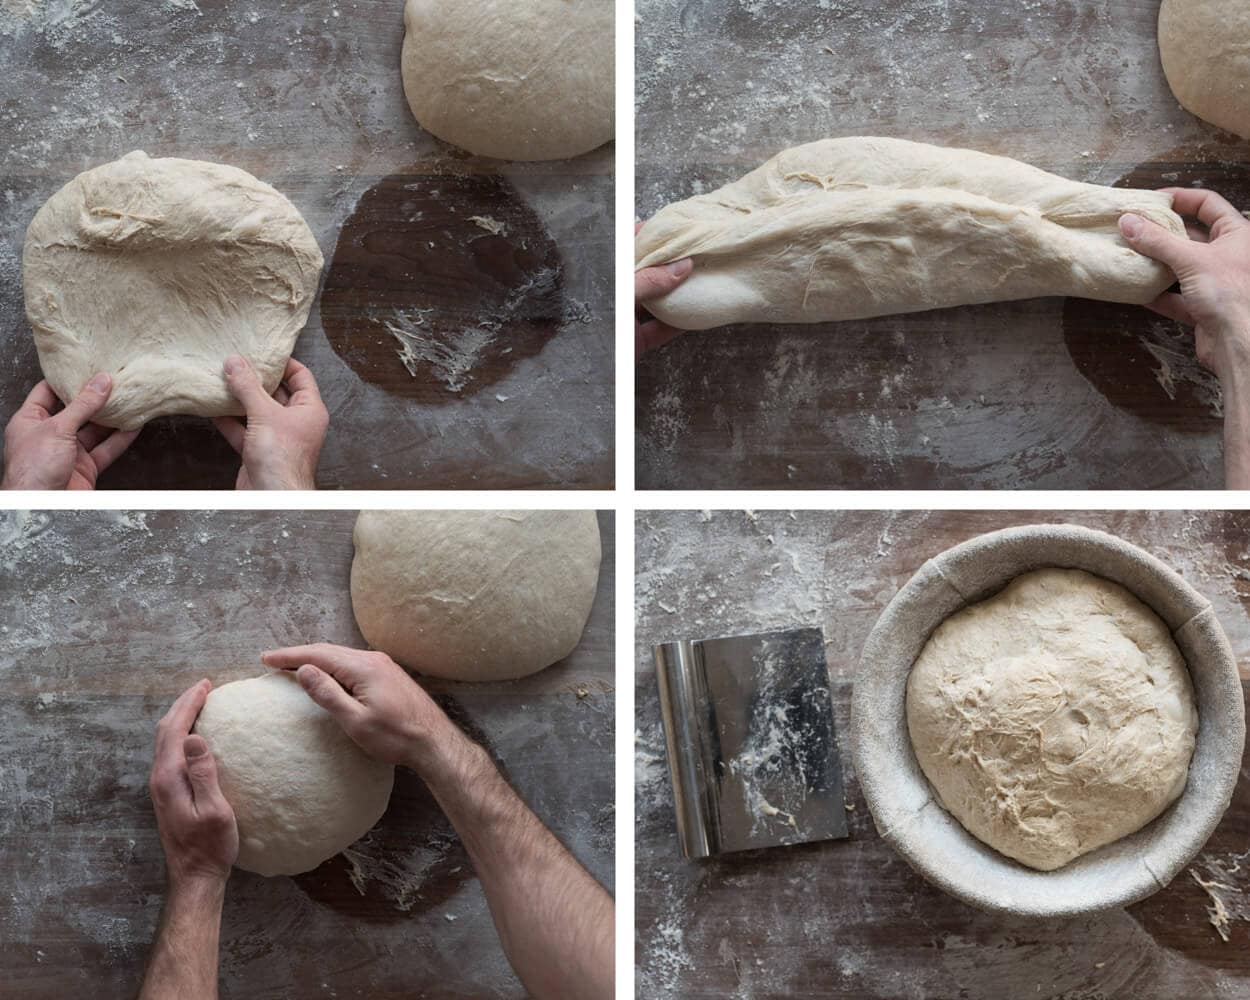
As seen in the image below, with lightly floured hands, grab the bottom of the round and stretch it lightly downward towards your body, and then up and over about 2/3 of the way to the top.
Then, grab the left and right sides of the dough and stretch them away from each other. Fold one side over toward the other and repeat with the other side.
Then, grab the top of the circle, stretch it away from your body, and then fold it down to the bottom of the dough. You’ll now have a tight package that resembles a letter.
Finally, flip or roll down the dough so the seams are all on the bottom. Using both hands, cup the top part of the round and drag the dough gently towards your body to create surface tension on the dough. The angle of your hands will gently press the dough’s bottom on the counter. This dragging helps create surface tension on the dough, which helps keep it in shape during proofing.
Let the dough rest on the bench for a few minutes to help the bottom seam seal.
In the video below, you can see how I shape bread dough into a boule shape.
Meanwhile, prepare your proofing baskets. Line two proofing baskets, kitchen bowls, or bannetons with clean kitchen towels. Dust lightly and evenly with plain white flour or white rice flour. Gently transfer each piece of shaped dough to a proofing basket, seam-side-up.
You can also top this dough with sesame seeds, sunflower seeds, pepitas, and much more—see my guide to topping bread dough for more ideas and instructions.
7. Rest and proof – 5:40 p.m. to 9:30 a.m. (next day)

To prevent your dough from drying out overnight, place your bowls containing your shaped dough into reusable plastic bags and seal. I usually puff up the plastic bag around the bowl by opening it wide and then quickly closing it.
Let the dough rest on the counter for 20 minutes. Then, retard (a baker’s term meaning place into a cold area to proof) in the refrigerator at 38°F (3°C) for 16 hours (overnight).
During this time, overall fermentation will slow (especially yeast activity), but bacterial activity will continue at a reduced rate, resulting in a more complex flavor and, ultimately, deeper crust coloring.
8. Bake – Next morning: preheat oven at 8:30 a.m., bake at 9:30 a.m.
Now, it’s time to bake your sourdough bread. It’s not a difficult step, but there are some things to know. The oven needs steam for the best crust and tallest rise. I like to use a Dutch oven or combo cooker, which is very easy. These pots trap the steam released from the dough and provide the right environment for it to rise optimally.

See my full guide to baking sourdough bread for tips on scoring your dough, pots, and steaming.
Place an oven rack in the bottom third of the oven with no rack above it. Put your combo cooker or Dutch oven on the oven rack, and preheat the oven to 450°F (232°C) for at least 30 minutes. If you’re using a combo cooker, place the shallow side face up on one side and the heavier, deep side face down on the other.

When your oven is preheated, remove one of the proofing baskets from the fridge, uncover it, and place a piece of parchment paper over it. Place a pizza peel, cutting board, or inverted baking sheet on top of the parchment and, using both hands, flip everything over. Gently remove the basket; your dough should rest on the parchment.
Using a razor blade, sharp knife, or baker’s lame, score the dough at a 90° angle between the blade and the dough. I chose to make a “box” pattern. If using scissors, snip the dough a few times at a very shallow angle between the scissors and the dough, forming a set of ridges down the dough’s center.

While wearing your heavy-duty oven mitt, and with caution, pull out your shallow side of the combo cooker and place it on a heat-safe rack or stovetop. Slide the dough into the combo cooker or Dutch oven. Place it back into the oven and cover the shallow side with the deep side, or put the lid on the Dutch oven. This sealed environment helps trap the moisture (escaping steam) from your dough to steam the loaf exterior as it bakes, which encourages maximal rise and a crunchy, shiny crust.
Bake for 20 minutes. Vent the oven of steam: use your oven mitt to very carefully remove the top of the combo cooker or Dutch oven. Leave the large side of the combo cooker in the oven to the side. Close the oven door and bake for 30 minutes more. When done, the loaf should have an internal temperature of around 208°F (97°C), and the crust should be a deep mahogany color and crackle/crunch when squeezed.
Use your oven mitt to transfer the bread to a wire rack carefully. Cool for 1 to 2 hours before slicing into your beginner’s sourdough bread. For the second loaf, preheat the combo cooker or Dutch oven for 15 minutes and repeat.
Follow my guide to storing bread to keep your loaves fresh for as long as possible.
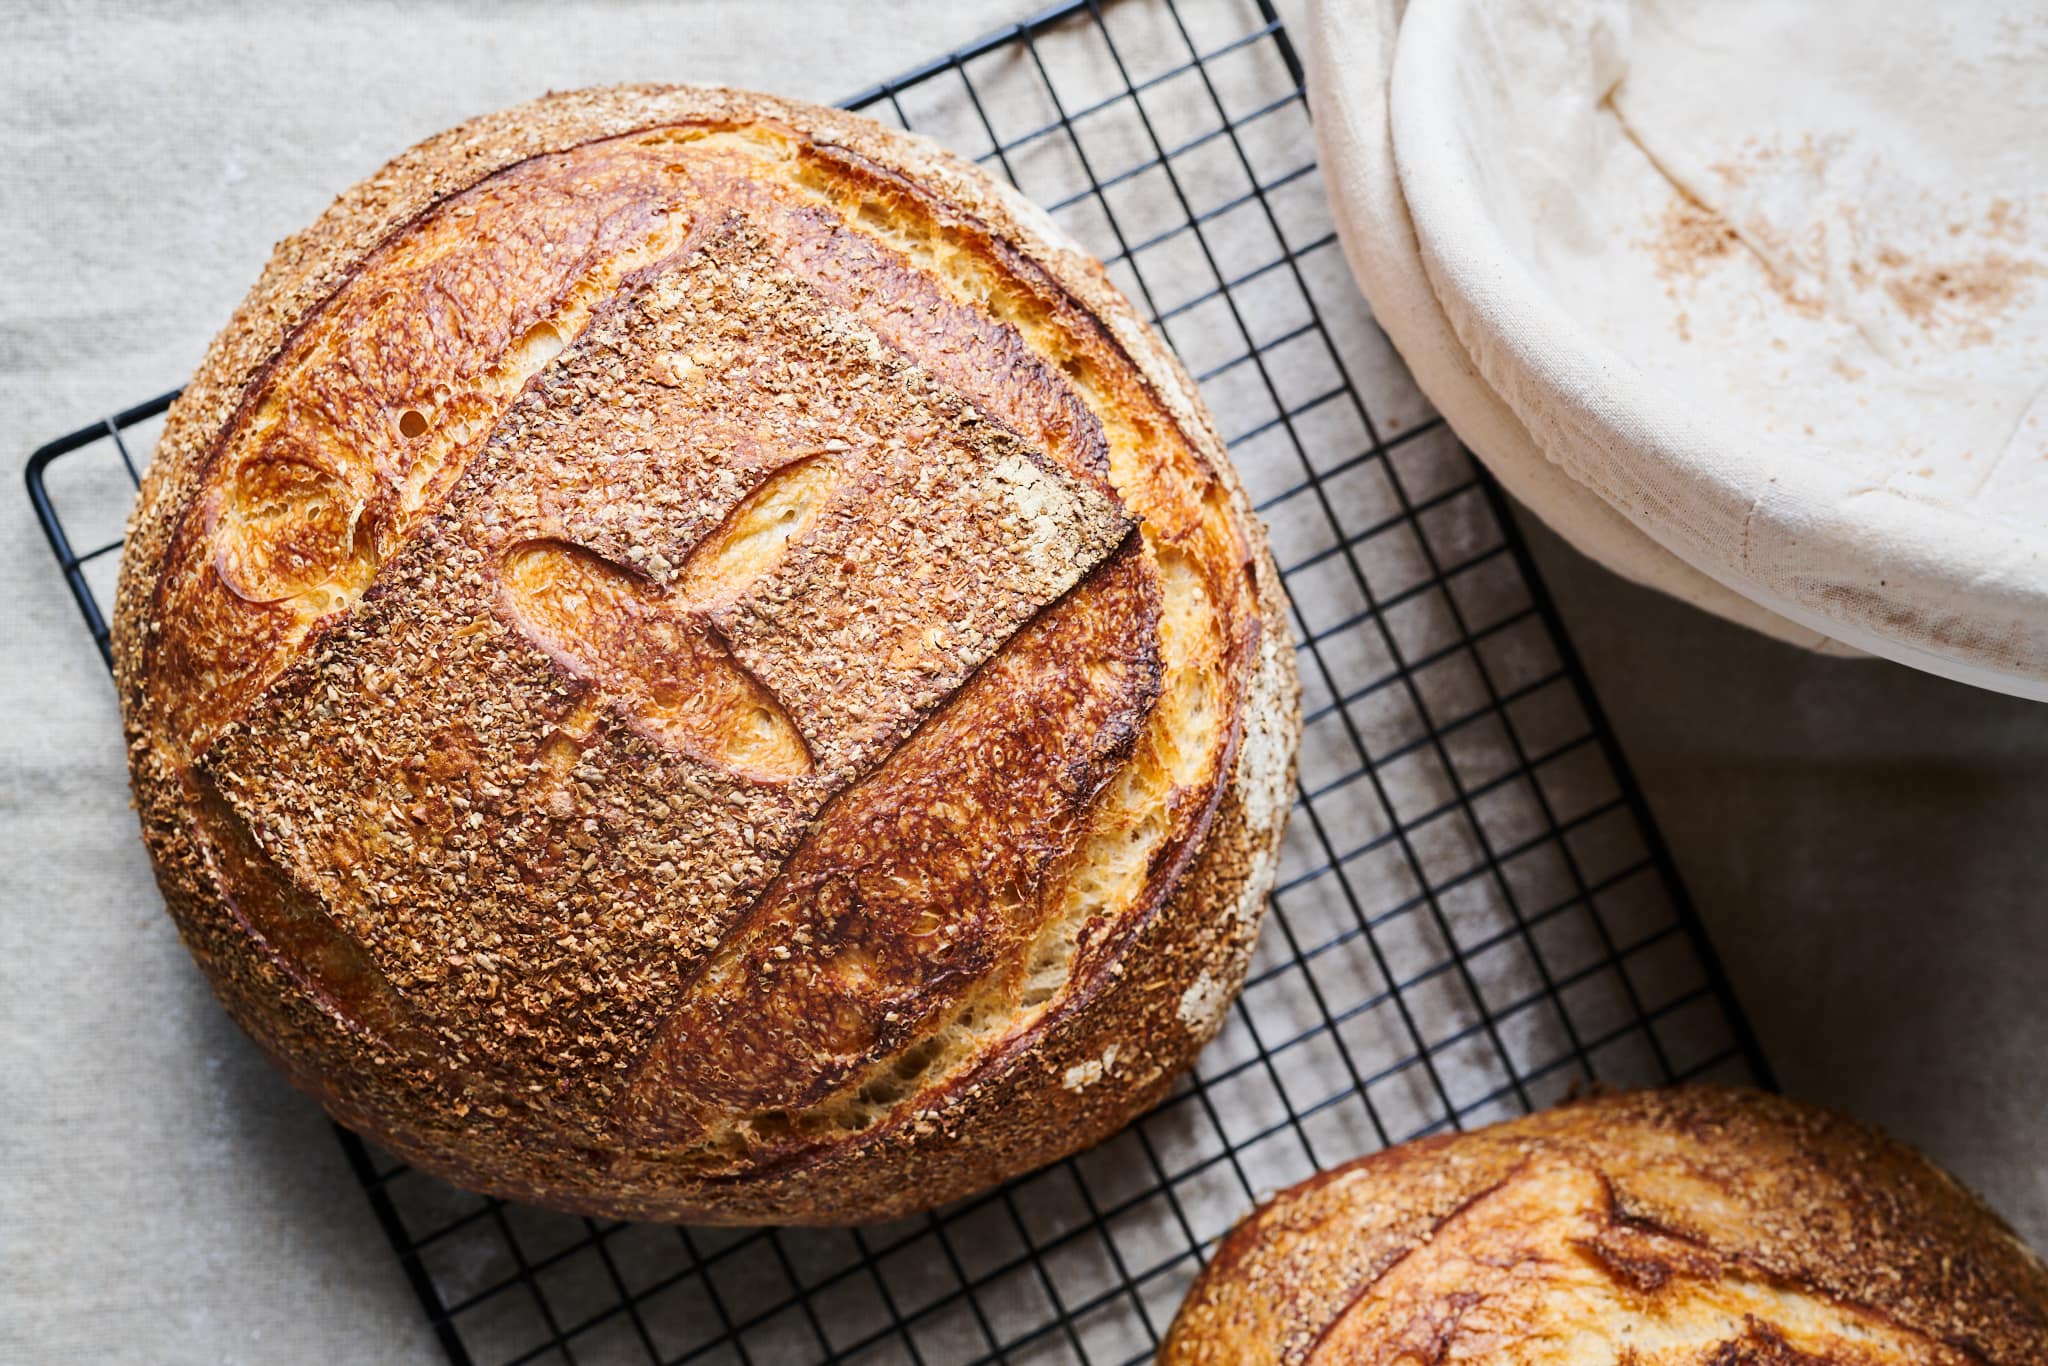
Once you get the hang of this beginner’s sourdough bread process and formula, you can endlessly modify it with add-ins like walnuts, cranberries, seeds, and a host of other ingredients bound only by your imagination. But the most important thing is to bake and have fun. Remember that sometimes bread doesn’t come out as you intended–but stick with it, and you’ll be rewarded time and time again.
And of course, buon appetito!
Watch me make this Beginner’s Sourdough Bread from start to finish
In my YouTube video below, you can see how I make my Beginner’s Sourdough Bread, from creating the levain to slicing the final loaves.

Beginner’s Sourdough Bread Recipe
- Prep Time: 23 hours
- Cook Time: 1 hour
- Total Time: 24 hours
- Yield: 2 loaves
- Category: Main course
- Cuisine: American
Description
The perfect bread to get started baking sourdough bread at home. This crusty, crunchy, and absolutely delicious loaf of bread is perfect for any lunch or dinner table.
Ingredients
Levain
- 38 grams stoneground whole wheat flour
- 38 grams bread flour
- 76 grams water
- 38 grams ripe sourdough starter
Main dough
- 773 grams bread flour
- 114 grams whole wheat flour
- 51 grams whole grain rye flour
- 653 grams water
- 18 grams fine sea salt
Instructions
- Levain (8:00 a.m.)
In a small container, mix the levain ingredients and keep at 74-76°F (23-24°C) for 5 to 6 hours. - Autolyse (12:00 p.m)
In a medium mixing bowl, mix the flour and 603 grams of water (reserve 50 grams until the next step). Cover and let rest for 1 hour. - Mix (1:00 p.m.)
To the mixing bowl holding your dough, add the salt, ripe levain (from step 1), and reserved 50 grams water. Mix by hand or with a dough whisk until incorporated. Transfer your dough to a bulk fermentation container and cover. - Bulk Fermentation (1:10 p.m. to 5:10 p.m.)
Give the dough 3 sets of stretch and folds at 30-minute intervals, where the first set starts 30 minutes after the start of bulk fermentation. - Divide and Preshape (5:10 p.m.)
Lightly flour your work surface and scrape out your dough. Using your bench knife, divide the dough in half. Lightly shape each half into a round shape. Let the dough rest for 25 minutes, uncovered. - Shape (5:35 p.m.)
Shape the dough into a round (boule) or oval (batard)—place in proofing baskets. - Rest and Proof (5:40 p.m. to 9:30 a.m. the next day)
Cover proofing baskets with reusable plastic and seal shut. Let the dough sit out on the counter for 20 minutes. Then, place both baskets into the refrigerator and proof overnight. - Bake (Preheat oven at 8:30 a.m., bake at 9:30 a.m.)
Preheat your oven with a combo cooker or Dutch oven inside to 450°F (230°C). When the oven is preheated, remove your dough from the fridge, score it, and transfer to the preheated combo cooker. Place the cooker in the oven, cover with the lid, and bake for 20 minutes. After this time, remove the lid (you can keep it in the oven or remove it) and continue to bake for 30 minutes longer. When done, the internal temperature should be around 208°F (97°C). Let the loaves cool for 1 to 2 hours on a wire rack before slicing.
Notes
While the recipe calls for 16 hours of total proof time, you could extend this time and bake the loaves in the morning, afternoon, or even the evening on day two. Leave the proofing dough in the fridge until ready to bake.
Beginner’s Sourdough Bread Frequently Asked Questions
Why is sourdough bread good for you?
Sourdough, and its lengthy natural fermentation process, can help break down the gluten in grain, which helps aid in the body’s digestion. Additionally, fermentation helps “unlock” the nutrition inherent in the grain, allowing for better absorption.
Is sourdough bread sour?
Sourdough isn’t super sour in the traditional sense—it’s not sour like taking a bit of a lemon. But it does have tanginess which is the byproduct of lactic acid fermentation. Sourdough bread will have more sourness than one made with 100% commercial yeast due to the acids created by natural fermentation.
How can I make sourdough bread more sour?
To increase the sour flavor of this sourdough bread, add more whole grains (both to your sourdough starter and the dough itself), keep the dough warm (78°F/25°C or warmer), and lengthen the total fermentation time by keeping the dough in the fridge to proof even longer than the 16 hours specified in the recipe—24 hours is a good starting point.
How can I get a more open crumb with my bread?
First, focus on your sourdough starter to get a more open crumb for this sourdough bread: it should be refreshed (fed) often, kept warm, and used when ripe. Next, strengthen the dough sufficiently during mixing and bulk fermentation by using stretches and folds. Finally, your dough must be fully proofed so that when you press a finger into the dough, it slowly springs back about halfway (if it springs back quickly, let it proof longer; if the finger indentation stays, bake immediately).
What’s Next?
After baking this beginner’s sourdough bread, check out my Baking Guides for more in-depth discussions on all parts of the sourdough bread-making process. If you’re looking to add mix-ins to your bread, have a look at my walnut cranberry sourdough bread—it’s one of the most popular recipes here at The Perfect Loaf—and for good reason! Or, have a look at my Simple Weekday Sourdough Bread for a way to squeeze sourdough bread baking into a busy workday.
Finally, now that you have your sourdough starter bubbling away on your counter check out my sourdough starter discard recipes for ideas on how to use leftovers!


3,336 Comments
Hi Maurizio!
Thanks for all your help and recipes. I tried the recipe. It turned out good. I baked it with the vital gluten and it turned out good it terms of the structure and the crust. However while baking my butter paper got stuck to the bread. Just wanted to know why this happened and what I can do differently next time.
Glad to hear that, Ekta! That might be the brand/type of paper you’re using. I like to use Reynolds and haven’t noticed any sticking with it! It could also be if your dough isn’t shaped tightly enough: you want a nice and taut skin on the dough after shaping, it should have a skin formed on the outside that will keep it from sticking excessively to the proofing basket and parchment when you go to bake.
I feel like it would be helpful in the vitals to not only list the “Pre-fermented Flour” but also the baker’s math percentage of levain weight to total flour.
e.g. 184 g levain / 1013 g total flour = ~18.2%
This way I can compare it to many other recipes that don’t use a levain at all and just add a percentage of starter in the mix step.
Hey, Jan. Yes, great suggestion. Something I’ve been thinking about including (and I do on my newer posts!).
Hi Maurizio! I don’t have a Dutch Oven or Combo Cooker, just a regular kitchen oven. How hot and how long do you recommend the temp and time for for these loafs? Thanks
It would likely be very similar! The residual heat from the DO might reduce that second half of the baking time, so you might expect a shorter period for that section. It also depends on if you have a baking surface such as a pizza stone or baking steel, if you do, I’d say the bake time will be almost the same as this recipe as stated.
Hi Maurizio, I have a couple of generic questions: 1) after doing three sets of folds, I sometimes notice that the dough is not as strong as I would it to be: it tends to flop and collapse a bit when i do the preshape. Can I stretch and fold too much? That is, can I do two or three cycles (north, south, east, west) at each set of folding, or would cycles 2 and/or 3 negate any benefit that might have been acheived during cycle #1? Similarly, would four or five sets of folds (over the course of 5 hours, for example) be beneficial? Or can there be too much stretching and folding? And 2) my wife bought me a Mock Mill 100 for my birthday, and I have had fun trying recipes with home-milled flour. My question is, if I use flour that I mill myself from wheat or rye berries, isn’t everything I would be using be considered “whole wheat” flour, since I’m milling the entire berry? If so, is it not wise to substitute home-milled flour en total for a recipe? When I see recipes that call for using whole wheat flour, it is commonly used in conjunction with A/P or bread flour.
It’s hard to overdo stretch and fold to the point where it will fall apart on you (in fact, I’ve never seen this happen, for that reason at least). If the dough is still too slack and weak when you preshape, giving it more sets (as you described) is the way to go. But keep an eye on the dough, a 5 hour bulk at a warm temp (like 78F) might be pushing the dough too far in terms of fermentation. It all depends on how it’s progressing at that point.
Yes, if you’re using all the flour that comes out of your mill, it’s 100% whole grain flour. You can use that flour anywhere it calls for “whole wheat” or “whole grain.” If you used that flour for 100% of the flour in this recipe you will likely have dough that over proofs on you, as whole grain flour is much more active in terms of fermentation, but that’s also much more true with freshly milled flour, which is very active! I’d say start by substituting out the whole wheat and rye in this recipe for your whole grain, freshly milled flour. Keep an eye on the dough, though, as it might be progressing faster through bulk fermentation (meaning, you’ll have to likely reduce that fermentation time).
Keep me posted!
Great! Thanks for the info, Maurizio!
Instead of dividing the dough into two large pieces, divide it into smaller pieces at that point.
I would bake them directly on a baking stone/steel and steam the oven.
This should work well!
Glad to hear that, Igor! Enjoy 🙂
This is a fantastic recipe, and your directions are excellent! Thanks so much!! Two quick questions: 1) My bread sometimes comes out a little too moist: I wouldn’t quite say “gummy,” but headed in that direction. What should I adjust? 2) I like a really sour flavor. I’ve tried lengthening the time in the refrigerator, which worked for flavor, but I ended up with a much shorter, denser loaf. Is there a way to get more sour flavor without sacrificing rise?
Thank you, Rusalka! 1) You could try reducing the hydration of the dough by 2-5% and see if that helps. A moist interior could also be from under fermented dough or slicing into the loaf too early after baking (give it time to fully cool!). 2) That does come down to the recipe. You could try increasing the whole wheat percentage a bit in the dough, or making the levain with a higher percentage of whole wheat flour.
Thanks so much!
Hi Maurizio!
Some recipes I’ve seen on YouTube or on the Internet call for a series of slap and folds or doing the Rubaud method of mixing. These slap and folds/mixing occur right after incorporating the levain and salt into the autolyse mixture. One recipe calls for mixing the levain into the autolyse mixture and then doing the Rubaud method. Then, they add salt and water and perform two sets of slap and folds for 3-5 minutes each, spaced about 25 minutes apart.
Your recipe doesn’t call for this, nor do other recipes I’ve seen. Is there a reason why some bakers include these methods of mixing?
Yes, I use the slap and fold technique often, and you’ll see it often here. Check out my guide to slap and fold.
For this dough it’s not necessary but you can do it if you’d like. The low-ish hydration and strong bread flour don’t need extensive kneading/strengthening.
I want to use this recipe for demi-baguettes. Any thoughts or guidance? Thanks.
Instead, I would use my sourdough baguette recipe, or use it as a starting point!
Hi Maurizio
My loaves flatten after I remove the dutch oven lid. On initial opening they are really nice and round and have a good height. After the final 20 minutes they drop to a flatter profile.
Am I over proofing? I am doing a over night final after the shaping.
many thanks.
Aloha!
Sounds like over proofing a bit or over hydrated/under strenghtened dough!
Thanks Maurizio.
I believe all 3 issues might be at play here.
I think one of my biggest problems is my location. It is very warm here. Average temp in the house is mid to high 80’s. I keep a room air-conditioned to about 80 for proofing. But the ambient house temp is several degrees higher. When I add the levain and salt after autolyse it seems perfect but adding even a little of the 50g of held back water makes the dough soupy.
Ope, checked out older posts and found my answer.
Ok, great!
If I want to start very early and bake the bread the same day, no over night refrigeration, how long would the final rise be given a room temp of 75?
I would like to know this too!
See above!
Julie—I’d say around 2-3 hours at that temp, but it does depend on how the dough comes out of bulk fermentation. Look for a puffy dough where a finger press slowly springs back, not fully filling in the depression. It should feel light and airy, jiggly.
Hey there. I just made this and it turned out great. If I wanted to make four loaves, should I double the recipe? Or make two batches?
Thanks!
Great to hear that! Double all the ingredients.
Hi Maurizio,
First up thank you for all the help and advice with this post. Greatly appreciated!
I baked my first loaf yesterday and had a few issues that I was hoping you could help me with:
1. Sticky dough – found it very difficult to do stretch and folds without the dough sticking to my fingers
2. During bulk, the dough only transformed and became aerated towards the last hour – is this normal? There definitely were bubbles and even some large ones noticed.
3. There was hardly any oven spring and the loaf came out fairly flat like a foccacia! Then when I tried to slice it after cooling completely, it was so difficult as the crust was very soft, and insides were gummy.
Hoping to learn more from you and try again! Thanks for your help 🙂
Emma–it sounds like your dough is most likely over hydrated. Try reducing the hydration by 10% and give it another go—the reduced water should bring strength to the dough and you’ll feel it immediately. Once you find a suitable hydration, you can try to push it back up (if desired), but as you do, take note of how the consistency of the dough changes: the dough will start to slacken out as you add more and more water, this means you’ll likely have to mix more upfront or add another set or two of stretch and folds during bulk fermentation.
Try to keep everything else as consistent as possible and let me know how the next attempt goes!
Hi, a am starting to make a few recipes of sourdough bread.. however where I live it is been difficult to bread flour which contains 13% protein… What is easily available is a 10% protein flour. I wanted to know if i can still use the 10% flour and then substitute with Vital Gluten to it. Will that work for all the bread recipes where required?
Yes, that will work. I don’t have any experience with VWG, but that should supplement and strengthen your flour. However, I’d suggest trying it out with the bread flour you do have available! I’d say reduce the hydration in this recipe significantly to ensure your dough isn’t over hydrated and slack.
What flour ratios can be used if rye isn’t available?
Sub out the whole grain rye for whole wheat flour.
Do you take the dough straight from fridge to oven or should it sit on counter to warm to room temp at all? Many Thanks!
Straight from fridge to oven!
Can I proof dough in fridge for more than 16 hours?
It depends on the dough that day and how fermented it is, but generally with this recipe, it should be fine. The longer you go, the less rise and more sour the result.
I used a different brand of flour, and my autolyse mix does not look like yours, it’s significantly dryer. In fact it feels almost like a slightly dry but otherwise smooth dough. Do I need to add water?
First take some of the reserved water and use that in the autolyse. If you run out of water, then yes, add more as needed to get the consistency shown in my photos for this recipe!
I’ve got a heavy duty mixer with a dough hook. Is there any reason that this would not be a good choice for mixing at the beginning of autolyse and to blend in the levain?
No reason at all, a mixer will work very well with this recipe.
Hey there! So over my journey in sourdough I came to question what the Levain was doing fro me and all the extra time involved in dealing with it. I started using my Barm (starter) in place of levain. I mix my water, flour and barm for autolyse, then add salt and proceed with stretching and bulk fermentation as noted. My results have been great and I have been making two boules a week for months. So, although I am happy with my bread I can’t help but wonder what I am missing out on by cutting out the levain component of this recipe. Any insight would be appreciated!
Hey, Sean. You can certainly simply use your ongoing starter for this bread. I like to have a separate levain building step just to get everyone on the same page when starting out. If you’re familiar with your starter and its cycle, you can certainly just use that. I use a levain when I want to adjust the flour composition, flavor characteristics, or timing for a particular bake. So your bread might have a different flavor profile than I’m intending (based on the temperature your starter is kept at and the flour used for refreshments), but as long as the end result is delicious and to your liking, keep with it!
I’m working on a post now discussing this exact thing, levain vs. starter — hopefully this will clear up some confusion for many on this topic. Keep an eye out, perhaps next week I’ll have it finished. Until then, happy baking!
Hi Maurizio, Can I sub in more bread flour or Whole wheat flour in place of the Rye (which I do not have)?
Yes, that will work just fine! I’d go with whole wheat flour.
Just above step five, I believe it should say “photo above” instead of below.
Thank you!
Is there an archived version of this? It’s been my tried and true since March but things keep changing and I don’t want to mess with perfection. I think I found the old cook time/temp in a comment, but I’d really love to save the old version to reference!
Hi Danielle, this might help you get to what you want: https://web.archive.org/web/20200201000000*/https://slimlife.fit/beginners-sourdough-bread/%3C/a%3E Just select a year from the top, and then click on one of the highlighted dates. It will show you what the webpage looked like back then.
Thanks, Mark!
The old times had everything increased by 50°F. Instead of preheating at 450°F, I preheated at 500°F, then dropped the temp down to 450°F after the first 20 minutes of steaming and for the remainder of the bake. Sorry, I’ve been updating slowly over the years as I’ve found improvements!
I have been baking sourdough for about 4 months now. I am very happy with most of my results, including the taste and crust, however, my crumb isn’t as open with gaping holes as yours or many pictures I see. It’s light and airy, not tight, either, just very few large holes. Is this okay, or should I make some adjustments?
Sounds totally fine to me, Candy. As long as your end loaf has no dense or gummy spots, it sounds like fermentation is just right.
Hi Maurizio,
I started baking sourdough in December. I’m making your beginner loaf today. I noticed that when I was mixing my flours and water the dough was so dry that I couldn’t mix in all the flour, so I added more water just to combine it. It was still a really firm ball. I waited the hour and added the salt, levain and 50g of water. Took forever to get the water incorporated, but once I got it mixed it felt ok. Two question, beside possibly adding too much flour (I don’t think I did and I used a scale), why do you think this happened? And do you think it will have an effect on the final loaf? Thanks so much for your help!
Donna
It could be that your flour simply needs an increased hydration — which isn’t a problem at all. Every flour we use is different, sometimes it needs a bit more water, sometimes less. Adjust as needed!
Hi Maurizio,
Thank you! The bread actually turned out beautifully! And I’ve since made it twice. I tagged you in my Instagram post. Today I baked your whole-wheat, spelt, rye loaf. The taste is fantastic. My favorite by far!it was a little misshapen and not as tall, but like you said that’s from the higher whole grain and hydration. Thank you so much for the recipes!
Donna
Excellent to hear, Donna! No worries about the shaping, it happens and it’s always still delicious 🙂 Enjoy!
Maurizio, thank you for sharing many of your sourdough baking experiences. I apologize if this question has been asked before. I would like to add rosemary (and possibly other herbs in the future) to the beginners recipe. What is the timing, would I need to do the entire recipe or just one loaf? The amount? And, can I add a salt dusting on top without affecting the chemistry?Thank you!
I add rosemary at the end of mixing and gently massage it in with a splash of water. I typically use rosemary in a low percentages, perhaps 1-2%, but this is personal preference. You can always divide all the ingredients in half and just make one loaf! Sprinkling salt on top will cause no issues at all. Happy baking, Kate!
Maurizio, did you update the recipe? The amounts on the first formula are not the same as I used to bake and the levain is only 3.75%, it used to be 20%. Also, the amounts in this first formula/table are not the same as in the text…
I slightly updated the formula, but nothing big. But I DID rearrange the tables. Now each step shows what’s called for in the step itself (instead of a large table up top) to help when you’re in the kitchen. The levain is still around 20%, that’s the 3.75% of starter needed to make the levain build, shown a bit below that. Sorry for the confusion, it’s just a rearranging!
Thank you kindly for such an informative site Maurizio. I have one comment and one question. First comment is that I found this beginners recipe quite forgiving. It was very hot here, for some reason I didn’t make enough levin following this recipe, therefore I added 2 gr dry yeast also. Then I over bulk fermented and so before shaping I put it all in the fridge overnight. Next morning I shaped and let it proof in the baskets, then baked. It was the most superb bread I’ve made! Who could have guessed this from a novice?? So my question is why am I consistently not getting the 184gr of leaven when I am following the recipe to a T? Today I got 174 but previously I have got less. I have been supplementing with some dry commercial yeast and it is fine.
Ingrid I’ve had the same problem twice! I call it the case of the disappearing levin! First time I followed the recipe and when it came time to add to the dough it came out to 141g. The second time I increased all the ingredients to build the levin by 5g and still only came to 160g. It sat on the counter for 5 hours, rose and fell nicely and passed the float test. It’s probably something simple but so perplexing, hopefully someone here can help 🙂
See my reply above, Hafeeza 🙂
This is pretty common, and sometimes you’ll get a bit of loss on the spatula, jar, etc. I’d say it’s generally not an issue, I just try to get as much out of the jar and off any tools as possible. If you find you’re really short, add a few grams of water and flour to the levain when you mix it up to add a little more mass.
The funny thing is, I use to build in a little “buffer” like this in the recipes, then people would wonder why there’s excess 🙂 It’s ok to be a little under or a little over as long as it’s not excessive (15g might be pushing it).
Thank you!!! Is it ok to add the ‘missing’ mass from leftover starter? I’ll definitely build in more buffer the next time.
Yes, that’ll work!
Hi everybody! I’ve been checking others comments but don’t find the question I’ve, which is about the pre-shape method, I really don’t get what is need to be done there. I normally try to make a taut ball or the pushing with your little finger holding, can somebody tell how is the process here exactly?
Other than that, I’m surprised to find that the official hydration of a dough counts the amount of water in the levain! Other bakers count only the water added to the dough, and so in that case I guess this is a 60% hydratation right?
As the issues I had, I used whole spelt instead of whole wheat and rye, and a drizzle olive oil (does that change much?), and so when mixing the halved amount of flour (for 1 loaf) with the 300 gr water it was basically imposible to get all dough incorporated, so I had to add 15 ml which was not enough neither and left a very crumbly and rough dough through the whole process (weird isn’t it?). Then more water adding the SD (whole wheat) and salt. Then after 5 (!) s&f and 4 h total bulk, When pre shaping and shaping I was surprised to see, specially after placing in the proofing bowl, that when sealing/pinching/folding to create more surface tension, it would break! My dough has been sticky and kinda over fermented all this time, which really frustrates me 🙁 What could have gone wrong? My kitchen is around 25 degrees (outside it’s 32), my starter was ready and despite its roughness there was quite strength and tightness. Put in the fridge for 7 h, then outside for 4h where finally start rising but as I saw bubbles and this “over proofing” look, springing back started to fail to the end, so I didn’t wait longer. Should I’ve? It’s also tricky to incorporate levain to a dry dough which might have been the reason, maybe it’s more important to mix properly and develop some gluten already? (Even did some slap&fold when adding more water)
My loaf rose a tiny bit more than other times, but it still doesn’t get big wholes at all and still very humid in the inside, to the point that I want to give up haha
Thanks again for such an intensive guide tho!! May I encourage you to make a whole beginners video? 😀 It’d help us to understand the gluten development and targeted textures of every step 🙂
Hey, Paula! Use whatever preshape method you like to get the divided dough into a reasonably taut round, ready for shaping after a “bench rest.” I like to use both hands to sort of drag the dough toward me while my pinky fingers pinch it against the work surface — sounds similar to what you’re doing.
Yes, the water in the levain is counted toward the hydration calculation. The total hydration for this recipe is 72%.
It sounds like maybe you over hydrated the dough a bit, but it’s hard to say for sure. I’d try to follow my recipe exactly if you cant. Using whole spelt in place of the whole wheat and rye is fine, but try to stick to the dough temperatures and all else and see how it goes!
Maurizio, Thanks for guidance here and this fantastic beginners recipe. I have followed it 3 times and I am getting the hang of baking great bread. I also discovered having burnt the bottom a few times, that another simple solution to not burning the bottom of a loaf while using the dutch oven is to place a cookie or baking sheet under the dutch oven.
Hey, Dave! Thanks for the feedback — yes, that works really well! I need to add it to my baking in a Dutch oven guide (I just checked, i do have it there!). Happy baking!
Great site– thanks! A quick question about timing: how do you get a starter at its peak first thing in the morning? Even if I feed mine late at night, it peaks in about 5-6 hours, and it’s past its prime by the time I want to bake in the morning. Is there a way to slow it down? Is it OK to use it for the levain build when it’s past its peak (since it will rise back up in the levain)?
You can slow the rate of ripening by leaving less starter in the jar the night before. It’s ok to use it when it’s a little past it’s peak ripeness, but getting it as close there is preferred for this recipe!
SaraM
Thanks for this great site! I have a question about timing: since you start the levain build with mature starter, when do you feed it? If I feed the very last thing before going to bed in the evening, mine is still past its prime by first thing in the morning (peaks around 5-6 hours, while I sleep more like 8-9!). is there any way to slow down the starter (but not as slow as putting it in the fridge)? Does the starter need to pass a float test before going in to the levain build, or will it build back up in the levain?
Hey, Sandy. You can slow the ripening of your starter by leaving less ripe starter in the jar when you feed it at night. Keep reducing that amount until you find it still needing time in the morning.
Hey Maurizio! Thank you, I have also made this recipe 4 times and it has come out well each time, getting better and better. Really appreciate it as a new baker. Question: I follow your recipe to a tee (halving it each time to only make one loaf) and I never get the correct weight of levain to materialize.
IE according to the recipe, I’m supposed to end up with and use 92g levain, but I was only able to scrape out 82g/83g consistently from it. The bread has been good regardless…any idea whether that means I’m supposed to let the levain rise longer, or whether that’s fine, or whether I am doing something wrong? Not sure how much difference 10g of levain could make haha! Thanks.
I think he uses 20% of the total flour for levain. So, if you are making a bread that has 1000g of flour, your levain would be 200g. You have to do the math with your total grams of flour. I’ve seen recipes that were used 15%, 20% , or even 25% of levain. So, I assume that 10g off wouldn’t make too big of a difference in your bread.
If you’re unable to get more levain, I would suggest just adding more equal parts of water and flour. Idk what ratio you are doing, but I do 1:5:5 and I get plenty for my bread.
That’s pretty typical, sometimes it’ll come up short as some is inevitably lost on the utensils, jar, etc. You could add a bit extra flour and water the night before when you do your levain build if you want to get it right on, but usually it’s not an issue 🙂
I’ve made this recipe 4 times now and each time it has come out amazing! I was completely new to bread baking and your site has helped me so much. Thanks for all the hard work you put into it!!!
I made this bread the first time and left it to proof outside the fridge overnight on accident! I still cooked it and it was still really good! It was also the first loaf of bread I have ever made! I have to admit I was quite intimidated with this site at first with all the the percentages and dough weights but found that it really came in handy! I am making it a second time today and retarding it in the fridge. I even used your starter recipe and created my own starter from scratch! It really is fun to do! Thank you for all your information and I love the video tutorials!