


When most people read the words”pumpkin” and “bread” in the same sentence, a mélange (pun intended) of strong spices—cinnamon, nutmeg, ginger, and clove—and sweet concoctions come rushing to mind. But this recipe doesn’t quite follow the usual connection between our beloved fall-time squash and those pungent spices. Instead, this pumpkin cinnamon sourdough bread is lofty and light, tender, a touch sweet, and deeply colored by the addition of smooth pumpkin puree. And while the cinnamon is just a small hint, but that, in combination with the creamlike pumpkin and sweet raisins, is enough to ensure you’re ushering in fall with the right spices and the right flavors.
I’m not really a sweets person—except for that personal batch of cinnamon rolls on the weekend (I know you’ve at least thought about it)—but this sweet-ish bread really hits the cool-weather spot. The falling leaves and shorter days awaken that urgency for something a little sweet, and this tall, stunning loaf of pumpkin bread on the cutting board feels right. And if you’re like me, you might still have that stash of canned pumpkin puree ready to go already in your pantry.
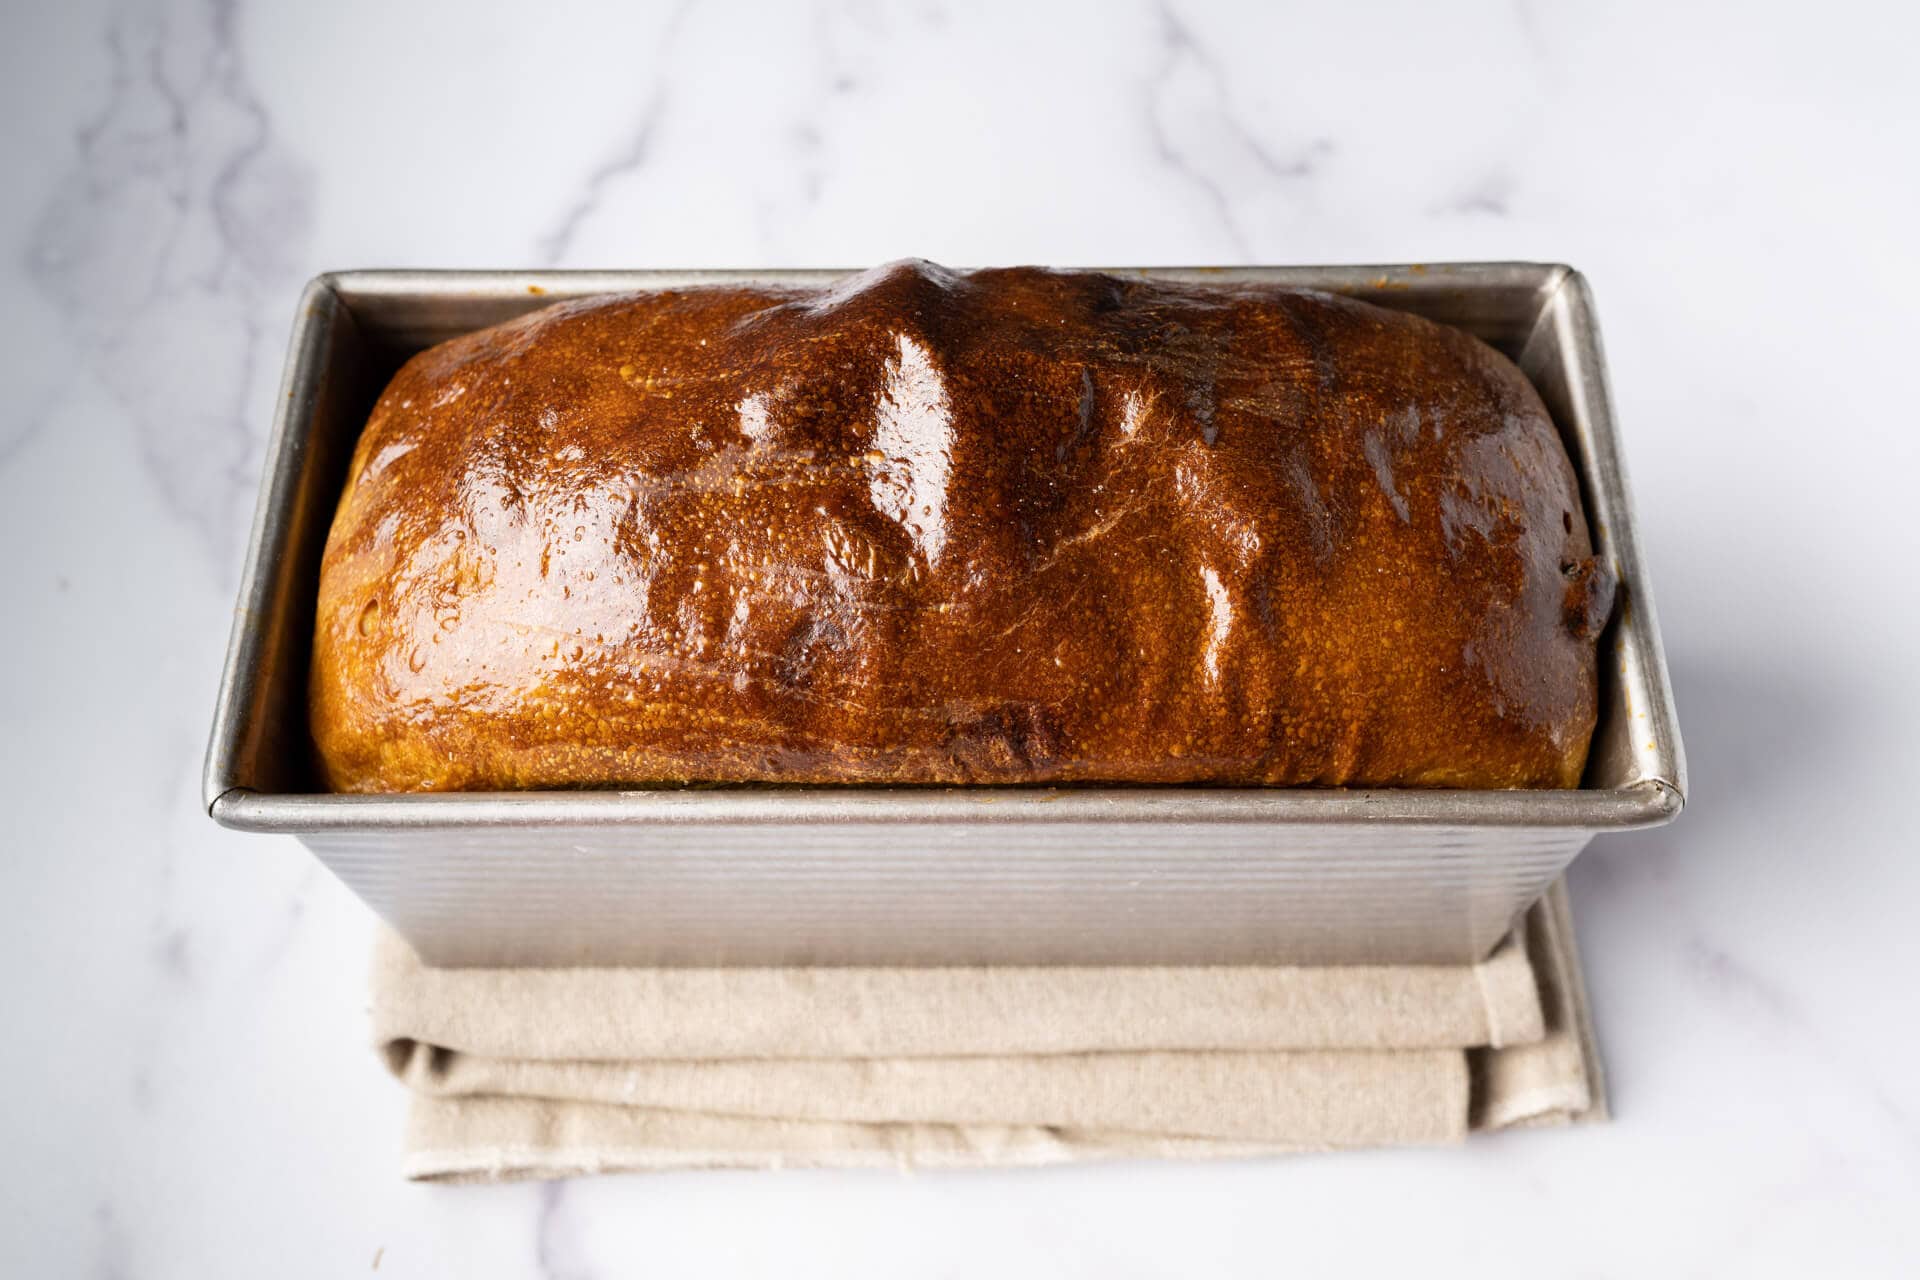
If you’re a diehard pumpkin spice fan, you could add nutmeg, ginger, and clove to taste.
If you’re a diehard pumpkin spice fan, you could adapt this recipe to include a touch of nutmeg, ginger, and clove—but I’d recommend keeping it light (perhaps only 0.25% of each?). These are powerful spices indeed, and can quickly overwhelm.
This pumpkin cinnamon sourdough bread is drastically different than a typical pumpkin quick bread. To me, the latter is closer to a banana bread, which is dense, ultra-moist, and typically sweeter. This is lofty, airy, and light, but still has the same warmth with a subtly sweet slant.
Using a Sweet Starter
This bread uses what’s sometimes called a “sweet starter.” I first heard about this technique a while ago from the extremely knowledgeable baker Ian Lowe (check out his Instagram feed and get ready for an immeasurable amount of baking inspiration), and have been using it in a variety of sourdough bakes here in testing.
A sweet starter (or levain, as I optionally call it), is a preferment with added sugar. To me, it’s similar to how naturally leavened panettone is made. Panettone is made with a series of builds (primo impasto, secondo impasto, etc.) that gradually increase sugar and other enrichments before making the final dough.
For this pumpkin cinnamon sourdough bread, a sweet starter helps to reduce the sourness in the final loaf and lets the flavors of pumpkin and cinnamon really shine through. Additionally, I also find it helps keep the fermentation on schedule with a bonus of increased yeast activity for a strong rise.
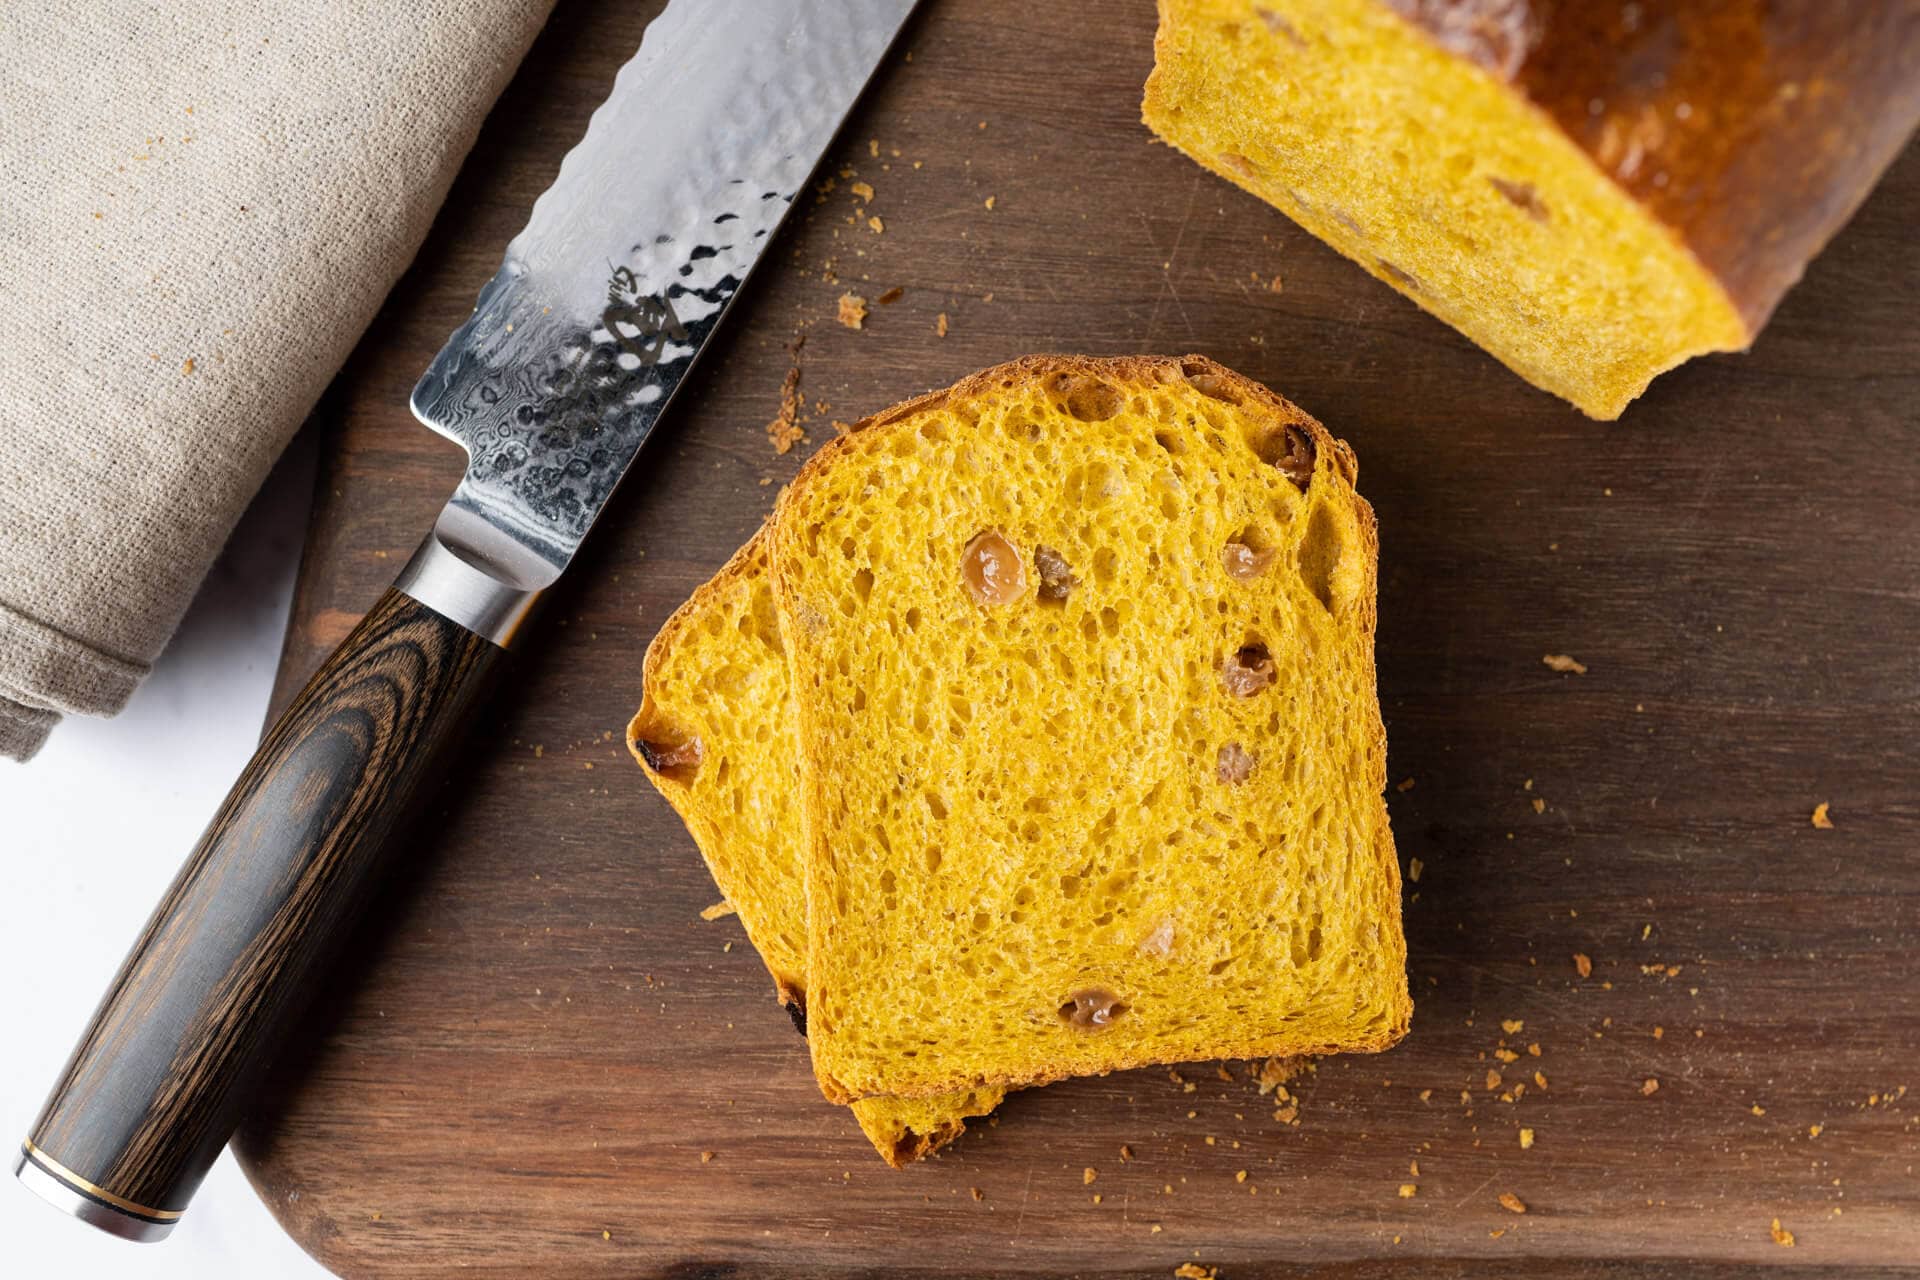
Flour Selection
After testing many iterations on this formula, I eventually settled on half medium-protein bread flour and half high-protein bread flour. The added pumpkin puree and enrichments (butter and sugar) make the dough especially soft and almost mousse-like. Using 50% higher protein flour helps the dough develop strength early, making for an easier dough to handle with no discernable side effects in the end.
King Arthur Baking Bread Flour will work well for the high-protein bread flour in this pumpkin cinnamon sourdough bread recipe. Any medium-protein bread flour (around 11% protein) or all-purpose flour will work well for the medium-protein bread flour. I’ve made this with King Arthur Baking All-purpose and Central Milling Artisan Baker’s Craft Plus with equally great results.
I considered using the tangzhong technique with this bread, but I don’t believe the added step would bring many benefits. Why? The dough is already incredibly soft with the added puree. Adding any more tenderness to this bread might be too much.
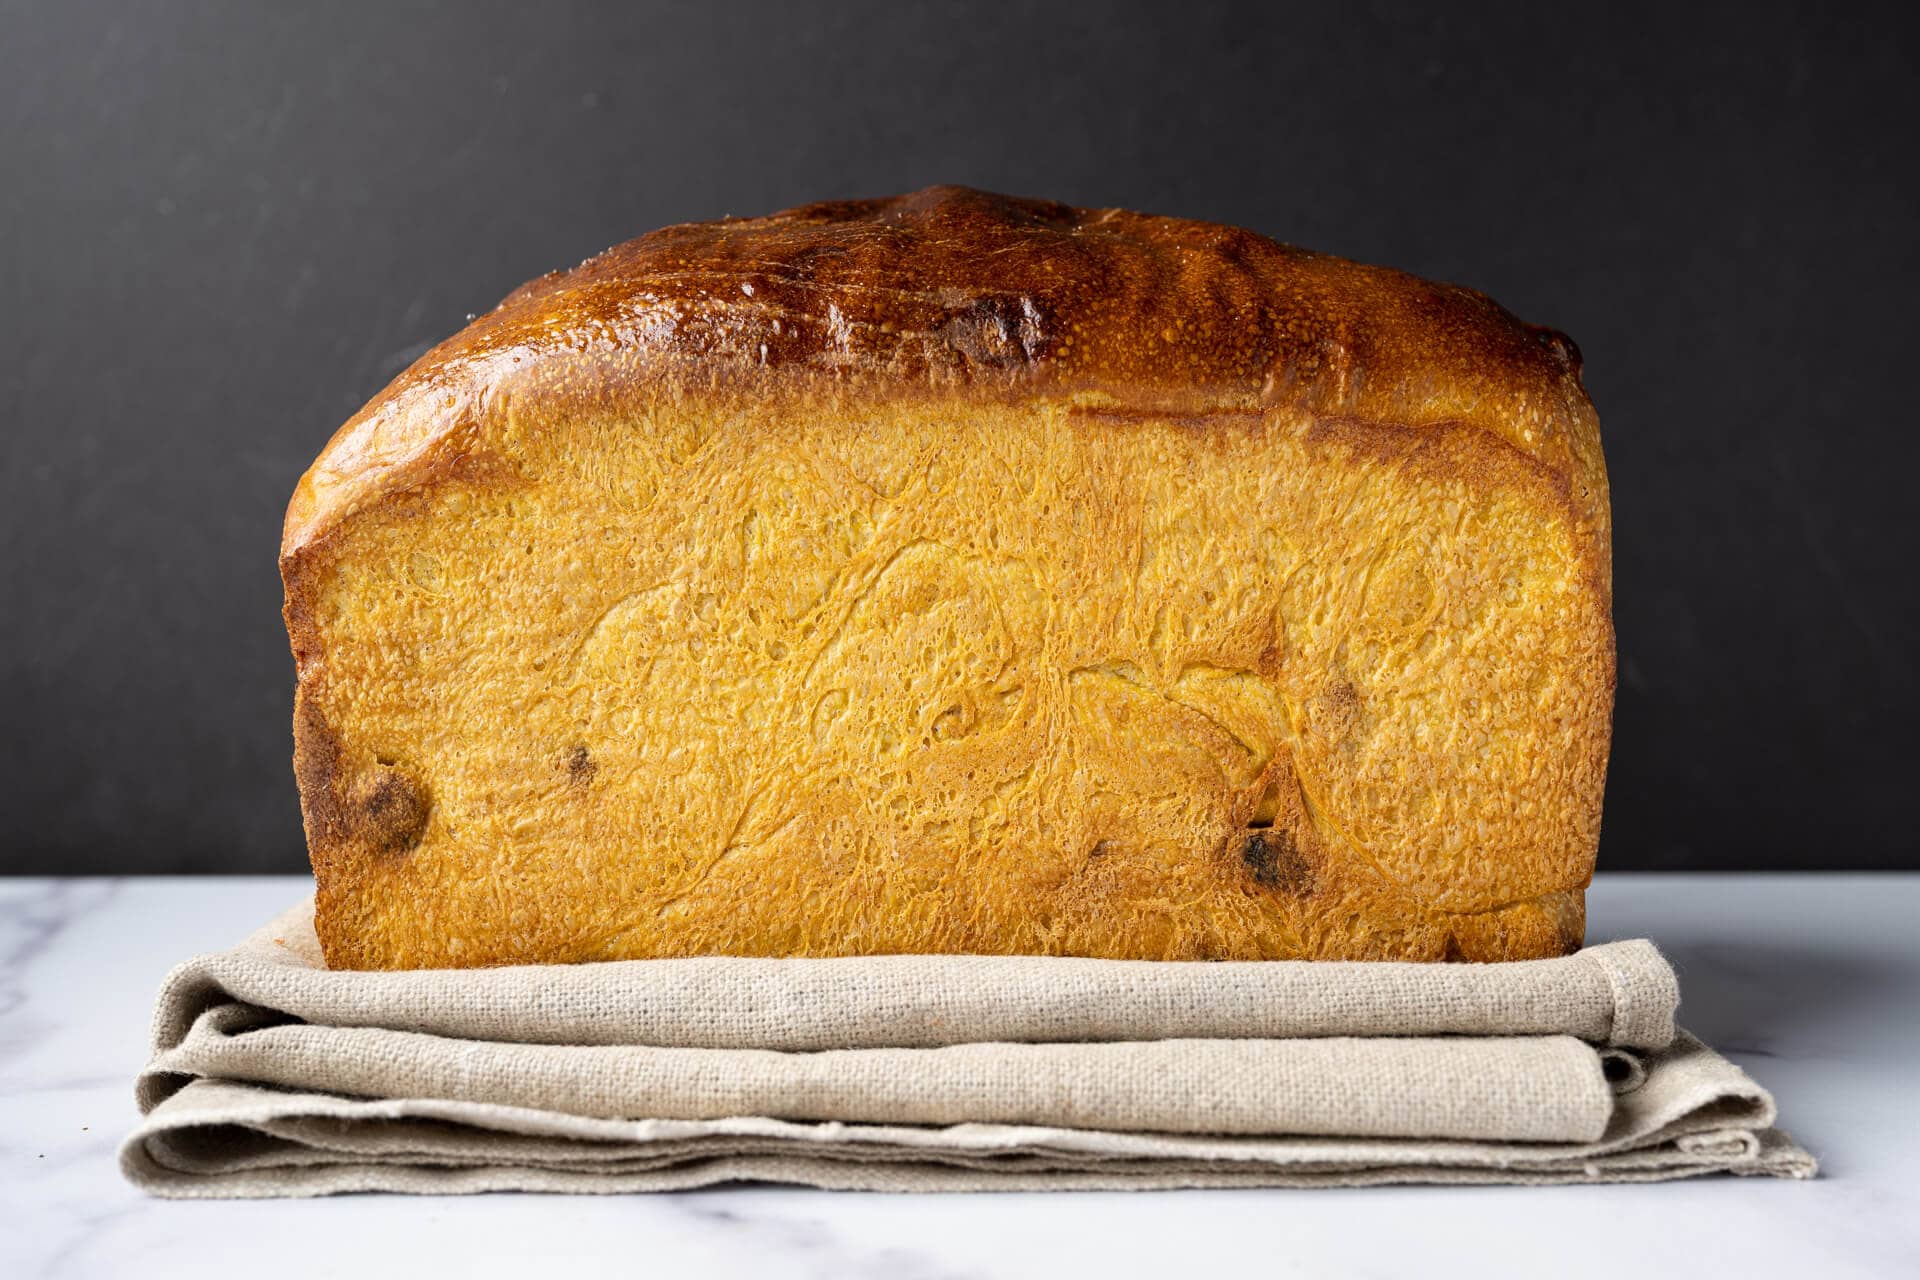
Preparing the Pumpkin
Me being who I am, I was tempted to roast my own pumpkin for this bread. But, I pretty quickly dismissed the idea. I’ve done this many times when making pumpkin pie, and while it’s totally an option, I find buying canned pumpkin puree to be just as good and a heck of a lot easier. That said, if you want to roast your own pumpkin (or you have some leftover from pumpkin pie), it will work well with this recipe. Just be sure to let the puree cool thoroughly before mixing it into your dough.
I ended up using the classic Libby’s Canned Pumpkin, and to me, it’s a wonderful puree for this bread. It’s always my go-to for pumpkin pie, and now, this pumpkin cinnamon sourdough bread is no different.
Baking Schedule
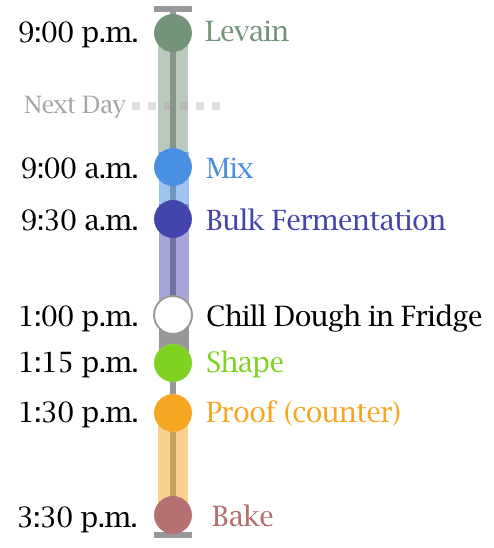
This pan bread is a direct bake, meaning it’s baked the same day you mix (except for the levain, which is created the night before).
Be sure to use your levain when it’s very ripe: it should be extremely bubbly, frothy, and well-risen. The dough might move a little slow in proof, give it extra time if necessary.
Overnight proof option: while I don’t call for this dough to be retarded (cold proof overnight), this can be done if it’s better for your schedule. Simply place it in the fridge after it’s shaped and in the Pullman pan, then bake first thing in the morning once fully proofed.

Pumpkin Cinnamon Sourdough Bread Formula
If you want to bake two loaves instead of one, double all the ingredients. For tips on how to calculate baker’s percentages or how to modify this formula, see my post on baker’s percentages (baker’s math).
| Total Dough Weight | 950 grams |
| Pre-fermented Flour | 11.50% |
| Levain in final dough | 33.79% |
| Yield | 1 x 950g pan loaf |
I used my 9x4x4″ USA Pan Pullman pan (without the lid) for this square loaf. The silicone liner on the inside ensures no sticking, and the straight sides make for nice slices.
But, if you’re looking for how to make this recipe work in a different pan, see my post on shaping a sandwich loaf.
Total Formula
Desired dough temperature: 77°F (25°C). See my post on the importance of dough temperature for more information on dough temperatures.
| Weight | Ingredient | Baker’s Percentage |
|---|---|---|
| 199g | Medium-protein bread flour or All-purpose flour (~11% protein, Central Milling Artisan Baker’s Craft or King Arthur Baking All-Purpose) | 50.00% |
| 199g | High-protein bread flour (~12-13% protein, King Arthur Flour Bread Flour) | 50.00% |
| 120g | Pumpkin puree | 30.00% |
| 80g | Raisins (golden or Thompson) | 20.00% |
| 64g | Butter, unsalted | 16.00% |
| 40g | Sugar, caster | 10.00% |
| 3g | Cinnamon, ground | 0.75% |
| 140g | Water | 35.00% |
| 80g | Milk, whole | 20.00% |
| 8g | Fine sea salt | 1.90% |
| 18g | Sourdough starter | 4.60% |
Total Yield: 238.25%, 950.0 grams.
NOTE: You’ll also need one egg and a splash of milk for the egg wash right before baking.
Pumpkin Cinnamon Sourdough Bread Method
1. Prepare Levain – Night before mixing, 9:00 p.m. (Day one)
Mix the following ingredients in a container and leave covered to ripen at about 77°F (25°C) for 12 hours overnight.
| Weight | Ingredient | Baker’s Percentage |
|---|---|---|
| 46g | Medium protein bread flour or all-purpose flour | 100.00% |
| 46g | Water | 100.00% |
| 9g | Sugar, caster | 20.00% |
| 18g | Ripe sourdough starter | 40.00% |
Total Yield: 260%, 119.2 grams.
2. Mix – 9:00 a.m. (Day two)
There is no autolyse step for this dough. Because I’m mixing the dough in a mechanical mixer with cold ingredients, it’s easy enough to develop the dough sufficiently without overshooting the final dough temperature. An autolyse would also be tricky here with the pumpkin puree, milk, and how everything is added during mixing. See my guide to the autolyse technique for more information.
I used my KitchenAid stand mixer to mix this dough, which I highly recommend. The pumpkin puree and butter makes for a very soft dough with lengthy mix times.
Because most of the ingredients are cold from the refrigerator, you might need to expect to warm the water slightly to hit the final dough temperature listed above.
| Weight | Ingredient |
|---|---|
| 154g | Medium-protein bread flour or All-purpose flour (~11% protein, Central Milling Artisan Baker’s Craft or King Arthur Baking All-Purpose) |
| 199g | High-protein bread flour (~12-13% protein, King Arthur Flour Bread Flour) |
| 120g | Pumpkin puree |
| 80g | Raisins (sultana or Thompson) |
| 64g | Butter, unsalted |
| 31g | Sugar, caster |
| 3g | Cinnamon, ground |
| 94g | Water |
| 79.7g | Milk, whole |
| 7.6g | Fine sea salt |
| 119.2g | Ripe levain (see above) |

First, take out your butter and cut it into 1/2″ pats. Set the butter on a plate to warm to room temperature and reserve until the end of mixing.
Use the paddle attachment to develop this dough efficiently.
To the bowl of a stand mixer fitted with the paddle attachment, add the water, milk, flour, ripe levain, sugar, cinnamon, pumpkin puree, and salt. Mix on speed 1 (STIR on a KitchenAid) for 1 to 2 minutes until the ingredients come together and no dry bits remain. Increase the mixer speed to medium (2 on a KitchenAid) and mix for 8 minutes until the dough starts to strengthen and clump around the paddle. It won’t completely remove from the bottom of the bowl, and it will still be shaggy.
Let the dough rest in the mixing bowl for 10 minutes.
If your dough is cohesive and elastic enough, you could now switch to using the dough hook (I did). Your butter should now also be at room temperature; a finger will easily slide in and leave a depression. Turn the mixer on to speed 1 and add the butter, one pat at a time, waiting to add each pat until the previous one is fully absorbed. Adding all the butter might take 5 to 8 minutes. In the end, the dough should be glossy and soft, but cohesive and showing some strength.
Finally, add the raisins to the dough and mix on low until just incorporated. It’s unnecessary to mix aggressively here; just get them mostly distributed.
Transfer your dough to a bulk fermentation container and cover.
Don’t be alarmed if your dough is softer than you’re used to—this is a very soft dough! It’ll gain significant strength through bulk fermentation.
3. Bulk Fermentation – 9:30 a.m. to 1:00 p.m.
At room temperature, around 77°F (25°C), bulk should take about 3 1/2 hours. If your kitchen is cooler, place the pan to rise in a small proofer, or extend bulk fermentation as necessary. If your kitchen is around 74°F (23°C), I’d say closer to 4 hour or 4 hours and 15 minutes.
Give this dough three sets of stretch and folds during bulk fermentation (first rise) at 30-minute intervals. The first set starts after 30 minutes from the start of bulk fermentation. For each set, wet your hands, grab one side and stretch it up and over the dough to the other side. Rotate the bowl 180° and perform another stretch and fold (this forms a long rectangle in the bowl). Then, rotate the bowl 90° and do another stretch and fold. Finally, turn the bowl 180° and do one last stretch and fold. You should have the dough neatly folded up in the bowl.
After the third set, let the dough rest, covered, for the remainder of bulk fermentation.
4. Chill Dough – 1:00 p.m. to 1:15 p.m.
Your dough should be puffy and light at the end of bulk fermentation (as seen below), but still elastic and not overly gassy. If your final dough temperature was lower than the 77°F (25°C) for this recipe or your dough is still tight, dense, and not smoother, give it another 15 to 30 minutes and check again.
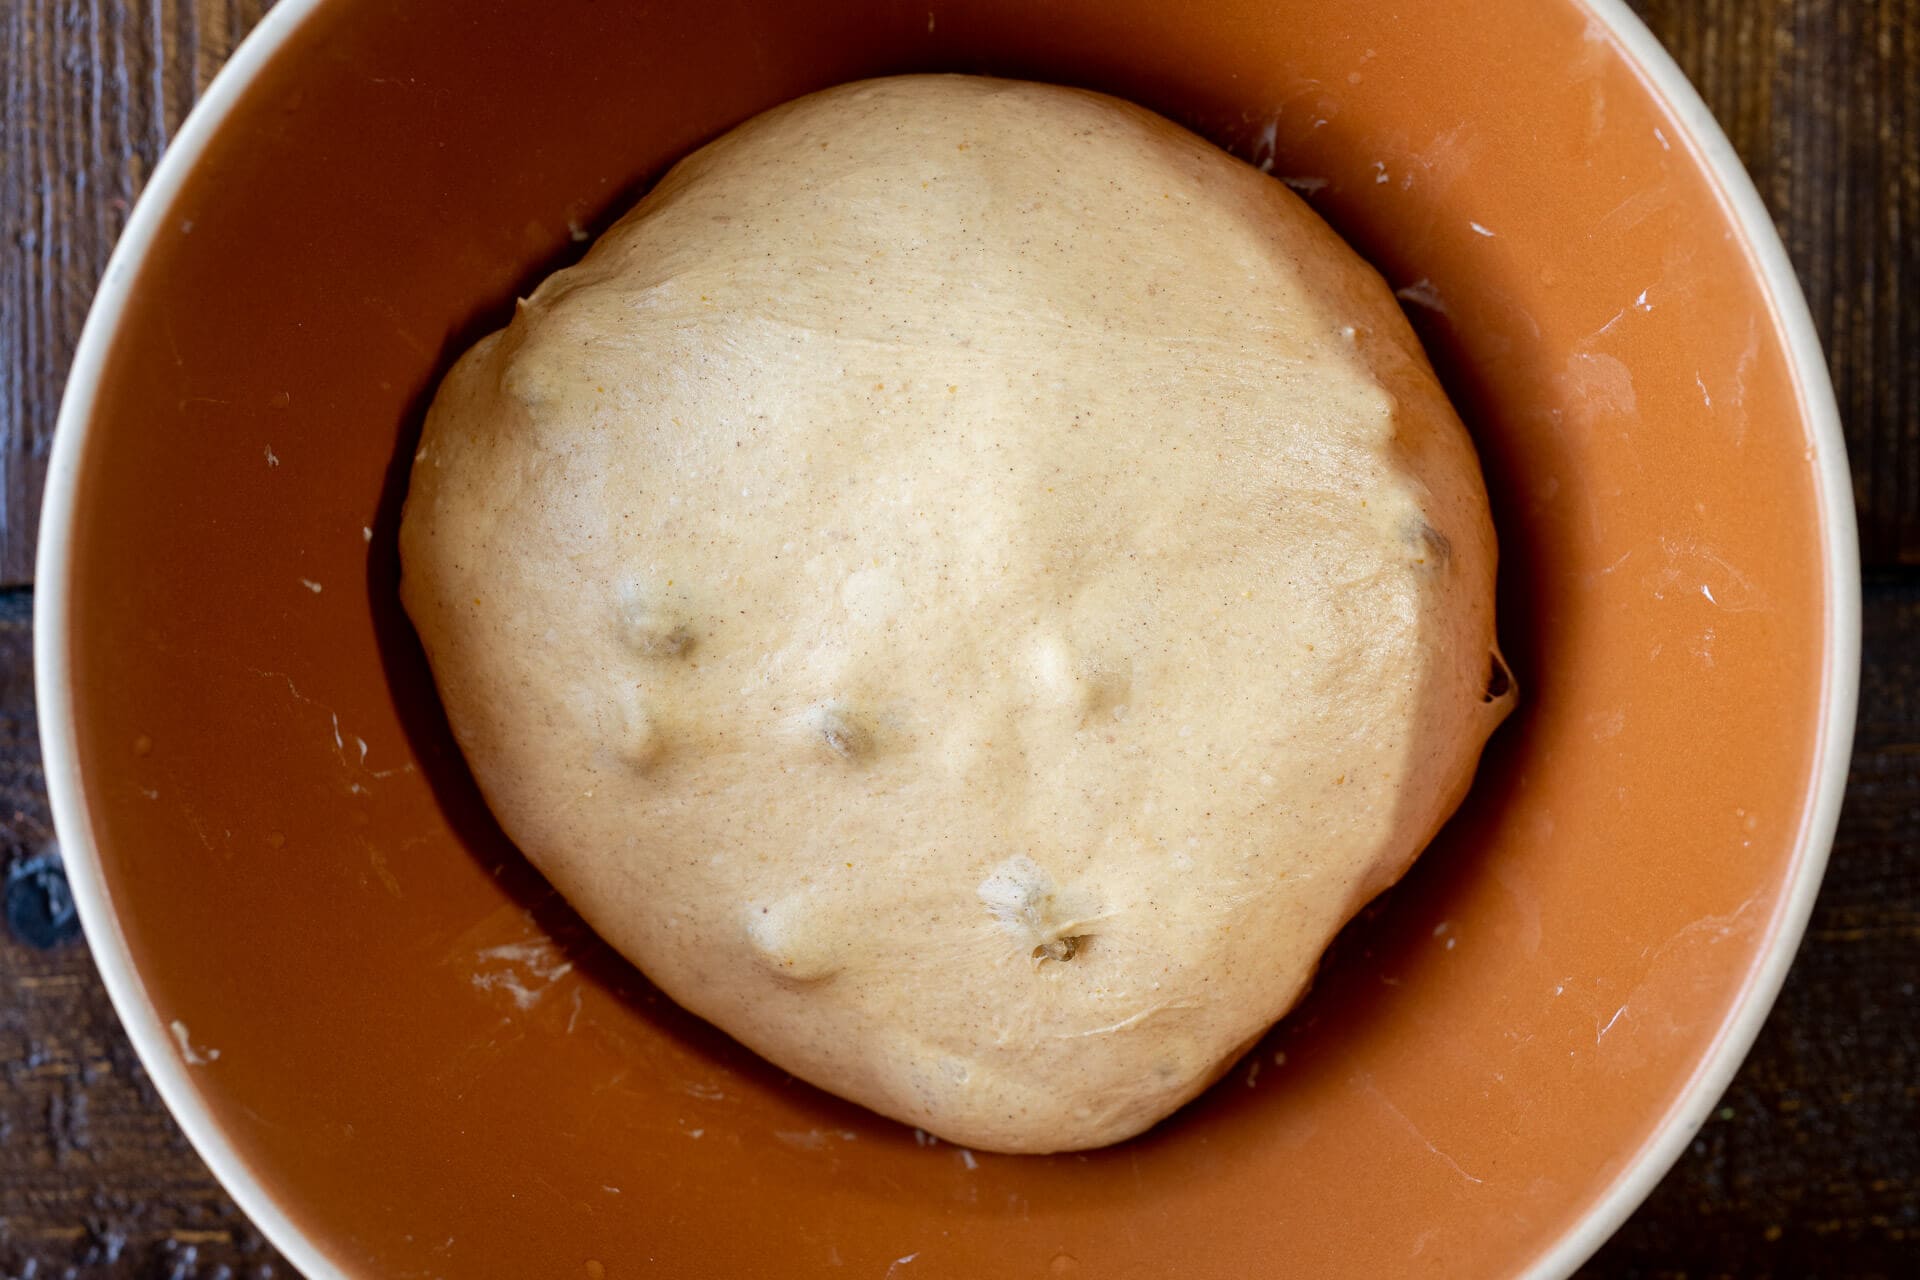
Uncover your bulk fermentation container and place the dough in the refrigerator for 15 to 25 minutes. This time will help firm up the dough to make shaping and transferring to the pan much easier.
5. Shape – 1:15 p.m.
First, lightly oil your Pullman pan with butter. While this isn’t strictly necessary when using a USA Pan Pullman pan, it’s a little insurance just in case.
I shaped this dough in my typical method for shaping a pan loaf. Check out my guide to shaping pan loaves for detailed instructions.
Remove your bulk fermentation container from the fridge and gently scrape the dough out of the bowl onto a floured work surface. Fold the dough’s left side over to the middle, the right side up and over to meet the left. Finally, roll the entire rectangle down to form a taut tube.
Once the dough is shaped into a long tube, transfer it to the pan, seam-side-down.
6. Proof – 1:30 p.m. 3:30 p.m. (2 hours at room temperature)
Cover the pan with a large, reusable plastic bag and seal it shut. Let the dough proof at a warm temperature, around 77°F (25°C), for 2 hours.
Overnight proof option: before the 2-hour counter proof, cover the pan with an airtight bag and place it in your refrigerator to proof overnight. Bake the loaf the next morning, as indicated below.
7. Bake – 3:30 p.m. (pre-heat oven at 3:00 p.m.)
Check on your dough: it should have risen just above the top of the Pullman pan and be extremely light and airy to the touch (see image below). If it’s not quite there, give it another 15 minutes and check again.
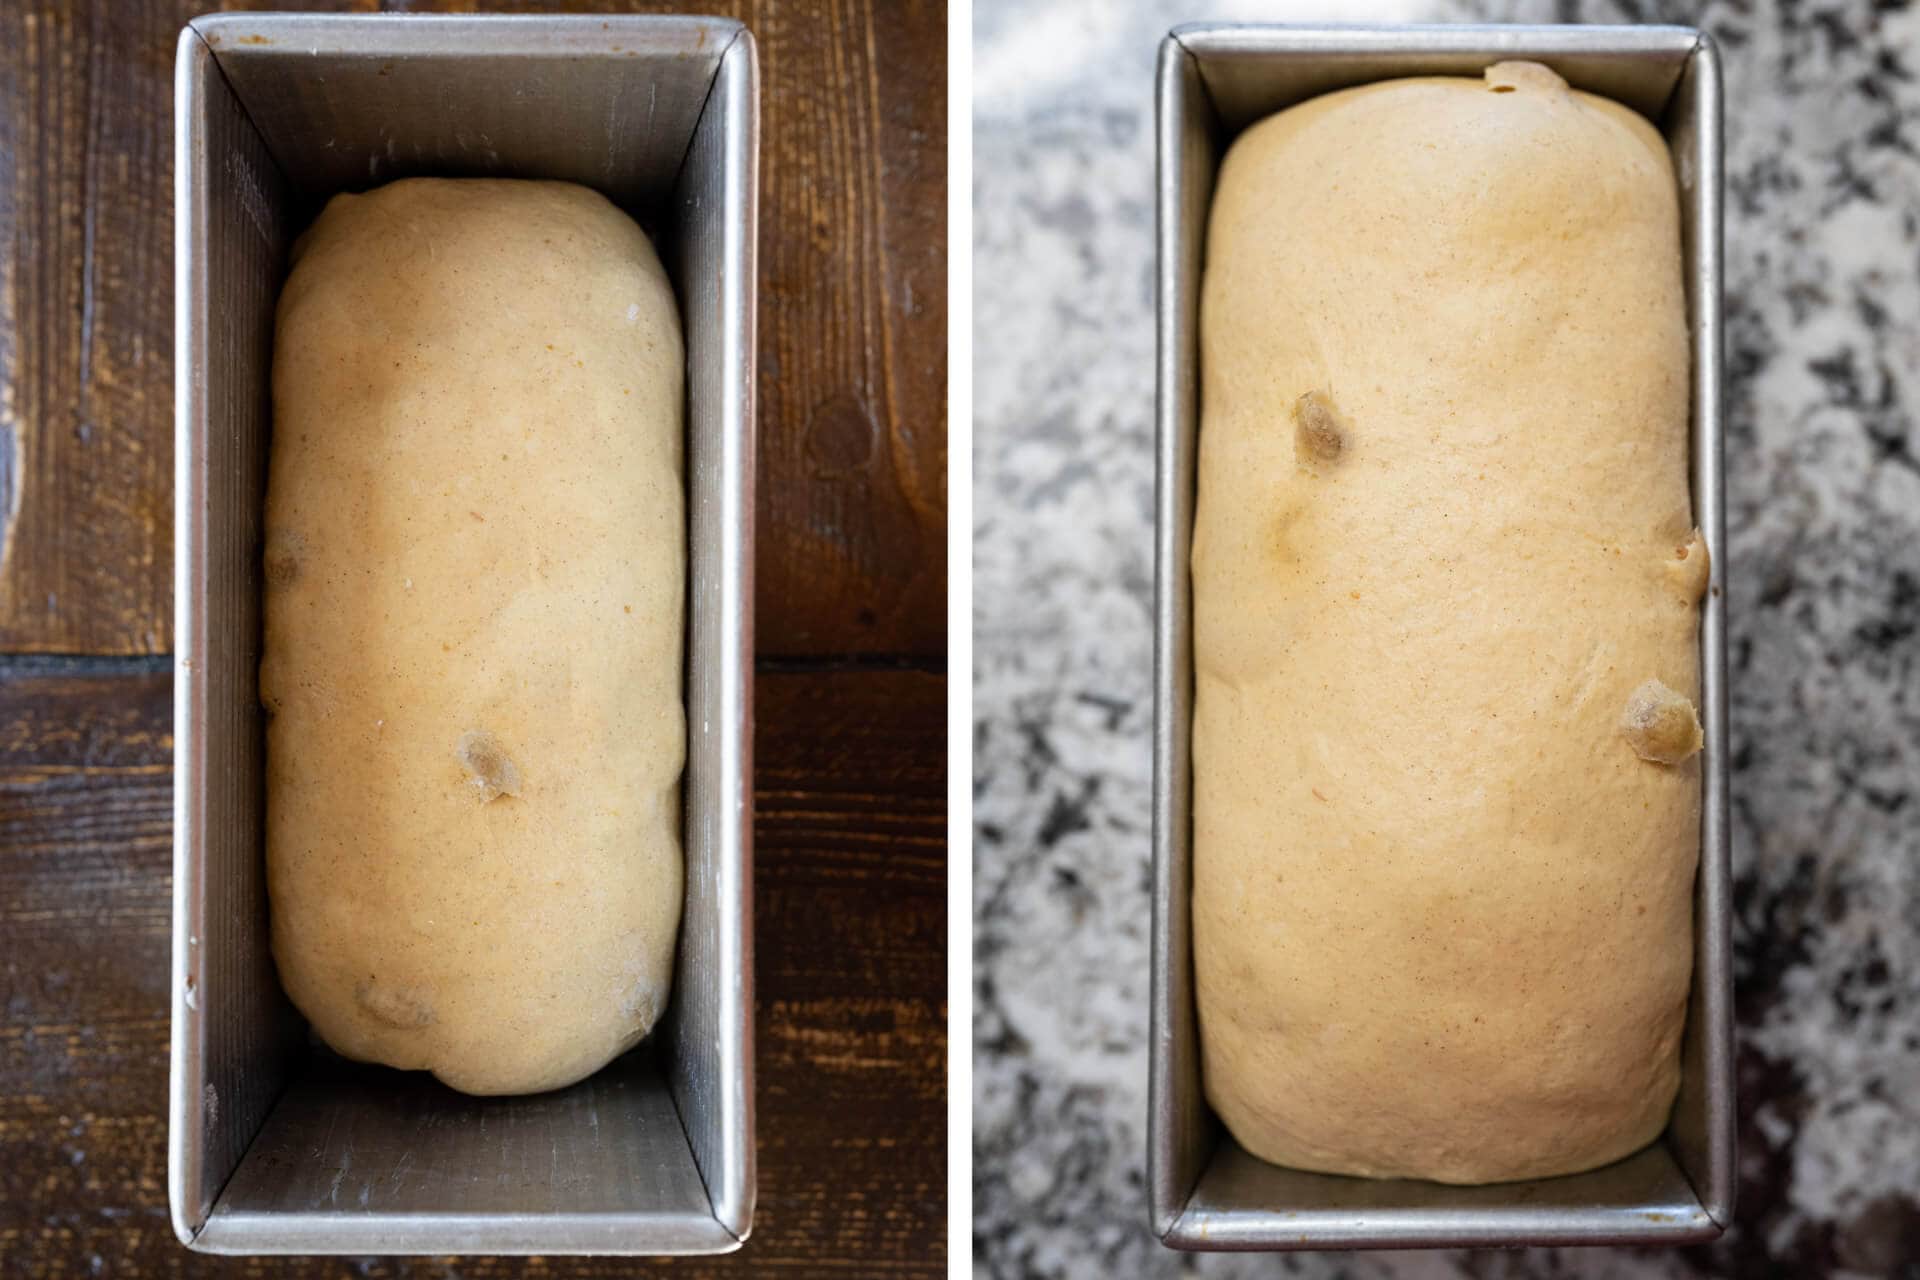
There’s no need to steam the oven for this bake because we’ll use an egg wash to top the dough. In a small bowl, whisk together a whole egg and a splash (about 1 tbsp) of whole milk.
Preheat your oven, with rack in the middle, to 400°F (205°C).
Once your oven is preheated, remove your pan from its bag, evenly brush on the egg wash, and slide the pan into the oven.
Bake at 400°F (205°C) for 20 minutes. After this time, rotate the pan 180° in the oven and reduce the temperature to 375°F (190°C). Bake for an additional 30 minutes until the top is well-colored. Remove the pan from the oven and gently knock the loaf out to a wire rack. Return the loaf (without pan) to the oven to bake for an additional 5 to 10 minutes to add extra color to the bottom and sides. The loaf is done when the internal temperature is around 205°F (96°C)—check with a discrete poke with your instant-read thermometer.
Let the loaf cool for 2 hours before slicing to ensure the interior is fully set. This bread keeps well for about a week if stored according to my post on how to store bread.
Conclusion
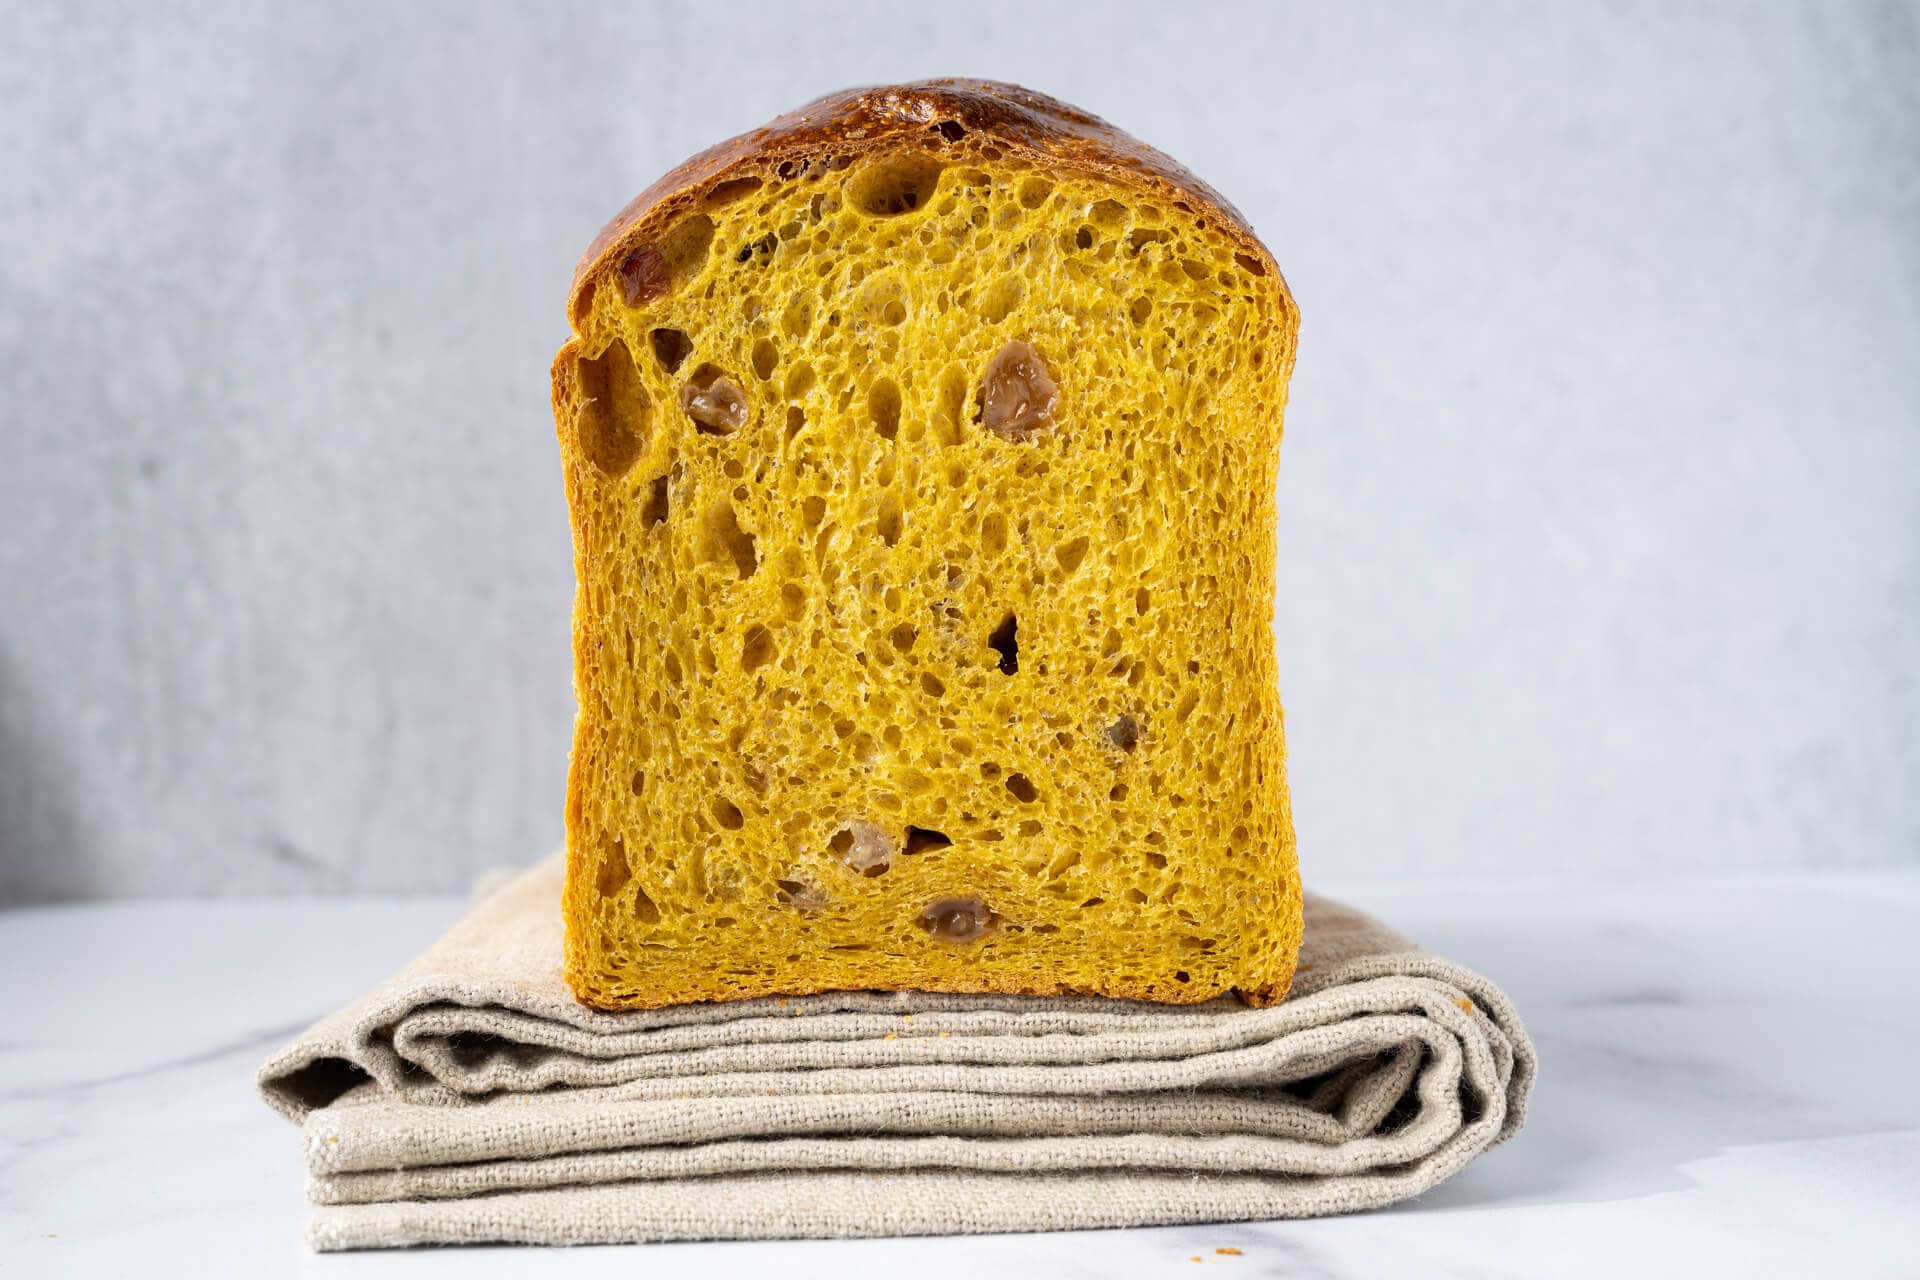
This pumpkin cinnamon sourdough bread is tender, light, sweet, and just spicy enough. The deep coloring from the pumpkin puree is showy and gives the crust and undeniable charm. The egg wash on top takes this further with intense caramelization and a delicious sheen. Finally, the flavor of this loaf is seductively warm, and the pop of sweetness when you snag a juicy raisin makes the mouth tingle—a seductively charming bread from every angle.
I think the perfect treatment for this pumpkin cinnamon sourdough bread might be to toast it and spread on some homemade apple butter. Let’s go all-in on fall. But frankly, a simple adornment of salted butter is always in season, isn’t it?
Buon appetito! 🎃
If you’re looking for more ways to use up that pumpkin puree, check out my sourdough starter discard pumpkin pancakes or my super soft and chewy pumpkin dinner rolls.

Pumpkin Cinnamon Sourdough Bread Recipe
- Prep Time: 15 hours
- Cook Time: 50 minutes
- Total Time: 15 hours 50 minutes
- Yield: 1 loaf
- Category: Sweet, Sourdough
- Cuisine: American
Description
This pumpkin cinnamon sourdough bread is tender, light, sweet, and just spicy enough. The deep coloring from the pumpkin puree is gorgeous and gives the crust this undeniable charm. The egg wash on top takes this further with intense caramelization and a delicious sheen. The flavor of this loaf is seductively warm, and the pop of sweetness when you snag a juicy raisin makes the mouth tingle with joy.
Ingredients
- 199g medium-protein bread flour or all-purpose flour
- 199g high-protein bread flour
- 120g pumpkin puree
- 80g raisins (sultana or Thompson)
- 64g butter, unsalted
- 39g sugar, caster
- 3g cinnamon, ground
- 140g water
- 80g milk, whole
- 8g fine sea salt
- 18g sourdough starter
Instructions
Prepare levain (the night before mixing, 9:00 p.m.)
In a small container, mix together the following and keep at 77°F (25°C) for 12 hours.
46g medium protein bread flour
9g sugar
46g water
18g ripe sourdough starter
Mix (9:00 a.m.)
Cut butter it into 1/2″ pats and let warm to room temperature. To the bowl of a stand mixer fitted with the paddle attachment, add:
154g medium-protein bread flour
199g high-protein bread flour
120g pumpkin puree
31g sugar
3g cinnamon
94g water
80g milk
8g salt
119g ripe levain (from step 1)
Mix speed 1 (STIR for KitchenAid) for 1 to 2 minutes until homogenous. Then, mix speed 2 for 8 minutes until dough clumps around the paddle.
Let the dough rest in the mixing bowl for 10 minutes.
Next, add the 64g butter, one pat at a time, while the mixer is running on speed 1 (STIR). Continue this for 5 to 8 minutes until all the butter is added to the dough and it’s glossy and soft.
Finally, add the 80g raisins at the very end of mixing and mix on low just to incorporate.
Transfer your dough to a bulk fermentation container and cover.
Bulk Fermentation (9:30 a.m. to 1:00 p.m.)
Give the dough 3 sets of stretch and folds at 30-minute intervals, where the first set starts 30 minutes after the start of bulk fermentation.
Chill dough (1:00 p.m. to 1:15 p.m.)
Place the bulk fermentation container, uncovered, in the refrigerator for 15 minutes to make shaping easier.
Shape (1:15 p.m.)
Butter or grease the baking pan. Scrape the dough out of the bulk fermentation container to a floured surface and shape the dough as a tube. Place into baking pan and cover.
Proof (1:30 p.m. to 3:30 p.m.)
Proof the dough at 77°F (25°C) for 2 hours.
Bake (3:30 p.m.)
Preheat your oven to 400°F (200°C). For the egg wash, whisk together one egg and a splash of whole milk. When the oven is preheated, brush on the egg wash and bake for 20 minutes. Then, rotate the pan 180° in the oven and reduce the temperature to 375°F (190°C). Bake for an additional 30 minutes until the top is well-colored. Remove the pan from the oven and gently knock the loaf out to a wire rack. Return the loaf (without pan) to the oven to bake for 5 to 10 minutes. The internal temperature should reach around 205°F (96°C). Let the loaf cool for 2 hours on a wire rack before slicing.
Notes
I used Libby’s canned pumpkin puree for the pumpkin, but you could also roast your own. If you want this loaf to have a more “pumpkin pie” flavor, add a small percentage of nutmeg, ginger, and clove.
If you use this recipe, tag @maurizio on Instagram so I can take a look!


288 Comments
Ugghh! I got caught by the way the ingredients are listed! I used 199 g of AP flour and 199 g of bread flour. I also used the total amount of sugar as I hadn’t planned ahead to make the required levain and used another starter that I had ready to go. (I found myself with pumpkin on hand thus this spur-of-the-moment impulse to make a pumpkin loaf.) After having measured out the 140 g of water , I noticed that the second list called fo 94 g of water so made the adjustment but never clued in to the fact that the flour in the second ingredient list had also been adjusted to account for the flour used in the levain. My dough will definitely be a lower hydration but hopefully it will work. Doing bulk ferment right now.
I find it confusing having the unconventional two lists of ingredients – the first one which lists the total amounts and the second which breaks it down into the ingredients for the levain and the main dough. I will definitely remember this next time and read and make careful notes before I begin. Fingers crossed that it will work out.
Just shaped the loaf and I think all will be well. The dough seems to have lots of hydration (not sure that I’d want any more) but bulk fermentation took longer than expected – 5 1/2 h. I may have to pop this in the fridge over night and bake in the morning. Looking good though!
Glad to hear things are going ok, Helga! Sorry about the confusion with the tables… I’ve been messing with those for years, trying to find the right balance there. The “Total Formula” table is a table intended to be an upfront overview of the entire bake. It tells you what ingredients you will need, and if you want to scale up or down the formula, that’s the way to do it. That’s the sort of table a baker can use to modify the formula if they want, but also a way to get a grasp for the formula from a baker’s percentages view.
Let me know how the bake goes today!
I think for the total table you could say TOTAL AP FLOUR = 199 g
( 46g AP / levain + 153 g AP / dough) .
I too made same error but caught it when only had the AP and bread flour for the dough in my bowl. Scooped out the 46g, hopefully the AP on the bottom, and know all will be fine. But I can relate to others who make this boo boo in the excitement to make your delicious bread.
Why does this say on cover page that this makes one 950 gram loaf? Am I missing something here or typo?
Thanks!
Hi! I baked this loaf a week ago and WOW, did it rise, have great texture and taste and color!! I didn’t have golden raisins so used regular ones instead, still tasted and looked great. My family bought me a B&T proofer for Christmas so I let the dough proof at around 77°F (25°C), for 2 hours in there, which seemed to work perfectly. I also added the extra nutmeg, ginger and cloves in your recommended amounts and the flavor was super. I used my vintage Sunbeam mixer which never came with a dough paddle, so I worried if the regular beaters would be okay. The dough hooks, which it did come with, were sufficient. Thanks for a fantastic recipe!
Fantastic, Mare! Sounds so great. I’ve seen those Sunbeam mixers from time to time, they look like workhorses. Thanks for the feedback and happy baking!
I have made this bread successfully numerous times. This time, despite a nice active leaven, bulk took 3 times normal even with the proofer up to 85 degrees so I didn’t have to stay up to all hours. . The only thing differently was a new fresh Vietnamese cinnamon rather than old McCormick cinnamon. Bread was a bit denser and much more sour. Any thoughts about strategies to minimize the potential negative effect of the cinnamon? I assume that was the cause because everything else was the same. Maybe a bit less and added after a S&F or 2?
Yes, I’d add less and/or add it later in the process, like you said. That should help minimize the effect. If it was too cinnomon-y tasting, definitely drop the percentage!
This is the 2nd time I have made the recipe and it turned out perfectly both times. I’m in tropical Asia, so our average room temperature is 30-32C, so BF takes a much shorter time. I have to play it by ear, but Maurizio’s detailed instructions are excellent, so I don’t feel nervous. A beautiful recipe. Thank you so much.
Thanks so much for the feedback, Piyali!
Hello! I’m wondering what would happen if you baked the bread with the pullman loaf pan top on for the whole time? Would the bread not cook properly or become too dense?
It would be fantastic! You’d end up with a thinner crust all around and you might have to bake a little longer, but it would work really well (and you wouldn’t need an egg wash or to steam the oven).
Hi Maurizio. . . . I made this today, first time and have to say the flavor is wonderful. I am not a fan of pumpkin, but this bread is so wonderful. Going to make 2 more loaves for Thanksgiving. Question . . . in general. I live at about the same elevation as you, south of Vaughn NM. But I must be A LOT drier here or something cause my flour is always thirsty and I try to alter the recipes to accommodate. I struggled with this recipe cause I didn’t know how soft the dough should be. I initially added more water, a little at a time, but then after bulk and shaping, I realized it did not match your photo which showed a smooth skin loaf. So I reshaped, adding a bit more flour and started the final rise again. Going on 12 hours after the start this morning, I baked it. The texture is fabulous and taste is great. But I still don’t know how to make my next loaves accounting for my thirsty flour. Is there a general rule? %?
Super glad to hear that, Marcy! You’re really making your way through my recipes, I love it. Unfortunately there’s no general rule for adjusting hydration, it’s one of those things where you ultimately have to adjust by feel when mixing. This dough is a little more challenging in that regard because I mix it up on the dry side because I know a large addition of butter is coming later, which means it’ll be a very soft and slack dough. So there’s a thin line with these types of recipes. The best way to adjust for that is to try and use the same flour each time you bake this recipe, then, take notes and increase the water a little each time to get you where you need to be. It’s more of an iterative thing, where you increase a little and see how the dough responds during bulk fermentation. Again, with enrichments like this (butter and sugar), it’s a touch more challenging than just flour and water recipes.
Hi! I made this for the first time and they were incredibly soft! Thanks for the wonderful recipe! (I used my usual starter without sugar and they turned out fine! Had a sour tinge but I think it’s due to over proofing at the final stage – was waiting for dough to hit the edge of tin instead of applying the finger test – noob mistake!)
So happy to hear that, Ying! No worries about the proof, I’m sure it’s still wonderful. Enjoy 🙂
Good morning! Making this loaf for the first time and wondering if I can add a bit of instant yeast to add to the rise. I realize this would alter the bread to not be pure sourdough but wondering the options especially if I am lacking time to extend the bulk fermentation or second proof. Also trying to make up for a cold/drafty house where rise is hard in the colder months. Thank you so much!! Love your recipes!
Hey, Erin. Sure, you can always do that if you feel it necessary! It’ll certainly shorten the timeline and give you stronger rise. Hope that helps and have fun!
Thanks for the great recipe and inspiration. I made this with a few vegan subs, and it worked out really well. I used oat milk and earth balance vegan butter 1 to 1. For the egg wash, I used 2 tablespoons of milk and one teaspoon of agave. I considered using aquafaba for the wash, but I didn’t know how it would brown.
That sounds great, Charles! Thanks for the feedback—now I can tell others looking to do the same thing what to use 🙂 I’ve never used aquafaba in baking, it might have worked given the starches present, but I’d have to test! Happy baking!
Yes so good to know Charles! I’m doing a dairy free diet at the moment. Do you think the consistency of vegan butter is similar to ghee? Thanks so much, Janene
I’m not sure. I’ve haven’t cooked with ghee. I have tried other vegan butters in baking. I can recommend Miyoko’s European Style, Om Sweet Home, and Fora foods butters. If you are adding it as semi-soft pats like this recipe, the stick based butters are better than the spreadable tubs.
You can also switch up the milk. I’ve found that oat milk produces baked goods with the most browning and sweetest flavor which is why I used it for this bread. Unsweetened soy milk produces a lighter color and more savory/nutty flavor. I haven’t tried soy milk in a cinnamon raisin bread, but it might work well for this bread isn’t particularly sweet.
I made this today, and it’s delicious! I did have a couple few issues. First, my levain weighed less than 119 grams this morning, likely due to overnight evaporation. (I covered it with a cloth & put it in a warm spot overnight.). Second, the proofing took over 3 hours before it rose above the top of the pan. I was afraid it wasn’t going to rise like it should, but it eventually did. Finally, mine cooked really fast! The top got really brown when there was still 15 minutes left on the timer at 375, and the internal temperature was already 205. Maybe my oven temp is off? Anyway, I took it out and didn’t do the out-of-pan browning. Not sure why all these things happened (I’m a newbie at bread-baking), but it looks like your photo (same height, same crumb) and it’s really tasty. Thank you for your recipe, and especially for your detailed description of the process! I look forward to trying more of your recipes.
For a newbie bread baker you did exactly what I would have recommended—great job, Susan! It’s ok for the levain to be a little short, and lengthening the bulk fermentation until the dough looked ready was exactly the move—sometimes it takes longer, especially if it was cold in your kitchen or your levain was a little under ripe when used. It’s possible your oven temp is a little off, but it might also just be elevation differences. I live at high alt and things do take longer to bake here. I try to adjust my times and temps to compensate, but sometimes it requires a little adjustment on the reader’s part.
All in all, great job, Susan! Thanks for reporting back and enjoy 🙂
Hello Maurizio,
I’m in the middle of Step #3 Bulk Fermentation, yet I was hasty in starting up and had not read the complete recipe through to the end, and in doing so, (later to realize I misinterpreted the first paragraph), added all ingredients to bowl with room-temp-butter. Altho botched that up, the sd-starter was very fresh/active and all ingreds are gram-measured and figured I’d just continue on with instructions timing & temps etc. The dough is quite gooey, rather beyond what I’d call just a wet dough, and I’ve had to do folds with a flexible scraper, tipping bowl down using gravity to stretch and pull with scraper. Should the dough actually be that sticky-gooey? Or do you think it’s b/c butter was added too early in the process and messed up the consistency? I suppose worst-case scenario with this is perhaps a dense loaf.
Hey, Patricia! It shouldn’t feel super gooey, but it is a wet dough (nebulous, I know!). Because we’re using a pan, I wouldn’t worry, though. My feeling is, it’ll still turn out great—definitely stick with it to the end. If you still have time in bulk, give it a few more sets spaced out by 10-15 minutes. Definitely chill the dough in the fridge to make shaping easier. Let me know how it turns out!
Will do; thanks so much for prompt reply.
Should be in oven around 8PM (CST).
Keep you posted!
So far, so good. For the final proof in the Pullman loaf pan, it did not rise as much as what’s shown in your photos and did not fill out the pan during baking, but hopefully when it’s sliced in the morning, it’ll still be wonderful!…..cooling on the rack, it looks delicious and lovely!
Btw, during the bulk fermentation, I used the extra pumpkin and sd-starter to make your Pumpkin SD Pancakes….the batter itself was delicious, like pumpkin chiffon magic!…..and the pancakes were good too 🙂
Good Morning, Maurizio!
Outstanding! I’ll definitely make this bread again and next time add more cinnamon and salt, also allow to proof a bit longer to get that full rise. I toasted a slice this morning and OMG sooo delicious; those golden raisins were delightful tasty gems! Thank you for sharing this great recipe and thorough instructions.
You’re very welcome, Patricia! So glad to hear it turned out well. Have fun with it, lots of modifications are possible 🙂
Its 9:30pm, just finished baking; took me a whole day but thats because I was stretching bulk fermentation.
I just wanted to say thank you for taking the time writing this out in order to share this with us. I love how you break the process in different steps with each own table of ingredients and their respectable quantities.
thank you,
I appreciate that, Oleg! And I’m happy to help. I hope your bread turned out great—enjoy!
Wow! This was a very wet dough but the results were spectacular!! I had to do a few extra stretch and folds and extended the bulk fermentation AND the final proof in order to get the right rise. The flavor and texture is so good I wonder if this can be a template for other types of bread – instead of using pumpkin, could mashed potatoes be used (for a potato-type bread), muesli?
Nice modifications, Deborah! Yes, it’s a wet and soft dough, but it yields such a great result. Absolutely, you can go with sweet potato or other purees. Just watch the hydration, be conservative and hold back liquid until it looks like the dough can handle it.
Hi Maurizio,
Is it possible to make this in a free style shape without using a pan?
I’d be hesitant with a large hearth style loaf. The dough is so, so soft my fear is you’d get a lot of spread in the oven. I could see buns or rolls, though!
I baked this for a second time this morning, and still couldn’t get the rise pictured here, but after an overnight proof in the fridge, the texture was airier and much less dense than the first time. I hope to get it right on the third go! Thanks again for this beautiful recipe. The spices, pumpkin and raisins are lovely.
You’re welcome, Maria! Glad you got better results with the overnight proof. It does sound like you need a bit more time in bulk and/or proof. You could also try adding in a bit more levain to the dough, perhaps just 15-20g more might give you a little more of a head start on fermentation.
I have one more question. I’m going to make this for a friend this week and would like to do the slow proof after shaping (in the fridge). Do I need to bring the dough/pan to room temp the next morning before popping it in the oven? Thank you!
Hey, Kimberlee. You don’t have to bring the dough back up to room temp, as long as it’s proofed sufficiently (which it should be if you follow the photos, temperatures, and timing in the post!). It should be risen well in the pan, feel soft and light, and fluffy. Keep in mind, the dough will be more firm because of the cold temperature of the fridge.
Thank you! I’ll give it a go!
Can confirm: this makes PHENOMENAL French toast!
Right on, Rebekah! And I agree with you 100% (as seen here on my Instagram feed 🙂). Happy weekend!
Yes, it does! PERFECT!
I did the same thing…made french toast! It was great!
Hey, Jane! No that’s correct. The “missing” AP flour went in the levain!
Oh my gosh I think I put it the larger measurement too!! I was wondering why my dough was stiffer than what you pictured!
I might need to think about how to make this more clear 🙂
I feel like I didn’t have this issue with other recipes (I use the High(er) Hydration and Spelt recipes frequently). I think the placement of the ingredients list in this one was a little different? Hardly the end of the world!
Yes, it’s different there. These newer posts I’m trying to make things easier to understand… Always a work in progress!
Hi Maurizio.
I made this loaf tonight and it was delicious and moist. I didn’t get much pumpkin flavor. Is that typical? I really wanted more pumpkin flavor. Thanks for sharing recipe!
Hey, Michelle! So glad to hear that. Yes, this is typical. In fact, I find most people conflate “pumpkin flavor” with “pumpkin spice flavor”—if you think that might be the case, try adding in a small bit of ginger, clove, and nutmeg with the next batch. That might hit the spot for ya 🙂
Officially obsessed. I scaled the recipe for 2 loaves and added some chocolate chips with the raisins for an extra punch based on my children’s request. They love it so much too!!!! Thank you!
Am looking for someone who doubled this recipe. No problems?
Hi Maurizio, I’m in the process of making this right now! Minor goof – I started adding ginger(!!) before I realized I had grabbed the wrong bottle, so hopefully the extra cinnamon will save the day. Also, my levain looked great today but I still only had about 107g by weight when I mixed it in this morning. Any ideas? Thank you!
I bet it’ll turn out just fine with the ginger! Might even be quite nice. it’s typically be a little low on the levain, just give the dough the time it needs in each step and go by my photos for help there! Let me know how it turns out—happy baking 🙂
Haven’t tasted it yet – still needs another hour to cool (I started a little later). It also didn’t rise as much after shaping as yours. Interesting since I’m in Florida and my kitchen/house temp runs about 77-78 degrees. I even gave it the extra 15 min, but it just never reached the rim. Still looks good – I’ll let you know how the ginger experiment came out tomorrow. LOL!
Ok. This bread is AMAZING! Even without the larger rise. The ginger was actually a nice addition – happy accident! Tasted even better this morning with all the flavors. Tip – if you have leftover cream cheese icing, it’s quite a lovely spread for this. 😉 Thanks again for the recipe!
Ooh, great idea with the icing. You’re very welcome, so happy it came out well for ya! Enjoy 🙂
Hi Maurizio, 12 hours seems like a long time to get an active levain. I feel like mine usually hits its peak height around 4-5 hours after mixing. Am I doing something incorrectly?
Looks delicious and I can’t wait to try it oug!
It all depends on the build parameters for the levain. This levain has a small “seed,” which is the amount of ripe starter used to make the levain. The low seed percentage means it’ll take the levain longer to ripen.
That makes sense! Thanks for the reply!
Wow! This bread was so incredible! Too good really for now I have to make multiple loaves for my family! I followed the recipe with the exception of the tenth of a gram. I rounded up if it was greater than .5 and down if it was less. My scale isn’t precise enough but it it worked out perfectly. Love your recipes! More more more!!
So happy to hear that, Tammy! Yes, I’m getting flooded with requests for this now as well—I don’t mind, I just make two at a time and keep one 🙂 You did exactly the right approach there with the tenth of a gram measurements. Thanks so much for the feedback and happy baking!
Do the raisins in this recipe need to be soaked ahead of time?
Mine were relatively dry and I didn’t soak them, they turned out just fine. The dough is so moist it hydrates them just fine! If you’re worried, you could soak them in some of the water that would be added to the dough.
Made this yesterday (all by hand as I don’t have a mixer) and am enjoying the spoils of my labour toasted this morning!
My flat is quite cold (20C) so did a 5.5-6hr bulk and then a 3hr bench proof in the tin before baking, and it rose beautifully. This was the first bake in the Pullman tin too – love it!
A question: could you make this like a normal loaf, prove overnight in a basket then bake in the combi cooker?
Thanks! Tina
Really nice modifications, Tina! Yes, 20C is rather cold, you’d definitely need additional time to get it to the right stage—sounds like you nailed it.
You could make it like a large loaf, but I’d be worried because the dough is so soft. If I were going to try that, I would chill the dough to help with shaping, and then shape it rather tightly. Using a combo cooker will help keep the dough in shape, that I’d definitely go that route!
Made 1 loaf last weekend, making 4 this weekend I loved it so much! Thanks for try great recipes and teaching me the sourdough ways!
Ahh so glad to hear that, Heidi! Thanks for reporting back and happy baking 🙂
Hi Maurizio! I noticed your weights listed on this recipe go to the tenth of a gram. I’ve been meaning to purchase a more accurate baking scale that can go to the tenth of a gram for some time, what is your recommendation? I believe the one listed under your baking tools only goes to the gram, instead of the tenth of a gram. Thanks for all of your great recipes, I’ve made a ton of them and can’t wait to try this one out!
Hey, Jason! That’s right, I’ve decided to start listing out the full precision to avoid any errors (and so many questions!). I use this Hario scale for measuring sub-gram weights, but I only use it for salt, sugar, and malt (not used in this recipe). For flour and other ingredients, rounding up is perfectly fine.
Glad to hear you’re enjoying my recipes, here’s to many more!
Avid perfect loaf fan here…just tried this recipe and the flavor is amazing! However, my loaf turned out quite dense…I tried the overnight proof since it fit my schedule better, and even proofed it a little extra at room temp the next day since it hadn’t risen much. The starter was definitely active when I formed the loaf…any recommendations to guide me towards the majestic rise pictured here?
Hey, Kim! Glad to hear the flavor was nice on your loaf. Do you think it over or under proofed? My guess is usually under proofed dough, as that’s the most common issue, but it does sound like you gave it extra fermentation time. Be sure to pay attention to that final dough temp for this bread as well. Even with a strong starter, if your dough comes in drastically below the 78°F (25°C) listed in the recipe, it’ll take quite a bit of extra time in bulk fermentation to “catch up.”
Great recipe indeed. Can the butter be significantly reduced or replaced by something else in this recipe? Unfortunately, my wife and kids don’t tolerate butter too well. Thanks for your wonderful site and recipes BTW.
The first time I baked this, I used butter as in the recipe, and it did turn out great. I want to bake it again now, and I am wondering what best I can possibly substitute the butter with? Olive oil? Greek Yogurt? Applesauce? Or just reduce the amount of butter to say, 1/3, and don’t add anything else? Which option do you think may work best with this recipe? If I use a substitute, not quite sure about the ratios, as I am a bit concerned about the differences in their moisture content. Would very much appreciate any suggestions/advice!
Thank you! It’s hard to do a straight 1-to-1 swap out for butter. I’d say oil could work (olive would be ok, but will bring with it added flavors; another neutral oil could work in it’s place also, such as canola). Another idea might be a vegan butter substitute. I’ve not tried any of these but I know others have reported success using them in my recipes.
If you wanted to try and just reduce the butter that would also work, but you might have to adjust the hydration of the recipe during mixing, and the final result won’t be quite as tender. It’ll work, though!
Hi! Just wanted to share, I used a plant based butter (Becel’s newest market item) and it turned out great!
Thanks for reporting back, Amy! A few others have reported success as well. Now I know what to try 🙂 Happy weekend.
I love your recipes, thanks. However, it can be VERY CONFUSING when you list different amounts of flour etc in different places in the same recipe, with no explanations! First you list all the ingridients, ok lets mix them all together. You don’t say anywhere that part of the 199.4g of AP flour is actually for the levain. I wonder how many people use the full 199.4g and another 199.4g of the other flour. After I mixed up the dough, I read the comments and reread the recipe a few times, as well as look at some of your other recipes, and realized this problem. I’m wondering if others are having this problem, and using the full list of ingridients. Maybe you could make a note on the flour listing that part is for the levain. THANKS
Hey, Jeff! Sorry for the confusion. I do have the tables and such listed out under different headings throughout the post. First up is the Total Formula, which lists everything you need for the bake. Next, each step of the process tells you exactly what you need for that step. For example, there’s a levain block, a mix block, etc. It’ll tell you only what you need for that step.
In this recipe, and future ones, I have a printable recipe at the very bottom as well.
Hope that helps!
I think he does a fairly good job of including the total weight ingredients, and then the individual weight ingredients for the levain and then the dough. Takes a little bit to get used to, but pretty straight forward once you get the hang of it!
Thanks, Dan. Always a work in progress! And always open to suggestions on how to make it more navigable. Lots of info to present and I try to pare back where I can.
Hi Maurizio! I would love to Bake this today, but I would like to shape it into a babka with a cinnamon spice swirl. Do you think that is feasible with this dough or is it too soft? Thank you! Adore your recipes ❤️
Inga—that sounds great! Totally doable. Just be sure to thoroughly chill the dough as I recommend on my babka recipe. It’ll be great!
I made this today with the addition of 3g each of ground nutmeg and ginger plus 1g of ground cloves. Incredible! I’ll be making this again on the weekend. Thanks so much for another wonderful recipe 🙏🤤
Right on, Kaye! I’ve had reports back from others who have used 1g of ginger as well. I love your modifications and thanks for reporting back! Enjoy 🙂
Definitely try a little ginger! I accidently put ginger in it before realizing I had the wrong spice. Added my cinnamon and it gave it such a nice warmth. 🙂
Hi Maurizio, So thought I’d give this a try today. I just put the dough in the pan but have to say I did not see much movement after the bulk fermentation process so am wondering – if I don’t see much movement in the pan, should I put the dough in the refrigerator and try getting a rise out of it tomorrow?
Yes, that’ll give it more time to ferment. Alternatively, you could leave it out on the counter to continue proofing until fully proofed!
This looks incredible! Is it possible to use a normal proofing basket for this? Or does it need the sandwich pan because it is an enriched dough?
Thanks, Mathison! I would be skeptical to use a larger basket with this dough. Not because it’s enriched, but because the dough is so soft with the enrichments and the puree—it likely would spread in the oven! If you don’t have a sandwich pan, you could form the dough into rolls and pack them tightly in a baking pan.
Made this yesterday afternoon and cut it this morning…DELICIOUS plain and SCRUMPTIOUS with some apple butter. Will be making this again! Thanks Maurizio for another great recipe!😋
So happy to hear you like it, Linda! I used some apple butter as well, pretty much knocked me over it was so delicious. Thanks for coming back with that feedback and enjoy!