

Our sleep was always broken by a small, three-wheeled cart scurrying down the stone streets with a large megaphone strapped to the roof. Political ramblings poured unrestricted out of that speaker, echoing off buildings and stone-paved streets as it ran down the length of each avenue—faster and louder than I’m sure anyone in our family’s hometown in Southern Italy cared for. Without the desire for air conditioning, every house had its window open overnight to let in the cool breeze. And the opportunistic man in the speedy cart was keenly aware of this situation. As a kid traveling to visit family, waking early wasn’t nearly as bad as going to bed early; after all, it just meant you’d get to play sooner.
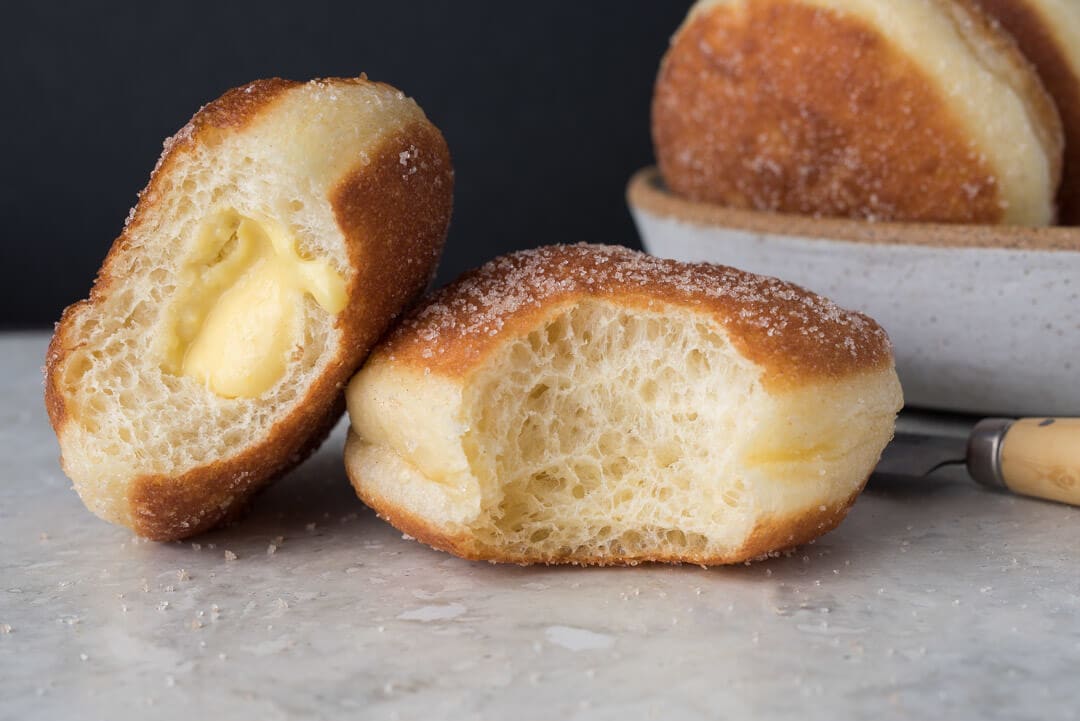
But probably my favorite thing of all, and the reason I secretly hoped that man would drive by even earlier, was it meant heading out early with my dad and brother to the local baker for fresh naturally leavened bomboloni (doughnuts).
Back then, I didn’t quite appreciate the lives these bakers led. For them to sell fresh baked goods first thing in the morning, they likely worked through the night: mixing, folding, shaping dough, and finally baking in the old ovens just as the sun streamed through the city streets. We’d walk in oblivious to all of this, instead focused acutely on which pastry to buy and devour on the walk back. I like to think our enthusiasm for their baked goods somehow validated their long night of hard work. I do know they were there every morning, ready to discuss a recent soccer game, wrap the pastry in a paper, and send us back on our way.
Naturally leavened bomboloni are essentially sourdough doughnuts (with no sourness). They’re also known as berliner, krapfen, ballen, pączki, donut, and many more names all over the world. It seems everyone at some point figured out that frying enriched dough was incredibly delicious. I’m sure glad they did.
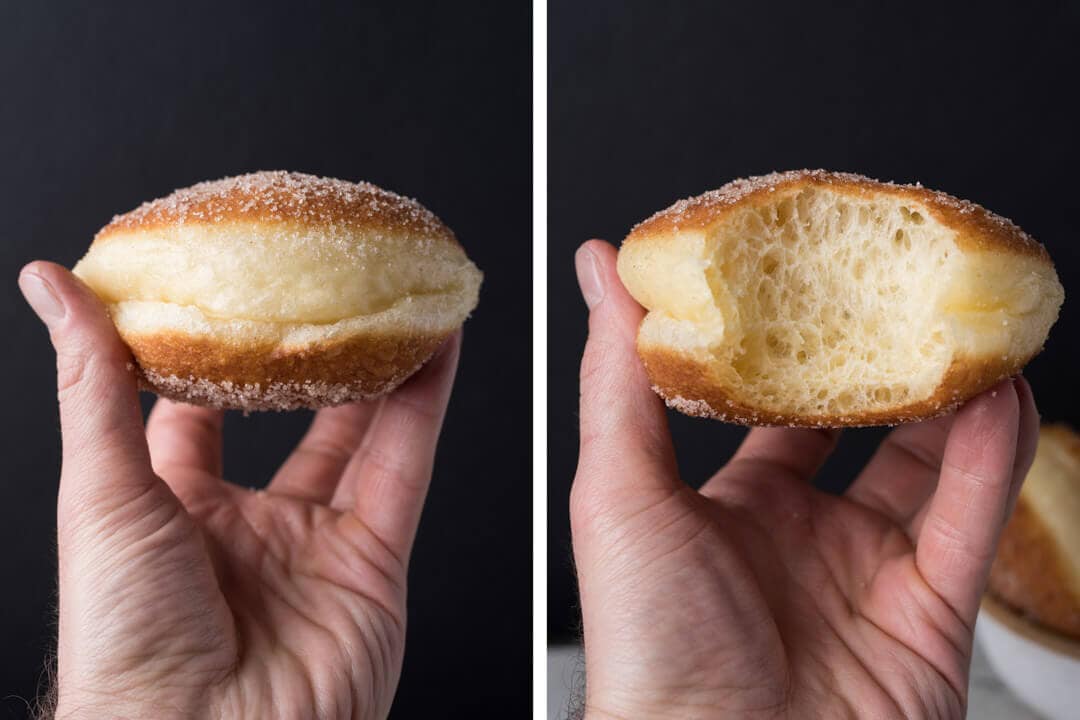
These bomboloni fry up so light and airy you can see why almost every culture has had their own incarnation. When I filled the first one with pastry cream (read on for the recipe) and took that first bite I was instantly transported back to my childhood in Italy. I almost always opted for the cream-filled variety but in the off chance they didn’t have one, the jelly ones came in at second choice. Let’s get frying.
Be sure to read to the end for a new troubleshooting section, a recipe for crema pasticerra, and a recipe for the sugar/cinnamon coating.
Naturally Leavened Bomboloni (Doughnuts) Recipe
These can be challenging to execute properly and do take some practice. Use the photos in this post and the following four extremely important details to ensure success. To make these as light as air, you will need:
- A strong levain
- Sufficient dough strength (lots of mixing, almost to full “windowpane”)
- Lengthy, warm bulk fermentation and final proof (see my post on the Importance of Dough Temperature for more)
- Delicate handling when transferring from proof tray to frying oil
I’ll delve more into each of the above during their step in the process below, but I want to highlight these important elements at the start. First and foremost, strong fermentation is absolutely critical. This begins with your sourdough starter and, subsequently, your levain. Make sure your starter is fed regularly, and you use a ripe starter to create your levain.
Due to the sugar and other enrichments in this dough, overall fermentation activity will be reduced. To counter this, the bulk fermentation and proof steps will need to be lengthened. In addition, it’s also very important to keep the dough warm during each of these steps!
Vitals
If you’d like to double this recipe to make more doughnuts just multiply everything in the Build and Formula section by two. I would not recommend halving the recipe, a total dough weight of 1200g is already quite small for a stand mixer and to ensure sufficient dough mass for fermentation.
| Total Dough Weight | 1200 grams |
| Yield | 18 x 65 gram bomboloni |
Levain Build
A 100% hydration levain made with all white flour will be very mild and not overly acidic. Be sure to use this levain when it’s strong and ripe but not overly so: it should be used right about when it reaches its peak height and looks very active.
| Weight | Ingredient | Baker’s Percentage |
|---|---|---|
| 45g | Mature 100% hydration starter | 50% |
| 90g | All-Purpose White Flour (King Arthur Unbleached All Purpose) | 100% |
| 90g | Water | 100% |
Dough Formula
Target final dough temperature (FDT) is 76-78°F (24-25°C). If your FDT is slightly lower than this, that’s fine, just be sure to keep the dough around 78°F (25°C) during bulk, and it should get back up to temperature rather quickly.
| Weight | Ingredient | Baker’s Percentage |
|---|---|---|
| 253g | All-Purpose White Flour (King Arthur Unbleached All Purpose) | 50.00% |
| 253g | High Protein Bread Flour (King Arthur Bread Flour) | 50.00% |
| 187g | Eggs (about 3 large + 1 yolk, cold from the fridge) | 37.00% |
| 101g | Unsalted Butter (European Style, Kerrygold) | 20.00% |
| 101g | Fine White Sugar | 20.00% |
| 91g | Water | 18.00% |
| 10g | Salt | 2.00% |
| 203g | Mature 100% hydration levain | 40.00% |
Method
1. Levain – 9:30 a.m.
Using a ripe sourdough starter, build the levain (everything listed in the Levain Build section, above) in the morning and store somewhere around 78°F (25°C) ambient until ripe, about 5 hours.
2. Mix – 2:00 p.m.
First, measure out the required butter and cut into 1/2” chunks. Leave this out at room temperature to soften while mixing the other ingredients.
Measure out the called for eggs: crack three full eggs into a small bowl on a scale. If the weight is close to the requirement, add only the yolk of the remaining fourth egg to get to the required amount, if not add the entire egg. Lightly whisk to break the yolks and incorporate.
The paddle attachment is far more efficient at strengthening this type enriched dough. As it’s mixing you’ll notice the dough will tend to cling to the middle of the paddle and press to the sides of the bowl. Stop periodically during mixing to scrape the paddle and sides to reincorporate. At the end of the second phase of mixing the dough should almost pass the “windowpane” test (full development). We will do a few sets of stretch and folds during bulk to finish strengthening the dough.
To the bowl of a stand mixer fitted with the paddle attachment, add the flour, sugar, eggs, levain, salt, and water. If the dough is overly dry add in a little bit more water (be cautious doing so, we don’t want to have a dough that’s too wet).
Set the mixer to STIR and mix for about a minute until everything comes together. Set mixer to SPEED TWO and mix for 5 minutes. At the end of this time, the dough will still stick to the bottom and sides of the bowl but it will start to clump up around the paddle.
Let the dough rest for 10 minutes.
Check your butter. It should be pliable and show a finger indent when lightly pressed. If it’s still cold, place in the microwave for 10 seconds or so. It shouldn’t be melted, just pliable.
Set your mixer to SPEED THREE and mix for 9-10 minutes. During this time add the butter to the bowl, one small chunk at a time. Wait until each chunk is absorbed into the dough before adding the next.
The slow-motion video to the right shows my dough midway through the second phase of mixing after the butter has been incorporated. You can see the dough has balled up around the paddle but overall it still needs further development. At this point stop the mixer, scrape down the sides and paddle and continue mixing. You will have to do this several times throughout mixing.
Near the end of this mixing, the dough will almost pass the windowpane test. Using wet hands grab a chunk of dough and gently spread it out with your fingers. If mixed sufficiently, you’ll see a thin membrane that will barely start to rip when stretched out.
When finished, transfer the dough to a container for warm bulk fermentation.
3. Warm Bulk Fermentation – 2:30 p.m. to 8:30 p.m.
This dough requires a long and warm bulk fermentation. At 78°F (25°C), the dough will ferment 6 hours before it’s placed in the fridge overnight. I place my entire bulk container in my dough proofer set to this temperature (see my guide to using a dough proofer if you’re unfamiliar with their use)
Perform a total of 4 sets of stretch and folds during bulk, spaced out by 30 minutes (starting 30 minutes after mixing finishes).
After the last set (2 hours into bulk), let the dough rest for the remaining 4 hours. By the end of the 6 hours, the dough should have risen by at least 30%. Ensure the bulk container is covered and place it in the refrigerator overnight for cold bulk fermentation.
4. Cold Bulk Fermentation – 8:30 p.m. to 8:00 a.m. (next day)
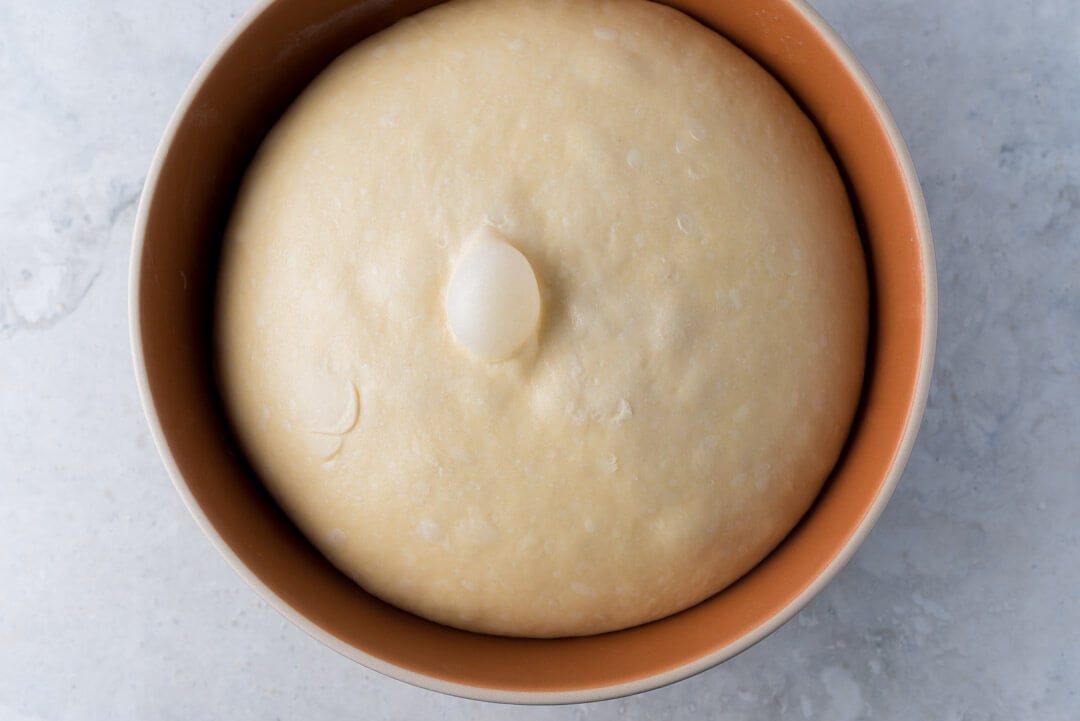
The duration of this cold bulk fermentation step is very flexible. The dough can continue to rest in the fridge several more hours (or perhaps even more) after I have listed here if desired. Take it out and proceed with the rest of the process when convenient.
Above, you can see the activity in my dough after the warm and cold bulk steps—it’s active and alive, even though at this point it’s cold and firm from the fridge.
5. Divide & Shape – 8:00 a.m.
Take the cold bulk fermentation container out of the fridge, uncover, and dump the dough to an un-floured work surface. The dough will feel very cold and stiff, which is exactly what we want. You might need a little flour on your hands to prevent sticking but keep this to a minimum: we’re looking for maximum friction between the dough and the work surface to create very tight rounds.
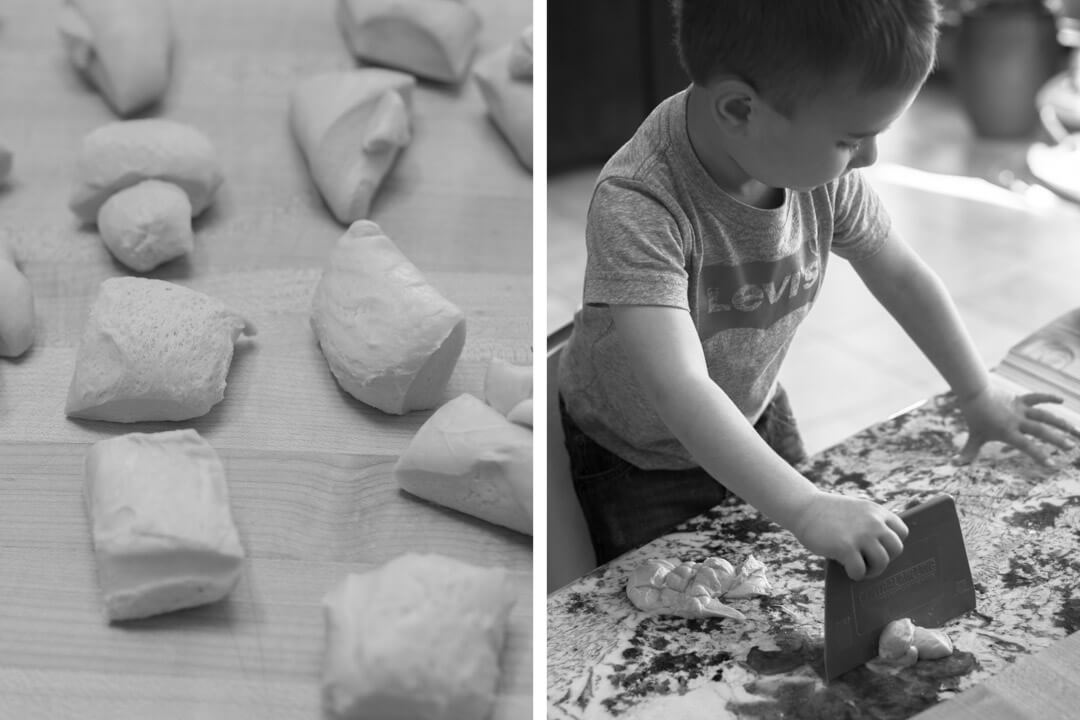
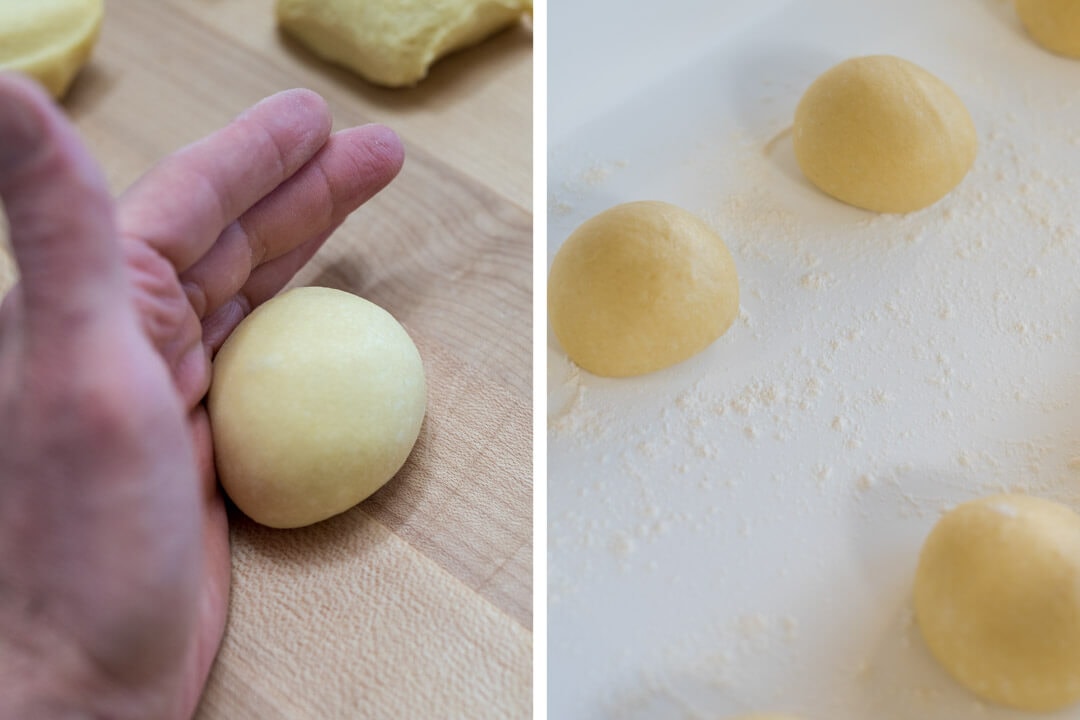
Using your scale, divide the mass of dough into eighteen 65g pieces. You might have a little leftover dough, perfect for engaging a little helper in the kitchen, as you can see below.
Using your hands preshape the dough pieces into rounds. Each round needs to have a very taut surface and no seam on the bottom. Use the side of your hand to push the round against the surface to tighten the surface.
Shaping these naturally leavened bomboloni is very similar to how I shape buns and rolls.
6. Proof – 8:15 a.m. to 7:30 p.m. (appx. 12 hours)
To proof these rounds I use two rectangular pizza trays (a covered baking sheet will also work well) dusted liberally with flour. I can fit 8 rounds in each tray with room for them to expand during the proof. The remaining two rounds I place in two floured Pyrex storage containers (these are good to test with when you start frying).
Place the covered trays with the rounds in a warm spot, around 78°F (25°C), for 12 hours. Since the trays are too large for my dough proofer, I keep them in my oven with the light on and periodically check to ensure they’re kept warm.
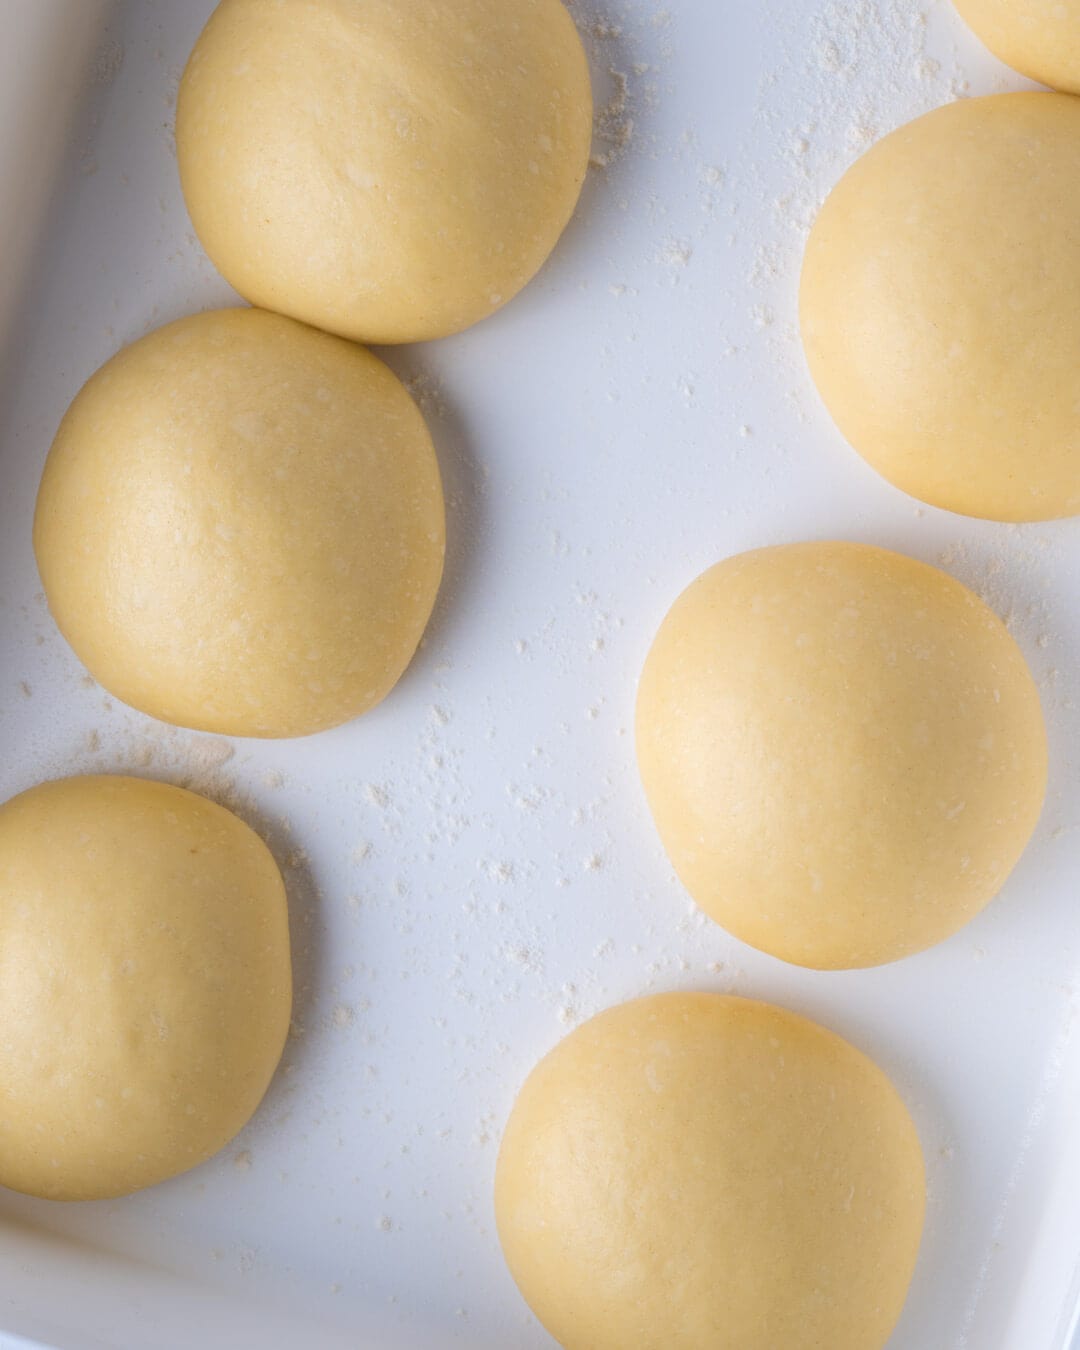
Let the dough proof for about 12 hours. It’s very important the dough is fully proofed before you begin to fry these. They should almost double in size and be very puffy and delicate. If you gently poke them they will feel like they are completely filled with air. Below, you can see the difference between the just-shaped rounds in the image in the previous step.
If you’d rather fry these in the morning you could stop the proof a few hours before completion and finish proofing them in the morning. If you refrigerate them when they are fully proofed, the bomboloni might not fry with quite the same height the next day as they would if frying at night (the longer the proof, the less rise you’ll see).
You can also refrigerate the proofed dough at this point and fry them first thing in the morning for breakfast.
I’ve done both ways, including splitting the batch into two sessions, making one batch the night they’re mixed and one the next day, and they both turn out beautifully.
7. Fry – 7:30 p.m. (or put in the fridge until next day)
Frying Tools
- Vegetable oil, refined coconut oil (my preference), or any frying oil
- Lodge 3.2 qt combo cooker (the same one I use to bake bread!) to hold the frying oil
- Thermoworks ChefAlarm frying thermometer (or a standard Frying thermometer)
- Timer (I love my Thermoworks Big & Loud timer)
- Frying spoon
- Baking sheet lined with paper towels and a cooling rack inside
Frying Oil, Type & Temperature
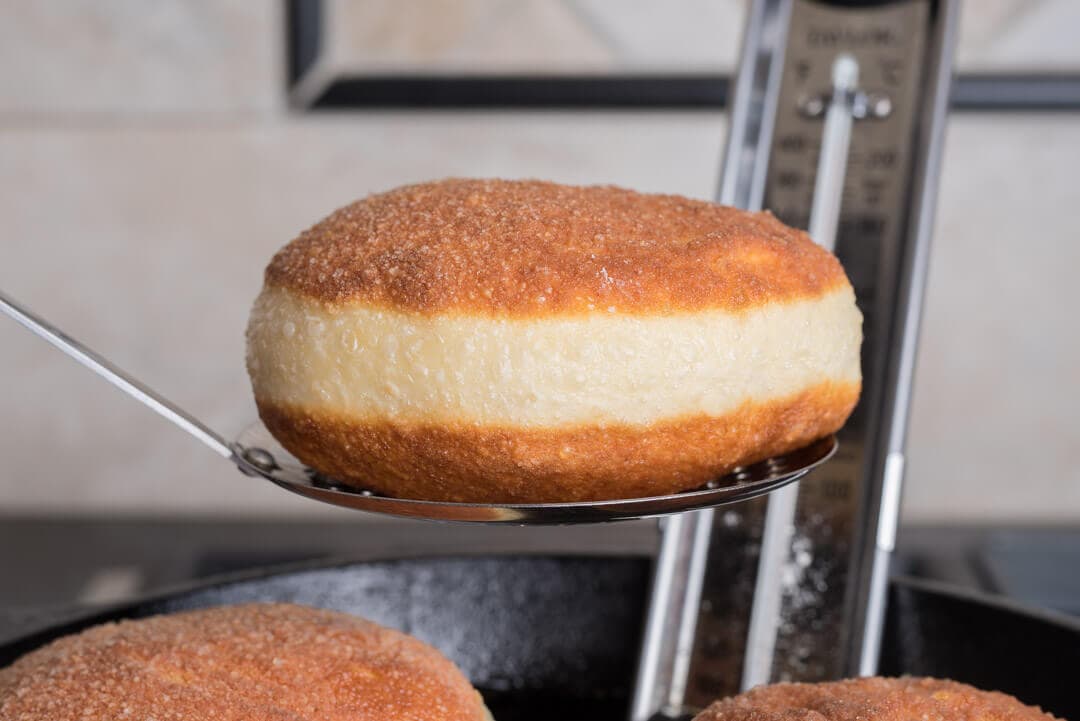
I’ve experimented with both canola and vegetable oil for frying these naturally leavened bomboloni (doughnuts), and much prefer vegetable between the two (but I will be using coconut oil from here on out, see Update below). Canola imparted a slightly odd flavor to my initial test batch and it has an off-putting smell to me. You will have to experiment with the frying temperature. At an oil temperature of 360-370°F (182-187°C) mine cook to a nice golden brown in 2.5 minutes per side.
Update:
I recently tried frying with refined coconut oil (I purchased this tub of refined coconut oil, which should last quite a while (be sure to get refined oil as the smoke point is high enough for frying) and the results were very, very good. Because this oil is solid at room temperature, once the bomboloni cool, they become even crispier and have a little oily feeling to them. Additionally, when frying, the oil doesn’t give off unwanted smells in the kitchen. The resulting bomboloni tasted very similar to vegetable oil and did not have any coconut flavor to them.
You can see a shot of my coconut-oil-fried-bomboloni on Instagram.
Fry
Before beginning, place the trays with fully proofed dough in the refrigerator while you get the frying station setup. It’s much easier to transfer the delicate rounds from tray to oil when they’re a little more firm.
Meanwhile, fill the deep side of the combo cooker to about 2/3 full with frying oil and set over medium heat. The heavy cast iron combo cooker will help keep the oil at a more consistent temperature, even after adding the cool rounds of dough. Place the frying thermometer on the side of the pot and heat until the oil registers 360-370°F (182-187°C).
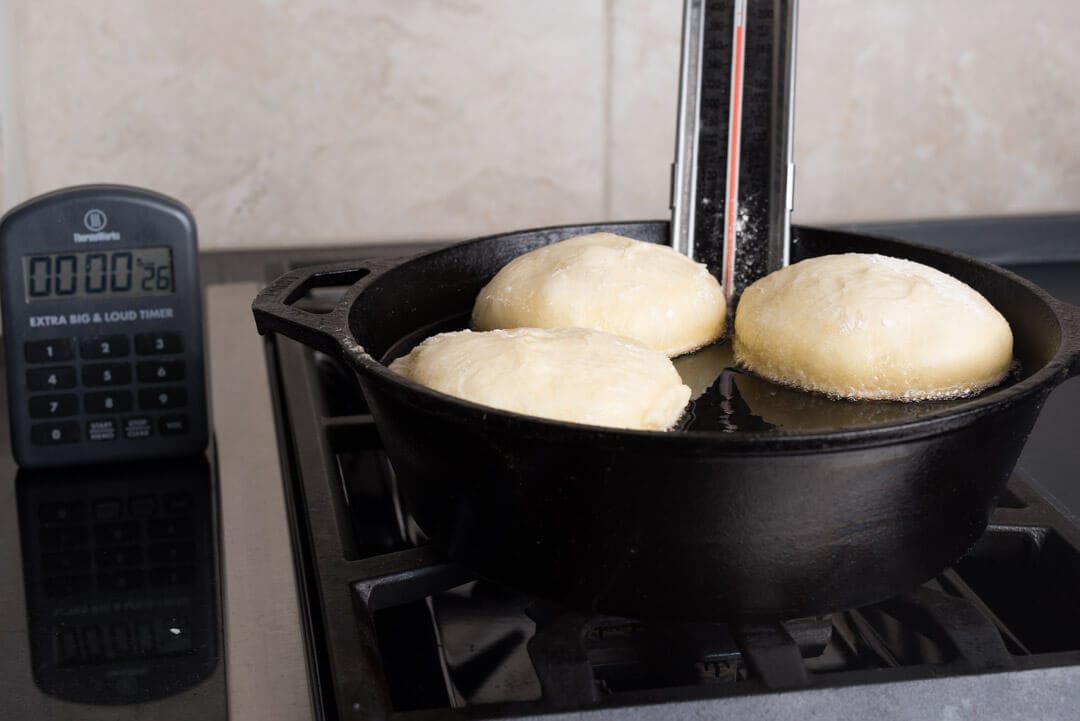
Set your timer for 2.5 minutes. Gently transfer one round from the proofing tray to oil using the frying spoon so the smooth top of the dough is down in the oil first. Flipping the dough over helps to get a nice uniform roundness on the bottom and encourages initial upward expansion.
Keep a close eye on the frying thermometer, the oil temperature will drop each time you add new dough to fry. Constantly monitor and adjust the heat on your range to keep the oil at just the right temperature. I can comfortably fry 3 rounds of dough at a time in the Lodge Combo Cooker. If you have a larger Dutch oven you could accommodate more.
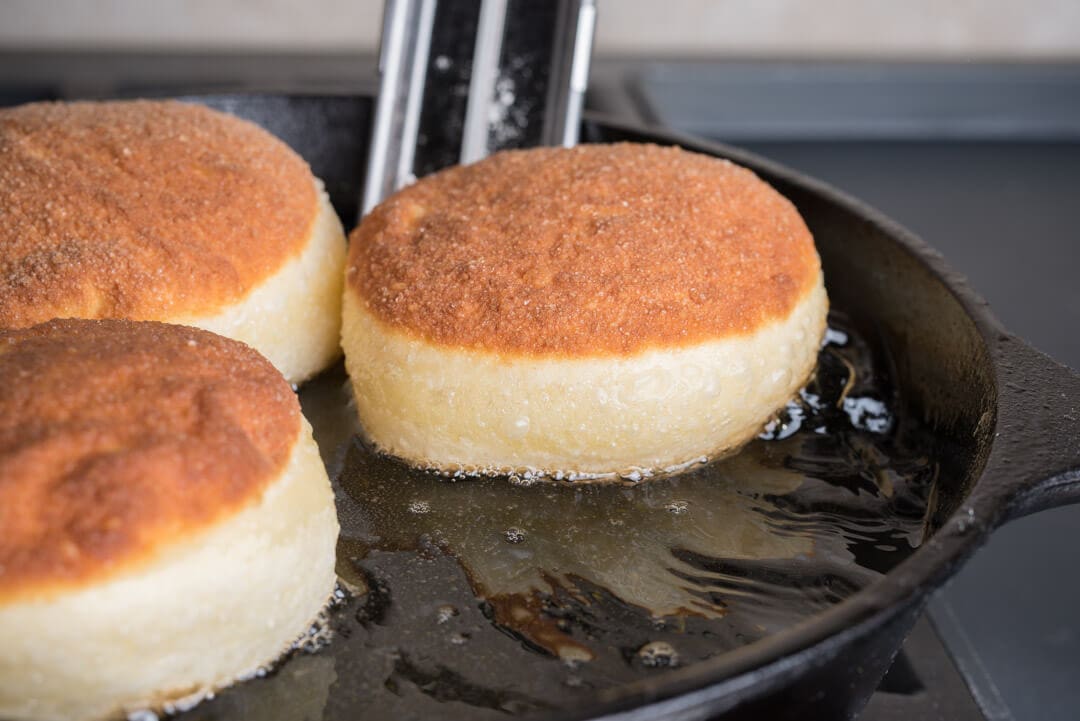
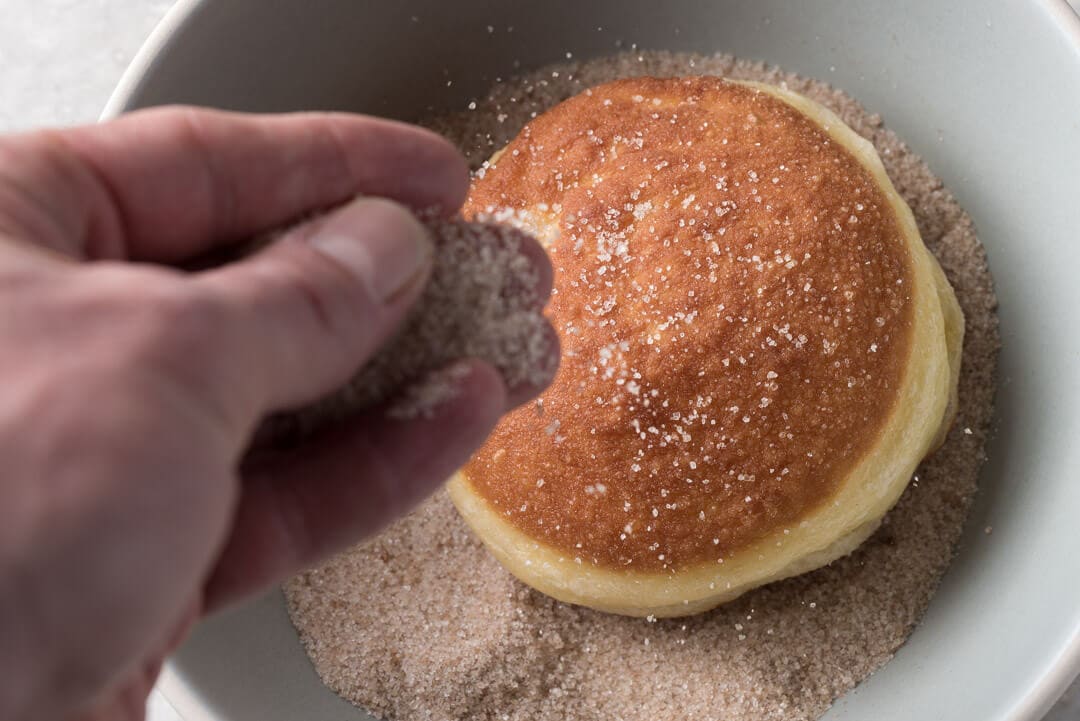
I prefer the look and texture after frying these for 2.5 minutes per side, but if you’d like them lighter reduce the fry time. When fully cooked, use your frying spoon to transfer each bomboloni to the baking sheet lined with a paper towel and cooling rack inside. Let cool several few minutes then toss in a mixture of sugar & cinnamon. Later, pipe with crema pasticcera (recipe below), if desired.
Cinnamon & Sugar Coating
This couldn’t be more simple. Mix the following in a bowl and when the bomboloni are still slightly warm, toss to coat several times. I prefer large, granulated sugar for the coating but you could also use fine sugar.
| Weight | Ingredient |
|---|---|
| 2g (1 teaspoon) | Cinnamon, ground |
| 200g (1 cup) | Sugar, coarse or fine granulation |
Crema Pasticcera (Pastry Cream) Recipe
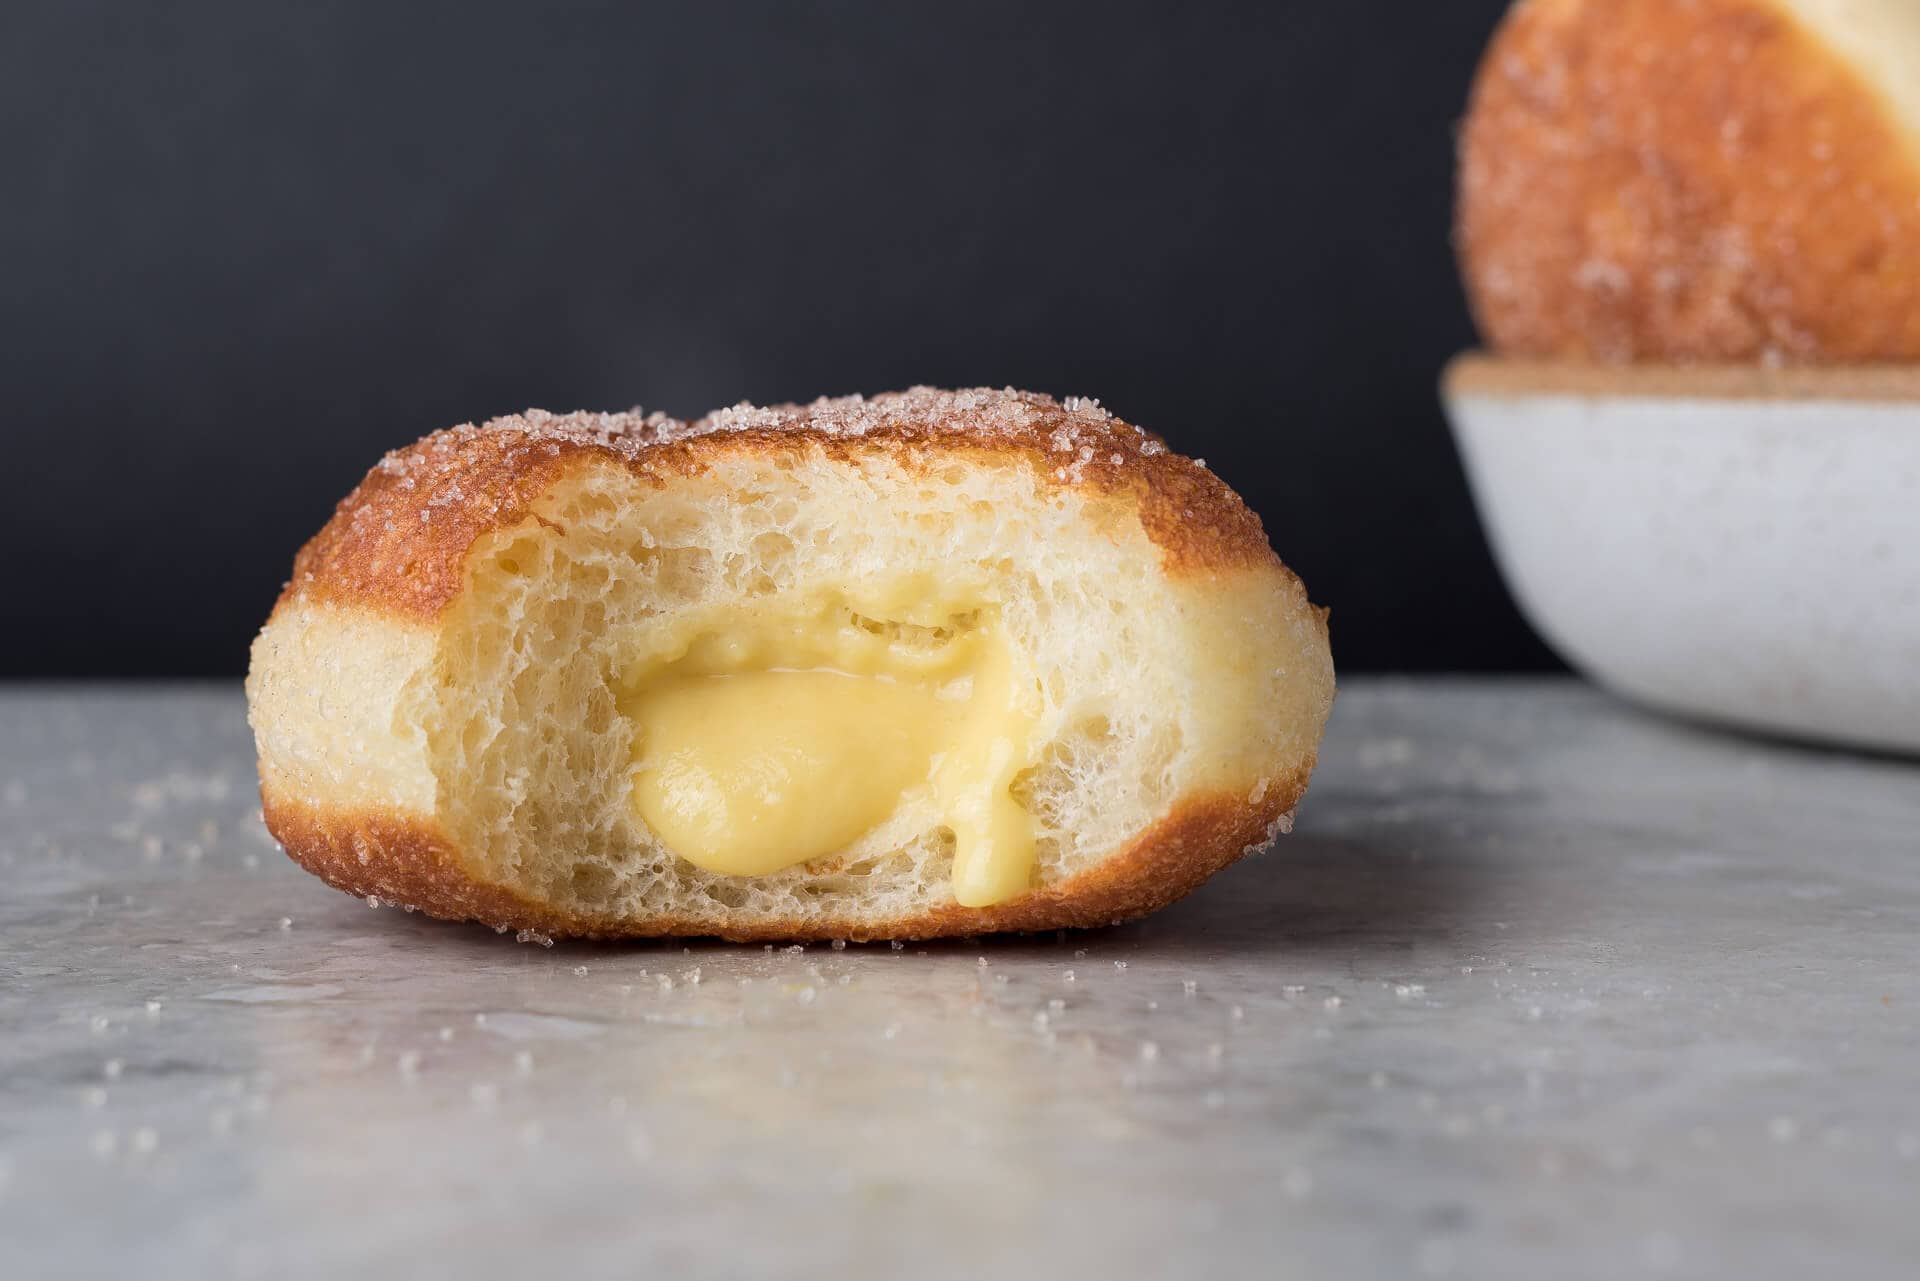
I adore adding lemon zest to this pastry cream. It’s subtle but noticeable, and somehow reminds me of the summer days spent back in Italy. Additionally, this recipe is a great base for many other types of creams (coffee, chocolate, fruit-flavored, etc.).
This recipe makes enough crema to fill half the bomboloni, depending on how much you pipe in and it can easily be doubled.
Ingredients
| Weight | Ingredient |
|---|---|
| 365g | Whole milk |
| 30g | All-purpose white flour (King Arthur Unbleached All Purpose) |
| 100g | Fine white sugar |
| 4 | Large egg yolks |
| 1g | Salt |
| 4g | Vanilla extract |
| 1 lemon | Lemon zest (optional but encouraged) |
Method
Gather a whisk, strainer, saucepan, and two medium mixing bowls.
- Place the milk in a saucepan over medium heat. Warm until bubbles start to form on the sides (just before boiling but do not boil)
- In a medium mixing bowl mix together flour, salt, and sugar. Add the egg yolks and whisk everything until incorporated. It’ll form a thick paste — just make sure everything is mixed together
- Pour the warm milk into the egg mixture a little bit at a time, whisking to incorporate after each addition
- Pour everything in the mixing bowl back into the saucepan over medium heat. Whisk constantly as the mixture heats. Continue heating and whisking until the contents just begin to boil (you’ll see large bubbles popping when you pause to whisk)
- Strain the mixture into another bowl. You’ll have to press and stir the thickened cream through the strainer
- Add the vanilla extract and lemon zest and stir to incorporate
- Cover the bowl with plastic wrap pressed to the surface of the cream (to prevent a skin from forming in the fridge) and refrigerate until firm
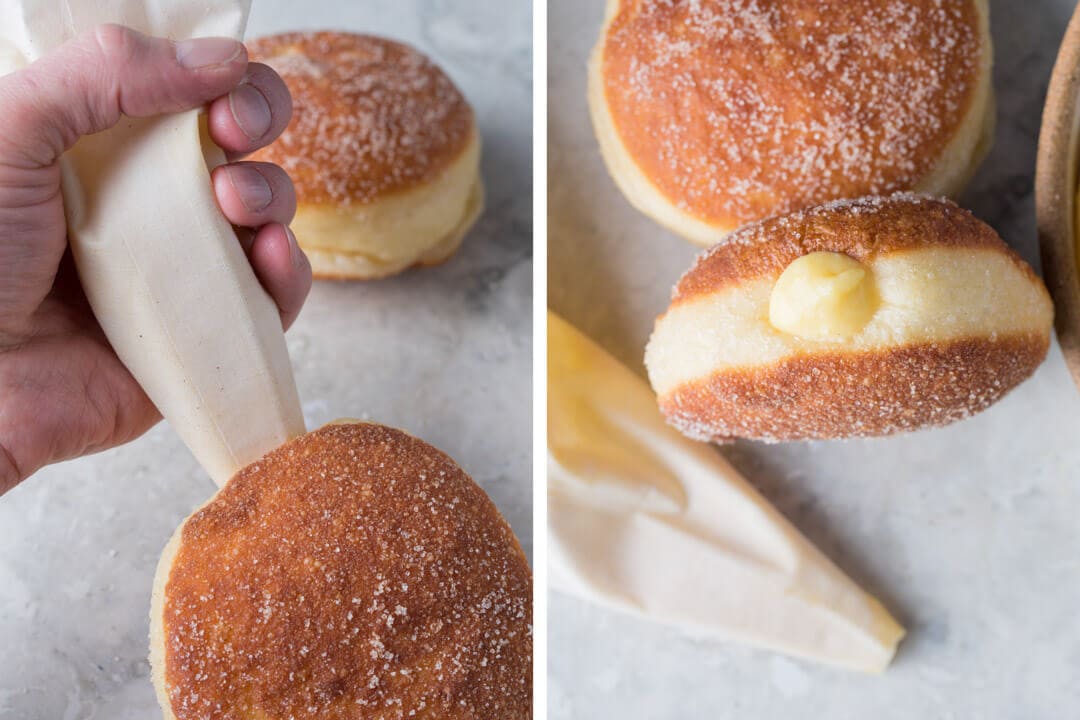
The crema will keep well for 3-4 days in the fridge. Use a piping bag and paring knife to fill the bomboloni just before serving. Make a small cut on the side with the knife, insert the piping bag, and squeeze in the desired amount.
Conclusion
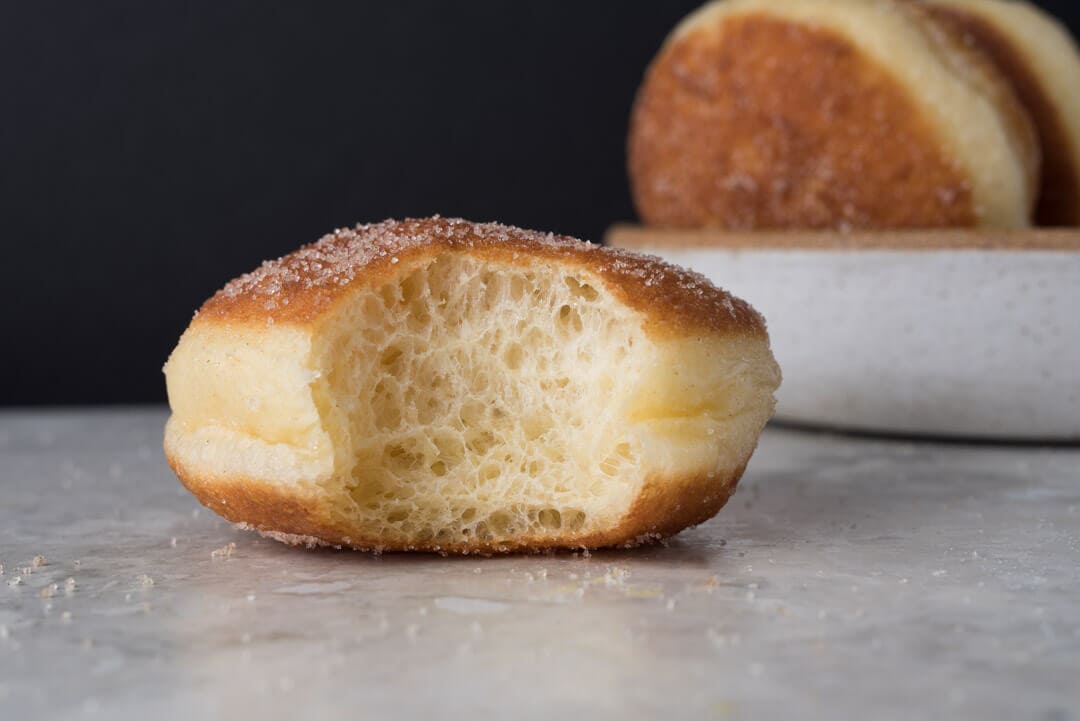
These are such a treat; I love making them for special events (birthdays!), holiday weekends, or group gatherings. With my recipes for sourdough waffles and pancakes, I have lots of options for weekend breakfasts. It’s easy enough to prepare the dough a day or two in advance, proof overnight, and have fresh bomboloni first thing in the morning. Because the dough is rather flexible, once you dial in the bulk and proof times, and develop a sense for when they are ready, you can adjust the schedule to make these in advance until ready to fry. And because frying is such a straightforward process, they’re a quick and easy thing to whip up once the dough is ready.
Crust, Crumb, and Texture
Impossibly light is the perfect adjective to describe these naturally leavened bomboloni. They are soft, pliant, and have just the slightest hint of crisp at the top and bottom. I like to fry them just a touch toward the darker side to emphasize the contrast between crispy crust and tender interior — it works well to further emphasize the overall lightness of each doughnut.
The coarse sugar coating adds a little extra crunch with each bite, even if the sugar tends to scatter readily, and the ones filled with crema pasticerra are in a league of their own. Each person seems to have a preference for just how much crema they want inside, but there’s really no wrong answer. Go big, no one is going to complain!
Taste

With no sourness at all, these bomboloni are, to me, the perfect breakfast indulgence. My target was for a result that wasn’t overly sweet or rich but rather one that was just on the edge of each of these. The end result is one that certainly tastes fantastic on its own with a light dusting of sugar, but transforms to something truly magical when filled with crema.
These bomboloni embody my childhood trips to Italy and our visits to the local town baker. Each morning as I take a bite into one fresh from frying, I’m whisked away back to traveling Southern Italy to visit family. The only thing missing, for better or worse, is the morning visit from the three-wheeled cart with megaphone rigged to the top. Although, now at home, I simply use my alarm clock — at least it has a snooze button.
Buon appetito!
If you use this recipe, tag @maurizio on Instagram so I can take a look!
Troubleshooting & How I Got Here
I spent a significant amount of time testing and developing this method and process. This recipe started with my brioche-like hamburger buns formula. That enriched dough was a good jumping off point but I knew the percentages would have to be changed. I tested various amounts for sugar, butter, and eggs and settled on the formula above. The result is a doughnut that fries up well and isn’t overly sweet on its own: it’s light and airy with requisite richness and sweetness. And they’re so, so perfect for filling with cream.
Below are a few common problems you might run into when attempting this recipe (and are the same things I struggled with in the beginning). Click on the symptom to reveal possible causes with suggested fixes.
Why is there no rise while the dough is proofing?
The time and temperature required to bulk ferment and final proof this dough is very critical. If the dough is not warm enough and left to bulk ferment long enough there will not be sufficient activity in the dough before it’s placed in the fridge overnight (retarded). Ensure the dough rises at least 30% during bulk fermentation, push out bulk as long as necessary until the dough achieves this. Typically, this takes between 5 and 6 hours at 78-80°F (25-26°C).
When frying, why do I get large bubbles on the top or sides?
I’ve noticed there are a few things that could lead to massive bubbles forming when frying a bomboloni. The first is a dough that is not strong enough and required more mixing. The dough should almost pass the windowpane test when done mixing, and the four sets of stretch and folds during bulk will finish imparting the required strength. From there, the dough needs to be lightly degassed during shaping and shaped tight. There should be no seams on each shaped round. Finally, the under-proofed dough can cause erratic, uncontrolled bubbles to form. The rounds need to be fully proofed and, when poked, feel like very gassy and light pillows. They will seem almost over proofed.
Why does butter leak out of the dough?
The butter should be incorporated into the already-strengthened dough when it’s at room temperature, not melted. When pressed with a finger, you’ll see an indentation but it shouldn’t be a puddle of liquid butter. If the butter has melted, place it back into the fridge and let it firm up before adding to the dough.
Why does the butter never mix into the dough?
If the butter is too cold and not pliable, it won’t incorporate easily into the dough when mixing. See the question above for how the butter should look and feel.
I can’t keep my dough at 78°F (25°C) during bulk and proof, what can I do?
As I mentioned in the post above, bulk and proof temperatures are very important with this recipe. If you’re not able to keep the dough warm enough during these steps, it could take several hours longer at each step before it’s ready to proceed to the next. Watch the dough and give it the time it needs!
Can I freeze this dough?
I have not tried to freeze this dough but others have reported successfully freezing my brioche hamburger buns. I would be wary to do this, though, and would first like to test before saying yes/no!


315 Comments
Hi there! If I want to get rid of the cold bulk fermentation and do all warm bulk fermentation, how many more hours of warm fermentation do I have to add to the original 6 hours to make up for the 12 hours of cold bulk fermentation? Thanks!
Hey Maurizio! Question: would you be willing to elaborate a bit more on how to make the filling, or maybe you have a link to a video of the process? Would be super useful to get a bit more direction on the straining step, how long to refrigerate, the paring and pumping process, etc. Either way, thanks so much for this one!
Ben—I’m going to be updating this post soon, I’ll try to take more photos and video around that!
Hi. If I want to fry them in the morning, how much of the final proof should I do? And if I stop short, how long do I proof in the morning, after taking them out of the fridge?
Hey, Dana! I usually put them about 2-3 hours before they’re fully proofed (so I call for around 12 hours for that last proof, I’d put them in the fridge, depending on their progress, about 10 hours into that proof). Then in the morning, take them out and let them come up to temp while you prepare the frying oil and bring it up to temp, around 15 minutes.
They came out PERFECT. Thank you!!!
I am not a huge doughnut person but when fall rolls around I crave cider doughnuts, especially when I’m far from New England where I grew up. I adapted your recipe (with this one as a guide: http://sowandsavor.co/apple-cider-sourdoughnuts-simple-sourdough-starter/) and they were delicious and puffy as you describe, but didn’t have as much cider flavor as I’d hoped and definitely had a sourdough tang. I used ~230g of cider (no water), 2 eggs, and cut sugar down to 50g–and due to time constraints definitely underproofed a bit (got some crazy fun bubbles when they fried). I want to try again with more cider (or apple butter as the other recipe suggests) but am curious how you think that might affect the fermentation even if I can get the right hydration balance, given the sweetness and acidity of the cider or apple butter. Would love any tips you have for this! Or a chocolate version!
I’ve been thinking about making a recipe like this. You might get a better result making a doughnut with a ring like those, it’ll likely help them fry up. Regardless, I’m not sure how the cider will affect fermentation, but it will to some degree. You might have to extend the fermentation time even farther, increase the levain, and other parameters. I’ll have to think about this. My feeling is it might be possible to get more apple flavor with grated apple or applesauce even…
Just an idea. . . maybe use apple cider extract to bump up the flavor? And I would agree the acid might affect the fermentation. I only have made these once, and they really have to push through all the butter to ferment as is. . . . I’ve seem many brands of this and other extracts on the internet.
I tried making these half a year ago and they came out absolutely delicious! Going to give the recipe another go now, but I have small question. I see that most recipes I find online use milk instead of water. Have you tried doing this with milk? I’m curious about what the main difference would be.
Awesome, Joel! I haven’t tried using milk, but it’ll bring more fat to the dough: softer texture in the end. These are already pretty soft to me, though! If you try it out, let me know how it goes. I’ll have to test this myself as well.
Please forgive my heresy, but is it possible to bake these instead of fry. I have eliminated fried foods from my life, but would love to try this recipe baked. I lost my other doughnut recipe that used the oven instead of frying. What are your thoughts and please forgive me for even asking.
I’ve seen a few other bakers do exactly that and they said they turned out great! You’ll get a different result, of course, but I bet they’ll still be awesome.
Thanks for the reply. I will give it a go.
Did you end up trying this @disqus_pmA3P8JxRR:disqus ? I had the same question and would love to know how it turned out for you!
Maurizio…….I have just made these and OMG they are deliciousssssss😋. I’m worried that I could actually attempt to sit down and eat all 18 at once they are so good. Thanks you for your knowledge and recipes…I love baking your creations
Hah! So glad to hear that, Jane. But I totally understand how you feel, I could do just the same 🙂 Happy baking!
Hello Maurizio! Thank you so much for the detailed recipe! I had great success in all things except for the frying – the biggest issue I had was getting the perfectly risen bombolini OFF of the trays. I lined my trays with Silicone baking mats, but they definitely stuck too much for me to easily remove. The top had firmed up, but the bottom (touching the tray) remained sightly sticky and airy. This forced me to have to very gently try to remove them from the tray, but in the majority, almost all of the air deflated and my perfect rounds were all wrinkled (and fried that way). They taste lovely, though I’ll need to work on my oil temp because they’re a bit too dark, but they’re not pretty to look at at all as they’re all wrinkled up. Any suggestions on how to get them off of the tray after the final proof?
I line my trays with couche proving cloth which I then sprinkle with rice flour. To lift them I use my scraper very gently underneath. They didn’t stick at all. Hope this helps
Does the rice flour stick to the dough surface?
It likely will. You can use rice flour or white flour—either will work just fine!
Like @janegove:disqus said below, I use a plastic scraper to lift them very, very gently off the trays and plop them into the oil. They’re definitely delicate, but mine don’t usually deflate as long as I’m being careful!
Hi Maurizio, just want to thank you for this recipe. I made them today and they came out great. My daughters love them so much that they each ate two! I don’t have a proofing box and it’s been super hot recently where I live so my bulk proof and second proof were both shorter than your recommendations. I also replace the bread flour with home milled whole wheat flour but made sure the dough was very close to passing the windowpane test. I will definitely make them again!
You’re very welcome, Joyce! Great job adjusting for your temperatures, it’s hot here as well and these move much faster when it’s nice and warm. Thank you for reporting back and happy baking!
My starter is not even close to peak yet but because of scheduling purposes I have to start building the levain. Can I compensate the lack of starter rise for a longer levain build and longer bulk fermentation?
You could make the levain but it will likely need longer to ripen before you use it to mix into a dough (depending on the temperature it’s kept at). Make it, then give it a little extra time.
Thanks so much for the quick response!
Hey Maurizio,
Is it advisable if in the second proof after it’s been shaped to puff up to cut short it’s 12 hours? Seeing how this doughs seems rather similar to your cinnamon rolls and that proofs up in 2 hours or so can we attempt that with this recipe?
You can skip the long, cold proof, but it will still take at least a few hours to fully proof. Give it the time it needs, but yes, will be shorter than 12 hours at room temperature.
Hey Maurizio,
Thanks! got it
buongiorno! Hello! Can i use brewer’s yeast ? I need to change something in the recipe?
Thank you! Thank you! I am having so much fun working my way through your creative ideas with sourdough. The bomboloni are incredible, and I did not even make the custard filling. When my far flung family can finally travel to be together my sons will join me in making these, and we’ll have the custard filling too. I have made your pain de mie, your brioche and Poilane’s, and of course your simple sourdough and best sourdough. It’s all been amazing. Thank you for broadening my baking repertoire, which had become rather ho hum after 50 yrs of baking the same old breads. ❤️
Made these for the first time – was unsure what I was looking for in the final prove as they looked quite flat. Cooked them anyway and the puffed up loads! Put them in the fridge after the final prove and worked really well 🙂 would definitely recommend!
Wonderful to hear that, Izzy! They’re something special to be sure 🙂
Hi. My dough after the cold fermentation was still too sticky??? It was very hard to work with. Please help meeeee.
Sounds like the dough likely was under strengthened at mix time. Be sure to mix long enough that it’s almost at full development: the dough should be very smooth, elastic, and resist stretching out.
Hi!
Wanna ask if the starter can be replaced by active dry yeast/instant yeast? If yes, how does this affect the length of the warm, cold fermentation and proofing stage?
Thank you for the great recipe!
You can make these yeasted but the entire timeline and ingredients would have to change!
Hey!
I made this twice and both times I have run into inconsistencies/problems. During warm bulk fermentation there was almost no rise in 8 hours (@ 25-26ºC, the first time) and today(second time) I let it proof for almost ten hours at 27ºC and then cold proof for 12 hours, little rise too. Then divided and shaped and proof for another 15 hours or so (both times), little rise again. The first time when fried there was signs of underproof but not as big as the second time. Today I tried frying one after 15 hours and it it puffed up like a balloon. I am letting them proof even more time and see what happens. I do not know what might be the problem. I think that my starter was fairly active both times. I have run into similar problems with the soft hamburguer buns recipe.
It’s super critical to use your starter when it’s very, very mature for these. You need to catch it when it’s at peak activity and strength, if you use it too early you’ll risk needing to lengthen the bulk fermentation quite a bit. With all of these enriched doughs (burger buns included), salt and fat can cause issues with fermentation — your starter and levain need to be peak! Also, be sure to keep the dough nice at warm, 25-26°C is perfect.
Hello! Loved this recipe but had some challenges around the second proof and frying. Once the doughnuts were shaped, I warm proofed after for about 6 hours in my oven with the light on, then moved them to the fridge (at about 3pm) so that I could fry them in the morning around 8am. They were already double in size and very light to the touch when I moved them into the fridge, so I hoped the long overnight cold proof would slow down the rise. When I fried them the next morning, I found that half of them had collapsed in the fridge. They fried alright, but didn’t puff up as much as the those that hadn’t collapsed. I also had trouble getting any of the doughnuts (collapsed or not) to have a clean, white ring around the center since they didn’t puff up as much in the oil. Any advice or tips? If I’m planning to fry in the morning, at what hour into the warm, 12 hour proof should I move them to the fridge? Thank you!
Hi! Do you think it would be ok if i did all of the bulk and proofing at room temperature?
Yes, absolutely.
Hello!
I ran into some issues while trying to make these geat donuts, first batch didn’t rise at all when I used cold flour and water, starter was really active when added. Second batch was really sticky when shaping, any advice?
These look incredible! Would it be possible to just use all purpose (KAF)? I feel like the extra protein is rather important here, but perhaps I could take down the hydration of the dough a little?
Can’t wait to try these – thank you! 🙂
You could, i’ve done it! Yes, drop the hydration just a bit to compensate.
I am currently making this and the dough looks AMAZING so far. My starter is a little over a month old but very active. I was wondering if the Cold Fermentation resting time in the fridge has to be 12+ hours, and if not, what is the minimum amount of time the dough requires for cold fermentation in the fridge?
Great to hear that! It’s very dough dependent, but I’d say after 6-8 hours it’s probably sufficient.
Hi Maurizio!
What is the proper temperature for dough retarding / cold proof overnight in the fridge? following your recipe to proof in fridge for 12 hours approximately, is 3C too cold? or 6C is better? Let’s say I only want to cold proof for 1 hours to reduce acidity, can you recommend the suitable temperature?
EDIT: In your recipe you also added to use cold water from the fridge, what’s the desired temperature for this cold water? Thanks!
Thank you!
All fridge temps in this recipe are at 4°C!
Just fried mine this morning! They turned out great. My wife is currently omitting dairy products from her diet so we can hopefully figure out our son’s breastmilk allergies. I ended up substituting the butter for coconut oil. I was worried about the coconut oil melting and weeping out of the dough so I proofed for a longer amount of time at around 68-70 degrees. I placed the dough balls on precut squares of parchment paper for the final proof so that when it was time to fry I just picked up the dough and paper then removed the paper from the dough once it fried for a minute or so. It worked perfectly. Thanks for the great recipe!
Fantastic to hear that, Cody! I’d say these are a welcome treat for new parents!
Is it possible to make these bombolonis without the eggs (and therefore vegan)? Butter could easily be replaced with vegan butter.
Definitely possible but I’ve not tried!
Is it possible to make these bombolonis without the eggs (vegan)?
Awe man! I think I messed up! I had NO SLEEP two nights ago and started making this dough yesterday morning. It was all going really well and was resting in it’s warm spot. I was supposed to move it to the fridge around 10:30pm but I fell asleep and slept through my set alarm. I put it in the fridge now and will still see what happens after 12 hours with rolling them and overnight proofing.
Keep with it!
I had the same problem and ended up living my dough in the bulk fermentation for almost 12 hours at 69F. I’m a little concerned if this will affect the final product. Should I live less time in the last bulk fermentation after pre shaping them? PLEASE ANSWER ME!!!!
Nope, that’s just fine. Give the dough the time it needs. At 69F, which is very cold, the dough will take significantly longer to proof!
What happened to your dough? The same happened to me and I ended up bulk fermenting for almost 12 hours.
Hello, I made these for the first time today and can’t tell if I underproof them or not. I figured I did since I just wanted to bake one early to see where I’m at since I had to make a lot of adjustments to the consistency of the rise of the leaven and the post shape proof. The leaven I had to pop into the fridge after feeding it because I had to run out so the total time for that was 8 hours with 2 hrs in the fridge. I waited an extra 2 hours because the leaven didn’t look mature enough for me to use. I wanted to test where my dough was at so I took one out of the last proof 2 hours early to fry. I didn’t have issues with anything flipping over as the other comments about it, but the dough got very round like a ball. Inside there was a big gap on the top of the dough and it was quite stodgy inside so I thought it might have been underproof, but it’s verrry sour.
I’ve attached https://imgur.com/gallery/l3Q9MMR . I left the rest of the doughs in the fridge because I wanted to cook them tomorrow morning, I surmise it’ll be very sour too. Maybe I’m not feeding my starter frequently enough? I feed it once a day.
Yes, those are the typical signs for under proofed dough with this recipe: huge rise and they form more into a ball than a hockey puck shape. Give them more time to proof, they should be very, very soft!
Hi Maurizio – the first time I made this recipe it came out absolutely perfect! But on my second attempt I started having similar problems as a few commenters. Once the dough hit the oil, it took on a life of its own, turning on itself within 30 seconds or so. And I couldn’t flip them back over without them turning on themselves again. I also kept the oil temp right around 360 but for some reason, after two minutes, the doughnut was a bit too dark on the outside and slightly raw on the inside.
After doing a batch of three doughnuts and having these results, I went for a walk to let the rest of the dough proof longer. I went through the comments and saw that someone had similar problems and you thought it was from being under-proofed. My kitchen in New York definitely doesn’t get to 78 degrees, so I gave it a couple of extra hours to proof. Unfortunately I had the same result with the remaining balls – flipped on its own within 30 seconds of hitting the oil, too dark after only two minutes, while still slightly raw inside and definitely not the even shape that I got on my first try.
Do you think maybe the first warm bulk wasn’t sufficient? I gave it about 7.5 hours just because the temperature in my kitchen probably hovers between 68-72 degrees on most non-summer days. I usually use the oven as my ‘proofing box’ leaving a pan of boiling water in there with the dough, but unfortunately the oven was in use at the time I made this dough.
Hoping to give these a shot again this weekend.
Thanks so much!
Farhod
Yes, I’d give the dough more time in the first rise (bulk). I had this flipping issue in the past and it was typically do to under proofed dough (they rise too dramatically when hitting the oil and form a ball instead of a hockey puck shape). Temperature control is very important with this recipe!
Hi Maurizio,
I am in the process of this recipe and left my dough to bulk ferment. I’ve made sourdough before, but I completely got side tracked and forgot to do stretch and folds. It’s been about 5.5 hours…should I do a couple stretch and folds and put it straight in the fridge or leave it out to bulk ferment a little longer?
Thanks!
LB
Hopefully they turned out great! I would have given it a few stretches and then into the fridge.
Hi Maurizio!
Is it possible to use 5Qt. stand mixer? as I’m afraid it won’t fit 1.200 grams of dough.
Thank you!
Yes, that’ll work!
Hi,
I have made these 2 times now & we love them. The first time I have tried to make any type of doughnut. The only problem I have is that they stick to the baking tray while proving & I find them hard to remove before frying. Even though I put flour on the tray. Any suggestions or should I try an alternative to a baking tray?
Thank you
Eve
Glad to hear that Eve! Other options would be to liberally grease the tray with oil or butter or you could even line the tray with parchment (and then oil) or silicone baking mats.
I would absolutely love to make these, but don’t have a stand mixer and would have to do it by hand. Any recommendations?
It’s possible but quite a bit of work to get all the enrichments worked into the dough. Leave the butter out until the very end and use the slap/fold technique to mix the dough to a really strong consistency, then add butter in on pad at a time. Others have commented below on success with this method (but it is a lot of work)!
Hi! Currently making this recipe and am about 20 mins into bulk fermentation. Everything is going alright, but I am just wondering how sticky the dough is supposed to be?
It’s still pretty sticky even after mixing in the machine. Keep with it and give it stretch and folds as necessary!
hello, i wanna asking about the flavour of bomboloni. how can you make the taste had no sourness at all? need help thankyou
Do you taste sourness when making these? There’s some to me, but it’s not very evident!
At the beginning before it goes t
o proof stage, the dough taste no sourness at all. But the it was fried, the after taste was very strong of sourness. I was wondering maybe this is happened because when the warm fermentaion stage, my dough was not rise completely before it go to bulk fermentation. So i took more time in warm fermentation until it approved at 12 hours. In this case i have question, is the caused of warm fermantion that took so long that affect sourness to the dough at the end ? Or it is okay if i just move into cold bulk fermentation?
That’s ok to proof it longer, this is a slow moving dough and it does take more time to fully proof. Try to keep the warm temperatures no higher than 25-26°C and see if that helps next time. Also, make sure your starter/levain is used at the right time, don’t let it see in a very mature state too long before using it to mix the dough.
You certainly want the dough to ferment to a certain level before placing it in the fridge, it needs to be fairly well risen and a little “jiggly” in the bowl, but it doesn’t have to be fully fermented, of course. It’s a balance, if you try to put the dough in the fridge too early you’ll have a very sluggish dough the next day when you take it out to finish the process. You do always have the option of skipping the cold bulk, too, it just makes shaping a little more difficult!
sorry for the late reply. 4 days ago i was made this bomboloni based on your recipe and technique, and i made it! The sourness not too strong and it had very rich of flavour than instant yeast bomboloni. In proofing stage i decided to proof it just for 9 hours (because of the envinroment and avoid for too long which result s in excessive acid taste), and it works! , After that i planned to make it again, but i got a new issue. i was confused why my dough fermented so long in warm bulk step. This things happened too in my succesed trial before, but the different is in proofing stage, my dough ferment slowly. Im just wondering maybe this problem happened because i changed feeds time of my starter, that usually 2 times everyday to 3 times everyday (every 8 hours). it fermented but sometimes not reach peaks before i fed it again. i did that because i was thought that is maybe made my bomboloni sour because the starter fermented too long. Based from your experience, will it affect the acidity or it just make things become worse? thankyou
Glad to hear that, Alvin! These do take a long time to rise, both in bulk and proof. I’ve found that if you don’t use your starter/levain at just the right time it can either slow things down quite a bit or it can make things overly sour. Additionally, if you don’t let the dough rise sufficiently in bulk fermentation, the final proof will be very, very slow.