


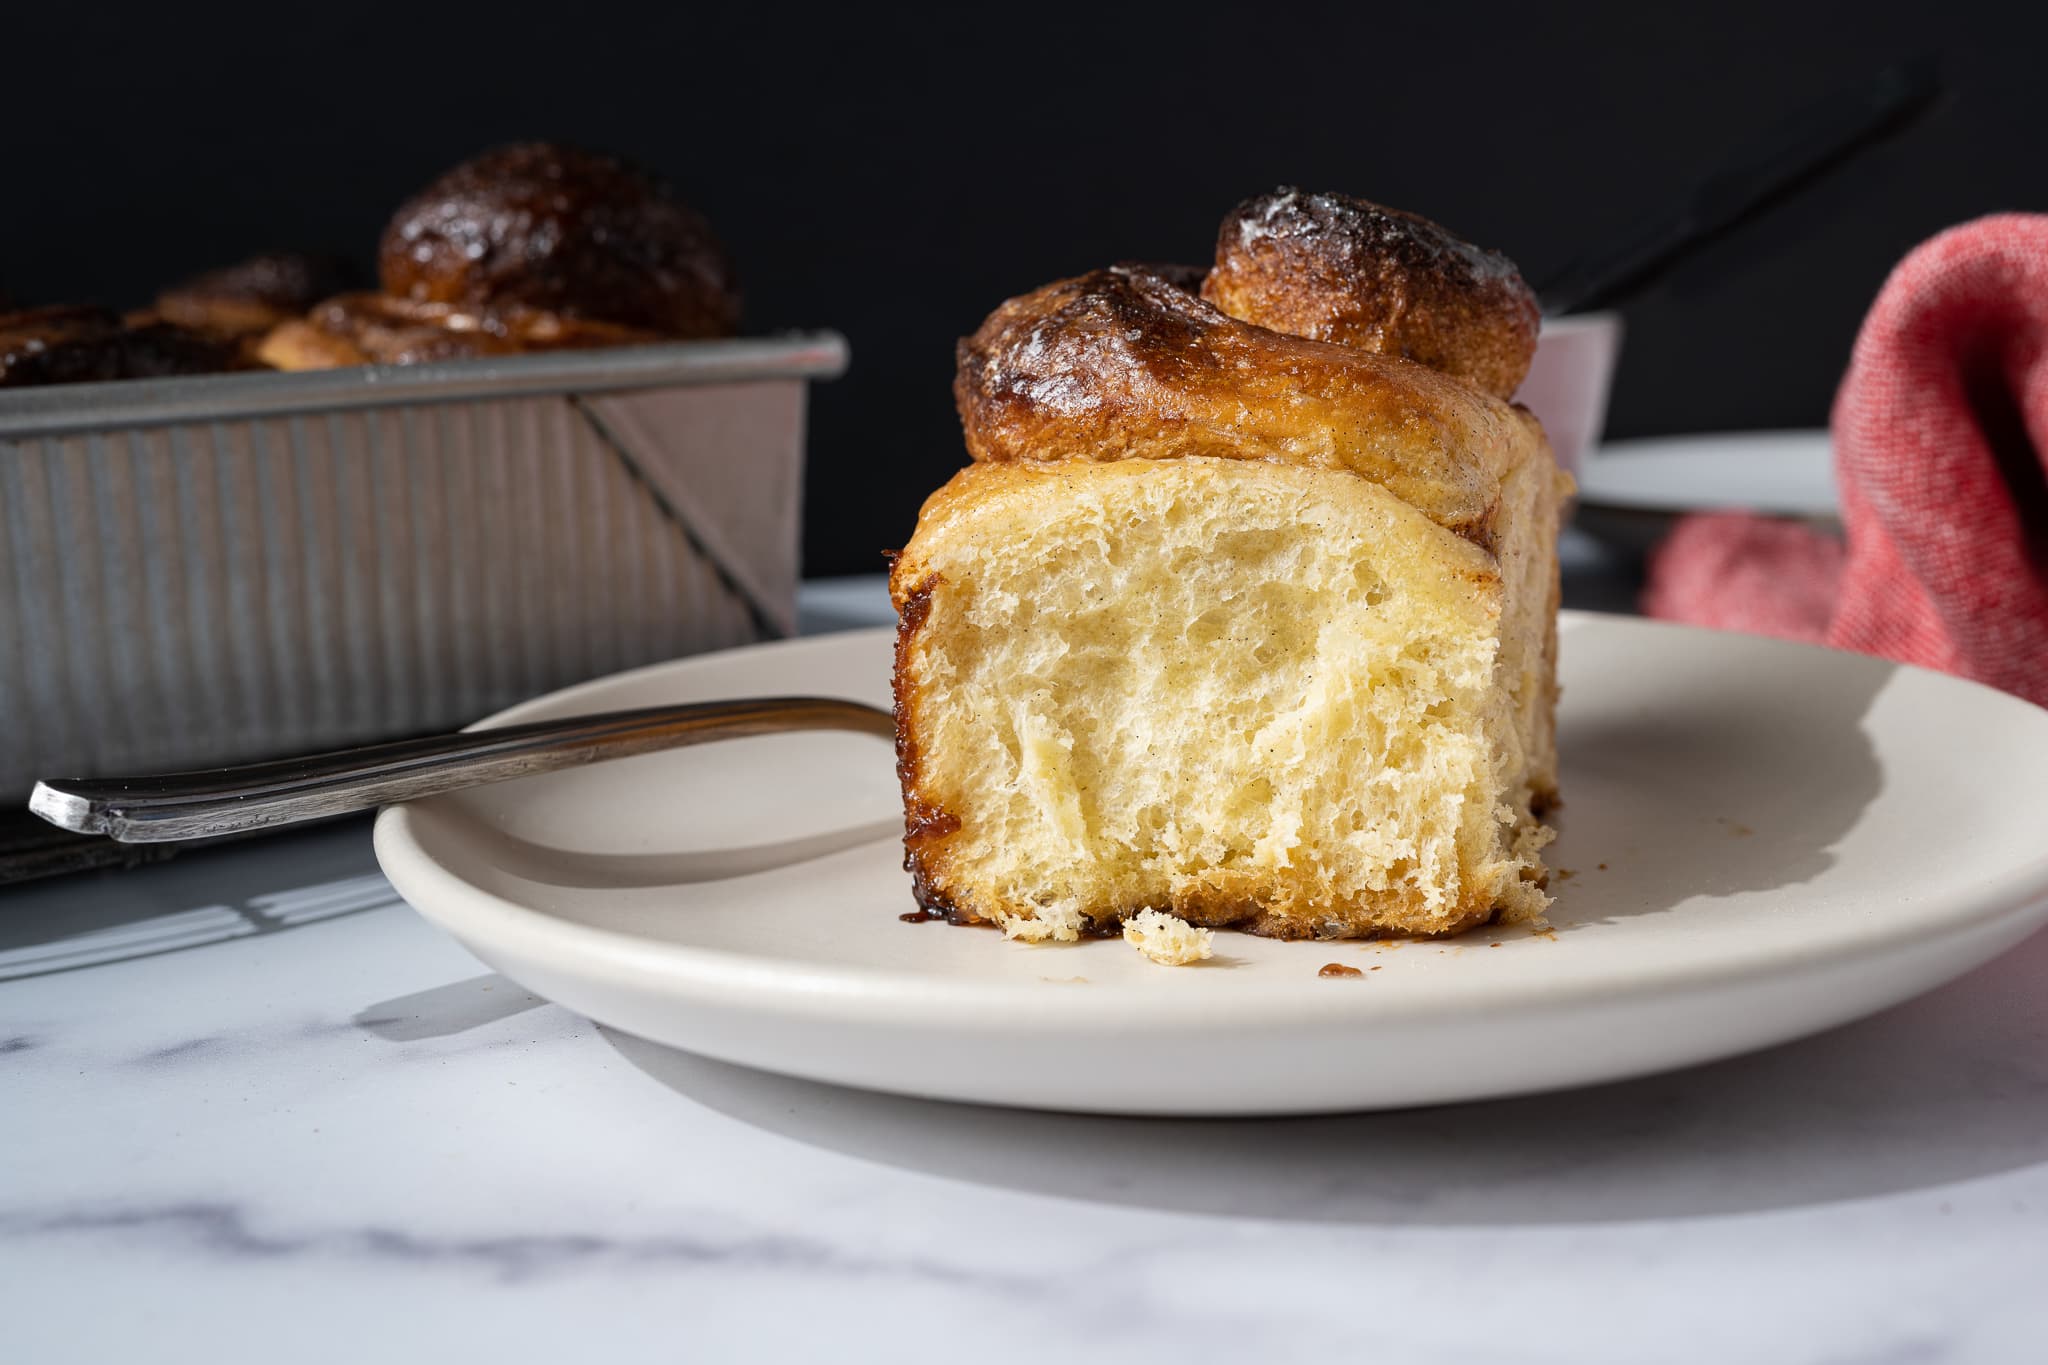
I’m no stranger to making an enriched sourdough dough, spreading on a filling, rolling it up, and then enjoying the delicious outcome. But these sourdough cardamom rolls take a decidedly delicious detour at a few places along the way. First, I’ve added a small bit of cardamom directly to the dough for enhanced flavor and aroma. Next, the dough has a yudane (similar to tangzhong) mix-in for added tenderness. Finally, these indulgent cardamom rolls aren’t topped with icing, but rather, a cardamom-infused simple syrup for a shiny and not-too-sweet twist.
If I were to create a hierarchy defined by the level of enrichments (eggs, butter, sugar) amongst my sourdough babka, brioche-style cinnamon rolls, and these cardamom rolls, these rolls would be at the bottom of the ladder. Why? These rolls have significantly less egg, butter, and sugar than my cinnamon rolls and a smidgen less than my babka, but the secret here is the yudane: it brings tenderness without adding fat (egg, milk, or butter).
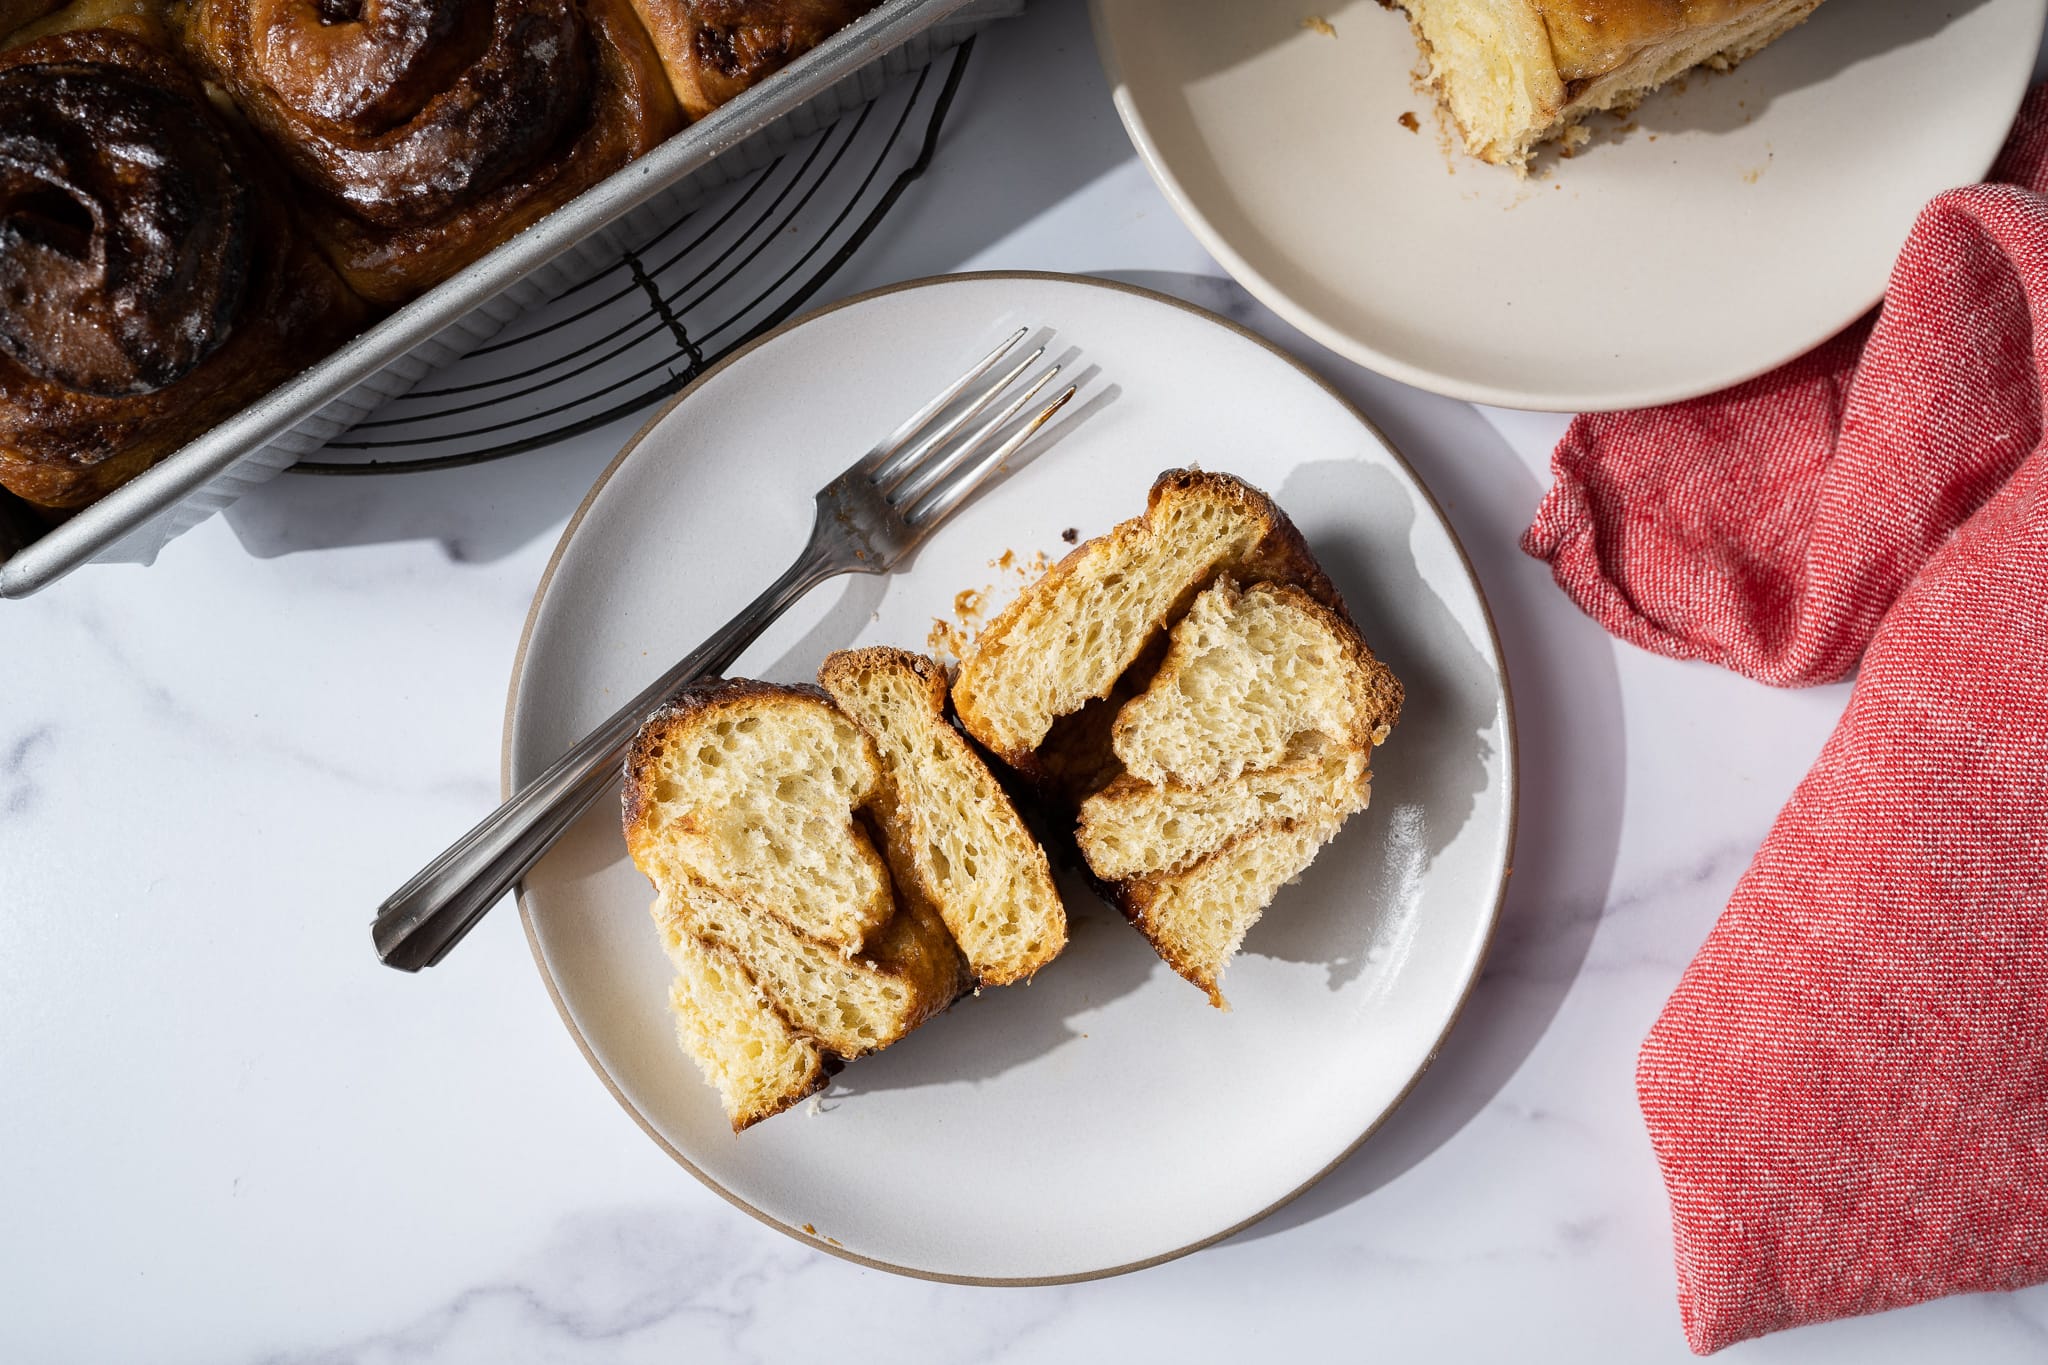
Cardamom is a spice I seldom use, but it’s one that brings a luxurious aroma and a sweet punch. Like many spices, I find it can be overpowering when used in high quantity, but it also depends on whether your cardamom is freshly prepared in a mortar and pestle or already ground cardamom in a bottle. Fresh cardamom certainly has a stronger flavor than the two. I use ground cardamom in this recipe and have it included in the dough, the filling, and the simple syrup itself. If you’re using freshly ground cardamom, you might want to consider reducing the amount mixed into the dough.
Let’s dig into the flour I use in this recipe and what yudane brings into the mix (couldn’t resist 🙂).
Flour Selection and Yudane (Similar to Tangzhong)
This recipe will work well with any all-purpose flour or medium-protein bread flour (11-12% protein). The dough is on the stiffer side before the butter is added, so if you’re using a higher protein white flour or one that’s especially absorbent, you might need to adjust with an added dash of milk.
Read the guide to what butter does to bread dough for a deeper look at its effect.
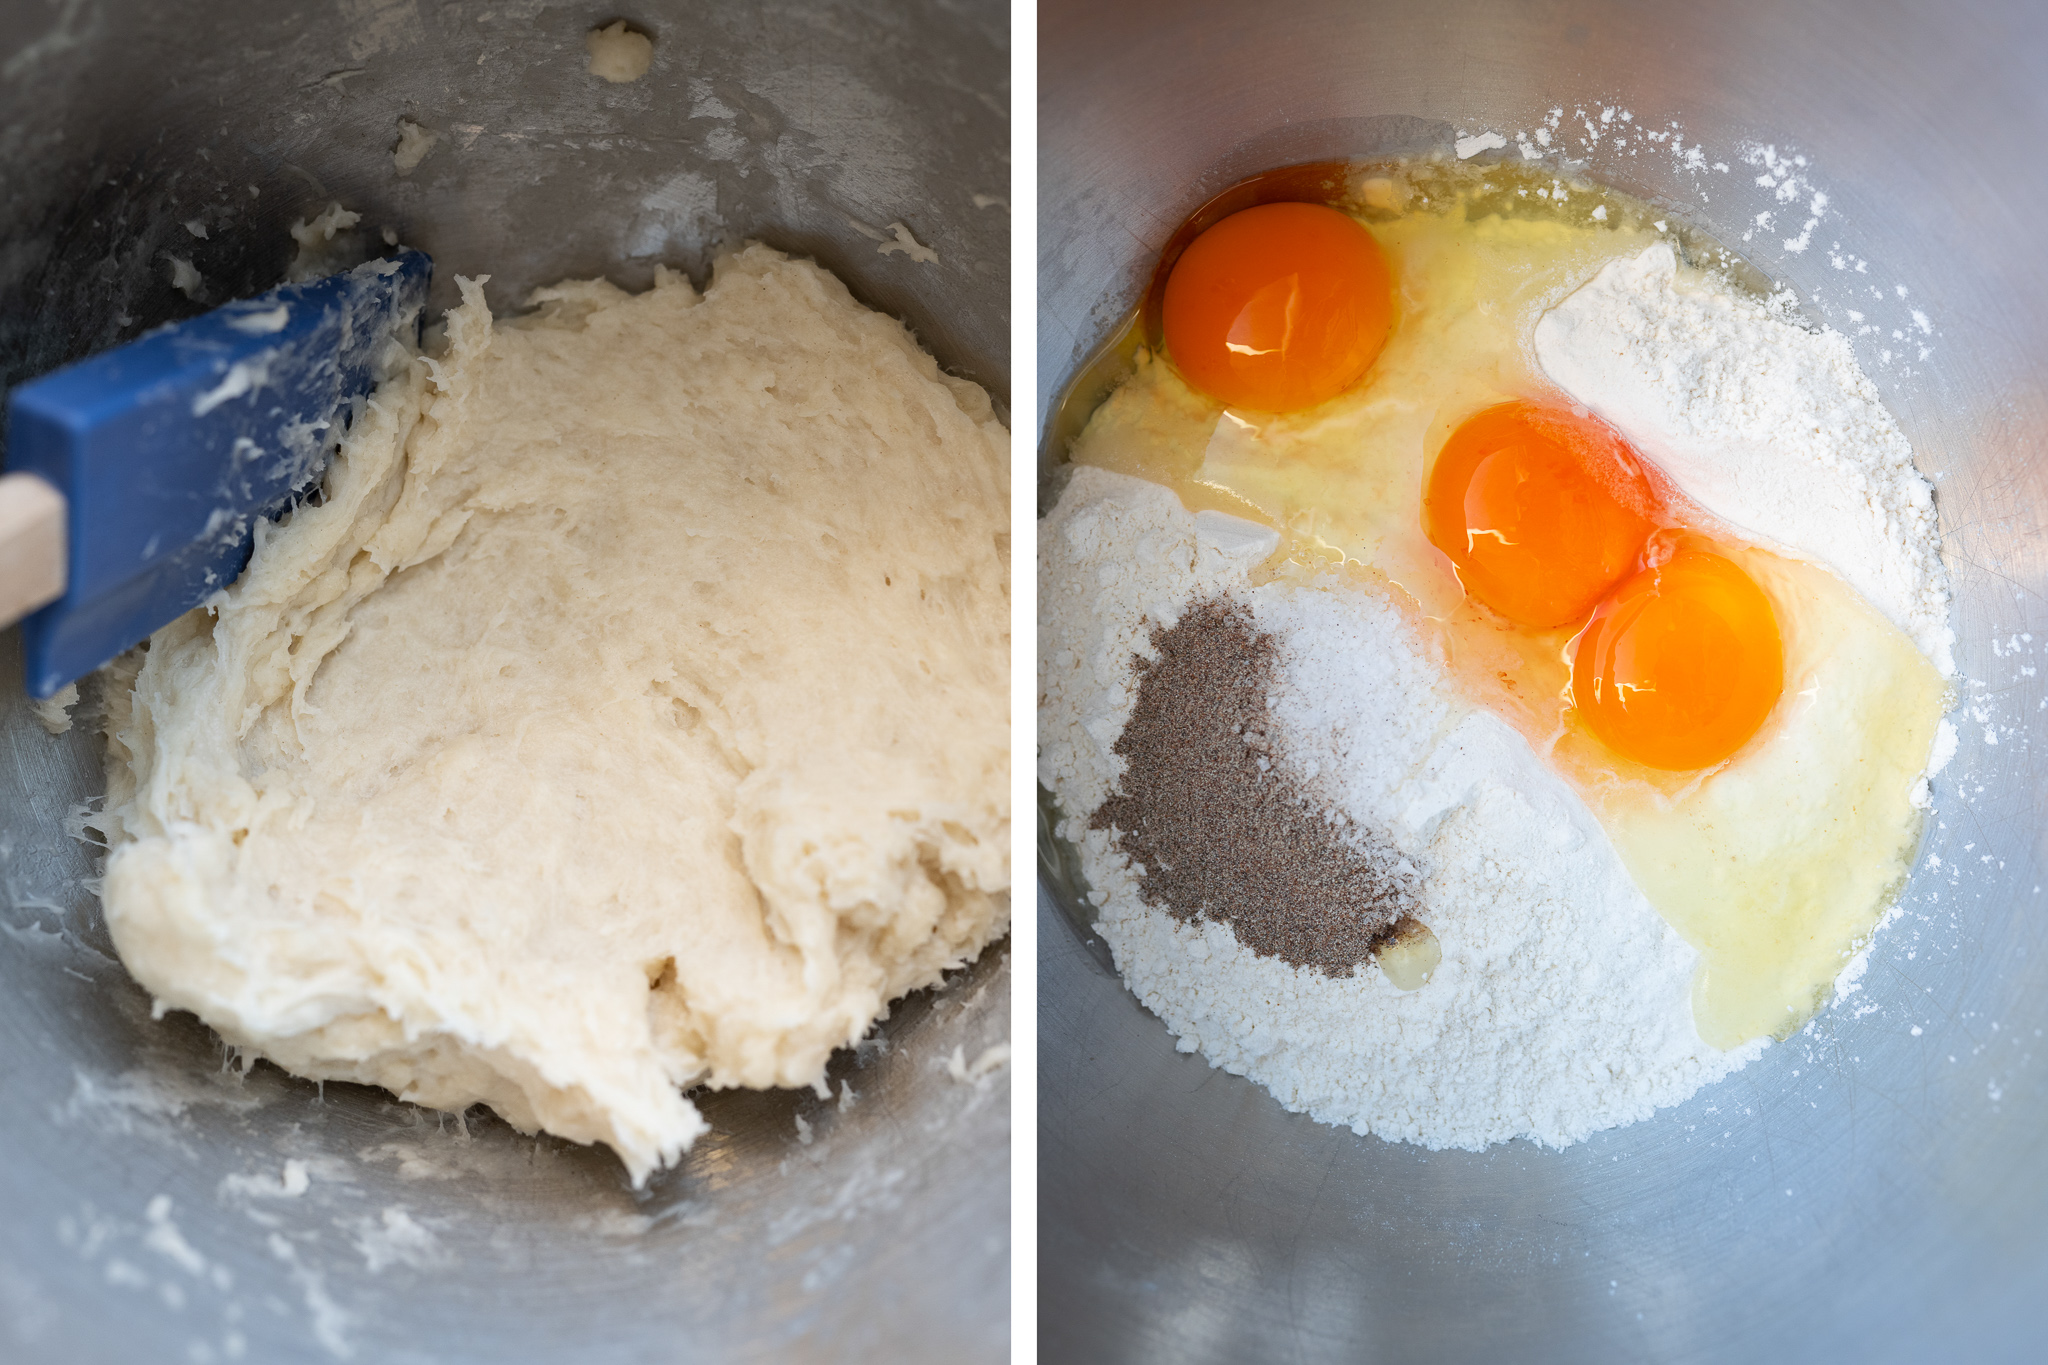
To add extra tenderness to these cardamom rolls, I add a pre-gelatinized flour mixture called yudane. Compared to tangzhong, which calls for actively cooking flour and milk over the stove, yudane calls for boiled water to be poured over the flour, and then the mixture is stirred until it thickens. It’s a straightforward way to make the mixture, taking only minutes, and it adds a distinctly “shreddy” texture to these rolls.
I opted for yudane in this recipe for two reasons: 1) I don’t have to take any of the milk from the main mix to make the yudane, and 2) it’s incredibly easy, and easy is good.
Let’s look at the baking schedule.
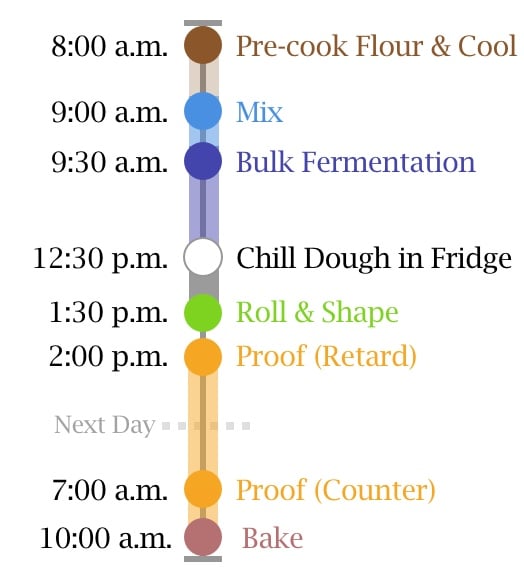
Baking Schedule
I spread making these rolls over two days. The first day goes all the way up to shaping and cutting. Once cut, place the pieces in their baking pan, cover, and retard overnight. This way, you can take them out in the morning to finish proofing and bake them fresh for breakfast or brunch.
Baking Equipment
Pan choice: USA Pan 8-inch square pan.
My goal for these cardamom rolls was to have fewer, larger rolls packed tight in a pan. To that end, I used my 8 x 8-inch square USA Pan, which has a natural nonstick liner. If you want to make more, smaller rolls, cut them smaller and use a larger pan. If you’re not using a nonstick pan, I recommend lining the pan with parchment paper.
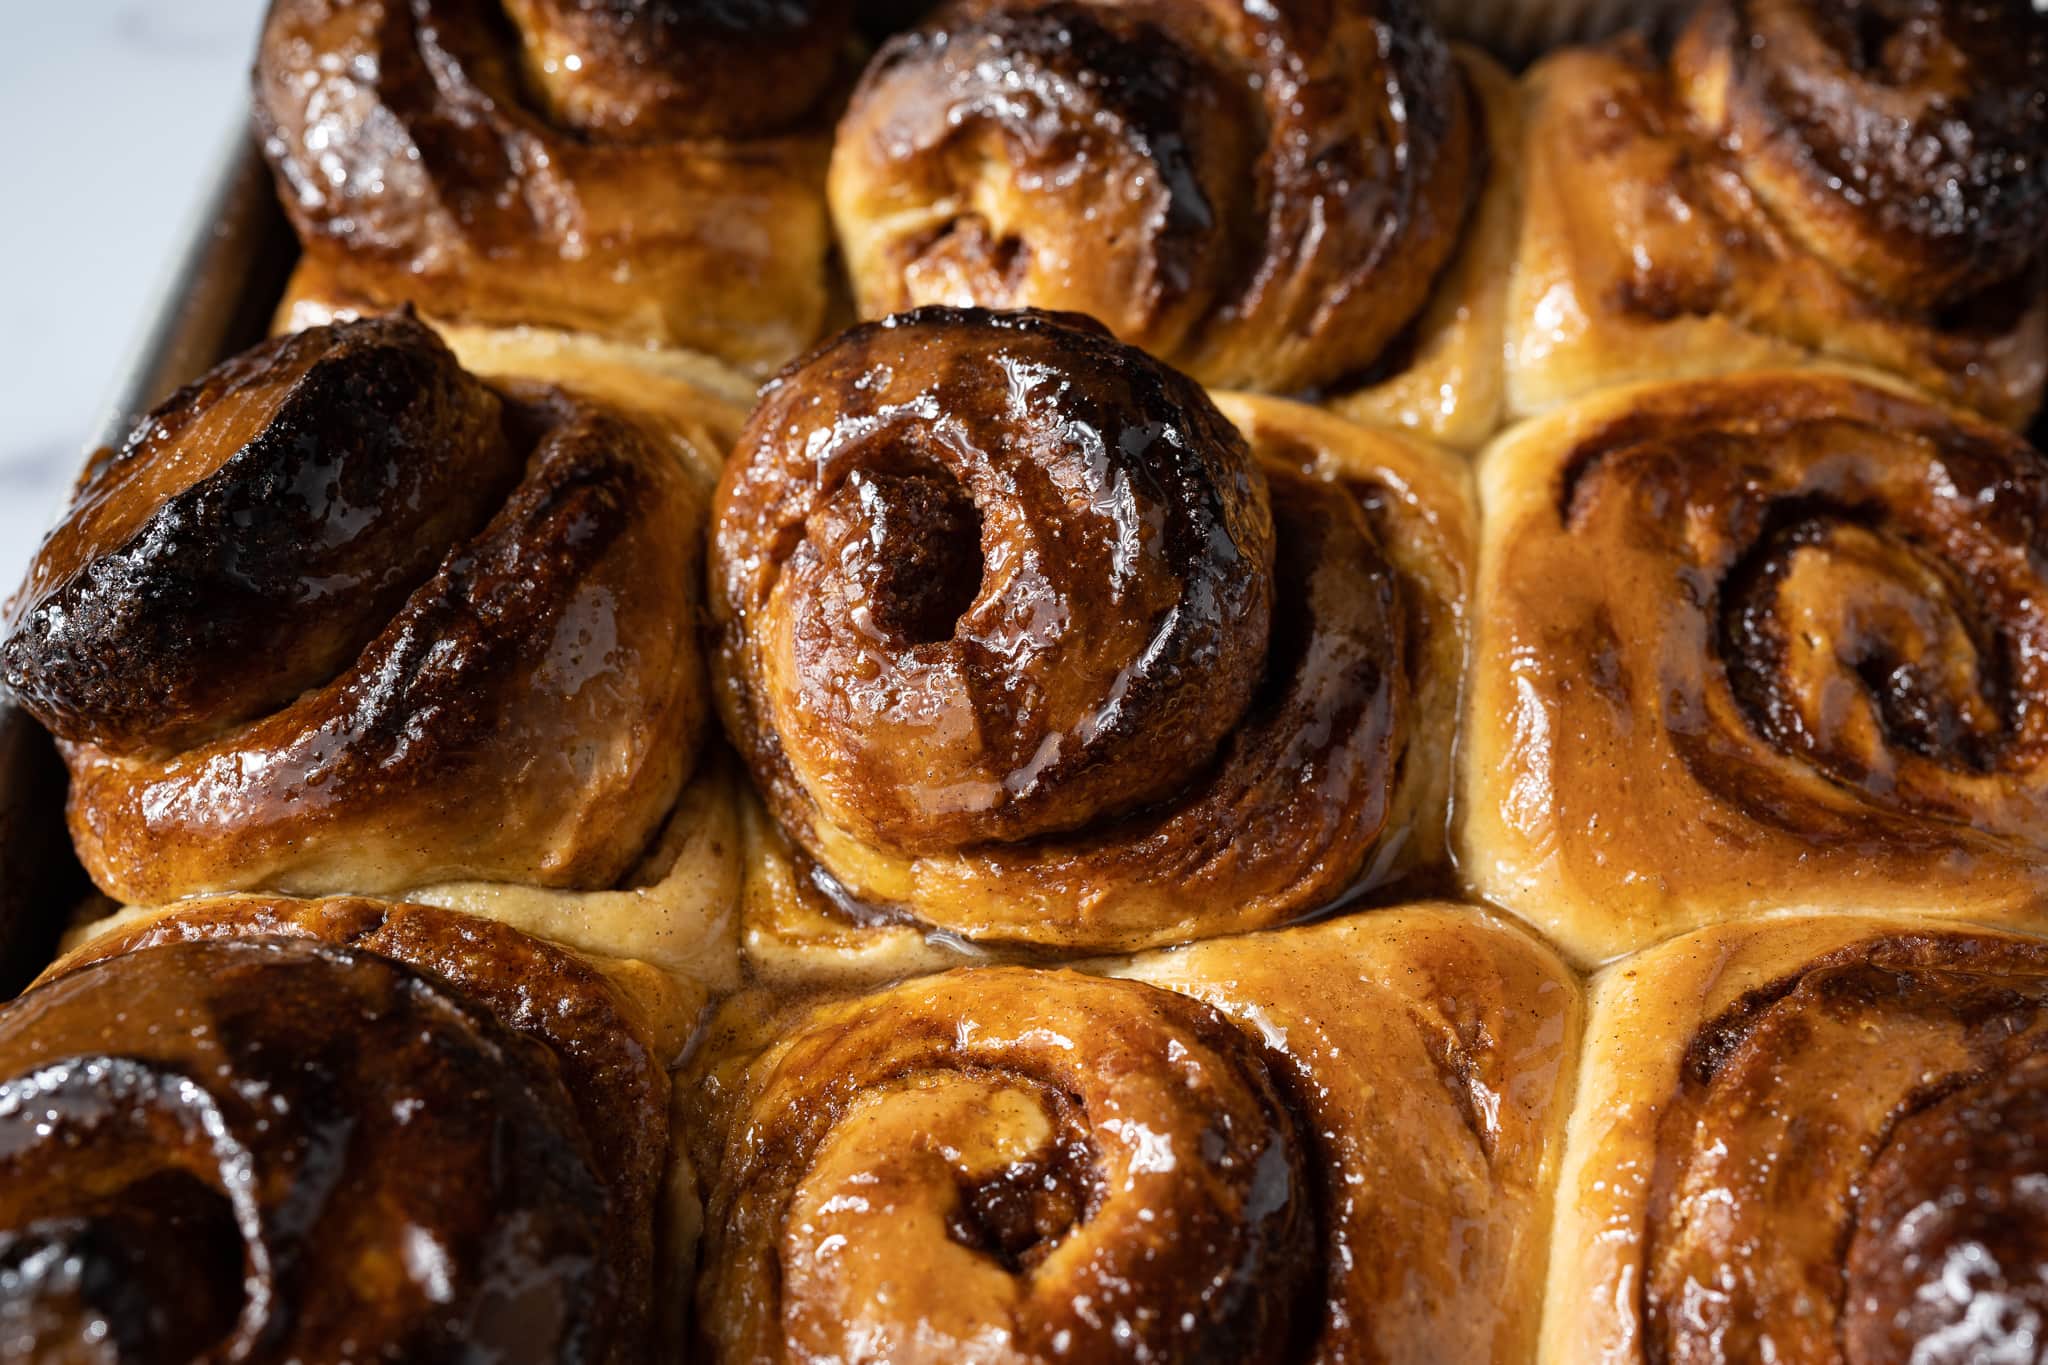
Cardamom Rolls Formula
For tips on how to calculate baker’s percentages or how to modify this sourdough cardamom rolls formula, check out my guide to baker’s percentages (baker’s math).
| Total Dough Weight | 1,200 grams |
| Sourdough starter in final dough | 30.00% |
| Yield | Nine large cardamom rolls (baked in an 8 x 8″ square pan) |
Total Dough Formula
Desired dough temperature: 76°F (24°C).
| Weight | Ingredient | Baker’s Percentage |
|---|---|---|
| 101g | Yudane: All-purpose flour (~11% protein, King Arthur Baking All-Purpose) | 20.00% |
| 106g | Yudane: Water, boiled | 21.00% |
| 404g | All-purpose flour (~11.7% protein, King Arthur Baking All-Purpose) | 80.00% |
| 136g | Butter, unsalted and at room temperature | 27.00% |
| 131g | Milk, whole | 26.00% |
| 131g | Eggs | 26.00% |
| 25g | Sugar, caster | 5.00% |
| 3g | Cardamom, ground | 0.60% |
| 10g | Salt | 1.90% |
| 152g | Sourdough starter | 30.00% |
Cardamom Rolls Filling
Make this filling when your dough is chilling in the fridge. Be sure to give it enough time to let the melted butter slightly cool.
| Weight | Ingredient |
|---|---|
| 30g | Butter, unsalted and melted |
| 90g | Brown sugar |
| 2g (1 teaspoon) | Cinnamon, ground |
| 1g (1/2 teaspoon) | Cardamom, ground |
Cardamom Simple Syrup
Instead of topping these sourdough cardamom rolls with icing (which you totally could, if you wanted), I opt for a cardamom-infused simple syrup.
| Weight | Ingredient |
|---|---|
| 100g | Sugar, granulated (don’t waste your superfine caster sugar here; use any granulated white sugar) |
| 45g | Water |
| 2g (1 teaspoon) | Cardamom, ground |
Cardamom Rolls Method
1. Pre-cook Flour (Yudane) – 8:00 a.m.
Be sure to make this yudane ahead of time to give it time to cool before mixing. The texture of the mixture seems to improve if left to rest for at least one hour.
Do ahead: Alternatively, you could make the yudane the night before, let it cool, then cover and place it in the fridge. The next morning, let it warm to room temperature before mixing it into your dough.
| Weight | Ingredient |
|---|---|
| 101g | All-purpose flour |
| 106g | Water |
Boil the water and pour it over the flour in a small heat-proof mixing bowl. Stir or whisk until the mixture tightens up and all dry bits are incorporated. Let the pre-gelatinized flour cool on the counter until you mix the main dough.
2. Mix – 9:00 a.m.
Because I used a KitchenAid stand mixer to quickly and efficiently mix, and because I’m not looking for added extensibility, I decided against using an autolyse for this enriched dough.
| Weight | Ingredient |
|---|---|
| 200g | Yudane (from above) |
| 404g | All-purpose flour |
| 136g | Butter, unsalted and at room temperature |
| 131g | Milk, whole |
| 131g | Eggs |
| 25g | Sugar, caster |
| 3g | Cardamom, ground |
| 10g | Salt |
| 152g | Sourdough starter |
First, take out your butter and cut it into 1/2″ pats. Set the butter on a plate to warm to room temperature and reserve until the end of mixing.
To the bowl of a stand mixer fitted with the dough hook attachment, add the milk, flour, sourdough starter, eggs, sugar, yudane, cardamom, and salt. Mix on speed 1 (STIR on a KitchenAid) for 1 to 2 minutes until the ingredients come together. Increase the mixer speed to speed 2 (2 on a KitchenAid) and mix for 6 to 7 minutes until the dough starts to strengthen and clump around the dough hook.
This dough doesn’t need to be fully developed in the mixer, but it’s better to mix longer than shorter—you want a strong dough before adding the butter. It won’t completely remove from the bottom of the bowl, and it will still be shaggy, but the majority of the dough should clump up around the dough hook.
Let the dough rest in the mixing bowl for 10 minutes.
Your butter should now be at room temperature; a finger will easily slide in and leave an impression. Turn the mixer on to speed 1 and add the butter, one pat at a time, waiting to add each pat until the previous one is fully absorbed. Adding all the butter could take around 5 to 8 minutes.
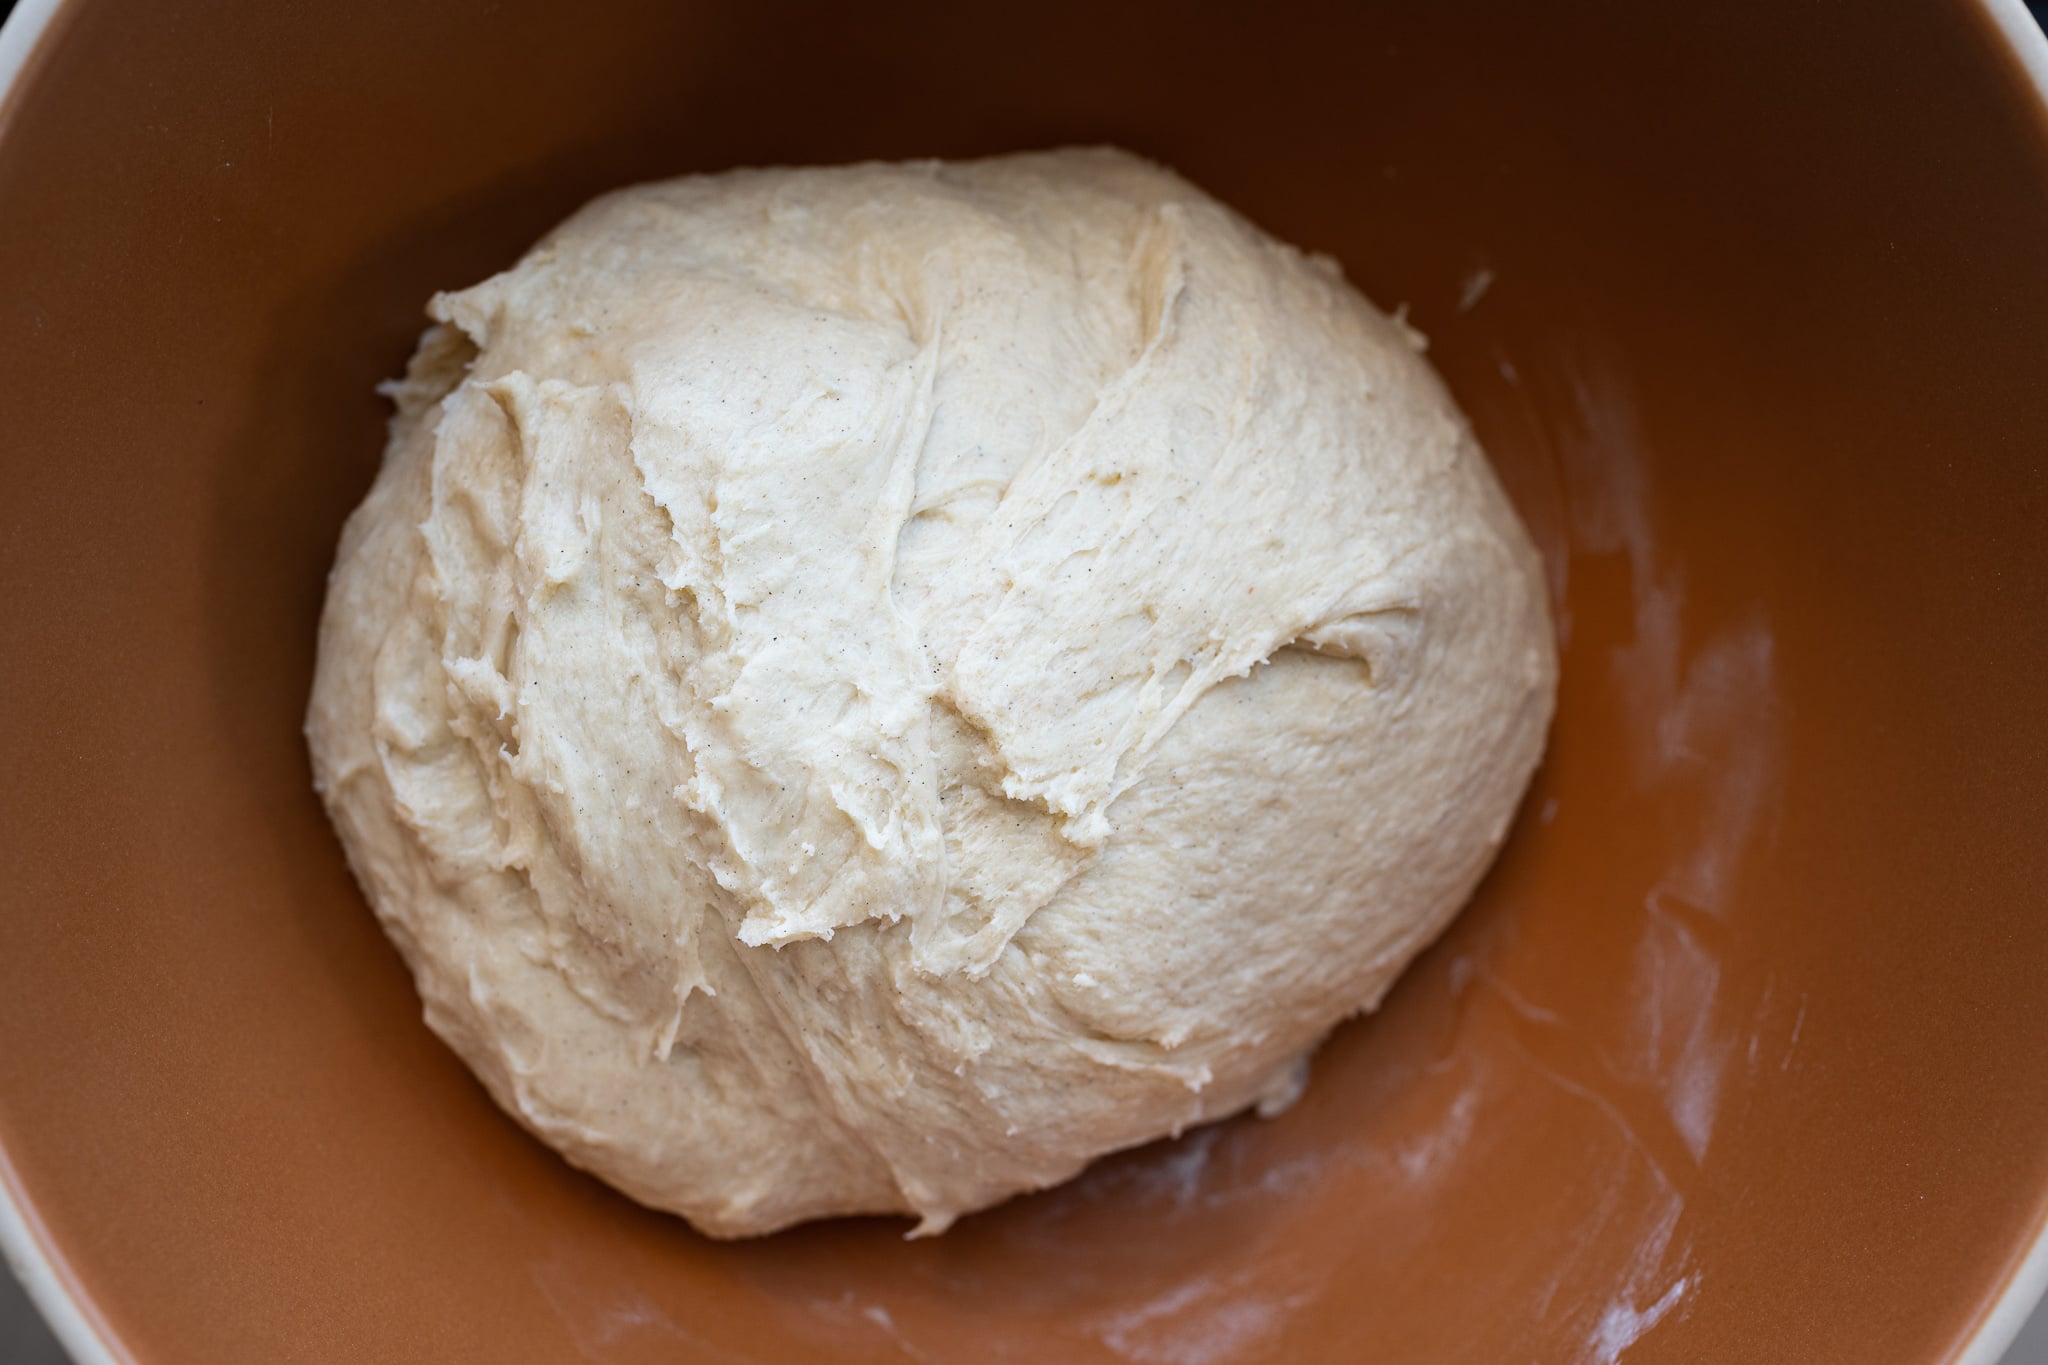
As you can see above, the sourdough cardamom rolls dough is soft but mostly smooth and holding its shape at the end of mixing. The dough will be further strengthened through stretch and folds during bulk fermentation. Transfer your dough to a bulk fermentation container and cover.
3. Bulk Fermentation – 9:30 a.m. to 12:30 p.m.
At a warm room temperature, around 76°F (24°C), bulk should take about 3 hours. If your kitchen is cooler, place the pan to rise in a small dough proofer, or extend bulk fermentation as necessary.
Give this dough three sets of stretch and folds (see my guide on how to stretch and fold sourdough) during bulk fermentation at 30-minute intervals. The first set starts after 30 minutes from the start of bulk fermentation. For each set, wet your hands, grab one side and stretch it up and over the dough to the other side. Rotate the bowl 180° and perform another stretch and fold (this forms a long rectangle in the bowl). Then, rotate the bowl 90° and do another stretch and fold. Finally, turn the bowl 180° and do one last stretch and fold. You should have the dough neatly folded up in the bowl.
After the third set, let the dough rest, covered, for the remainder of bulk fermentation.
4. Chill Dough – 12:30 p.m. to 1:30 p.m.
At this point, your dough should have risen in your bulk container, be puffy to the touch, and have smoothed out. If the dough still feels dense and tight, give it another 15 minutes and check again.
Place your covered bulk fermentation container in the refrigerator for at least one hour to fully chill the dough.
5. Roll and Shape – 1:30 p.m.
Before removing your dough from the refrigerator, make the filling. In a small mixing bowl, combine the following. It may seem like it’s not enough filling to cover the entire surface of the dough—spread it thin.
| Weight | Ingredient |
|---|---|
| 30g | Butter, unsalted and melted |
| 90g | Brown sugar |
| 2g (1 teaspoon) | Cinnamon, ground |
| 1g (1/2 teaspoon) | Cardamom, ground |
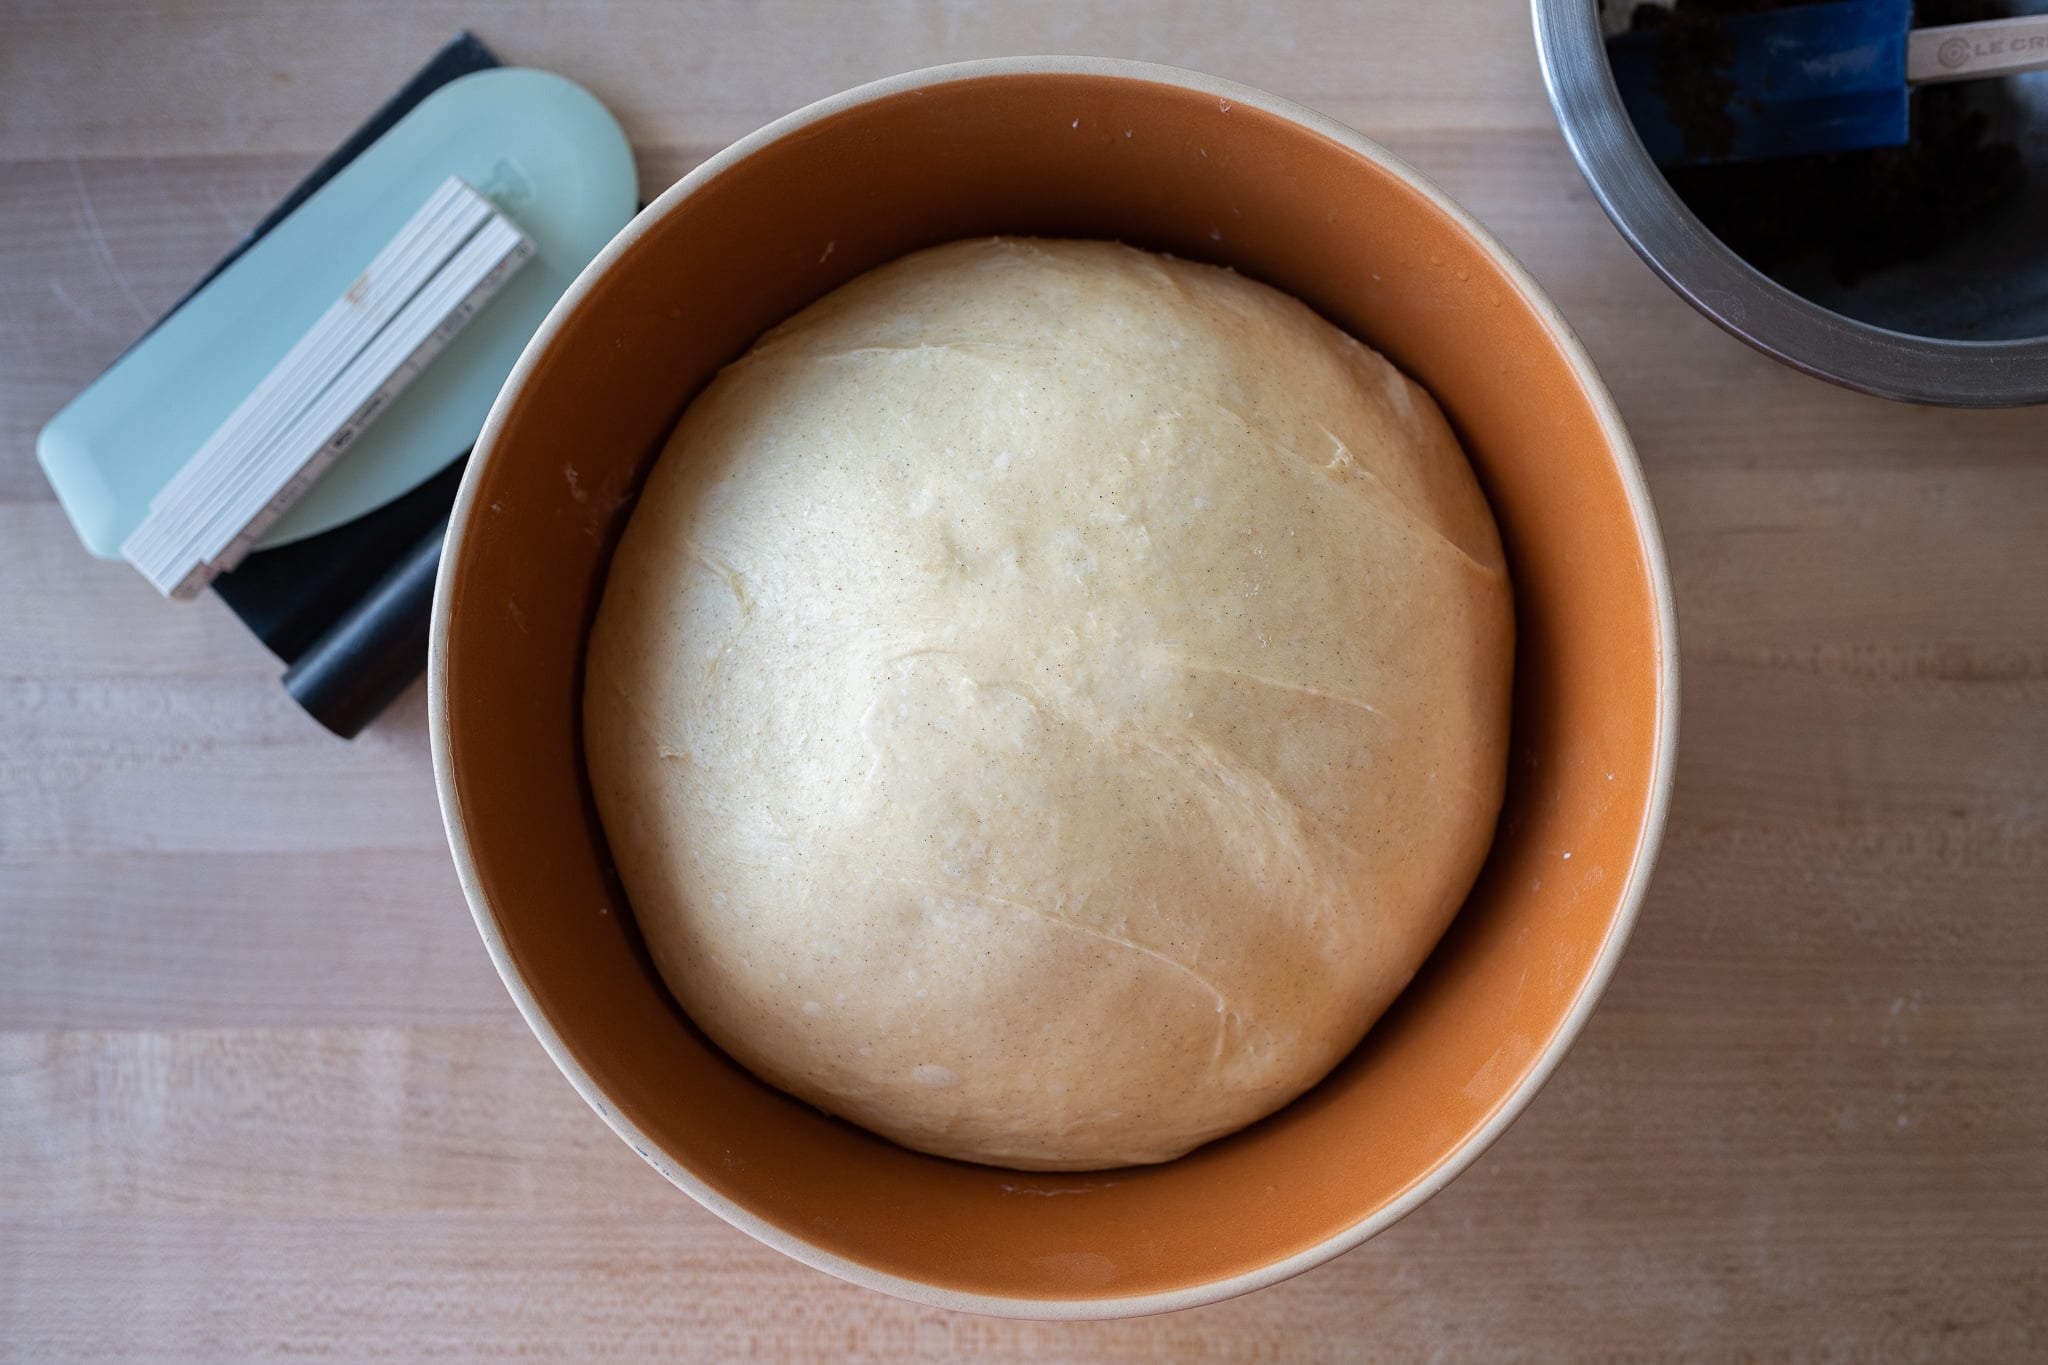
Above is my dough at the end of bulk fermentation and after the 1 hour in the refrigerator. The dough should be cold and firm to the touch; give it more time to chill if necessary.
Next, butter your baking pan (even if it’s nonstick) to ensure the rolls remove cleanly after baking. My 8 x 8-inch nonstick pan has never had issues, but I still lightly butter the pan just in case.
This dough is very soft. Act quickly to roll, spread the filling, and cut before the dough warms and softens further. If it begins to soften, place it in the fridge to firm.
Remove your bulk fermentation container from the fridge, lightly flour your work surface in a large rectangle shape, and the top of the dough in the bowl. Then, gently scrape out the dough to the center of your floured rectangle. Lightly dust the top of the dough with flour, and using a rolling pin, roll the dough out to a 15″ x 15″ square.
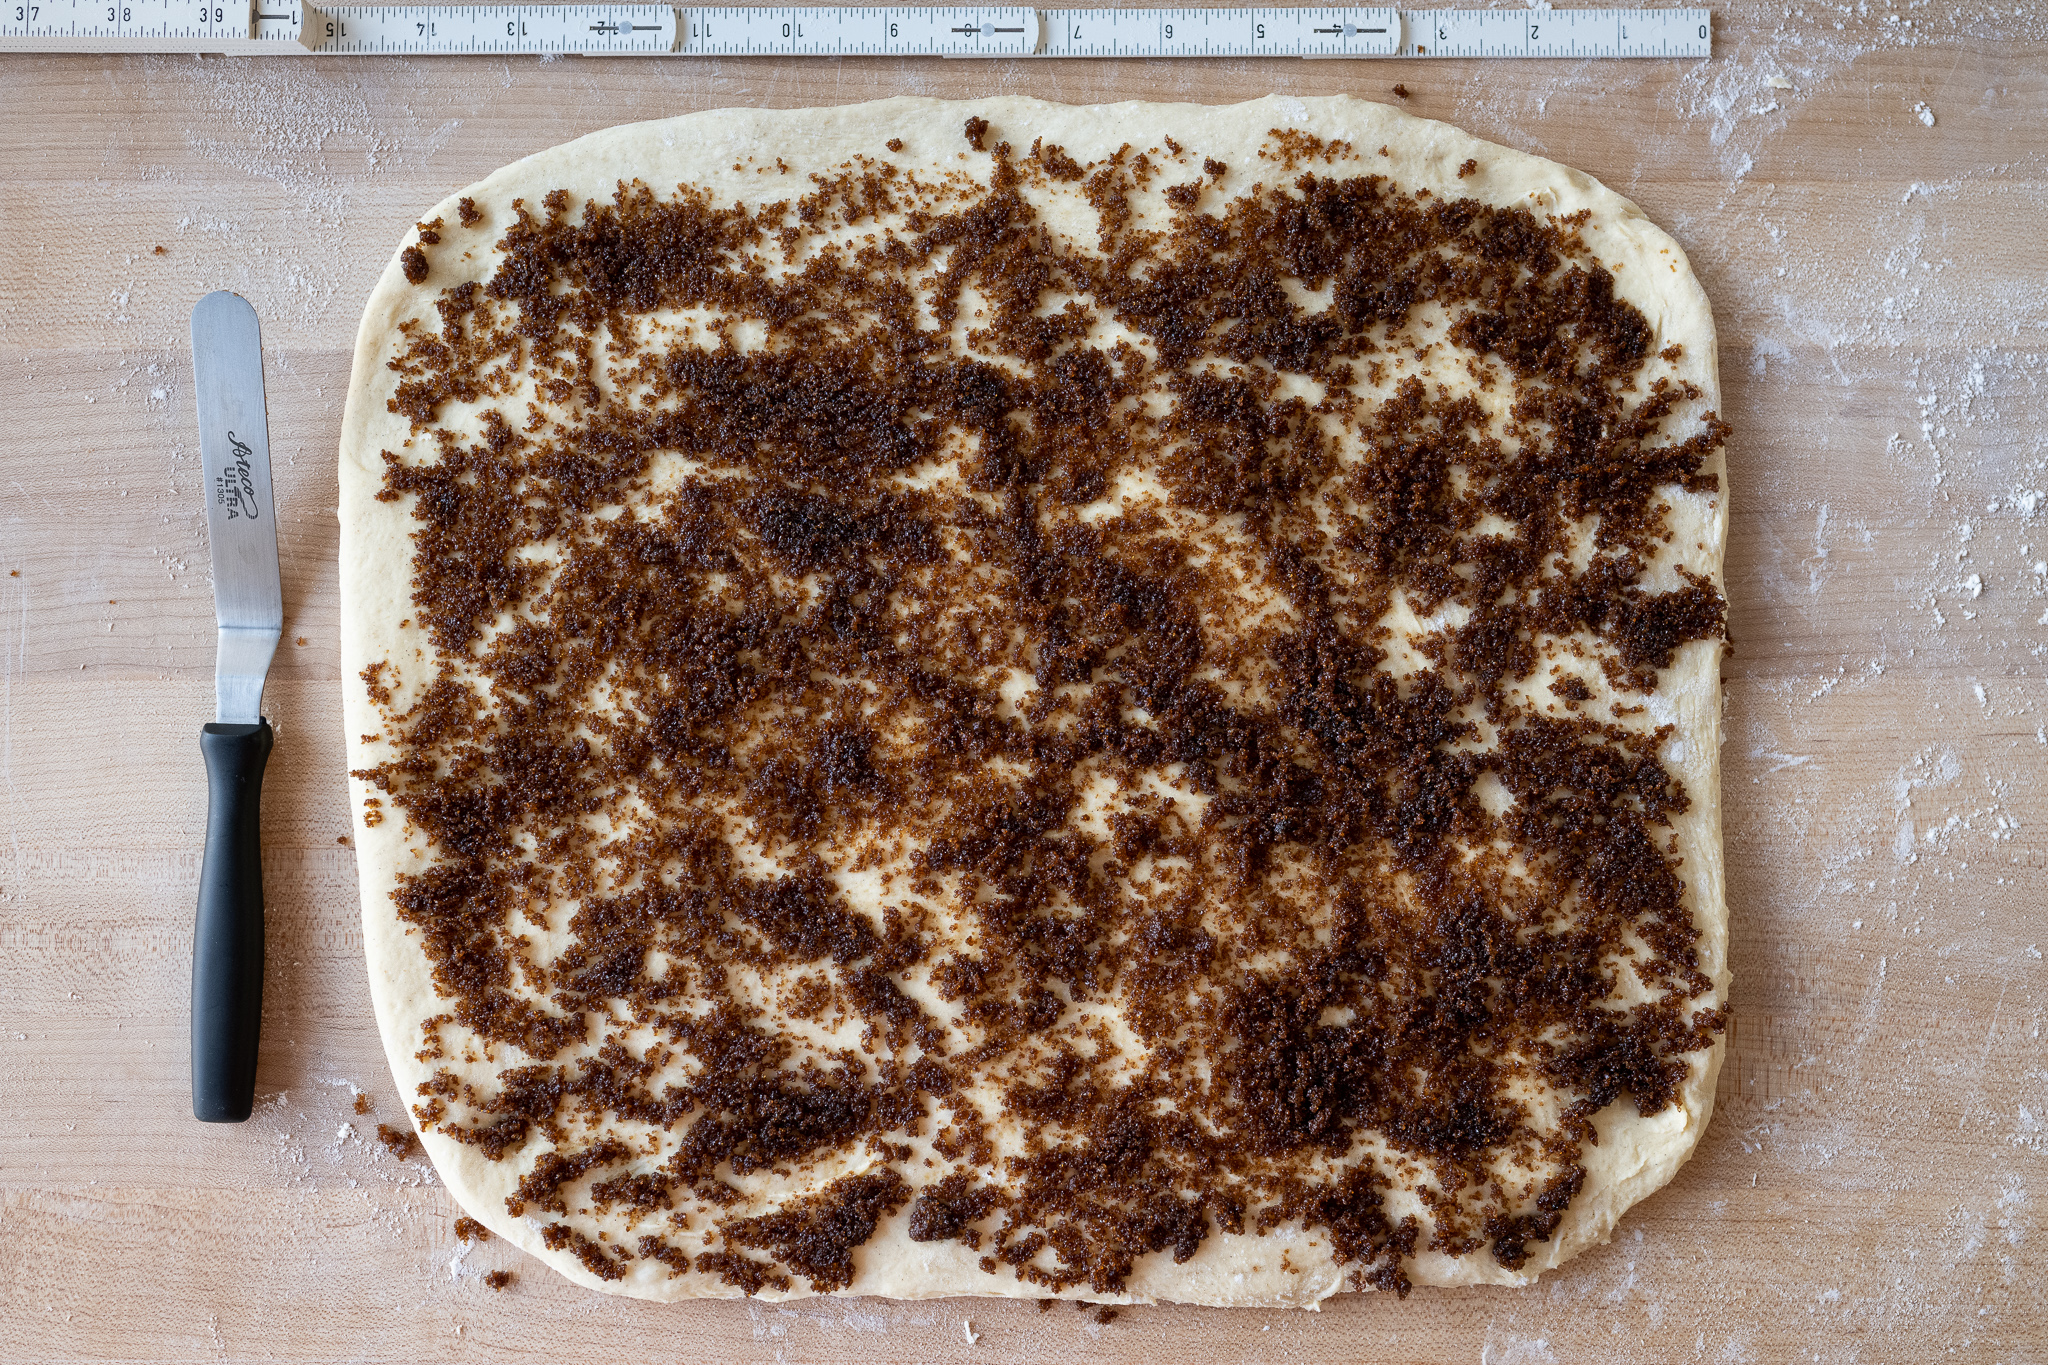
As shown above, use a small offset spatula or your hands to spread on the cardamom and cinnamon filling evenly. It may look and feel like not enough filling, but there’s plenty when the dough is rolled up.
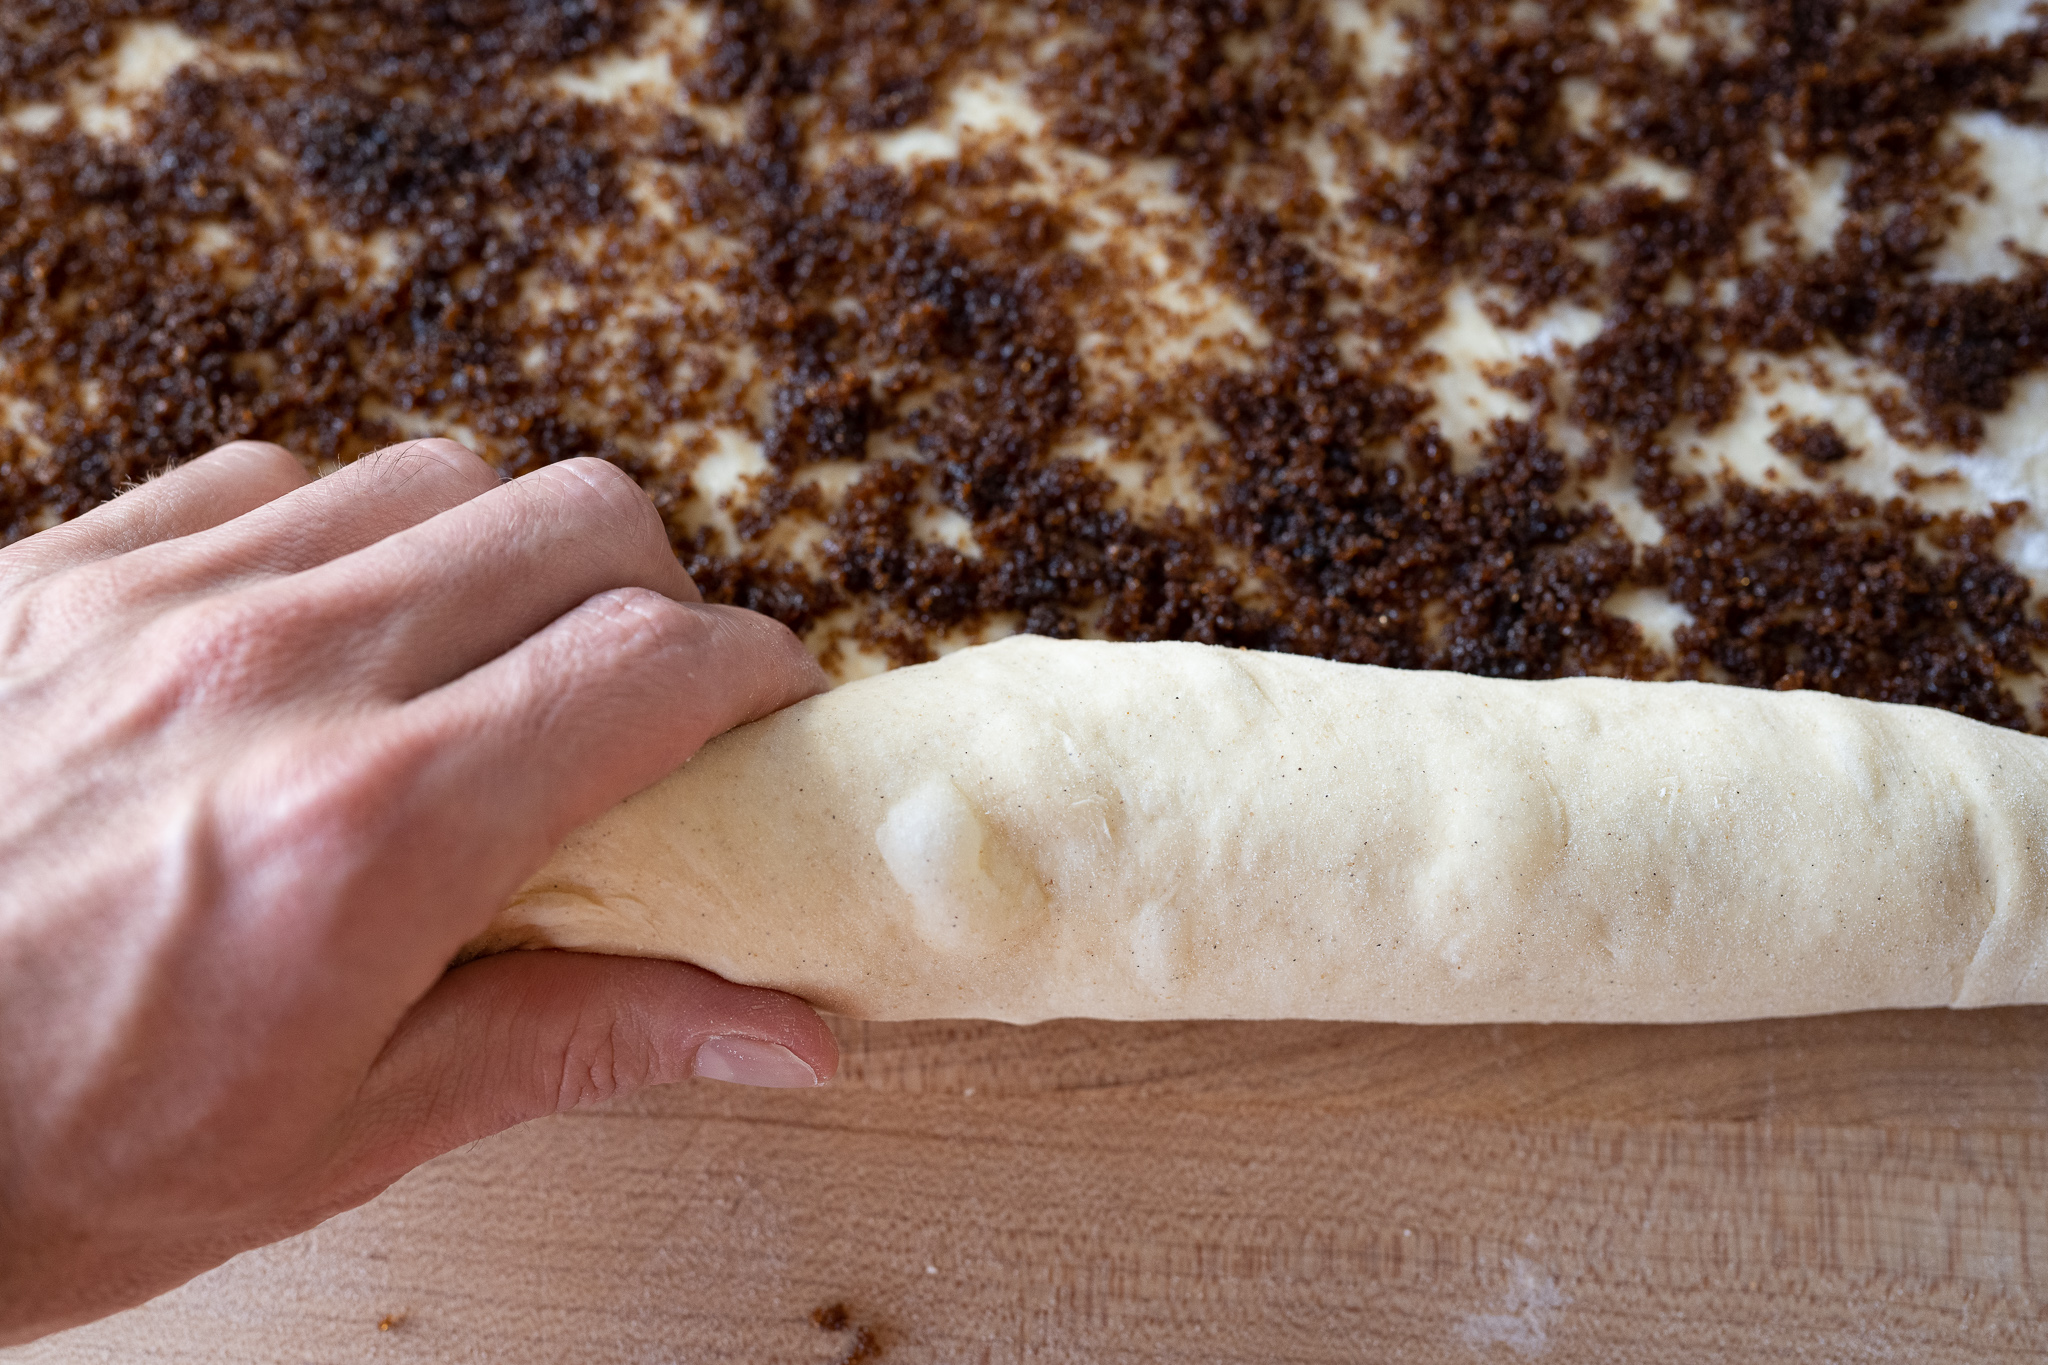
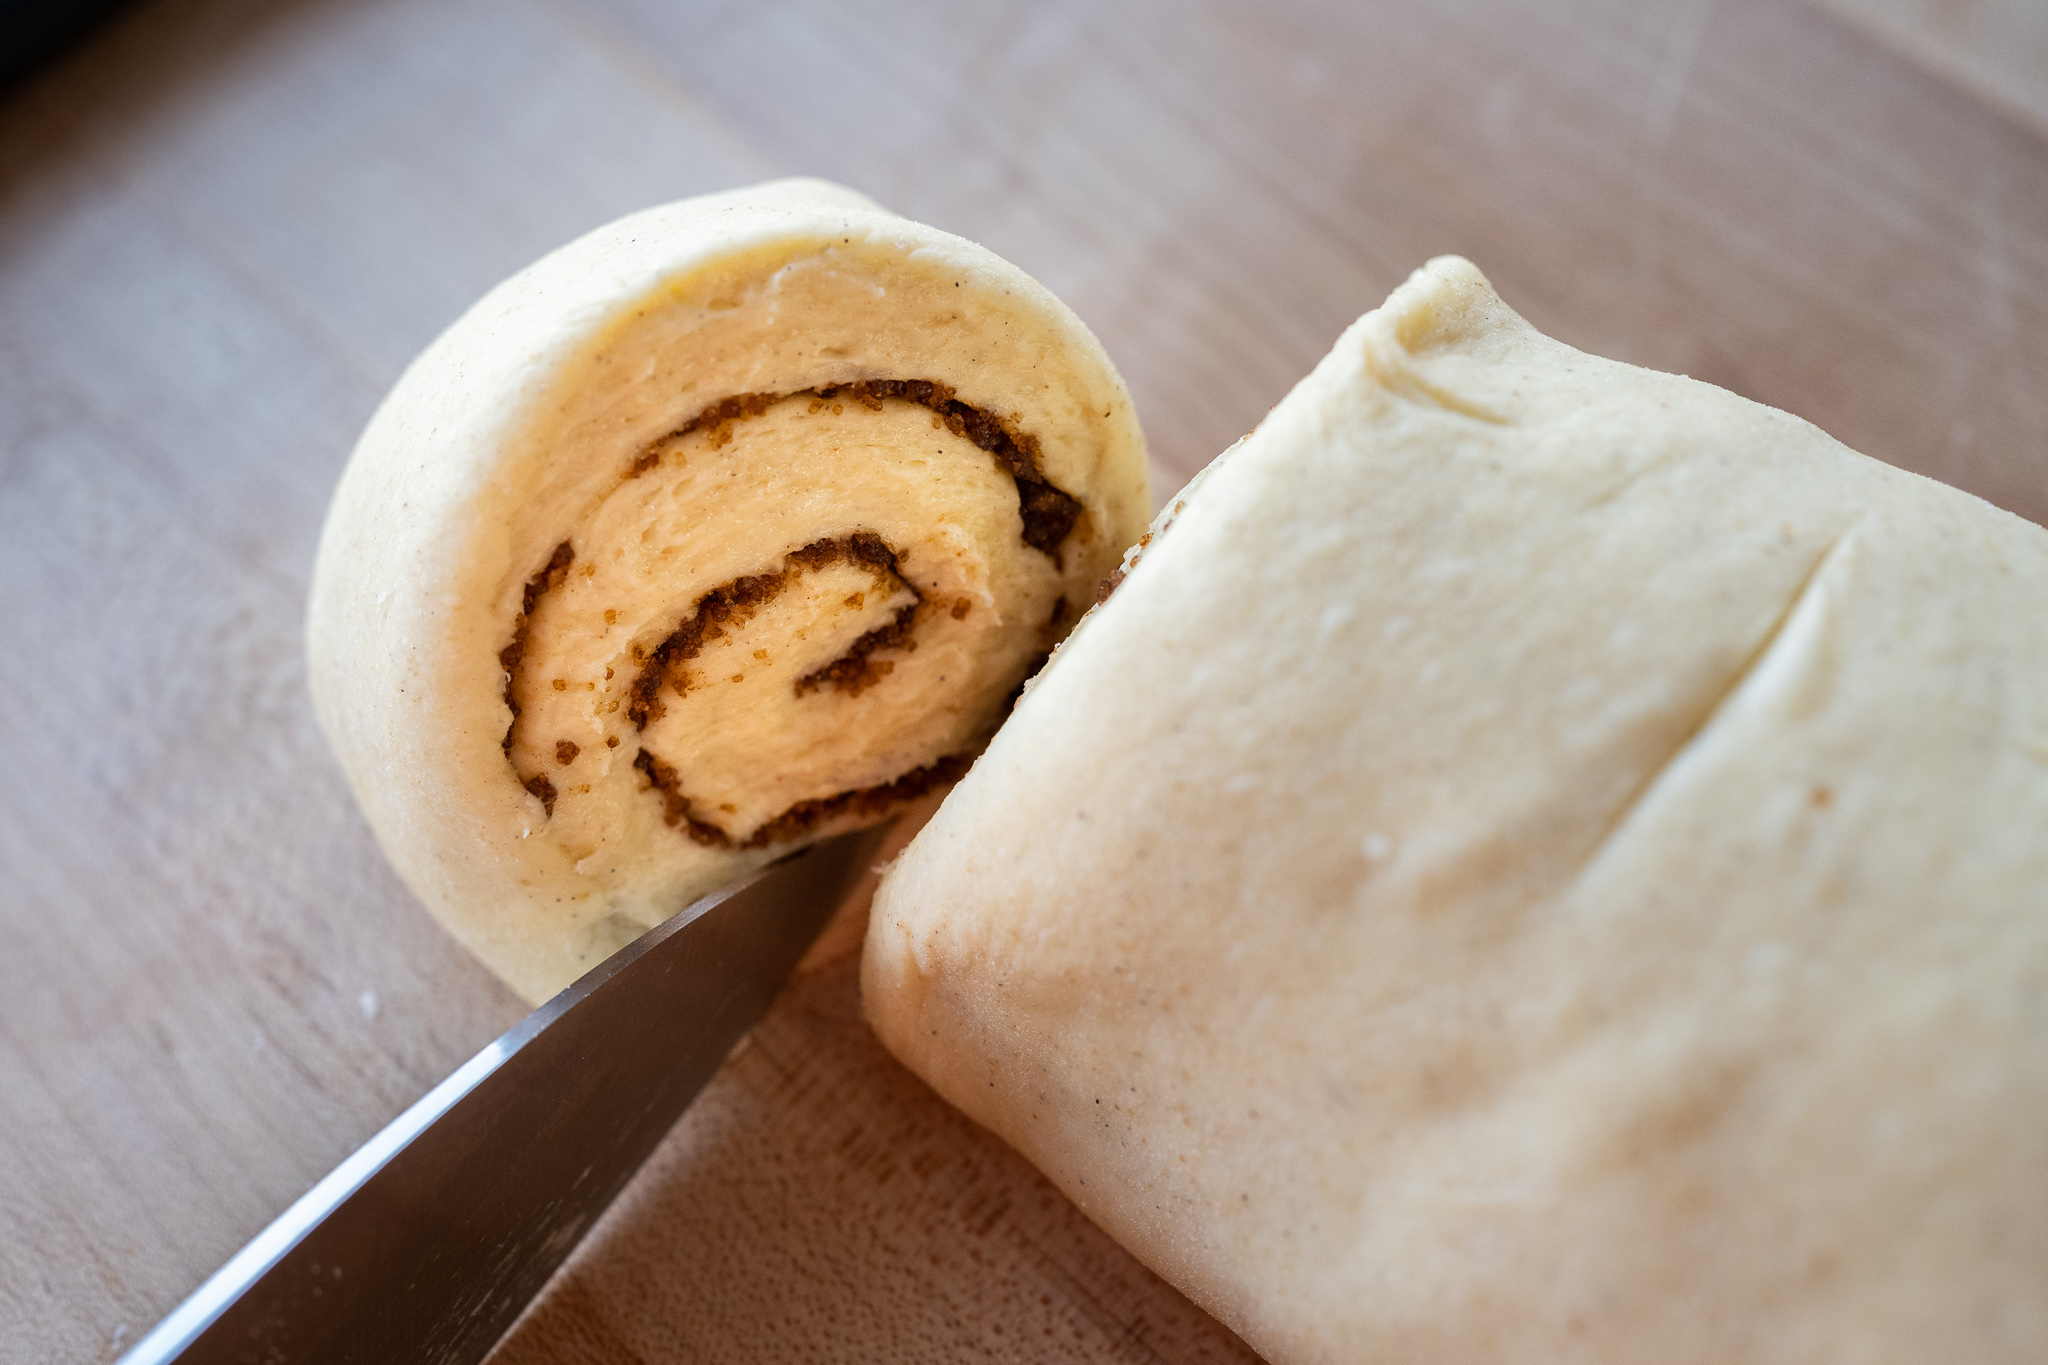
Starting at one of the long sides of the rectangle in front of you, begin rolling up the dough as you move across. Be sure to tightly roll the dough by gently tugging on the dough as you roll.
Once finished rolling up the dough, divide it into nine 1 1/2″ pieces using a sharp knife. Transfer the pieces to the prepared baking pan and cover with a large, reusable bag.
6. Cold Proof – 2:00 p.m. to 7:00 a.m. (Overnight)

As you can see above, the nine cut pieces are placed into the square pan, ready for their overnight proof in the refrigerator. Also noticeable is how soft the dough is—it’s ok if they’re not neatly placed into the pan. As they rise, they’ll fill the nooks and crannies.
Place the covered pan into the refrigerator and proof overnight.
7. Warm Proof – 7:00 a.m. to 10:00 a.m. (next morning)
In the morning, take the pan out of the refrigerator about three to four hours before you want to bake the rolls, depending on the temperature in your kitchen.
Be sure to start preheating your oven about 30 minutes before you feel the rolls will be fully proofed. For me, the final warm proof time was about 3 hours in my 77°F (25°C) proofer, so I started preheating around 9:30 a.m.
8. Bake – 10:00 a.m.
Preheat your oven, with a rack in the middle, to 400°F (200°C).
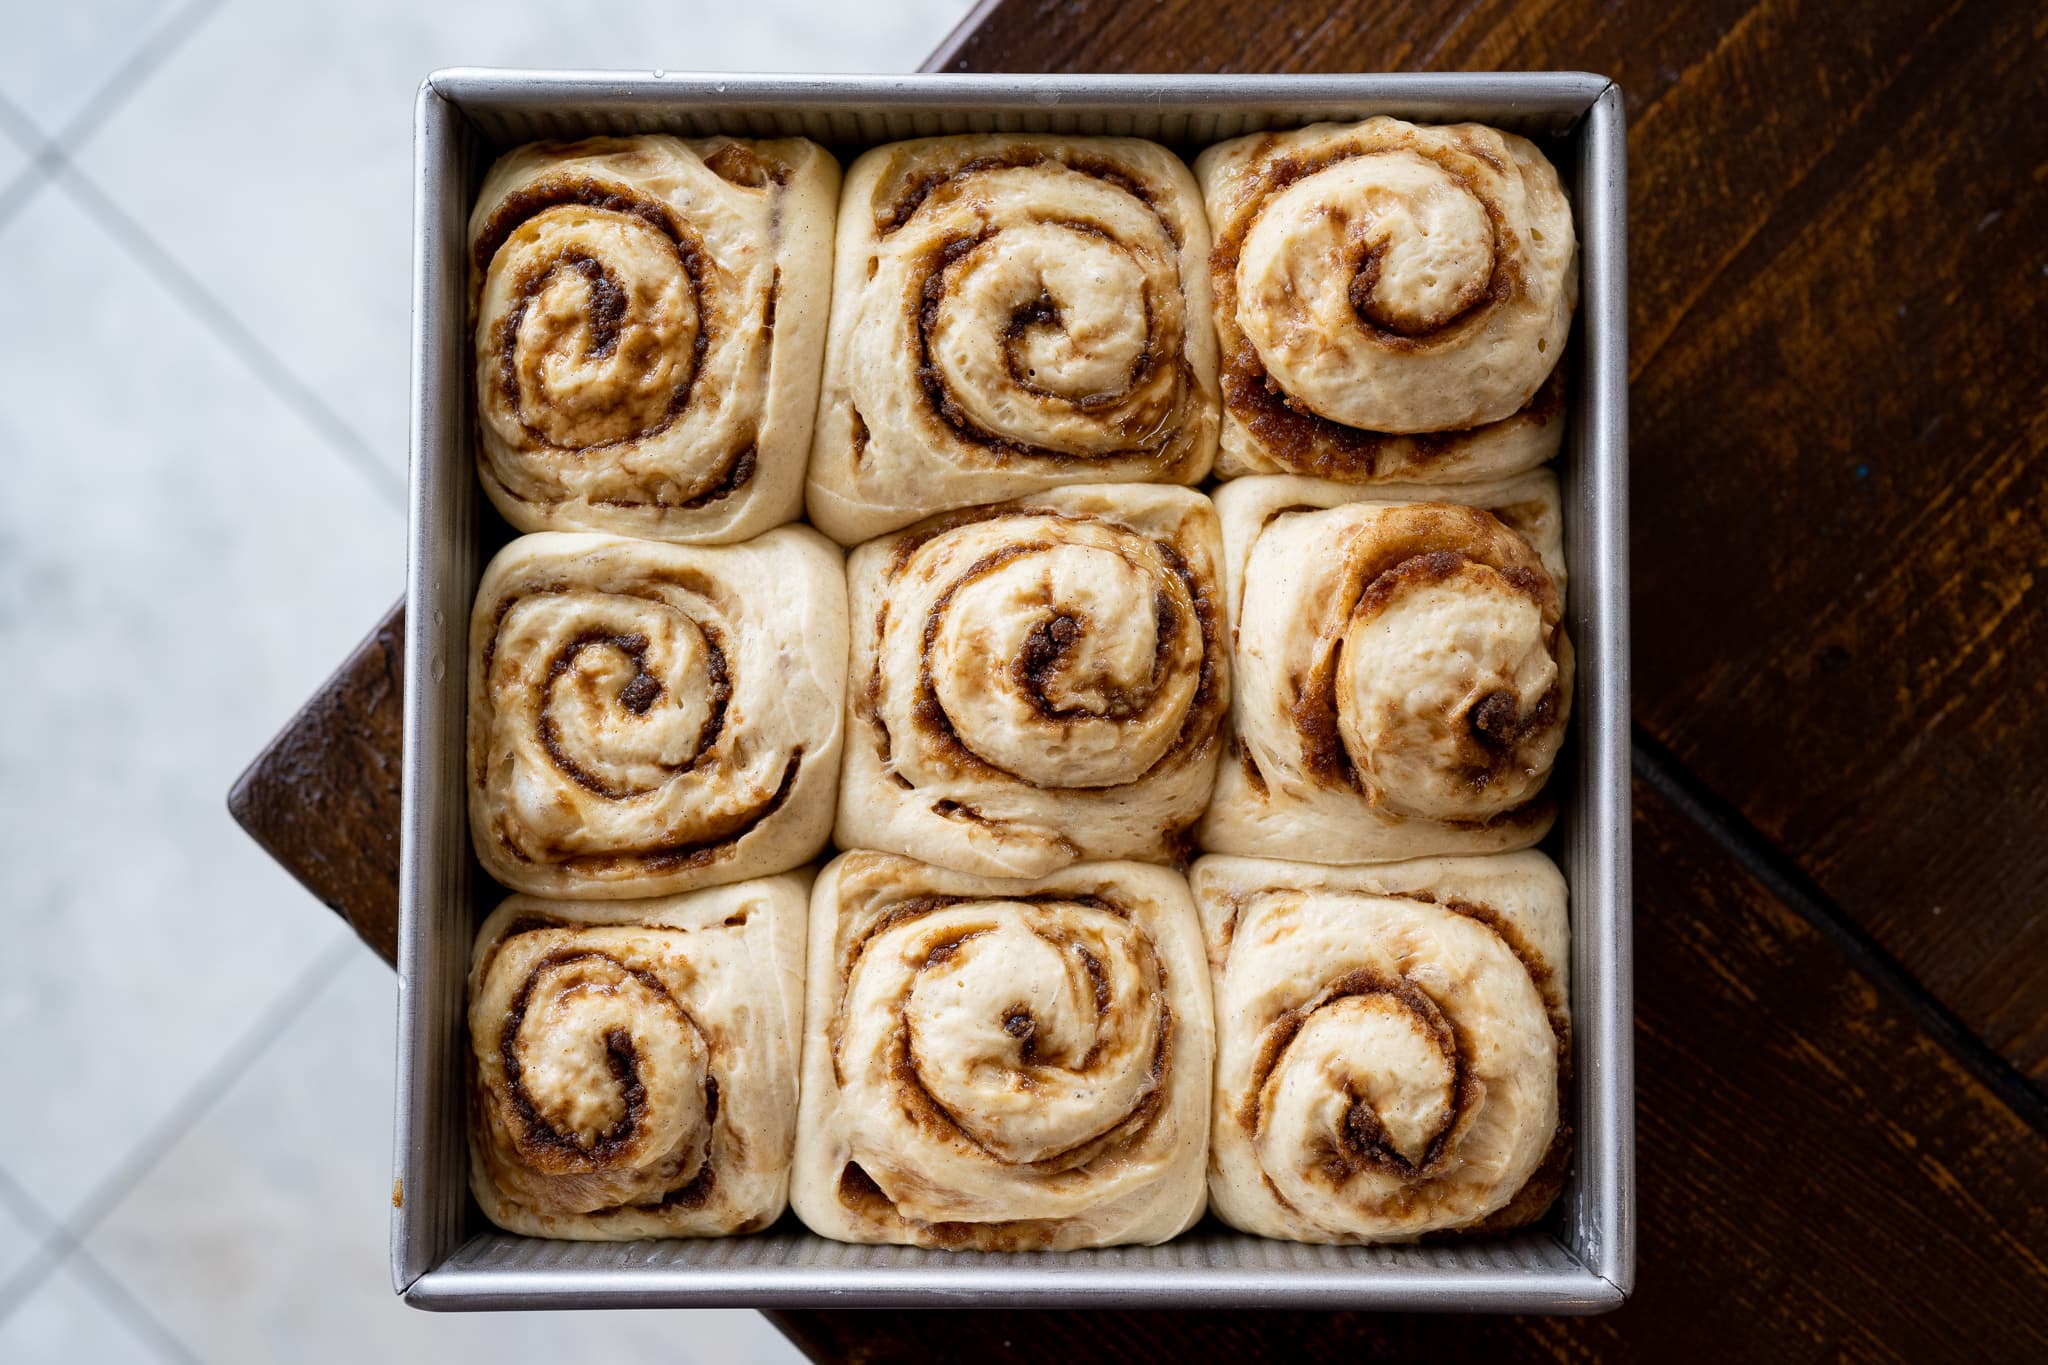
After the warm proof, uncover your dough and gently press the tops of a few rolls. As you can see above, the fully proofed cardamom rolls will look very soft. The texture of the dough will be almost like a whipped mousse. Be sure to give them extra time in warm proof if necessary. If the dough needs more time to proof, cover the pan and give the dough another 15 to 30 minutes at a warm temperature and check again.
Once your oven is preheated, remove your pan from its bag, slide it into the oven, and bake for 30 to 35 minutes.
While your rolls are baking, prepare the simple syrup. Combine the following in a saucepan and heat until boiling. Remove from the heat and let cool until ready to use. You will have some leftover syrup.
| Weight | Ingredient |
|---|---|
| 100g | Sugar, granulated |
| 45g | Water |
| 2g (1 teaspoon) | Cardamom, ground |
The rolls are finished baking when the tops are well-colored and the internal temperature is around 195°F (90°C). Remove the rolls from the oven and brush on the cardamom-infused simple syrup. Let the rolls cool for 5 to 10 minutes in the pan, then serve.
These are best the day they’re made, and certainly fresh from the oven, but can be reheated in a warm oven a day or two after.
Print
Sourdough Cardamom Rolls
- Prep Time: 24 hours
- Cook Time: 30 minutes
- Total Time: 24 hours 30 minutes
- Yield: 9 large rolls
- Cuisine: American
Description
Sticky, sweet (but not too sweet), and utterly delicious, these sourdough cardamom rolls use yudane—similar to tangzhong—to bring them extra tenderness. The cardamom-infused simple syrup is a different way to dress the typical roll and adds an added hint of sweetness with a captivating aroma.
Ingredients
Pre-cooked Flour (Yudane)
- 101g all-purpose flour
- 106 water
Dough
- 404g all-purpose flour
- 136g butter, unsalted and at room temperature
- 131g milk, whole
- 131g eggs
- 25g sugar, caster
- 3g cardamom, ground
- 10g salt
- 152g sourdough starter
Filling
- 30g butter, unsalted and melted
- 90g brown sugar
- 2g (1 tsp) cinnamon, ground
- 1g (1/2 tsp) cardamom, ground
Cardamom-infused Simple Syrup
- 100g sugar, granulated
- 45g water
- 2g (1 tsp) cardamom, ground
Instructions
- Pre-cook flour, yudane (8:00 a.m.)
Add the flour listed in the Pre-cooked Flour (Yudane) section to a small heat-proof mixing bowl. Boil the water and pour it over the flour in the bowl. Stir or whisk until the mixture tightens up and all dry bits are incorporated. Let the pre-gelatinized flour cool on the counter until mixing. - Mix (9:00 a.m.)
Cut the butter into 1/4″ pats and let warm to room temperature while mixing the ingredients. In the bowl of a stand mixer fitted with the dough hook attachment, add the milk, flour, sourdough starter, eggs, sugar, yudane, cardamom, and salt. Mix on speed 1 to 2 minutes until incorporated. Increase the speed to 2 and mix for 5 to 6 minutes until the dough begins to clump around the dough hook (but not completely). Let the dough rest for 10 minutes. Turn the mixer on to speed 1 and add the butter, one pat at a time, waiting to add each until the previous is absorbed. Continue until all the butter is added and the dough is shiny and smooth; this could take around 5 to 8 minutes. - Bulk fermentation (9:30 a.m. to 12:30 p.m.)
Transfer the mixed dough to a bulk container and let ferment for 3 hours at 75ºF (23°C). Perform 3 sets of stretch and folds at 30-minute intervals. - Chill dough (12:30 p.m. to 1:30 p.m.)
Place the covered bulk fermentation container into the fridge for at least 1 hour to thoroughly chill. - Shape rolls (1:30 p.m.)
First, make the filling. In a bowl, mix the filling ingredients and set aside. Next, take out your dough from the fridge, lightly flour your work surface and the dough, and roll out to a 15×15″ square with a long side closest to your body. Spread the filling evenly over the dough. roll the dough up away from you into a tight log. Cut the log into 9 pieces, about every 1 1/2″. Transfer the cut pieces to a baking pan with space around each one and cover. - Cold Proof (2:00 p.m. to 7:00 a.m.)
Place the covered pan into the refrigerator to proof overnight. - Warm Proof (7:00 a.m. to 10:00 a.m.)
The next morning, take the pan out of the refrigerator 3 hours before you want to bake the cardamom rolls and let the dough proof on the counter or in a warm proofer. - Bake (10:00 a.m.)
Preheat your oven to 400°F (200°C). Slide the rolls into the oven once preheated and bake for 30-35 minutes. While your rolls are baking, prepare the simple syrup. Combine the simple syrup ingredients in a saucepan and heat until boiling. Remove from the heat and let cool until ready to use. You will have some leftover syrup. When the rolls are finished baking, remove the oven, spread the glaze on the rolls’ tops, and let cool in the pan.
Notes
This recipe uses pre-ground cardamom. If you’re using freshly ground cardamom, you might need to reduce the amount in the dough, filling, and/or glaze.
What’s Next?
These sweet, sticky, and utterly delicious cardamom rolls are sure to make any breakfast one to remember. A distinct cardamom aroma wafts through the kitchen when these are in the oven, an aroma that screams comfort and with it an acknowledgment that when these are finished baking, time will be spent indulging regardless of what might be next on the day’s calendar. I think these sourdough cardamom rolls successfully take the traditional cinnamon roll to a new place, somewhere a little less sweet (if you can believe it) and a little more tender, thanks to a little upfront time making the yudane.
Happy holidays and buon appetito!
P.S. Oh, and if you’re still looking for that perfect gift for the baker in your life, check out my bread baker’s gift guide!
If you use this recipe, tag @maurizio on Instagram so I can take a look!


225 Comments
I just put mine in to cold proof! Do they really need to stay in for 17 hours?
Not necessarily! Just overnight, whatever is convenient, then be sure to give them ample time in the AM to finish proofing.
I’M BACK! Been on a very boring diet for four months due to health issues, but cracking at the seams to eat something naughty. This was it. I’m here to report you can substitute aquafaba 1:1 for eggs and the dough still behaves splendidly. Almost better, frankly. Great result. I was also able to substitute in 1/2 vegan butter and 1/5 oat milk. Other than an oven accident causing my glass baking dish to explode in a million pieces, they’re nearly indistinguishable from the non-vegan-ish version. The crunchy little glass pieces sorta suck. Better get back to my strict diet I guess. FYI for the vegan folks, this can probably be done 100% vegan! (Fellow baker Carolyn confirms it works well 100% vegan in comments below.)
Amazing, Caroline! Glad to hear your swaps turned out great. I’ll have to remember this when other bakers ask! Thanks for reporting back (and sorry for my late reply 🙂).
Have these proofing now …..just wondering if they can be twisted the traditional way.
You can do just about anything you’d like!
Maurizio, I used this recipe to make a Norwegian julekake, an enriched cardamom bread with glacé fruit. I doubled the sugar, deleted the filling, and added 250g of candied fruit and currants, topped with the cardamom syrup and toasted slivered almonds. It was incredible!
I’m going to try to scale up the recipe to make a few more later this week as gifts. I baked at 375 degrees F because of the sugar, but I think I’ll stick with 400 as you recommend to get a nice golden brown on the outside. Any other suggestions to accommodate for the added sweetness? Thanks so much for your incredible recipes!
Wow, that sounds amazing, Curtis! I hope they came out great, sorry for the late reply. I recently worked on a “kanelstang” recipe using an enriched dough base with sliced almonds and a white sugar icing on top, it reminds me of what you made, perhaps!
Hi! I’m planning on making this recipe, but I was wondering, when you add your starter, is it at room temperature? Since I don’t bake very often, I keep my starter in the fridge and feed it weekly. Will I be able to add the starter straight from the fridge? Or do I need to activate it at room temperature beforehand?
Yes, levain/starter is used at room temp! I would recommend giving it one or two refreshments, spaced by 12 hours, before using it in this recipe.
10 am is a bit late but I don’t want to get up at 4! So I am going to try to leave this out in the colder part of my house (60 degrees F) overnight after spending a few hours in the fridge. Will let you know how it goes!
I hope it turned out great, KWF!
Hi there! First of all, thank you so much for all of the work you put into this site, it’s been such a wonderful resource over the past couple of years!
I made these for Christmas morning last year and LOVED them! Such a wonderful celebratory recipe!
I’m coming up on my due date and wanted to make some of these ahead of time to freeze for after baby arrives – any advice on at what point you’d attempt to freeze these with the most success? Pre, or post bake? Or do you think I’m asking for trouble with this idea? Ha!
Thanks again!
You’re very welcome, Kellen! So glad you liked these rolls (I’m making them for Christmas this again as well, without a doubt). I would probably bake them just a bit short of finished, then freeze once completely cool. When you want to finish them, let them thaw overnight in the fridge, then finish baking (probably just a few minutes) once completely thawed. At that point you can top with simple syrup or icing, whatever works for you! And congrats on the due date! Enjoy, Kellen 🙂
Just wanted to report back that your freezing and reheating instructions worked beautifully- thank you!
Also, I made a riff of these this Christmas using a frangipan/ & orange zest filling and topping with sliced almonds (think almond croissant) it was great! Such a delicious base recipe to get creative with. Thanks again for sharing it!
Looking forward to more baking in 2022 : )
Hi Maurizio! Big fan of your work here. These are warm proofing now. But when I took them out of the fridge (36-37F) this morning , I noticed some syrup-like fluid at the bottom of the pan!. I am not sure what it is. But it tasted sweet so I am wondering if the dough release some moisture during proofing and got mixed with the filling which is odd. They are kind of firm to the touch now and I am worried that I might have ruined it somehow. Do you have an idea what might have happened? Thanks!
Update: They turned out FABULOUS!!! Thanks again for this great recipe. next time I might garnish it with some ground pistachios on top just to add more middle-eastern feel to it!
Ah so glad to hear they turned out great! I love the idea of ground pistachios. I’ve used pecan meal (a local grown out here) and it was awesome! Enjoy 🙂
I want to give this recipe a try and was thinking of adding some kind of nut. Pistachios are a great idea. Maurizio what are your thoughts …treat the pistachios as a garnish or add them to the filling?
Either way would work really well! The idea of crushed pistachios on top sounds amazing to me, though they would work in the filling as well. Let me know how it goes!
Hi Maurizio! I currently have these proofing
in the fridge but was wondering what your thoughts are on leaving them in longer? My brain was not with me yesterday when I started making them, and I was hoping to bake them tomorrow, not today. Do you think they’d be horribly overproofed if I left them in for another 24 hours but skipped the warm proof prior to baking?
It’ll likely still be just fine! They might be a little more sour, but I think in the end they’d probably be ok. How did they turn out?
I don’t think it will matter all that much in the end, but the amount of brown sugar for the filling is listed as 100g in the roll and shape section (step 5), but 90g in other spots.
All your recipes I’ve made have turned out great!
Ah sorry about that Calin! Will go back and fix 🙂 Thank you!
Thank you so much for your site. I have been following you for years and attribute much of my intuitive sourdough baking to your guidance. I was following this recipe very carefully but then realised I put the butter in with all other ingredients rather than after mixing for 6-7 minutes. My take away is that the texture of the dough at full proof was not quite ‘mousse like’, however, still had a somewhat stringy texture post bake. The flavour was divine and all consumers very happy! I will try again and add the butter after mixing all the other ingredients as per recipe and compare results. Thanks again!
Hey, Michelle! So glad to hear I’ve helped for so long 🙂 I’ve done that many times, for various reasons, and it usually turns out just fine in the end, but I do notice a better structure when I wait to add the butter—you just give the gluten more of a chance to develop before fat inhibits its development. No worries, though, glad the flavor was on point. Thanks for the comments and happy baking!
I made these for Easter (the dough from this recipe but the filling from your cinnamon roll recipe) and they were a hit. I somehow got about 14 rolls that we all quite a good size and used a circular pan instead. Thanks for all that you do on this blog. Every recipe I have made is excellent and I am sure you dedicate lots of time to each one. Much appreciated!
Super happy to hear that, Vicky! And you’re very welcome, I’m happy to help 🙂 Have a great rest of the week!
Hi Maurizio
I’ve recently discovered your site, managed to master the creation of a starter (called Geoff) and am now a firm follower of yours. My sourdough improves each bake and so I thought I’d try your cardamom rolls …
All was going well up to the point of bulk fermentation. I had mixed by hand and was just clearing up the kitchen when I saw a bowl in the corner of the worktop. Horror of horrors, I’d forgotten to mix in the yudane!!
I quickly added it (well I mixed it in for a good 6-7 minutes) but I honestly thought I was going to end up having to throw the buns out, but guess what, they turned out just perfectly- proving that the mixture is very forgiving indeed! I have just tasted the first one and it is so light and the dough comes apart in strands just as it should.
Just thought it might be worth sharing with others in case they initially ‘forget’ to add an ingredient! It’s worth persevering 😀
Hey, Clare! Ahhh—well, I’d be lying if I didn’t say things like that happened here as well (including forgetting salt!). Glad it worked out for you, and I’m sure others will definitely find your comments helpful, you can’t be the only one 🙂
Here’s to many more awesome bakes!
Hi Maurizio,
I just tried them yesterday and cold proofed them overnight as in your schedule.
This morning I woke up and they are all sitting in like a brown liquid – almost as if all the filling oozed out. It’s quite a bit of liquid as well.
Where did I go wrong? Is that supposed to happen?
I’ll still bake them off and see what happens, hopefully they’ll rise during the warm proofing?
They’ll still bake up great! I have not had that happen, maybe your filling mixture slightly melted somehow (if it was really warm when proofing, that might happen). I see this sometimes with cinnamon rolls and it’s usually just fine, that liquid bakes into the rolls on the bottom which get a little sticky—delicious in my opinion! I hope they turn out great!
Thank you for the sweet words! You are absolutely right, they baked up to perfection and are probably the best cardamom / cinnamon buns I’ve ever had the pleasure of eating.
They are just the right amount of sweetness to know that you are eating a cardamom bun without feeling like instant diabetes. The dough is soooooo soft due to the yudane, but so full of flavor due to the cold proof. I also did cardamom icing instead of the sugar glaze, as I love the look, and it just works so perfectly.
I also used fresh cardamom, but kept the amount the same (maybe even added a tad bit more), as I can die for cardamom flavor, and it’s just perfect.
Thank you for this recipe and for turning my sourdough experimentation into a full blown addiction. 🙂
Huge praise and so happy to hear that! I love the idea of a cardamom icing on these as well, sounds fantastic. You’re very welcome and happy baking!
The same thing happened to me! I’m afraid I cut proofing a bit short though since I was afraid even more of the liquid would come out. It was definitely not hot in my kitchen – 23 degrees celcius. So I’m thinking maybe it’s the type of sugar reacting with the butter?
Possibly… It must be just enough to liquify one or both.
I made these exactly as instructed and they came out really delicious! The texture from adding the yudane gives them the perfect bite. I will make these again and again. I used coconut sugar instead of brown sugar and the sweetness is a little more mellow. I also doubled the amount of cardamom in the dough, as we love the stuff. Perfect!
Happy to they they came out great, Karyn!
Could you add a bit more instruction than “make the cardamom glaze”? I gather I’m supposed to boil those three ingredients together but the cardamom is not really dissolving and I’m a bit worried about making the rolls soggy if i dump this on top.
Ariela, hey there! I’ll add some words to that portion of the post, yes (will be updated soon). Further up in my post where I have more details, I explained it a bit better:
Thanks – I wasn’t sure if I should let it boil awhile. It wasn’t really thickening. But update: It worked out, everyone loved it, and everyone agreed that these spicy cardamom rolls are much better than the usual gloppy cinnamon buns. Thanks for another winner!
Right on, so glad to hear that, Ariela! Enjoy 🙂
I just veganized these and they worked fantastically. I subbed equal weights of aquafaba for the eggs, soy milk for the milk, and plant based unsalted butter. The aroma and texture are incredible.
I’ve not tried baking with aquafaba, I have it on my list! Glad to know my recipe still holds up, I’d imagine it would just fine. Thanks for reporting back, Carolyn, and enjoy!
Hi Carolyn, I’m Caroline. Unfortunately I didn’t see your comment before making my stupid comment a year later. Now I want to go all-in vegan on these!
Good to know, Mike. I gave away my stand mixer after 20 years of being annoyed at how much counter space it took up. I will try this.
Hi Maurizio, Rica here, from @somuchtodough, been following you in IG and this site is my go to for sourdough recipes, most especially when I got more confident in exploring sweet sourdough recipes . This is an amazing recipe- thanks for sharing and for going through the painstaking process to perfect this and finally share with your followers- you saved us the time, pain and suffering 🙂 I find it a challenge to stay a purist since I started selling in my neighborhood.. there are just so many good stuff to bake that are yeasted, like croissants.. I’ve checked some sourdough croissants recipes but when I see that they use poolish, I get discouraged..I’ve also tried some with just wild yeast but haven’t been successful, too chewy.. do you think this recipe can be used for croissants? have you tried it? Anyway I just wanted to let you know that this recipe is fantastic and will be a hit in my neighborhood- a wonderful indulgence thats healthier for the gut 🙂 God bless you!
Hey, Rica! You’re very welcome, glad you like the recipe. I do not think this recipe would be suitable for croissants. I haven’t dug into those deeply just yet, but it’s something I plan to do in the future. They will absolutely take quite a bit of work, especially if 100% sourdough.
Thank you and happy baking!
Hi Maurizio, is it okay to cold proof the rolls for only 15 hours instead of 17?
Thank you
Yup, will be fine!
Hi Maurizio, if I wanted to have this for a late night dessert instead of AM breakfast, could I just let it warm rise for the evening and skip the overnight cold rise? Thanks!
Yes, exactly, Tara!
Thanks!
I made this last weekend by hand (no mixer, just a lot of extra slap and fold) and split them up into 12 rolls in a 9×13 pan and they came out excellent. Also, I made a glaze from confectioner’s sugar, milk, butter, vanilla, and cardamom. It really added a great element.
I almost went with that style of glaze with these… Next time I make them I’ll follow your lead! Thanks for the feedback, Mike—happy baking!
The aroma of this bread is very nice. The texture and softness of the dough is amazing. It has the perfect sweetness to it. Simply superb, Maurizio!
So happy to hear you liked it, Guia!
Am this is another beautiful recipe, thanks a lot Maurizio! I would like to ask if it is ok to leave the dough in the fridge overnight and then roll it and fill it the next day? Then leave it at room temperature for the final rise until baking time.
Thank you! Yes, that works just fine. Happy baking 🙂
I have a question about milk in recipes. I had read in Rose Levy Beranbaum’s Bread Bible that milk contains glutathione which slows down yeast production and can cause breakdown of the protein in the flour, resulting in a sticky and weakened dough. She says that you can inactivate glutathione by scalding the milk or use King Arthur Baker’s Special Dry Milk and water to replace the milk. Any thoughts? I often see bread recipes with milk in them and it is not scalded. It’s certainly easier not to scald and cool.
I was just speaking to another baker about this! You’re absolutely right, milk interferes with the gluten in a dough and can cause it to weaken. Scalding will alleviate the issue to a degree, and using dry milk is a common way to go in a bakery setting, but I usually don’t do either. I’ve been meaning to experiment more with scalding to see how that helps prevent breakdown to achieve a taller loaf. However, in this recipe, while there’s a significant amount of milk, I think it’s actually a good thing it’s not scalded. The milk really brings a tenderness to this dough that’s quite wonderful. In combination with the yudane, which seems to bring strength to the dough, it seems to even out in the end. It yields a soft roll that still has plenty of rise—kind of the best of both worlds.
This past week i looked to see if I could find dry baker’s milk at the market (Bob’s sells some), but I couldn’t find any. My next step will be ordering some from King Arthur and I’ll be giving that a try in this recipe or another and comparing it with my usual process. I am sure dry milk will yield great results! It’s just not something I always have on hand…
Great question, Elizabeth, I hope that answers it!
I’ve used the King Arthur Baker’s Special Dry Milk in a sourdough Anadama and it worked great and does make a very tender loaf, but I never made the recipe with regular, unscalded milk. I still don’t know whether it’s necessary to scald or not. I don’t often have whole milk in the fridge, so having the King Arthur stuff is nice and shelf stable.
In case you are interested, there’s quite an extensive and nerdy discussion on the topic at the Fresh Loaf: https://www.thefreshloaf.com/node/44783/milk-heat-or-not-heat
Thanks for the link! Will give that a read. Yes, that’s exactly where I was going to buy it from—will pick some up and do more testing!
What a great discussion! I loved this back and forth posting! And thank you for sharing the link.
Hello Maurizio!!
I was wondering if i could make the babka with this dough recipe or if i Can make the cinammon roll with the babka recipe?
Thank you !
Sure, you could swap them around, should work well. Be sure to thoroughly chill this dough, though, because it’s more soft than the babka dough, which means if it’s warm at all it might be difficult to roll, fill, cut, braid. Have fun!
Love the flavor or cardamom and am looking forward to making these. Can I use starter ‘discard’ or should it be an active starter? Many thanks for your wonderful website and willingness to pass along the great tips and tricks to all of us!
Hey, Lori! Definitely should be an active starter. I wouldn’t recommend using starter discard that’s been sitting too long or has been in the fridge. Happy baking and I’m happy to help!
I make this with discard straight from the fridge all the time and it’s fine. Just sayin’!
Definitely good to know, Caroline! I should try that, too 🙂
I have to admit I’m the worst sourdough parent EVER. I feed it like I water my cacti, which cling to life… barely. Starter stays in the fridge 24/7 except when I’m pulling it out to bake with or feed. BUT it is generous with me and gives me huge savory loaves and fluffy rolls! The goods get eaten way too fast to determine the subtle difference in nose or flavor or whatnot. Just not picky here — and it works fine 🙂
And that goes to show just how resilient our cultures are! No worries at all, I think what you’re doing is absolutely fine—if it’s delicious, how can we complain?? Happy baking 🙂
These are AMAZING. It’s cold (~65F) in our house and I was worried the dough didn’t rise enough during the bulk ferment (it was not exactly “puffy to the touch” when I put it in the fridge). Alas, I used a heating pad and space heater for the warm proof this am, and the rolls puffed right up and ultimately turned out great! We were so excited that we ran around and delivered warm rolls to all the neighbors. Thanks for the great recipe, Maurizio!
Nice adjustments, Carson! Happy to hear these turned out so well for you—and sharing with neighbors, is there anything better? Thanks for the feedback and have a great New Year!
Hi! I have a question, when I did stretch and fold the dough tore. Did I over knead or under knead it. I noticed dough was more elastic before i add butter. also during warm proof, i notice sugar water around the dough. Yours look pretty dry still. What did I do wrong. taste is good though.
If it was a strong dough and started to tear excessively (it was hard to stretch out), it might have been strong enough. I’d say it would be hard to do this, though, unless you left it in the mixer for a much longer time than I indicate in the recipe. This is a soft dough, so depending on how much it was actually tearing, it might have been ok.
Hi! I have a question, tho it isn’t on the actual recipe per se. Under the “Mix” portion of your method in the write up, you said you decided against using an autolyse because you weren’t looking for added extensibility. And it caught my attention because I then wondered how one would go about autolysing enriched dough. I have yet to see a recipe where an enriched dough is autolysed in the purist sense (that only water and flour is allowed to sit for some time before adding yeast and salt). I have searched online and the closest I could find was mixing together all the ingredients and letting the enriched dough sit for about 15-30 minutes before kneading. I have also personally tried autolysing flour and water before adding the rest of the enrichments and the caveat I have found was that it was extremely difficult to incorporate the sugar, salt, and butter after the autolyse (if eggs were part of the recipe, I included it in the autolyse). There is a video on youtube (link: https://youtu.be/796ZupzMvoI) where Jacob Burton makes a brioche by hand and lets flour, eggs, milk, and yeast sit for 30 minutes before incorporating sugar, salt, and butter. I realize that what he did was effectively an autolyse equivalent (albeit yeast was added too) for enriched doughs. But then after the autolyse he goes and employs the fraisage, a technique more commonly used in pastry making, to incorporate the sugar, salt, and butter, and I worry that perhaps it damages the gluten strands so as to undermine any extensibility afforded by the autolyse. So I guess my question is, suppose you did desire added extensibility and decided on an autolyse for this recipe how would you have done it? Are my fears of losing any autolyse benefits in Jacob Burton’s incorporation of sugar, salt, and butter after “autolysing” unfounded, and it’s completely fine to do it that way? Or would it perhaps be more prudent to just skip the autolyse altogether for enriched doughs? Thank you so much!
Great question, Avery! You’re right, I rarely do a full and proper autolyse with enriched dough. Since I’m usually mixing those doughs in a mixer and the goal is to get it as strong as possible as quickly as possible, I don’t perform an autolyse (I don’t want any added extensibility in the dough, even if an autolyse can help reduce mix time). I’m not saying it’s wrong to do an auto with enriched dough, some bakers might do this often, I just don’t usually.
If I were to do an autolyse, I’d add most of the liquid with the flour (depending on the recipe, this might include the eggs if they are a high percentage, otherwise it might not be possible to mix the dough). After the rest, I’d then proceed with adding the salt and sugar, mixing for a while until sufficiently strengthening, then proceed to add the butter at the end.
But I guess what I’d have to ask is why are you looking to autolyse with enriched dough? Is it to gain extensibility? Strength? Reduce mixing time? I rarely see an autolyse as a mandatory step, more of a convenience thing in most cases.
Interesting discussion!
I used this dough recipe to make an orange and canela wreath for Christmas Eve, so only difference was flavoring and shaping. The texture is SO DREAMY, I was beyond excited with the result. I’m probably going to continue to use this for all sorts of fun, enriched breads 😋 And I’m hoping to have time in the near future to use it as written, too, for cardamom rolls!
Oh that sounds wonderful, Kelly! I have been toying with the idea of an orange version of this as well, now I know it’s a winner 🙂 Definitely a versatile dough that can be used for all sorts of baked goods. Thanks for the comments and Happy New Year!
+1 to the orange version!
🙂
I’ve just used this dough to make orange cranberry cinnamon rolls, and they were excellent!
That sounds awesome! Did you use dried cranberries?
Awesome, Jen! I’ve recently thought about warming/scalding the milk in this recipe, but I think with the yudane and how wonderfully these spring up, they’re great as-is. Would love to hear how you like them when you make the recipe. Happy baking!
Thank you for the recipe, I am hooked, over the break I have made the walnut cranberry sourdough, potato sourdough and bagels! I am looking to make these free form (not in a pan) and shape them into King’s Cake for Three Kings Day on January 6th. Two questions, do you think that the dough is sturdy enough to handle this? Or should I try the babka or brioche cinnamon roll recipes instead? Can I cold proof longer than the recipe indicates? I work during the week and would like to do the first day on Sunday and bake on Wednesday afternoon around 4. Should I just look for a different recipe or do you think I should give it a try? That would be cold proofing for 72+ hours. Thanks for your input and all the effort you put into this site!
You’re welcome, Meredith! Good question. I think these could be done free form, but it is indeed a rather soft dough. However, the yudane and longer mix does yield a dough that’s surprisingly elastic and strong. I think it’s possible, just be cautious about over filling them, which could cause the layers to separate (this would happen for sure with my cinnamon rolls, I wouldn’t use that dough free form, especially if they have a lot of filling). That’s a long time to cold proof, it’s hard to say as I’ve not tested it that long (usually just overnight, 24 hrs max). I’d say it’s worth a try, my feeling is since it’s so cold in the home fridge they’d probably be just fine. That’s my take!
Thank you so much for your prompt reply! I will give it a try!
I accidentally added the butter with everything else. Added a bit more flour so it’s not so sticky but is it salvageable or should I give up now?
Go with it! Give it a few more sets of stretch and folds during bulk and be sure to chill the dough in the fridge before rolling out.
Hello Maurizio.
Thanks for this recipe. I am making them now and am starting the bulk fermentation. My question is how do you know when this phase is complete. My kitchen is not as warm as yours so I have it in my oven with a light on. I want to be sure it’s not underdone or overdone.
I’m really new at sourdough-just about a month and a half trying out breads.
Thank you in advance!
Carla
Hey, Carla! The dough should be well-risen and soft to the touch. It should feel a little gassy even (meaning, there’s signs of aeration inside the dough due to the rise). It should be smoother and even feel more elastic (stronger, resist stretching outward). It should show signs of defined edges, if there are any, a signal the dough has strengthened. If your kitchen is around 70F (21C), the dough might need around an hour more in bulk than what I call for, but it all depends on what temperature your dough was at after you finished mixing.
I hope that helps!
Thank you so much! I can only say that I wish it were a one day recipe because I am dying to try it!! Thank you again!
These are amazing. Thank you so much for your help. I will definitely make them again.
You’re very welcome, Carla!