


I was intimidated to make my first loaf of sourdough bread. I’d heard others talk about flat and dense loaves—dough that never rose. It wasn’t until I read a sourdough book cover to cover and painted it with post-it notes, highlights, and dog-eared pages that I felt ready to put my newborn sourdough starter to work. I bought flour. I filtered water. I measured. I mixed and kneaded. I folded ever-so-gently while I held my bread until, hours later, I pulled my first sourdough from the oven.
I had my wife taste it. “Pretty good,” she said. “Yeah, pretty good bread.” Only later did she fess up that it was “actually just okay, to be honest.” But all-in-all the bread had a nice rise, a crunchy and well-colored crust, and it did taste great considering it was my first loaf of any kind of bread. And you know what? We ate the entire thing.
This Beginner’s Sourdough Bread post has several videos where I walk you through each step of the sourdough bread-making process. Be sure to see the end for a complete video walkthrough of me making this recipe!
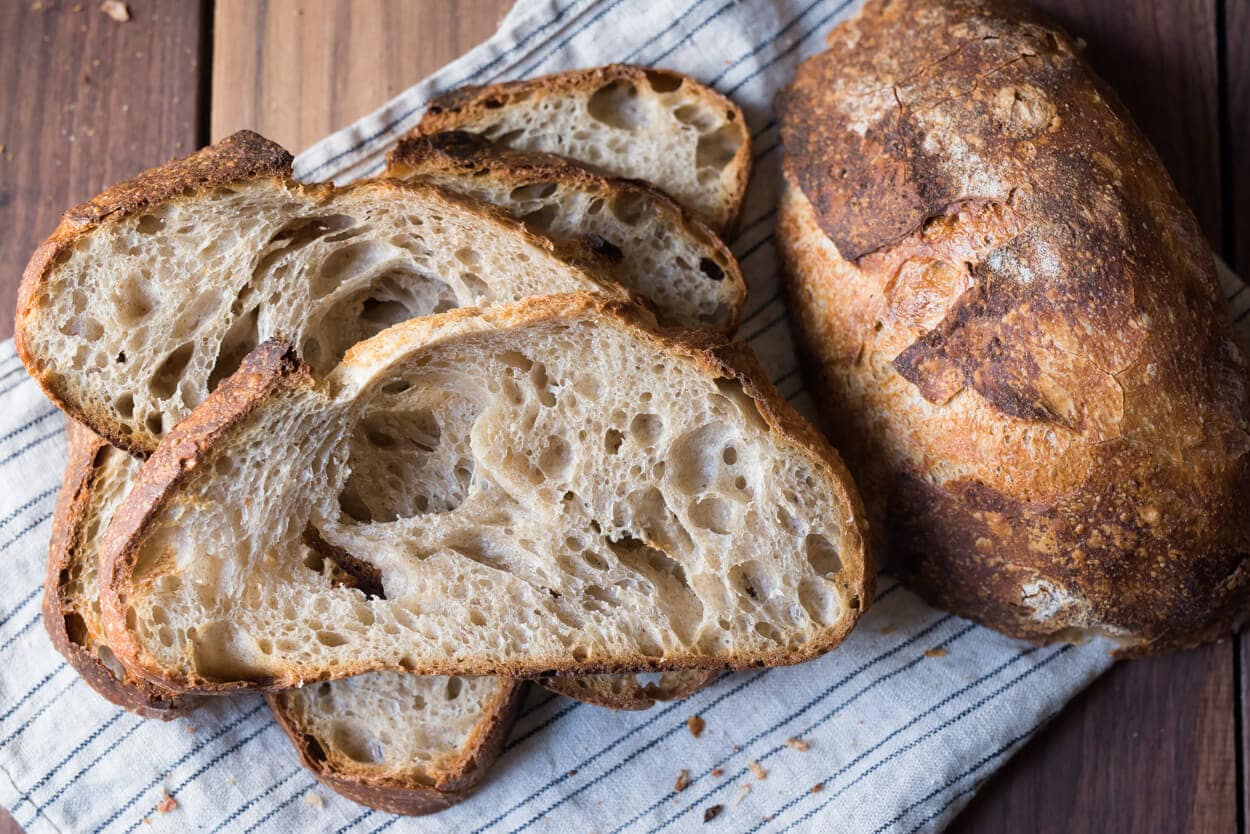
As the new obsession set in, I started making fresh sourdough bread for every meal. There was something about the whole bread-making process that I found captivating. It was–and still is–exciting to mix such elemental ingredients and to see them produce beautiful, life-giving sustenance: it is modern-day alchemy. It’s such a simple thing, and yet it brought me so much joy to see my family and friends tear into a freshly baked loaf that I wanted to bake every day of every week.
This recipe will give you confidence as you take your first steps in baking sourdough bread from your home kitchen.
Starting to make your first loaf of sourdough bread can be daunting. That’s why I’ve put together this beginner’s sourdough bread tutorial and recipe—it will give you confidence as you take your first steps in baking sourdough bread from your home kitchen. This how-to guide starts with explaining baking terms and definitions so that we will have a common vocabulary once we get to the recipe.
And then, each step of the process has lots of information to ensure you understand what is happening and what to do. But, before we go on this beginner’s sourdough bread recipe, let’s first take a look at what sourdough bread is.
What is Sourdough Bread?
Sourdough is a specific type of bread created through a natural fermentation process involving suitable bacteria and wild yeasts in the environment (i.e., the air and even a baker’s hands) and, most importantly, on the grain itself. A sourdough starter culture is used to seed fermentation in new dough when making sourdough bread.
Generally speaking, bacteria are primarily responsible for producing organic acids (lactic acid and acetic acid) that contribute to sourdough bread’s flavor, texture, and storage qualities. The wild yeasts produce carbon dioxide gas and ethanol during fermentation. When this gas becomes trapped in the dough’s airtight gluten matrix, the dough begins to rise, resulting in a final loaf of bread with a light and airy texture.
All recipes on The Perfect Loaf are naturally leavened; in other words, you won’t find any commercial yeast or instant yeast here. There’s nothing inherently wrong with commercial yeast, but I prefer to make bread this way because of the wonderful flavor and texture, the health benefits like increased bioavailability of minerals and nutrients, increased keeping quality thanks to the acids generated during natural fermentation, and the fact that it requires so few ingredients (just three!) to make something so delicious.
For a high-level look at each step of the sourdough process, read through the Beginner’s Guide to Sourdough Bread →
Creating a Sourdough Starter
It all begins with a sourdough starter. Before we look at how to make sourdough bread, you need to create a healthy sourdough starter that shows consistent signs of fermentation each day. Creating a sourdough starter is easy: mix flour and water for a few days in succession, and eventually, thanks to the bacteria and wild yeasts on the grain, natural fermentation will begin.
If you’d like to look at how I feed my starter daily, look at my sourdough starter maintenance routine. In this guide, you will see the visual and aromatic cues to look for when your starter is ready for refreshment (feeding).
While waiting for your sourdough starter, let’s look at some terms bakers often use to discuss the various parts of the bread-making process.

Baker’s Terminology
Sourdough starter
A starter is a mixture of flour and water you allow to ferment naturally. You’ll refresh (feed) the starter indefinitely to keep the fermentation active and healthy, and you will wait for it to become fully ripe before you use any of it to make bread.
When you want to make bread, you take a small amount of your starter to create an off-shoot called a levain (see below). See my post on starter creation to read more about the starter and learn how to make one.
Levain (or leaven)
A levain is made by mixing a small off-shoot of your ripe starter with water and flour and allowing it to ferment before mixing it into a dough. You can always use your starter directly to make sourdough bread, but a levain is a small off-shoot that allows you to adjust the flour, hydration, and ripening schedule (which have implications on the bacteria and wild yeast balance).
Also, unlike your sourdough starter, which lives on as its own entity, the entirety of the levain goes into the dough and has the same fate as the bread itself: to be baked in the oven. See my post on what a levain is and how it’s different from a sourdough starter for more information.
Autolyse
Some recipes utilize a step called autolyse (“auto-lease”). It occurs at the beginning of bread baking and is a step in which only flour and water are mixed together and left to rest. The goal of autolyse is to initiate enzymatic activity in the dough to help draw out sugars from the flour. Additionally, it helps increase dough extensibility (the ability for the dough to stretch out without tearing).
In most cases, increased extensibility is good as it helps the dough expand and fill with gasses, resulting in a light and airy loaf. See my in-depth post on the autolyse technique for more information.
Bulk fermentation
The dough’s first rise is called bulk fermentation. After mixing the flour, salt, and levain into a dough, you put it all into a bowl or container, cover it, and let it rest. The dough will undergo a fermentation process during this critical step. Bacteria and yeast begin to generate organic acids and alcohols and leaven the dough, which will translate to flavor and rise in your final bread.
For more on this critical step in the bread-making process, see my in-depth guide to bulk fermentation.
Proofing
The proof is the dough’s final, or second, rise after the dough has been divided and shaped and lasts until the dough is finally baked in the oven. During this time, the dough continues to ferment, further strengthening and leavening it. I typically proof at a cold temperature in the refrigerator (also called “retarding”).
In my ultimate guide to proofing, I talk about how to spot when the dough is finished rising and ready to bake, plus a whole lot more.
Final Dough Temperature
The final dough temperature (FDT) is the dough’s temperature after mixing all ingredients. The dough’s temperature is important because it’s the main factor that affects fermentation strength: a warmer dough will ferment faster than a cooler dough.
Naturally, each component (levain, the flour, the water, and the ambient environment) has a temperature. While most of these are out of our control, we can easily adjust the water temperature, which enables us to change the FDT of the entire dough to meet whatever the recipe calls for.
I have a handy water temperature calculator you can use to quickly figure out what you need to warm or cool your mixing water to get the dough to the right temperature.
Or, so you don’t have to do any calculations, here’s a quick cheat sheet for this Beginner’s Sourdough bread recipe:
| If your kitchen temperature is | Warm or cool the mixing water to |
|---|---|
| 68°F (20°C) | 98°F (37°C) |
| 70°F (21°C) | 94°F (34°C) |
| 72°F (22°C) | 90°F (32°C) |
| 74°F (23°C) | 86°F (30°C) |
| 76°F (24°C) | 82°F (28°C) |
| 78°F (25°C) | 78°F (25°C) |
| 80°F (26°C) | 74°F (23°C) |
If your kitchen is outside of these temperatures, my guide on the importance of dough temperature in baking will walk you through calculating exactly what to warm (or cool) your mixing water to so your dough meets the FDT for any recipe.
Baker’s Percentages (Baker’s Math)
Baker’s math, or baker’s percentages, helps bakers adjust the actual quantity of the ingredients up or down, depending on how much bread they want to make. I write all the formulas on The Perfect Loaf in baker’s percentages, where all ingredient weights are a percentage of the total flour weight, which always adds up to 100%. Read through my introduction to baker’s percentages for a more in-depth explanation (including how to scale up and down a bread recipe).
TPL Members (the baking community here) have access to all the recipes here at The Perfect Loaf in spreadsheet form, making scaling up and down recipes as simple as changing a few numbers.
Baking Tools
There are a few necessary tools for baking your first loaf of this beginner’s sourdough bread. The following might look like a long list, but you probably already have many of these in your kitchen—There are a few tools necessary for baking this beginner’s sourdough bread. Note that one item is absolutely necessary: a kitchen scale. If you don’t have a kitchen scale, please consider buying one. Measuring flour with cups and scoops is entirely inaccurate!
- combo cooker like a Lodge 3qt. cast iron combo cooker or a Le Creuset Dutch oven that can withstand 500°F (260°C) in the oven and has a well-sealing lid
- large mixing bowl to mix your dough by hand
- two medium kitchen bowls to proof your dough
- two kitchen towels or a tea towel to line the proofing bowls
- bench knife to cut and shape the dough
- plastic or silicone bowl scraper
- kitchen scale that measures in grams
- instant-read thermometer
- white rice flour for dusting proofing bowl
- blade for scoring your dough (a “lame”), or a razor blade, sharp knife, or scissors
- fine-grain sea salt
- parchment paper
- pizza peel (or cutting board)
- heavy duty oven mitt
- the best bread knife for cutting your sourdough bread
You can find a full list of all the tools I use when baking on my baking tools page.
The Importance of Dough Temperature
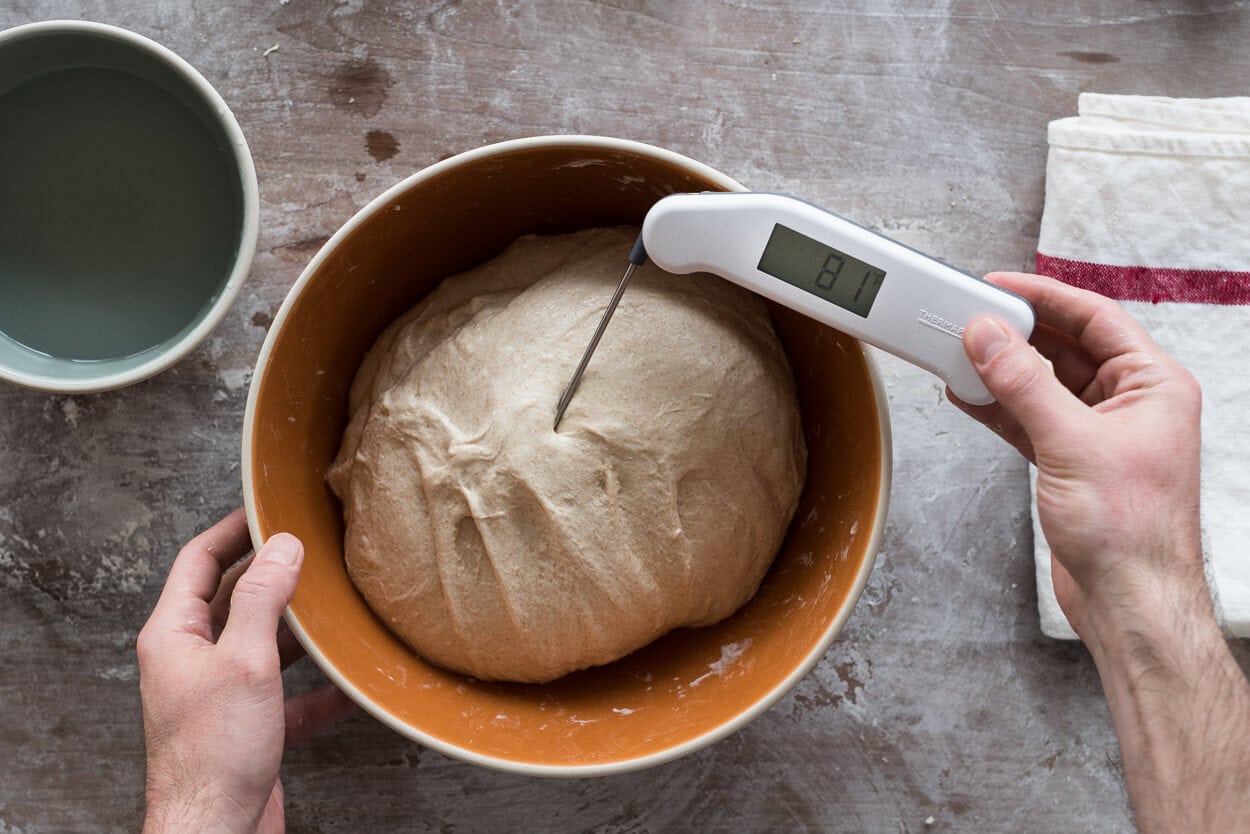
When I first started baking, I didn’t quite grasp how important temperature is in the bread-making process. I always like to say: Treat temperature as an ingredient, just as flour, water, and salt are ingredients. What I mean by that, practically, is that if one day you mix with water that is 70°F (21°C) and then a week later mix with water that is 80°F (26°C), you will get drastically different outcomes.
Temperature determines the amount of fermentation activity you’ll see. Lower temperatures generally mean less activity; therefore, things will take longer. Higher temperatures generally mean more activity; therefore, things will take less time. Working with consistent temperatures will ensure consistency in your bread baking, and you’ll get the desired results in terms of flavor, rise, texture–well, everything.
Treat temperature as an ingredient, just as flour, water, and salt are ingredients.
If it’s cold where you’re baking, see my tips on how to bake sourdough bread in the winter. And conversely, if it’s warm where you are, see my post on how to bake in the summer. These guides will help ensure your loaves have the best flavor and volume.
Flour For Baking Bread
I used commonly available supermarket flour for this recipe: Bob’s Red Mill Artisan Bread Flour, Bob’s Red Mill Whole Wheat Flour, and Bob’s Red Mill or Arrowhead Dark Rye Flour. These are great flour choices, but any of King Arthur’s offerings are equally suitable. I chose “bread flour” as it has a higher protein percentage than all-purpose flour, which helps bring significant strength to the dough so that less mixing and kneading is required–it also makes things a bit easier for your first loaf of bread.
As you’ll hear me mention throughout this site, I do like to use as little high-protein flour in my recipes as possible as I find it leads to a slightly chewier, gummy interior—or be sure to use it in the correct way.
Baking Schedule
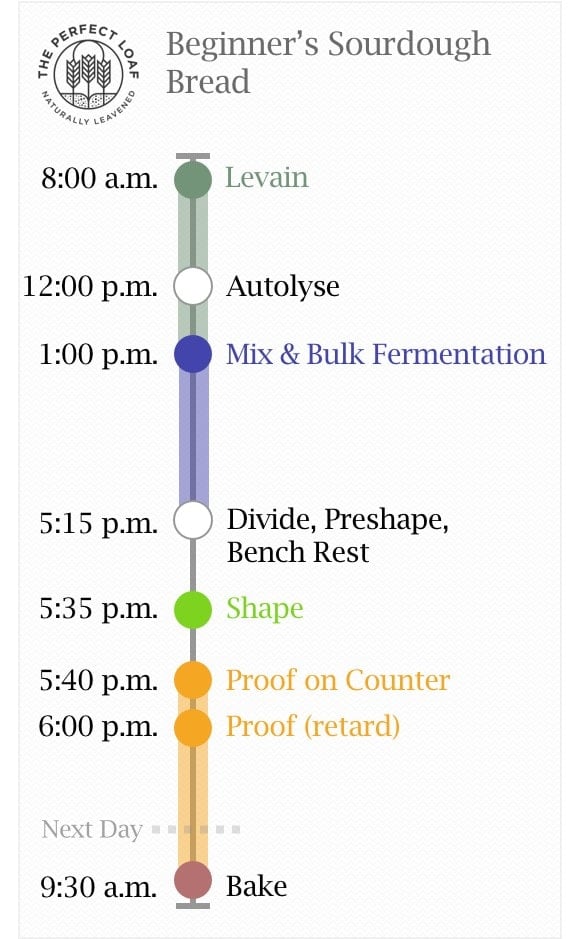
This beginner’s sourdough bread is a two-day-long process where the bread is mixed and prepared on day one, cold-proofed (retarded) in the fridge overnight, then baked on day two.
I love the convenience of this type of schedule: most of the work is done on the first day, then the dough can be left in the fridge until the next day, when it can be baked in the morning, afternoon, or even the evening.
The baking schedule to the right shows you a high-level view of what step takes place and when.
Beginner’s Sourdough Bread Formula
Now we get to the formula for the beginner’s sourdough bread formula. I start every recipe with two tables: Vitals and Total Formula. The Vitals table gives you a high-level view of the contents of the dough, as well as how much the recipe makes (in this case, two loaves). The Total Formula table lists the ingredients needed for the entire recipe and their respective amounts.
Vitals
| Total Dough Weight | 1,800 grams |
| Pre-fermented Flour | 7.5% |
| Levain in final dough | 20.3% |
| Hydration | 72.0% |
| Yield | Two loaves |
Total Formula
| Weight | Ingredient | Baker’s Percentage |
|---|---|---|
| 811g | Bob’s Red Mill Artisan Bread Flour | 80.0% |
| 152g | Bob’s Red Mill Stoneground Whole Wheat Flour | 15.0% |
| 51g | Bob’s Red Mill Dark Rye Flour | 5.0% |
| 730g | Water | 72.0% |
| 18g | Fine sea salt | 1.8% |
| 38g | Ripe sourdough starter, 100% hydration | 3.8% |
Beginner’s Sourdough Bread Method
1. Levain – 8:00 a.m.
| Weight | Ingredient | Baker’s Percentage |
|---|---|---|
| 38g | Ripe sourdough starter (100% hydration) | 50.0% |
| 38g | Bob’s Red Mill Stoneground Whole Wheat | 50.0% |
| 38g | Bob’s Red Mill Artisan Bread Flour | 50.0% |
| 76g | Water | 100.0% |
Remember: the levain is an off-shoot of your continually maintained sourdough starter and is likewise composed of bacteria and yeasts. You make this levain well before you mix the dough, so it has time to ferment, and eventually, it’s added to the dough to seed fermentation.
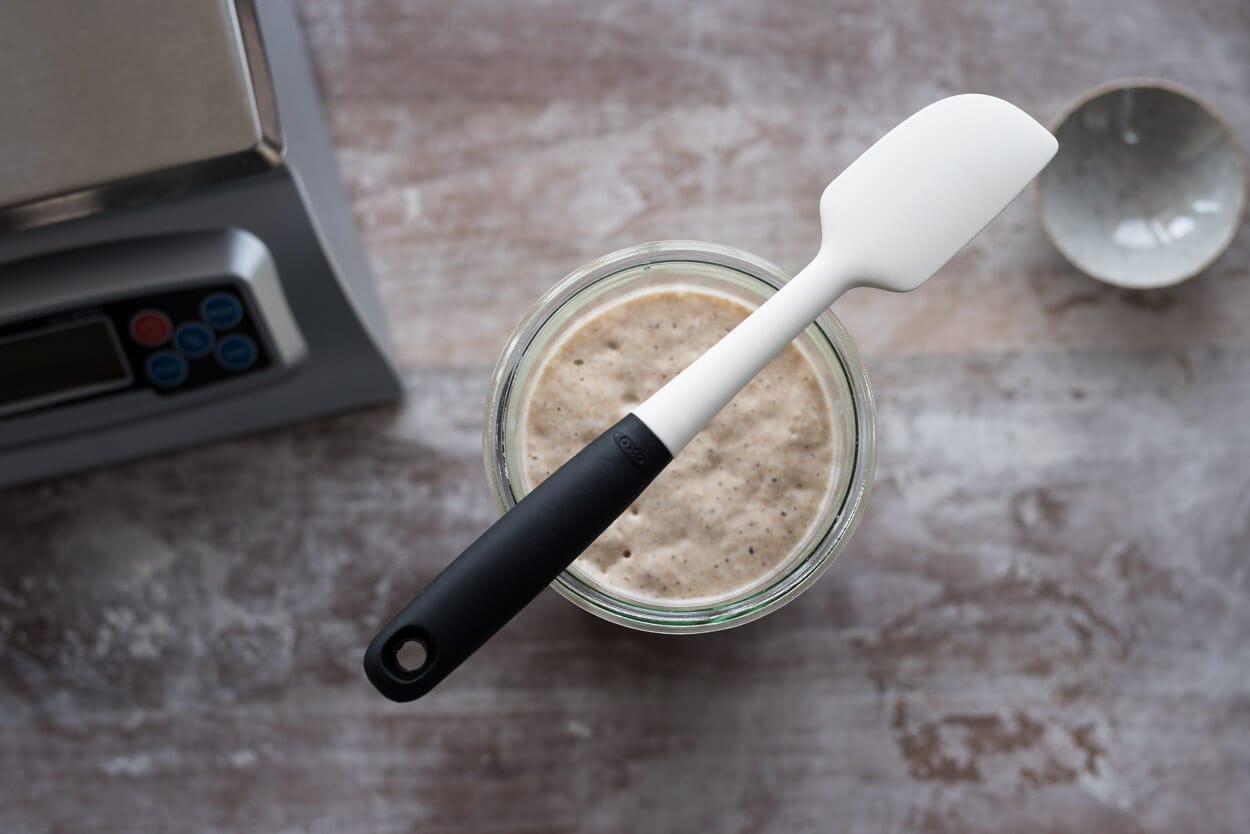
Mix the ingredients in the table above in a clean jar (I use the same sourdough starter jars) and leave it at warm room temperature, 74-76°F (23-24°C), for 5 to 6 hours. When it’s ready, it will be expanded, bubbly on top, inside, and at the sides, and have a slightly sour aroma. The photo below shows my levain before it goes into my dough mix.

2. Autolyse – 12:00 p.m.
| Weight | Ingredient |
|---|---|
| 773g | Bob’s Red Mill Artisan Bread Flour |
| 114g | Bob’s Red Mill Stoneground Whole Wheat Flour |
| 51g | Bob’s Red Mill Dark Rye Flour |
| 603g | Water (this has 50g less than the overall formula, reserved for Mix step below) |
The desired dough temperature (DDT) for this dough is 78°F (25°C). As described in the temperature section above, we will try to get the dough to this temperature right at the end of mixing (which is also at the beginning of bulk fermentation).
Warm or cool the autolyse water so the mixed dough reaches the FDT for this recipe. Place the flour and the water called for in the table above in a large bowl. Use wet hands to mix until no dry bits remain; the dough will be shaggy and loose. Use a bowl scraper to scrape down the sides of the bowl, keeping all the dough in one area at the bottom. Cover the bowl and place it near your levain for 1 hour.

Note that the autolyse stage does not incorporate salt or the levain in any way since the autolyse is a long one hour. Adding the levain to the autolyse would mean fermentation would begin, which could end up overproofing the dough. Salt is rarely added to an autolyse because the salt would diminish enzymatic activity during this time, which is precisely why we are doing an autolyse. The autolyse and levain are two separate entities that will be mixed together later in the process.
3. Mix – 1:00 p.m.

| Weight | Ingredient |
|---|---|
| 50g | Reserved water (this water was held back in the Autolyse step) |
| 18g | Fine sea salt |
| 190g | Ripe, 100% hydration levain (from Levain, above) |
Use your instant-read thermometer to take the dough’s temperature and compare it to the FDT for this recipe. If it is higher, use cold water for the reserved water; if it is lower, use warm water.
At this point, your autolyse is complete and your levain is ready—it’s time to mix and strengthen the dough. If the dough feels very wet and shaggy, do not use all of the reserved 50g of water; use only a splash to help incorporate the salt and levain. If the dough feels good to you, use all the reserved water.
To the autolyse, add the ingredients in the table above (salt, reserved water to help adjust dough hydration and consistency, and levain). I like to spread everything on top of the dough and use wet hands to pinch all the ingredients together. Transfer the dough to a container or thick-walled bowl for bulk fermentation.
Take the temperature of the dough to get your final dough temperature. If your FDT is below 78°F (25°C), next time use warmer water, and conversely, if it’s above 78°F (25°C), use cooler water. Cover the dough.
4. Bulk Fermentation – 1:10 p.m. to 5:10 p.m.
At 74-76°F (23-24°C) ambient temperature, bulk fermentation should go for about 4 hours. Perform 3 sets of stretches and folds during bulk fermentation, spaced out by 30 minutes.
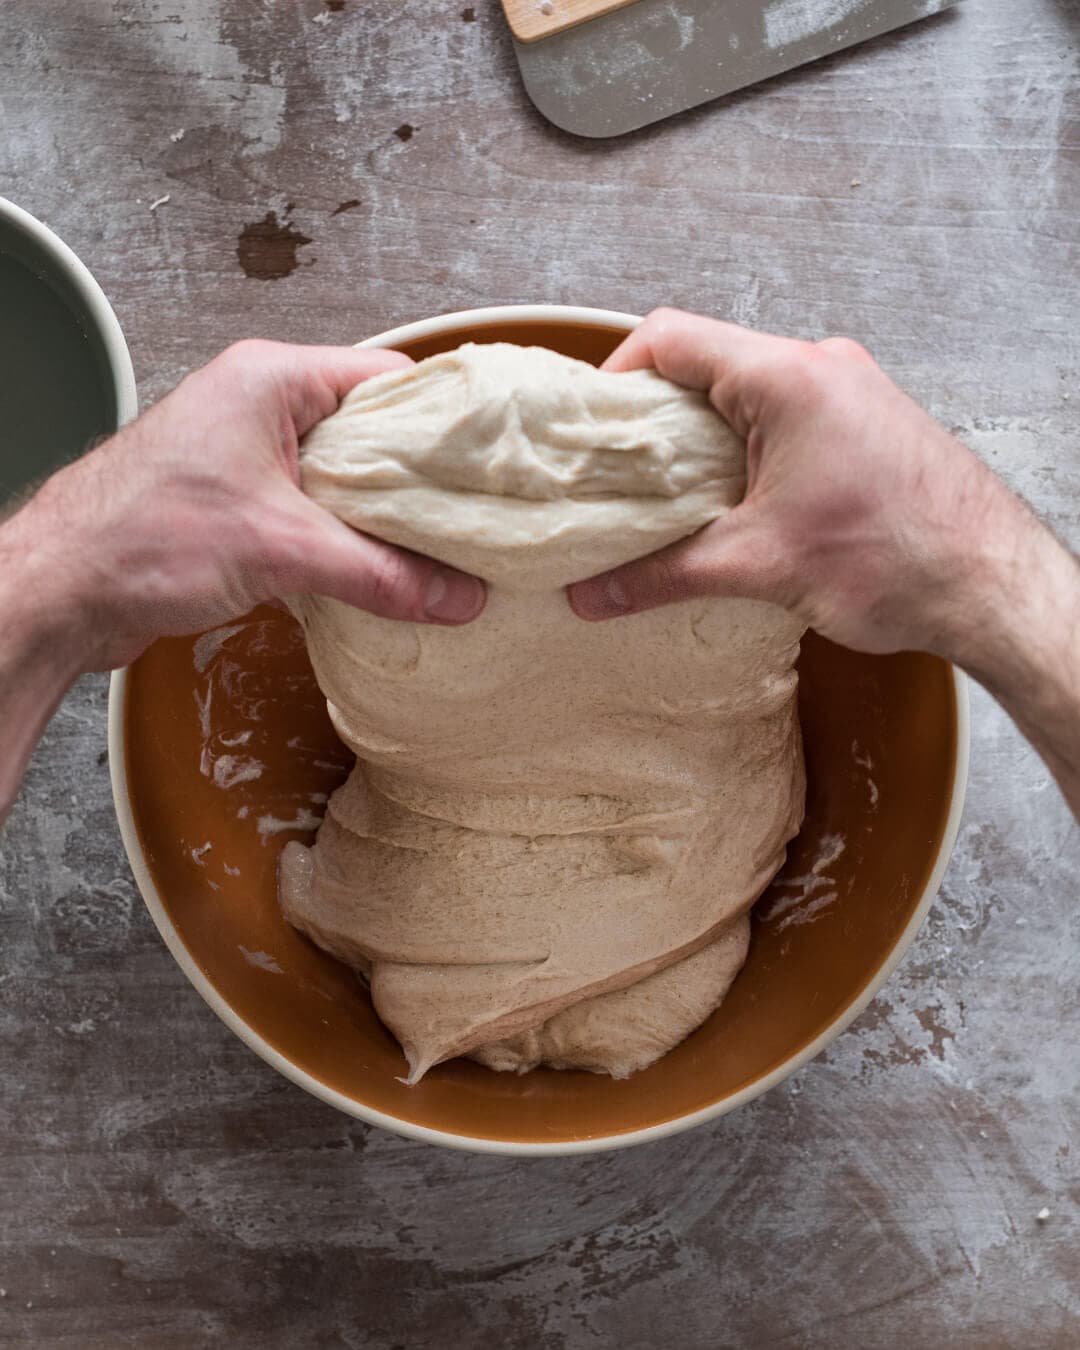
Each set of stretches and folds consists of 4 folds: one each at the North, South, East, and West sides. Wet your hands with a little water to prevent sticking, and then lift one side (North) of the dough with two hands. Stretch the dough high enough so you can fold it completely over to the other side. Rotate the bowl 180° and do the other side (South). Finish the other two sides (East and West) to complete the set. Let the dough rest for 30 minutes, covered, between sets.
In the video below, you can see how I stretch and fold this dough during bulk fermentation.
After the third set of stretch and folds, let the dough rest for the remainder of bulk fermentation. During this time, fermentation aerates the dough (making it rise), continues to strengthen it, and further develops its flavor.
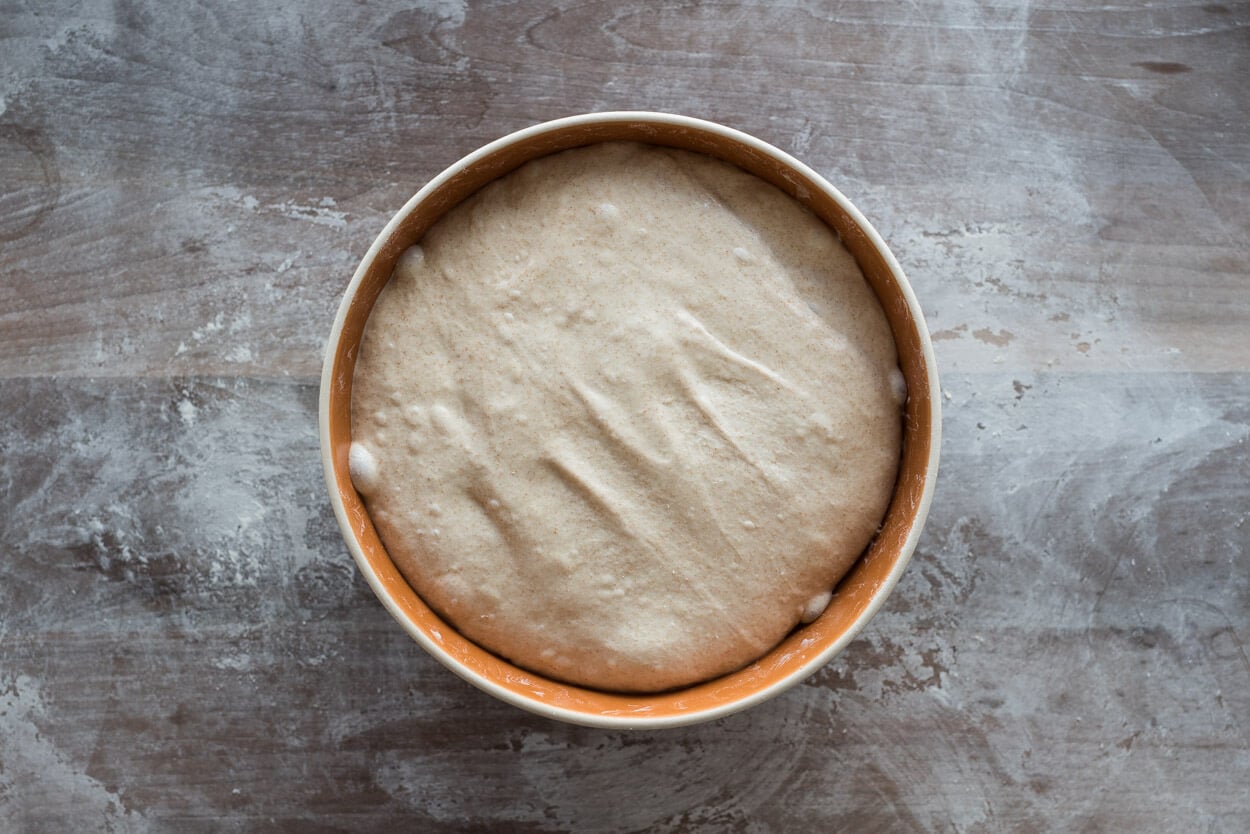
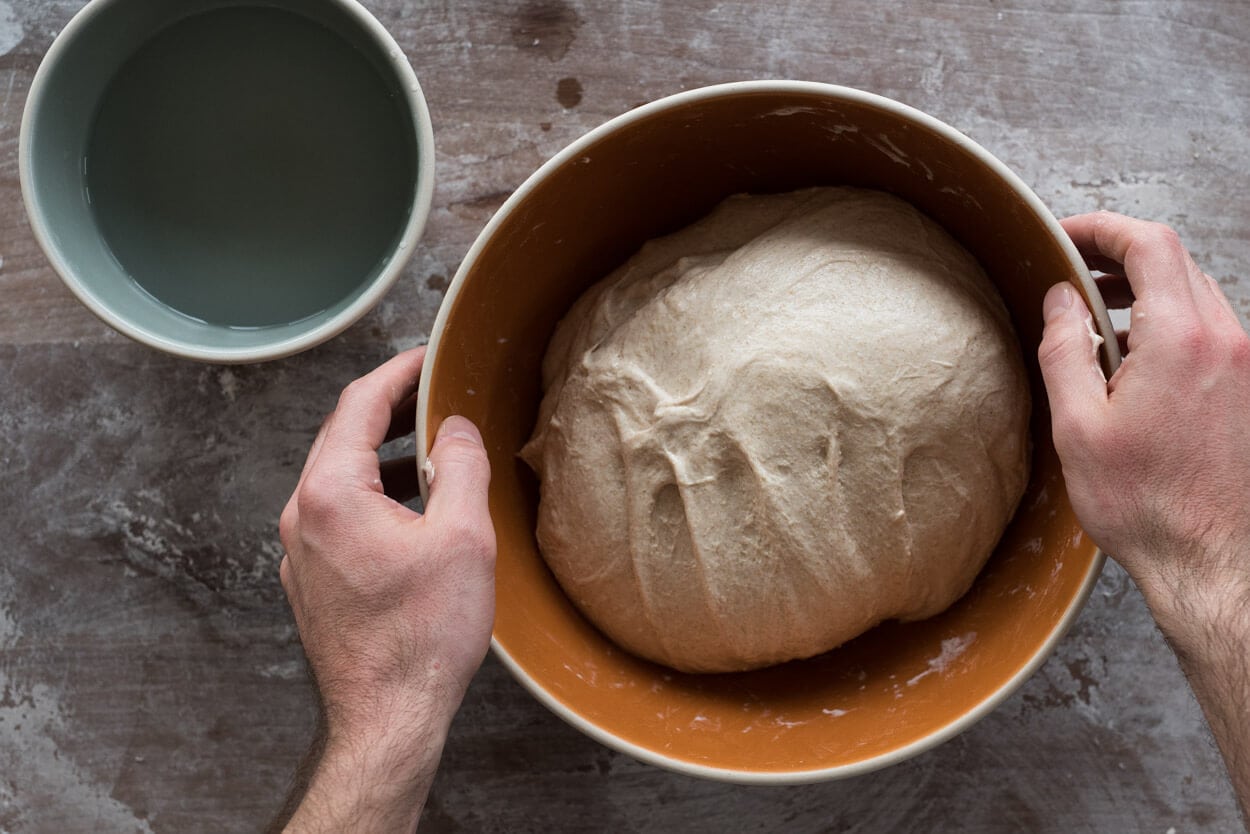
At the end of bulk fermentation, your dough should have risen by 20% to 50%. It should show some bubbles on the top and sides, and the edge of the dough where it meets the bowl should be slightly domed, which indicates strength. In the photo above, you can see all these signs. If you don’t see these signs, leave it for another 15 minutes in bulk fermentation and check again.
5. Divide and preshape – 5:15 p.m.

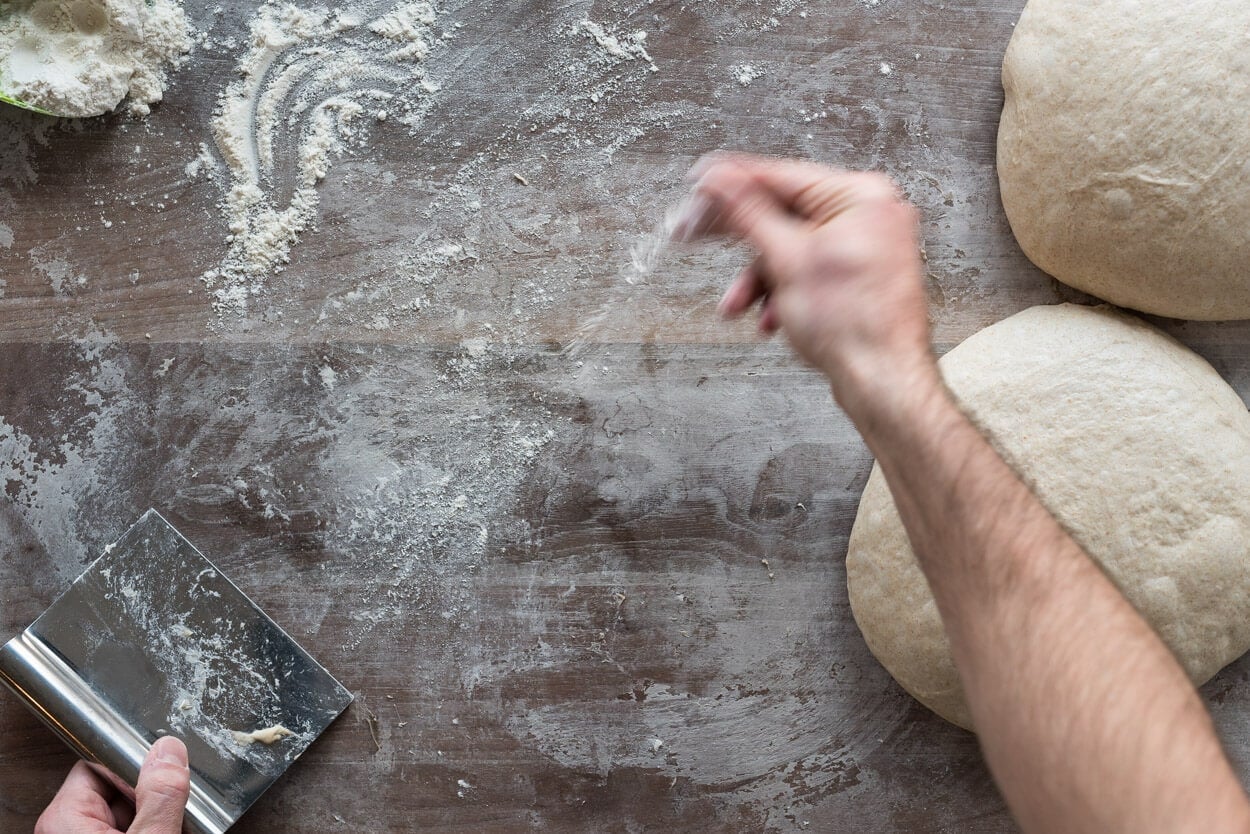
Lightly flour a work surface. Using a bowl scraper, gently scrape the dough onto the work surface and use your bench knife to divide the dough directly in half. Using your bench knife in your dominant hand, and the other hand wet (or floured, if you prefer) to reduce sticking, turn each half of the dough on the counter while lightly pulling the dough towards you. This gentle turning and pulling motion will develop tension on the dough’s top, forming a circle.
Preshaping bread dough is an often overlooked step, but it sets the stage for successful shaping later. See my guide to preshaping bread dough for more information.
Let the dough rest for 25 minutes, uncovered.
In the video below, you can see how I preshape this beginner’s sourdough bread dough:
6. Shape – 5:35 p.m.
If you’re new to shaping bread dough, check out my guide to shaping a boule (a round) in addition to the steps below.
Lightly flour the top of your dough rounds and the work surface. Working with one round at a time, flip the round so the floured top is now down on the floured work surface.
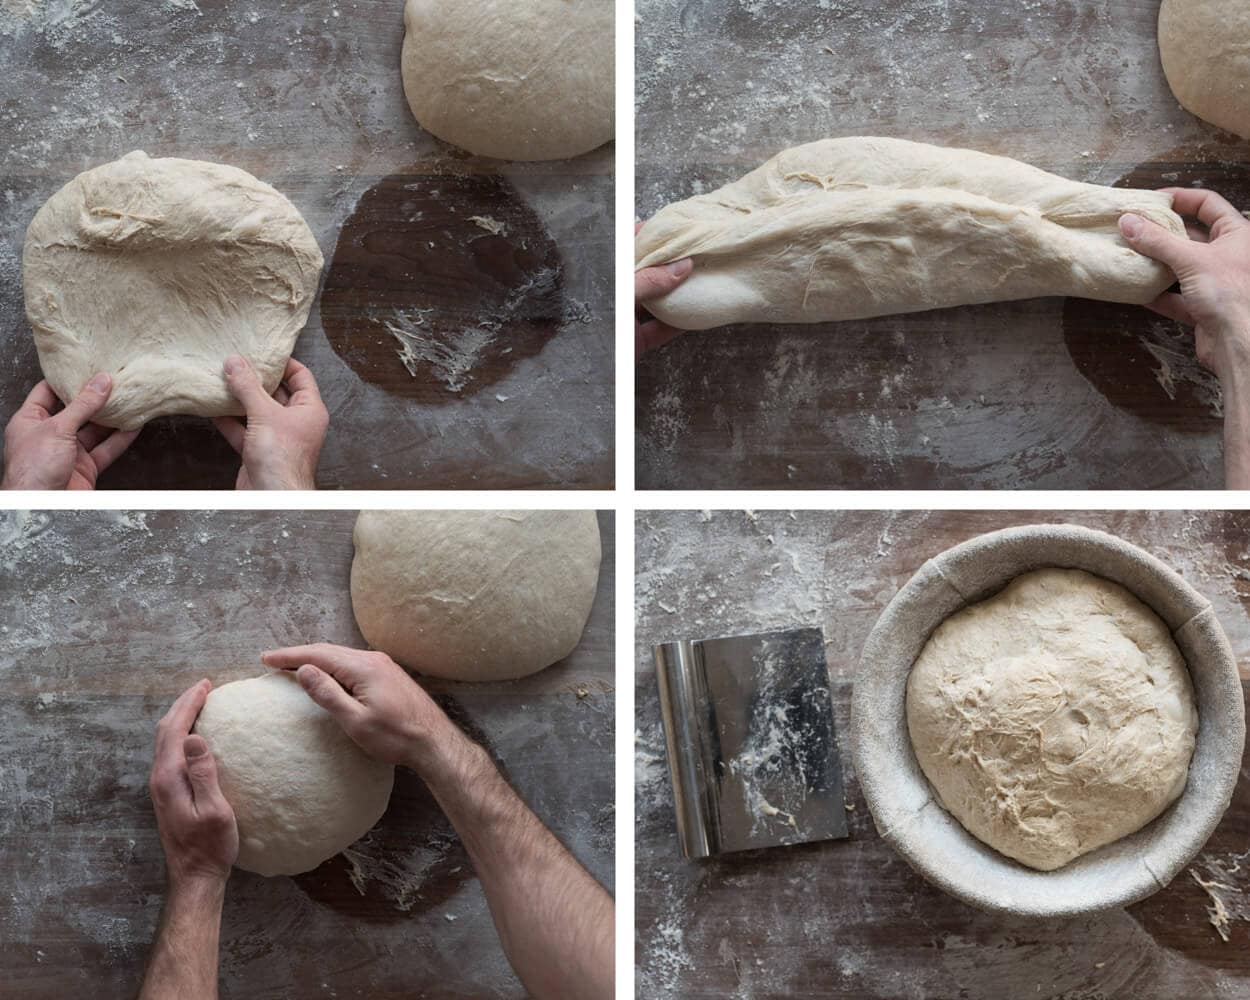
As seen in the image below, with lightly floured hands, grab the bottom of the round and stretch it lightly downward towards your body, and then up and over about 2/3 of the way to the top.
Then, grab the left and right sides of the dough and stretch them away from each other. Fold one side over toward the other and repeat with the other side.
Then, grab the top of the circle, stretch it away from your body, and then fold it down to the bottom of the dough. You’ll now have a tight package that resembles a letter.
Finally, flip or roll down the dough so the seams are all on the bottom. Using both hands, cup the top part of the round and drag the dough gently towards your body to create surface tension on the dough. The angle of your hands will gently press the dough’s bottom on the counter. This dragging helps create surface tension on the dough, which helps keep it in shape during proofing.
Let the dough rest on the bench for a few minutes to help the bottom seam seal.
In the video below, you can see how I shape bread dough into a boule shape.
Meanwhile, prepare your proofing baskets. Line two proofing baskets, kitchen bowls, or bannetons with clean kitchen towels. Dust lightly and evenly with plain white flour or white rice flour. Gently transfer each piece of shaped dough to a proofing basket, seam-side-up.
You can also top this dough with sesame seeds, sunflower seeds, pepitas, and much more—see my guide to topping bread dough for more ideas and instructions.
7. Rest and proof – 5:40 p.m. to 9:30 a.m. (next day)

To prevent your dough from drying out overnight, place your bowls containing your shaped dough into reusable plastic bags and seal. I usually puff up the plastic bag around the bowl by opening it wide and then quickly closing it.
Let the dough rest on the counter for 20 minutes. Then, retard (a baker’s term meaning place into a cold area to proof) in the refrigerator at 38°F (3°C) for 16 hours (overnight).
During this time, overall fermentation will slow (especially yeast activity), but bacterial activity will continue at a reduced rate, resulting in a more complex flavor and, ultimately, deeper crust coloring.
8. Bake – Next morning: preheat oven at 8:30 a.m., bake at 9:30 a.m.
Now, it’s time to bake your sourdough bread. It’s not a difficult step, but there are some things to know. The oven needs steam for the best crust and tallest rise. I like to use a Dutch oven or combo cooker, which is very easy. These pots trap the steam released from the dough and provide the right environment for it to rise optimally.

See my full guide to baking sourdough bread for tips on scoring your dough, pots, and steaming.
Place an oven rack in the bottom third of the oven with no rack above it. Put your combo cooker or Dutch oven on the oven rack, and preheat the oven to 450°F (232°C) for at least 30 minutes. If you’re using a combo cooker, place the shallow side face up on one side and the heavier, deep side face down on the other.

When your oven is preheated, remove one of the proofing baskets from the fridge, uncover it, and place a piece of parchment paper over it. Place a pizza peel, cutting board, or inverted baking sheet on top of the parchment and, using both hands, flip everything over. Gently remove the basket; your dough should rest on the parchment.
Using a razor blade, sharp knife, or baker’s lame, score the dough at a 90° angle between the blade and the dough. I chose to make a “box” pattern. If using scissors, snip the dough a few times at a very shallow angle between the scissors and the dough, forming a set of ridges down the dough’s center.

While wearing your heavy-duty oven mitt, and with caution, pull out your shallow side of the combo cooker and place it on a heat-safe rack or stovetop. Slide the dough into the combo cooker or Dutch oven. Place it back into the oven and cover the shallow side with the deep side, or put the lid on the Dutch oven. This sealed environment helps trap the moisture (escaping steam) from your dough to steam the loaf exterior as it bakes, which encourages maximal rise and a crunchy, shiny crust.
Bake for 20 minutes. Vent the oven of steam: use your oven mitt to very carefully remove the top of the combo cooker or Dutch oven. Leave the large side of the combo cooker in the oven to the side. Close the oven door and bake for 30 minutes more. When done, the loaf should have an internal temperature of around 208°F (97°C), and the crust should be a deep mahogany color and crackle/crunch when squeezed.
Use your oven mitt to transfer the bread to a wire rack carefully. Cool for 1 to 2 hours before slicing into your beginner’s sourdough bread. For the second loaf, preheat the combo cooker or Dutch oven for 15 minutes and repeat.
Follow my guide to storing bread to keep your loaves fresh for as long as possible.
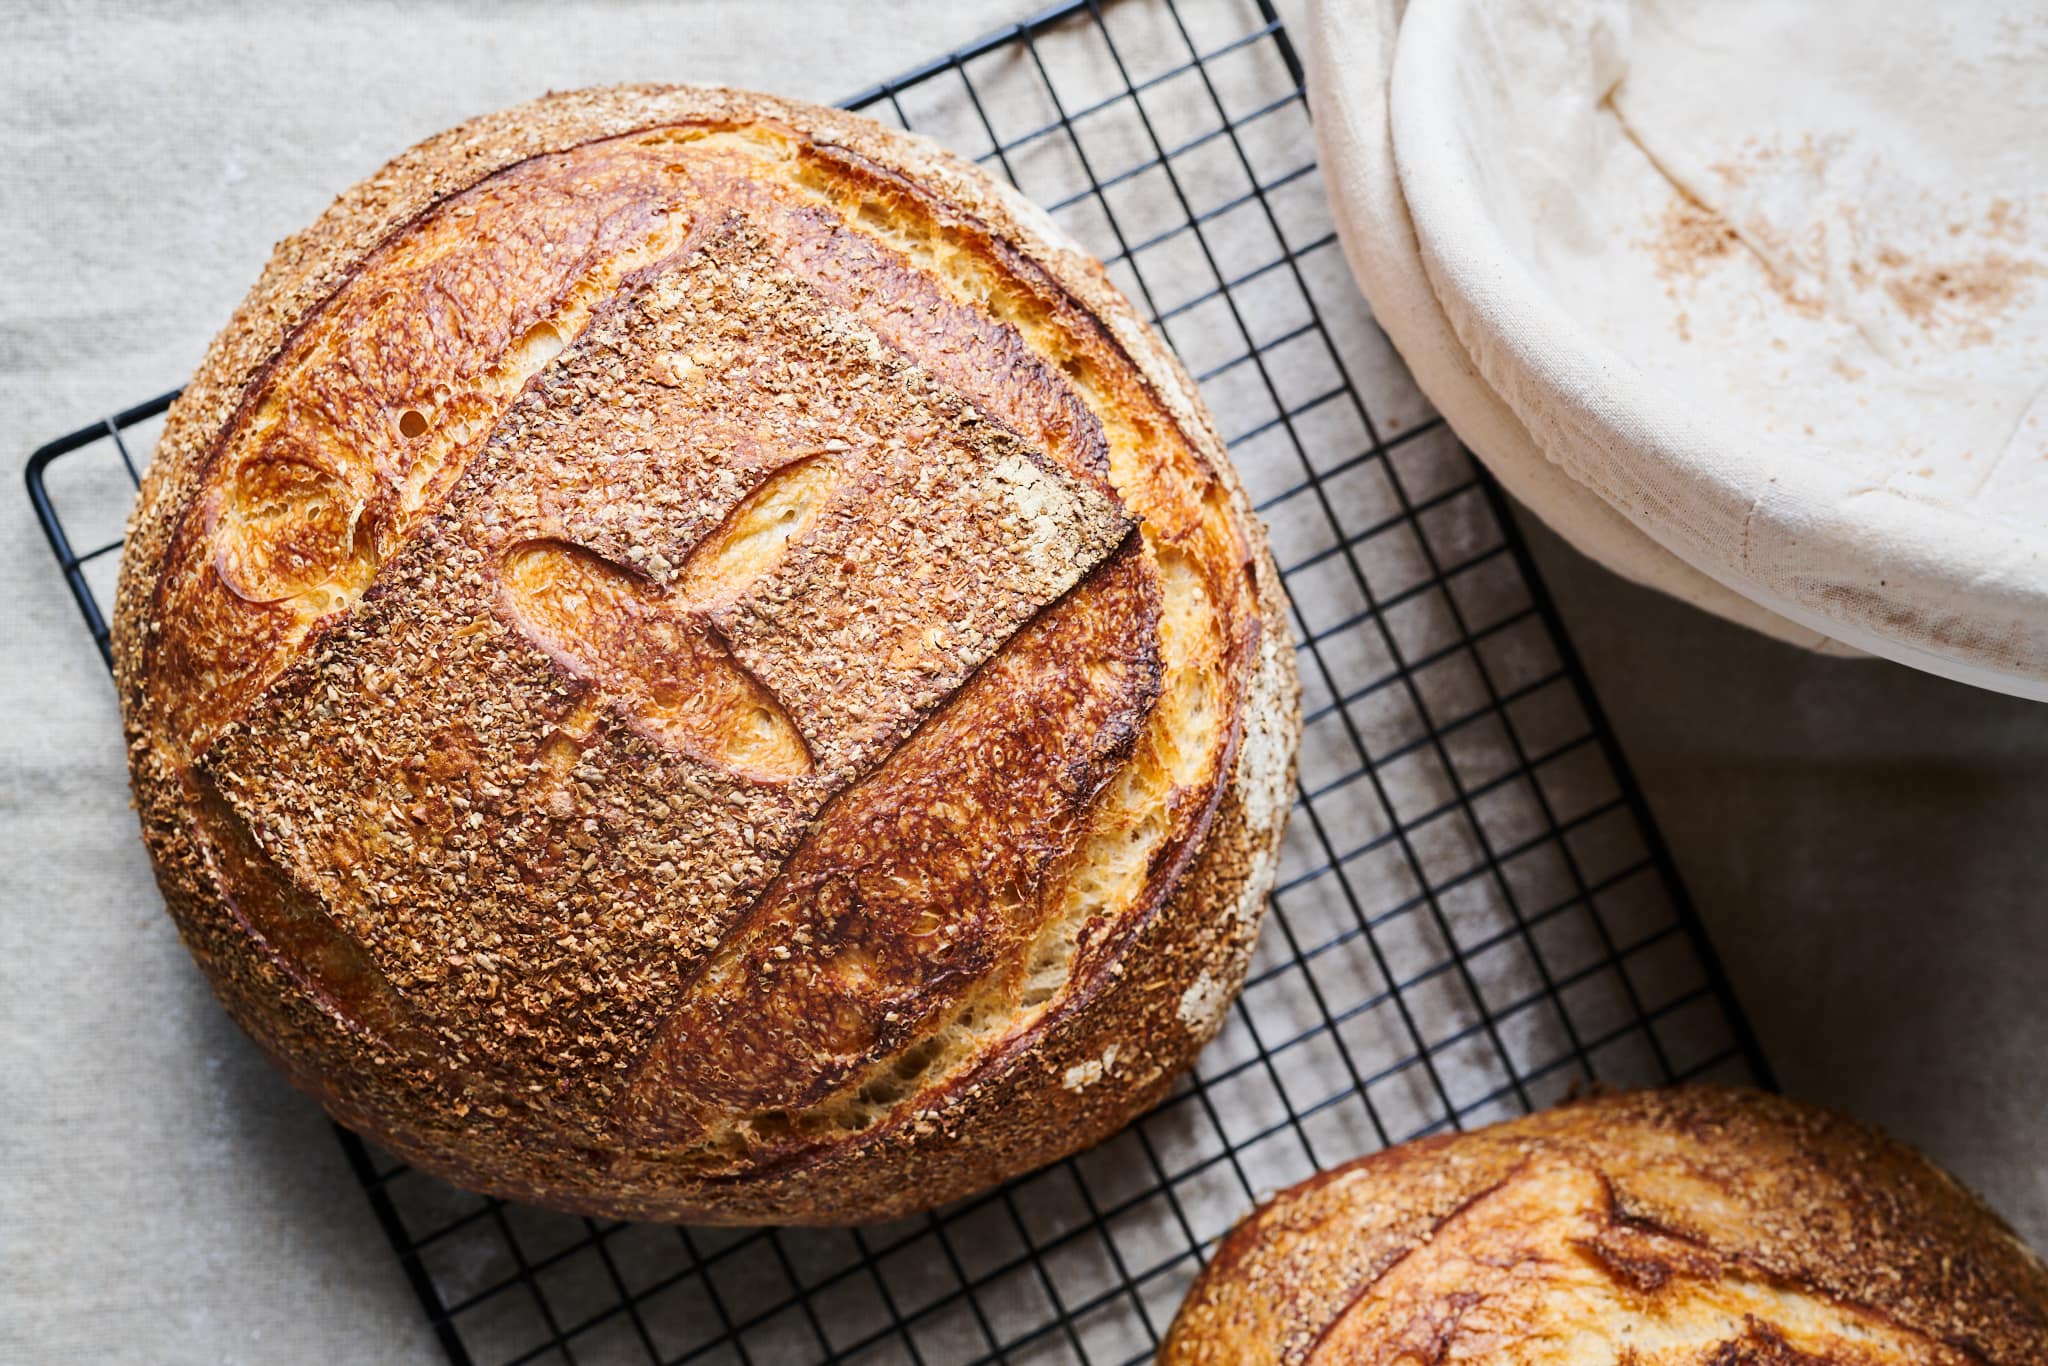
Once you get the hang of this beginner’s sourdough bread process and formula, you can endlessly modify it with add-ins like walnuts, cranberries, seeds, and a host of other ingredients bound only by your imagination. But the most important thing is to bake and have fun. Remember that sometimes bread doesn’t come out as you intended–but stick with it, and you’ll be rewarded time and time again.
And of course, buon appetito!
Watch me make this Beginner’s Sourdough Bread from start to finish
In my YouTube video below, you can see how I make my Beginner’s Sourdough Bread, from creating the levain to slicing the final loaves.

Beginner’s Sourdough Bread Recipe
- Prep Time: 23 hours
- Cook Time: 1 hour
- Total Time: 24 hours
- Yield: 2 loaves
- Category: Main course
- Cuisine: American
Description
The perfect bread to get started baking sourdough bread at home. This crusty, crunchy, and absolutely delicious loaf of bread is perfect for any lunch or dinner table.
Ingredients
Levain
- 38 grams stoneground whole wheat flour
- 38 grams bread flour
- 76 grams water
- 38 grams ripe sourdough starter
Main dough
- 773 grams bread flour
- 114 grams whole wheat flour
- 51 grams whole grain rye flour
- 653 grams water
- 18 grams fine sea salt
Instructions
- Levain (8:00 a.m.)
In a small container, mix the levain ingredients and keep at 74-76°F (23-24°C) for 5 to 6 hours. - Autolyse (12:00 p.m)
In a medium mixing bowl, mix the flour and 603 grams of water (reserve 50 grams until the next step). Cover and let rest for 1 hour. - Mix (1:00 p.m.)
To the mixing bowl holding your dough, add the salt, ripe levain (from step 1), and reserved 50 grams water. Mix by hand or with a dough whisk until incorporated. Transfer your dough to a bulk fermentation container and cover. - Bulk Fermentation (1:10 p.m. to 5:10 p.m.)
Give the dough 3 sets of stretch and folds at 30-minute intervals, where the first set starts 30 minutes after the start of bulk fermentation. - Divide and Preshape (5:10 p.m.)
Lightly flour your work surface and scrape out your dough. Using your bench knife, divide the dough in half. Lightly shape each half into a round shape. Let the dough rest for 25 minutes, uncovered. - Shape (5:35 p.m.)
Shape the dough into a round (boule) or oval (batard)—place in proofing baskets. - Rest and Proof (5:40 p.m. to 9:30 a.m. the next day)
Cover proofing baskets with reusable plastic and seal shut. Let the dough sit out on the counter for 20 minutes. Then, place both baskets into the refrigerator and proof overnight. - Bake (Preheat oven at 8:30 a.m., bake at 9:30 a.m.)
Preheat your oven with a combo cooker or Dutch oven inside to 450°F (230°C). When the oven is preheated, remove your dough from the fridge, score it, and transfer to the preheated combo cooker. Place the cooker in the oven, cover with the lid, and bake for 20 minutes. After this time, remove the lid (you can keep it in the oven or remove it) and continue to bake for 30 minutes longer. When done, the internal temperature should be around 208°F (97°C). Let the loaves cool for 1 to 2 hours on a wire rack before slicing.
Notes
While the recipe calls for 16 hours of total proof time, you could extend this time and bake the loaves in the morning, afternoon, or even the evening on day two. Leave the proofing dough in the fridge until ready to bake.
Beginner’s Sourdough Bread Frequently Asked Questions
Why is sourdough bread good for you?
Sourdough, and its lengthy natural fermentation process, can help break down the gluten in grain, which helps aid in the body’s digestion. Additionally, fermentation helps “unlock” the nutrition inherent in the grain, allowing for better absorption.
Is sourdough bread sour?
Sourdough isn’t super sour in the traditional sense—it’s not sour like taking a bit of a lemon. But it does have tanginess which is the byproduct of lactic acid fermentation. Sourdough bread will have more sourness than one made with 100% commercial yeast due to the acids created by natural fermentation.
How can I make sourdough bread more sour?
To increase the sour flavor of this sourdough bread, add more whole grains (both to your sourdough starter and the dough itself), keep the dough warm (78°F/25°C or warmer), and lengthen the total fermentation time by keeping the dough in the fridge to proof even longer than the 16 hours specified in the recipe—24 hours is a good starting point.
How can I get a more open crumb with my bread?
First, focus on your sourdough starter to get a more open crumb for this sourdough bread: it should be refreshed (fed) often, kept warm, and used when ripe. Next, strengthen the dough sufficiently during mixing and bulk fermentation by using stretches and folds. Finally, your dough must be fully proofed so that when you press a finger into the dough, it slowly springs back about halfway (if it springs back quickly, let it proof longer; if the finger indentation stays, bake immediately).
What’s Next?
After baking this beginner’s sourdough bread, check out my Baking Guides for more in-depth discussions on all parts of the sourdough bread-making process. If you’re looking to add mix-ins to your bread, have a look at my walnut cranberry sourdough bread—it’s one of the most popular recipes here at The Perfect Loaf—and for good reason! Or, have a look at my Simple Weekday Sourdough Bread for a way to squeeze sourdough bread baking into a busy workday.
Finally, now that you have your sourdough starter bubbling away on your counter check out my sourdough starter discard recipes for ideas on how to use leftovers!


3,336 Comments
First loaf just finished!! It’s beautiful! I started with your starter over a week ago which was so much fun to watch! And my bread is delicious, just as you describe. To get it a little more sour is there a different recipe you suggest. Or anything different I can do?
That’s excellent, Cindy! There are a few things you can do to try and increase the sourness of your bread. First, you want to use your starter, and levain, when it’s very ripe. If it rises up to a certain height, let it sit there for a bit before you use it. If it starts to fall that’s ok too, just try to catch it right before, or after, it falls. That mature, ripe starter/levain has much more acidity than if used when it’s more on the “younger” side. Just be weary that your dough fermentation rate might be a bit faster than previous, keep an eye on it during bulk fermentation and divide the dough when it looks ready.
Additionally, you could try using some rye flour in your final dough mix. Rye helps stimulate more acid production for a more sour flavor. I wouldn’t go overboard on the rye, though, as the more you include the more dense your loaf will be. It’s up to you on the percentage, but even 5% plays a big role.
Finally, if you can try to push the cold proof in the fridge. There’s a limit of course, but if you could go even a few more hours you should notice more sourness.
Hope this helps and happy baking!
Hi Maurizio! After final proof and rest in fridge my dough looks kind of yours. But as soon as I take it out of the basket and score it, if collapses and doesn’t rise as good? What could be the causo of this?
Thanks!
Brecht — it’s possible that your dough has over proofed if it lacks structure when you go to bake it. Try cutting back the final proof time by a few hours and see if that helps.
Additionally, make sure you impart enough strength to the dough during shaping so it holds its shape on the counter when you’re finished shaping. If you shape too loosely, it’ll spread too much in the oven as well.
Hope that helps!
Thanks! I think I indeed over proofed it (after shaping I first put it in the box at 25° for 2h and then 12h in fridge, it was a test…) and it also spread too much in the ducth oven..so the test was not succesfull 🙂
So I have to do more of the preshaping?
Thanks!
It sounds like you’ll just have to reduce that proof time on the counter before placing it in the fridge. I’d try reducing it to perhaps no time at all, stick it right in the fridge and see how it bakes up the next day.
With regard to the preshaping/shaping: just ensure your dough has a nice tight surface when you’re finished shaping so it holds its structure when you get to baking.
Enjoy!
Hi! Thanks again!
I’m almost there…☺️
What happens everytime is that I good better proof and Building but in the Dutch oven I dont get any more rise So I end with flat bread, althogh I do right scoring…
Any idea?
Thanks!
I’d say either continue to cut back on the proof time and see if that helps. It could also be a shaping/strength issue with the dough. Make sure your dough is strong enough to hold its shape all the way until you bake it in the morning. It shouldn’t be overly slack or “soupy”!
Hi Maurizio
Just want to let you know that my breads are working really good now! Perfect spring, taste, …baking 3 breads each time because all the neighbours want them! Thanks for the help!
2 more questions: do you maybe have a good site with detailed info about scoring? And the crust with this bread is not always that crusty, is this depending on the flour type?
Thanks!
That’s great, Brecht! I have posted two articles over at the King Arthur Blog about scoring, have a look at my scoring articles here.
The flour definitely plays into the crust but there’s also many other factors (fermentation, your oven, proper scoring, etc.). But yes, the type of flour plays a huge role!
I do not have a dutch oven or a combo cooker. What I do have is a large cast iron sauce pan/saute pan or a crock pot, both of which do not have lids that are oven safe. Is there a way I can use one of those?
you can use a stainless bowl as a lid
As @disqus_iCoejAWf50:disqus suggested below I do have a post up on steaming a home oven in a different way with just a few roasting pans and a baking stone or baking steel: Baking With Steam in Your Home Oven.
Alternatively, you could also do as Ariel suggested below and invert an oven safe metal bowl on top of your dough when you load it into your oven on baking stones. The inverted bowl will trap the steam released by the dough and keep it moist — exactly what we want.
Hope this helps!
Hi Maurizio! I just baked my first loaf with this recipe and it was delicious! It rose beautifully and the color of the crust was gorgeous. I baked it in a large dutch oven. The crust though was really thick and the loaf was very hard to cut into with a knife – even within ten minutes of it coming out of the oven. Any pointers on getting a thinner crust next time around?
Super glad to hear that, Sarah! I’ve noticed when I use a Dutch oven the resulting loaf does tend to get a slightly thicker crust. You could try preheating the DO for less time so it’s not quite as hot when you load the dough. Additionally, I’d be tempted to decrease the overall bake temperature by reducing it 25°F and see if that helps.
Reducing that thick crust is hard sometimes, it’ll take some experimentation!
Like magic! I baked two loaves this morning taking your advice and the crust was so much more manageable! I lowered the temperature of the whole process by 25 degrees and only let the dutch oven pre-heat for 30 minutes. The loaves still reached exactly 211 degrees when I pulled each one out and the crust is a beautiful color and thickness. Thank you for your advice and dedication to responding to comments!
Excellent! So happy to hear that. Enjoy!
Okay, I feel like I’m halfway terrified and halfway excited to try this. Thank you for diving so deeply into the how-to so we’re so informed before beginning – I’m excited.
Nothing to be afraid of — dig in and get your hands dirty! Happy baking 🙂
Hello!
Thanks for the wonderful recipe. If I needed to proof on the counter, not in the fridge, would you say I should leave it out for about 4 hours?
I share my fridge with roommates and never have enough room for a whole loaf to rest peacefully 🙂
Thanks,
Hannah
Hannah, the amount of time you leave it on the fridge depends on the state of the dough when you start proofing and also the ambient temperature. If it’s typical room temps, say 74-78°F, the proof could finish in around 2-3 hours. Use the “poke test” (Google that for videos) periodically to see if the dough is ready to go into the oven.
Poke test: essentially after you shape the dough and it’s resting in your proofing baskets, gently poke the dough on the surface in a few spots and judge how it springs back. If it springs back super fast it’s still under proofed and needs more time. If it is very, very slow to spring back, or it never springs back, then the dough is over proofed — get it into the oven ASAP. What you want to see is dough that slowly fills the indentation back in.
Hope this helps and happy baking!
Thanks for your wonderful website. I’m learning so much and loving it. Just a question please. Can I leave the shaped loaf in the fridge for longer than 16 hours before baking?
It’s possible to go longer than 16 hours, it depends on how fermented the dough is when you begin the cold proof. I would suggest you try to increase the time a few hours at a time and see how the bake goes, if it is sluggish to rise in the oven you’re starting to push the proof to its extent.
With this recipe, there is generally quite a bit of flexibility and pushing it to 20 hours in the fridge shouldn’t be a problem. But again, see how it bakes up and if you notice the dough not rising as high as you’d like, cut back on that proof time the next attempt.
Hope that helps and happy baking!
I just bit into my first loaf. The second is in the oven now. First let me say thank you and I will have to try and not eat an entire loaf with my wife today. Absolutely everything worked out exactly as you suggested with the exception of one thing, or so I thought. It seemed that the final consistency of the dough just before baking, was for lack of a better word, floppier than it would/should be. When I put it on the peel, it would flow out more than I expected and i was concerned that it should maintain the more compact domed shape in your photos. As it turned out, it didnt make any difference and after baking for the times you suggest i had what I consider to be a perfect loaf, excellent crumb and awesome crust, and a shape worthy of my dreams. I’ve used my starter for baguetts and I think it seemed to be perfect for this recipe as well.
I will definately experiment with this recipe but if nothing turns out as well I have this to fall back on. I’ve been baking bread off and on for many years and I’ve recently retired; this was my first foray from my standard go-to recipes.
That’s just so awesome to hear, Jon! Thanks for the update on your bake and I hope you guys made it the past few days without devouring both loaves — it’s a hard task over here!
Thanks again and happy baking!
Hi Maurizio,
Just wanted to say thanks for these recipes. I’ve been struggling the past month to get a sourdough bread eatable…but all my attempts failed. My starter is strong enough now…so I decided to do some more research …and I “stumbled ” on your website. I can relate to your recipes- grams and % make sense to me- all other recipes I tried had a mix of volumes and weights and I was not sure if I followed them correctly… I stick to the grams on your recipe and today is the big day – my bulk looks ok and I am curios what will happen soon in the oven …and what will be taste it will have. The only thing I am missing for now is the temperature monitoring – I will get a thermometer soon so I can monitor this also. Hope to master this recipe soon and move to other. Thanks once again!
That’s great! I hope your bake went well. I do find it easier to just keep everything in grams — why mix? Temperature monitoring is important but over time you might not even needs this, although I do always take the temp of my dough just to help increase consistency.
Happy baking and thanks for the message!
Thanks so much Shruti, I really appreciate that. I’m glad you’ll be following along and happy baking!
Hi Maurizio….Nervously waiting for first reveal moment after 20 mins with Lodge Cast Iron Pot (Luv it!!!) lid on. Here is the thing. I have modified your beginners recipe and mixed it up with Jim Lahey’s Morrocan style apricot and almond loaf recipe. I have no idea whether this is going to work. 22 year old (“can you make me a sourdough loaf with apricots in it mum?”) ordered a sd fruit loaf. Daughter not a fan of cranberries (darn it – your recipe looked brilliant) .. so here I am mixing two recipes together. Never a good idea …. and whoa re: almond butter added and whizzed up in the water…. but lets see how I go. I have 10 minutes to heartsink or big smile.
I hope it turned out really well for you! Nothing wrong with a little improvisation 🙂
Hi Maurizio–thank you so much for creating this website and your very helpful and detailed guides. I followed your beginner guides to create my own starter (took a couple of tries, but I think I have one now), and then yesterday and today my first sourdough boule. However, the bread I made today, though it tastes wonderful, did not puff up very much in the oven and a cross section looks like a bunch of denser areas with small insignificant bubbles, with some very large bubbles interspersed. In addition, the texture of the bread seems much chewier than I’d expect. I followed your recipe through the stretch and folds during bulk (except that I used all purpose flour instead of bread flour in an attempt to avoid the gummy flavor you’ve referred to; also I tried mixing the remaining 50g of water with the salt before adding it with the levain to the autolyse, but maybe that was a bad idea), but then realized my dough was still extremely sticky and messy even after all of the stretch and folds. Acting as a perfect example of “a little knowledge is a dangerous thing,” I decided at that point (with about 2 hours left in bulk) to try to do some slap and folding after watching some videos showing wet dough come together nicely using that technique. Well, it didn’t quite work out, leaving the dough even messier, as if at some point the gluten strands I was building had broken during the slapping and folding. So, I guess my question is this: if the dough is still hard to handle after the 3 sets of stretch and folds in your guide, is that of concern? Should I have done slap and folds right after combining everything at the beginning of bulk, or should I have avoided that entirely? Or do I just need to try less water? Thanks so much for everything you’ve given us hopeful first-time bread bakers!
Hey there! It sounds to me like it’s very possible your dough was not fermenting appropriately — perhaps this was due to your starter not being strong enough, it wasn’t used at the right time, or temperatures were too cold (and other potential reasons, but those are the biggies). Make sure your starter is rising and falling predictably each day you feed it. It needs to be in strong working order to leaven your bread! From there, make sure you use it in your dough when it’s nice and “ripe” (see here for tips on determining when your starter is ready to be used). If it’s not ready to use, give it another 30 minutes or 1 hour — the “float test” I mention above is also a lot of help with this recipe. Finally, make sure to keep your dough warm! It should be somewhere near 78°F after you mix everything together, and it helps to keep the dough at this temp all the way through bulk.
You should visibly see your dough transform over the course of the 3-4 hour bulk. It’ll start out shaggy, messy, sticky. Over the 4 hours it’ll start to smooth out, rise, and it’ll jiggle in the bowl when you shake it. This activity is really important. If you cut bulk too short you’ll have a very hard time recovering.
It’s ok to mix the salt with the held back water, not a problem. I would say, though, that you might want to try and reduce the hydration by 5% in this recipe. It might be that your flour and environment are different enough that the dough isn’t able to take on as much water.
Hope that helps and let me know how the next try goes!
Thanks for your reply!–that’s very helpful information. Hmmm, so I did try the float test before mixing in my levain, and it did float. However, it never rose as high in the Weck jar as your starter does in your pictures–could it be that my starter just requires a bit more time and I should let bulk go on for a bit longer than 4 hours? In general, I have been getting a starter that looks quite airy, but, despite having fed it twice a day for several days, it does not tend to fall back down within 12 hours–it still seems to be sturdy and airy at that point. Is there anything I can do to speed it up and make it behave more like the mature starter in your guide? Lastly, do I continue with the rye/APF mixture indefinitely for starter feedings or is there ever any need to change that up? Thanks again!
The fact that it floated is a good sign. Your starter does not have to rise to the top of the jar, in fact it might look completely different than mine. The key is to just observe the signs for your starter and learn to determine when it’s at its maximum and asking for a feeding. To speed up your starter you can keep it in a warmer spot (or use warmer water to feed), keep around more mature starter at each feeding, or add in more whole grains. What you could try is to give your starter a lot more time and see when it does eventually fall. Try this out one day and then you can actually see what it’ll start to look like when it breaks down and starts receding in your jar.
Yes, it’s definitely possible to extend bulk past 4 hours! Give your dough the time it needs, if it needs another 30m, another 1hr, whatever, let it ferment till it looks ready.
You don’t have to stick to the rye/apf mixture. Feel free to change this to whatever you like (what gives you the flavor, performance, and schedule you’re after).
Hope that helps!
Tried again one week later, and success!!! My very inexperienced guess is that I had two main problems last week. First, my starter was not as robust as it is now, one week later after 2/day feedings. I think that, in turn, led to underproofing/underfermenting. Second, I think last week, when halfway through bulk I decided my dough was too wet and did a few slap and folds, I didn’t do enough and somehow broke up the structure built during the first three sets of turn and folds. I say that because the slap and folds started alright, and then my dough suddenly became very shaggy, and then I freaked out and stopped. I also didn’t try to do any further turn and folds after that because, again, I freaked out and thought I had overhandled the dough. This week, I did 10 minutes of slap and folds right after mixing and noticed the shaggy stage come and then go, finally yielding something a little smoother. Then I did the three sets of turn and folds during bulk. Anyway, I’m so excited to have baked my first successful loaves and can’t thank you enough for all of the helpful written material and pictures on your website. (PS I grew up in Albuquerque and was also very excited to read that your breadmaking wisdom-building is taking place in my hometown!)
That’s fantastic to hear, thanks for sharing this update! It sounds like all your changes were spot on, leading to a great bake. I definitely think mixing only upfront is the way to go, otherwise, like you said, you run the risk of breaking things down when you really want the dough to remain untouched.
That’s great you grew up in ABQ! It’s a wonderful town and I’ve been here all my life. Excellent weather, hiking, and food of course. Cheers!
Maurizio- Your Instagram posts are what first caught my attention and now I cannot THANK YOU enough for your beautifully presented terms and definitions. Your ability to cover each step in this recipe has finally given me sourdough success!! I have made your Beginners Dourdough Bread recipe 3 times and with each attempt I am gaining skill. I think I’m now ready to modify the recipe with add ins such as nuts, seeds, dried friut and toasted whole grains. Do I need to add the weight of these add ins to come up with my total flour weight in order to figure out the correct hydration? Would I replace some of the flour with the chosen add in? If so, is there a chart or formula to use for the different add ins? What about flour types since their density is different? Also, do you ever add extra gluten to your recipes? Thank you again beyond words!
That’s great, really happy to hear your bakes have gone so well! I think sometimes a little more information at each step really helps solidify things. Yes, if you want to keep the “final dough weight” the same you’d replace some of overall weight of everything with nuts/seeds. If it’s ok for your total dough weight to increase (usually this will be fine as long as your proofing baskets have a little room and you can fit the dough in your Dutch oven) then just add in some nuts and seeds and it should be just fine. In this case you will probably have to add a bit of water to keep the consistency of the dough the same (especially when adding nuts that absorb water, like walnuts).
I’ve never added gluten to my recipes. Sometimes if I find a certain formula needs more strength I’ll use “bread flour” (12-13.5% protein) for added strength. You’ll see that occasionally here.
Hope that helps!
Thank you for your added advice. I made 2 loaves of the beginner sourdough recipe using your suggestions, one with the addition of chopped walnuts in place of 15g of the whole wheat flour and one with flax meal in place of 30g of the whole wheat flour. Both turned out beautifully. You have simplified how to modify the ingredients in a recipe for me! Endless gratitude for sharing your expertise with us all 🙂
Meant 4 loaves, 2 recipes 🙂
Excellent, those sound delicious. I especially love walnuts in sourdough — so good! Glad things are moving so well, happy baking!
I made this recipe last weekend and it turned out great! And thank you for the encouraging comment on Instagram (I’m my own worst critic.) Now I’m getting my head around Baker’s Percentages and while the Final Dough math is straight forward, I’m having trouble wrapping my head around the 7.5% of Pre-fermented Flour under the “Vitals”. I’ve done the math and the closest I can get is 7.79%. I get this by dividing 80g of the flour in the levain formula into the sum of the starter (40g) + levain flour (80g) + Dough formula flour (907g). My formula is 80/1027 = 7.79%. My questions is really whether or not I have the formula correct, I’m not concerned about 0.29%. 🙂 Also, is this something I should concern myself with? There’s a cheddar and jalapeno SD recipe I want to try and it calls for 20% pre-fermented flour @ 100% hydration. I have the BP for everything but the levain formula or heck, maybe I do knowing it calls for 20% pre-fermented flour and I can back into it or experiment from there.
Doh! I think I got it. I went to the Bread Bakers Guild of America and built a BP spreadsheet and then reverse engineered the above to get the Total Formula. I think if my calculations are correct, the 7.5% pre-fermented flour is the percent to calculate the 184g of levain used in the Final Dough formula. The levain formula given allows for extra (which I think you even mention). Sorry for getting in the weeds on this!
Hey, Aaron! Yes, you called it exactly. My calculations above allow for a little bit more levain just in case, this way if there’s some left on the side of the container, your hands, or the stirrer you’ll have just a little more. From here on, though, I’ve started listing it exactly as is — you’re not the first person a little confused by my numbers up there. Sorry about that! I was trying to help, I promise 🙂 I have in my “to-do” list to go back and fix all these numbers to avoid confusion.
If there’s anything else that doesn’t quite add up please let me know. Again, sorry about that confusion!
Thank you for sharing this great recipe, I managed to produce my first loaf and it turned out beautifully.
Really happy to hear that, Belle, thanks for sharing your success! Time to break out the butter and sick back and enjoy 🙂
Hi, just made a loaf and it turned out beautiful! There was one problem though, the bread stuck to the parchment paper, any ideas?
That’s great, Wendy! Happy to hear the loaf turned out wonderfully. Hmm, I’m not sure why the dough would stick to the parchment, I’ve never seen this happen here. In fact, I’m sorry to say I can’t even think of a reason why this would happen as long as the paper is perfectly flat with no creases to get caught into the dough. Perhaps the dough got accidentally smushed down onto the paper or some other cause?
Sorry, I can’t think of any reasons!
thanks for your quick reply…so to update, the second loaf I sprayed the parchment paper with some oil, and also I lowered the temperature of the oven. We just moved here and not sure if the oven temp. reading is correct. (I guess I better get an oven thermometer) I think it may have been to hot as the bread cooked quicker that what you said. The second loaf was perfect and I am amazed how great it turned out. I have been making sourdough bread for over a year, its good but nothing like this one. Thanks for all your help. Your site is educational and inspiring!!
I had the same problem when I used cheap generic dollar store parchment paper that had no brand identified on the box. I switched to Reynolds Premium Parchment and that solved the problem with the paper sticking to the bread.
I know it’s recommended to keep the bulk up to 82 degrees, but what about higher temps? I keep my home cold, so ive tried to bulk in my oven with the light on, and I’m recording temps of 92 is that ok?
92°F is very hot, I’ve never bulked that high personally. I don’t think at those temps you’ll have any real problems inhibiting fermentation but the high activity in the dough will mean a very speedy bulk. You could try this out by mixing your dough with cold water so the final dough temp (FDT) is lower than usual, perhaps 75°F or so, this way it’ll take time for your dough warm up to an ambient of 92°F. This could help elongate bulk to be just right — you’ll have to test! I hope that makes sense.
Another option is to pickup a rather helpful tool (which I use quite a bit): a small dough proofer. I love this thing, I keep it on 24/7 in my pantry and bulk my dough in there set to whatever temp I’d like. This might also help save some electricity costs since you can bulk at 80°F and not higher.
Hope that helps!
Thanks for the help! Much appreciated! I am trying to cycle the pilot light so that when it gets to 82f I turn it off and back on when it falls to 77F. But in the case of I’m not home and it happened to go over and jumps to 92, I was just curious if it would be bad in terms of flavour or something. I was also curious what’s the best way to tell when bulk is complete?
It will probably change the flavor some, yes. Higher temps will favor different bacteria/yeast metabolization rates and this will change the flavor. Try it out and take note of the resulting loaves, if the flavor isn’t where you want it that’s what I’d first change.
Determining exactly when to call bulk fermentation “done” can be a hard thing. I usually look for when the dough has risen some percentage, has bubbles on top and the sides and the most important thing to me: the edge where the dough meets the container is slightly domed down. To me this indicates there’s enough rise and strength in the dough to divide. You could also wet your hand and give the dough a little tug here and there. It should feel stronger, more elastic. A good rule of thumb for my formulas here are 3.5-4 hours at 77-82°F.
Namaste Maurizio
Its always a pleasure connecting with you. I have been trying through several trials and errors to get a large hole boule but have failed .Your guidance in getting my wholewheat starter which is the same flour that we make rotis from and specially the fine one that we use is absolutely spot on and gives me some of the best focassia breads not only in flour but in different types of millet flours too. Somehow i dont due to the weather or where i am going wrong that i fail to get the large hole light loaf in normal bakes. Secondly would be very grateful if you could guide me in making the same with whole wheat same flour that we use for rotis and the a formula for white bread too but a smaller boule. Thankyou so much and always in gratitude.
Warm Regards
Mita T
Mita, you’re very welcome! I find it is actually a bit hard to get a super open interior when shaping the dough as a boule–I think it’s just the nature of the shape, or perhaps the basket itself. There’s nothing wrong with shaping that way at all, I just expect a different type of outcome when I shape this way. The best advice I can give there is to try and be as gentle as possible with the dough when shaping a round, try to tighten just that skin on the top without pressing the dough down too much.
As far as the flour you use to make roti, I believe that’s a milled whole wheat. From my experience with that wheat it’s very hard to get an open loaf of bread, although I’ve only tried it once before. Sorry I can’t offer more advice with that!
Hope this helps. Happy baking!
Thankyou so much Maurizio. Your inputs are most valuable.
Hi Maurizio, thank you for keeping this blog updated & instagram. I’ve learned a lot from you! I had an issue with my bread reaching an internal temperature of 210-212 degrees.. I usually bake my bread pretty dark. However, I had to pull my bread out at 204 internal temp because it was looking almost burnt. Should I have lowered the overall oven temp and extended the time or vice versa? I really want my crust to last at least 24 hours after it’s cooled down (it gets leathery). I’ve been having issues with this, even living in Colorado (5280 elevation). Thanks!
You bet! I have several posts I’m working on for the site here, can’t wait to share them 🙂
It’s ok if your internal temp doesnt reach this high, I live in Albuquerque, NM (similar elevation) and I also struggle to get internal temps this high. If the interior tastes cooked fully to you and it’s not gummy or wet (make sure to let it cool before cutting into a fresh baked loaf) then that works just fine. I never take the internal temp, I just look at the exterior color and feel the loaf a bit to determine when it’s cooked.
Unfortunately at our elevations, and perhaps similar humidity levels, our loaves do dry out quicker. I usually keep my bread in a paper bag or a bread box starting two days after I bake it — this helps it stay just moist enough to ensure it doesn’t harden to a rock 🙂
Hope that helps!
When I shape my batards they do spread out to some degree in the basket and the amount depends on how strong/firm the dough is. I actually want this spread, though, as that’s what gives me the elongated shape of a batard.
If your dough is very wet and you shape it incredibly tight, you might not get much spread during proof. Conversely, if your dough is wet and you shape it loosely, it’ll spread significantly (perhaps too much). If your dough is dry and firm, you won’t need as heavy a hand when shaping because you know it wont spread too much in the basket. All of this is to say the basket you choose to use should fit the dough you intend to make. I make wetter doughs with moderate strength and then moderately tight shaping, this allows it to spread just about to the length of the basket (14″). When I’m doing 100% whole wheat doughs that are very, very wet I don’t use the same batard baskets as the dough would just spread too much. For that type of dough I choose a 9″ long basket so I can shape gently and the basket helps hold the shape of the dough during proof.
I have always gone straight from fridge to oven because my dough is usually fermented enough by that point to go straight to bake. If it looks like your dough is under proofed and needs more counter fermentation time (warmer) then letting it sit out is warranted. It all depends on the dough!
Hope that all makes sense!
Hey Maurizio,
I have been trying this recipe for months and failing… the bread would always come out gummy and wouldn’t rise. Giant holes would appear but not evenly distributed at all.
As a funny coincidence, this weekend my refrigerator broke and wouldn’t keep anything colder than 50-55 degrees. So, my overnight proof was only about 9 hours… and the bread turned out perfectly! Amazing rise and crust, and it tasted great!
So for those of you struggling to get a good rise, try proofing at a warmer temp!
It sounds like your dough might not have had enough fermentation activity in it before your fridge broke. When it did bread and you let it ferment longer at a warmer temperature you gave the dough enough time to ferment fully. A happy accident 🙂
maurizio, tremendous post. very helpful. a question: i’m visiting family and would love to make some bread with them. the catch is, i might not be able to dedicate a full day to the process. so is there a way to buy time or slow things down? can i refrigerate the dough at some point so maybe the autolyse or bulk fermentation takes 8 hours instead of a couple? obviously this isn’t ideal, but i’m willing to sacrifice a little quality in the name of having fun–as long as we can make something that’s pretty tasty and looks okay i’ll be happy. thanks much
Thanks, Mark! Yes, you can definitely toss the dough when it’s in bulk into the fridge and then take it out to resume the process. I would go all the way to bulk fermentation, perhaps give it 1-2 hours of bulk, then place the entire bulk container (covered) into the fridge. Later, take it out and divide the dough cold. Let it warm up on the counter in preshape or you can do this after shaping. Then, let proof in shape in their baskets until ready to bake (Google “poke test” to determine this).
Hope that helps and happy baking!
Hi Maurizio, your blog has been invaluable, thank you so much. I followed your starter recipe to the letter and finally had success. It took about 2 weeks in the cold winter of Victoria in Australia. I’ve made one very successful batch of bread, but I find at the bulk fermentation stage the dough is very wet, making it difficult to stretch and fold. Is this normal? Is it ok to sprinkle a bit more flour on to the dough?
Thanks Brenda, really happy to hear my website has helped so much — and that you have a sourdough starter up and running! It’s ok if the dough is sticky by the end of bulk, but it should be stronger and smoother than when you first mixed things together. Through stretch and folds, and fermentation, the dough should tighten up and become more and more elastic (meaning the dough will want to snap back when tugged on). If it is overly wet and sticky you could try reducing the hydration of this recipe by 5-10% and see if that helps the texture by the end of bulk.
But yes, it’s ok to use flour on your hands and on your counter when preshaping (and shaping) the dough! I try not to use too much, but enough to ensure it doesn’t stick is totally fine.
Have fun & happy baking!
Hi- my daughter has been recently diagnosed with Celiacs. I am attempting this with a Gluten Free flour blend- any tips? Combining your techniques with a GF recipe- but would appreciate any insight you may have. Thanks!!
Hi, Kim! I have not worked with any GF flour or blend so I can’t comment definitively on anything. Really, though, things should work similarly if the flour you’re using is listed as able to make bread. Sorry I can’t help any more, I just don’t have much experience in this! Good luck and happy baking to you!
Thanks- It came out pretty good and my daughter was super excited to have “real bread” again. I am pretty comfortable with experimenting and have had to do a lot of it lately- grew up with a French Mother who made all of our bread from scratch. I appreciate your breakdown of methodology and tips- some thing you just can’t remember from watching and helping, and now that my mom has passed, having this resource is amazing!
Thanks again!
Thanks so much Kim and I’m glad to hear the bread turned out great! There’s not much like making bread from scratch, as you know!
Hi Maurizio. This is an amazing site! Thank you for the detailed explanations on the process. I am planning to make some sourdough bread, but I only have a toaster oven and don’t think I could fit a dutch oven inside of it. Any recommendations working with a toaster oven? the dimensions of the oven are 12.5 w X 5.75h X 12.5d. It has a max temperature of 450 F. It has convection.
Thanks, Peter! Much appreciated. Well, you’ll definitely only be able to do a single loaf at a time, but make sure a cast iron Dutch oven or something similar can fit in there. With that, you should be able to get decent heat into the loaf at 450°F. That Dutch oven will also take care of the steam needed to ensure the loaf rises sufficiently.
I’d say just give it a try and see how it works out for you!
Hi Maurizio,
Thanks for the advice! I ended up getting a new.ightargwe toaster oven that could fit a Dutch oven and hit 500 degrees.
I made the first two loaves today and they look great. I won’t be digging into them until this evening. It turned out that instead of taking 30 minutes to cook after removing the lid they only needed 12 minutes to reach an internal temp of 212. I don’t know if it is the size of the toaster oven, but it was shorter for both. I am looking forward to trying more recipes in the future!
Hi Maurizio. This site is great and I really enjoy reading the in depth explanations of the baking process. However, there is one thing I don’t understand. Why make a levain when the sourdough starter essentially on its own is the same thing and could be used on its own if one had enough? (of cause the starter needs to be fully active)
Thank you for sharing your knowlage and experience 🙂
Thanks, Martin! You’re right, you do not have to make a levain if you don’t want too as a starter and levain are actually the same thing. I find making a separate levain makes things easier to time and also ensures we keep a bit of our culture going (I like to keep them separate just in case I forget to save some of my culture!). Additionally, making a levain enables you to make it from different flour types and/or hydrations.
However, if you get into a good routine where your starter is ripe and ready for feeding you can just use a portion of that to mix into your final dough mix!
Excellent! Rye sure is a wonderful flour, and yes, starter cultures sure love all the additional nutrition in there.
Determining that perfect proof point can be challenging but I find with room temp proofed dough the “poke test” does help quite a bit. Poke the dough gently, and in multiple places, and try to assess what’s happening inside the loaf as you poke around. We’re trying to feel when the dough is nice and puffy and risen but not overly weak or ready to spread. That perfect proof point is hard to spot sometimes, but the best advice I can give is try the same recipe over and over and draw correlations between how the dough feels and how it bakes. This way you’re building up that intuition for finding that sweet spot.
Hope that helps and happy baking!
Oh, Maurizio. I followed all the steps to the minute, weighed everything to the tenth of a gram, and even used the exact same flours. And wouldn’t you know, it turned out perfect 🙂 Hope I had you going for a second, thinking I’d say it all went wrong. Quite the contrary. It even has ears, nice big ones. I couldn’t be happier with your recipe and instructions. Thank you.
Ha ha! You did have me going, I was already anticipating an issue 🙂 Glad to hear this, Adam! Happy baking!
Second loaf bigger and better….rise incredible. Bread Slice with Smooshed gorgonzola with apple slices and basil leaves. Smashed Advo aint got nothing on Smooshed Gorgonzola.
So pleased with my first beginners’ sour dough loaf. Hi Maurizio. I am looking at my very first PL Sourdough creation as I type. The second loaf is 15 mins in with 5 mins to go until I experience that “Ta Da” unveiling moment. I have to say I am thrilled with the result. Having a 15 year hx of mucking around with sourdough, abandoning it then trying again etc – has really kicked in with recognising stages via appearance and aroma etc. Went out to a movie last night with “cooking-guy” partner – so had to play around with the bulk fermentation a bit…but think I got it down correctly. My issue is and has always been shaping. I haven’t tried your method whereby you use bench knife and pull towards you. I have just cupped, pulled and turned on steel bench. Not ideal…the underside is never fully um…closed…. Will try your method next time. Would be great to have a few vids re: shaping .. but I see you are working on new posts. Yay. Oooo….time up. Here goes. Thank you again for your huge efforts with The Perfect Loaf Blog. Amazing!!!
Awesome Lisa, really happy to hear that your bake turned out so well! I know, videos would sure be a nice addition here… Working on it! Baking at home is so rewarding, isn’t it? I can’t get enough — if you haven’t been able to tell yet 🙂
Oh, and gorgonzola + apple + basil sounds awesome!
Hey thank u Maurizio. What an absolutely awesome site. You hv described the process so clearly that I’m sure even a complete novice like me will benefit. My question is, wud it b ok to use only whole wheat flour and bread flour and omit the rye flour? Rye flour is not easily found in india and I m always wondering if my sourdough wud taste the same without it.?
Thanks so much Durriya, I really appreciate that. Sure, you can definitely sub out the rye for whole wheat. The flavor will change some, but that will totally be fine! As bakers we have to use what’s available, and since rye isn’t something that you have readily available use what you do have. Have fun and enjoy 🙂
Maurizio, I have been researching sourdough since July 1. I am the mother of 12 and have made literally 1000’s of loaves of “other” bread but today I dove into the world of sourdough! I turned out great! Thank you for the “method” and timeline. I had my iPad on the counter checking your directions and pictures. Thank you, thank you. I am hooked!
Hi, Gena! Wow, that’s a large family you have there, awesome! I’m really happy to hear your loaf of sourdough turned out great — it’s totally addicting, that’s for sure. Not only is the flavor a revelation but also the health benefits, can’t beat that.
Happy baking and thanks so much for the message!
Hey thanks for the help earlier with the starter.
Now I am just curious about what method to use when making the levain.
From what I’ve read on the website. This is how I understand this works. Please correct me where I am wrong.
1) I take my sourdough starter that I have been building, then take out a certain amount and mix it with more flour and water to create a levain in a different jar.
2) I still discard enough sourdough starter so it’s my original jar plus 40 Grams. And then do the whole feeding process over again.
3) Once the levain has had time to build overnight, I can use it in a recipe.
Is this correct?
You bet, Vladimir! That’s absolutely correct. The levain is an “offshoot” of your continuously maintained starter, it will be completely consumed in a single bake.
Hi Maurizio, first of all, what a beautiful website!
I’m a home baker from Belgium. I’m having trouble with my sourdough bread. My starter is very active (no problem there) and I follow your steps meticilous. My dough never becomes smooth or bubbly after the bulk fermentation. It stays a wet mess. I even reduced the water % to 60.
What can be the problem?
Hey, thanks Tom! Good move on reducing the water, that would have been my first suggestion. It could be that you’re not strengthening the dough sufficiently during mixing/kneading/stretch and folds in bulk. Have you tried mixing and kneading a bit longer upfront and then maybe adding in one more set of stretch and folds?
Strong fermentation is definitely key here as well as the fermentation activity in the dough strengthens it as well (via organic acids produced as a byproduct of fermentation).
Hello Maurizio!
I am new to sourdough, I have tried this recipe about 6 or 7 times. I am having a problem with oven spring. I know there are so many variables and it would be hard to pinpoint the problem, but I have reached a level of frustration that has me reaching out to you here! I am confused because every step of this recipe I follow exactly as you describe, and every step I am getting great activity with the fermentation. I have gotten very comfortable working with the dough, and each time I have so much excitement during the building process because I develop a beautiful boule but the resulting loaf comes out flat! I have excellent taste, crumb, crust, and color…but the loaf is just flat. Is my problem in the final proof? When I dump my dough into the dutch oven, it immediately runs flat and takes the entire bottom of the pan. And when I score the bread after flipping into the dutch oven, the blade usually catches in the dough and it’s a bit sticky and hard to slice evenly like your photo above. Is that a sign that I should experiment with letting my dough proof a bit longer? Thanks for you detailed recipes and website, it is so helpful and it was how I got my start into sourdough!
Hey, Matt! Sorry for the late reply. There are, unfortunately, tons of variables to diagnose with an issue like that. Without pictures it’ll be hard for me to pinpoint things to work on. It sounds like either your dough is over proofed (since you did mention you have plenty of fermentation activity), not strong enough (mixing, kneading, stretch and folds during bulk) or severely over hydrated.
My guess here would be the dough might be over proofed. There are a few indicators your dough could be going over: sluggish rise in the oven, the score on top of the dough might not open with a nice “ear” and instead just kind of fuse together, the interior will have lots of small holes and perhaps one or two large ones near the top (but no dense areas of unfermented flour), and finally the loaf could be a little on the sour side. You mentioned two of these already. Check the interior next time and if it’s as I just described try cutting back some of the time during bulk fermentation and/or proof time.
I’d give that a shot and see how it goes next time! Keep me posted and good luck, we will get you there!
Thank you for that very helpful response! The first time I attempted sourdough, the result when I tried to shape it was a sticky mess. From that, I assumed I needed to bulk ferment and proof much longer. But I guess I over corrected. I am impressed that you could diagnose my problem! I shortened my bulk fermentation and proof in yesterday’s bake and I got much more oven spring and a much prettier loaf. One variable I still need to work on is the consistency of the bread. The crust and taste of my loaf is great, but the interior of the bread seems a bit heavy and doughy. Is this another sign of overproofing? I’m still struggling with scoring the dough as well. Based on your pictures, it looks like you have so much surface tension that gently sliding the lame across the dough allows it so split open. When I score my dough, it drags and catches and I’m not getting clean cuts. Another possible sign of still being a little overproofed?
Thank you so much for your help! Your website has gotten quite a following and I know that responding to all these comments is a task in and of itself. But we are all so glad you do it!
Ah, great to hear that, I’m glad I could help!
There are several things that could cause a tight, heavy interior. Under proofing is definitely one possibility, but maybe we are dealing with an over hydration issue. Have you tried reducing the amount of water you use for the mix to see if that helps? I’d say try reducing the water by 5% and see if the dough feels stronger to you, it should bring more strength to the dough.
A blade that drags when scoring could be due to over proofing, over hydration, insufficient strength in the dough, or a shaping that isn’t quite tight enough. It sounds like you’ve tried pulling back on the bulk or proof (or both) and this has helped, but maybe we need to try my suggestion above and start with a bit less water. Then, focus on shaping the dough nice and tight before you place it into its proofing basket.
I hope this helps and you’re very welcome, I’m happy to help 🙂